
Haven 31080 - Lawn mower TORO - Free user manual and instructions
Find the device manual for free Haven 31080 TORO in PDF.

| Product type | Robot lawn mower |
| Brand | Toro |
| Model | Haven 31080 |
| Maximum mowing area | Up to 5000 m² (depending on model) |
| Dimensions (mower) | 54 cm (L) x 81 cm (W) x 34 cm (H) |
| Weight (mower) | 18.9 kg (5000 m² model) |
| Dimensions (charging station with sunshade) | 62 cm (L) x 93 cm (W) x 60 cm (H) |
| Maximum operating slope | 25° |
| Number of blades | 4 sharp blades (reversible) |
| Battery type | Integrated rechargeable lithium-ion |
| Communication hub | Dimensions: 11.2 x 7.9 x 3.0 cm, weight 95 g, Ethernet port 10/100 Mbps, power supply 5 V DC / 1 A |
| Connectivity | Bluetooth® with MyToro app, encrypted radio link with hub, Wi-Fi via router |
| Main functions | Programmed autonomous mowing, SmartZone navigation, obstacle detection, automatic return to charging station, creation of exclusion zones and passageways |
| Safety | Emergency stop button, 4-digit PIN code, anti-theft alarm if moved without authorization, automatic blade stop when lifted |
| Recommended maintenance | Clean lenses monthly, replace or flip blades every 2 to 4 weeks, regular general cleaning |
| Operating temperature | 0 °C to 40 °C (mower) |
| Protection rating | Not specified but suitable for outdoor use |
Frequently Asked Questions - Haven 31080 TORO
User questions about Haven 31080 TORO
0 question about this device. Answer the ones you know or ask your own.
Ask a new question about this device
Download the instructions for your Lawn mower in PDF format for free! Find your manual Haven 31080 - TORO and take your electronic device back in hand. On this page are published all the documents necessary for the use of your device. Haven 31080 by TORO.
USER MANUAL Haven 31080 TORO
natural_image
Line drawing of a robotic lawn mower (no text or symbols)Model—Serial Range
20459, 20460, 20491, 20492,
20496, 20497, 30960, 30962,
30970, 30972, 30980, 30982,
31060, 31062, 31070, 31072,
31080, 31082—324000000 and Up

Disclaimers and Regulatory Information
This product complies with all relevant European directives; for details, please see the separate product specific Declaration of Conformity (DOC) sheet.
WARNING
CALIFORNIA
Proposition 65
The power cord on this product contains lead, a chemical known to the State of California to cause birth defects or other reproductive harm. Wash hands after handling.
Battery posts, terminals, and related accessories contain lead and lead compounds, chemicals known to the State of California to cause cancer and reproductive harm. Wash hands after handling.
Table of Contents
Disclaimers and Regulatory Information....2
Chapter 1: Introduction.... 1–1
Intended Use 1–1
Getting Help.... 1-2
Haven Help Center.... 1–2
Manual Conventions.... 1–3
Safety Alert Classifications.... 1–3
Chapter 2: Safety.... 2–1
General Safety 2–1
FCC/IC Statement 2–1
Safety and Instructional Decals 2-4
Chapter 3: Product Overview ...... 3–1
Robotic Mower Overview 3-3
SmartZone™ Mowing Pattern 3-3
Charging Station Overview 3-4
Hub Overview 3–5
Creating the Working Areas 3–6
Creating the Working Area Process Overview ....
Operating on Slopes 3-7
Untrained Obstacles 3–8
Control Panel 3-9
Specifications 3–11
Attachments/Accessories 3–12
Chapter 4: Setup.... 4–1
Downloading the App and Adding the Mower ....
Connecting the Hub 4–10
Determining a Location for the Charging Station.... 4
Installing the Power Supply and Charging Station ....
Preparing the Lawn Before Using the Robotic Mower.... 4
Ideal Conditions for Setting up the Mower 4–16
Starting and Charging the Mower 4–17
Installing the Mower Handle....4–18
Removing the Mower Handle and Storing it in the Charging Station.... 4
Chapter 5: Operation 5–1
Operation Safety 5-1
Trimming Areas of the Lawn that the Robotic Mower Cannot Access......
Repositioning the Mower if it is Stuck on an Obstacle......
Manually Stopping and Starting the Mower 5–5
Docking and Charging the Mower 5–5
Installing an Optional Anti-Theft Device 5–6
Chapter 6: Maintenance 6–1
Recommended Maintenance Schedule 6-1
Maintenance Safety 6-1
Battery and Charging Station Safety 6-2
Servicing the Battery 6–3
Disconnecting the Battery 6-3
Connecting the Battery 6-4
Replacing the Wheels 6–5
Removing the Wheels 6–5
Installing the Wheels.... 6–6
Replacing the Blades....6-7
Cleaning....6-8
Cleaning the Mower and Charging Station......
Cleaning or Replacing the Lens Protectors......
Disposing of Waste 6–10
Chapter 7: Storage.... 7–1
Storage Safety 7-1
Preparing for Off-Season Storage 7–1
Chapter 8: Troubleshooting 8–1
Chapter 9: Glossary 9–1
California Proposition 65 Warning Information
!
WARNING
!
Failing to follow the operating instructions or to receive proper training may result death or serious injury.
- To maximize the safety, performance, and proper operating of this machine, carefully read and fully understand the content of this Operator's Manual.
- For more information on safe operating practices, including safety tips and training materials, go to www.Toro.com.
Intended Use
This robotic lawnmower is intended to be used by residential homeowners for autonomous, programmable lawn care. It is designed primarily for cutting grass on well-maintained lawns or residential properties. This is a maintenance lawnmower that maintains the height of the grass consistently. Using the mower, battery, charging station, and power supply for purposes other than their intended use could endanger you and bystanders.
Read this information carefully to learn how to operate and maintain your product properly and to avoid injury and product damage. You are responsible for operating the product properly and safely.
Getting Help
Visit www.Toro.com for product safety and operation training materials, accessory information, help finding a dealer, or to register your product.
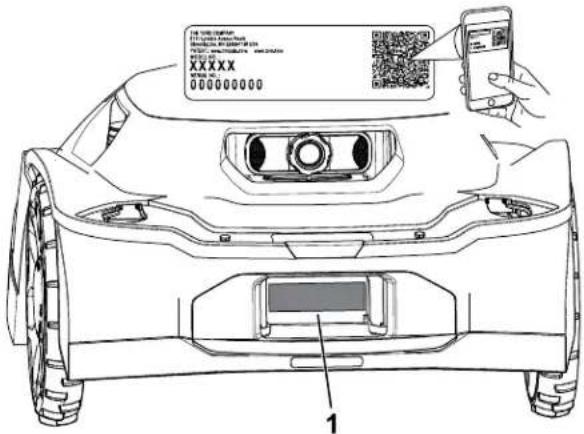
Whenever you need service, genuine Toro parts, or additional information, contact an Authorized Service Dealer or Toro Customer Service and has the model and serial numbers of your product ready. These numbers are located on the serial plate on your product. Write the numbers in the space provided.
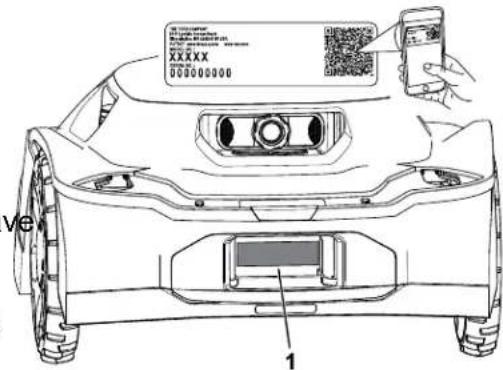
G489469
IMPORTANT
With your mobile device, you can scan the QR code on the serial number decal (i equipped) to access warranty, parts, and other product information.
| Model Number: | Serial Number: |
Haven Help Center
Visit the Haven Help Center (pubs.toro.com/helpcenter) to view instructional videos, FAQs, help articles, the Operator's Manual, full product safety content, and the product warranty.

G445734
Manual Conventions
This manual identifies potential hazards and has safety messages identified by the safety-alert symbol, which signals a hazard that may cause serious injury or death if you do not follow the recommended precautions.

G405934
This manual uses 2 words to highlight information. Important calls attention to special mechanical information and Note emphasizes general information worthy of special attention.
Safety Alert Classifications
The safety-alert symbol shown in this manual and on the machine identifies important safe messages that you must follow to prevent accidents.
Safety-alert symbol appears above information that alerts you to unsafe actions or situations and is followed by the word DANGER, WARNING, or CAUTION.

Danger indicates an imminently hazardous situation which, if not avoided, will result in death or serious injury.

Warning indicates a potentially hazardous situation which, if not avoided, could res in death or serious injury.

Caution indicates a potentially hazardous situation which, if not avoided, may result in minor or moderate injury.
General Safety
- The operator/supervisor of the machine is responsible for any accidents or hazards occurring to others or their property.
- Read, understand, and follow all these instructions and warnings before using the machine.
- Improperly using or maintaining the machine could result in serious injury or death. To reduce this potential, follow all safety instructions.
- Do not allow children or untrained people to operate or service this device. Allow only people who are responsible, trained, familiar with the instructions, and physically capable to operate or service the device.
FCC/IC Statement
This product contains three modular approvals:
| FCC ID IC Module | ||
| OF7-OCB 3575A-OCB OCB | ||
| A8TBM70ABCDEFGH 12246A-BM70BLES1F2 BLE |
Models may have an optional CalAmp module containing FCC ID APV-2630MB and IC 5843C-2630MB
WARNING
The user that changes or modifications not expressly approved by The Toro Company could void the user's authority to operate the equipment.
Note: This equipment has been tested and found to comply with the limits for a Class B digital device, pursuant to part 15 of the FCC Rules. These limits are designed to provide reasonable protection against harmful interference in a residential installation. This equipment generates, uses and can radiate radio frequency energy and, if not installed and used in accordance with the instructions, may cause harmful interference to radio communications. However, there is no guarantee that interference will not occur in a particular installation. If this equipment does cause harmful interference to radio or television reception, which can be determined by turning the equipment off and on, the user is encouraged to try to correct the interference by one or more of the following measures:
- Reorient or relocate the receiving antenna.
-
Increase the separation between the equipment and receiver.
-
Connect the equipment into an outlet on a circuit different from that to which the receiver is connected.
- Consult the dealer or an experienced radio/TV technician for help.
Antenna Requirements:
This radio transmitter FCC ID: OF7-OCB IC: 3575A-OCB has been approved by Innovation Science and Economic Development Canada to operate with the antenna types listed below, with the maximum permissible gain indicated. Antenna types not included in this list that have a gain greater than the maximum gain indicated for any type listed are strictly prohibited for use with this device.
Optional CalAmp Module Requirements:
This radio transmitter FCC ID: APV-2630MB IC: 5843C-2630MB has been approved by Innovation, Science and Economic Development Canada to operate with the antenna types listed below, with the maximum permissible gain indicated. Antenna types not included in
this list that have a gain greater than the maximum gain indicated for any type listed are strictly prohibited for use with this device.
Safety and Instructional Decals

Safety decals and instructions are easily visible to the operator and are located near any area of potential danger. Replace any decal that is damaged or missing.
Decal Part: 133-8061
⚠ WARNING: Cancer and Reproductive Harm - www.P65Warnings.ca.gov. For more information, please visit www.ttcoCAProp65.com
133-8061
s decal133-8061
Decal Part: 137-9705
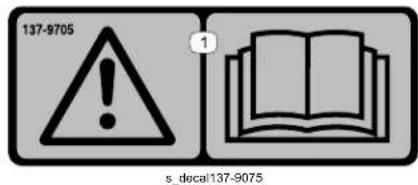
① Warning—read the Operator's Manual.
Decal Part: 140-4055

decal140-4055
① Cutting width
② Warning—read the Operator's Manual.
③ Cutting/dismemberment hazard of hands and feet —shut off the mower before doing maintenance.
④ Cutting/dismemberment hazard of hands and feet —stay away from moving parts.
⑤ Thrown object hazard—keep bystanders away.
⑥ Cutting/dismemberment hazard of hands and feet —do not ride on the mower.
⑦ Mower—on
⑧ Mower—off
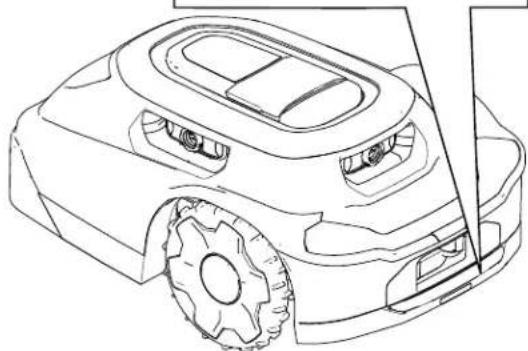
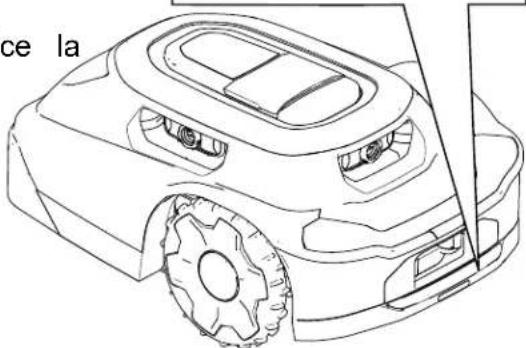
Mower:
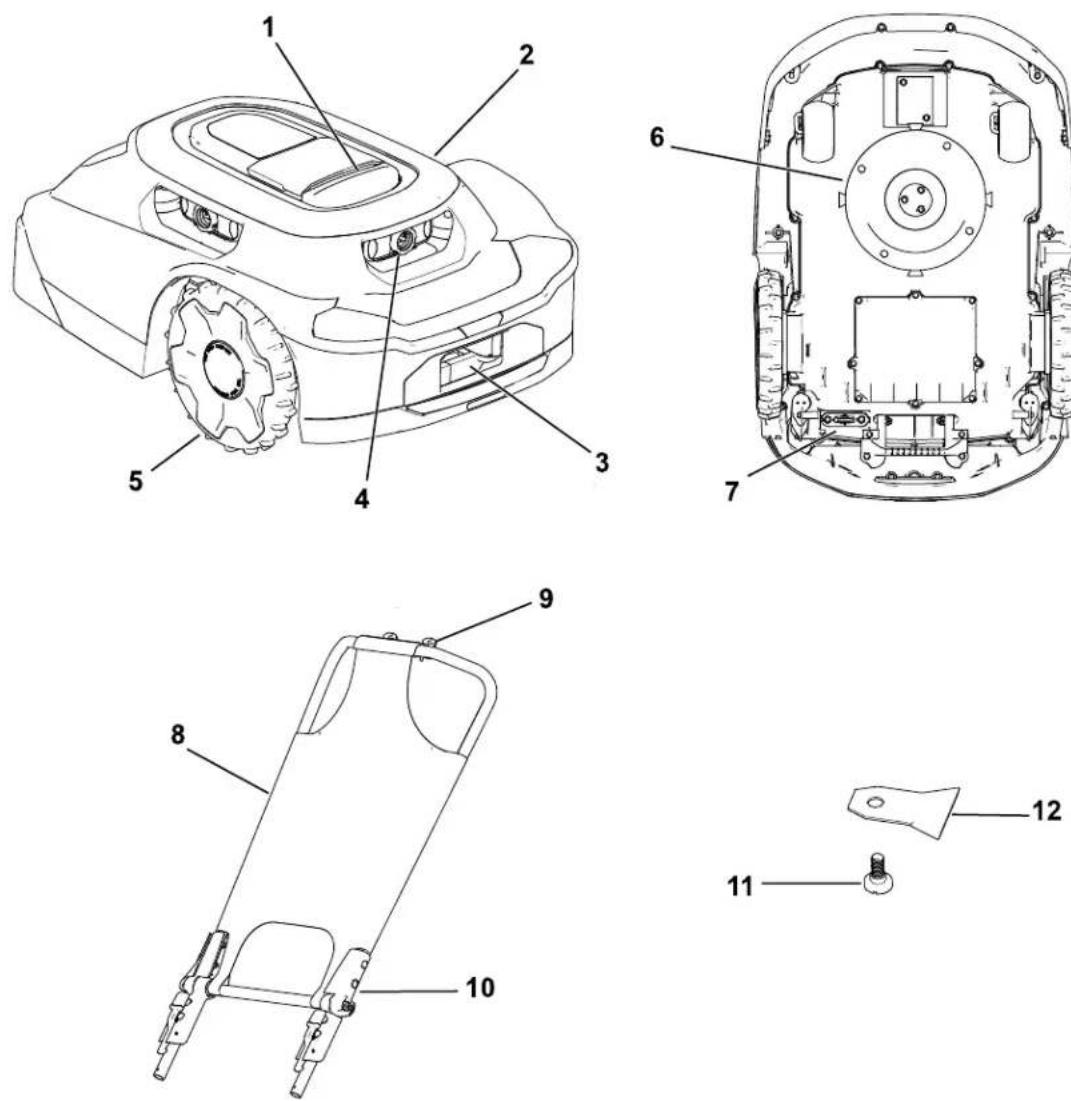
G468383
① Stop button
② Mower body
③ Mower charging port
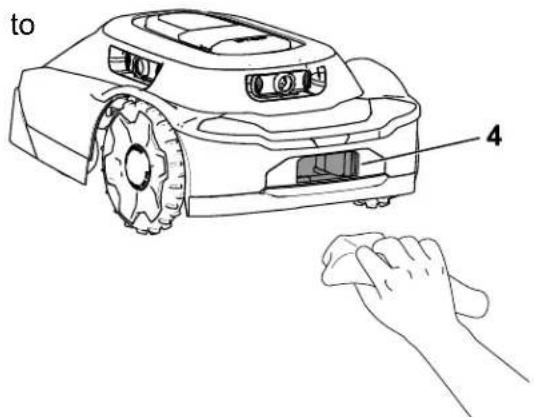
④ Lens/Imaging system
⑤ Wheel
6 Cutting system
⑦ Power switch
8 Sunshade/cover
⑨ Phone opening
10 Mower handle
⑪ Blade screw
12 Blade
Charging Station:
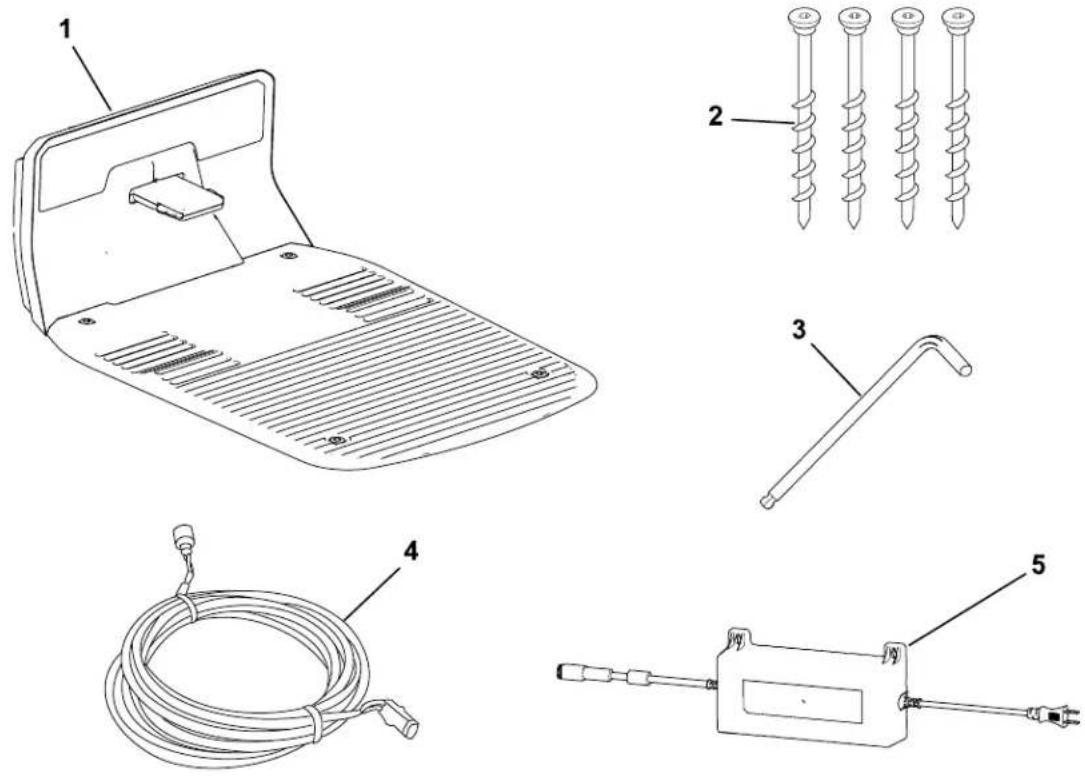
G468384
① Charging station
4 Low-voltage cable
② Allen-head screws
⑤ Power supply
③ Allen wrench
Hub:
natural_image
Line drawing of a wireless router with antenna and ports (no text or symbols)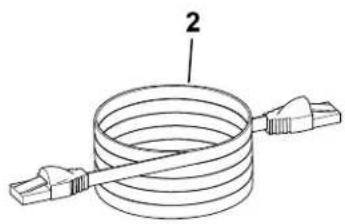
natural_image
Diagram of a coiled cable with two connectors (no text or symbols)
natural_image
Simple line drawing of a connected electrical outlet with a cable (no text or symbols)G468385
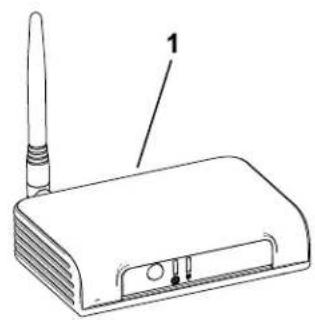
① Hub
② Ethernet cord Power cord
3
Property Example:

① Wi-Fi router
② Hub
③ Transit path
④ Charging station
5 Mower
Robotic Mower Overview
The robotic mower is a maintenance lawn mower that maintains the height of the grass consistently. When the mower is not mowing your lawn, the mower returns to the charging station to charge before continuing with the next scheduled mowing task.
If the robotic mower contacts an object or reaches a boundary, it will change direction.
SmartZone™ Mowing Pattern
SmartZone maximizes mowing efficiency by progressively moving to unmowed areas of the lawn rather than staying in one mowing zone for too long.
The robotic mower does not follow a normal pattern; it follows a random pattern.
Charging Station Overview
When the mower battery charge is too low for mowing or when it reaches the end of a mowing task, the mower goes to the charging station to charge.
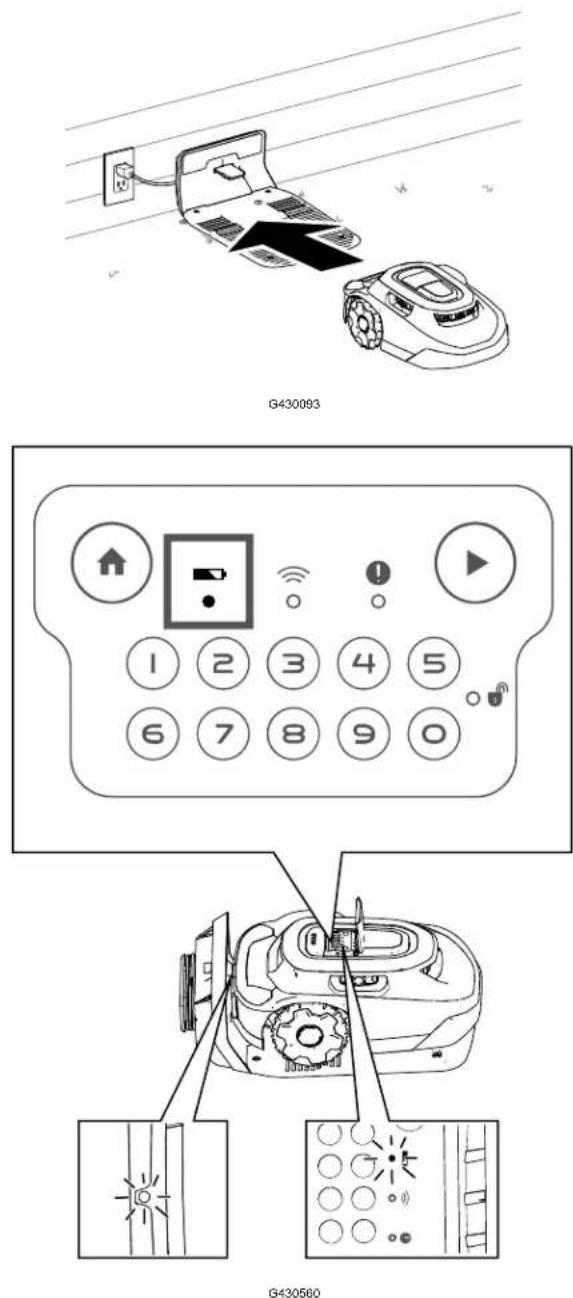
While charging, the indicator light on the mower blinks green. After fully charging, the light turns solid green.
After charging, the mower will exit the charging station and automatically continue with the next scheduled mowing task or it will remain in the charging station if there is not a scheduled task after fully charging.
Note: If the indicator lights on both the charging station and mower do not illuminate when the mower goes into the charging station, the mower is not charging.
Hub Overview
The hub allows you to communicate with the mower from anywhere within your property. I uses your router to securely connect to the internet.
Communicating through encrypted radio signal, the hub provides a secure communication path and nearly three times the communication distance of a typical Wi-Fi router.
Creating the Working Areas
IMPORTANT
Follow the instructions in the app using your mobile device.
Refer to the following example of a property.
You can map the following objects as shown in the figure below.
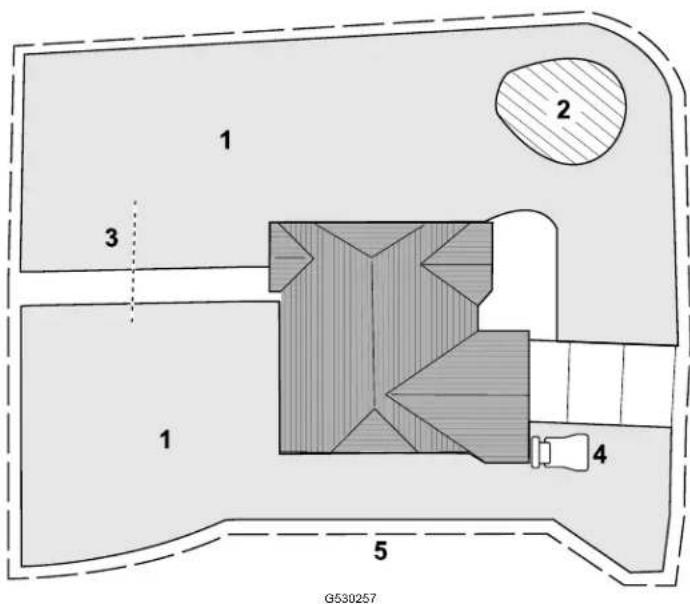
① Mowing zone
② Exclusion zone
③ Transit path
④ Charging station
⑤ Working area
Creating the Working Area Process Overview
IMPORTANT
Follow the instructions in the app using your mobile device.
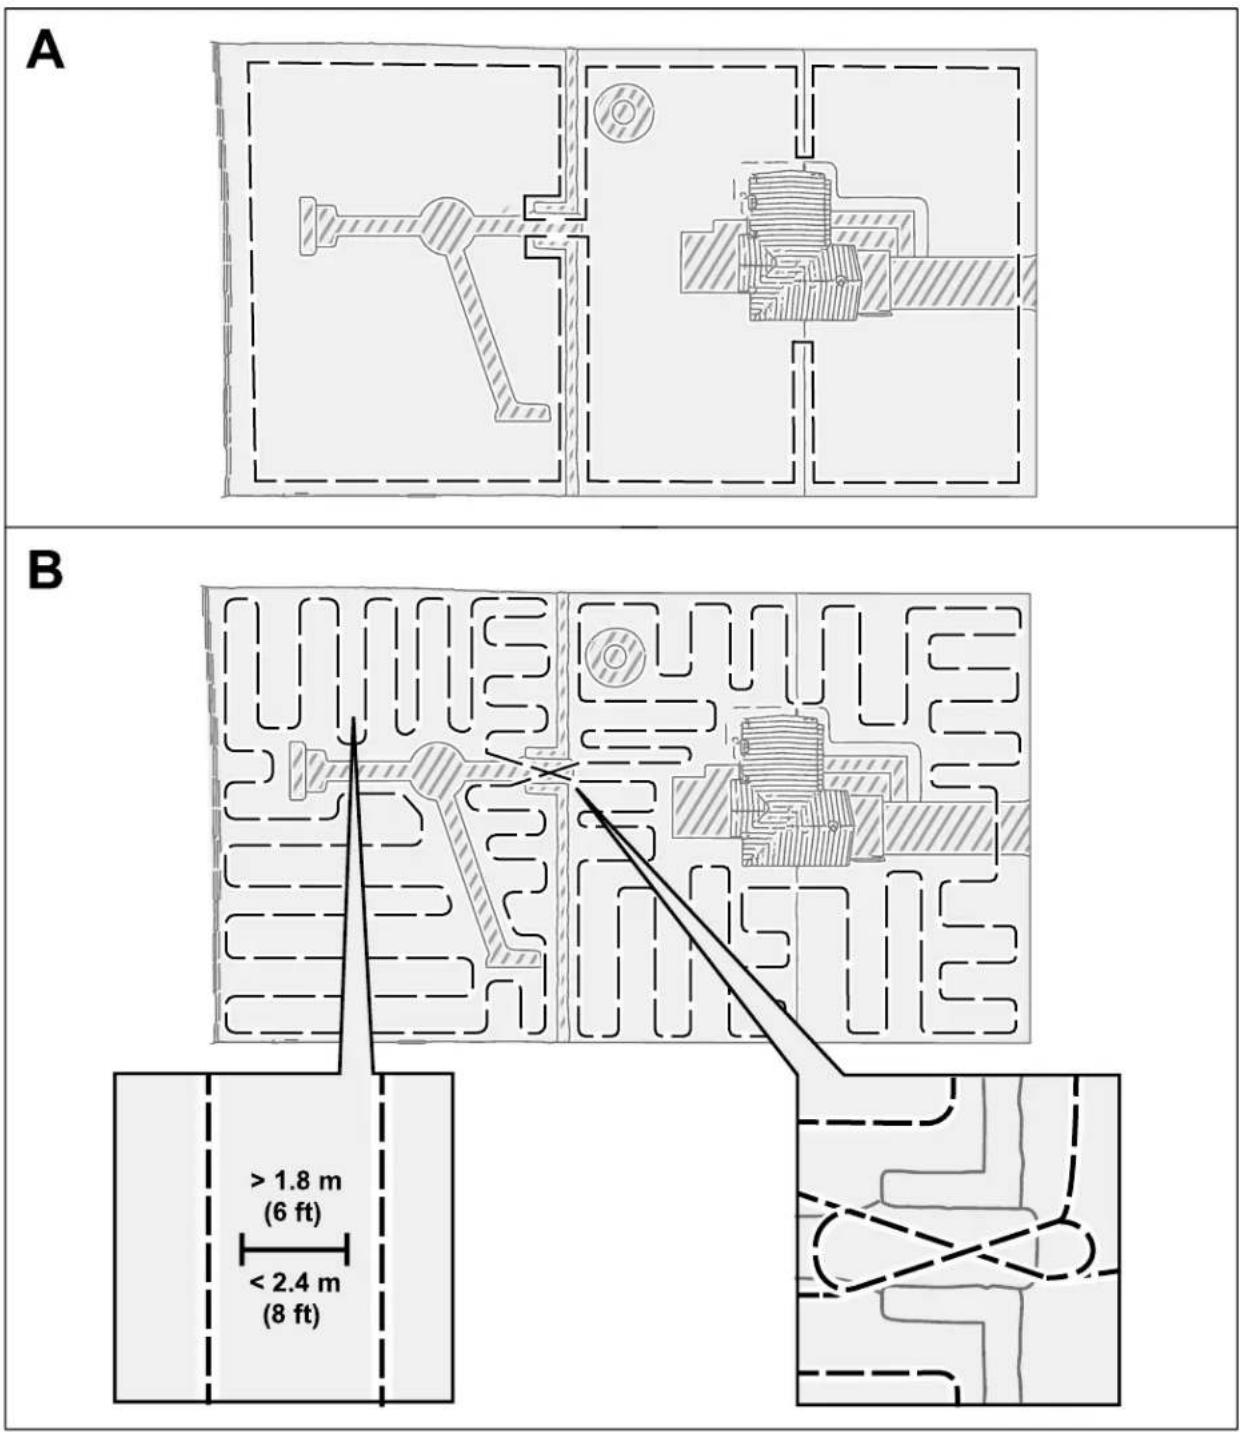
In order for the mower to understand your lawn, it has to create a 3D map of your lawn. is called the working area. Follow the instructions in the app to create your working area map.
- Push the mower around the entire perimeter of your property.
- Push the mower around the interior of your property using zig-zags spaced approximately 1.8 to 2.4 m (6 to 8 ft) apart.
Note: If your lawn contains narrow passageways, such as a gate, push the mower through the passageway in a figure-8 as shown below.
Creating the Working Area Process Overview (continued
Operating on Slopes
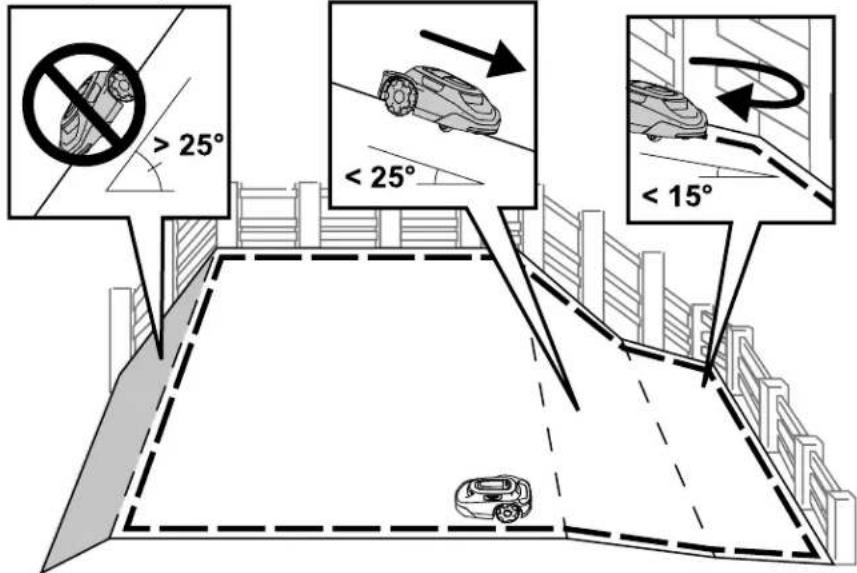
The mower is able to operate on slopes up to 25^ as long as there are no mowing zone boundaries on that slope. Use an exclusion zone to prevent the mower from operating do\ slopes that are steeper than allowed.
Operating on Slopes (continued)
Mowing zone boundaries should only be placed on slopes less than 15^ . Otherwise, there a risk that the mower will become stuck while turning at the boundary. However, if the boundary is at the top of a slope, or if there are permanent obstacles on the boundary that the mower is able to collide with, such as fences or dense hedges, boundaries can be acted to slopes greater than 15^ but less than 25^ .
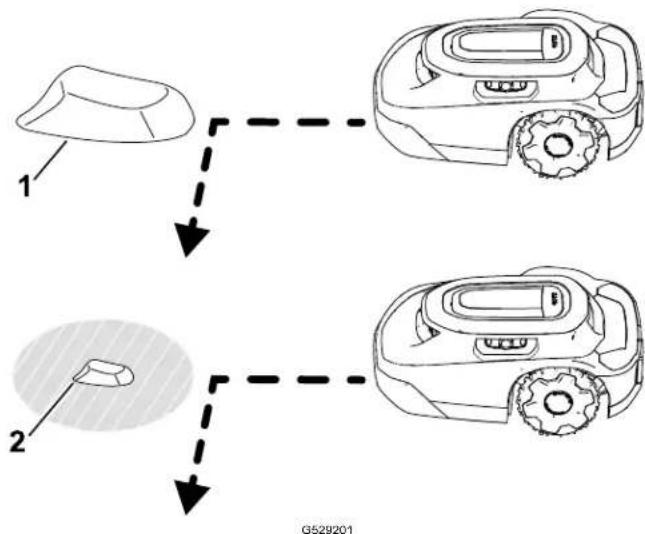
Untrained Obstacles
The mower is able to collide with untrained obstacles, such as rocks or roots, that are tal than 15 cm (6 inches) without damaging the mower. The mower will turn away after collid with these types of objects and won't require an exclusion zone to be mapped.
However, it is recommended to use exclusion zones on any fixed objects to ensure quiet operation and prevent the mower from getting stuck on objects.
Objects that are shorter than 15 cm (6 inches) should be excluded using an exclusion zor or removed from your lawn. The mower could attempt to mow over these objects and the blades could be damaged.
flowchart
graph TD
    A["1"] --> B["2"]
    B --> C["3"]
    style A fill:#f9f,stroke:#333
    style B fill:#ccf,stroke:#333
    style C fill:#cfc,stroke:#333
① Object taller than 15 cm (6 inches)—no exclusion zone required.
② Object shorter than 15 cm (6 inches)—exclusion zone required.
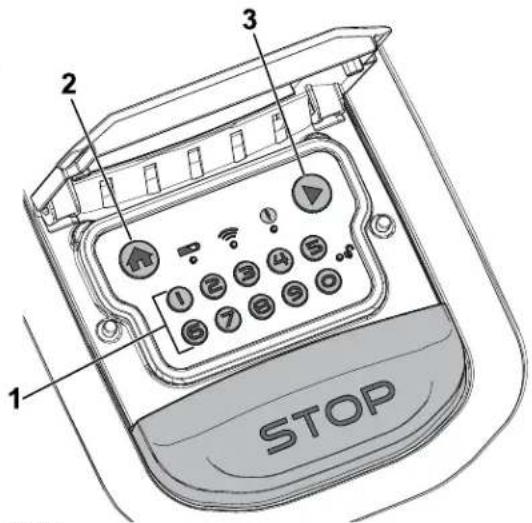
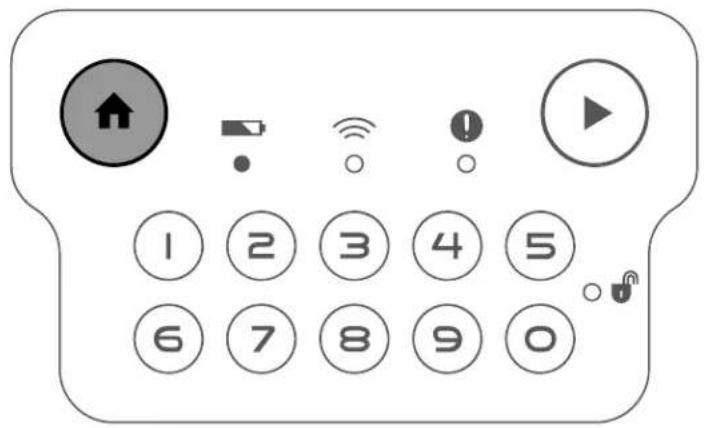
Control Panel
Become familiar with all the controls before you start and operate the mower.
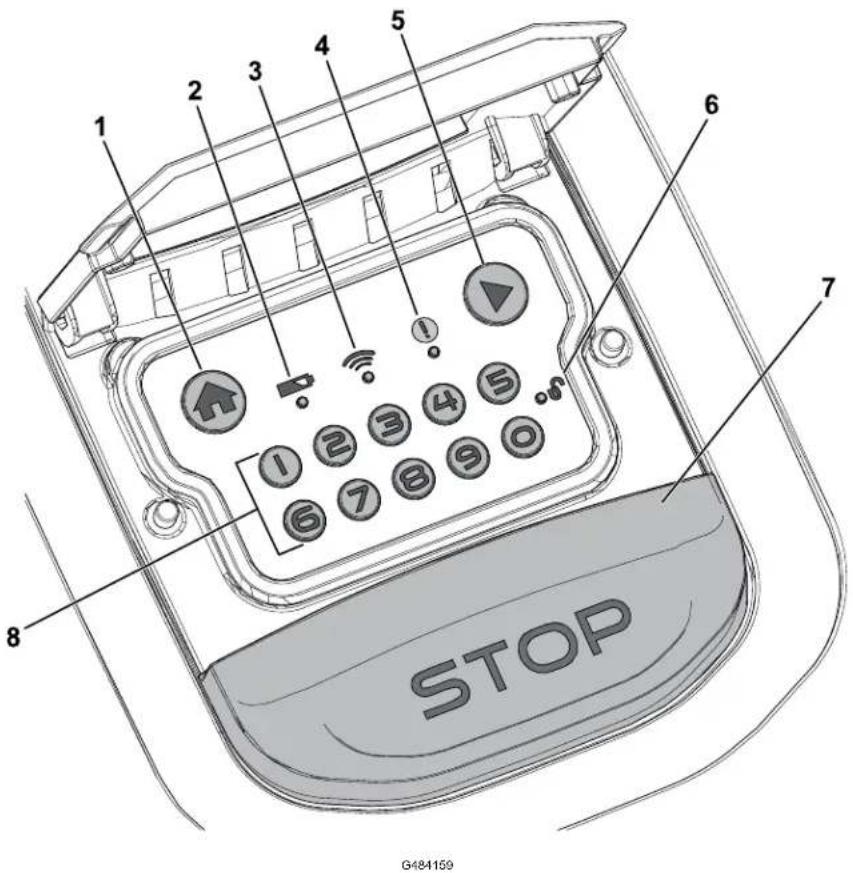
① Home button
⑥ Lock/unlock indicator
② Battery indicator
⑦ Stop button
③ Hub-connection indicator
⑧ Numeric keypad/Code buttons
④ Status indicator
⑤ Play (resume operation) button
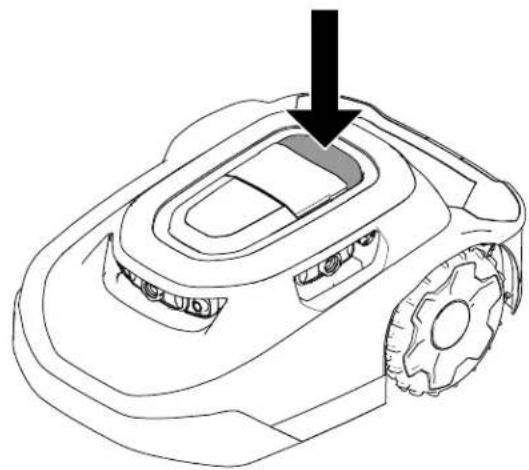
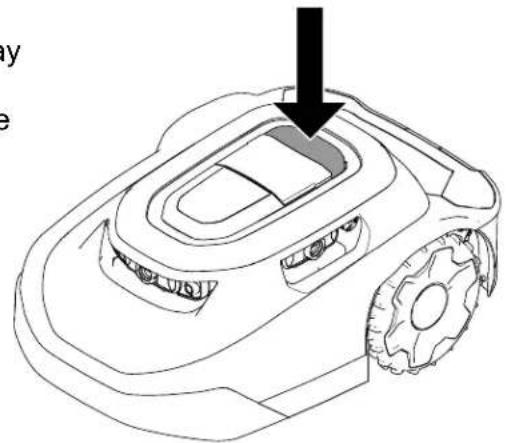
Stop Button
The stop button manually stops the mower.
natural_image
Line drawing of a robotic lawn mower with a black arrow pointing to the blade (no text or symbols)G430095
Home Button
The HOME button sends the mower to the charging station until the next scheduled mowing task.
Play (Resume Operation) Button
The PLAY (resume operation) button resumes mower activity according to the previously active function (i.e., scheduled mowing, unscheduled mowing, returning to the charging station) on the mobile application.
Numeric Keypad/Code Buttons
Using the numeric keypad, enter your 4-digit code to unlock the mower controls.
Hub-Connection Indicator
The hub-connection indicator illuminates green when the mower is able to communicate with the hub or red when the mower is unable to communicate with the hub.
Battery Indicator
The battery indicator illuminates green if the battery is properly charged or red if the batte needs to be charged.
Status Indicator
If the status indicator illuminates green, the mower is functioning properly; if the indicator is red, there is an active fault.
If a fault occurs, open the app to view the fault.
Visit the Haven Robotic Mower Help Center for assistance.
If you cannot correct the fault, contact an Authorized Service Dealer.
Lock/Unlock Indicator
After entering your 4-digit code, the lock/unlock indicator illuminates green if the mower is unlocked or red if the 4-digit code you entered was incorrect, which keeps the mower locked.
Running Light
The running light ^① illuminates on top of the mower when it is mowing autonomously.
G477896
Specifications
Note: Specifications and design are subject to change without notice.
Mower:
| 3000 m2 (0.75 Acre) Models | 5000 m2 (1.25 Acre) Models | |
| Width 54 cm (21-5/16 inches) | 54 cm (21-5/16 inches) | |
| Length 81 cm (32 inches) 81 | cm (32 inches) |
Mower: (continued)
| Height 34 cm (13-1/2 inches) | 34 cm (13-1/2 inches) | |
| Weight 18.5 kg (41 lb) 18.9 kg (42 lb) |
Charging Station:
| Width 62 cm (24-1/2 inches) | |
| Length 93 cm (36-3/4 inches) | |
| Height with the sunshade installed 60 cm (23-1/2 inches) | |
| Height without the sunshade installed 30 cm | (11-3/4 inches) |
Mower Docked in the Charging Station:
| Width 62 cm (24-1/2 inches) | |
| Length 96 cm (37-3/4 inches) | |
| Height with the sunshade installed 60 cm (23-1/2 inches) | |
| Height without the sunshade installed 34 cm | (13-1/4 inches) |
Hub
| Dimensions (without the antenna installed) 4.4 x 3.1 x 1.2 inches | |
| Weight 95 g (3.4 oz) | |
| Certification Specs The hub is intended to be supplied by an EIC62368-1 certified external power supply with a LPS (ES1/PS2) output and an output rating of Vdc, minimum 1.0 A | |
| Port Speed | 10/100 Mbps |
| Operating Temperature 0 to 40°C (32 to 104°F) | |
| Storage Temperature | -20 to 60°C (-4 to 140°F) |
| Operating Humidity | 10% to 80% RH, non-condensing |
Attachments/Accessories
A selection of Toro approved attachments and accessories is available for use with the machine to enhance and expand its capabilities. Contact your Authorized Service Dealer or authorized Toro distributor or go to www.Toro.com for a list of all approved attachments and accessories.
To ensure optimum performance and continued safety certification of the machine, use only genuine Toro replacement parts and accessories.
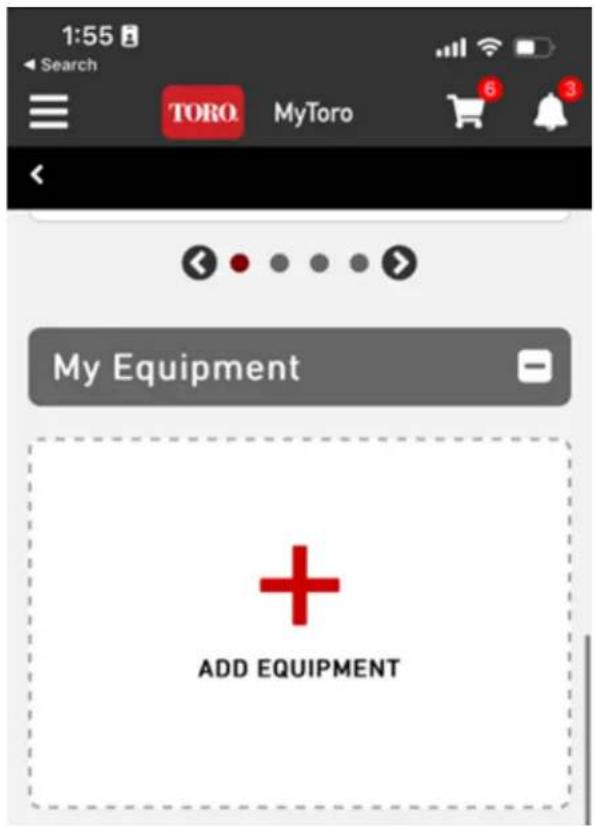
Downloading the App and Adding the Mower
- From the phone app store, download the MyToro app.
Figure 1 Apple download:

G430242

G362110
Figure 2 Android Google Play Store download:

G430241

G387030
- If you have an existing account, tap Log In.
If you do not have an account, tap Create Account.

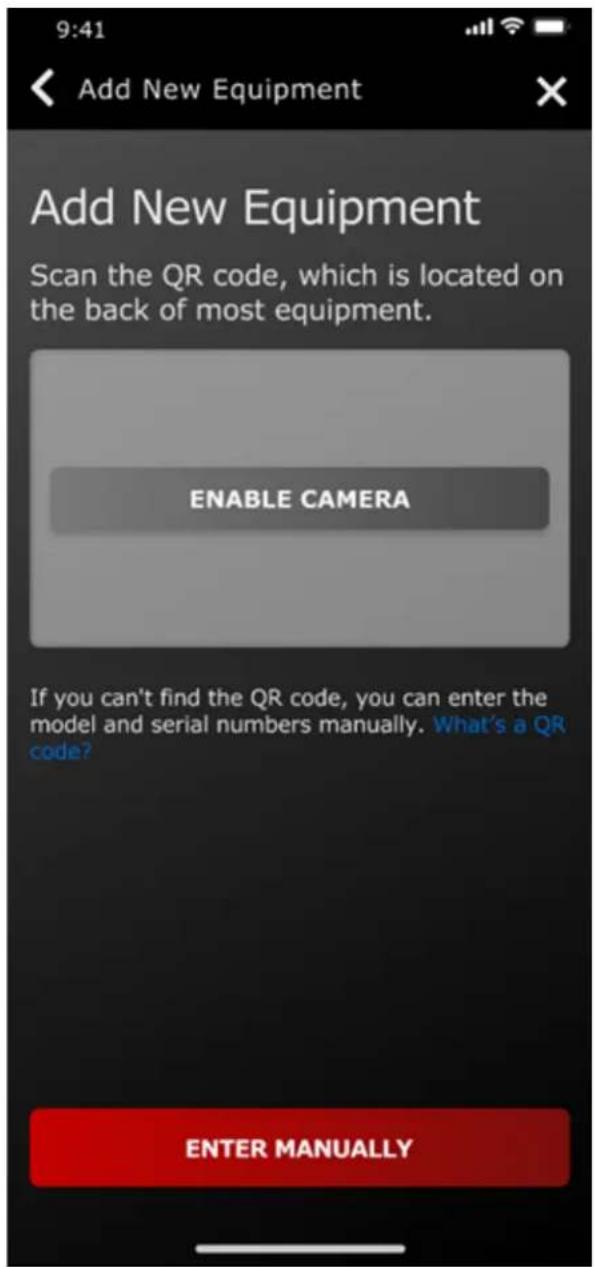
- From the home screen, tap Add Equipment.
G445462
- Enable the camera on your phone.
Note: Alternatively, you can manually enter your new equipment information.
G445465

G445467
- Scan the QR code ^① located on your mower or manually enter the information with your phone.
0489469
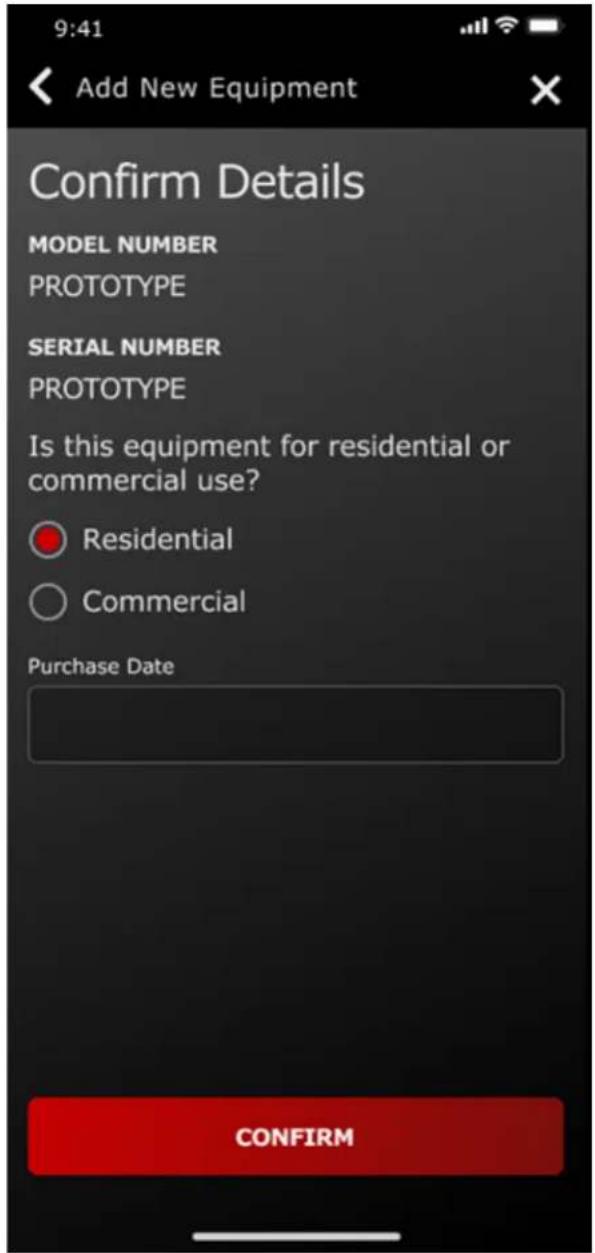
- Confirm the model number and serial number and enter the purchase date.
G445464
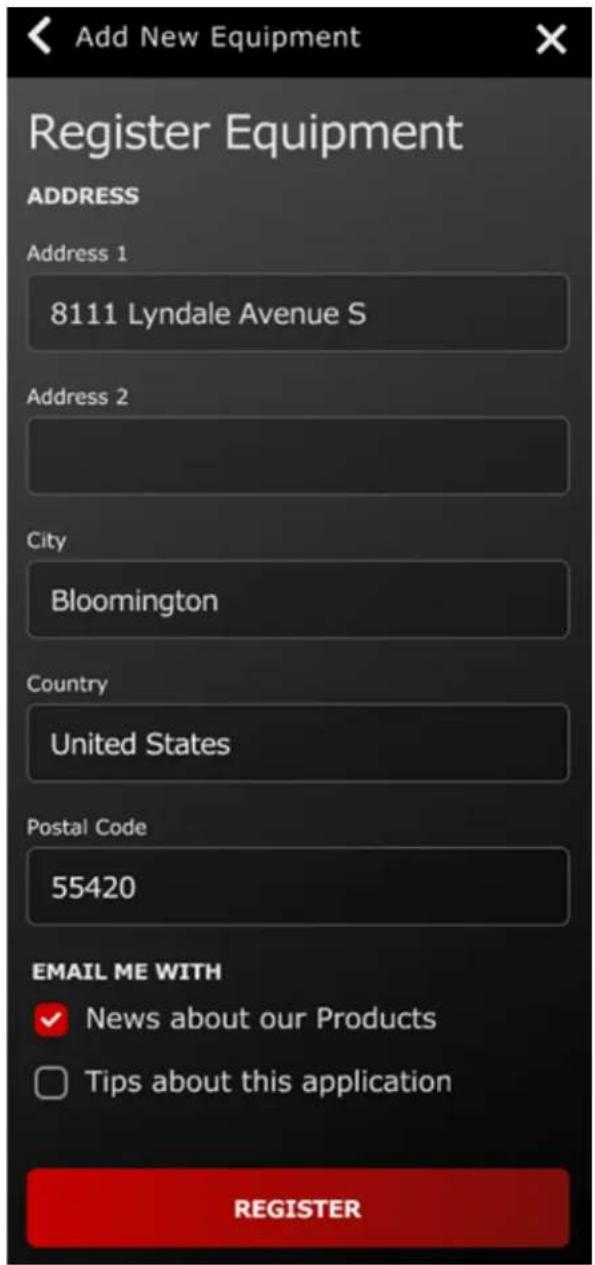
- Enter your personal information and tap Register.
G445466
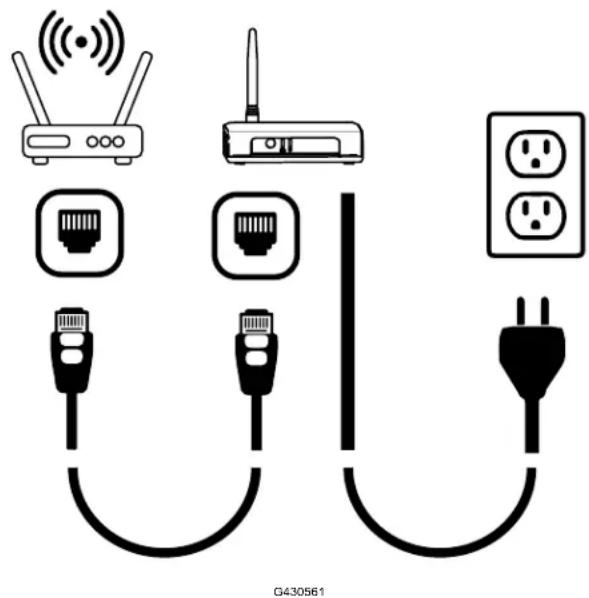
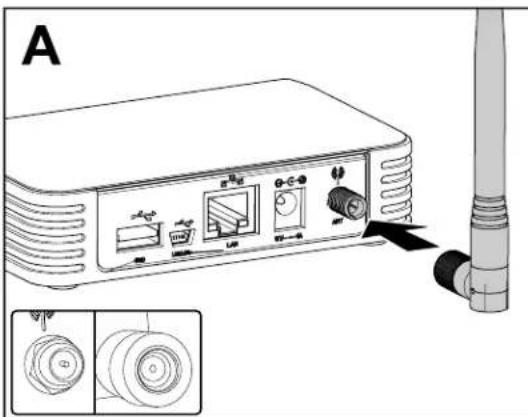
Connecting the Hub
Parts Required
| 1 Hub | |
| 1 Ethernet cable | |
| 1 Power cord | |
| 1 Antenna | |
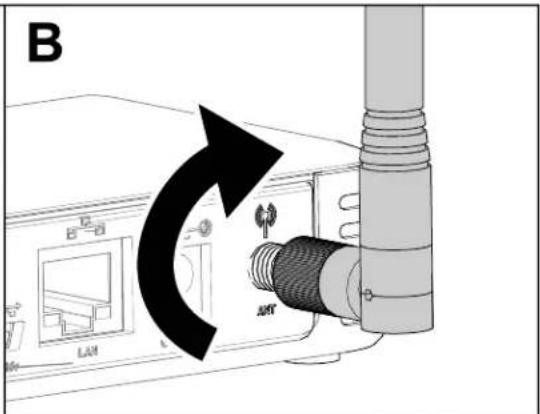
- Insert the antenna into the coaxial terminal.
- Rotate the antenna clockwise until it is tight.
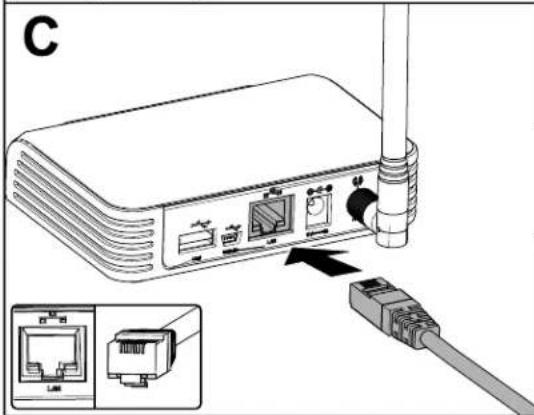
- Insert the Ethernet cable into the LAN terminal.
- Insert the power cord into the 5V—1A terminal.
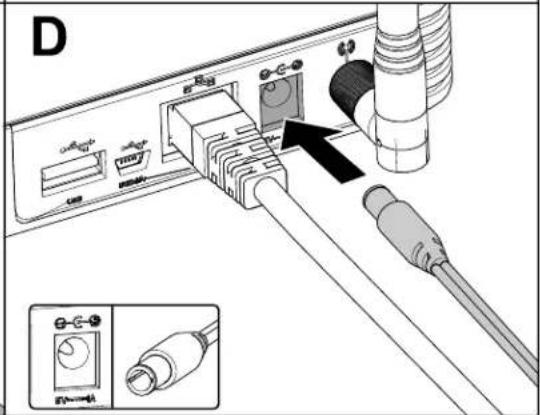
G473652
- Plug the power cord brick into an electrical outlet.
- Plug the hub into the router and it will automatically connect to the internet. When the globe symbol on the hub turns solid green, the hub is connected.
Note: This process may take a few minutes.
You do not need Wi-Fi passwords or network permissions.

Determining a Location for the Charging Station
Refer to the following guidelines when choosing a location for the charging station:
- Place it near an outdoor electrical outlet.
- Do not use an extension cord.
- Ensure that the charging station is within 0.5 m (1.6 ft) of a mowing zone boundary and there is room for the mower to navigate in front of the charging station.
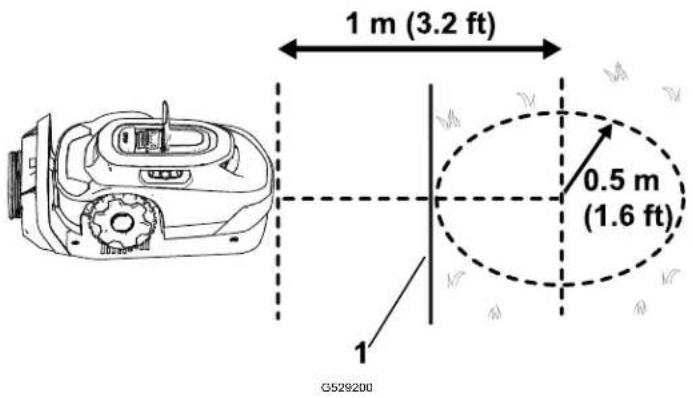
① Mowing zone boundary
- Do not install the charging station in an area prone to standing or rushing water.
- Do not install the charging station on a deck or any other inaccessible area.
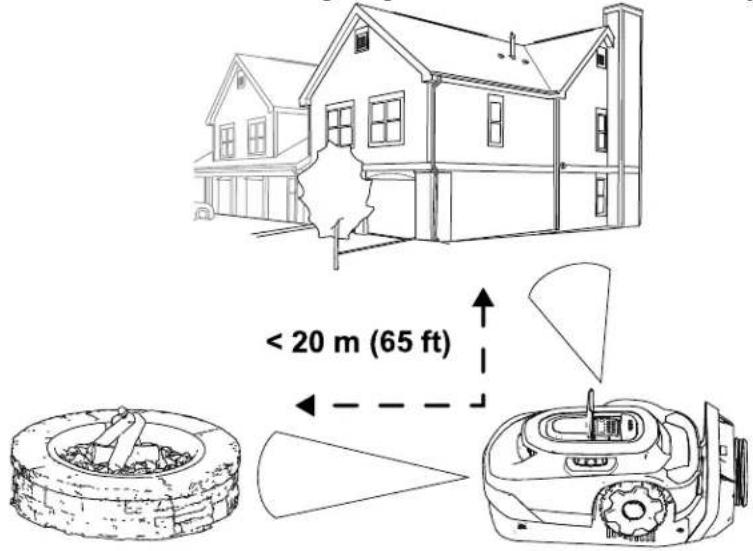
- Ensure there at least 2 reference objects within 20 m (65 ft) of the charging station. Walls of a house or garage are valid reference objects.
- Install the charging station on a level surface; do not install on a steep slope, as it could bend the charging station.
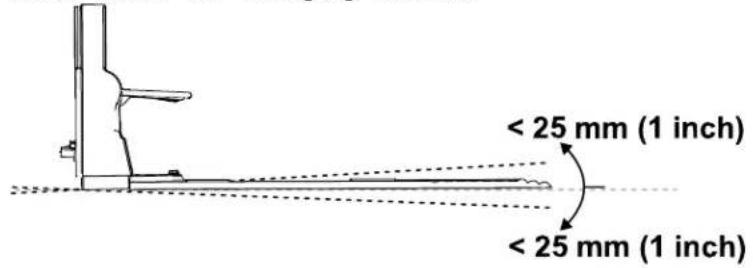
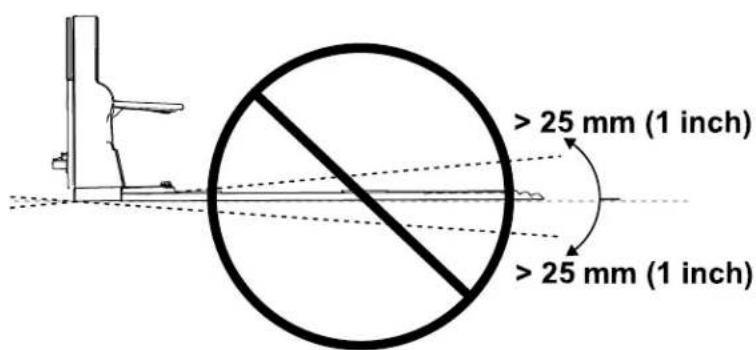
- The charging station can be installed on a variety of surfaces, but the end of the charging station must be in contact with your lawn.
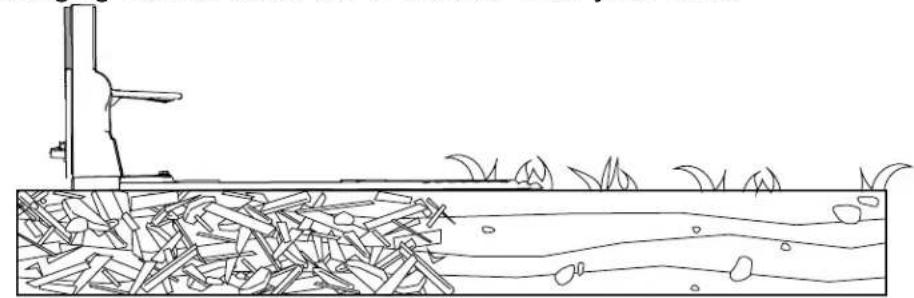
natural_image
Diagram of a grassy field with a vertical pole and scattered leaves, showing no text or symbols.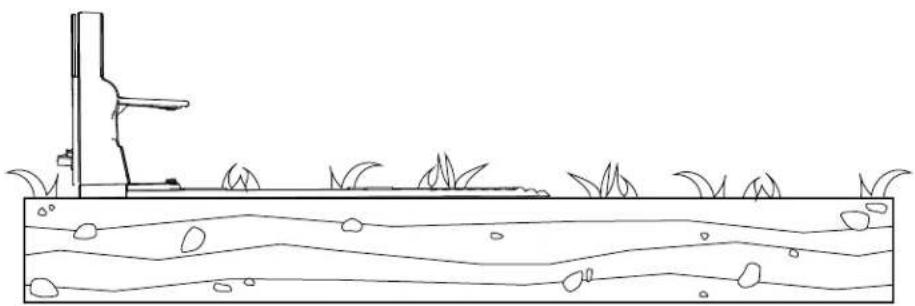
natural_image
Simple line drawing of a grassy field with a vertical structure and wavy water surface (no text or symbols)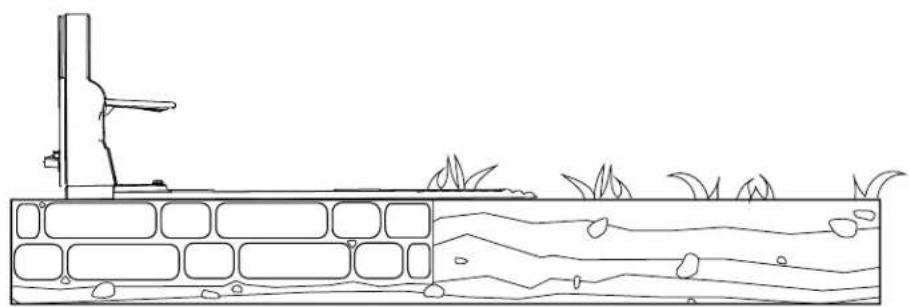
natural_image
Line drawing of a water channel with vegetation and a small structure, no text or symbols presentInstalling the Power Supply and Charging Station
Parts Required
| 1 Power supply |
| 1 Low-voltage cable |
| 1 Charging station |
| 4 Allen-head screw |

WARNING

A power supply plugged into a non-GFCI or non-RCD receptacle could result in electric shock.
Plug the power supply into only a ground-fault circuit interrupter (GFCI) or residual current device (RCD) receptacle with a tripping current not more than 30 mA.

WARNING

A malfunctioning or damaged charging station, low-voltage cable, or power supply could overheat and cause an increased risk of fire.
Do not install the charging station, low-voltage cable, or power supply near flammable or combustible materials.
If the power supply to the charging station is malfunctioning or damaged, disconned the power supply, and contact an Authorized Service Dealer to replace it.
IMPORTANT
Check to ensure compliance with all codes and regulation before mounting the power supply.
Mounting the power supply may require additional materials and/or hardware, depending on the type of base material present at your chosen mounting location.
IMPORTANT
Route the power cord to the charging station outside of the mowing area; otherwise the mower may damage the cord.
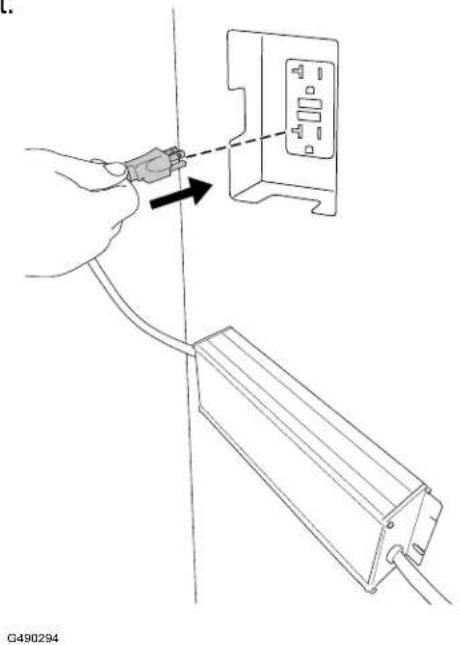
- Mount the power supply to your structure at a minimum height of 30 cm (12 inches).
Note: Ensure that the power-supply cord has enough slack to plug into the low-voltage cable.
- Plug the male connector on the power supply into the female connector on the low-voltage cable.
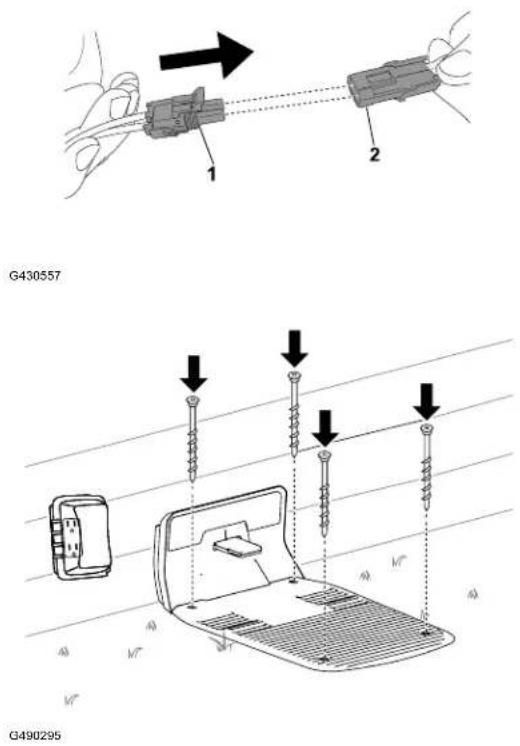
-
Use the 4 Allen-head screws to secure the charging station.
-
Plug the power supply into an electrical outlet.
The indicator light on the charging station should turn green.
Preparing the Lawn Before Using the Robotic Mower
To prepare the lawn before using the robotic mower, do the following:
- Clear any obstructions and/or debris from your lawn.
- Before training your robotic mower, mow the lawn to a height of 83 mm (3.25 inche
- Fill in any holes in the lawn that could stop the mower.
- To ease the setup process using the app, make a sketch of the mowing zone and obstacles, boundaries, transit paths, exclusion zones to make it easier to install the charging station.
Ideal Conditions for Setting up the Mower
Cloudy days during the middle of the day are ideal conditions for setting up your mower. Ensure that you start the setup process 3 hours after sunrise and you complete the proce 3 hours before sunset. These conditions allow the mower to make a high-quality map of y lawn.
Note: You can always resume setting up the mower the next day if you don't complete t setup process.
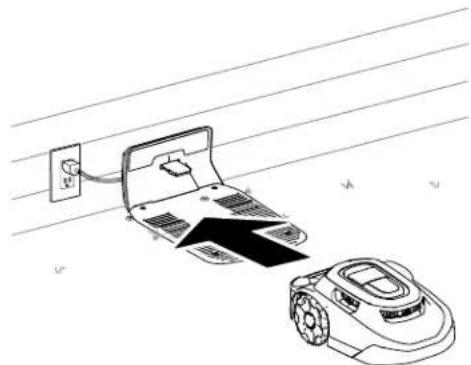
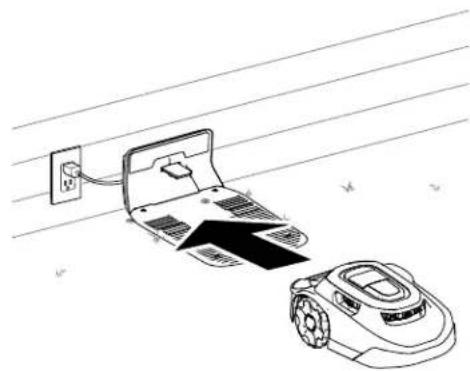
Starting and Charging the Mower
- To start setting up the mower, turn the power switch from the ⊕ position to the ON ① position.
- Pull the mower into the charging station. The mower comes with an approximately 30% battery charge. Before you can start the setup process using the mobile app, you need to charge the mower to at least 85%.
- After reaching the proper charge level, use the mobile app to start the mower.
natural_image
Line drawing of a robotic car with visible wheels and side brackets (no text or symbols)G530546
natural_image
Line drawing of a robotic vacuum cleaner next to a laptop with power outlet, placed on a surface (no text or symbols)G430093
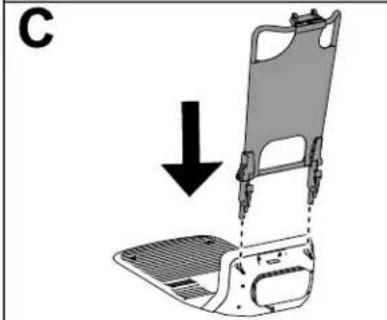
Installing the Mower Handle
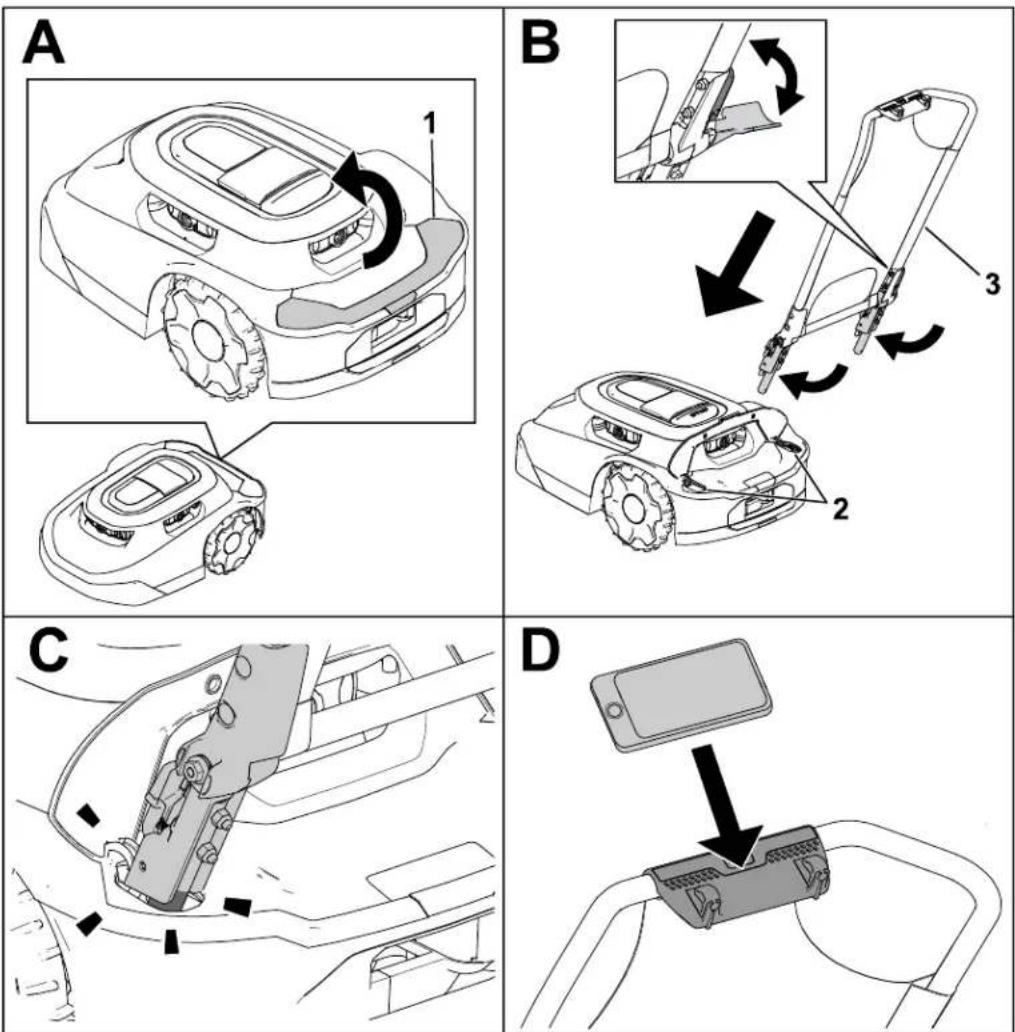
G530208
① Lift the cover.
② Openings for the handle Handle assembly
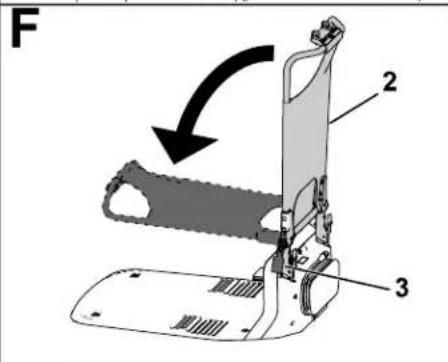
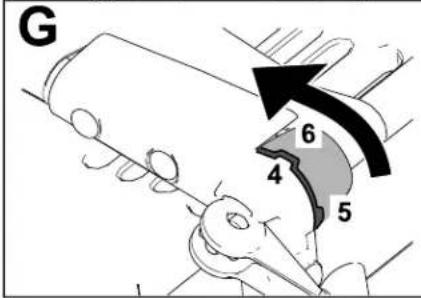
Removing the Mower Handle and Storing it in the Charging Station
natural_image
Diagram of a vehicle seat assembly with a downward arrow indicating force or motion (no text or symbols present)
natural_image
Technical line drawing of a mechanical assembly with no visible text or symbols


G430160
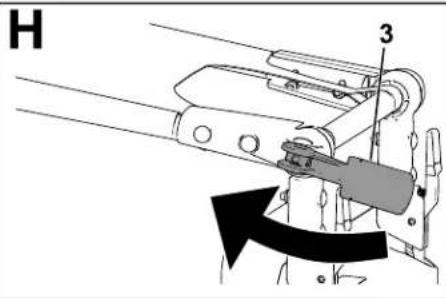
① Squeeze the release levers inward.
③ Cam lever
⑤ Upright/vertical notch position
② Handle assembly
④ Notch in the handle assembly
⑥ Sunshade/horizontal notch position
Operation Safety
- Keep bystanders and children away from the machine, charging station, and power supply during operation.
- Wear appropriate clothing, including long pants and substantial, slip-resistant footwear, whenever you manually operate the machine.
- Do not operate the machine without all safety protective devices in place and working properly or if a power cord is damaged or worn.
- Inspect the area where you will use the machine and remove all objects that could interfere with the operation of the machine.
- Use only the battery and power supply approved by the manufacturer for the machine. Do not use any battery that is not designed for use with the machine.
- Do not use a damaged or modified battery, which may exhibit unpredictable behavior that results in fire, explosion, or risk of injury.
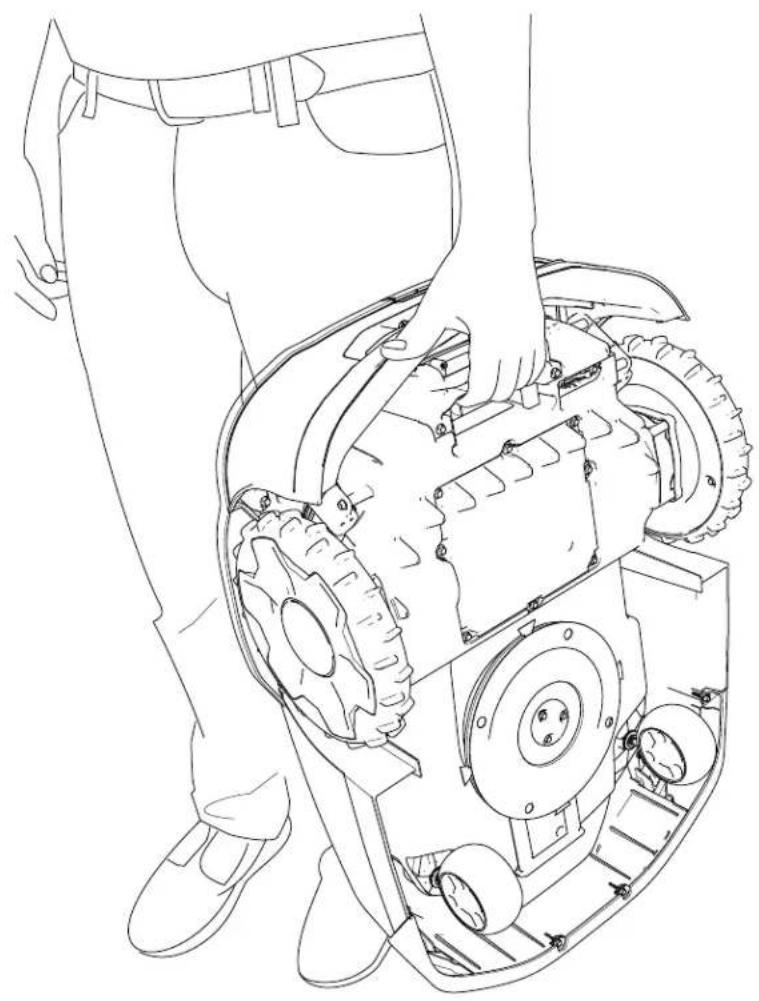
- The blades are sharp; contacting the blades can result in serious personal injury. Press the stop button and wait for all moving parts to stop before unclogging, servicing, or transporting the machine.
- Keep your hands and feet away from moving parts on and under the machine.
- Do not overreach. Keep proper footing and balance at all times. This enables better control of the machine in unexpected situations. Walk, never run when training the machine.
- Do not stand, sit, or ride on the machine or allow others to do so.
- If the machine strikes an object and/or starts to vibrate abnormally, immediately shut off the machine and wait for all movement to stop before examining the machine for damage. Make all necessary repairs before resuming operation.
- Press the stop button on the machine, wait for all movement to stop, and disable the machine in the following situations:
– Before clearing blockages on the machine
- Before checking, cleaning, or maintaining the machine (especially the blades), and the charging station
- After the machine strikes a foreign object, is in an accident, or breaks down; examining the machine for damage and make repairs before resuming operation
- If the machine begins to vibrate abnormally; examine the machine for damage and make repairs before resuming operation
- Avoid using the machine and its peripherals in bad weather conditions especially when there is risk of lightning.
- Do not place any object on either the machine, charging station, or power supply.
- Do not modify the machine, software, charging station, hub, or power supply.
- Do not modify or override the machine controls, safety devices, or power supply.
- Do not use a modified machine, charging station, or power supply.
• We recommend not using the machine while watering or irrigating the operating area.
- Use only accessories approved by Toro to avoid the risk of fire, electric shock, or injury
- Press the stop button on the machine and wait for the blades to come to a complete s before handling the machine. Carry the machine with the blade(s) away from your body
natural_image
Line drawing of a person using a lawn mower on a mechanical component (no text or symbols)G430092
- Do not use or charge a damaged, deformed, or excessively hot battery. A damaged battery may generate heat, rupture, leak, ignite, or explode.
- Use the battery only for the application for which it was intended.
• The battery could emit explosive gasses if it is significantly overcharged.
- Do not subject the battery to mechanical shock.
- Do not use or operate a damaged or improperly functioning charging station or power supply.
- Do not plug the charging station or the power supply into a power strip or an extension cord.
- Do not operate a charging station or power supply that has received a sharp or heavy blow.
- Do not use a charging station other than that designed for the machine; refer to the Operator's Manual for proper charging instructions.
- Do not connect a damaged power supply cord. Do not touch a live damaged cord.
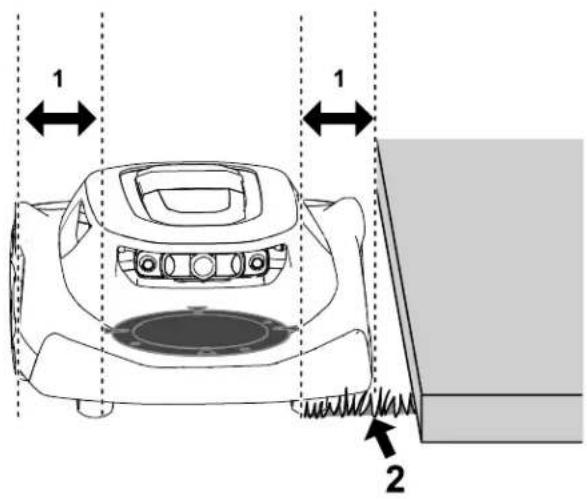
Trimming Areas of the Lawn that the Robotic Mower Cannot Access
The mower blades do not reach the edge of the mower shroud, so you need to trim at 10 cm (4 inches) of uncut grass periodically.
Examples of areas that you need to trim include the following:
- Between the lawn and a fence, driveway, sidewalk, etc.
- Around a tree, fire pit, etc.
G474711
① Gap between the blade disc and the edge of the ② Uncut grass mower shroud—10 cm (4 inches)
Repositioning the Mower if it is Stuck on an Obstacle
Note: If possible, remove the obstacle (fill the hole, remove the toy, branch, etc.). If you cannot remove the obstacle, create an exclusion zone around the obstacle to prevent this from recurring.
If the mower gets stuck on an obstacle, do the following:
- Press the stop button on the mower.
- While carrying the mower with the blades away from your body, manually move the mower away from the obstacle to another part of the mowing zone.
natural_image
Line drawing of a robotic lawn mower with a black arrow pointing to the blade (no text or symbols)G469079
- Enter the 4-digit code ^1 .
- Press the play button ^3 to resume mowing or press the home button to send the mower to the charging station.
G530441
Manually Stopping and Starting the Mower
When you manually stop the mower, autonomous features are disabled. Enter the 4-digit code to enable the mower.
-
Press the stop button on the mower.
-
Enter the 4-digit code.
-
Press the play button to resume mowing or press the home button to send the mower the charging station.
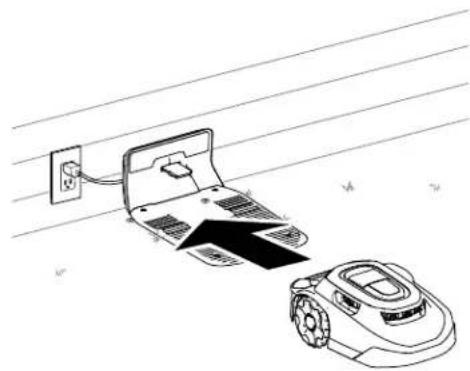
Docking and Charging the Mower
With the mower enabled, press the home button on the control panel to manually send the mower to the charging station.
The mower will remain in the charging station until it is fully charged or until the next scheduled mowing task.
Note: The mower automatically docks in the charging station if the battery is too low.
G431603
natural_image
Line drawing of a robotic arm and a laptop connected to a power outlet, with no text or symbols present.G430093
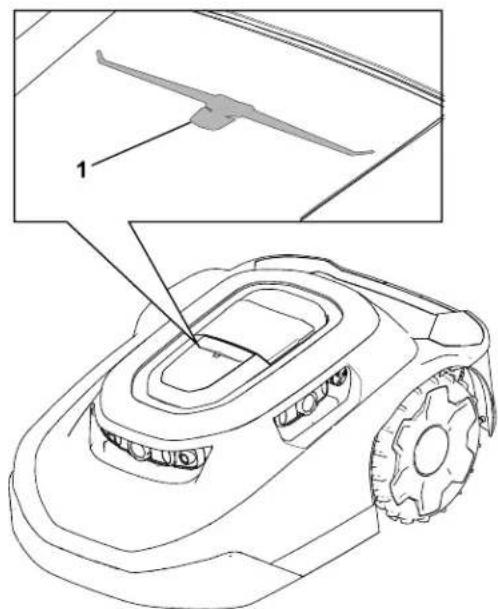
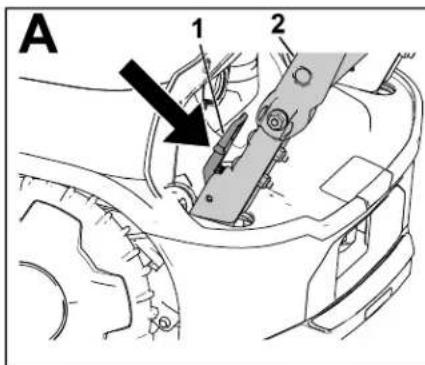
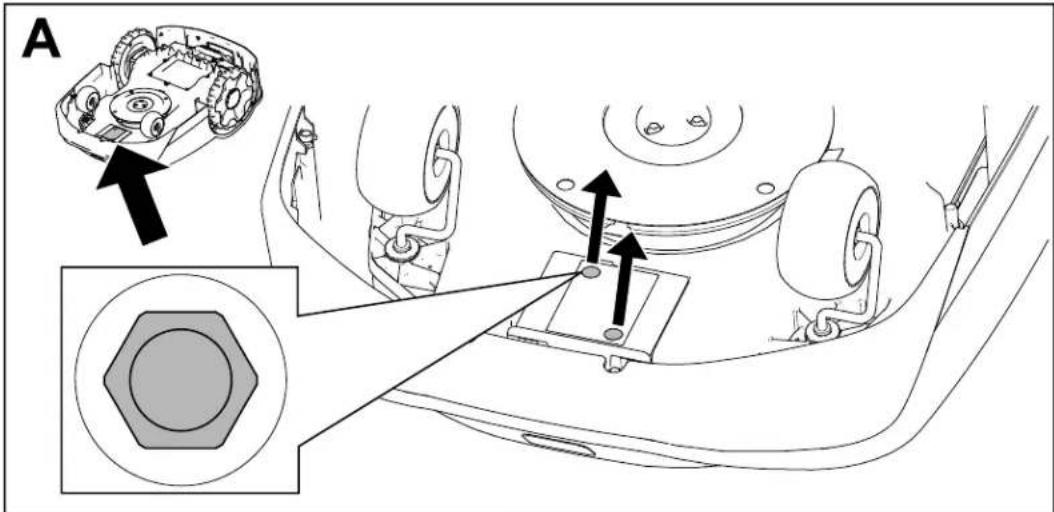
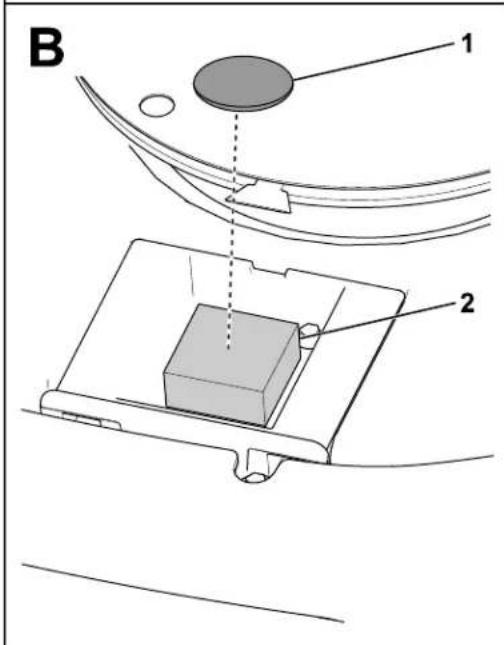
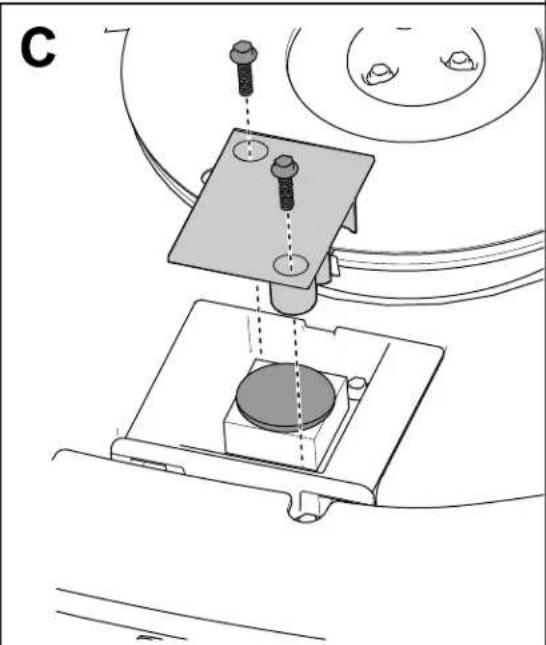
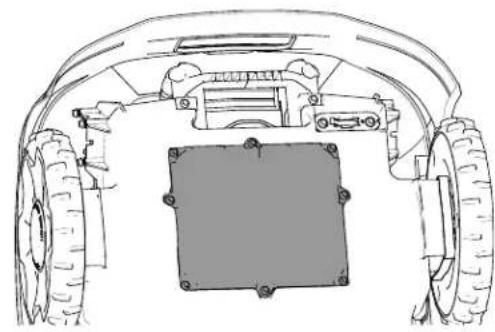
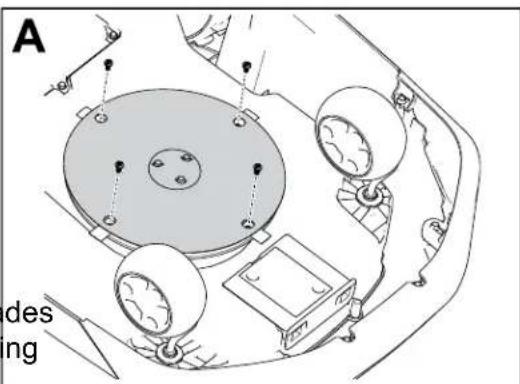
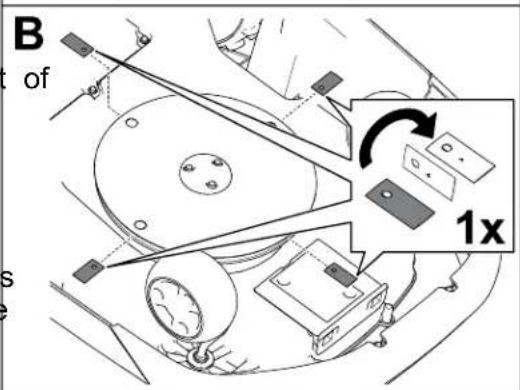
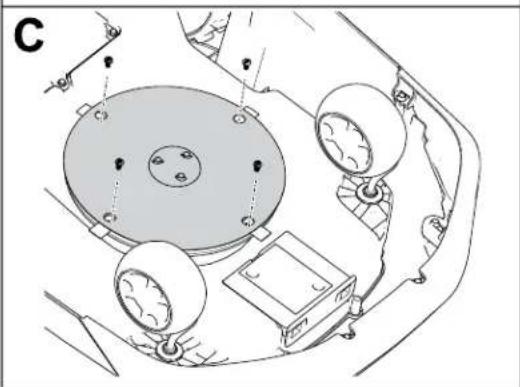
Installing an Optional Anti-Theft Device
Note: An anti-theft device is not included with the robotic mower. However, the mower automatically makes an alarm noise if it is removed from the working area or if it is carried without entering the PIN code.
Anti-theft devices are available for purchase separately.
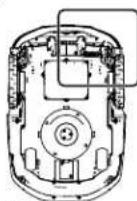
- Remove the screws from the cover.
- Place the anti-theft device ^1 on the foam pad.
- Secure the cover using the 2 screws previously removed.
natural_image
Technical line drawing of a mechanical assembly with no visible text or symbolsG464079
Recommended Maintenance Schedule
| Maintenance Service Interval | Maintenance Procedure |
| Monthly | Clean the lens protectors (more often in dusty, dirty, or wet conditions). |
| Inspect the caster wheels. | |
| Every 2 to 4 weeks | Replace or flip the blades (depends on the frequency of the mowing schedule). |
| Every 3 months | Inspect the drive wheels. |
| Yearly | Replace the lens protectors (more often in dusty, dirty, or wet conditions). |
| Inspect the charging port. |
Maintenance Safety
- Before servicing the machine, turn the power switch underneath the machine to the O_FF position.
- Do not allow children to clean and maintain the machine.
- Keep your hands and feet away from moving parts on and under the machine.
-
The blades are sharp; contacting the blades can result in serious personal injury.
-
Shut off the machine.
- Wear cut-resistant gloves when servicing the blades.
-
Do not repair or alter the blades.
-
Inspect the machine often to ensure that the blades are not worn or damaged.
- Maintain or replace safety and instruction labels as needed.
- Disconnect the power supply from the electrical outlet before performing maintenance on or cleaning it to reduce the risk of electric shock.
- Do not attempt to repair, open, or disassemble the charging station or power supply.
• Take the charging station to an Authorized Service Dealer for service or repair. Do not disassemble the charging station. - For best performance, use only genuine Toro replacement parts and accessories. Other replacement parts and accessories could be dangerous, and could void the product warranty.
Battery and Charging Station Safety
- Clean the charging port on the mower and/or charging station using a nonconductive tool (cloth or soft brush); otherwise, damage may occur.
- Wipe the charging terminals on the charging station and mower using a clean, dry cloth they are dirty.
- When servicing the battery, do not wear jewelry and tie back long hair.
- Do not dismantle or open the battery.
- Keep the battery clean and dry.
- Do not use or charge the mower if it is unusually hot or emits smoke or an unusual s
- Leaking battery fluid can cause skin and eye irritation or chemical burns.
- If the battery leaks, do not allow the liquid inside the battery to contact skin or eyes. If there is contact, wash the affected area with a large amount of water and seek medical advice.
- Use an inert absorbent such as sand to clean up spilled battery fluid.
- Dispose of a used battery properly.
- Do not dispose of the battery in a fire. The cell may explode. Check with local codes f possible special disposal instructions.
- CAUTION—A mistreated battery may present a risk of fire, explosion, or chemical burn.
- Do not disassemble the battery.
- Replace the battery with an approved battery only; using another type of battery may cause a fire or risk of injury.
- Keep battery out of the reach of children.
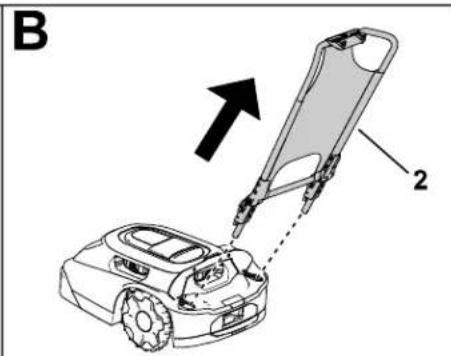
Servicing the Battery
Disconnecting the Battery
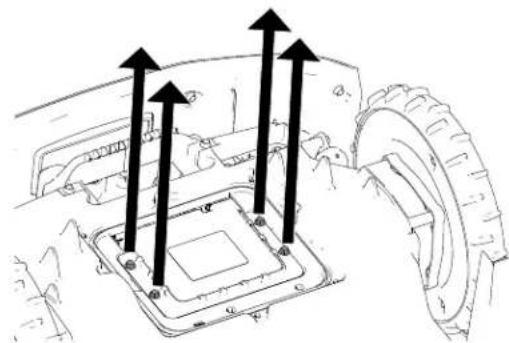
- Turn the power switch to the OFF position.
- Use a 7 mm socket to remove the 8 screws and the battery cover.
natural_image
Technical line drawing of a vehicle chassis with front wheel, rear wheels, and central rectangular component (no text or symbols)G433890
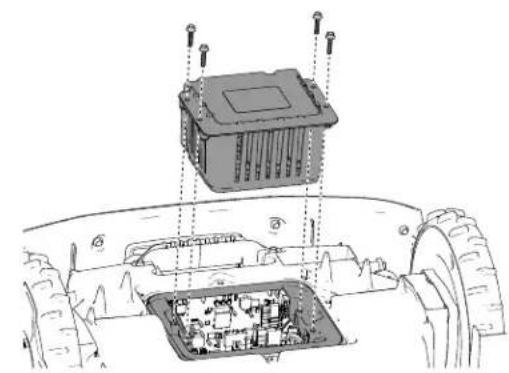
- Remove the screws securing the battery.
natural_image
Technical line drawing of a mechanical component with arrows indicating assembly or force direction (no text or symbols present)G433889
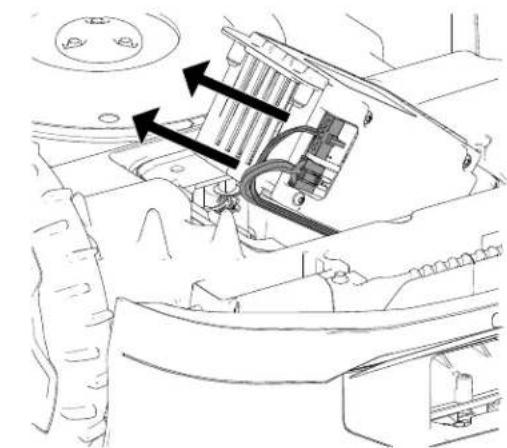
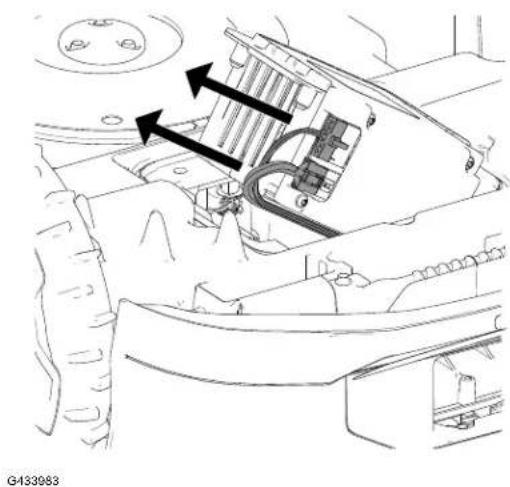
- Disconnect the 2 wire-harness connectors from the battery.
natural_image
Technical diagram of a vehicle's internal components, showing engine, motors, and wiring (no text or labels)G433983
Connecting the Battery
- Connect the 2 wire-harness connectors to the battery.
- Secure the battery using the previously removed screws.
- Install the battery cover.
- Turn the power switch to then position.
- Place the mower in the charging station to charge.
natural_image
Technical diagram of a vehicle chassis with internal components and mounting points (no text or symbols)G433995
Replacing the Wheels
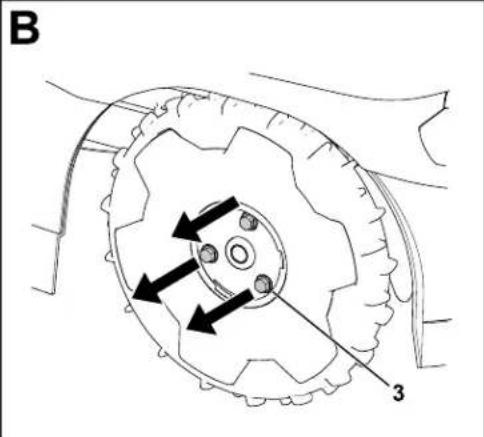
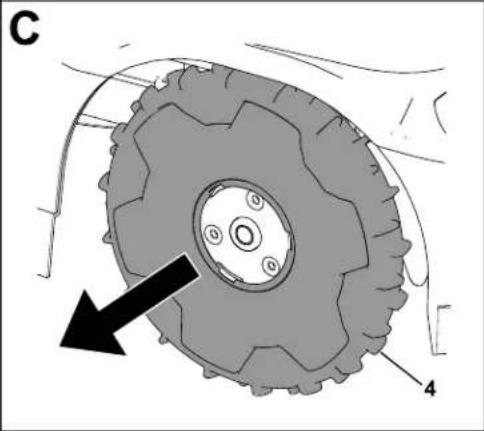
Removing the Wheels
- Press the stop button and wait for all moving parts to stop.
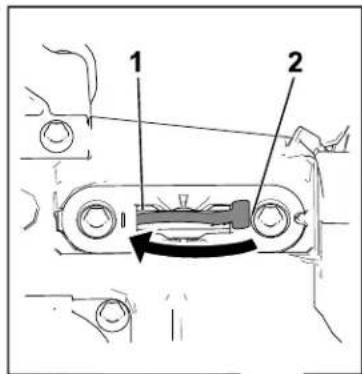
- Using a flat-head screwdriver ^1 , remove the cap ② from the wheel ^4 .
- Remove the 3 bolts ^3 .
- Remove the wheel④.

natural_image
Mechanical tire assembly diagram showing gear and wheel components with no visible text or symbolsG430568.svg
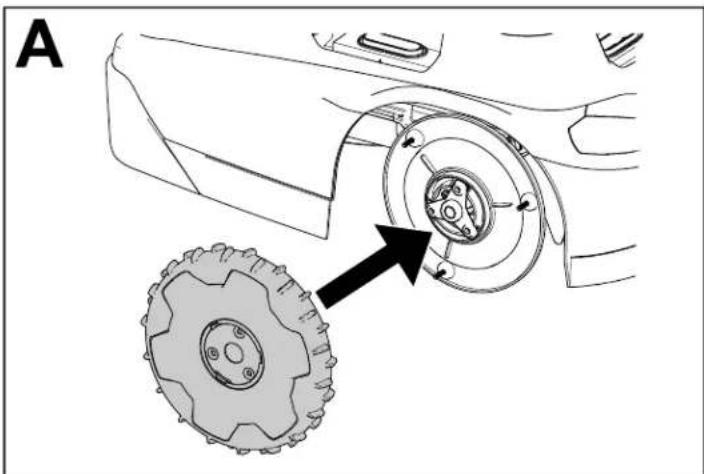
Installing the Wheels
natural_image
Technical diagram of a vehicle wheel assembly showing two components with arrows indicating direction (no text or labels)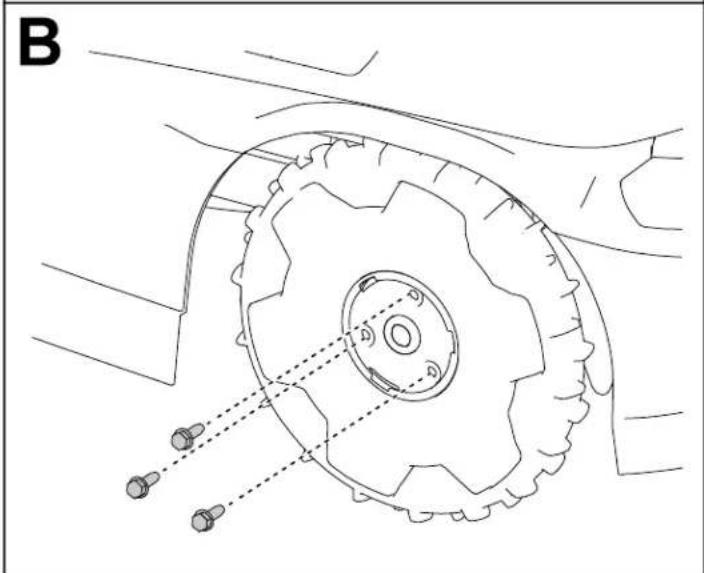
natural_image
Technical line drawing of a mechanical component with gears and shafts, no text or symbols present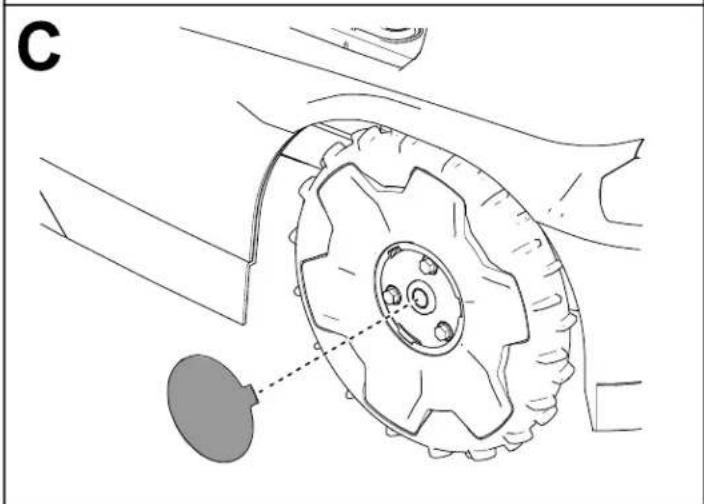
natural_image
Technical line drawing of a mechanical component with gear and mounting bracket (no text or symbols)G430569
Replacing the Blades
Always mow with sharp blades. Sharp blades cut cleanly without tearing or shredding the grass.
WARNING
The blades are sharp; contacting the blades could result in serious personal injury. Wear cut-resistant gloves and use care when replacing or cleaning the blades.
- Turn the power switch to the F0 position.
- Tip the mower over.
- Rotate the blade disc until the holes on the blade disc align with the screws.
- Using a Phillips-head screwdriver, remove the blade screws and blades.
- Clean any debris from cutting system.
- If the service interval is reached for a set of blades for the first time, you may flip the blades over and install them to the mower again using the existing screws.
Note: Both sides of the blades have sharp edges that can be used for mowing. One set blades should only be flipped over once.
- If installing new blades or both sides of the blades have been used, install the blades using the provided screws.
Note: Discard the existing blades and screws after using both sides of the blades, or if the blades are damaged.
- Turn the mower over.
- Turn the power switch to then position.
- Press the play (resume operation) button on the control panel.
natural_image
Technical line drawing of a mechanical assembly with circular components and mounting holes (no text or symbols)G542513
Cleaning
Cleaning the Mower and Charging Station
IMPORTANT
Do not pressure-wash the mower; the water can damage the electronics. Use compressed air when cleaning the mower.
IMPORTANT
Clean the charging port on the mower and/or charging station using a non-conductive tool (cloth or soft brush); otherwise, damage may occur.

CAUTION

If metal objects contact the positive and negative posts at the same time, this could short out the battery pack. The battery pack or conductor could overheat and burn you, resulting in minor or moderate injury.
Do not use metal objects to clean around the battery.
- Turn the mower power switch to the position and wait for all moving parts to stop.
- Unplug the power supply for the charging station.
- Turn the mower over.
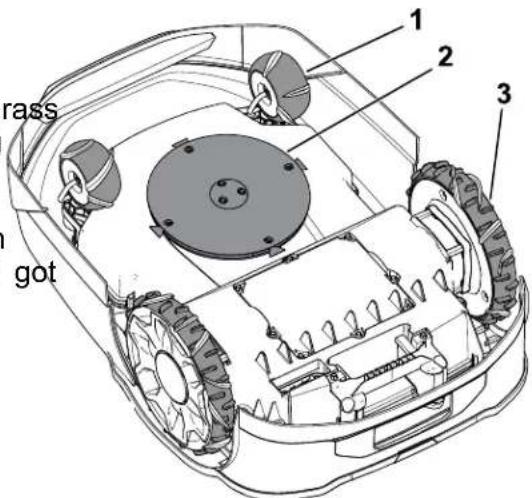
- Clean any debris or grass build-up on the caster wheels ^① and drive wheels ^③ .
- Use a wet cloth or a soft brush to remove grass clippings and debris from the mower housing ②.
Ensure that there are not any obstructions in the top side of the mower (e.g., a stick that got stuck or debris buildup).
G530537
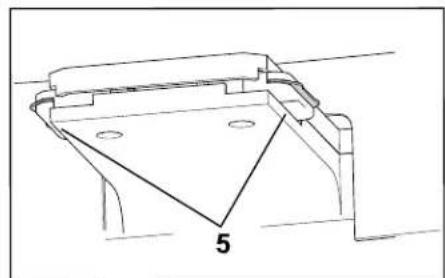
Cleaning the Mower and Charging Station (continued)
- Use a dry cloth or non-conductive soft brush to clean the mower charging port.
G530536
- Use a dry cloth or non-conductive soft brush to clean the charging station terminals.
- Turn the mower over.
- Turn the mower power switch to the O position.
- Plug in the power supply for the charging station.
natural_image
Technical line drawing of a mechanical bracket or housing component with a triangular cutout and labeled point '5' (no text or symbols beyond the label)
natural_image
Illustration of a hand using a power tool to cut or mark a component on a cutting board (no text or symbols present)G530462
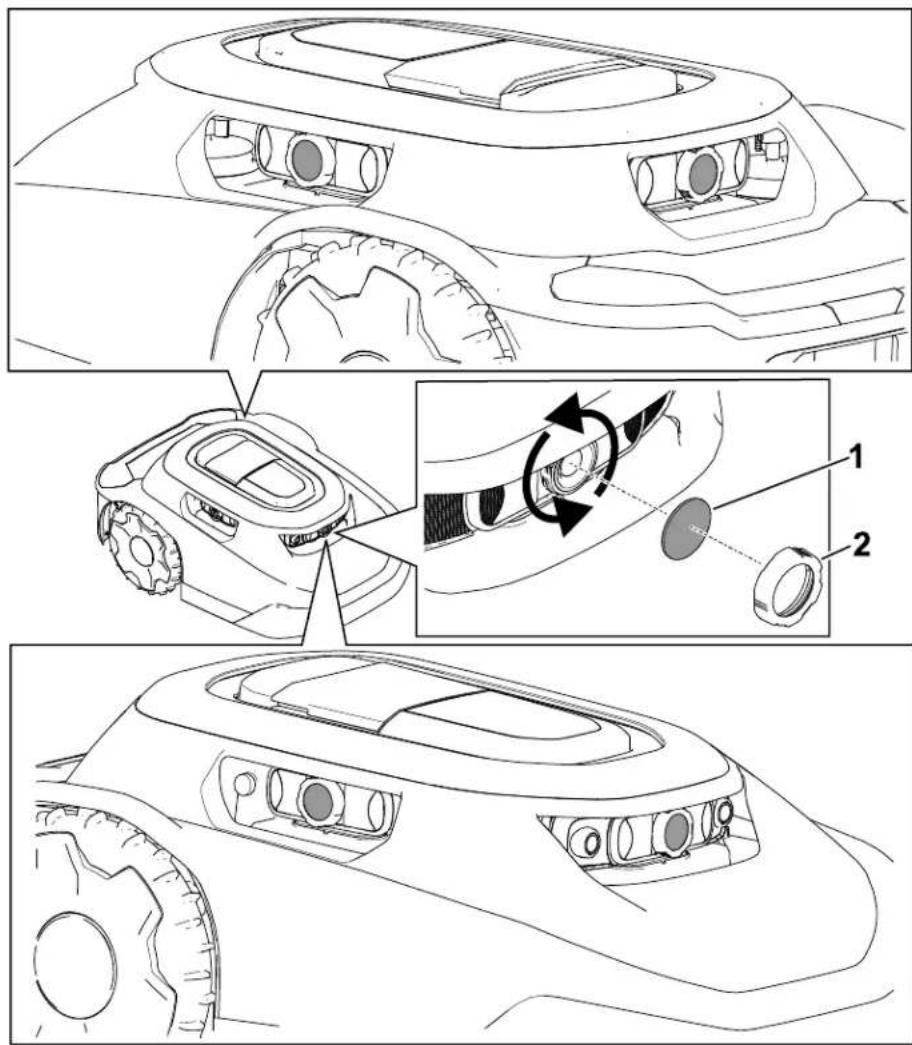
Cleaning or Replacing the Lens Protectors
Clean the lens protectors using a dry soft-bristle brush and/or a clean microfiber cloth. Refer to the figure below for the lens locations and how to replace the lens protectors.
Replace the lens protectors by unscrewing the lens caps and removing the lens protectors.
Disposing of Waste
Batteries are pollutants to the environment. Dispose of these according to your state and local regulations.
Storage Safety
When you are not using the mower, store it indoors in a dry, secure place out of the real children or other unauthorized users.
Preparing for Off-Season Storage
WARNING
Improperly storing the mower and its battery may result in an increased risk of fire and/or electric shock; this may cause personal injury and/or property damage.
- Disconnect and remove the battery from the mower before storing the mower and or its battery inside your home.
- Follow the instructions for properly storing the mower.
IMPORTANT
Store the mower in a cool (0°C to 23°C/32°F to 73°F), dry location (< 65% relative humidity) that is free of excessive dust and corrosive chemicals or gasses.
The temperature that the battery is stored at will affect its long-term life. Storage for long periods of time at extreme temperatures will reduce the battery life.
IMPORTANT
Store the mower, power supply, and charging station out of the reach of children, away from corrosive agents such as garden chemicals and de-icing salts, and away from extended exposure to snow and ice. Store the mower, power supply, and charging station in a cool, dry place when the mower will not be used for more time month.
- Fully charge the mower.
- Press the stop button on the mower.
- Remove the mower from the charging station.
- Turn the power switch to the F0position.
-
Disconnect and remove the battery from the mower.
-
Clean the mower housing using a cloth or soft brush and remove grass clippings, dirt, and grime from external parts of the shroud and from the top of the mower housing.
-
To prepare the mower for the next season, check the condition of the blades; if necessary, replace the blades.
-
Before storing the charging station indoors, disconnect the power supply and low-voltage cable from the charging station.
The mower does not start a mowing cycle.
| Possible Cause Corrective | Action |
| The on/off switch underneath the mower in the Ⓗ position. | Push the on/off switch to the position. |
| The handle is still installed in the mower. | Remove the handle from the mower and stow the handle in the charging station. |
| The mower is stuck on an object. Move | the mower away from the object. |
| The mower is pushed up against an object. | Move the mower away from the object. |
| The mower is on too steep of an incline. | Place the mower on an incline of 25° or less. |
| The mower is locked. If the lock/unlock in | indicator light is illuminated on the control panel, enter you PIN on the keypad, then press the play (resume operation) button or the home button. |
Mower impacts object, will not change direction.
| Possible Cause Corrective | Action |
| There is an obstruction between the shroud and the chassis. | Remove the obstruction between the shroud and the chassis. |
The mower will not move.
| Possible Cause Corrective | Action |
| There is mud or grass built up on the drive wheels. | clear the mud or grass from the drive wheels until the tread on the drive wheels are exposed. |
The charging station has no power.
| Possible Cause Corrective | Action |
| There is no power at the house outlet. | Reset the house breaker. The LED light on the charging station will illuminate when power is restored. |
| The power supply is not plugged into the house outlet. | Plug the power supply into the house out. The LED light on the charging station will illuminate when power is restored. |
| The connection between the power supply and the charging station is not connected. | Connect the power supply to the charging station. The LED light on the charging station will illuminate when power is restored. |
A caster wheel is not functioning properly.
| Possible Cause Corrective | Action |
| The caster wheel is not pivoting or rolling. | Clean the caster wheel and metal pivot. |
| The caster wheel bearing is damaged. Inspect the bearings for wear and ensure that they rotate freely. Replace the bearin if needed. | |
The mower is not cutting evenly.
| Possible Cause Corrective | Action |
| The cutting blades are dull. Replace the | 4 cutting blades. |
There is no Bluetooth® connection between the mower and phone.
| Possible Cause Corrective | Action |
| The Bluetooth function on your phone is turned off. | Turn on the Bluetooth function on your phone. |
| Your phone is not connected to the mower. | 1. Open the settings on your phone.2. Refresh the connected devices list on your phone and ensure that your phone is connected to the hub/mower.3. If your phone is not connected to the hub/mower, pair your phone with the hub/mower. |
There is no wireless connection between mower and hub.
| Possible Cause Corrective | Action |
| There is no wireless signal from the Wi-Fi router. | iRestart your Wi-Fi router by disconnecting the power cord from the router and reconnecting the power cord.Wait 30 to 60 seconds before reconnecting the power cord. |
| There is no wireless signal from the hub the globe symbol on the hub is not illuminated. | iRestart your hub by disconnecting the power cord from the hub and reconnecting the power cord.Wait 30 to 60 seconds before reconnecting the power cord. |
| The mower is outside the property line. | Return the mower to your property. |
The mower is not charging.
| Possible Cause Corrective | Action |
| There is an obstruction in the charging station. | Check the charging station for obstructions. Clear any obstructions. |
| There is an obstruction in the mower charging port. | Check the mower charging port for obstructions. Clear any obstructions. |
| The charging terminals on the charging station are dirty. | Clean the charging terminals. |
| The power switch on the mower is in the O_FF position. | 1. Turn the power switch to the N_O position.2. Ensure that the indicator light on the charging station is green.3. If the mower is docked in the charging station and the indicator light is red, the magnet could be missing from the mower shroud. Contact an Authorized Service Dealer. |
When manually pushing the mower, the handle feels loose.
| Possible Cause Corrective | Action |
| The cam lever on the handle is loose. T | ghten the cam lever. |
Advisory
A message that informs the user of an operator error or anything that may cause a job to pause or halt and may require the user to intervene.
App
An abbreviation for software application. A computer program on a mobile device that performs one or more tasks. Also called application or mobile app.
Autonomous
Automated machine functions that operate in autonomous mode during all the operating cycles of the machine.
Boundary
Something that indicates or fixes a limit or extent. For a robot, it is the outside, no-cross of an operating area, transit path or zone, or exclusion area. Also called perimeter.
Bump Sensor
An electronic sensor used in detecting and recording physical touch. Also called tactile sensor or touch sensor.
Charging Station
An automatic battery-charging facility located on or within the working area.
Computer Vision
The way a robot “sees” the world around it, putting together the sensor data and the picture it creates to respond to its environment.
Exclusion Zone
An area recorded by the operator that the robot shall not enter.
Fault
The result of a mechanical, sensor, or software error, which requires service or correction the machine, sensor, or software code.
Job
The work being performed by a robot at one time inside an operating area.
Localization
The process of determining where a mobile robot is with respect to its environment. Localization is a most fundamental competency required by a robot as the knowledge of it location is necessary for making decisions about future actions.
Mowing Zone
An area in which the robot can run autonomously. The area inside a boundary. Operating may be interchangeable with adjectives that describe the work, such as mowing, clearing, and trenching.
Navigation
The ability of a robot to determine its own position in its frame of reference and then to a path toward some goal location.
Obstacle
An object or ground condition which can cause harm, or is harmed, if it comes into conta collision with the machinery.
Obstacle Avoidance
The process of avoiding a collision with an obstacle in the path of a robot by maneuvering around the obstacle.
Obstacle Detection
The process of detecting objects or terrain types that impede the motion of a robot. A rot may use obstacle avoidance to maneuver around an obstacle.
Obstacle Sensor
A device that senses when the machine contacts a person or an obstruction.
Path
A route that a robot is programmed to travel. As part of a job, a path can connect multip fields or paths.
Robot
A machine designed to execute one or more tasks automatically. For example, a robot can sense, compute, and act. It must be able to have sensors that provide it with input and insights about the physical space around them. It must be able to compute to make decisions based on its programming and inputs. To be defined as a robot, it must be able to move in or change the physical world in some manner.
Sensing
The feedback from the environment of the robot, which enables the robot to react to its environment. Sensory inputs may come from a variety of sensor types.
Sensor
A device that responds to physical stimuli (including, but not limited to, heat, light, sound, pressure, magnetism, and motion) and transmits the resulting signal or data providing a measurement, operating a control, or both. For example, a sensor can estimate the condition of a robot and its environment. This information is sent to a controller to enable appropriate behavior. A robot requires extensive information about its environment to function effectively.
Transit Path
A non-mowing autonomous lane used only for the robot to travel from one mowing zone t another. An autonomous, exact path that passes through, across, or connects to another transit path, transit area, or operating area.
Working Area
Any defined area in which the machine can function automatically.
California Proposition 65 Warning Information
What is this warning?
You may see a product for sale that has a warning label like the following:

WARNING: Cancer and Reproductive Harm—www.p65Warnings.ca.gov.
What is Prop 65?
Prop 65 applies to any company operating in California, selling products in California, or manufacturing products that may be sold in or brought into California. It mandates that the Governor of California maintain and publish a list of chemicals known to cause cancer, birth defects, and/or other reproductive harm. The list, which is updated annually, includes hundreds of chemicals found in many everyday items. The purpose of Prop 65 is to inform the public about exposure to these chemicals.
Prop 65 does not ban the sale of products containing these chemicals but instead requires warnings on any product, product packaging, or literature with the product. Moreover, a Prop 65 warning does not mean that a product is in violation of any product safety standards or requirements. In fact, the California government has clarified that a Prop 65 warning “is not the same as a regulatory decision that a product is ‘safe’ or ‘unsafe.’” Many of these chemicals have been used in everyday products for years without documented harm. For more information, go to https://oag.ca.gov/prop65/faqs-view-all.
A Prop 65 warning means that a company has either (1) evaluated the exposure and has concluded that it exceeds the significant risk level"; or (2) has chosen to provide a warning based on its understanding about the presence of a listed chemical without attempting to evaluate the exposure.
Does this law apply everywhere?
Prop 65 warnings are required under California law only. These warnings are seen throughout California in a wide range of settings, including but not limited to restaurants, grocery stores, hotels, schools, and hospitals, and on a wide variety of products. Additionally, some online and mail order retailers provide Prop 65 warnings on their websites or in catalogs.
How do the California warnings compare to federal limits?
Prop 65 standards are often more stringent than federal and international standards. There are various substances that require a Prop 65 warning at levels that are far lower than federal action limits. For example, the Prop 65 standard for warnings for lead is 0.5 g/day, which is well below the federal and international standards.
Why don't all similar products carry the warning?
- Products sold in California require Prop 65 labelling while similar products sold elsewhere do not.
- A company involved in a Prop 65 lawsuit reaching a settlement may be required to use Prop 65 warnings for its products, but other companies making similar products may have no such requirement.
- The enforcement of Prop 65 is inconsistent.
- Companies may elect not to provide warnings because they conclude that they are not required to do so under Prop a lack of warnings for a product does not mean that the product is free of listed chemicals at similar levels.
Why does Toro include this warning?
Toro has chosen to provide consumers with as much information as possible so that they can make informed decisions about the products they buy and use. Toro provides warnings in certain cases based on its knowledge of the presence one or more listed chemicals without evaluating the level of exposure, as not all the listed chemicals provide exposure limit requirements. While the exposure from Toro products may be negligible or well within the “no significant risk” range, out of an abundance of caution, Toro has elected to provide the Prop 65 warnings. Moreover, if Toro does not provide these warnings, it could be sued by the State of California or by private parties seeking to enforce Prop 65 and subject to substantial penalties.
TORO®
natural_image
Line drawing of a robotic lawn mower (no text or symbols)30970, 30972, 30980, 30982,
31060, 31062, 31070, 31072,
G445734
Antenna Requirements:
This radio transmitter FCC ID: OF7-OCB IC: 3575A-OCB has been approved by Innovation, Science and Economic Development Canada to operate with the antenna types listed below, with the maximum permissible gain indicated. Antenna types not included in this list that have a gain greater than the maximum gain indicated for any type listed are strictly prohibited for use with this device.
Optional CalAmp Module Requirements:
This radio transmitter FCC ID: APV-2630MB IC: 5843C-2630MB has been approved by Innovation, Science and Economic Development Canada to operate with the antenna types listed below, with the maximum permissible gain indicated. Antenna types not included in this list that have a gain greater than the maximum gain indicated for any type listed are strictly prohibited for use with this device.
WARNING: Cancer and Reproductive Harm - www.P65Warnings.ca.gov. For more information, please visit www.ttcoCAProp65.com
133-8061
s_decal133-8061
Autocollant : 137-9705

s_decal137-9075
natural_image
Line drawing of a wireless router with a antenna and ports (no text or symbols)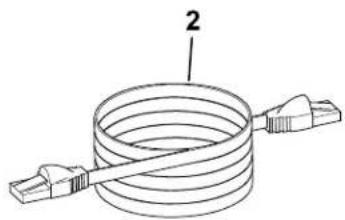
natural_image
Diagram of a coiled cable with two connectors, labeled with number 2 (no text or symbols on the diagram itself)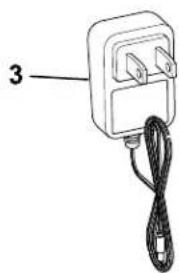
natural_image
Simple line drawing of an electrical plug with a cord and cable (no text or symbols)G468385
① Hub
② Câble Ethernet Cordon d'alimentation ^3
① Routeur Wi-Fi
⑤ Tondeuse
② Hub
natural_image
Line drawing of a robotic arm and a laptop connected to a power outlet, with no text or symbols present.G430093
G430560
G430561
Obstacles non appris
flowchart
graph TD
    A["1: Top part"] --> B["2: Target"]
    B --> C["3: Right arm with gear and handle"]
natural_image
Line drawing of a robotic lawn mower with a black arrow pointing to the blade (no text or symbols)0430095
Bouton Retour
G477896
0362110
G387030
G445462
G445465

G445467
G489469
G445464
G445466
Connexion du hub
Pièces nécessaires
natural_image
Diagram of a network device showing ports, cables, and an attached cable with a connector (no text or labels)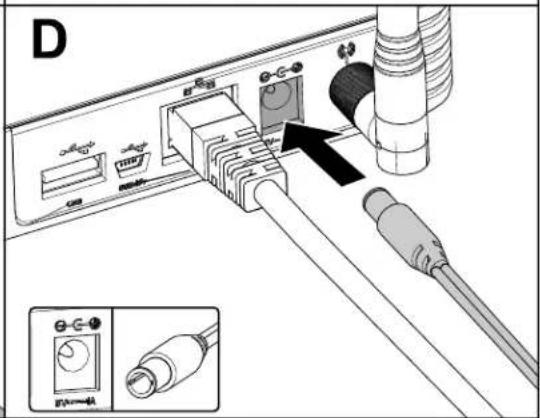
G473652

natural_image
Cross-sectional diagram of a grassy field with vegetation and a small structure, no text or symbols present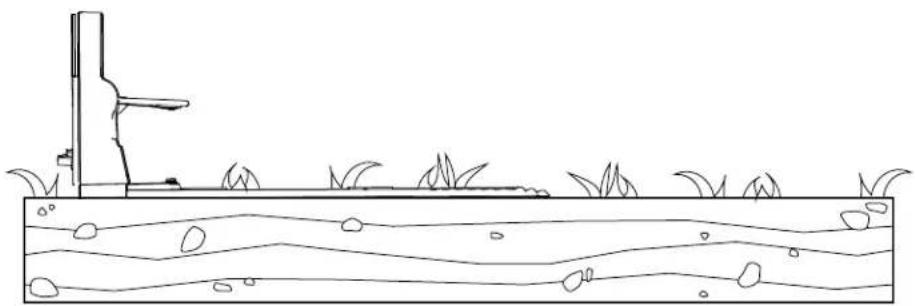
natural_image
Simple line drawing of a grassy field with a vertical structure and wavy water surface (no text or symbols)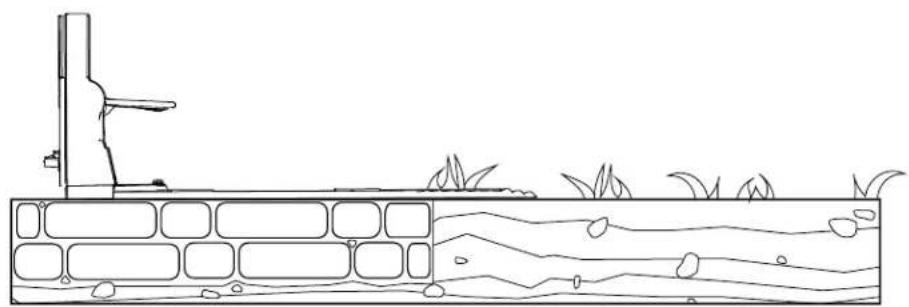
natural_image
Line drawing of a water channel with vegetation and a small structure, no text or symbols presentG430557
natural_image
Line drawing showing a hand holding a cable connected to an electrical outlet, with no text or symbols present.natural_image
Diagram of a vehicle seat assembly with a downward arrow indicating force or motion (no text or symbols present)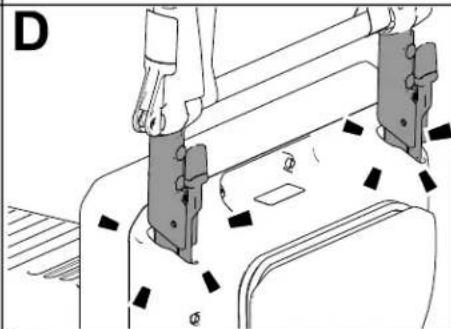
natural_image
Technical line drawing of a mechanical assembly with no visible text or symbols


natural_image
Line drawing of a person using a lawn mower to adjust the wheel rim (no text or symbols present)G430092
natural_image
Line drawing of a robotic lawn mower with a black arrow pointing to the blade (no text or symbols)G431603

natural_image
Line drawing of a robotic arm and a laptop connected to a power outlet, with no text or symbols present.G430093
natural_image
Technical line drawing of a mechanical assembly with mounting bracket and base plate (no text or symbols)G464079
natural_image
Technical line drawing of a vehicle chassis with four tires and a central rectangular component (no text or symbols)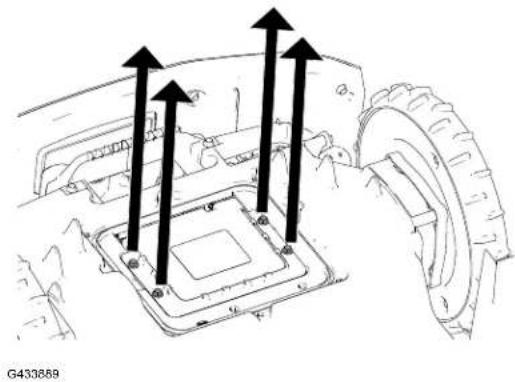
natural_image
Technical diagram of a vehicle's internal components with arrows indicating motion or flow (no text or symbols present)natural_image
Technical diagram of a vehicle chassis with internal components and mounting points (no text or symbols)G433995
natural_image
Mechanical tire assembly diagram showing gear teeth and central hub with labeled parts (no text or symbols beyond labels)G430568.svg
Montage des roues

natural_image
Technical diagram of a vehicle wheel assembly showing two components with arrows indicating direction (no text or labels)
natural_image
Technical line drawing of a mechanical component with gears and shafts, no text or symbols present
natural_image
Technical line drawing of a mechanical component with gear and mounting bracket (no text or symbols)G430569
natural_image
Technical line drawing of a mechanical assembly with circular components and mounting holes (no text or symbols)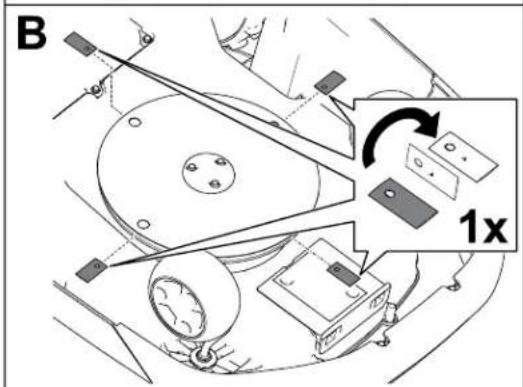

natural_image
Technical line drawing of a mechanical assembly with circular components and mounting holes (no text or symbols)G542513
Nettoyage
G530537
natural_image
Line drawing of a robotic car with a hand cleaning it (no text or symbols)G530536
natural_image
Technical line drawing of a mechanical bracket or housing component with no visible text or symbols
natural_image
Illustration of a hand using a power tool to cut a mechanical component on a sheet metal (no text or symbols visible)G530462
natural_image
Line drawing of a robotic lawn mower (no text or symbols)20459, 20460, 20491, 20492,
20496, 20497, 30960, 30962,
30970, 30972, 30980, 30982,
31060, 31062, 31070, 31072,
31080, 31082—324000000 y superiores

G445734
WARNING: Cancer and Reproductive Harm - www.P65Warnings.ca.gov. For more information, please visit www.ttcoCAProp65.com
133-8061
s_decal133-8061
Pegatina pieza: 137-9705

s_decal137-9075
natural_image
Line drawing of a wireless router with a spike and labeled component (no text or symbols beyond label)
natural_image
Diagram of a coiled cable with two connectors, labeled with number 2 (no text or symbols on the diagram itself)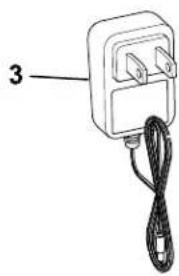
natural_image
Simple line drawing of a handheld electrical device with a cord and labeled part '3' (no text or symbols on the device itself)G468385
① Enrutador Wi-Fi
natural_image
Line drawing of a robotic arm and a laptop connected to a power outlet, with no text or symbols present.G430093
G430560
G430561
flowchart
graph TD
    A["1"] --> B["2"]
    B --> C["3"]
natural_image
Line drawing of a robotic lawn mower with a black arrow pointing to the blade (no text or symbols)0430095
Botón Inicio
G477896
Especificaciones
G387030
G445465

G445467
G445464
G445466

natural_image
Diagram of a grassy field with scattered reeds and a vertical structure, no text or symbols present
natural_image
Simple line drawing of a grassy field with a vertical structure and wavy water surface (no text or symbols)
natural_image
Line drawing of a water channel with vegetation and a vertical structure (no text or symbols)G430557
natural_image
Line drawing of a robotic lawn mower with visible gears and mounting brackets (no text or symbols)G530548

natural_image
Line drawing of a robotic arm and a laptop connected to a wall-mounted power outlet (no text or symbols)G430093
natural_image
Diagram of a vehicle seat assembly with a downward arrow indicating force or motion (no text or symbols present)
natural_image
Technical line drawing of a mechanical assembly with no visible text or symbols

G430160
natural_image
Line drawing of a person using a lawn mower on a mechanical component (no text or symbols)G430092
G431603
natural_image
Line drawing of a robotic arm and a laptop connected to a power outlet, with no text or symbols present.G430093
natural_image
Technical line drawing of a mechanical assembly with no visible text or symbolsG464079
natural_image
Technical line drawing of a vehicle chassis with four wheels and a central rectangular component (no text or symbols)G433890
natural_image
Technical line drawing of a mechanical component with three upward arrows indicating assembly or force directions (no text or symbols present)G433859
natural_image
Technical diagram of a vehicle's internal components with arrows indicating motion or movement (no text or symbols present)G433983
natural_image
Technical diagram of a vehicle chassis with an internal battery housing and mounting points (no text or symbols)G433995
natural_image
Mechanical tire assembly diagram showing gear and wheel components with no visible text or symbolsG430568.svg
natural_image
Technical diagram of a vehicle wheel assembly showing two components with a magnified view highlighting the inner gear (no text or labels present)
natural_image
Technical line drawing of a mechanical gear assembly with mounting holes and dashed alignment lines (no text or symbols)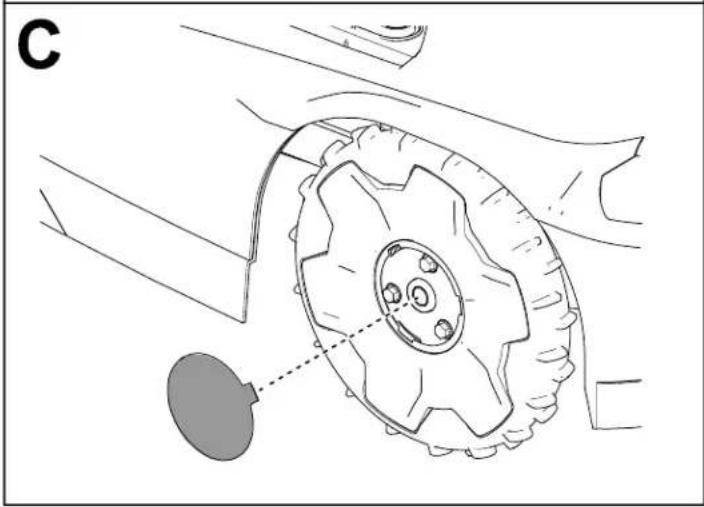
natural_image
Technical line drawing of a mechanical component with a gear and mounting bracket (no text or symbols)G430569
natural_image
Technical line drawing of a mechanical component with circular features and mounting holes (no text or symbols)G542513
Limpieza
natural_image
Technical line drawing of a mechanical component with triangular cutout and labeled point 5 (no text or symbols beyond label)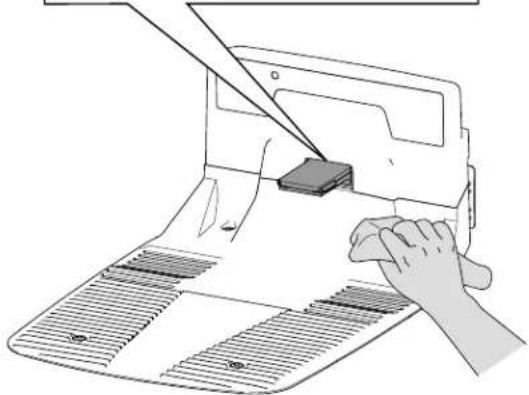
natural_image
Illustration of a hand using a power tool to cut a mechanical component on a sheet of paper (no text or symbols visible)G530462

- Model—Serial Range
- Disclaimers and Regulatory Information
- WARNING
- CALIFORNIA
- Proposition 65
- Table of Contents
- !
- Intended Use
- Getting Help
- IMPORTANT
- Haven Help Center
- Manual Conventions
- Safety Alert Classifications
- General Safety
- FCC/IC Statement
- Antenna Requirements:
- Optional CalAmp Module Requirements:
- Safety and Instructional Decals
- Decal Part: 133-8061
- Decal Part: 137-9705
- Decal Part: 140-4055
- Property Example:
- Robotic Mower Overview
- SmartZone™ Mowing Pattern
- Charging Station Overview
- Hub Overview
- Creating the Working Areas
- Creating the Working Area Process Overview
- Creating the Working Area Process Overview (continued
- Operating on Slopes
- Operating on Slopes (continued)
- Untrained Obstacles
- Control Panel
- Stop Button
- Home Button
- Play (Resume Operation) Button
- Numeric Keypad/Code Buttons
- Hub-Connection Indicator
- Battery Indicator
- Status Indicator
- Lock/Unlock Indicator
- Running Light
- Specifications
- Mower: (continued)
- Charging Station:
- Mower Docked in the Charging Station:
- Hub
- Attachments/Accessories
- Downloading the App and Adding the Mower
- Connecting the Hub
- Parts Required
- Determining a Location for the Charging Station
- Installing the Power Supply and Charging Station
- Preparing the Lawn Before Using the Robotic Mower
- Ideal Conditions for Setting up the Mower
- Starting and Charging the Mower
- Installing the Mower Handle
- Removing the Mower Handle and Storing it in the Charging Station
- Operation Safety
- Trimming Areas of the Lawn that the Robotic Mower Cannot Access
- Repositioning the Mower if it is Stuck on an Obstacle
- Manually Stopping and Starting the Mower
- Docking and Charging the Mower
- Installing an Optional Anti-Theft Device
- Recommended Maintenance Schedule
- Maintenance Safety
- Battery and Charging Station Safety
- Servicing the Battery
- Disconnecting the Battery
- Connecting the Battery
- Replacing the Wheels
- Removing the Wheels
- Installing the Wheels
- Replacing the Blades
- Cleaning
- Cleaning the Mower and Charging Station
- CAUTION
- Cleaning the Mower and Charging Station (continued)
- Cleaning or Replacing the Lens Protectors
- Disposing of Waste
- Storage Safety
- Preparing for Off-Season Storage
- The charging station has no power.
- A caster wheel is not functioning properly.
- The mower is not cutting evenly.
- There is no Bluetooth® connection between the mower and phone.
- There is no wireless connection between mower and hub.
- The mower is not charging.
- When manually pushing the mower, the handle feels loose.
- Advisory
- App
- Autonomous
- Boundary
- Bump Sensor
- Charging Station
- Computer Vision
- Exclusion Zone
- Fault
- Job
- Localization
- Mowing Zone
- Navigation
- Obstacle
- Obstacle Avoidance
- Obstacle Detection
- Obstacle Sensor
- Path
- Robot
- Sensing
- Sensor
- Transit Path
- Working Area
- California Proposition 65 Warning Information
- TORO®
- Autocollant : 137-9705
- Obstacles non appris
- Bouton Retour
- Connexion du hub
- Pièces nécessaires
- Montage des roues
- Nettoyage
- Pegatina pieza: 137-9705
- Botón Inicio
- Especificaciones
- Limpieza
Brand : TORO
Model : Haven 31080
Category : Lawn mower