
ERL 500 - Patient lift EINHELL - Free user manual and instructions
Find the device manual for free ERL 500 EINHELL in PDF.

User questions about ERL 500 EINHELL
0 question about this device. Answer the ones you know or ask your own.
Ask a new question about this device
Download the instructions for your Patient lift in PDF format for free! Find your manual ERL 500 - EINHELL and take your electronic device back in hand. On this page are published all the documents necessary for the use of your device. ERL 500 by EINHELL.
USER MANUAL ERL 500 EINHELL
natural_image
Illustration of stacked open book pages with visible pages, no text or symbols presentGB Please pull out pages 2-5
● Fig. 1 = Full view of ERL 500 (with Item 1 - 8)
● Fig. 2 = Warning logos (1 - 8)
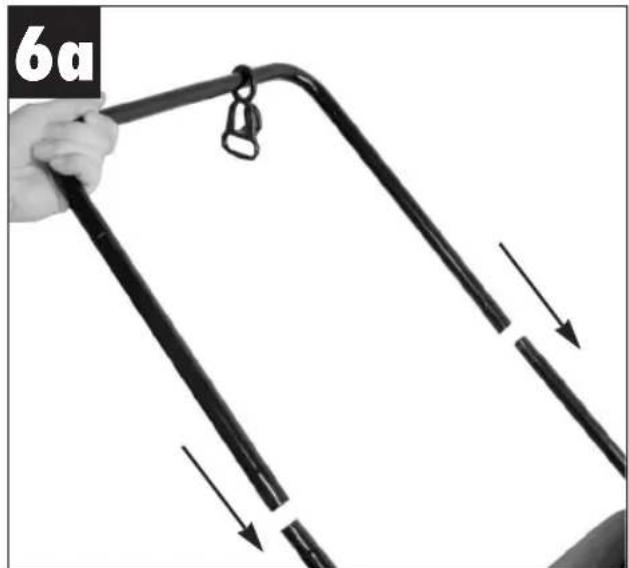
● Fig. 5/6a/6b = Mounting of ejector flap and lower push bar
● Fig. 4 = Height adjustment
● Figs. 7/8 = Mounting of lower push bar
● Fig. 9 = Actuating the ON/OFF switch
● Fig. 10 = Cable holder
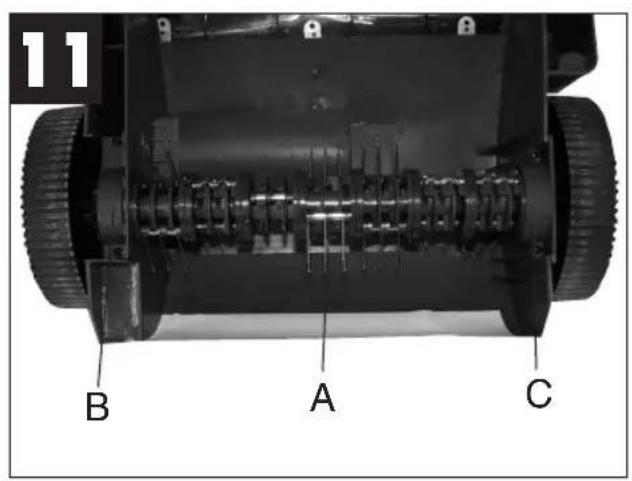
● Fig. 11 = Bottom view of lawn aerator
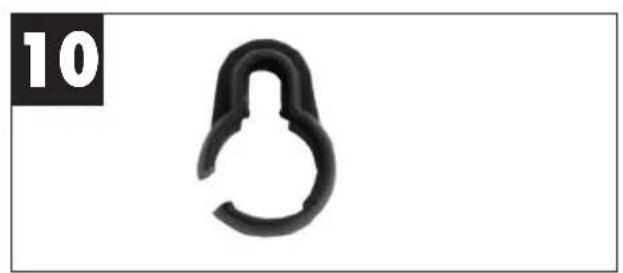
● Fig. 12 = Mounting of spring for the ejector flap
6
The image is too blurry to recognize any text content.
The image is too blurry to recognize any text content.

The image is too blurry to recognize any text content.
1
5
The image is too blurry to recognize any text content.
The image is too blurry to recognize any text content.
The image is too blurry to recognize any text content.
3
natural_image
Close-up of a hand adjusting a mechanical component with a circular hole and textured outer ring (no text or symbols visible)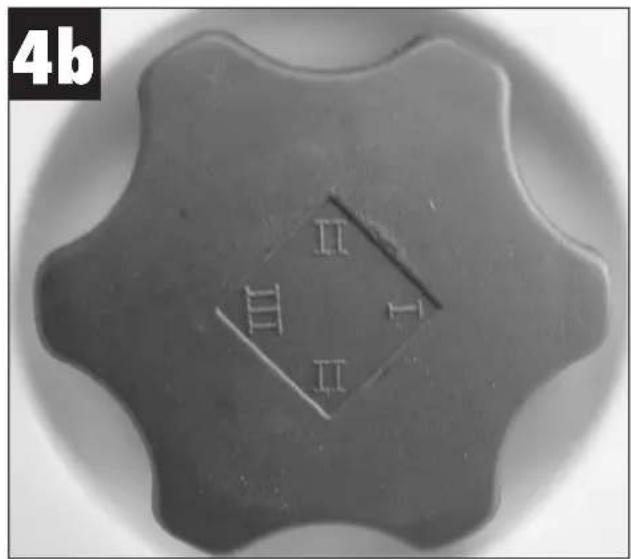
natural_image
Circular metallic object with four internal symbols, no visible text or labels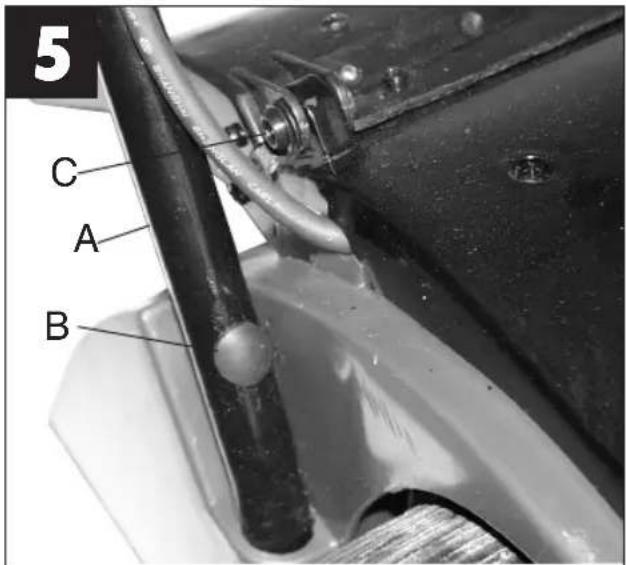
natural_image
Hand holding a black metal rod with a hook, showing a curved handle and two arrows indicating direction (no text or symbols)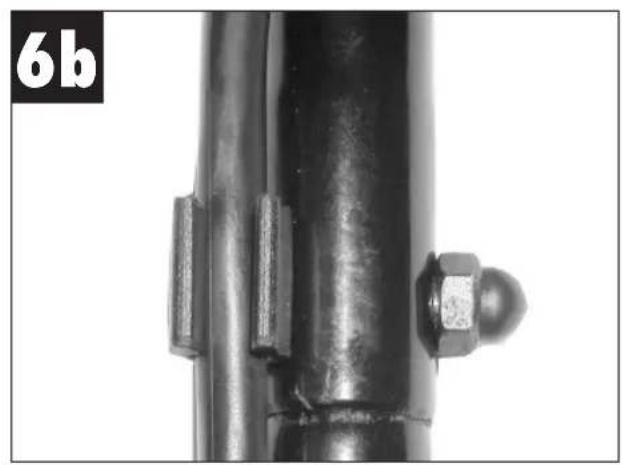
natural_image
Close-up of a metallic pipe joint with a bolt and nut (no text or symbols visible)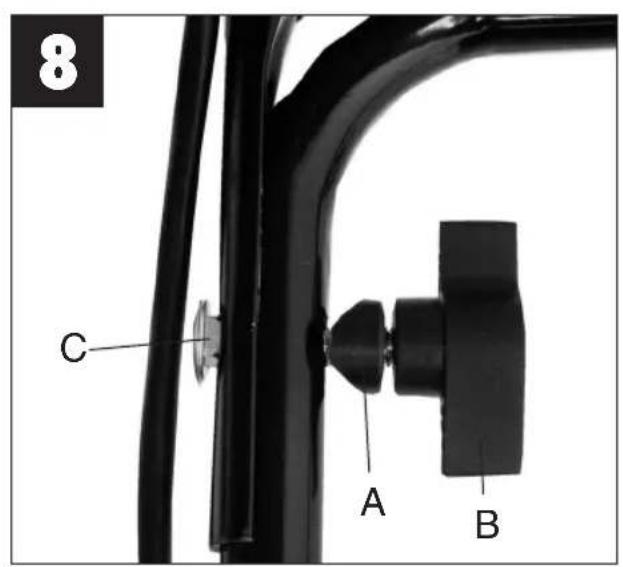
natural_image
Close-up of a black chain-link spring with a loop handle, no text or symbols visible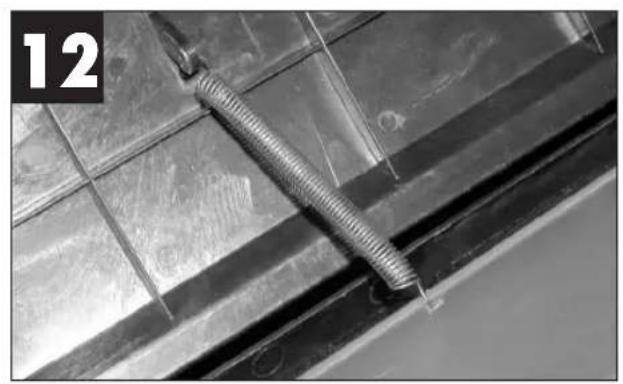
natural_image
Close-up of a metal pipe fitting with bolts installed on a metal panel (no text or symbols visible)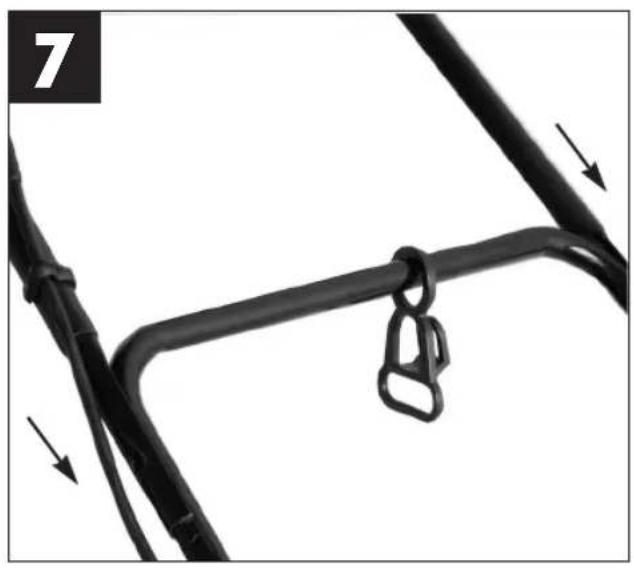
natural_image
Close-up of a black cable with a hanging hook and a hanging clip, shown with arrows indicating motion (no text or symbols)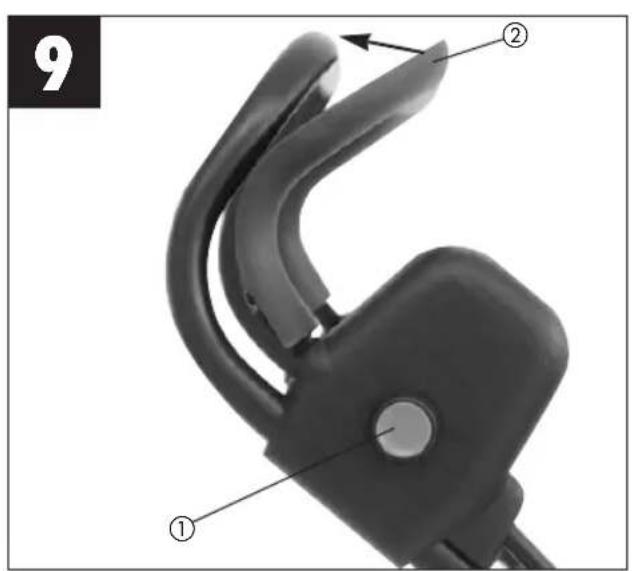

Before you operate this electric lawn aerator, thoroughly read through the following safety regulations as well as the operating instructions.
Always keep these operating instructions in a safe place!
Familiarize yourself with the operator controls and proper operation of the machine.
Improper operation of the aerator can lead to serious injuries.
This electric lawn aerator is only designed to aerate grass.
1. General safety regulations
- Never allow children or other persons who are not familiar with the operating instructions to use the lawn aerator. Contact your local governmental agency for information regarding minimum age requirements for operating the aerator.
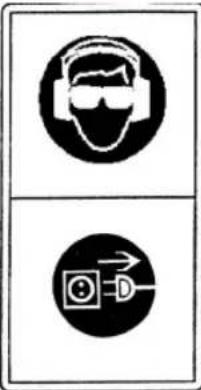
- Always disconnect the power cable before carrying out any checks, maintenance or repairs.
- The person operating the lawn aerator is liable for any damages sustained by third parties within the machine's working radius as a result of its use.
- Work only in broad daylight or with suitable artificial lighting.
- Always check the machine for signs of damage prior to using it.
- Make sure that all the guards are fitted and that they are in good working order.
- Never use the machine when you are tired.
- Switch off the motor and disconnect the power plug before you carry out any checks, cleaning, maintenance or other work on the aerator, and whenever the aerator hits a foreign body.
- Before using the aerator, always visually examine the tine roller for excessive wear or damage.
- It is imperative to follow the instructions when fitting or dismantling the tine roller.
-
Examine the site where you want to use the lawn aerator and remove all objects which could be struck and thrown up. Foreign objects must be removed before you begin to aerate and you should also watch out for foreign objects while you are using the lawn aerator. Watch out for any extension cables you may be using during operation.
-
Always wear sturdy, non-slip footwear and long trousers while aerating. Never aerate in bare feet or when wearing light sandals.
- Always use the lawn aerator with the ejector flap closed.
- Do not raise the aerator when you start the motor.
- Never move your hands or feet toward or under any rotating parts. Keep clear of the ejector opening at all times.
- Slopes have to be aerated along the slope and not up and down.
- Do not use the lawn aerator on gradients exceeding 15 %.
- Switch off the motor, pull out the power cable and wait for the tine roller to come to a standstill before you lift the lawn aerator for transporting.
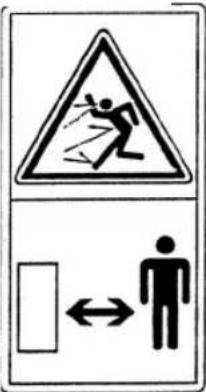
- Make sure there are no persons and particularly no children or animals in the direct vicinity of the lawn aerator while it is being used. Make sure that a safety distance of 10 meters is observed.
- Store the lawn aerator in a dry place that is inaccessible to children.
- Entrust repairs to the electrical parts of the lawn aerator only to a qualified electrician.
- The power cables used are not to be of a lighter duty class than light rubber-insulated H07RN-F in accordance with DIN 57282/VDE 0282 and they must have a cross section of at least 1.5 mm_. The connection must be splash-proof. The power cable must be fed through the stress-relief clips and be plugged into the switch/plug block. Before use, check the cable for damage and signs of aging. Never aerate with faulty cables. If the cable is damaged while aerating, disconnect the mains plug immediately and only then inspect the damage.
- Do not tilt the lawn aerator when you start the motor unless the aerator must raised off of the ground a little in order to start it. In the latter case, tilt the aerator as little as absolutely necessary and only raise the side opposite the user.
- Make sure that all nuts, bolts and screws are tightened securely and that the machine is in safe working condition.
- If the lawn aerator strikes a foreign body, examine the machine for signs of damage and carry out any necessary repairs before restarting and continuing to work with the aerator.
- Do not expose the lawn aerator to rain. The grass should not be wet or very moist.
-
Always make sure that you have a solid footing while working with the lawn aerator.
-
Operate the machine at a walking pace only.
-
Be particularly careful when you change direction on a slope.
-
Be particularly careful when you turn the lawn aerator around or pull it toward yourself.
-
Stop the lawn aerator whenever it has to be lifted for transporting over areas other than lawns and whenever it has to be moved from or to the area you want to aerate.
-
Carefully actuate the starter switch in accordance with the manufacturer's instructions. Make sure your feet are far enough away from the tine roller.
-
Never lift or carry the lawn aerator with the motor running.
-
Switch off the motor and pull out the mains plug before you leave the lawn aerator.
-
Allow the motor to cool down before you put the machine in a closed room.
-
Switch the lawn aerator off and disconnect the power cable before performing any adjustment or cleaning work to the lawn aerator, and before checking to see if the mains connection is entwined or damaged.
-
Socket couplers to connection elements must be made from rubber, soft PVC or other thermoplastic material of equal rigidity or coated with such material.
-
When aerating, ensure that you avoid paths that could restrict the free movement of the extension cable.
-
Switch off the motor:
-
before you try to remove any obstructions or blockages,
- before performing any checking, adjustment or cleaning work to the lawn aerator,
-
after running over an obstruction.
-
If the lawn aerator should start to vibrate unusually, it must be checked immediately.
-
To prevent risk of fire, keep the motor free of grass, leaves and moss at all times.
-
For safety reasons you should always replace worn or damaged parts.
2. Layout (see Fig. 1)
-
ON/OFF lever
-
Push bar
-
Switch/plug block
-
Cable holder
-
Wing nuts
-
Stress-relief clips
-
Ejector flap
-
Hubcap with lawn aeration height adjustment
-
Cable guide
3. Brief description of the warning logos (see Fig. 2)
1 = Warning!
Thoroughly read the instructions before starting to use the machine.
2 = Keep other persons (and animals) away from the danger zone.
3 = Wear hearing and eye protection.
4 = Pull the plug out of the power socket before doing any work on the tine roller!
5 = Rotating tine roller
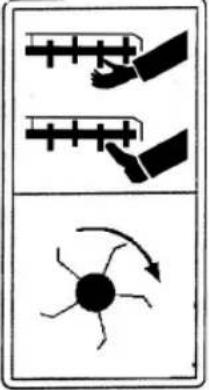
6 = Do not place your hands or feet under the rotating lawn aerator.
7 = Keep the power cable away from the machine. This will eliminate the risk of the power cable being shredded and destroyed by the rotating tine roller.
4. Proper operation
Power supply
The lawn aerator can be connected to any light socket (with 220/230 volts of alternating current). However, the socket outlet must have an earthing contact protected by a 16 A circuit breaker. Additionally, a 30 mA residual current circuit breaker should be present!
Power cable
Please only use power cables that are not damaged. The total length of the power cable should not exceed 50 meters; going beyond this distance will reduce the power output of the electric motor. The power cable must have a cross-section of 3 x 1.5 mm_. The insulating sheath of lawn aerator power cables is frequently damaged.
Some of the causes for this are:
- Cracking from running over the cable
- Pinching when the power cable is dragging under doors and pulled through windows
- Cracking due to old age of the insulation
- Kinking by improperly fastening or guiding the power cable
Even though power cables with damaged insulation sheaths pose a lethal hazard, some people still use them. Do not make this mistake!
GB
Cables, plugs and socket couplers must meet the following requirements listed below. Power cables used to hook up lawn aerators must have a rubber insulation sheath.
The power cables must, at the very minimum, be of type HO5RN-F and 3-stranded. The cable type must be printed somewhere on the power cable. Only purchase power cables that are marked as such! Plugs and socket couplers for the power cables must be made from rubber and be splash-proof. There is a limit to how long power cables can be. Longer power cables require larger conductor cross-sections. Power cables and connecting lines must be regularly checked for damage. Ensure that the lines are de-energized before checking them. Completely unwind the power cable. Also check power cable entry points, plugs and socket couplers for kinks.
The lawn aerator is intended for private use, i.e. for use in home and gardening environments.
Lawn aerators for private use are machines whose annual operating time generally does not exceed 10 hours, during which the machine is primarily used to maintain small-scale, residential lawns and home/hobby gardens. Public facilities, sporting halls, and agricultural/forestry applications are excluded.
The operating instructions as supplied by the manufacturer must be kept and referred to in order to ensure that the lawn aerator is properly used and maintained. The instructions contain valuable information on operating, maintenance and servicing conditions.
Important! Due to the high risk of bodily injury to the user, the lawn aerator may not be used to chop branches or hedge clippings. Moreover, the lawn aerator may not be used as a power cultivator to level out high areas such as molehills.
For safety reasons, the lawn aerator may not be used as a drive unit for other work tools or toolkits of any kind.
5. Assembling the lawn aerator
The lawn aerator comes disassembled. The ejector flap and the entire push bar assembly must be assembled and mounted before using the lawn aerator. Follow the operating instructions step by step and use the pictures provided as a visual guide to easily assemble the machine.
Mounting the ejector flap
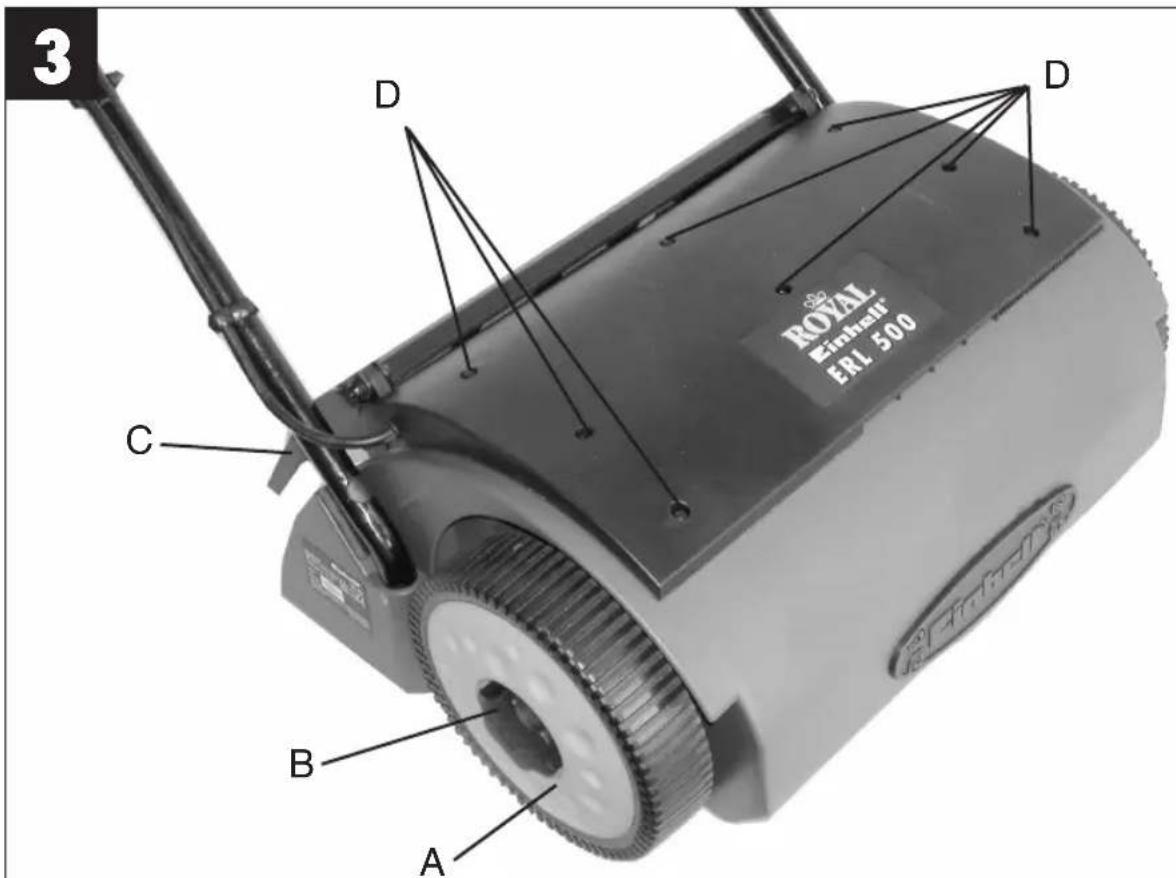
Align and hold the ejector flap (Fig. 3, point C) to the guide eyelets (Fig. 5, point C). Push the bolts (supplied) through the guide holes.
Insert one end of the supplied spring in the guide eyelet located on the inner side of the panel in the center and the other end in the hole located on the outer side of the upper housing section in the center. The ejector flap must now be able to flip back to the „Closed“ position after being flipped upwards.
Mounting the lower push bar
(see Figs. 5 and 6 a/b)
- Insert the offset base bars (Fig. 5, point A) in the housing holes.
● Mount the cable holder on the lower push bar (Fig. 6a).
● Now mount the lower push bar on the base bars (Fig. 6a). - Using the supplied bolts and cap nuts, fasten the pipes together.
● Important! Mount the cable guide as shown in Fig. 6b!
● Using the supplied bolts, fasten the two base bars (Fig. 5, point B) to the housing.
● Finally, press the two supplied rubber caps into both bolt holes (Fig. 5, point B).
Mounting the upper push bar
- Position the upper push bar (Fig. 7) such that its holes line up with the holes of the lower push bar.
- Insert the supplied saucer-head screws through the holes from the outside in (Fig. 8, point C).
- Insert the supplied plastic parts (Fig. 8, point A) onto the saucer-head screws with the beveled side facing the pipe.
- Use the supplied plastic wing nuts to fasten both push bars (Fig. 8, point B).
- Fasten the power cable to the push bar pipes using the stress-relief clips (Fig. 10) such that the ejector flap can be opened and closed (Fig. 1, point 6).
- Caution!
Make sure that the ejector flap can be opened and closed easily!
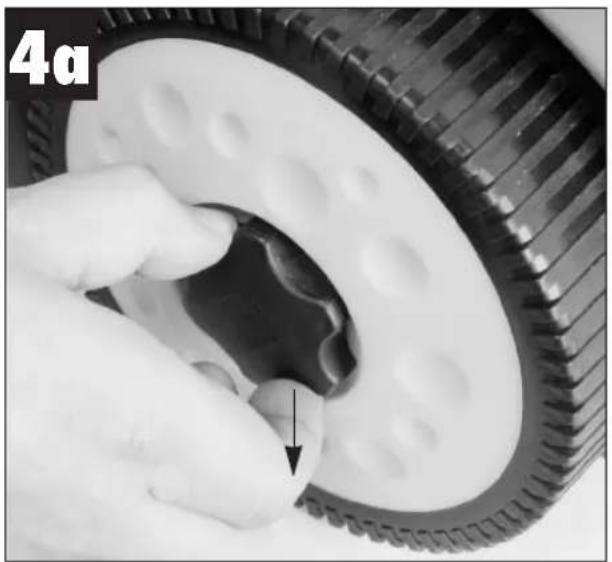
6. Adjusting the lawn aerator height:
Caution! Before you adjust the aerator height, switch off the machine and let the motor come to a complete stop.
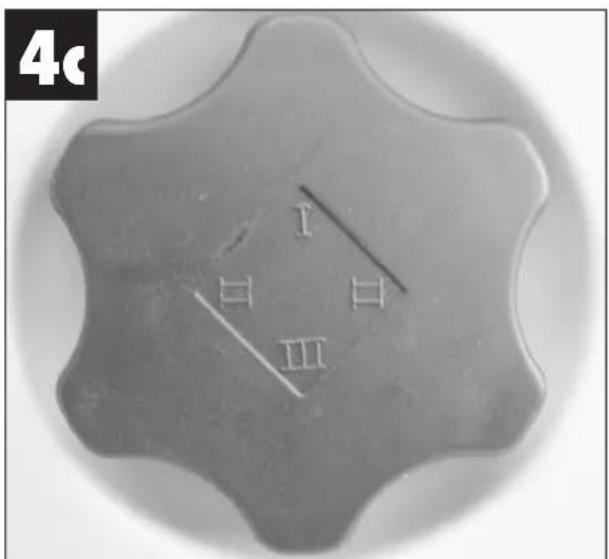
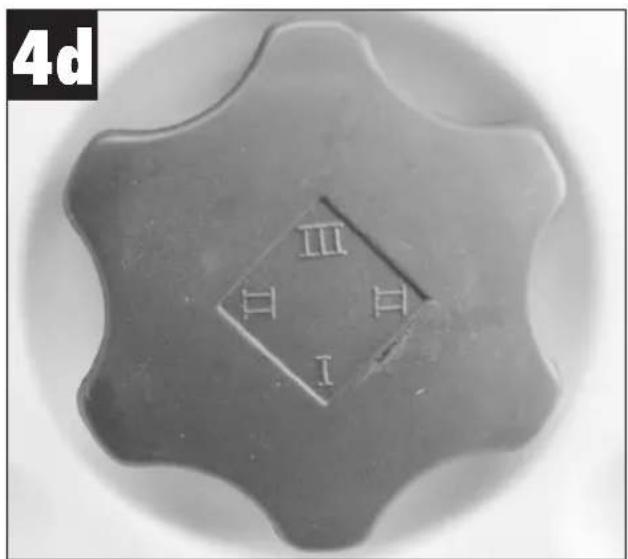
● The aerator height is adjusted by turning the hubcaps. You can choose from three different height settings by pulling out and turning the hubcaps (Fig. 4a)
● Figures I, II and III are stamped in the center of the hubcaps.
- When figure „II“ is facing down, the middle setting is locked in.
- The middle setting remains constant when the second figure „II“ is facing down (Fig. 4b).
- When figure „III“ is facing down, the low setting is locked in (Fig. 4c).
- When figure „I“ is facing down, the high setting is locked in (Fig. 4d).
Caution!
The hubcaps must always be firmly locked into place!
At the beginning it is best to select height setting „I“. When the tips of the tines have become worn you can then revert to setting „II“ or „III“.
7. Starting up
Connect the power cable to the switch plug/block (Fig. 1 / Item 3) and secure the cable with the cable holder.
Important!
In order to prevent the lawn aerator from inadvertently switching on, the switch/plug block is equipped with a two-point switch (Fig. 9, Item 2) that has to be pressed before the lever
(Fig. 9/Item 2) can be pulled. The lawn aerator switches itself off when the lever is released.
Repeat this process several times so that you are sure that the machine functions properly. Before you perform any repair or maintenance work on the machine, ensure that the tine roller is not rotating and that the power supply is disconnected.
Important! Never open the ejector flap when the motor is running. A rotating tine roller can cause injuries.
Always fasten the ejector flap carefully.
The flap flips back to the „Closed“ position by the tension springs!
Always ensure that a safe distance (provided by the long handles) is maintained between the user and the housing. Be especially careful when aerating and changing direction on slopes and inclines. Maintain a solid footing and wear sturdy, non-slip footwear and long trousers. Always aerate along the incline (not up and down).
For safety reasons, the lawn aerator may not be used to aerate inclines whose gradient exceeds 15 degrees.
Use special caution when backing up and pulling the lawn aerator (tripping hazard).
8. Tips for proper aeration
It is recommended that you overlap aeration paths a little.
Try to aerate in straight lines for a nice, clean look. In so doing, the aeration swaths should always overlap each other by a few centimeters in order to avoid bare strips.
How frequently you should aerate your lawn is determined primarily by the speed at which the grass grows.
Keep the underside of the aerator housing clean and remove grass build-up. Deposits make it more difficult to start the aerator and decrease the quality of the aeration.
Always aerate along inclines (not up and down).
Switch off the motor before doing any checks on the tine roller. Keep in mind that the tine roller continues to rotate for a few seconds after the motor has been switched off. Never attempt to manually stop the tine roller. In the event that the tine roller strikes an object, immediately switch off the lawn aerator and wait for the roller to come to a complete stop. Then inspect the condition of the tine roller. If the tine roller is damaged, it must be replaced (see 10.).
Lay the power cable on the ground in front of the outlet in a figure 8. Aerate away from the outlet or cable and ensure that the power cable always trails in the aerated grass which will prevent the lawn aerator from traveling directly over the cable.
9. Care and maintenance
Maintenance and cleaning work on the lawn aerator as well as removal of the safety devices may only be performed when the motor is switched off and the power cable has been pulled.
GB
Worn out or damaged tine rollers should only be replaced by an authorised professional (see address on warranty certificate).
Do not clean the lawn aerator with running water, particularly with high-pressure water.
Ensure that all mounting components (i.e. bolts, nuts, etc.) are always tightened so that the lawn aerator can be safely operated at all times.
Store your lawn aerator in a dry room. In order to ensure that you enjoy your lawn aerator for many years to come, all screwed parts, as well as the wheels and axles, should be cleaned and lubricated.
Keeping your lawn aerator in good condition not only ensures a long lifespan and high-performance, but also enables the machine to thoroughly aerate your lawn with minimal effort. For best results, clean the lawn aerator with a brush or rag. Do not use any solvents to remove dirt.
10. Replacing the tine roller
For safety reasons, we recommend having the tine roller replaced by an authorized professional (see address on warranty certificate).
Important! Wear work gloves!
Only replace the unit with a genuine Einhell tine roller (see point 11, „Ordering replacement parts“), as this will ensure top performance and safety under all conditions.
If you decide to replace the tine roller yourself, follow the steps listed below:
- Switch off motor and let it run to a complete stop
● Pull the power cable - Remove the wheels
● Turn the lawn aerator belly side up to expose the tine roller (Fig. 11)
● Unscrew both plastic tine roller guides (Fig. 11, points B and C)
● Flip the lawn aerator over again and unscrew the 9 screws (Fig. 3, points D) - Remove the black motor cover plate
● Unscrew both screws of the motor bracket and remove the bracket
● Lift up the motor and remove the V-belt
● The tine roller (Fig. 11, point A) can now be replaced
● Assemble in reverse order
At the end of the season, perform a general inspection of the lawn aerator and remove any grass and dirt which may have accumulated.
At the start of each season, ensure that you check the condition of the aerator.
If repairs are necessary, please contact one of our customer service centres (see address on warranty certificate).
11. Ordering replacement parts
The following information should be given when ordering replacement parts:
● Model of machine = ERL 500
● Art. No. of machine = 34.202.10
● ID No. of machine = 01022
● Replacement part number of the required replacement part = e.g. tine roller = 34.055.59
12. Technical data
Voltage: 230 V \~ 50 Hz
Power consumption: 450 W
Two-hand safety switch with switch/plug block
Working width: 32 cm
Number of tines: 42
Height adjustment: 3-fold
Tine roller with ball bearings
LPA sound pressure level: 78,5 dB(A)
Vibration on the handle < 2.5 m/s
13. Troubleshooting guide
| Fault Possible causes Rectification | ||
| Motor does not start a) No electricity in plug a) Check line and fuseb) Cable defective b) Checkc) Switch, switch/plug block c) Check defectived) Connections to motor d) Have machine checked by or capacitor disconnected a customer service centere) Machine standing in high e) Start motor on shortergrass or other area;change aeration height if necessaryf) Aerator housing clogged f) Clean housing so that the tine roller spins unobstructed | ||
| Engine performance drops a) Grass too tall or damp a) Change aeration heightb) Aerator housing cloggedc) Tines severely worn | ||
| Imprecise aeration | a) Tines wornb) Wrong aeration height b) Change aeration height | a) Replace tine roller |
F
GB EC Declaration of Conformity
The undersigned declares in the name of the company that the product is in compliance with the following guidelines and standards.
Brook House, Brookway
North Chesire Trading Estate
Prenton, Wirral, Chesire
CH 43 3DS
Tel. 0151 6084802, Fax 0151 6086339
S.C. A Ap. 9 Sector 1
RO 75 121 Bucharest
Tel. 01 4104800, Fax 01 4103568
©CZ Poker Plus S.R.O.
Areal Vu Bechovice
Budava 10B
CZ-19011 Praha – Bechovice 911
Tel. + Fax: 02579 10204
Eschenstraße 6 · D-94405 Landau/Isar (Germany)
The guarantee period begins on the sales date and is valid for 2 years.
Responsibility is assumed for faulty construction or material or functional defects.
Any necessary replacement parts an necessary repair work are free of charge.
We do not assume responsibility for consequential damage.
Your customer service partner
F GARANTIE EINHELL
Technical changes subject to change