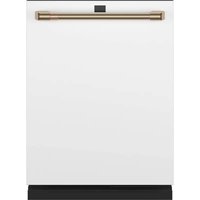
CDT875P4NW2 - Dishwasher Café - Free user manual and instructions
Find the device manual for free CDT875P4NW2 Café in PDF.



| Product Type | Built-in Dishwasher |
| Brand | Café |
| Model | CDT875P4NW2 |
| Dimensions (W x D x H) | 60 x 65 x 87 cm |
| Weight | 45 kg |
| Power Supply | 120 V, 60 Hz, 15 A |
| Capacity | 14 place settings |
| Wash Programs | Heavy, Normal, Light, Rinse, 1 Hour Wash |
| Options | Sani, Dry Boost, Steam, Heated Dry, Wash Temp, Delay Hours |
| Tub Material | Stainless Steel |
| Drying Type | Heated Air Drying (Heated Dry) |
| Noise Level | Approximately 44 dB |
| Water Consumption | Approximately 12 L per cycle |
| Energy Consumption | Approximately 1.2 kWh per cycle |
| Warranty | 2 years parts and labor, 3-5 years for rack and electronic module, lifetime for stainless steel tub |
| Special Features | Bottle Jets (on select models) |
| Filters | Fine filter, ultra-fine filter (2 pieces on select models) |
| Safety | Child lock, backflow protection, water heater safety |
| Included Accessories | Lower basket, cutlery basket, mounting bracket, 90° elbow, drain hose, acoustic insulation |
| Installation | Built-in, requires electrical and plumbing connections |
Frequently Asked Questions - CDT875P4NW2 Café
User questions about CDT875P4NW2 Café
0 question about this device. Answer the ones you know or ask your own.
Ask a new question about this device
Download the instructions for your Dishwasher in PDF format for free! Find your manual CDT875P4NW2 - Café and take your electronic device back in hand. On this page are published all the documents necessary for the use of your device. CDT875P4NW2 by Café.
USER MANUAL CDT875P4NW2 Café
SAFETY INFORMATION ..... 2
USING THE DISHWASHER
Getting Started .... 3
For the latest information, scan the QR Code on the rating plate found on the tub wall just inside the door.
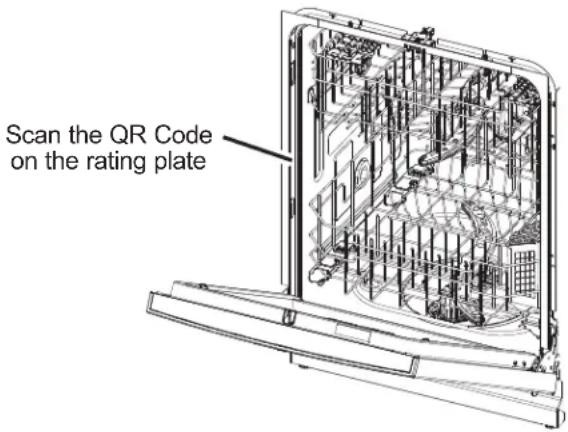
This manual contains the Installation Instructions. Follow these instructions completely. LEARN MORE - In an effort to conserve the earth's resources, this appliance also comes with this condensed Owner's Guide. The complete Owner's Manual for your model can be found online by scanning your models QR Code or through the website listed in the Consumer Support section.
Write the model and serial numbers here:
Model # ____
Serial # ____
You can find them on a label on the tub wall just inside the door.
GE is a trademark of the General Electric Company. Manufactured under trademark license.
IMPORTANT SAFETY INFORMATION - READ ALL INSTRUCTIONS BEFORE USING - SAVE THESE INSTRUCTIONS
WARNING
For your safety, the information in this manual must be followed to minimize the risk of fire, explosion, electric shock, and to prevent property damage, personal injury, or death.
WARNING
PROPER INSTALLATION AND MAINTENANCE
This dishwasher must be properly installed and located in accordance with the Installation Instructions before it is used. If you did not receive an Installation Instructions sheet with your dishwasher, you can receive one by visiting GEAppliances.com. In Canada, visit www.GEAppliances.ca.
■ Connect the dishwasher/appliance to a grounded metal, permanent wiring system; or run an equipment-grounding conductor with the circuit conductors and connect to the equipment-grounding terminal or lead of the appliance.
■ Improper connection of the equipment-grounding conductor can result in a risk of electric shock. Check with a qualified electrician or service representative if you are in doubt whether the appliance is properly grounded.
■ Detailed grounding instructions can be found in the "PREPARE ELECTRICAL WIRING" section of the Installation Instructions.
■ Consider recycling options for your appliance packaging material.
■ Do not attempt to repair or replace any part of your dishwasher unless it is specifically recommended in this manual. All other servicing should be referred to a qualified technician.
■ Use only cord kit WX09X70910 (5.4 ft) or WX09X70911 (7.9 ft) or hard-wire to building electrical. Failure to follow this instruction, could result in risk of fire and personal injury.
■ To minimize the possibility of electric shock, disconnect this appliance from the power supply before attempting any maintenance.
NOTE: Turning the dishwasher off does not disconnect the appliance from the power supply. We recommend having a qualified technician service your appliance.
⚠ WARNING
WHEN USING YOUR DISHWASHER, FOLLOW BASIC PRECAUTIONS, INCLUDING THE FOLLOWING:
- Use this appliance only for its intended purpose as described in this Owner's Manual.
■ Use only detergents or wetting agents recommended for use in a dishwasher and keep them out of reach of children. Using a detergent that is not specifically designed for dishwashers will cause the dishwasher to fill with suds. - Locate sharp items so that they are not likely to damage the door seal.
- Load sharp knives with the handles up to reduce the risk of cut-type injuries.
- Do not wash plastic items unless marked dishwasher safe or the equivalent. For plastic items not so marked, check the manufacturer's recommendations.
■ Do not touch the heating element during or immediately after use.
■ Do not operate your dishwasher unless all enclosure panels are properly in place.
■ Do not tamper with controls.
■ Do not abuse, sit on or stand on the door or dish rack of dishwasher.
■ To reduce the risk of injury, do not allow children to play with, on or inside this appliance at any time.
■ Do not store or use combustible materials including gasoline or other flammable liquids or vapors in the vicinity of this or any other appliance.
■ Small parts, such as rack clips, can be a choke hazard to small children if removed from the dishwasher. Keep out of reach of small children.
WARNING
WATER HEATER SAFETY
Under certain conditions, hydrogen gas may be produced in a water heater that has not been used for two or more weeks. HYDROGEN GAS IS EXPLOSIVE. If the hot water has not been used for two or more weeks, prevent the possibility of damage or injury by turning on all hot water faucets and allowing them to run for several minutes. Do this before using any electrical appliance connected to the hot water system. This simple procedure will allow any built-up hydrogen gas to escape. Since the gas is flammable, do not smoke, use an open flame, or use the appliance during this process.
WARNING
RISK OF CHILD ENTRAPMENT
PROPER DISPOSAL OF THE DISHWASHER
Junked or abandoned dishwashers are dangerous...even if they will sit for "just a few days." If you are getting rid of your dishwasher, please follow the instructions below to help prevent accidents.
■ Do not allow children to play with, on, or inside this or any discarded appliance.
■ Take off the door of the washing compartment.
CAUTION
TO PREVENT MINOR INJURY AND PROPERTY DAMAGE
■ During or after wash cycle, contents may be hot to the touch. Use care before handling.
■ Close supervision is necessary if this appliance is used by or near children. Do not allow children to play around the dishwasher when closing the door, closing the upper rack, or while vertically adjusting the upper rack due to the possibility of small fingers being pinched.
■ Non-Dishware Items: Do not wash items such as electronic air cleaner filters, furnace filters and paint brushes in your dishwasher. Damage to the dishwasher and discoloration or staining of the dishwasher may result.
- Load light-weight, plastic items so they do not become dislodged and drop to the bottom of the dishwasher—they might come into contact with the heating element and be damaged.
Proper Disposal of your Appliance
■ Dispose of or recycle your appliance in accordance with Federal and Local Regulations. Contact your local authorities for the environmentally safe disposal or recycling of your appliance.
READ AND FOLLOW THIS SAFETY INFORMATION CAREFULLY. SAVE THESE INSTRUCTIONS
Getting started
Features and appearance will vary throughout this manual
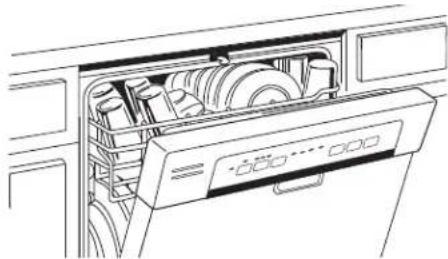
1 Scrape off scraps and load dishes
natural_image
Line drawing of an open kitchen appliance with multiple compartments and wheels (no text or symbols)2 Add detergent and rinse agent
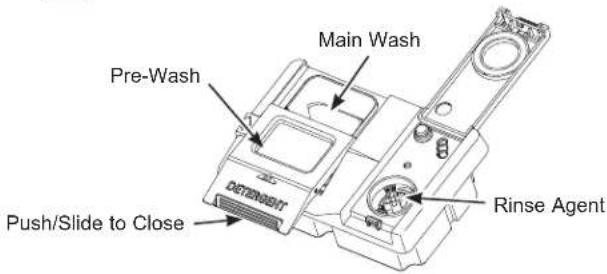
3 Select cycle\*\*
Select Cycle
- Heavy
- Normal
• Light - Rinse
• 1 Hour Wash
4 Select options\*\*
2 4 8 • • •
Sani
Boost
Normal High
Delay Hours
Steam
Wash Temp
Dry Boost
• Controls Hold 3 Sec
5 Start and close the door within 4 seconds
Start
Cancel
Hold 3 Sec
Cycle and Option Examples - The light by the selected pad will be lit to indicate which Cycle and Option has been selected.
| These cycles and options were used to rate the energy efficiency of this dishwasher and vary by model. | |
| Normal/Everyday | This cycle is meant for daily, regular, or typical use to completely wash a full load of normally soiled dishes and is designed to conserve both water and energy. Normal/Everyday was used to rate the energy efficiency of this dishwasher. |
| Heated Dry | (on some models) This option can be selected by pressing the Dry pad once to illuminate the Heated light. This setting will greatly improve your dry performance for daily, regular or typical dishes. The heated dry option will typically add 48 to 64 minutes to your cycle time. This option is not available with the Rinse cycle. NOTE: The use of rinse aid can further enhance the dishwasher's drying performance. On models with this feature, Heated Dry was selected to rate the energy efficiency of this dishwasher. |
| Dry Boost | Normal (on some models) - Turns on the option for faster drying. This option may add up to 64 minutes to the cycle time. This option is not available with the Rinse cycle. On models with this feature, Dry Boost Normal was selected to rate the energy efficiency of this dishwasher. |
* Use high quality detergents such as Cascade® Platinum™ ActionPacs™ or Finish® Quantum® Automatic Dishwashing Detergent and high quality rinse agents such as Cascade® Platinum™ Power Dry™ Rinse Aid or Finish® Jet-Dry® Rinse Aid.
** Varies by model
Filters
Inspect and clean the filters periodically. This should be done every other month or more depending on usage. If there is a decrease in wash performance or dishes feel gritty, this is also an indication the filters need to be cleaned.
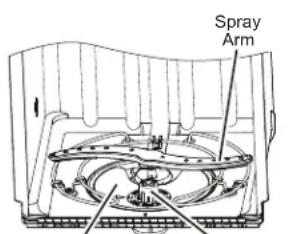
Fine Filter
Ultra-Fine Filter Assembly
To clean the Ultra-Fine Filter assembly, remove the bottom rack. Twist the Ultra-Fine Filter assembly counterclockwise and lift to remove for cleaning. Rinse filter with warm soapy water and use a sponge to carefully remove any stubborn particles.
For models with a 2-piece Ultra-Fine Filter assembly with an additional Filter Basket for food particles, twist the Filter Basket in the counterclockwise direction to unlock it from the Ultra-Fine Filter assembly. See directional arrows on the bottom of the Filter Basket. Pull the Filter Basket to remove from the assembly, throw away any food particles, rinse with warm soapy water, and use a sponge to remove any stubborn particles.
Once cleaned, replace Filter Basket back into the Ultra-Fine Filter assembly and twist it clockwise to lock into place.
2-piece - Ultra-fine Filter assembly with additional Filter Basket (on some models)
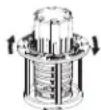
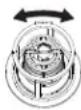
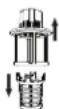
Fine Filter
To clean the Fine Filter (mesh plate), remove the bottom rack. Remove the Ultra-Fine Filter. Remove the Fine Filter. Rinse filter with warm soapy water. Scouring pads or brushes can scratch the filter surface but a soft brush or sponge may be needed to remove stubborn soils or calcium deposits caused by hard water. Once cleaned, replace the Fine Filter and the Ultra-Fine Filter.
Exterior Door Panel
Before cleaning the front panel, make sure you know what type of panel you have. Refer to the last two letters of your model number. You can locate your model number on the left-hand tub wall just inside the door.
- If your model number ends with BB, CC, WW, SA, SH, ES, DS, TS, FS, W2 or D1 then you have a painted door panel.
- If your model number ends with SS, then you have a Stainless Steel door panel.
- If your model number ends with II, then you have an Integrated door panel.
- If your model number ends with S5, then you have a glass door panel.
Follow the instructions for cleaning door panel for your model.
Painted/Coated Door Panels (model numbers ending in BB-black, CC-bisque, WW-white, SA-silver, SH-PRO steel, ES-slate, DS-black slate, TS-black stainless steel, FS-fingerprint resistant stainless steel, W2-matte white or D1-matte black)

DO NOT use Stainless Steel cleaners on the door surfaces.
Use a clean, soft, lightly dampened cloth, then dry thoroughly.
Stainless Steel Door Panel (model numbers ending in SS) For cleaning rust and tarnish, cleaners with oxalic acid such as Bar Keepers Friend Soft Cleanser™ will remove rust, tarnish and small blemishes. Use only a liquid cleanser free of grit and rub in the direction of the brush lines with a damp soft sponge. Do not use appliance wax or polish on the stainless steel.
For other blemishes and marks, use Stainless Steel Magic or a similar product using a clean soft cloth. Do not use appliance wax, polish, bleach or products containing chlorine on Stainless Steel. You can order Stainless Steel Magic #WX10X29 through GE Appliances Parts by calling 877.959.8688. In Canada, call 800-661-1616.
Integrated Door Panel (model numbers ending in II)
This is a custom installed door panel, and you will need to refer to the cabinet manufacturers recommendations for proper cleaning.
Glass Door Panel (model numbers ending in S5)
Use a glass cleaner or mild soap and water and a soft cloth to clean the glass door.
Do not use any abrasive powders.
Consumer Support
| Brand Contact Service | ||
| Monogram | US: monogram.com/contact/ or 800.444.1845Canada: monogram.ca/en/contact or 888.880.3030 | US: GEAppliances.com/ge/service-and-support/service.htm or 800.444.1845Canada: service.geappliances.ca/servicio/ or 888.880.3030 |
| GE Appliances/ Profile | US: GEAppliances.com/contact or 800.626.2000Canada: geappliances.ca/contact-us or 877.994.5366 | US: GEAppliances.com/service or 800.432.2737Canada: geappliances.ca/after-sales-support or 800.561.3344 |
| Café | US: cafeappliances.com/contactCanada: cafeappliances.ca/support/contact-us | US: cafeappliances.com/serviceCanada: cafeappliances.ca/support/contact-us |
| Hotpoint | US: Hotpoint.com or 800.626.2005Canada: Hotpoint.com or 800.626.2005 | US: GEAppliances.com/service or 800.432.2737Canada: GEAppliances.ca/en/support/service-request or 800.561.3344 |
| Haier | US: haierappliances.com/support/contact-usCanada: haiercanada.ca/contact-us | US: haierappliances.com/support/schedule-serviceCanada: haiercanada.ca/service |
Dishwasher Limited Warranty
All warranty service is provided by our Factory Service Centers, or an authorized Customer Care® technician. To schedule service, see the Consumer Support section. Please have your serial number and your model number available when calling for service.
Servicing your appliance may require the use of the onboard data port for diagnostics. This gives a GE Appliances factory service technician the ability to quickly diagnose any issues with your appliance and helps GE Appliances improve its products by providing GE Appliances with information on your appliance. If you do not want your appliance data to be sent to GE Appliances, please advise your technician not to submit the data to GE Appliances at the time of service.
| For the period of: We will replace: | |
| One yearFrom the date of the original purchase | Any part of the dishwasher which fails due to a defect in materials or workmanship. During this limited one-year warranty, we will also provide, free of charge, all labor and related service to replace the defective part. |
What is not covered:
■ Service trips to your home to teach you how to use the product.
■ Improper installation, delivery or maintenance.
■ Failure of the product if it is abused, misused, or used for other than the intended purpose or used commercially.
■ Replacement of house fuses or resetting of circuit breakers.
■ Products which are not defective or broken, or which are working as described in the Owner's Manual.
■ Damage to the product caused by accident, fire, floods or acts of God.
■ Incidental or consequential damage caused by possible defects with this appliance.
■ Defects or damage due to operation in freezing temperatures.
■ Damage caused after delivery including damage from items dropped on the door.
■ Product not accessible to provide required service.
■ Cleaning or servicing of the air gap device in the drain line.
EXCLUSION OF IMPLIED WARRANTIES
Your sole and exclusive remedy is product repair as provided in this Limited Warranty. Any implied warranties, including the implied warranties of merchantability or fitness for a particular purpose, are limited to one year or the shortest period allowed by law.
In the United States:
This limited warranty is extended to the original purchaser and any succeeding owner for products purchased for home use within the USA. If the product is located in an area where service by a GE Appliances Authorized Servicer is not available, you may be responsible for a trip charge or you may be required to bring the product to an Authorized GE Appliances Service location for service. In Alaska, the limited warranty excludes the cost of shipping or service calls to your home.
Some states do not allow the exclusion or limitation of incidental or consequential damages. This limited warranty gives you specific legal rights, and you may also have other rights which vary from state to state. To know what your legal rights are, consult your local or state consumer affairs office or your state's Attorney General.
Warrantor: GE Appliances, a Haier Company
Louisville, KY 40225
In Canada:
This limited warranty is extended to the original purchaser and any succeeding owner for products purchased in Canada for home use within Canada. If the product is located in an area where service by a GE Appliances Authorized Servicer is not available, you may be responsible for a trip charge or you may be required to bring the product to an Authorized GE Appliances Service location.
Some provinces do not allow the exclusion or limitation of incidental or consequential damages. This limited warranty gives you specific legal rights, and you may also have other rights which vary from province to province. To know what your legal rights are, consult your local or provincial consumer affairs office.
Warrantor: MC Commercial Inc., Burlington, ON, L7R 5B6
Extended Warranties: Purchase a GE Appliances extended warranty and learn about special discounts that are available while your warranty is still in effect. You can purchase it online anytime at
GEAppliances.com/extended-warranty
or call 800.626.2224 during normal business hours. GE Appliances Service will still be there after your warranty expires.
Staple sales slip or cancelled check here. Proof of original purchase date is needed to obtain service under warranty.
WHAT IS COVERED - From the Date of the Original Purchase
Two Years
Any part of the dishwasher which fails due to a defect in materials or workmanship. During this limited two year warranty, Monogram will also provide, free of charge, all labor and in-home service to replace the defective part.
Three to Five Years
The dishwasher rack, if it should rust, or the electronic control module, if it should fail due to a defect in materials or workmanship. During this three to five year limited warranty, you will be responsible for any labor or in-home service costs.
Lifetime
The stainless steel tub or door liner, if it fails to contain water due to a defect in materials or workmanship. During this limited lifetime warranty, Monogram will also provide, free of charge, all labor and in-home service to replace the defective part.
In the USA: This warranty is extended to the original purchaser and any succeeding owner for the products purchased for ordinary home use in the 48 mainland states, Hawaii or Washington, D.C.
If the product is located in an area where service by a Monogram Authorized Servicer is not available, you may be responsible for a trip charge or you may be required to bring the product to an Authorized Monogram Service location for service. In Alaska the warranty is the same except that it is LIMITED because you must pay to ship the product to the service shop or for the service technician's travel cost to your home.
In Canada: This warranty is extended to the original purchaser and any succeeding owner for products purchased in Canada for ordinary home use in Canada. In-home warranty service will be provided in areas where it is available and deemed reasonable by Monogram to provide. Proof of original purchase date is needed to obtain service under the warranty.
All warranty service will be provided by our Factory Service Centers or by our authorized Customer Care ^® servicers during normal working hours.
Should your appliance need service, during warranty period or beyond, call Monogram Preferred in the USA at 800-444-1845 or in Canada call 888-880-3030. Please have serial number and model number available when calling for service.
WHAT IS NOT COVERED
- Service trips to your home to teach you how to use the product.
- Improper installation, delivery or maintenance.
- Replacement of house fuses or resetting of circuit breakers.
- Failure of the product if it is abused, misused, or used for other than the intended purpose or used commercially.
-
Damage to the product caused by accident, fire, floods or acts of God.
-
Incidental or consequential damage caused by possible defects with this appliance.
- Cleaning or servicing of the air gap device in the drain line.
- Damage caused after delivery, including damage from items dropped on the door.
- Product not accessible to provide required service.
- Damage to finish, such as surface rust, tarnish, or small blemishes not reported within 48 hours of delivery.
EXCLUSION OF IMPLIED WARRANTIES—Your sole and exclusive remedy is product repair as provided in this Limited Warranty. Any implied warranties, including the implied warranties of merchantability or fitness for a particular purpose, are limited to one year or the shortest period allowed by law.
Some states/provinces do not allow the exclusion or limitation of incidental or consequential damages, so the above limitation or exclusion may not apply to you. This warranty gives you specific legal rights, and you may also have other rights which vary from state to state/ province to province. To know what your legal rights are in your state/province, consult your local or state/provincial consumer affairs office or your state's Attorney General.
Warrantor in the USA: GE Appliances, a Haier company, Louisville, KY 40225
Warrantor in Canada: MC Commercial Inc., Burlington, ON, L7R 5B6

MONOGRAM
Installation Instructions
For the latest information, scan the QR code on the rating plate found on the tub wall just inside the door.
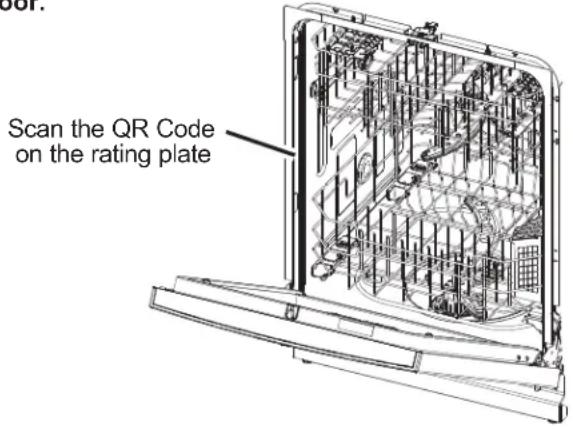
BEFORE YOU BEGIN
Read these instructions completely and carefully.
⚠ WARNING
- To reduce the risk of electric shock, fire, or injury to persons, the installer must ensure that the dishwasher is completely enclosed at the time of installation.
- FOR PERSONAL SAFETY: Remove house fuse or open circuit breaker before beginning installation. Do not use an extension cord or adapter plug with this appliance.
- The improper connection of the equipment grounding conductor can result in a risk of electric shock. Check with a qualified electrician or service representative if you are in doubt that the appliance is properly grounded.
- If house wiring is not 2-wire with ground, a ground must be provided by the installer. When house wiring is aluminum, be sure to use UL-Listed anti-oxidant compound and aluminum-to-copper connectors.
- To reduce the risk of electric shock, fire, or injury to persons, the installer should check to ensure that wires are not pinched or damaged, the house wiring is attached to the junction box bracket through a strain relief, and all electrical connections made at the time of install (wire nuts) are contained inside of the junction box cover.
CAUTION
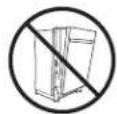
Do not remove wood base until you are ready to install the dishwasher. The dishwasher will tip over when the door is opened if base is removed.
While performing installations described in this booklet, gloves, safety glasses or goggles should be worn.
Built-In Dishwashers
FRONT PANEL ACCESSORY
Custom front panel models include a kit that contains a template, hardware and panel installation instructions. Refer to the kit instructions when installing the custom panel.
If a custom panel mounting hardware kit and template are needed, prior to delivery of the dishwasher, order: WD35X25996.
FOR YOUR SAFETY
Read and observe all WARNINGS and CAUTIONS shown throughout these instructions.
IMPORTANT – Observe all governing codes and ordinances.
- Note to Installer – Be sure to leave these instructions for the consumer's and local inspector's use.
- Note to Consumer – Keep these instructions with your Owner's Manual for future reference.
- Skill Level – Installation of this dishwasher requires basic mechanical, electrical and plumbing skills. Proper installation is the responsibility of the installer. Product failure due to improper installation is not covered under the GE Appliances Warranty. See Warranty information.
- Completion Time – 1 to 3 Hours. New installations require more time than replacement installations.
IMPORTANT – The dishwasher MUST be installed to allow for future removal from the enclosure if service is required.
Care should be exercised when the appliance is installed or removed, to reduce the likelihood of damage to the power supply cord.
If you received a damaged dishwasher, you should immediately contact your dealer or builder.
Optional Accessories – See the Owner's Manual for available custom panel kits.
Your dishwasher is a water heating appliance.
NOTE: Consider recycling options for your appliance packaging material.
Installation Preparation
PARTS SUPPLIED IN INSTALLATION PACKAGE:
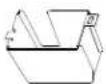

Junction Box Cover and #10 Hex-Head Junction Box Screw 3/8" long
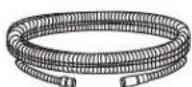
Drain Hose (approximately 58" long) (on some models)

Hose Clamp
Drain Hose Hanger
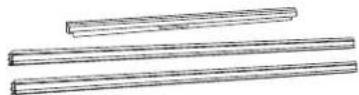
Tub Trim Pieces (on some models)

8-18 x 5/8" Phillips Special Head Screws (to secure dishwasher to underside of countertop or to side cabinets)
Handle and 1/8" Allen wrench (on some models)

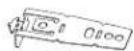
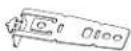
Mounting Brackets (for wood countertops or side cabinets)

Insulation Pieces (on some models)
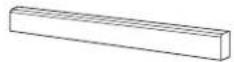
Toekick (pre-installed on some models)

Plug Buttons
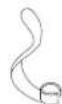
Bottle Jets clips (on some models)
Literature
MATERIALS YOU WILL NEED:
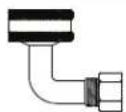
90° elbow (3/4" hose internal thread on one end, opposite end sized to fit water supply)
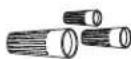
UL-listed Wire Nuts (3)

Masking Tape
MATERIALS YOU WILL NEED FOR NEW INSTALLATIONS ONLY:
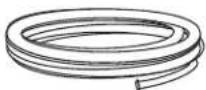
Hot Water Line-3/8" minimum, copper tubing (including ferrule, compression nut) or GE Appliances Part # WX28X326, flexible braided hos
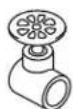
Hand Shut-Off Valve (recommended)
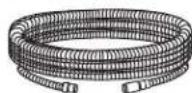
Optional - 12' Drain Hose - WD24X10065 4' Drain Hose - WD24X10062
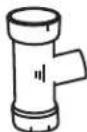
Waste Tee for house plumbing, if applicable
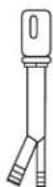
Air Gap for drain hose, if required

Coupler for optional drain hose

Hose Clamp (if needed for optional drain hose)
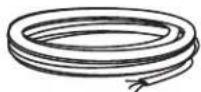
Electrical Cable or Power Cord Kit WX09X70910 (5.4 Ft) or WX09X70911 (7.9 ft) depending on your installation
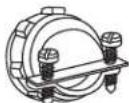
Strain Relief for electrical connection
TOOLS YOU WILL NEED:
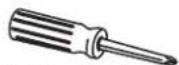
Phillips-Head Screwdriver
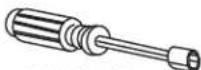
1/4" Nutdriver
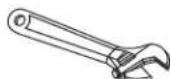
6" Adjustable Wrench

Level
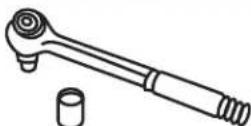
15/16" Socket (optional for skid removal)
Carpenter's Square
1
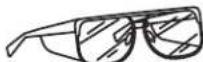
Safety Glasses
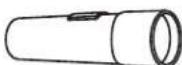
Flashlight
Bucket to catch water when flushing the line
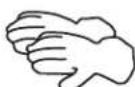
Gloves

TOOLS YOU WILL NEED FOR NEW INSTALLATIONS ONLY:
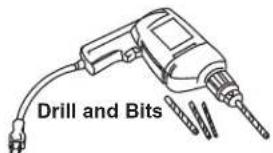
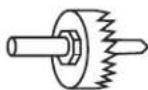
Hole Saw Set
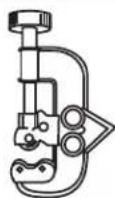
Tubing Cutter
PREPARE DISHWASHER ENCLOSURE
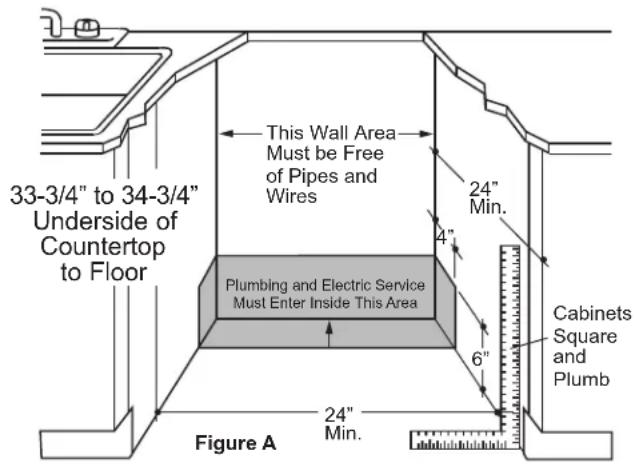
- The rough cabinet opening must be at least 24" deep, 24" wide and approximately 34-1/2" high from floor to underside of the countertop. NOTE: If your model has a pan, as shown in Step 3, a height of 33-3/4" min. from floor to underside of countertop is required.
- The dishwasher must be installed so that drain hose is no more than 16' in length for proper drainage.
- The dishwasher must be fully enclosed on the top, sides and back, and must not support any part of the enclosure.
WARNING
To reduce the risk of electric shock, fire, or injury to persons, the installer must ensure that the dishwasher is completely enclosed at the time of installation.
DISHWASHER HANDLE DIMENSION: The dishwasher door should be flush with the cabinet. For models with a handle, the total depth (with handle) is 26-1/4" max. depending on the model. Locate the Quick Specs document online for more dishwasher dimensions.
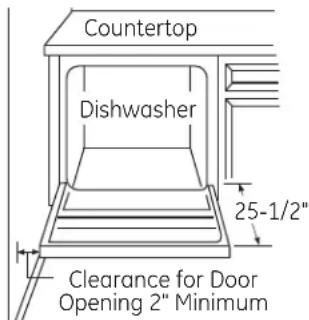
Figure B
CLEARANCES: When installed into a corner, allow 2" min. clearance between dishwasher and adjacent cabinet, wall or other appliances. Allow 25-1/2" min. clearance from the front of the dishwasher for door opening.
DRAIN REQUIREMENTS
- Follow local codes and ordinances.
- Do not exceed 16' distance to drain.
NOTE : Air gap must be used if waste tee or disposer connection is less than 18" above floor to prevent siphoning.
DETERMINE DRAIN METHOD
The type of drain installation depends on the following questions.
- Do local codes or ordinances require an air gap?
- Is waste tee less than 18" above floor?
If the answer to either question is YES, Method 1 MUST be used.
- If the answers are NO, either method may be used.
CABINET PREPARATION
- Drill a 1-1/2" diameter hole in the cabinet wall within the shaded areas shown in PREPARE DISHWASHER ENCLOSURE section for the drain hose connection. The hole should be smooth with no sharp edges.
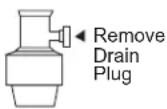
IMPORTANT – When connecting drain line to disposer, check to be sure that drain plug has been removed. DISHWASHER WILL NOT DRAIN IF PLUG IS LEFT IN PLACE.
Method 1 – Air Gap with Waste Tee or Disposer An air gap must be used when required by local codes and ordinances. The air gap must be installed according to manufacturer's instructions.
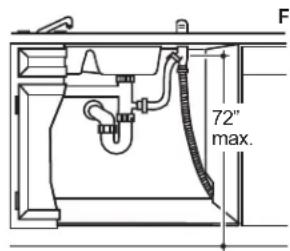
Figure C

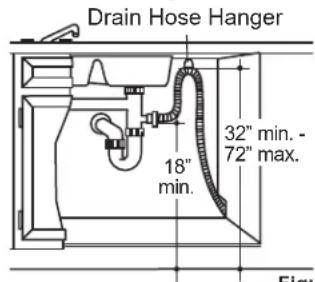
Method 2 – “High Drain Loop” with Waste Tee or Disposer
Drain Hose Hanger
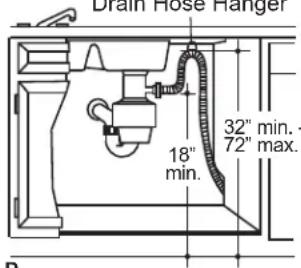
Tip: Avoid unnecessary service call charges. Always be sure disposer drain plug has been removed before attaching dishwasher drain hose to the disposer.
PREPARE ELECTRICAL WIRING
WARNING
FOR PERSONAL SAFETY: Remove house fuse or open circuit breaker before beginning installation. Do not use an extension cord or adapter plug with this appliance.
ELECTRICAL REQUIREMENTS
Be sure that the electrical connection and wire size are adequate and in conformance with the National Electric Code, ANSI/NFPA 70 – latest edition, and all local codes and ordinances.
This appliance must have:
- 120V, 60Hz, AC-only, 15-ampere or 20-ampere, fused electrical supply.
- Wiring must be 2 wire with ground and rated for 75^ (167°F).
- If the electrical supply does not meet the above requirements, call a licensed electrician before proceeding.
It is recommended to have:
- A circuit breaker or time-delay fuse.
- A properly grounded individual branch circuit.
Grounding Instructions–Permanent Connection
This appliance must be connected to a grounded metal, permanent wiring system, or an equipment-grounding conductor must be run with the circuit conductors and be connected to the equipment-grounding terminal or lead on the appliance.
Grounding Instructions-Power Cord Models
This appliance must be grounded. In the event of a malfunction or breakdown, grounding will reduce the risk of electric shock by providing a path of least resistance for electric current. This appliance is equipped with a cord having an equipment-grounding conductor and a grounding plug. The plug must be plugged into an appropriate outlet that is installed and grounded in accordance with all local codes and ordinances.
WARNING
The improper connection of the equipment grounding conductor can result in a risk of electric shock. Check with a qualified electrician or service representative if you are in doubt that the appliance is properly grounded.
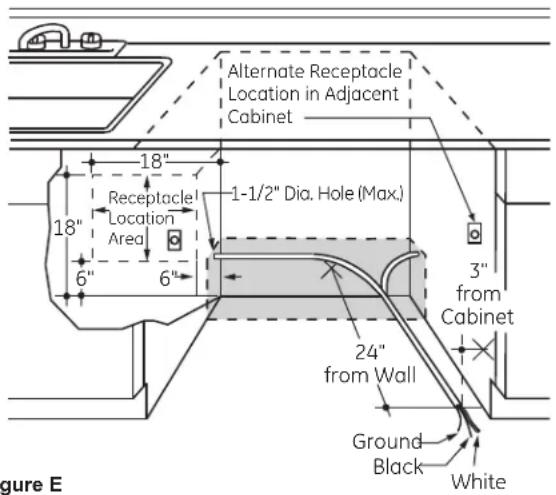
Figure E
WARNING
For models equipped with power cord: Do not modify the plug provided with the appliance; if it will not fit the outlet, have a proper outlet installed by a qualified technician.
Cabinet Preparation & Wire Routing
- The wiring may enter the opening from either side, rear or the floor within the shaded area illustrated above in Figure E and defined in Figure A.
- Cut a 1-1/2" maximum diameter hole to admit the electrical cable. Edges of hole should be smooth and rounded. Permanent wiring connections may pass through the same hole as the drain hose and hot water line, if convenient. If cabinet wall is metal, the hole edge must be covered with a bushing.
NOTE: Power cords with plug must pass through a separate hole in the cabinet.
Electrical Connection to Dishwasher
Electrical connection is on the right front of dishwasher.
- For permanent connections the cable must be routed as shown in Figure E. Cable must extend a minimum of 24" from the rear wall.
- For power cord connections, install a 3-prong grounding type receptacle in the sink cabinet rear wall, 6" min. or 18" maximum from the opening, 6" to 18" above the floor.
- Use only WX09X70910 or WX09X70911 Dishwasher Power Cord Kit.
PREPARE HOT WATER LINE
NOTE: GE Appliances recommends copper tubing for the water line, but if you choose to use flexible hose, use GE Appliances WX28X326, flexible braided hose.
- The water supply line (3/8" copper tubing or flexible braided hose) may enter from either side, rear or floor within the shaded area shown in Figure F.
- The water supply line may pass through the same hole as the electrical cable and drain hose. Or, cut an additional 1-1/2" diameter hole to accommodate the water line. If power cord with plug is used, water line must not pass through power cord hole.
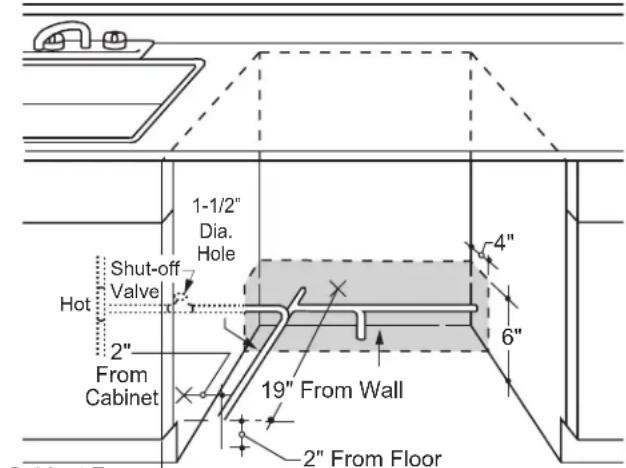
Figure F
WATER LINE CONNECTION
- If using a flexible braided supply hose, label the hose with the installation date to use as reference. Flexible braided hoses, elbows and gaskets should be replaced in 5 years.
- Turn off the water supply.
• Install a hand shut-off valve in an accessible location, such as under the sink. (Optional, but strongly recommended and may be required by local codes.) - Water connection is on the left side of the dishwasher. Install the hot water inlet line, using no less than 3/8" copper tubing or a flexible braided hose. Route the line as shown in Figure F and extend forward at least 19" from rear wall.
- Adjust water heater for 120^ to 140^ temperature.
- Flush water line to clean out debris.
- The hot water supply line pressure must be 20-120 PSI.
CAUTION
Do not remove wood base until you are ready to install the dishwasher. The dishwasher will tip over when the door is opened if base is removed.
Turn page to begin dishwasher installation.
LOCATE THE ITEMS IN THE INSTALLATION PACKAGE
- Screws
- Junction box cover
- Drain hose and clamp
- Mounting brackets
- Trim pieces (on some models)
- Drain hose hanger
- Owner's Manual
• Product samples and/or coupons
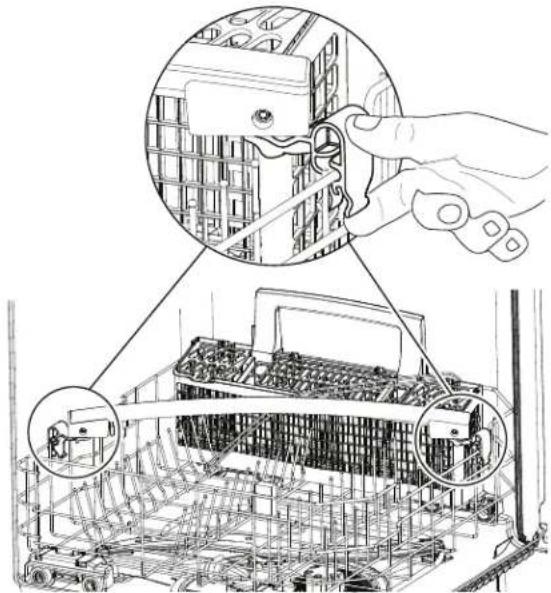
STEP 1 INSTALL HANDLE (on some models)
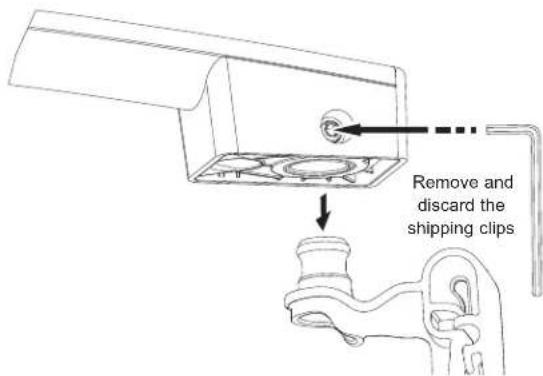
- Remove the packaged handle from the lower rack by pulling its shipping clips out and up.
natural_image
Technical illustration of a mechanical assembly with hand operating a tool, showing internal components and assembly lines (no text or symbols)- Using the provided 1/8" Allen wrench, loosen the set screws to remove the shipping clips and discard them.
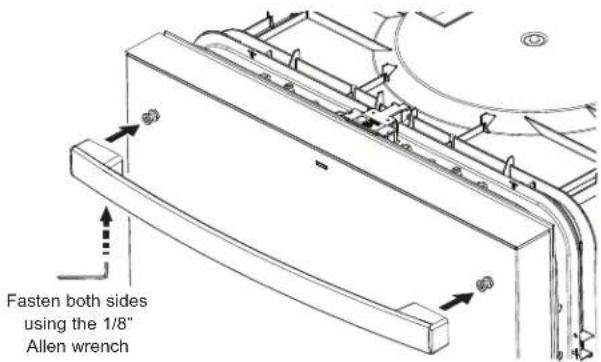
- Place the handle on the dishwasher door mounting fasteners, with the set screws on the bottom side, then tighten the set screws with the Allen wrench.
STEP 2 CHECK DOOR BALANCE
CAUTION
Opening the door will cause the dishwasher to tip forward when it is not fully installed. When opening the door prior to the dishwasher being fully installed, hold the dishwasher securely with one hand and h door with the other hand. Gloves should be
NOTE: If installing a Custom Door Panel (available on some models), please follow the instructions found in the Custom Door Panel kit
WD35X25996.
- With dishwasher on the wood base and holding the top of the dishwasher firmly and closing the de
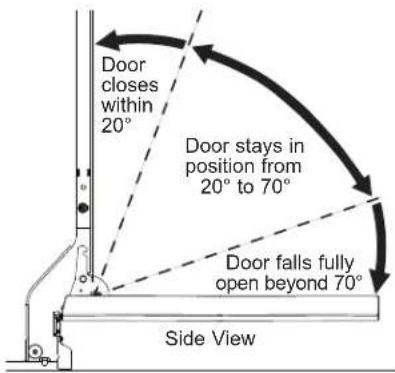
- Door is properly balanced if, when opened, it self closes within 20^ from vertical, stays in position from 20^ to 70^ and falls fully open beyond 70^ . - If necessary increase or decrease tension as shown. Some models will have 2 springs on one side and 1 spring on the other side. Latch door and adjust springs to correct balance.
NOTE: Models with tubular base rails are not adjustable.
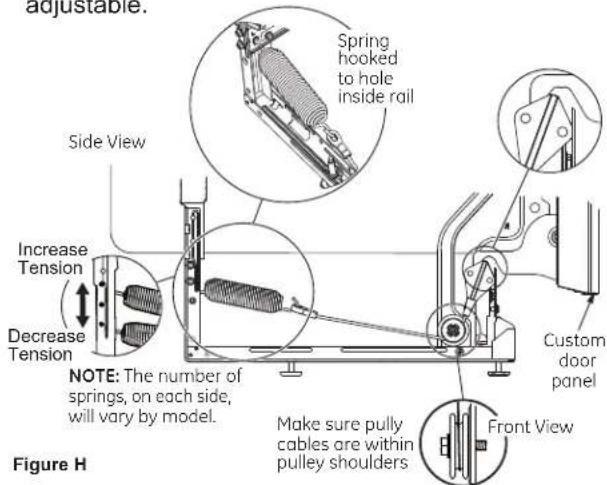
Tip: Make sure door opens and closes smoothly.
Check door opening and closing. If door does not open easily or falls too quickly, check spring cable routing. The cable is held in place by "shoulders" on the pulley. Check to be sure cable has not slipped over the pulley shoulders and is routed as shown.
Dishwasher Installation
STEP 3 REMOVE WOOD BASE, INSTALL LEVELING LEGS
NOTE: Some models have an attached wood base.
CAUTION
Do not remove wood base until you are ready to install the dishwasher. The dishwasher will tip over when the door is opened if base is removed.
IMPORTANT – Do not kick off wood base!
Damage will occur.
- Move the dishwasher close to the installation location and lay it on its back. NOTE: Do not place the dishwasher on its side.
- For models with an attached wood base, remove the 4 leveling legs on the underside of the wood base with a 15/16" socket wrench.
- Discard base.
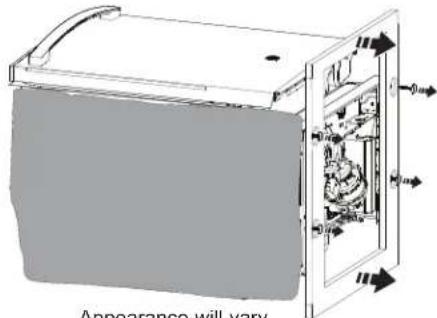
Remove all four
leveling legs and
the wood base
Appearance will vary
- On models without the center bottom adjustable leveling system:
Screw leveling legs back into the dishwasher frame, approximately 1/2" from frame as shown.
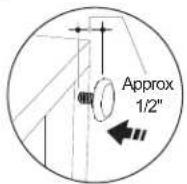
Replace all 4 legs to about 1/2" from the frame
- On models with the center bottom adjustable leveling system:
Screw front leveling legs back into dishwasher frame approximately 1/2".
STEP 3 REMOVE WOOD BASE, INSTALL LEVELING LEGS (CONTINUED)
- Screw rear leveling legs completely in until fully seated.
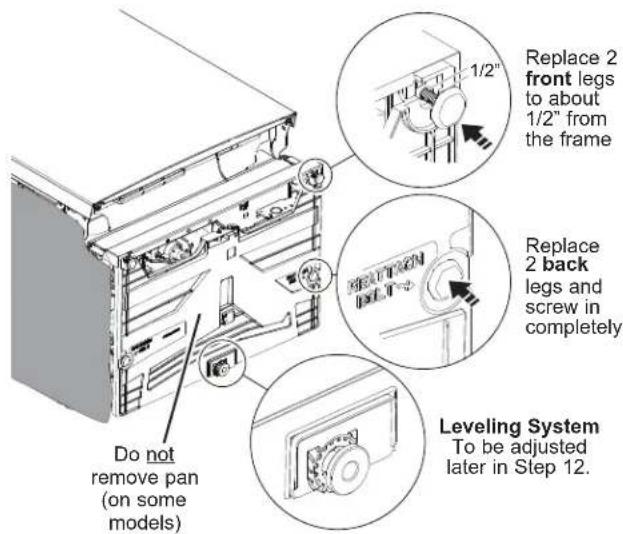
NOTE: Pan (on some models) should not be removed during installation.
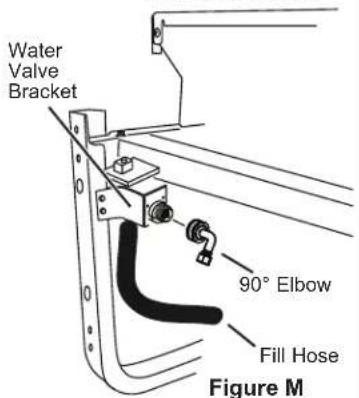
STEP 4 INSTALL 90° ELBOW
- Thread 90^ elbow onto the water valve. Ensure rubber gasket is located between valve and elbow.
- Do not overtighten elbow. Water valve bracket could bend or water valve fitting could break.
- Position the end of the elbow to face the rear of the dishwasher.
Front of dishwasher
STEP 5 INSTALL INSULATION PACKET (on some models)
If your model came with an insulation kit, follow the instructions provided with the kit and install it now.
Dishwasher Installation
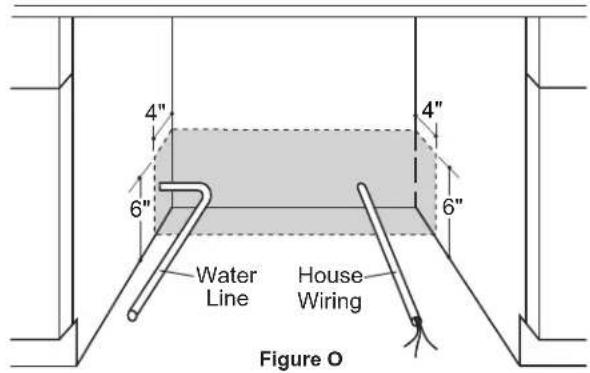
STEP 6 POSITION WATER LINE AND HOUSE WIRING
- Position water supply line and house wiring on the floor of the opening to avoid interference with base of dishwasher and components under dishwasher.
STEP 7 INSTALL DRAIN HOSE, THROUGH CABINET
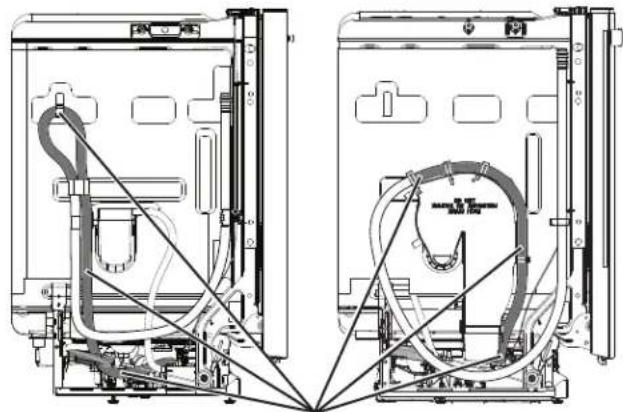
- Identify the illustration below that most closely matches your model and detach only the section of the drain hose shown in white.
natural_image
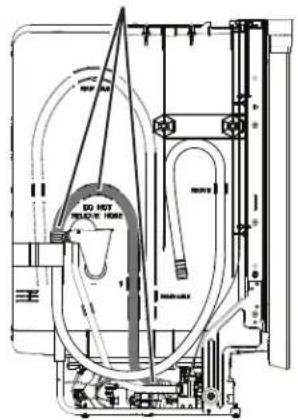
Technical line drawing of a dual-panel device with internal components and wiring (no text or symbols)Do NOT detach the section of the drain hose, highlighted in gray, from these locations
STEP 7 INSTALL DRAIN HOSE, THROUGH CABINET (CONT.)
- Position dishwasher in front of cabinet opening, and if present, dislodge drain hose from drain hose clip. Insert drain hose into the hole in cabinet side. If a power cord is used, guide the end through a separate cabinet opening.
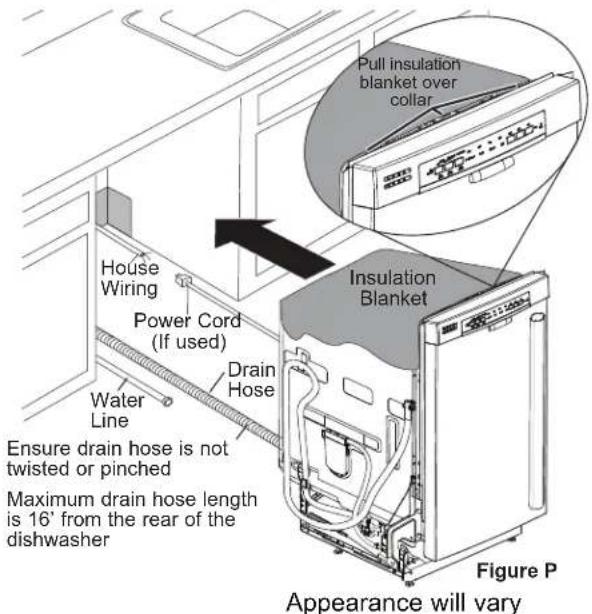
Tip: Prevent unnecessary service call charges for fill, drain or noise concerns. Position utility lines so they do not interfere with anything under or behind the dishwasher.
STEP 8 SLIDE DISHWASHER THREE-FOURTHS OF THE WAY INTO CABINET
IMPORTANT – Do not push against front panel with knees. Damage will occur.
- Grasp the sides of the front panel and slide dishwasher into the opening a few inches at a time.
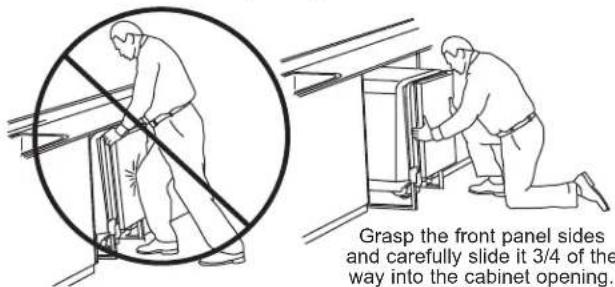
Do not push against the front door panel with knee. Damage to the door panel will occur.
Figure Q
STEP 8 SLIDE DISHWASHER THREE-FOURTHS OF THE WAY INTO CABINET (CONTINUED)
- As you proceed, pull the drain hose through the opening under the sink. Stop pushing when the dishwasher extends about 6 inches forward of adjacent cabinets.
- Make sure drain hose is not kinked under or behind the dishwasher.
- Make certain the house wiring, drain line and water line do not interfere with components under dishwasher.
STEP 9 INSTALL TRIM PIECES
In this step you will need the trim pieces set aside earlier.
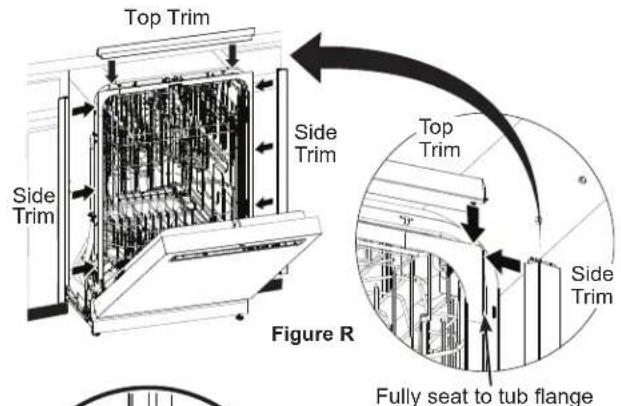
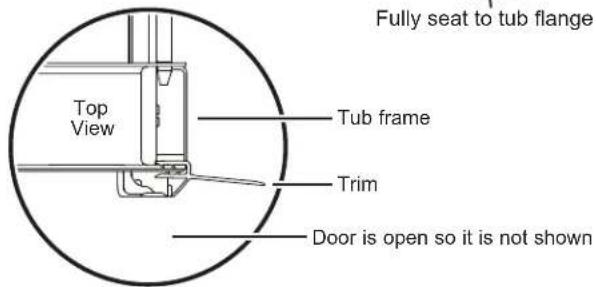
- Select the top trim piece (See Figure R) and line up center to the top latch. Press the trim piece onto the tub flange moving from one side to the other.
- Select the left trim piece (see Figure R). Align top edge with the top trim and press it onto the left side of the tub flange moving from the top to the bottom. Repeat for the right side tub flange trim piece. (See Figure R for right side trim piece.)
STEP 10 INSTALL MOUNTING BRACKETS
You will need the mounting brackets set aside earlier.
You must install the mounting brackets onto the dishwasher tub frame top OR sides prior to sliding the dishwasher into place under the countertop.
Install mounting brackets on top if the underside of countertop is wood or wood-like material that accepts screws:
Install the brackets by inserting the tabs through the slots on the tub frame as shown. NOTE: You may need to work the tabs through the slots.
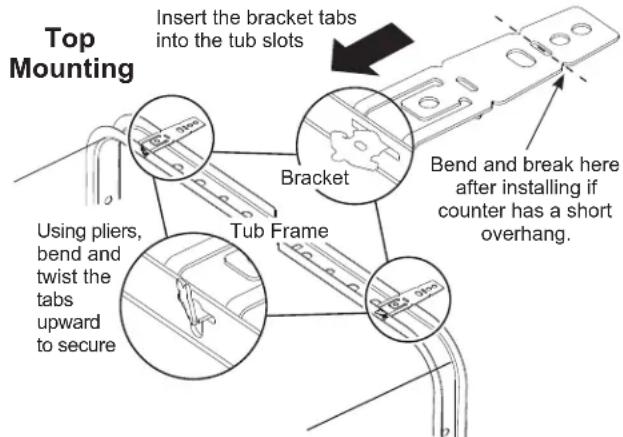
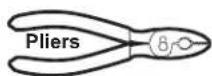
Using pliers, bend and twist the tabs upward to secure as shown.
IMPORTANT - After installing brackets and before closing the dishwasher door, adjust the brackets by bending them up as needed, so that they do not contact the top of the dishwasher door and cause damage.
- If you are installing the dishwasher under a counter with a short overhang, the countertop brackets may extend beyond the edge of the counter. If this is the case, remove the excess length by repeatedly bending the brackets at the front notch only until they break.
STEP 10 INSTALL MOUNTING BRACKETS (CONT.)
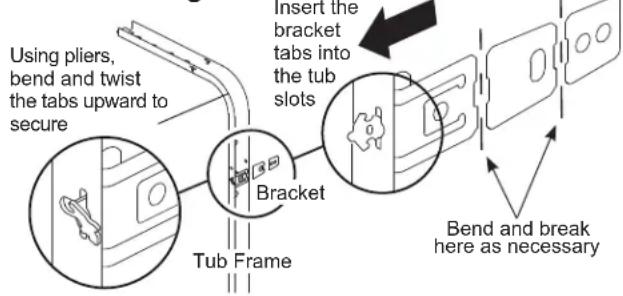
Install mounting brackets on sides if the countertop is granite or similar material that will not accept wood screws:
- Break off front portion of the bracket with pliers at the location shown prior to attaching to dishwasher.
- Install the brackets by inserting the tabs through the slots on the tub frame as shown. NOTE: You may need to work the tabs through the slots.
Using pliers, bend and twist the tabs to secure as shown.
Side Mounting
STEP 11 PUSH DISHWASHER INTO FINAL POSITION
- Check the tub insulation blanket, if equipped, to be sure it is smoothly wrapped around the tub. It should not be “bunched up” and it must not interfere with the door springs. If the insulation is “bunched up” or interfering with the springs, straighten and re-center the blanket prior to sliding the dishwasher into its final position.
- Slide the dishwasher into the final position by pushing on the sides of the door panel. Do not push or pull the door in a partially open or closed position when moving the dishwasher. Do not use a knee or push on the center of the panel. If you do, damage to the panel will likely result. Check that the dishwasher is squarely positioned in the cabinet opening at both the top and the bottom of the appliance prior to mounting to the cabinet.
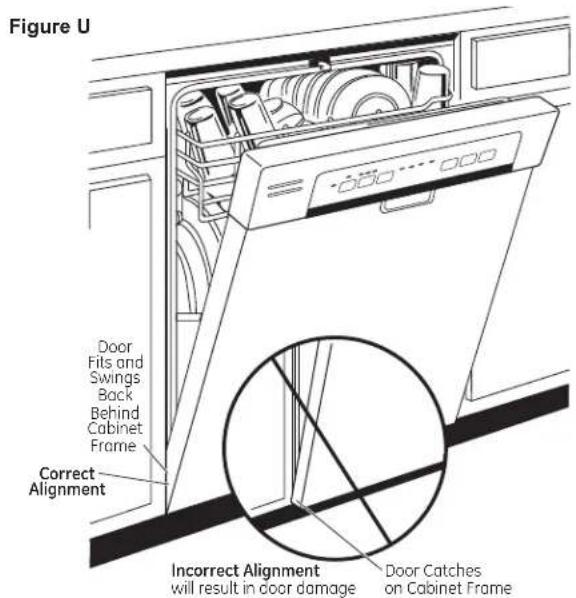
IMPORTANT – Before opening the dishwasher door, be certain the edges of the dishwasher door panel are behind the face of the adjacent cabinet and not up against the cabinet face. Refer to Figure U. If the dishwasher door is opened when the edge of the door is against the face of the cabinet, dishwasher door damage and cabinet damage will occur.
STEP 11 PUSH DISHWASHER INTO FINAL POSITION (CONT.)
- Open and close the dishwasher door to be sure it operates smoothly, and does not rub on the adjacent cabinet.
Tip: Prevent unnecessary service charges for panel damage or wash performance.
Check dishwasher alignment prior to opening dishwasher door to prevent panel damage.
Make sure utility lines are not trapped or crushed behind dishwasher. Crushed lines will restrict water flow.
Check that trim does not contact the door at all points
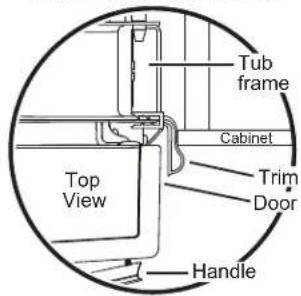
If the trim interferes with the door it may be tucked in as an alternate installation
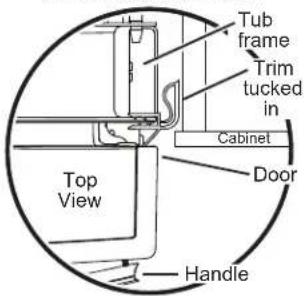
Tub trim may be trimmed if necessary to ensure proper door operation
STEP 12 LEVEL DISHWASHER
IMPORTANT – Dishwasher must be level for proper dish rack operation, wash performance and door operation. The dishwasher must be leveled left to right and front to back. This ensures the dish racks will not roll in or out on their own, circulation water will flow to the pump inlet, and the door will close without hitting the side of the tub.
LEVEL DISHWASHER (CONT.)
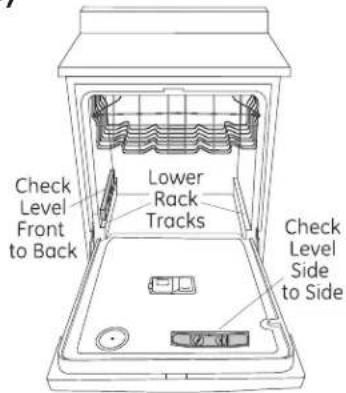
- Remove the lower dish rack and place a level on the door and lower rack track as shown in figure.
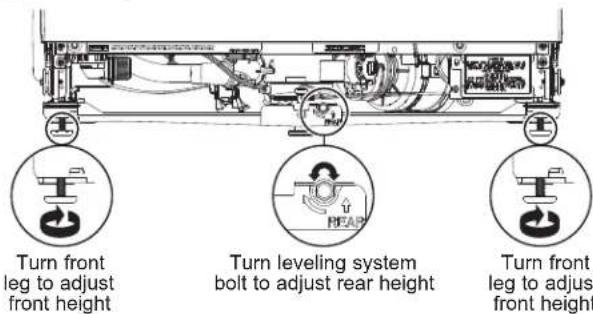
If your model has a rear leveling system, the rear height is adjusted from the front of the dishwasher along with the 2 front legs on the bottom of the dishwasher. Begin the leveling process with the front legs by individually turning the front 2 legs. Adjust the front legs first. When the front legs are adjusted to a height resulting in an appropriate gap to the upper cabinet, proceed to adjust the rear leveling system by adjusting the leveling bolt as illustrated in the figure. Turn the bolt to adjust the rear leveling system. Slowly rotate the bolt clockwise to raise the back of the dishwasher, and counterclockwise to lower it. Continue to adjust the feet until the dishwasher is level as illustrated in the figure. Ensure all 3 legs are firmly in contact with the floor.
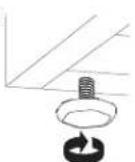
If your model has 4 leveling feet, adjust the level of the dishwasher by individually turning the 4 legs on the bottom of the dishwasher as shown in figure.
- The dishwasher is properly leveled when the level indicator is centered left to right and front to back. Also, the dishwasher door should close without hitting the side of the tub.
- Replace the lower rack.
Tip: Prevent unnecessary service charges. Verify dishwasher is leveled.
Pull the dish racks half way out. They should stay put. Open and close the door. The door should fit in the tub opening without hitting the side of the tub. If the racks roll on their own, or the door hits the side of tub, re-level the dishwasher.
STEP 13 POSITION DISHWASHER, SECURE TO COUNTERTOP OR CABINET
In this step you will need the 2 Phillips special head screws from the screws set aside earlier.
The dishwasher must be secured to the countertop or the cabinet sides. When the underside of the countertop is wood, use Method 1. Use Method 2 when the underside of the countertop is made of a material, such as granite, that will not accept wood screws.
IMPORTANT – Prevent door panel and control panel damage. Dishwasher must be positioned so the front panel and control panel do not contact the adjacent cabinets or countertop. Mounting screws must be driven straight and flush. Protruding screw heads could scratch the door panel or control panel and interfere with door operation.
Method 1
Secure dishwasher to underside of wood countertop.
- Recheck alignment of the dishwasher in the cabinet. Refer to Steps 11 and 12. Door panel and/or control panel must not hit cabinets or countertop.
- Fasten the dishwasher to the underside of the countertop with the 2 Phillips special head screws. Refer to figure. Make certain screws are driven straight and flush to prevent panel damage.
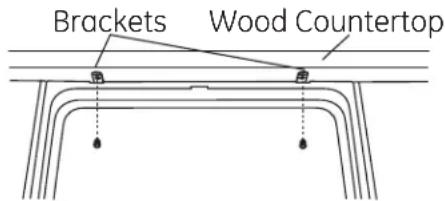
Method 2
Secure dishwasher to cabinet sides.
- Recheck alignment of the dishwasher in the cabinet. Refer to Steps 11 and 12. Door panel and/or control panel must not hit cabinets or countertop.
- Remove plug buttons. Do not discard.
- Fasten the dishwasher to the adjacent cabinets with the 2 Phillips special head screws provided. Refer to Figure X. Make certain screws are driven straight and flush to prevent panel damage. Do not screw into the cabinet face frame.
- Install plug buttons to the side of the tub in the holes provided.
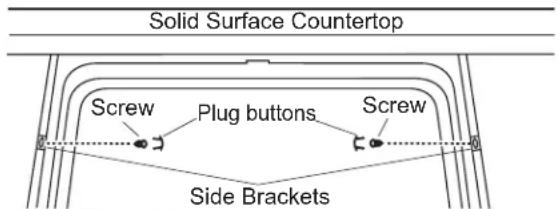
Figure X
STEP 13 POSITION DISHWASHER, SECURE TO COUNTERTOP OR CABINET (CONT.)
- Re-check that the dishwasher is square and level at both the top and bottom of the cabinet opening, with no twisting or distortion of the tub or door after mounting to the cabinets/countertop. Adjust if necessary.
- Confirm all leveling legs are in contact with the floor to prevent the dishwasher from rocking and ensure proper door and latch operation.
STEP 14 CONNECT WATER SUPPLY
Connect water supply line to 90° elbow.
If using a flexible braided hose connection:
- Attach nut to 90^ elbow using an adjustable wrench.
If using a copper tubing connection: - Slide compression nut, then ferrule over end of water line.
- Insert water line into 90^ elbow.
- Slide ferrule against elbow and secure with compression nut.
IMPORTANT – Check to be sure that door spring and/or door spring cable do not rub or contact the fill hose or water supply line. Test by opening and closing the door. Re-route the water supply lines if a rubbing noise or interference occurs.
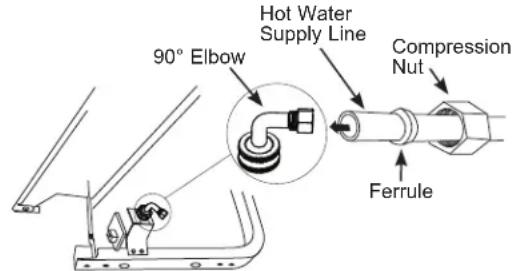
Bottom Left Side
Figure Y
STEP 15 CONNECT DRAIN LINE
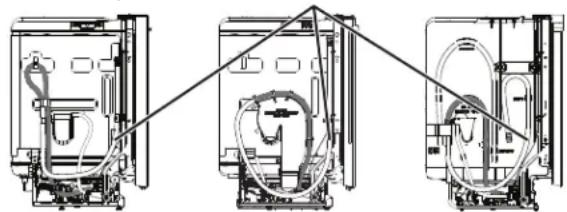
- The hose should have already been detached from the tub at locations indicated.
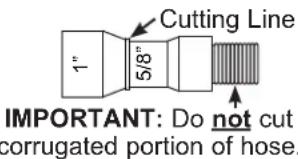
The molded end of the drain hose will fit 5/8" through 1" diameter inlet ports on the air gap, waste tee or disposer.
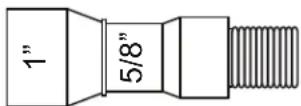
STEP 15 CONNECT DRAIN LINE (CONT.)
- The hose should have already been detached from the tub at locations indicated. NOTE: Do not remove high drain loop.
Detach only the sections of the drain hose shown in white.
natural_image
Technical line drawing of three views of a washing machine (no text or symbols)Do NOT detach the sections of the drain hose shown in gray.
- Determine size of inlet port. If required, cut drain hose connector on the marked line, to fit the inlet port.
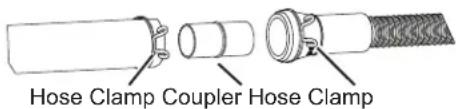
- If a longer drain hose is required, replace the provided user bag drain hose with GE Appliances service part WD24X10065, a 12' long hose which can be connected directly to the drain loop already attached to the unit.
If service part hose is not available, an additional hose with coupler, ID of 5/8" or 7/8" and no longer than 66", may be attached to the provided user bag drain hose. Secure the connection with hose clamp (obtain locally) to the provided user bag drain hose.
STEP 15 CONNECT DRAIN LINE (CONT.)
NOTE: TOTAL DRAIN HOSE LENGTH MUST NOT EXCEED 16' FROM THE REAR OF THE DISHWASHER FOR PROPER DRAIN OPERATION.

natural_image
Technical illustration of a coiled hose clamp assembly (no text or symbols)- Connect drain line to air gap, waste tee or disposer using the previously determined method. Secure hose with a hose clamp.
Method 1 – Air gap with waste tee or disposer
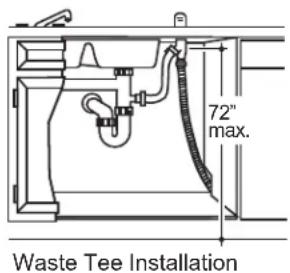
Method 2 – “High drain loop” with waste tee or disposer
With this method you will need the drain hose hanger set aside earlier.
Fasten drain hose to underside of countertop with the provided hanger.
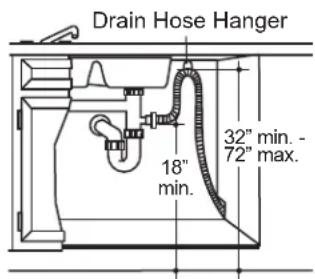
Waste Tee Installation
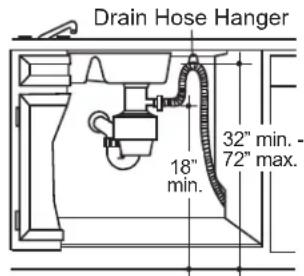
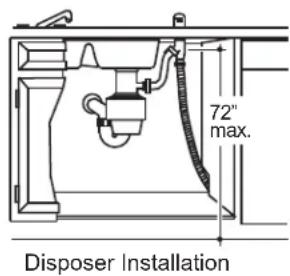
Disposer Installation
IMPORTANT – When connecting drain line to disposer, check to be sure that drain plug has been removed. DISHWASHER WILL NOT DRAIN IF PLUG IS LEFT IN PLACE.
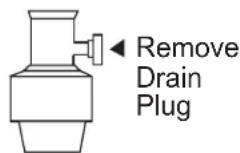
Tip: Avoid unnecessary service call charges for a no drain complaint.
Make sure excess drain hose has been pulled through the cabinet opening. This will prevent excess hose in the dishwasher cavity from becoming kinked or crushed by the dishwasher.
STEP 16 CONNECT POWER SUPPLY
If a power cord with plug is already installed proceed to Step 17.
WARNING
If house wiring is not 2-wire with ground, a ground must be provided by the installer. When house wiring is aluminum, be sure to use UL-Listed anti-oxidant compound and aluminum-to-copper connectors.
In this step you will need the junction box cover and the #10 Hex head screw from the screws set aside earlier.
- Secure house wiring to the back of the junction box with a strain relief.
- Locate the 3 dishwasher wires, (white, black and green) with the stripped ends coming out of the AC jumper. Use UL listed wire nuts of appropriate size to connect incoming ground to green, white to white and black to black.
- Install the junction box cover using #10 hex head screw. Check to be sure that wires are not pinched under the cover.
- Make sure that the junction box cover is resting on the mounting bracket.
- If using a Power Cord Kit, use GE Appliances part number WX09X70910 or WX09X70911 and refer to the included instructions.
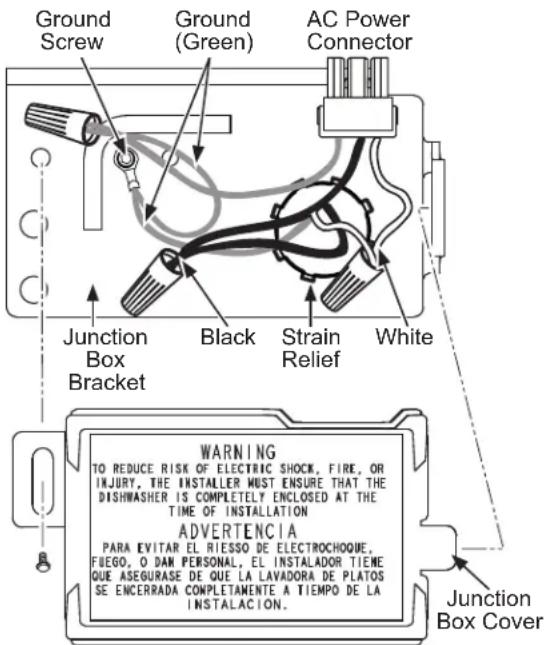
NOTE: All ground screws, brackets and wires must remain intact.
STEP 17 PRETEST CHECKLIST
Review this list after installing your dishwasher to avoid charges for a service call that is not covered by your warranty.
- Check to be sure power is OFF.
- Open door and remove all foam and paper packaging.
- Locate the Owner's Manual set aside earlier.
- Read the Owner's Manual for operating instructions.
- Check door opening and closing. If door does not open and close freely, check for proper routing of spring cable over pulley. If door drops or closes when released, adjust spring tension. See Step 2.
- Check to be sure that wiring is secure under the dishwasher, not pinched or in contact with door springs or other components. See Step 16.
- Check door alignment with tub. If door hits tub, level dishwasher. See Step 12.
- Check door alignment with cabinet. If door hits cabinet, reposition dishwasher. See Step 11.
- Check that door spring does not contact water line, fill hose, wiring or other components. See Step 11.
- Verify water supply and drain lines are not kinked or in contact with other components. Contact with motor or dishwasher frame could cause noise.
- Turn on the sink hot water faucet and verify water temperature. Incoming water temperature must be between 120°F and 140°F. A minimum of 120°F temperature is required for best wash performance. See “Prepare Hot Water Line,” page 5.
- Add 1 quart of water to the bottom of the dishwasher to lubricate the pump seal.
- Turn on water supply. Check for leaks. Tighten connections if needed.
- Remove protective film if present from the control panel and door.
- Check that tub trim does not contact the door.
STEP 18 DISHWASHER WET TEST
- Turn on power supply or plug power cord into outlet, if equipped.
- Select a cycle to run and push the Start pad.
- Ensure the door is latched. Dishwasher should start.
- Check to be sure that water enters the dishwasher. If water does not enter the dishwasher, check to be sure that water and power are turned on.
- Check for leaks under the dishwasher. If a leak is found, turn off power at the breaker, and then tighten water connections. Restore power after leak is corrected.
NOTE: A small amount of water may splash out of the fill funnel, on the right side of the tub, during the first use after installation. Splash-out is most likely to occur if there is air in the water supply line from new construction or if the valve has been closed for an extended time.
- Check for leaks around the door. A leak around the door could be caused by door rubbing or hitting against adjacent cabinets. Reposition the dishwasher if necessary. See Step 11.
- Press and hold the Start pad for 3 seconds to cancel the cycle. The unit will begin to drain. Check drain lines. If leaks are found, turn off power at the breaker and correct plumbing as necessary. Restore power after corrections are made. See Steps 4, 6, 7, 8 and 15.
- Open dishwasher door and make sure all of the water has drained. If not, check that disposer plug has been removed and/or air gap is not plugged. Also check drain hose to be sure it is not kinked underneath or behind dishwasher. See Step 15.
- Press Start pad once again and run dishwasher through another cycle. Check for leaks and correct if required.
- Repeat these steps as necessary.
STEP 19 POSITION SOUND INSULATION PIECE (on some models)
- Locate the sound insulation package inside the dishwasher.
- Stand the parts upright as shown.
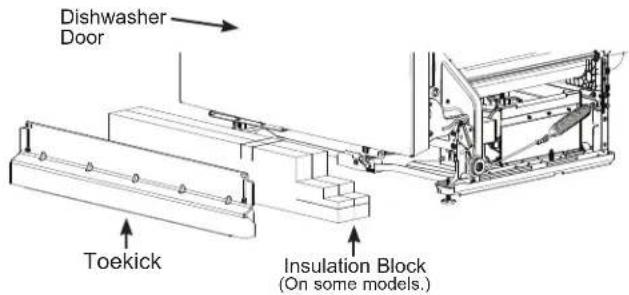
- Locate the control box.
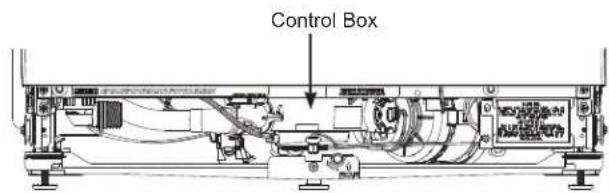
- Push insulation block portion under the dishwasher until it is beneath the control box.

natural_image
Technical line drawing of a mechanical component labeled Figure AH, showing internal structure without any text or symbols.- Push the panel portion up to the front of the block.
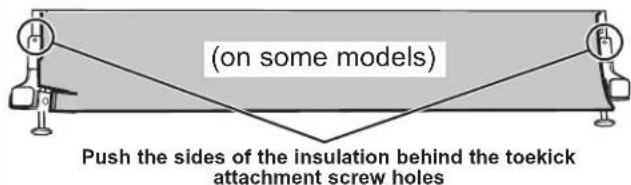
- Tuck the sides of the front panel behind the toekick attachment screw holes.
STEP 20 INSTALL TOEKICK
- Remove the 2 screws from the user bag.
- Place toekick against the legs of the dishwasher.
- Align the toekick with the bottom edge and make sure it is against the floor.
- Insert and tighten the 2 toekick attachment screws. The toekick should stay in contact with the floor.
NOTE: Be careful not to over-tighten the screws in the toekick.
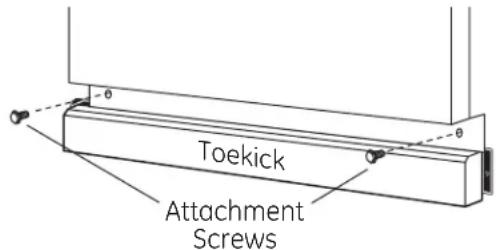
- When reinstalling the toekick, on models with a sound barrier, ensure that the bottom edge is flush with the floor. Any excess material should be tucked up behind the outer door.
Tip: Reduce sound from under the dishwasher. Make sure toekick is against floor.
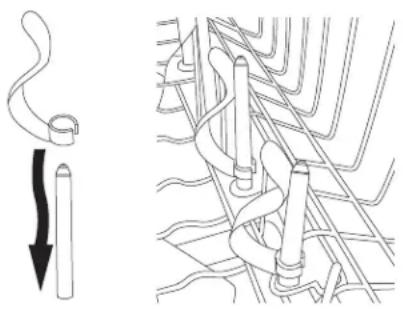
STEP 21 INSTALL BOTTLE JETS CLIPS (on some models)
- Locate the Bottle Jets clips, depending on model, either in the silverware basket or the user bag. Install a clip over a Bottle Jets stem by slipping its clip end over the nozzel and pressing it down to the base.
natural_image
Diagram showing a cable being inserted into a pipe, and the resulting cable with coiled wires (no text or labels)STEP 22 CHECK THE FOLLOWING
- Tub trim does not interfere with the door
- Dishwasher is square and level at both the top and bottom of the cabinet opening, with no twisting or distortion of the tub or door
- On models without the adjustable leveling system, make sure all 4 legs of the dishwasher are firmly in contact with the floor
- On models with the adjustable leveling system, make sure both front legs of the dishwasher and the center rear leveling system leg are firmly in contact with the floor
- Drain hose is not pinched between the dishwasher and adjacent cabinets or walls
- Tub trim is fully seated on the tub flange
STEP 23 LITERATURE
- Be sure to leave complete literature package, these Installation Instructions and product samples and/or coupons with the consumer.
CONSIGNES DE SÉCURITÉ ..... 2
UTILISATION DU
LAVE-VAISSELLE
natural_image
Line drawing of an open kitchen appliance with multiple compartments and a control panel (no text or symbols)Louisville, KY 40225
geappliances.com/extended-warranty
Garant : MC Commercial Inc., Burlington, ON, L7R 5B6.

MONOGRAM
Instructions d'Installation
natural_image
Technical line drawing of a mechanical assembly or enclosure with internal components (no text or symbols)AVANT DE COMMENCER
natural_image
Technical line drawing of a mechanical assembly with hand operating a tool, showing internal components and assembly lines (no text or symbols)natural_image
Technical line drawing of a dual-panel device with internal components and wiring (no text or symbols)ÉTAPE 7 INSERTION DU BOYAU DE VIDANGE DANS L'ORIFICE DE L'ARMOIRE (SUITE)
natural_image
Technical line drawing of three views of a refrigerator with internal components and wiring (no text or symbols)ÉTAPE 15 RACCORDEMENT DU BOYAU DE VIDANGE (SUITE)
REMARQUE : LA LONGUEUR TOTALE DU TUYAU DE VIDANGE NE DOIT PAS DÉPASSER 4,88 M (16 PIEDS) DE L'ARRIÈRE DU LAVE-VAISSELLE POUR UN FONCTIONNEMENT CORRECTE DE LA VIDANGE.

natural_image
Technical illustration of a coiled spring and hose assembly (no text or symbols)natural_image
Technical line drawing of a mechanical component labeled Figure AH, showing internal structure without any text or symbols.natural_image
Diagram showing a pipe with a coiled tube and a directional arrow, alongside a schematic of coiled pipes and cables (no text or labels)INSTRUCCIONES
DE SEGURIDAD 2
USO DEL LAVAVAJILLAS
Puesta en Marcha 4
CUIDADO Y LIMPIEZA....5
SOPORTE AL CLIENTE......6
GARANTÍA LIMITADA 8
LA GARANTÍA LAVAPLATOS
MONOGRAM 9
INSTRUCCIONES
natural_image
Line drawing of an open kitchen appliance with visible dish, wheels, and door (no text or symbols)| Marca Contáctenos Servicio Programad | ||
| Monogram | monogram.com/contact/or 800.444.1845 | GEAppliances.com/ge/service-and-support/service.htm or 800.444.1845 |
| GE Appliances/Profile | GEAppliances.com/contact o 800.626.2000 | GEAppliances.com/service or 800.432.2737 |
| Café | cafeappliances.com/contact | cafeappliances.com/service |
| Hotpoint | Hotpoint.com or 800.626.2005 | GEAppliances.com/service or 800.432.2737 |
| Haier | haierappliances.com/support/contact-us | haierappliances.com/support/schedule-service |
Louisville, KY 40225
geappliances.com/extended-warranty
Garante: GE Appliances, a Haier company, Louisville, KY 40225

MONOGRAM
natural_image
Technical line drawing of a mechanical assembly or enclosure with internal components (no text or symbols)ANTES DE COMENZAR
natural_image
Technical illustration of a mechanical assembly with hand operating a tool, showing internal components and assembly lines (no text or symbols)natural_image
Technical line drawing of a dual-panel device with internal components and wiring (no text or symbols)PASO 7 INSTALE LA MANGUERA DE DESAGÜE A TRAVÉS DEL GABINETE (CONT.)
natural_image
Three technical line drawings of a washing machine with internal components and wiring (no text or symbols)natural_image
Technical line drawing of a mechanical component labeled Figura AH, showing internal structure without any text or symbols.natural_image
Diagram showing a pipe with a downward arrow and a schematic of coiled pipes or cables (no text or symbols present)


- USING THE DISHWASHER
- IMPORTANT SAFETY INFORMATION - READ ALL INSTRUCTIONS BEFORE USING - SAVE THESE INSTRUCTIONS
- WARNING
- PROPER INSTALLATION AND MAINTENANCE
- ⚠ WARNING
- WHEN USING YOUR DISHWASHER, FOLLOW BASIC PRECAUTIONS, INCLUDING THE FOLLOWING:
- WATER HEATER SAFETY
- RISK OF CHILD ENTRAPMENT
- PROPER DISPOSAL OF THE DISHWASHER
- CAUTION
- TO PREVENT MINOR INJURY AND PROPERTY DAMAGE
- Proper Disposal of your Appliance
- Getting started
- Select cycle\*\*
- Select Cycle
- Select options\*\*
- Start and close the door within 4 seconds
- Start
- Filters
- Ultra-Fine Filter Assembly
- Fine Filter
- Exterior Door Panel
- Dishwasher Limited Warranty
- What is not covered:
- EXCLUSION OF IMPLIED WARRANTIES
- In the United States:
- In Canada:
- WHAT IS COVERED - From the Date of the Original Purchase
- Two Years
- Three to Five Years
- Lifetime
- WHAT IS NOT COVERED
- Installation Instructions
- BEFORE YOU BEGIN
- Built-In Dishwashers
- FRONT PANEL ACCESSORY
- FOR YOUR SAFETY
- Installation Preparation
- PARTS SUPPLIED IN INSTALLATION PACKAGE:
- 8-18 x 5/8" Phillips Special Head Screws (to secure dishwasher to underside of countertop or to side cabinets)
- MATERIALS YOU WILL NEED:
- MATERIALS YOU WILL NEED FOR NEW INSTALLATIONS ONLY:
- TOOLS YOU WILL NEED:
- TOOLS YOU WILL NEED FOR NEW INSTALLATIONS ONLY:
- DRAIN REQUIREMENTS
- DETERMINE DRAIN METHOD
- CABINET PREPARATION
- PREPARE ELECTRICAL WIRING
- ELECTRICAL REQUIREMENTS
- This appliance must have:
- It is recommended to have:
- Grounding Instructions–Permanent Connection
- Grounding Instructions-Power Cord Models
- Cabinet Preparation & Wire Routing
- Electrical Connection to Dishwasher
- PREPARE HOT WATER LINE
- WATER LINE CONNECTION
- LOCATE THE ITEMS IN THE INSTALLATION PACKAGE
- STEP 1 INSTALL HANDLE (on some models)
- STEP 2 CHECK DOOR BALANCE
- WD35X25996.
- Tip: Make sure door opens and closes smoothly.
- Dishwasher Installation
- STEP 3 REMOVE WOOD BASE, INSTALL LEVELING LEGS
- IMPORTANT – Do not kick off wood base!
- STEP 3 REMOVE WOOD BASE, INSTALL LEVELING LEGS (CONTINUED)
- STEP 4 INSTALL 90° ELBOW
- STEP 5 INSTALL INSULATION PACKET (on some models)
- STEP 6 POSITION WATER LINE AND HOUSE WIRING
- STEP 7 INSTALL DRAIN HOSE, THROUGH CABINET
- STEP 7 INSTALL DRAIN HOSE, THROUGH CABINET (CONT.)
- STEP 8 SLIDE DISHWASHER THREE-FOURTHS OF THE WAY INTO CABINET
- STEP 8 SLIDE DISHWASHER THREE-FOURTHS OF THE WAY INTO CABINET (CONTINUED)
- STEP 9 INSTALL TRIM PIECES
- STEP 10 INSTALL MOUNTING BRACKETS
- Install mounting brackets on top if the underside of countertop is wood or wood-like material that accepts screws:
- STEP 10 INSTALL MOUNTING BRACKETS (CONT.)
- STEP 11 PUSH DISHWASHER INTO FINAL POSITION
- STEP 11 PUSH DISHWASHER INTO FINAL POSITION (CONT.)
- Tip: Prevent unnecessary service charges for panel damage or wash performance.
- STEP 12 LEVEL DISHWASHER
- Tip: Prevent unnecessary service charges. Verify dishwasher is leveled.
- STEP 13 POSITION DISHWASHER, SECURE TO COUNTERTOP OR CABINET
- Method 1
- Method 2
- STEP 13 POSITION DISHWASHER, SECURE TO COUNTERTOP OR CABINET (CONT.)
- STEP 14 CONNECT WATER SUPPLY
- STEP 15 CONNECT DRAIN LINE
- STEP 15 CONNECT DRAIN LINE (CONT.)
- STEP 16 CONNECT POWER SUPPLY
- STEP 17 PRETEST CHECKLIST
- STEP 18 DISHWASHER WET TEST
- STEP 19 POSITION SOUND INSULATION PIECE (on some models)
- STEP 20 INSTALL TOEKICK
- STEP 21 INSTALL BOTTLE JETS CLIPS (on some models)
- STEP 22 CHECK THE FOLLOWING
- STEP 23 LITERATURE
- UTILISATION DU
- LAVE-VAISSELLE
- Instructions d'Installation
- AVANT DE COMMENCER
- ÉTAPE 7 INSERTION DU BOYAU DE VIDANGE DANS L'ORIFICE DE L'ARMOIRE (SUITE)
- ÉTAPE 15 RACCORDEMENT DU BOYAU DE VIDANGE (SUITE)
- ANTES DE COMENZAR
- PASO 7 INSTALE LA MANGUERA DE DESAGÜE A TRAVÉS DEL GABINETE (CONT.)
Brand : Café
Model : CDT875P4NW2
Category : Dishwasher