
CDD220P4WW2 - Dishwasher Café - Free user manual and instructions
Find the device manual for free CDD220P4WW2 Café in PDF.


| Product Type | Built-in Dishwasher |
| Brand | Café |
| Model | CDD220P4WW2 |
| Width | 24 inches |
| Height | 34.5 inches |
| Depth | 24.5 inches |
| Weight | 110 lbs |
| Power Supply | 120V, 60Hz, 15A |
| Energy Consumption | 270 kWh/year |
| Water Consumption | 3.5 gallons per cycle |
| Number of Place Settings | 14 |
| Cycle Options | Normal, Heavy, Light, Rinse, Sanitize |
| Noise Level | 48 dBA |
| Interior Material | Stainless Steel |
| Rack Configuration | Upper adjustable rack, lower rack with fold-down tines, silverware basket |
| Control Type | Electronic touch controls |
| Display | LED indicator lights and time remaining display |
| Delay Start | Up to 24 hours |
| Child Lock | Yes |
| Filter System | Self-cleaning filter with manual cleanup recommended |
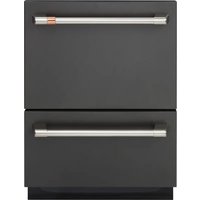
| Installation Type | Built-in, front panel ready |
| Parts and Repairability | Replacement parts available through Café service centers; user-replaceable filters and racks |
Frequently Asked Questions - CDD220P4WW2 Café
User questions about CDD220P4WW2 Café
0 question about this device. Answer the ones you know or ask your own.
Ask a new question about this device
Download the instructions for your Dishwasher in PDF format for free! Find your manual CDD220P4WW2 - Café and take your electronic device back in hand. On this page are published all the documents necessary for the use of your device. CDD220P4WW2 by Café.
USER MANUAL CDD220P4WW2 Café
Models: CDD220 Series and CDD420 Series
Contents
Safety Information....3 Care and Cleaning....2 2
Using the Dishwasher Troubleshooting Tips 26
Appliance Communication 6 Limited Warranty 2.1
Getting Started 8 Limited Warranty 61
Dispensers 14 Consumer Support 32
Loading 17
Write the model and serial numbers here:
Model # ____
Serial # ____
You can find them on the dishwasher's frame face, between the drawers, on the left side.
English • Español
THANK YOU FOR MAKING CAFÉ A PART OF YOUR HOME.
We take pride in the craftsmanship, innovation and design that goes into every Café product, and we think you will too. Among other things, registration of your appliance ensures that we can deliver important product information and warranty details when you need them.
Register your Café appliance now online. Helpful websites are available in the Consumer Support section of this Owner's Manual. You may also mail in the pre-printed registration card included in the packing material.
CAFÉ
DISTINCT BY DESIGN™
IMPORTANT SAFETY INFORMATION READ ALL INSTRUCTIONS BEFORE USING THE APPLIANCE
⚠ WARNING For your safety, the information in this manual must be followed to minimize the risk of fire, explosion, electric shock, and to prevent property damage, personal injury, or death.
⚠ WARNING PROPER INSTALLATION AND MAINTENANCE
This dishwasher must be properly installed and located in accordance with the Installation Instructions before it is used. If you did not receive an Installation Instructions sheet with your dishwasher, you can receive one by visiting our Website at cafeappliances.com.
■ Connect the dishwasher/appliance to a grounded metal, permanent wiring system; or run an equipment-grounding conductor with the circuit conductors and connect to the equipment-grounding terminal or lead of the appliance.
■ Improper connection of the equipment-grounding conductor can result in a risk of electric shock. Check with a qualified electrician or service representative if you are in doubt whether the appliance is properly grounded.
■ Detailed grounding instructions can be found in the "Installation Preparation" section of the Installation Instructions.
■ Dispose of discarded appliances and shipping or packing material properly.
- Do not attempt to repair or replace any part of your dishwasher unless it is specifically recommended in this manual. All other servicing should be referred to a qualified technician.
■ Use only included product cord or hard-wire to building electrical as described in the Installation Instructions. Failure to follow this instruction, could result in risk of fire and personal injury.
■ To minimize the possibility of electric shock, disconnect this appliance from the power supply before attempting any maintenance.
NOTE: Turning the dishwasher off does not disconnect the appliance from the power supply. We recommend having a qualified technician service your appliance.
⚠ WARNING WHEN USING YOUR DISHWAS INCLUDING THE FOLLOWING:
- Use this appliance only for its intended purpose as described in this Owner's Manual.
■ Use only detergents or wetting agents recommended for use in a dishwasher and keep them out of reach of children. Using a detergent that is not specifically designed for dishwashers will cause the dishwasher to fill with suds. - Locate sharp items so that they are not likely to damage the drawer seal.
- Load sharp knives with the handles up to reduce the risk of cut-type injuries.
- Do not wash plastic items unless marked dishwasher safe or the equivalent. For plastic items not so marked, check the manufacturer's recommendations.
■ Do not operate your dishwasher unless all enclosure panels are properly in place.
■ Do not tamper with controls.
■ Do not abuse, sit on or stand on the drawer of the dishwasher.
■ To reduce the risk of injury, do not allow children to play with, on or inside this appliance at any time.
■ Do not store or use combustible materials including gasoline or other flammable liquids or vapors in the vicinity of this or any other appliance.
■ Small parts can be a choke hazard to small children if removed from the dishwasher. Keep out of reach of small children.
READ AND SAVE THESE INSTRUCTIONS
IMPORTANT SAFETY INFORMATION READ ALL INSTRUCTIONS BEFORE USING THE APPLIANCE
⚠ WARNING WATER HEATER SAFETY
Under certain conditions, hydrogen gas may be produced in a water heater that has not been used for two or more weeks. HYDROGEN GAS IS EXPLOSIVE.
If the hot water has not been used for two or more weeks, prevent the possibility of damage or injury by turning on all hot water faucets and allowing them to run for several minutes. Do this before using any electrical appliance connected to the hot water system. This simple procedure will allow any built-up hydrogen gas to escape. Since the gas is flammable, do not smoke, use an open flame, or use the appliance during this process.
⚠ WARNING RISK OF CHILD ENTRAPMENT
PROPER DISPOSAL OF THE DISHWASHER
Junked or abandoned dishwashers are dangerous...even if they will sit for "just a few days." If you are getting rid of your dishwasher, please follow the instructions below to help prevent accidents.
■ Do not allow children to play with, on, or inside this or any discarded appliance.
▲CAUTION TO PREVENT MINOR INJURY AND PROPERTY DAMAGE
■ During or after wash cycle, contents may be hot to the touch. Use care before handling.
■ Close supervision is necessary if this appliance is used by or near children. Do not allow children to play around the dishwasher when closing the drawers due to the possibility of small fingers being pinched.
■ Non-Dishware Items: Do not wash items such as electronic air cleaner filters, furnace filters and paint brushes in your dishwasher. Damage to the dishwasher and discoloration or staining of the dishwasher may result.
■ Load light-weight, plastic items so they do not become dislodged and drop to the bottom of the dishwasher.
CAUTION
■ Under no circumstances should you open the drawer while the dishwasher is in operation.
■ Always knock on the right side front of the drawer to pause the dishwasher and wait until you hear the four additional beeps before opening the drawer.
The dishwasher must be used with the motor assembly, filter plate, drain filter and spray arm in place. To identify what these parts are, see the Care and Cleaning section in this Owner's Manual.
■ Take care when loading the drawer not to load dishware items so they prevent the internal lid from properly sealing with the drawer. Items should be placed so they do not protrude above and/or forced into the drawer, otherwise a service call may result.
■ Cleaning and user maintenance shall not be done by children without supervision.
If the dishwasher is not being used for long periods of time, turn the electricity and water supply to the dishwasher off.
NOTICE
■ Use only powder, Cascade® Platinum™ ActionPacs™ or Finish® Quantum® Automatic Dishwashing Detergent or rinse agents recommended for use in a dishwasher and keep them out of the reach of children. Cascade® Platinum™ ActionPacs™ or Finish® Quantum® Automatic Dishwashing Detergent, and Cascade® Platinum™ Power Dry™ Rinse Aid or Finish® Jet-Dry® Rinse Aid rinse agents have been approved for use in all Café dishwashers.
READ AND SAVE THESE INSTRUCTIONS
IMPORTANT SAFETY INFORMATION READ ALL INSTRUCTIONS BEFORE USING THE APPLIANCE
ELECTRICAL REQUIREMENTS
Be sure that the electrical connection and wire size are adequate and in conformance with the National Electric Code, ANSI/NFPA 70 – latest edition, and all local codes and ordinances.
This appliance must have:
■ 120V, 60Hz, AC-only, 15-ampere or 20-ampere, fused electrical supply.
■ Wiring must be 2 wire with ground and rated for 167°F.
■ If the electrical supply does not meet the above requirements, call a licensed electrician before proceeding.
It is recommended to have:
■ A circuit breaker or time-delay fuse.
■ A properly grounded individual branch circuit.
Proper Disposal of your Appliance
■ Dispose of or recycle your appliance in accordance with Federal and Local Regulations. Contact your local authorities for the environmentally safe disposal or recycling of your appliance.
■ Consider recycling options for your appliance packaging material.
Appliance Communication
WiFi Connect for customers in the United States (on some models)
Your dishwasher is GE Appliances WiFi Connect capable. A WiFi communication card is built into the product allowing it to communicate with your smartphone for remote monitoring, control and notifications.
1) Use the QR code to download and access the SmartHQ App or visit cafeappliances.com/connect.
2) Follow the instructions in the App to connect your dishwasher.
Please visit cafeappliances.com/connect to connect your appliance, learn more about connected appliance features and learn what connected appliance app's will work with your smartphone.
In Canada, visit cafeappliances.ca.

This device complies with Part 15 of the FCC Rules. Operation is subject to the following two conditions:
- This device may not cause harmful interference, and
-
This device must accept any interference received, including interference that may cause undesired operation. This equipment has been tested and found to comply with the limits for a Class B digital device, pursuant to Part 15 of the FCC Rules. These limits are designed to provide reasonable protection against harmful interference in a residential installation. This equipment generates uses and can radiate radio frequency energy and, if not installed and used in accordance with the instructions, may cause harmful interference to radio communications. However, there is no guarantee that interference will not occur in a particular installation. If this equipment does cause harmful interference to radio or television reception, which can be determined by turning the equipment off and on, the user is encouraged to try to correct the interference by one or more of the following measures:
-
Reorient or relocate the receiving antenna.
- Increase the separation between the equipment and receiver.
- Connect the equipment into an outlet on a circuit different from that to which the receiver is connected.
- Consult the dealer or an experienced radio/television technician for help.
Labelling: Changes or modifications to this unit not expressly approved by the manufacturer could void the user's authority to operate the equipment.
Getting started
Quick Start
This dishwasher operates differently than most dishwashers. When a cycle is running, the drawer is locked closed. To open the drawer mid cycle, you must pause the cycle. Since there are no controls on the outside of the dishwasher, you must knock on the right side of the drawer front, 2 knocks, wait for 3 seconds and then open the drawer. Press Start ▶ to restart the cycle.

Features and appearance will vary throughout this manual
Smart Assist Connect your dishwasher to SmartHQ to unlock enhanced capabilities and information for the Smart Assist feature to maintain optimal wash and dry performance. Smart Assist is designed to monitor your dishwasher's functionality and will help ensure optimal performance. See the Appliance Communication section for instructions on how to connect.
Indicators
Off/On - Opening the drawer will automatically turn the dishwasher on. If the dishwasher is in an idle state, touch any button to reactivate it.
1 Wash Program Indicators
If lit: The wash program has been selected.
2 Lock Indicator
If lit: Keylock or Childlock is activated.
2 Wash Option Indicators
If lit: The wash cycle option has been selected. The wash program length and temperature will be set accordingly.
4 Delay Start Indicator
If lit: Delay start is set. The wash program will start after the selected time delay (1-12 hours).
Controls
A Wash Cycle Selector
Press Cycle Select » to scroll through the available wash programs and select the desired one.
NOTE: Each drawer can run independently of the other drawer or at the same time as the other drawer.
Options Selector
Press Options Select to scroll through the wash options.
NOTE: Not all options are available for all wash programs.
Start Selector (on the inner control panel)
To Start Wash: Press Start ▶ on the control panel before closing the drawer.
To Pause: Firmly knock twice on the right side of the drawer front.
- Wait for three short and one long tone before opening the drawer.
NOTE: Forcing the drawer open mid cycle may cause damage or injury.
- If the dishwasher drawer is not restarted within seven minutes, it will sound intermittently until it is restarted.
Delay start
To Set Delay Start: Press and hold Start ▶ to set the delay start time. Each tone indicates a 1 hour delay (up to 12 hours). The delay start indicator Ⓤ will light up.
- If you scroll past 12h (12 hours) the dishwasher will exit delay start. To re-enter delay start follow the instructions above.
- The wash will start when the delay time is over, provided the drawer is closed.
If drawer is not closed within 4 seconds of setting delay start, OR If the drawer is opened after delay start has been set (for example, to load more dishes), delay start will be suspended.
To Resume: Press Start ▶ and close the drawer.
To Cancel Delay Start × : Press and hold Start ▶
- If there is any water in the drawer, it will automatically drain before the dishwasher turns off.
Getting started
Leak Protection
If a leak is detected, the dishwasher will drain, the cycle will stop and the below indicated control panel lights will turn on. If this occurs, contact Café for service.
| Pots | Plus | Normal | Express | China | Rinse | Ultra DryFastSanitize | X |
1 Discard Scraps
Scrape large food particles off (eg bones, fruit stones) and remove any foreign objects (eg toothpicks, strings, paper).
2 Load Dishes Carefully- See the Loading section for more information.
To help with wash performance, arrange dishes so they are evenly spaced and not nesting.
IMPORTANT!
Accommodates plates up to a max height of 11" for lower drawers or 12 1/4" for upper drawers.
3 Check Spray Arm(s) - See the Care and Cleaning section for more information.
Check the spray arm is mounted correctly by physically rotating it around with your hand.
Before a wash, ensure there are no items preventing the spray arm(s) from rotating.
4 Add Detergent - See the Dispensers section for more information.
Fill the detergent dispenser with powder detergent and close the dispenser door.
IMPORTANT!
Do not use liquid detergent.
Do not place tablets or put liquid detergent in the detergent dispenser.
If using a tablet or gel pouch, place it in the cutlery basket or at the edge of the base rack.
5 Check Rinse Aid - See the Dispensers section for more information.
If the indicator on its plug glows bright red, refill the rinse aid dispenser with liquid rinse aid.
Make sure you then refit the rinse aid plug back into its original position, by rotating the plug back into an upright position.
6 Select Wash Cycle - Press Cycle Select » to scroll through the available wash programs and stop to select the desired one. The lit indicator light above the selected wash program will indicate the selected wash program.
| Pots | This cycle is meant for heavily soiled dishes, cookware, pots, or pans with dried-on or baked-on soils. Everyday dishes are safe to be used in this cycle. *Time: 2 hours 31 minutes. |
| Plus | This cycle is meant for daily full loads of medium to heavily soiled dishes. *Time: 2 hours 15 minutes. |
| Normal | This cycle is for normally soiled dishes and provides optimum water and energy usage. The Energy Guide for each drawer is based on this cycle. *Time: 2 hours. |
| Express | For washing partial loads with loose soils. Wash times and water temperatures are reduced. *Time: 46 minutes. |
| China | For washing lightly soiled and heat sensitive dishware. Wash temperatures are reduced.*Time: 1 hour 30 minutes. |
| Rinse | For rinsing partial loads that will be washed later. Prevents odors and keeps soils from drying on dishes.Do not use detergent.Detergent is not dispensed during the rinse cycle.*Time: 16 minutes.*Washing time only. Does not include drying time. |
Getting Started

Select Options - Press Options Select ☐ to scroll through the available options and stop to select the desired one. The lit indicator light above the selected option will indicate the selected option.
Ultra Dry Increases the final rinse temperature and the length of the drying phase for improved drying performance.
| Fast | Uses additional water and energy for a faster wash time, while maintaining wash performance. |
| Sanitize | Raises the water temperature during the rinse phase to sanitize dishes. Ideal for washing items such as baby bottles and preserving jars.The sanitize wash option adjusts the wash program to meet the conditions required by NSF 184, Section 6 for sanitization to occur.While sanitize is running, the wash program is monitored to ensure that these conditions are met.IMPORTANT!Only programs utilising the sanitize wash option are certified to meet the conditions required by NSF 184, Section 6. Other wash programs may not reach the temperatures required for sanitization to occur. See table for wash programs that have sanitize available as an option.For sanitization to occur, the temperature of the water needs to reach 158ircF . Make sure that all items are marked dishwasher safe or the equivalent before running the sanitize option.If the wash is interrupted or the water supply is turned off during the program, then the heating conditions for sanitization may not be met. You may need to run the program again to ensure sanitization of your dishes.At the end of a wash program with sanitize, always check to make sure that sanitization was successful.If sanitization was successful:The wash will finish as normal.If sanitization was not successful:An alert will sound.When the drawer is opened the sanitize indicator will flash.Check if the water supply has been turned off or the wash program interrupted.Press and holdStart▶ once to stop the beeping and a second time to clear the flashing alert code.Reset sanitize and then run the cycle again. |
NOTES:
Only one option can be set at a time.
Not all options are available for every wash program. If a wash option is not available for the chosen wash program, then that option cannot be selected. See the table below for options available with each wash program.
Wash Program Options Available
| Pots Ultra Dry Fast Sanitize | |||
| Plus Ultra Dry Fast Sanitize | |||
| Normal - | - | - | |
| Express | Ultra Dry | - | - |
| China | Ultra Dry Fast | - | |
| Rinse | - | - | - |
Lock Options - Press Options Select → to scroll through the available options and stop to select the desired one. The lit indicator light above the selected option will indicate the selected option.
Keylock Disables all the buttons - Helpful when cleaning the dishwasher.
To activate: Press and hold Options Select ≈ until you hear a tone. The lock indicator 🔒 will light up.
To cancel: Press and hold Options Select ≈ until you hear a tone. The lock indicator 🔒 will turn off.
Childlock Disables all the buttons and locks the drawer closed (preventing unauthorized use by children).
To activate: Press and hold Options Select ≈ until you hear two tones. The lock indicator 🔒 will light up.
To cancel: Press and hold Options Select ≡ until you hear a tone. The lock indicator 🔒 will turn off.
8
Additional Options - How to set and change the settings of the additional options.
1 CHECK
Check that there is no wash underway, then open drawer.
2 ENTER MENU
To enter the menu: Press and hold the Cycle Select >> and Options Select at the same time for four seconds.
- You are now in the Rinse Aid option of the options menu.
- To change the Rinse Aid setting, go to step 4 now.
3 SCROLL TO OPTION
Press Options Select to scroll to the next option.
The option indicators will display which option is selected (see table below).
When you have scrolled to the end of the sequence, the menu will start again with Rinse Aid.
4 CHANGE SETTING
Press Cycle Select to change the setting within an option.
The wash program indicators will display which setting is selected (see table below).
5 SAVE SETTING & QUIT MENU
Press Start ▶ to save the new setting and quit the preference options menu.
You can use either drawer to change the settings.
Changing the settings in one drawer will set your preferences for the whole dishwasher.
| OPTION RINSE AID | OPEN DRAWER AUTO POWER-ON (SUITABLE AS A SABBATH OPTION) | TONES AT END OF WASH | CLOSED DRAWER AUTOLOCK | WI-FI | |
| Which option am I in? | Ultra DryFastSanitize | Ultra DryFastSanitize | Ultra DryFastSanitize | Ultra DryFastSanitize | Ultra DryFastSanitize |
| Possible settings | 0 to 5 (max) | On or Off | On or Off | On or Off | On or Off |
| Settings examples | 4 indicators lit = setting 4Pots Plus Normal Express China Rinse1 indicator lit = setting 1Pots Plus Normal Express China Rinse | OnPlus Plus Normal Express China RinseOffPlus Normal Express China Rinse | OnPlus Plus Normal Express China RinseOffPlus Normal Express China Rinse | OnPlus Plus Normal Express China RinseOffPlus Normal Express China Rinse | Connected SunshineDisconnected |
9
Start Dishwasher
| Start | Press Start ▶ on the control panel and close the drawer within 4 seconds. If the drawer was not closed within 4 seconds, then press Start ▶ again before closing the drawer. |
| Pause | Firmly knock twice on the right side of the drawer front. Wait for three short and one long tone before opening the drawer. NOTE: Forcing the drawer open mid cycle may cause damage or injury.If the dishwasher drawer is not restarted within seven minutes, it will sound intermittently until it is restarted. |
| Cancel | Press and hold Start ▶. |
Delay Start Press and hold Start ▶ to set the delay start time. Each tone indicates a 1 hour delay (up to 12 hours). The delay start indicator Ⓞ will light up.
- If you scroll past 12h (12 hours) the dishwasher will exit delay start.
To re-enter delay start follow the instructions above. - The wash will start when the delay time is over, provided the drawer is closed.
If drawer is not closed within 4 seconds of setting delay start, OR If the drawer is opened after delay start has been set (for example, to load more dishes), delay start will be suspended.
To Resume: Press Start ▶ and close the drawer.
To Cancel Delay Start × : Press and hold Start ▶.
- If there is any water in the drawer, it will automatically drain before the dishwasher turns off.
Getting Started

Start Dishwasher (Cont.)
Remote Start
After your dishwasher has been connected to your network, Remote Start is available. Open the drawer, the red WiFi light must be lit. Press and hold the Cycle Select » button for 5 seconds, the WiFi light will start flashing, close the drawer. When you open the app the Remote Start button will be available. Press Remote Start on your phone to start the dishwasher.
If you open the drawer before the dishwasher is started, Remote Start will be disabled. Remote Start will be disabled if not used after 72 hours.
Dispensers
Check the Water Temperature
The entering water should be at least 120irc F and not more than 150irc F for effective cleaning and to prevent dish damage. Check the water temperature with a candy or meat thermometer.
Turn on the hot water faucet nearest the dishwasher, place the thermometer in a glass and let the water run continuously into the glass until the temperature stops rising.
Use a Rinse Agent
High quality rinse agents such as Cascade® Platinum™ Power Dry™ Rinse Aid or Finish® Jet-Dry® Rinse Aid are designed for great drying action and to protect against spots and film build-up on your dishes, glasses, flatware, cookware, and plastic.
NOTE: You may hear some unusual, high-pitched beeping when rinse aid is being dispensed. This is normal.
When to Fill the Rinse Agent Dispenser
If the indicator glows or flashes bright red, refill rinse aid.
If the indicator glows or flashes dimly or not at all, you do not need to refill, there is enough rinse aid for the wash.
NOTE: Lighter colored rinse aids will not dim the indicator as effectively as darker ones.
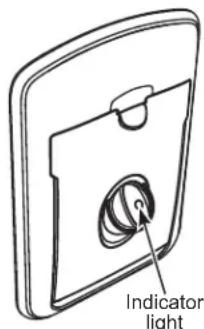
Filling the Rinse Agent Dispenser
The rinse agent dispenser holds 1.7 oz. of rinse agent. Under normal conditions, this will last approximately one month.
The rinse aid dispenser is on the inside of the drawer, underneath the detergent dispenser.
1 Turn the plug counterclockwise and remove.

② Pour rinse aid into the circular opening, taking care not to spill any into the drawer.
IMPORTANT!
Any accidental spillages of rinse aid must be wiped up. If not wiped up, rinse aid will cause excessive foaming, which may result in a service call that will not be covered by warranty.
③ Replace the plug, then turn it clockwise back to its original position.

natural_image
Diagram of a door handle with a rotating button and directional arrows indicating rotation (no text or symbols)Replace plug and turn clockwise to tighten
IMPORTANT!
Make sure that the plug is closed tight, with its finger grip in the vertical position.
Rinse Aid Setting
You may need to adjust the amount of rinse aid dispensed in each wash to suit your water conditions. The lowest setting is 0 (off), the highest is 5.
If there is excessive foam at the end of the wash, reduce the setting.
If dishes are wet or streaky after drying, increase the setting.
If you live in a hard water area and you have no water softener installed in your water supply or built into your dishwasher, we recommend adjusting the rinse aid setting to 5.
To adjust the setting
See 8 Additional Options in the Getting Started section.
Detergent Dispensing
IMPORTANT!
Do not use liquid detergent.
Do not place tablets or put liquid detergent in the detergent dispenser.
If using a tablet or gel pouch, place it in the cutlery basket or at the edge of the base rack as described later in this section.
Powder Detergent Dispenser
The detergent dispenser is located inside the drawer on the front left side.
Use only powder detergent designed for automatic dishwashers in the detergent dispenser.
Filling the Powder Detergent Dispenser
1 Press the latch down to open the dispenser.

② Check that the dispenser is empty and dry, then add powder detergent (do not place solid or liquid tablets in the dispenser). No detergent is needed Rinse program.
③ Close the dispenser until it clicks shut. The detergent will automatically be released into the drawer during the wash program.

natural_image
Illustration of a container with liquid and particles, no text or symbols presentNOTE: When washing heavily soiled dishes and in very hard water you may also fill the secondary dispenser with detergent to aid dishwasher performance.
When using the detergent dispenser the amount of powder detergent you use will be determined by the hardness of your water, the temperature of your water, and the food soil load inside the dishwasher. Contact your water company to get information about the hardness of the water in your area. Water hardness is measured in grains per gallon. Use this information and the table below to determine the amount of detergent to use. You may purchase a hard water test strip from Café. Call 877-959-8688 and ask for part number WD01X10295.
| Number of Grains/Gal. | Detergent Dispenser(s) to Fill |
| Less than 4 Fill | main to 1/3 full |
| 4 to 8 Fill main to 2/3 full | |
| 8 to 12 Fill main completely full | |
| Greater than 12 | Fill both main and secondary dispensers |

Use the table as a starting point and then adjust the amount of detergent you use. Use just enough to get good wash performance. Using just the right amount of detergent will provide great wash performance without wasting detergent or etching glassware.
Using too much detergent with very soft and/or very hot water may cause a condition called etching on your glassware. Etching is a permanent cloudiness in glassware. This condition is irreversible. However, using too little detergent will cause poor wash performance.
your
DO NOT USE HAND DISH DETERGENT
NOTE: Using a detergent that is not specifically designed for dishwashers will cause the dishwasher to fill with suds. During operation, these suds will spill out of the dishwasher vents, covering the kitchen floor and making the floor wet.
Because so many detergent containers look alike, store the dishwasher detergent in a separate space from all other cleaners. Show anyone who may use the dishwasher the correct detergent and where it is stored.
While there will be no lasting damage to the dishwasher, your dishes will not get clean using a dishwashing detergent that is not formulated for automatic dishwashers.
Dispensers
Detergent Dispensing
IMPORTANT!
Do not use liquid detergent.
Tablet Tray - For Gel Pouch or Tablet
The tablet tray is located on the cutlery basket.
Use only gel pouches or tablets designed for automatic dishwashers.
Placement on the Tablet Tray
1 Place on the tablet tray in the cutlery basket.

2 Slide the tray down and secure in the cutlery basket.
Placement within the Side Rack Rails - For Gel Pouch or Tablet
If the cutlery basket is not being used in the dishwasher for a particular load, the gel pouch or tablet may be wedged within the side rack rails.
Use only gel pouches or tablets designed for automatic dishwashers.
Placement within the Side Rack Rails
1 Securely wedge the gel pouch or tablet within the side rack rails.

2 IMPORTANT!
Do not place the gel pouch or tablet on the floor of the drawer, as it may interfere with the spray arm rotation and affect wash performance.
Notes on using tablets
- If you are using tablets, follow manufacturer instructions on the packet. Some tablets may not be suitable for all wash programs.
- Using tablets could improve wash performance in hard water areas.
- Make sure that tablets never come into direct contact with dishes or cutlery.
- If you are using dishwasher tablets with a built-in rinse aid component, we recommend turning off the rinse aid.
DO NOT USE HAND DISH DETERGENT
NOTE: Using a detergent that is not specifically designed for dishwashers will cause the dishwasher to fill with suds. During operation, these suds will spill out of the dishwasher vents, covering the kitchen floor and making the floor wet.
Because so many detergent containers look alike, store the dishwasher detergent in a separate space from all other cleaners. Show anyone who may use the dishwasher the correct detergent and where it is stored.
While there will be no lasting damage to the dishwasher, your dishes will not get clean using a dishwashing detergent that is not formulated for automatic dishwashers.
Loading
For best dishwashing results, follow these loading guidelines. Features and appearance of racks and cutlery basket may vary from your model.
Recommended Loading
The dishwasher is tested to 10 CFR part 430 for energy and water consumption using the parameters detailed below. Each drawer was individually tested as a compact dishwasher.
Top Drawer and Cutlery Basket

natural_image
Interior view of a kitchen drawer with multiple white ceramic dishes arranged in tiered compartments (no text or symbols visible)Bottom Drawer and Cutlery Basket

natural_image
Interior view of a kitchen appliance with multiple white ceramic kitchenware arranged in metal racks (no visible text or labels)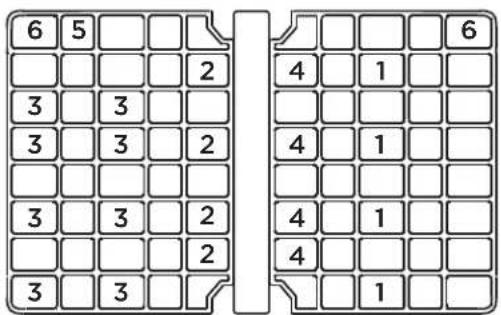

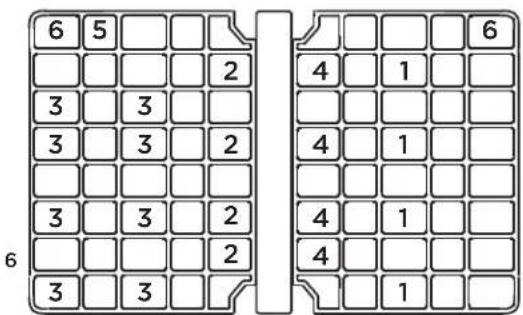
NOTE: CDD220 is a single drawer model only.
Loading
Dos and Don'ts of Loading

natural_image
Diagram of a storage rack with two blade blades inserted, showing internal structure and no text or symbols
Do: Sharp or pointed items must be placed horizontally or with sharp edges/points facing down to avoid risk of injury.

natural_image
Mechanical device with a cylindrical component mounted on a platform, connected to a control panel (no visible text or symbols)
Don't: Protruding items will stop the internal lid of the dishwasher from sealing properly, which could result in a service call.

natural_image
Technical line drawing of a mechanical assembly with springs and rollers (no text or symbols)
Do: A neatly arranged load with evenly spaced dishes helps wash performance.
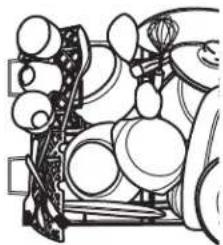
natural_image
Technical line drawing of a mechanical assembly with circular components and a central hub (no text or symbols)
Don't: Overcrowding reduces wash performance.
natural_image
Technical diagram of a mechanical assembly with springs and rollers (no text or labels)
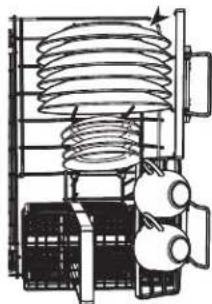
Do: Ensure there is enough space between plates. Mix spoons, knives and forks within the cutlery basket to prevent them from nesting.

natural_image
Technical line drawing of a mechanical assembly with springs and rollers (no text or symbols)
Don't: If plates and cutlery are nesting, they are less likely to be cleaned well.

natural_image
Technical line drawing of a mechanical device with a handle and base plate (no text or symbols)
Do: Ensure that water reaches all items on the racks.

natural_image
Line drawing of a mechanical device with a flat plate and lever (no text or symbols)
Don't: Dishware is blocking water from reaching items on the racks.
Cutlery Basket
Place flatware in the removable cutlery basket. Sharp objects, such as forks and knives, may be placed with the handles facing up, in order to protect your hands. For the best wash performance, place other items such as spoons with the handles facing down. Avoid allowing items to nest together, which may keep them from being properly washed. When loading, distribute items evenly in the basket.
The cutlery basket may also be used for small items, such as measuring spoons, baby bottle nipples, plastic lids, or corn cob holders.
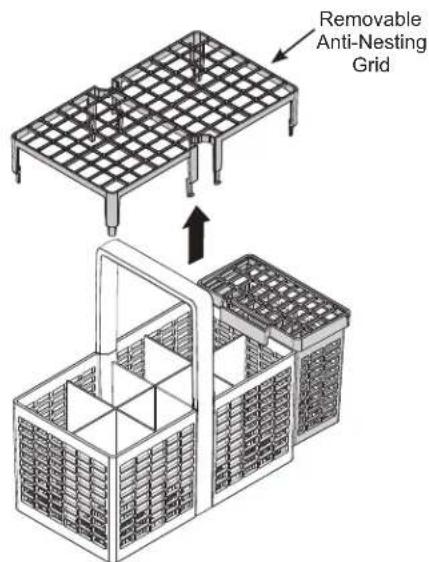
Removable Anti-Nesting Grid
- The anti-nesting grid clips onto the top of the cutlery basket.
- Use the grid to separate cutlery items and stop them from nesting together.
Removable Tablet Tray
- If using dishwasher gel pacs or tablets, place them on the removable tablet tray, as shown. When not in use make sure the removable tablet tray is securely stored outside of the dishwasher. See the Dispensers section for proper use of gel pouches and tablets.

Removable Small Items Container
- You can extend the cutlery basket by clipping the small items container onto its side.
- Small, light items like baby bottle teats are best placed into the small items container to prevent them from being displaced during the wash.
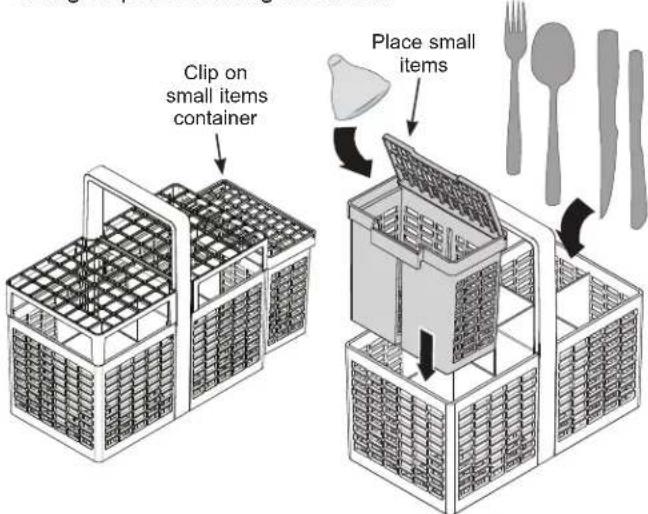
Small Items Container Placement
- To optimize the cutlery space within the basket, the small items container can be placed elsewhere in the drawer.
- If you lay the container flat, make sure that the solid plastic side is facing up.
- If you place a fully laden container under the stem safe shelves, it is best to leave the rack space directly above the container empty - there may not be enough water reaching items that are placed above.

Loading
Racks - Stem Safe Shelves
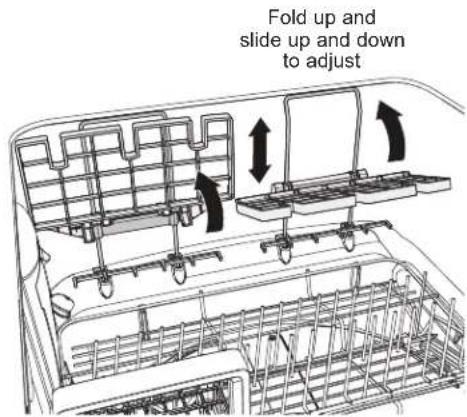
To add flexibility in loading, the stem safe shelves can be placed in the up or down position. They may also be adjusted up or down.
Foldaway
• They can be folded up or down independently of each other.
- Fold them down to use their stemware notches to help support long-stemmed glassware or for rows of cups.
- Fold them up for more space for taller items such as glasses.

Adjustable Height
- The shelves are independently height adjustable to accommodate glassware and cups of varying heights.
1 Fold up to unlock the shelf.
② Adjust to the desired height by sliding up or down.
3 Fold down to lock in position.
Racks - Knife Clips
- The knife clips clip onto the adjustable racks and support knives and other utensils during the wash.
• Always ensure that knife blades are facing down.

Racks - Folding Tines
- For optimum stability, place larger plates between the longer tines in the front.
- Fold the tines down if you need the space for pots or other large items.
- Release by folding tines down towards each other to detach them from the clips at the rear of the unit.
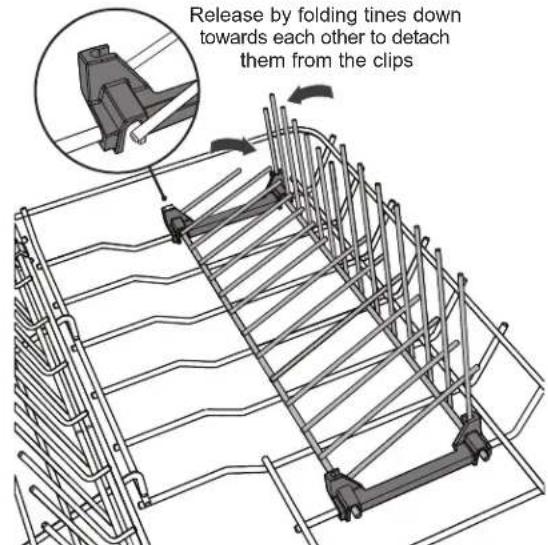
Removing the Folding Tines
The folding tines can be removed if so desired. However it is recommended you fold the tines down rather than removing them (if more space is needed in the dishwasher).
To remove:
Unclip the folding tine rack at each end by pulling firmly towards you.

To replace:
Line up the clips with the base rack and push firmly to click into place.
Removable Spacing-Adjustable Tine Rack
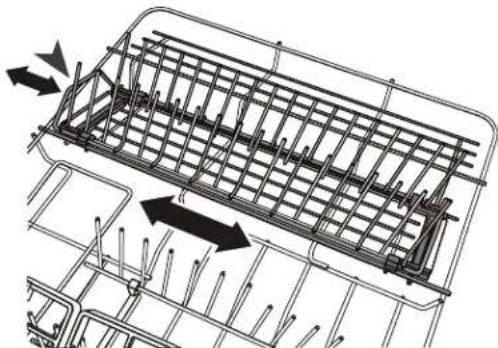
- Designed to fit deep bowls (wide spacing) or small plates (narrow spacing), depending on adjustment.

natural_image
Technical line drawing of a mechanical component with grid-like internal structure (no text or symbols)Adjust the Tine Spacing
- To adjust between wide and narrow spacings, slide the tines backward or forward by pushing or pulling the handle at the front.
natural_image
Technical line drawing of a mechanical component with internal grid structure and directional arrows (no text or symbols)Remove the Rack to Make Space for Larger Items
To remove the rack:
Grip handles at the front and rear of the rack and pull up to unclip.

natural_image
Technical line drawing of a reinforced concrete structure with rebar framework and upward force arrows (no text or symbols)To replace the rack:
Align front and rear clips with the base of the basket and click into place.
Care and Cleaning
Drain Filter, Filter Plate and Spray Arm
We recommend that the drain filter and filter plate in each drawer are removed and cleaned about once a month in normal use or whenever there is evidence of food particles.
The spray arm in normal use should require cleaning less frequently.
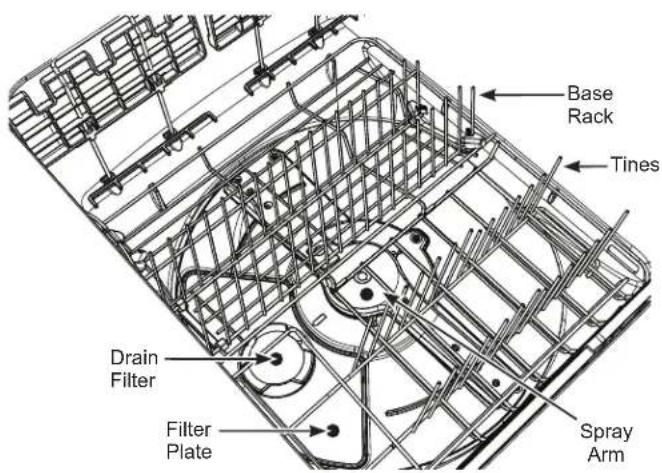
Cleaning the Drain Filter and Filter Plate
IMPORTANT!
- If a dishwasher cleaner / descaler is used, you must run a wash program with detergent immediately afterward to prevent any damage to the dishwasher.
- The dishwasher must be used with the filter plate, drain filter and spray arm correctly in place.
• We recommend that you always use the dishwasher with the right hand fold down tine rack in place.
Remove the base rack first:
1 Unplug the dishwasher or turn it off at the power supply.
NOTE: For ease of access to the drain filter and filter plate you may find it easier to remove the whole base rack (including tine racks) first.
To remove the whole base rack: Lift the rack up from the back first, to prevent it knocking against the detergent and rinse aid dispenser, and lift out.
2 If the base rack is left in, to access the drain filter:
- Remove the cutlery basket.
- Lift the trap door up.

Removing the Drain Filter and Filter Plate
3 Twist the circular drain filter counter-clockwise and lift to remove. It is normal to find some water under it.

4 Remove the drain filter mesh by pinching one side only and pulling it off, as shown.

NOTE: Do not attempt to remove the drain filter mesh by pinching two opposing sides together as this may damage the drain filter mesh.
5 Wash both parts of the drain filter in hot soapy water and rinse thoroughly under running water.
6 Carefully lift the filter plate out. Remove any foreign material on either side, wash in hot soapy water and rinse thoroughly in clean water, then wipe with a damp cloth.

Replacing the Filter Plate and Drain Filter
7 Carefully replace the filter plate. Ensure it is fully pushed into position.

8 Refit the circular drain filter:
a) Push the drain filter mesh back onto the holder. It should click into place.
After cleaning push mesh back on


Rotate the mesh counterclockwise until the arrows line up as shown.
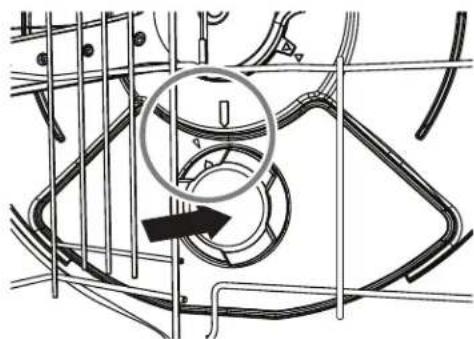
b) Rotate the drain filter mesh until the arrow on the mesh filter lines up with the arrow on the holder.
c) Refit the drain filter into the drain hole by lining up the arrow on the top of the drain filter with the arrow on the filter plate.
Line up the arrows on the filter plate and insert the drain filter
natural_image
Technical diagram of a mechanical assembly with no visible text or symbolsd) Rotate the drain filter clock wise until the arrow on the drain filter lines up with the arrow on the base of the drawer.

9 Replace the whole base rack (if removed).
10 Fold down the trap door so it is resting on the base rack and replace the cutlery basket.
Care and Cleaning
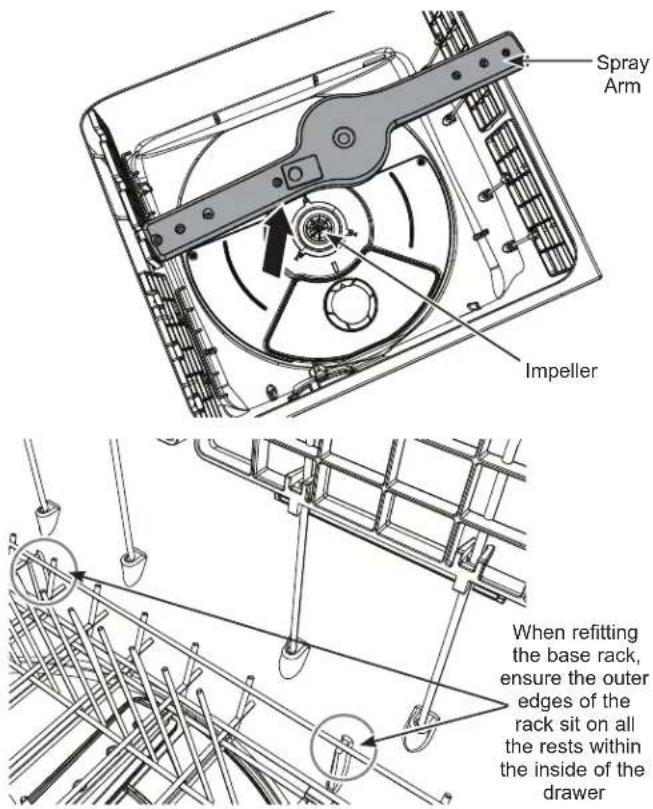
Cleaning the Spray Arm
1 Unplug the dishwasher or turn it off at the power supply.
② Unclip the glass supports (if fitted) from the rack wires and fold up all the foldaway stem safe shelves, so that they are all upright and close to the top.
③ Remove the base rack carefully. Lift from the back first to prevent knocking the detergent and rinse aid dispenser.
4 Lift the spray arm and shake any foreign material out. Rinse it clean under running water and wipe with a damp cloth.
5 Replace the spray arm back onto the impeller. Check that the spray arm is firmly seated and turns freely.
6 Replace the base rack, lowering its front edge into position first.
7 Plug the dishwasher back in or turn it on at the power supply.
NOTE: If there is broken crockery or glass in the drawer, it must be carefully removed to prevent damage to the dishwasher.
Care and Cleaning
Exterior Drawer Panels
Do NOT use Stainless Steel cleaners on the drawer surfaces. Use a clean, soft, lightly dampened cloth, then dry thoroughly. The Stainless Steel is coated to make it fingerprint resistant.
IMPORTANT!
We do not recommend the use of the following cleaning aids on your dishwasher as they may damage the surfaces:
- Plastic or stainless steel scouring pads
- Abrasive, solvent, household cleaners
- Acid or alkaline cleaners
• Hand washing liquids or soap
• Stainless steel cleaners or polishes - Laundry detergents or disinfectants
Interior
To clean and de-odorize your dishwasher, use citric acid, or Cascade® Platinum™ Dishwasher Cleaner or Finish® Dishwasher Cleaner, a detergent additive. They will break up mineral deposits, and remove hard water film and stains.
You can order citric acid Café kit WD35X151 through Café Parts by visiting cafeappliances.com/parts.
You can purchase dishwasher cleaners at your local grocery store.
Stainless Steel Drawers
The stainless steel used to make the drawers provides the highest reliability available in a Café dishwasher.
If the drawers should be scratched or dented during normal use, they will not rust or corrode. These surface blemishes will not affect their function or durability.
Protect Against Freezing
If your dishwasher is left in an unheated place during the winter, ask a service technician to:
1 Turn off electrical power to the dishwasher. Remove fuses or trip circuit breaker.
2 Turn off the water supply and disconnect the water inlet line from the water valve.
3 Drain water from the water inlet line and water valve. (Use a pan to catch the water.)
4 Reconnect the water inlet line to the water valve.
Does Your Dishwasher Have an Air Gap?
An air gap protects your dishwasher against water backing up into it if a drain clogs. The air gap is not a part of the dishwasher. It is not covered by your warranty. Not all plumbing codes require air gaps, so you may not have one.
Air gap
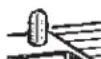
Check the air gap any time your dishwasher isn't draining well.
The air gap is easy to clean.
1 Turn off the dishwasher and lift off the air gap cover.
2 Remove the plastic cap under the cover and clean with a toothpick.
③ Replace the cap and cover when the air gap is clean.
Troubleshooting Tips... Before you schedule service
| Problem Possible Cause What To Do | |
| Dishes and flatware not clean | Filters are clogged |
| Wash program unsuitable for the load | |
| Spray arm unable to rotate | |
| Drawer overloaded/incorrectly loaded | |
| Filter plate/drain filter is incorrectly inserted | |
| Detergent put in the wrong compartment of the dispenser | |
| Excess food not removed from dinnerware prior to loading | |
| Spray arm holes are blocked | |
| Low inlet water temperature | |
| Water pressure is temporarily low | |
| Air gap or disposer clogged | |
| High drain loop or air gap not installed | |
| Improper rack loading Make sure large dishware does not block the detergent dispenser or the wash arms. See the Loading section. | |
| Poor performing detergent | |
| Not enough detergent | |
| Cloudiness on glassware | Combination of soft water and too much detergent |
| Low performing phosphate-free detergent | |
| Water temperature entering the dishwasher exceeds 150°F | |
| A white film on glassware, dishware and the interior | This problem is likely caused by a low quality phosphate-free dishwasher detergent |
Troubleshooting Tips... Before you schedule service
| Problem Possible Cause What To Do | ||
| Spots and filming on glasses and flatware | Extremely hard water Increase | the rinse aid setting and the amount of detergent. See the Dispensers section.Use high quality rinse agents such as Cascade® PlatinumTM Power DryTM Rinse Aid or Finish® Jet-Dry® Rinse Aid to prevent spots and prevent new film build-up. If water is extremely hard, a softener may be required. |
| Low inlet water temperature | Make sure water temperature is at least 120°F. | |
| Overloading or improper loading of the dishwasher | Load dishwasher as shown in the Loading section. | |
| Old or damp powder detergent | Make sure detergent is fresh. Use high quality detergents such as Cascade® PlatinumTM ActionPacsTM or Finish® Quantum® Automatic Dishwashing Detergent. | |
| Rinse agent dispenser empty | Refill with high quality rinse agents such as Cascade® PlatinumTM Power DryTM Rinse Aid or Finish® Jet-Dry® Rinse Aid. | |
| Rinse aid setting too low or off | Increase/turn on the rinse aid setting. See Use a Rinse Agent in the Dispensers section. | |
| Too little or low performing detergent | Make sure you use the proper amount of highly rated powder detergent. | |
| Black or gray marks on dishes | Aluminum utensils have rubbed against dishes | Remove marks with a mild, abrasive cleaner. |
| Dishes don't dry | Normal wash program used | Choose Plus or Pots wash program. |
| Overloading or improper loading of the dishwasher | Load dishwasher as shown in the Loading section. | |
| Additional drying time is needed | Leave drawer closed after the wash program has stopped to allow the fan to run as needed.Select Ultra Dry option to add additional drying time.NOTE: If you open the drawer, this fan extension will be cancelled. | |
| Low inlet water temperature | Make sure inlet water temperature is at least 120°F. Select Ultra Dry.Select a higher cycle, such as Plus or Pots. | |
| Rinse agent dispenser is empty | Check the rinse agent dispenser and fill as required. | |
| Rinse aid setting too low or off | Increase/turn on the rinse aid setting. See Use a Rinse Agent in the Dispensers section. | |
| Dishes were left in the drawer for several hours after a wash | We recommend unloading the dishes within a few hours after a wash program has finished, as the small amount of vapor left after the wash may, with time, resettle on dishes as condensation. Using rinse aid or increasing its setting will also help with drying. | |
| Program is taking much longer than usual | Wrong type of detergent usedAuto recovery program has been triggered to stop the dishwasher overflowing and to disperse excess foam. | No action required. Allow the program to finish.NOTE: You may need to run your chosen wash program again with the correct detergent if the dishes are not clean at the end of the recovery program. |
| The wash program seems to have finished (the dishwasher is idle), but the end of wash beeps haven't sounded and the drawer cannot be opened | The wash program is still in progress. It is in a 'quiet' phase that is needed for ensuring the best wash results. | No action required. The program will transition into a more audible phase after the 'quiet' phase is over. |
Troubleshooting Tips... Before you schedule service
| Problem Possible Cause What To Do | ||
| Intermittent beeping | Dishwasher is in pause mode | Press Start on the control panel then close the drawer to resume the program. |
| Sanitized light flashes when the drawer is opened at the end of the cycle | A drawer was opened and the cycle was interrupted during the final rinse | Do not interrupt the cycle by opening a drawer during the wash cycle. |
| The incoming water temperature was too low | Raise the water heater temperature to between 120°F and 150°F. | |
| Detergent left in dispenser | Dishes or utensils are blocking the detergent cup | Reposition the dishes, so the water from the lower spray arm can flush the detergent cup. See the Loading section.Reposition the tall utensils or heavy silverware that may be keeping the dispenser cup door from opening. See the Loading section.Don't place large bowls or pots directly in front of the detergent dispenser. |
| Powder detergent not dispensed | Detergent dispenser was wet when loaded | Clean the dispenser and ensure it is dry before adding powder detergent. |
| Suds in the drawers | Wrong amount of detergent | See Detergent Dispensing in the Dispensers section. |
| Wrong detergent Use only high quality automatic dishwasher detergents to avoid sudsing. Cascade® PlatinumTM ActionPacsTM or Finish® Quantum® Automatic Dishwashing Detergent have been approved for use in all Café dishwashers.To remove suds from the dishwasher, open the drawers and let suds dissipate. | ||
| Rinse aid setting too high | Decrease the rinse aid setting. See Use a Rinse Agent in the Dispensers section. | |
| Rinse aid dispenser plug not closed tightly enough | Ensure that the rinse aid dispenser plug is fully closed, with its finger grip pointing vertically. See Use Rinse Aid in the Dispensers section. | |
| Rinse agent was spilled Always wipe up rinse agent spills immediately. | ||
| Water under the drain filter | This is normal No action is needed. | |
| Drawer interior is stained | White film on inside surface—hard water minerals | Café recommends high quality rinse agents such as Cascade® PlatinumTM Power DryTM Rinse Aid or Finish® Jet-Dry® Rinse Aid to help prevent hard water mineral deposits from forming.Run dishwasher with citric acid to remove mineral deposits.Citric acid (Part number: WD35X151) can be ordered through GE Appliances Parts. See back cover for ordering information. Alternatively, purchase Cascade® PlatinumTM Dishwasher Cleaner or Finish® Dishwasher Cleaner and follow the directions on the label. |
| Some foods, like tomato based products, may stain the inside of the drawer | Pre-rinse dishes before placing in the drawer.Alternatively, using the Rinse program after adding the dishes may minimize staining. | |
| Hard Water Living in | an area with very hard water | Increase the rinse aid setting and the amount of detergent. See the Dispensers section.If living in an area with very hard water, consult a plumber on installing a household water softener. |
Troubleshooting Tips... Before you schedule service
| Problem Possible Cause What To Do | ||
| Water standing in the dishwasher | Air gap is clogged | Clean the air gap. See the Care and Cleaning section. |
| High drain loop or air gap not installed | Refer to the Installation Instructions for proper drain line installation. | |
| Drain hose(s) bent or kinked | Straighten the drain hose(s). | |
| Filters blocked | Clean the filter plate/drain filter. See the Care and Cleaning section. | |
| Water won't pump out of the dishwasher | Drain is clogged | If you have an air gap, clean it. See the Care and Cleaning section.If the dishwasher drains into a disposer, run disposer clear.Check to see if your kitchen sink is draining well. If not,you may need a plumber. |
| Dishwasher won't run | The Start ▶button was not pressed | Press the Start ▶button. |
| The drawer is not closed properly | Ensure the drawer is free from any objects and firmly closed. | |
| Dishwasher drawer is in “showroom mode” | Contact Café for further information. | |
| Fuse is blown or circuit breaker is tripped | Replace fuse or reset circuit breaker. Remove any other appliances from the circuit. | |
| Power is not connected or turned off | Connect power, replace fuse or reset circuit breaker.Remove any other appliances from the circuit. | |
| Keylock or Childlock is on | Unlock controls. See Lock Options in the Getting started section. | |
| Possible leak is detected Some models are equipped with leak detection and the cycle will be cancelled if a leak is detected. See Leak Protection in the Getting started section. Contact Café for service. | ||
| Control panel responded to inputs but dishwasher never filled with water | Drawer may not be completely closed | Make sure the drawer is firmly closed. |
| Water valve may be turned off | Make sure water valve (usually located under the sink) is turned on. | |
| Drawer will not open (no beeping, no wash in progress) | Childlock feature is on | Turn the Childlock off. See Lock Options in the Getting started section. |
| Closed drawer auto lock is on | Knock once on the right side of the drawer front and open drawer within 30 seconds. | |
| Power failure during wash program | Power outage in your home or area | Wait until power resumes, program will restart in same part of wash program. |
| Dishwasher does not recognize when I knock on the drawer front to pause or unlock it | Not knocking hard enough or not knocking on the right side of the drawer front | Ensure you are knocking firmly on the right side of the drawer front, rather than using a light tap. |
| Drawer front knock sensor is incorrectly installed or calibrated | Contact Café for service. | |
| Dishwasher is registering taps and bumps as knocks and pausing inadvertently | Drawer front knock sensor is incorrectly installed or calibrated | Contact Café for service. |
Troubleshooting Tips... Before you schedule service
| Problem Possible Cause What To Do | ||
| Noise Normal operating sounds:Beeping at the end of the cycle (on some models)Detergent cup openingWater entering dishwasherMotor stops and starts at various times during cycleSpray arms start and stop at various timesDrain pump sounds during pump outDrain pump starts and stops several times during each drain | These are all normal. No action is required. | |
| Fan noise starts up when I close the drawer, even though I didn't start a new wash | This is normal. In some cases, the drying fan will run whenever the drawer is closed for a set period of time after a program has finished. | No action required. The fan will automatically stop after the set time is over. |
| Fan noise coming from the dishwasher after a wash program has finished | This is normal. The drying fan continues to run for a set period of time after a program has finished to assist with drying. | No action required. The fan will automatically stop after the set time is over, or when the drawer is opened. In some cases, the fan may resume when the drawer is closed again. |
| Excessive motor noise | No water in the motor area This usually occurs on the first use or when the dishwasher has not been used for long periods of time. Pour 3 cups of water into the drawer before running a wash program. | |
| Water pooling on inner rim of drawer after a wash | This is normal condensation | Wipe dry. |
| Water leaking Drain hose | hose disconnected from waste pipe | Reconnect the drain hose to the waste pipe. |
| Water inlet hose not properly connected | Ensure the inlet hose is connected securely. | |
| Other leaks Turn water and power supplies to the dishwasher off.Contact Café for service. | ||
| Rinse aid dispenser plug not closed properly | Ensure that the rinse aid dispenser plug is fully closed, with its hand grip pointing vertically. See Use a Rinse Agent in the Dispensers section. | |
Café Dishwasher Limited Warranty
cafeappliances.com
All warranty service is provided by our Factory Service Centers, or an authorized service technician. To schedule service online, visit us at cafeappliances.com/service.
Servicing your appliance may require the use of the onboard data port for diagnostics. This gives a Café factory service technician the ability to quickly diagnose any issues with your appliance and helps Café improve its products by providing Café with information on your appliance. If you do not want your appliance data to be sent to Café, please advise your technician not to submit the data to Café at the time of service.
| For the period of: We will | replace: |
| One yearFrom the date of the original purchase | Any part of the dishwasher which fails due to a defect in materials or workmanship. During this limited one-year warranty, we will also provide, free of charge, all labor and related service to replace the defective part. |
What is not covered:
■ Service trips to your home to teach you how to use the product.
■ Improper installation, delivery or maintenance.
■ Failure of the product if it is abused, misused, or used for other than the intended purpose or used commercially.
■ Replacement of house fuses or resetting of circuit breakers.
■ Products which are not defective or broken, or which are working as described in the Owner's Manual.
■ Damage to the product caused by accident, fire, floods or acts of God.
■ Incidental or consequential damage caused by possible defects with this appliance.
■ Defects or damage due to operation in freezing temperatures.
■ Damage caused after delivery.
■ Product not accessible to provide required service.
■ Cleaning or servicing of the air gap device in the drain line.
EXCLUSION OF IMPLIED WARRANTIES
Your sole and exclusive remedy is product repair as provided in this Limited Warranty. Any implied warranties, including the implied warranties of merchantability or fitness for a particular purpose, are limited to one year or the shortest period allowed by law.
This limited warranty is extended to the original purchaser and any succeeding owner for products purchased for home use within the USA. If the product is located in an area where service by a Café Authorized Servicer is not available, you may be responsible for a trip charge or you may be required to bring the product to an Authorized Café Service location for service. In Alaska, the limited warranty excludes the cost of shipping or service calls to your home.
Some states do not allow the exclusion or limitation of incidental or consequential damages. This limited warranty gives you specific legal rights, and you may also have other rights which vary from state to state. To know what your legal rights are, consult your local or state consumer affairs office or your state's Attorney General.
Warrantor: GE Appliances, a Haier Company Louisville, KY 40225
Extended Warranties: Purchase a Café extended warranty and learn about special discounts that are available while your warranty is still in effect. You can purchase it online anytime at
cafeappliances.com/extended-warranty.
Café Service will still be there after your warranty expires.
Consumer Support
Café Website
Have a question or need assistance with your appliance? Try the Café website 24 hours a day, any day of the year! You can also shop for more great Café products and take advantage of all our on-line support services designed for your convenience.
cafeappliances.com
Register Your Appliance
Register your new appliance on-line at your convenience! Timely product registration will allow for enhanced communication and prompt service under the terms of your warranty, should the need arise. You may also mail in the pre-printed registration card included in the packing material.
cafeappliances.com/register
Schedule Service
Expert Café repair service is only one step away from your door. Get on-line and schedule your service at your convenience any day of the year.
cafeappliances.com/service
Extended Warranties
Purchase a Café extended warranty and learn about special discounts that are available while your warranty is still in effect. You can purchase it on-line anytime. Café Service will still be there after your warranty expires.
cafeappliances.com/extended-warranty
Parts and Accessories
Individuals qualified to service their own appliances can have parts or accessories sent directly to their homes (VISA, MasterCard and Discover cards are accepted). Order on-line today 24 hours every day.
cafeappliances.com/parts
Instructions contained in this manual cover procedures to be performed by any user. Other servicing generally should be referred to qualified service personnel. Caution must be exercised, since improper servicing may cause unsafe operation.
Contact Us
If you are not satisfied with the service you receive from Café, contact us on our website with all the details including your phone number, or write to:
General Manager, Customer Relations, Café | Appliance Park | Louisville, KY 40225
cafeappliances.com/contact
CAFÉ
DISTINCT BY DESIGN™
If the hot water has not been used for two or more weeks, prevent the possibility of damage or injury by turning on all hot water faucets and allowing them to run for several minutes. Do this before using any electrical appliance connected to the hot water system. This simple procedure will allow any built-up hydrogen gas to escape. Since the gas is flammable, do not smoke, use an open flame, or use the appliance during this process.
ADVERTENCIA
| Pots Ultra Dry | Fast Sanitize | ||
| Plus Ultra Dry | Fast Sanitize | ||
| Normal - | - | - | |
| Express Ultra Dry | - | - | |
| China Ultra Dry | Fast | - | |
| Rinse | - | - | - |
natural_image
Diagram of a device with a knob and directional arrows indicating rotation (no text or symbols)natural_image
Illustration of hands using a tool to adjust or install a component (no text or symbols visible)natural_image
Diagram of a door switch mechanism with directional arrows indicating rotation (no text or symbols)Powder Detergent Dispenser
natural_image
Simple icon of a container with a downward arrow and a chain of seeds (no text or symbols)natural_image
Interior view of a kitchen appliance showing multiple white ceramic dishes arranged in metal racks, with no visible text or labels.natural_image
Interior view of a kitchen appliance with multiple white plates and a rack, no visible text or symbols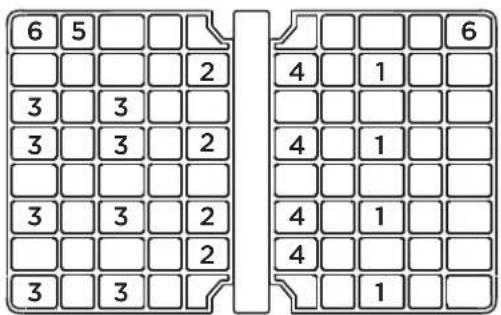


natural_image
Diagram of a 3D grid structure with two cutouts and an arrow indicating direction (no text or symbols)
natural_image
Technical line drawing of a mechanical assembly with rollers and springs (no text or symbols)
natural_image
Technical diagram of an electrical device with coiled spring and motor components (no text or labels)
natural_image
Technical line drawing of a mechanical device with a base and handle, no visible text or symbols
natural_image
Diagram of a mechanical device with a cylindrical component mounted on a platform, connected to a vertical panel (no text or symbols visible)
natural_image
Technical line drawing of a mechanical assembly with circular components and brackets (no text or symbols)
natural_image
Technical line drawing of a mechanical assembly with springs and rollers (no text or symbols)
natural_image
Line drawing of a mechanical device with a flat plate and lever, no text or symbols present
natural_image
Technical line drawing of a structural steel frame with internal rebar framework (no text or symbols)natural_image
Technical line drawing of a mechanical component with internal grid structure and directional arrows (no text or symbols)natural_image
Technical line drawing of a reinforced concrete structure with rebar framework and support beams (no text or symbols)Cleaning the Spray Arm
cafeappliances.com/extended-warranty


- Contents
- THANK YOU FOR MAKING CAFÉ A PART OF YOUR HOME.
- CAFÉ
- IMPORTANT SAFETY INFORMATION READ ALL INSTRUCTIONS BEFORE USING THE APPLIANCE
- ⚠ WARNING PROPER INSTALLATION AND MAINTENANCE
- ⚠ WARNING WHEN USING YOUR DISHWAS INCLUDING THE FOLLOWING:
- READ AND SAVE THESE INSTRUCTIONS
- ⚠ WARNING WATER HEATER SAFETY
- ⚠ WARNING RISK OF CHILD ENTRAPMENT
- PROPER DISPOSAL OF THE DISHWASHER
- ▲CAUTION TO PREVENT MINOR INJURY AND PROPERTY DAMAGE
- CAUTION
- NOTICE
- ELECTRICAL REQUIREMENTS
- This appliance must have:
- It is recommended to have:
- Proper Disposal of your Appliance
- Appliance Communication
- WiFi Connect for customers in the United States (on some models)
- Getting started
- Quick Start
- Features and appearance will vary throughout this manual
- Indicators
- Controls
- Delay start
- Leak Protection
- Discard Scraps
- Load Dishes Carefully- See the Loading section for more information.
- IMPORTANT!
- Check Spray Arm(s) - See the Care and Cleaning section for more information.
- Add Detergent - See the Dispensers section for more information.
- Check Rinse Aid - See the Dispensers section for more information.
- Select Wash Cycle - Press Cycle Select » to scroll through the available wash programs and stop to select the desired one. The lit indicator light above the selected wash program will indicate the selected wash program.
- NOTES:
- 8
- CHECK
- ENTER MENU
- SCROLL TO OPTION
- CHANGE SETTING
- SAVE SETTING & QUIT MENU
- 9
- Start Dishwasher (Cont.)
- Remote Start
- Dispensers
- Check the Water Temperature
- Use a Rinse Agent
- When to Fill the Rinse Agent Dispenser
- Filling the Rinse Agent Dispenser
- Rinse Aid Setting
- To adjust the setting
- Detergent Dispensing
- Powder Detergent Dispenser
- Filling the Powder Detergent Dispenser
- DO NOT USE HAND DISH DETERGENT
- Tablet Tray - For Gel Pouch or Tablet
- Placement on the Tablet Tray
- Placement within the Side Rack Rails - For Gel Pouch or Tablet
- Placement within the Side Rack Rails
- Notes on using tablets
- Loading
- Recommended Loading
- Dos and Don'ts of Loading
- Cutlery Basket
- Removable Anti-Nesting Grid
- Removable Tablet Tray
- Removable Small Items Container
- Small Items Container Placement
- Racks - Stem Safe Shelves
- Foldaway
- Adjustable Height
- Racks - Knife Clips
- Racks - Folding Tines
- Removing the Folding Tines
- To remove:
- To replace:
- Removable Spacing-Adjustable Tine Rack
- Adjust the Tine Spacing
- Remove the Rack to Make Space for Larger Items
- To remove the rack:
- To replace the rack:
- Care and Cleaning
- Drain Filter, Filter Plate and Spray Arm
- Cleaning the Drain Filter and Filter Plate
- Remove the base rack first:
- Removing the Drain Filter and Filter Plate
- Replacing the Filter Plate and Drain Filter
- Cleaning the Spray Arm
- Exterior Drawer Panels
- Interior
- Stainless Steel Drawers
- Protect Against Freezing
- Does Your Dishwasher Have an Air Gap?
- Café Dishwasher Limited Warranty
- cafeappliances.com
- What is not covered:
- EXCLUSION OF IMPLIED WARRANTIES
- Consumer Support
- Café Website
- Register Your Appliance
- Schedule Service
- Extended Warranties
- Parts and Accessories
- Contact Us
- ADVERTENCIA
Brand : Café
Model : CDD220P4WW2
Category : Dishwasher