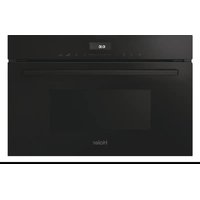
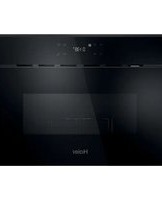
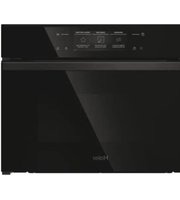
H38DMWID26NB - Microwave Oven HAIER - Free user manual and instructions
Find the device manual for free H38DMWID26NB HAIER in PDF.


| Product type | Built-in microwave oven |
| Brand | Haier |
| Model | H38DMWID26NB |
| Capacity | 25 liters (estimated) |
| Dimensions (W x H x D) | Recess 600 mm wide, minimum installation height 850 mm |
| Net weight | Approximately 15 kg |
| Power supply | 230 V / 50 Hz |
| Microwave power | 900 W (estimated) |
| Grill power | 1000 W (estimated) |
| Combined power | 2 modes: C-1 (55% MW + 45% grill), C-2 (36% MW + 64% grill) |
| Power levels | 5 (100%, 80%, 50%, 30%, 10%) |
| Control type | Electronic with slider and touch keys |
| Display | Digital LED |
| Timer | 0:05 to 95:00 minutes |
| Clock | 24-hour |
| Functions | Microwave, grill, combi, defrost (weight/time), 8 auto menus |
| Child lock | Lock by pressing 3 seconds |
| Turntable | Yes, glass (approx. 270 mm diameter) |
| Included accessories | Glass plate, ring, high rack, instruction manual |
| Interior material | Stainless steel |
| Standby consumption | 0.8 W |
| Energy class | A (estimated) |
| Warranty | 2 years (standard) |
Frequently Asked Questions - H38DMWID26NB HAIER
User questions about H38DMWID26NB HAIER
0 question about this device. Answer the ones you know or ask your own.
Ask a new question about this device
Download the instructions for your Microwave Oven in PDF format for free! Find your manual H38DMWID26NB - HAIER and take your electronic device back in hand. On this page are published all the documents necessary for the use of your device. H38DMWID26NB by HAIER.
USER MANUAL H38DMWID26NB HAIER
CANDY HOOVER GROUP – Via Comolli 16, Brugherio–Italy
Haier
User Instructions
| MICROWAVE OVEN | EN | 4 |
| BedienungsanleitungMIKROWELLENOFEN | DE | 26 |
| Istruzioni per l’usoFORNO A MICROONDE | IT | 48 |
| Instrucciones de usoHORNO DE MICROONDAS | ES | 70 |
| Mode d’emploiFOUR À MICRO-ONDES | FR | 92 |
| Instrukcje użytkownikaKUCHENKA MIKROFALOWA | PL | 114 |
| Instruções para o utilizadorFORNO MICRO-ONDAS | PT | 136 |
| Uputstvo za upotrebuMIKROTALASNA PEĆNICA | SR | 158 |
| Pokyny pro uživateleMIKROVLNNÁ TROUBA | CS | 180 |
| Návod na použitieMIKROVLNNÁ RÚRA | SK | 202 |
| Navodila za uporabnikaMIKROVALOVNA PEČICA | SL | 224 |
| KasutusjuhendMIKROLAINEAHI | ET | 246 |
| Naudojimo instrukcijosMIKROBANGŲ KROSNELĖ | LT | 267 |
| Norādījumi lietotājamMIKROVIŁNU KRĀSNS | LV | 288 |
| Felhasználói útmutatóMIKROHULLÁMÚ SÜTŐ | HU | 309 |
| Інструкції користувачаMIKROXВИЛЬОВА ПІЧ | UA | 330 |
Summary
Important safety indications
Product description
How the product works
Use of the appliance
Cleaning and maintenance
Environmental protection and disposal
Installation
Dear Customer,
We would like to thank you and congratulate you on your choice. This new product has been carefully designed and built using high-quality materials, and meticulously tested to ensure that it meets all your culinary requirements.
Please read and observe these simple instructions, which will enable you to achieve excellent results from the very first use. This state-of-the-art appliance comes to you with our very best wishes.
PRECAUTIONS TO AVOID POSSIBLE EXPOSURE TO EXCESSIVE MICROWAVE ENERGY
- Do not attempt to operate this oven with the door open since this can result in harmful exposure to microwave energy. It is important not to break or tamper with the safety interlocks.
- Do not place any object between the oven front face and the door or allow soil or cleaner residue to accumulate on sealing surfaces.
- WARNING: If the door or door seals are damaged, the oven must not be operated until it has been repaired by a competent person.
IMPORTANT SAFETY INSTRUCTIONS WARNING
To reduce the risk of fire, electric shock, injury to persons or exposure to excessive microwave oven energy when using your appliance, follow basic precautions, including the following:
- Read and follow the specific: "PRECAUTIONS TO AVOID POSSIBLE EXPOSURE TO EXCESSIVE MICROWAVE ENERGY".
- This appliance can be used by children aged from 8 years and above and persons with reduced physical, sensory or mental capabilities or lack of experience and knowledge if they have been given supervision or instruction concerning use of the appliance in a safe way and understand the hazards involved. Children shall not play with the appliance. Cleaning and user maintenance shall not be made by children without supervision.
- Keep the appliance and its cord out of reach of children less than 8 years.
- If the supply cord is damaged, it must be replaced by the manufacturer, its service agent or similarly qualified persons in order to avoid a hazard.
- WARNING: Ensure that the appliance is switched off before replacing the lamp to avoid the possibility of electric shock.
- WARNING: It is hazardous for anyone other than a competent person to carry out any service or repair operation that involves the removal of a cover which gives protection against exposure to microwave energy.
- WARNING: Liquids and foods must not be heated in sealed containers since they are liable to explode.
- When heating food in plastic or paper containers, keep an eye on the oven due to the possibility of ignition.
- Only use utensils that are suitable for use in microwave ovens.
- If smoke is emitted, switch off or unplug the appliance and keep the door closed in order to stifle any flames.
- Microwave heating of beverages can result in delayed eruptive boiling, therefore care must be taken when handling the container.
- The contents of feeding bottles and baby food jars shall be stirred or shaken and the temperature checked before consumption, in order to avoid burns.
- Eggs in their shell and whole hard-boiled eggs should not be heated in microwave ovens since they may explode, even after microwave heating has ended.
- Details for cleaning door seals, cavities and adjacent parts.
- The oven should be cleaned regularly and any food deposits removed.
- Failure to maintain the oven in a clean condition could lead to deterioration of the surface that could adversely affect the life of the appliance and possibly result in a hazardous situation.
- Only use the temperature probe recommended for this oven. (For ovens provided with a facility to use a temperature-sensing probe).
- The microwave oven must be operated with the decorative door open. (For ovens with a decorative door).
- This appliance is intended to be used in household and similar applications such as:
- staff kitchen areas in shops, offices and other working environments;
- by clients in hotels, motels and other residential type environments;
- farm houses;
- bed and breakfast type environments.
- The microwave oven is intended for heating food and beverages. Drying of food or clothing and heating of warming pads, slippers, sponges, damp cloth and similar may lead to risk of injury, ignition or fire.
- Metallic containers for food and beverages are not allowed during microwave cooking.
- The appliance shall not be cleaned with a steam cleaner.
- The appliance must not be installed behind a decorative door in order to avoid overheating. (This is not applicable for appliances with decorative door).
- The microwave oven is intended to be used built-in.
- The appliance must be operated with any cabinet door open.
- Care should be taken not to displace the turntable when removing containers from the appliance. (For fixed appliances and built-in appliances being used equal or higher than 900mm above the floor and having detachable turntables. But this is not applicable for appliances with horizontal bottom hinged door).
• Surface of a storage drawer can get hot.
- Do not use harsh abrasive cleaners or sharp metal scrapers to clean the oven door glass since they can scratch the surface, which may result in shattering of the glass.
- WARNING: The appliance and its accessible parts become hot during use. Care should be taken to avoid touching heating elements. Children less than 8 years of age shall be kept away unless continuously supervised.
- During and after use the appliance becomes hot. Care should be taken to avoid touching heating elements inside the oven.
- WARNING: Accessible parts may become hot during and after use. Young children should be kept away.
- WARNING: When the appliance is operated in the combination mode, children should only use the oven under adult supervision due to the temperatures generated.
TO REDUCE THE RISK OF INJURY TO PERSONS GROUNDING INSTALLATION
DANGER
• Electric Shock Hazard
- Touching some of the internal components can cause serious personal injury or death. Do not disassemble this appliance.
WARNING
• Electric Shock Hazard
- Improper use of the grounding can result in electric shock. Do not plug into an outlet until appliance is properly installed and grounded.
- This appliance must be grounded. In the event of an electrical short circuit, grounding reduces the risk of electric shock by providing an escape wire for the electric current.
- This appliance is equipped with a cord having a grounding wire with a grounding plug. The plug must be
plugged into an outlet that is properly installed and grounded.
- Consult a qualified electrician or serviceman if the grounding instructions are not completely understood or if doubt exists as to whether the appliance is properly grounded.
- If it is necessary to use an extension cord, use only a 3-wire extension cord.
- A short power-supply cord is provided to reduce the risks resulting from becoming entangled in or tripping over a longer cord.
- If a long cord set or extension cord is used:
■ The marked electrical rating of the cord set or extension cord should be at least as great as the electrical rating of the appliance.
■ The extension cord must be a grounding-type 3-wire cord.
■ The long cord should be arranged so that it will not drape over the counter top or tabletop where it can be pulled on by children or tripped over unintentionally.
Materials you can use in microwave oven
| Utensils | Remarks |
| Browning dish | Follow manufacturer's instructions. The bottom of browning dish must be at least 3/16 inch (5mm) above the turntable. Incorrect usage may cause the turntable to break. |
| Dinnerware | Microwave-safe only. Follow manufacturer's instructions. Do not use cracked or chipped dishes. |
| Glass jars | Always remove lid. Use only to heat food until just warm. Most glass jars are not heat resistant and may break. |
| Glassware | Heat-resistant oven glassware only. Make sure there is no metallic trim. Do not use cracked or chipped dishes. |
| Oven cooking bags | Follow manufacturer's instructions. Do not close with metal tie. Make slits to allow steam to escape. |
| Paper plates and cups | Use for short-term cooking/warming only. Do not leave oven unattended while cooking. |
| Paper towels | Use to cover food for reheating and absorbing fat. Use with supervision for a short-term cooking only. |
| Parchment paper | Use as a cover to prevent splattering or a wrap for steaming. |
| Plastic | Microwave-safe only. Follow the manufacturer's instructions. Should be labeled "Microwave Safe". Some plastic containers soften, as the food inside gets hot. "Boiling bags" and tightly closed plastic bags should be slit, pierced or vented as directed by package. |
| Plastic wrap | Microwave-safe only. Use to cover food during cooking to retain moisture. Do not allow plastic wrap to touch food. |
| Thermometers | Microwave-safe only (meat and candy thermometers). |
| Wax paper | Use as a cover to prevent splattering and retain moisture. |
Materials to be avoided in microwave oven
| Utensils | Remarks |
| Aluminum tray | May cause arcing. Transfer food into microwave-safe dish. |
| Food carton with metal handle | May cause arcing. Transfer food into microwave-safe dish. |
| Metal or metal-trimmed utensils | Metal shields the food from microwave energy. Metal trim may cause arcing. |
| Metal twist ties | May cause arcing and could cause a fire in the oven. |
| Paper bags | May cause a fire in the oven. |
| Plastic foam | Plastic foam may melt or contaminate the liquid inside when exposed to high temperature. |
| Wood | Wood will dry out when used in the microwave oven and may split or crack. |
Product description
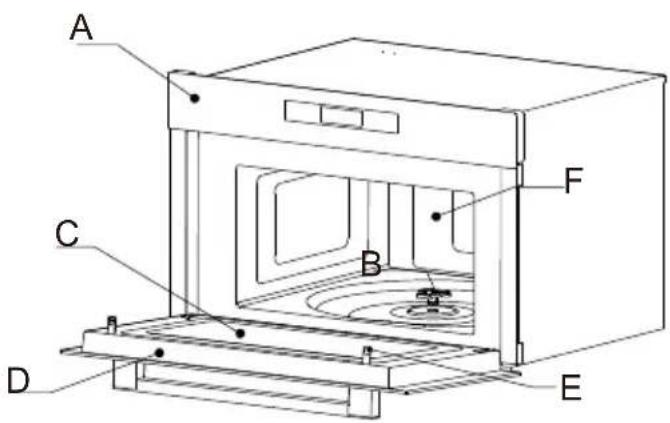
A) Control panel
B) Turntable shaft
C) Observation window
D) Door assembly
E) Safety interlock system
F) Oven cavity
ACCESSORIES
Remove the oven and all materials from the carton and oven cavity. Your oven comes with the following accessories:
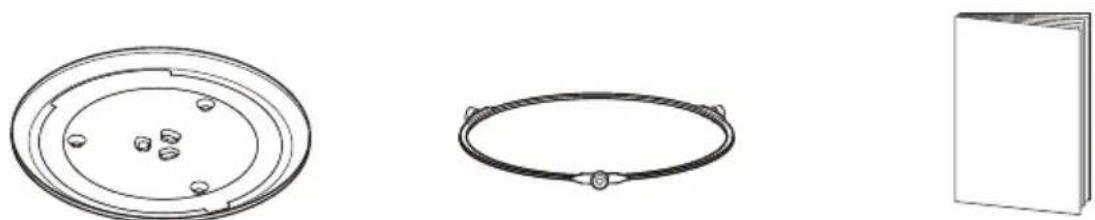
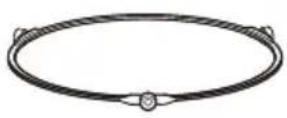
Glass Tray Turntable Ring Assembly Instruction Manual
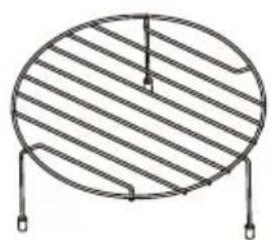
Higher Wire Rack( For grilling, e.g. steaks, sausages and for toasting bread.As a support for shallow dishes.)
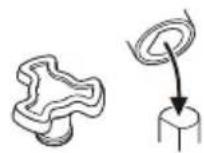
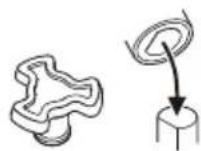
Turntable Shaft
TURNTABLE INSTALLATION
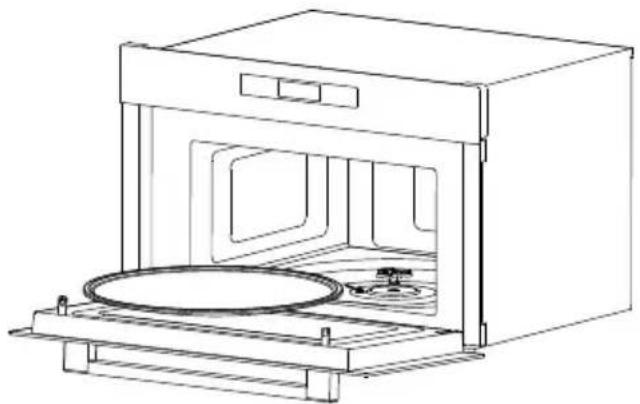
Cleaning the cooking compartment and putting the turntable in place. For new installations, make sure all packaging and shipping tape has been removed from the turntable shaft. Before using the appliance to prepare food for the first time, you will need to put the turntable in place correctly. You must clean the cooking compartment and accessories.
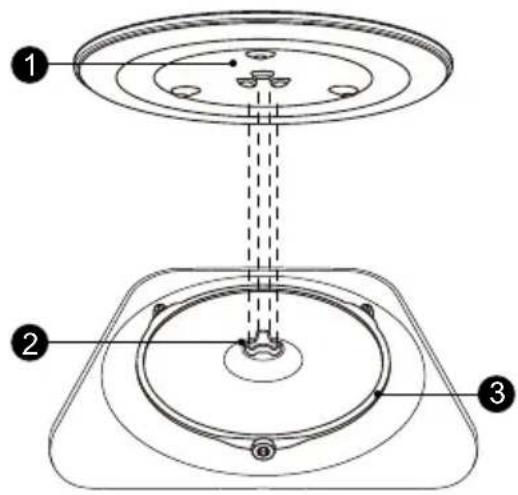
How to put the turntable in place:
-
Place the turntable ring assembly ③ into the recess in the cooking compartment.
-
Place the glass tray ① on the turntable ring assembly ③. Fit the raised, curved lines in the center of the glass tray bottom between the three spokes of the shaft. Make sure that the glass tray ① engages in the turntable shaft ② in the centre of the cooking compartment floor. The rollers on the shaft should fit inside the turntable bottom ridge.
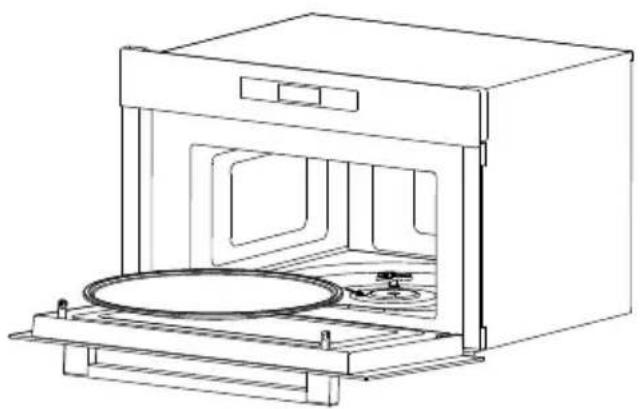
Note:
-
Never use the appliance without the turntable. Make sure that it is properly engaged. The turntable can turn clockwise or anti-clockwise.
-
Never place the glass tray upside down. The glass tray should never be restricted.
-
Both glass tray and turntable ring assembly must always be used during cooking.
-
Some food and containers of food are always placed on the glass tray for cooking.
-
Never restrict the movement of the turntable.
-
If glass tray or turntable ring assembly cracks or breaks, contact your nearest authorized service center.
How the product works
CONTROL PANEL

| Symbol | Function |
 | Microwave |
 | Function |
| [XXT7] | Clock/Kitchen Timer |
 | Auto Menu |
| [XGZD] | Lock/Cancel |
 | |
 | Start/+30Sec./Confirm |
OPERATION
| Name | Description | |||||
| Setting the clock | (1) Press “Clock/Kitchen Timer” once and then “00:00” will display.(2) Move the slider or press “+” or “-” to set the hour figures. The time should be within 0-23.(3) Press “Clock/Kitchen Timer” to confirm.(4) Move the slider or press “+” or “-” to set the minute figures. The time should be within 0-59.(5) Press “Clock/Kitchen Timer” to confirm. | |||||
| Kitchen Timer | (1) Press “Clock/Kitchen Timer” twice and then “00:00” will display.(2) Move the slider or press “+” or “-” to set the time. The time should be within 0:05~95:00.(3) Press “Start/+30Sec./Confirm” to confirm. | |||||
| Microwave | Power Level | 100% | 80% | 50% | 30% | 10% |
| Display | P10 | P8 | P5 | P3 | P1 | |
| (1) In waiting state, Press “Microwave” and then “P10” will display.(2) Press “Microwave” repeatedly to adjust the power level, 5 power levels are available.(3) Move the slider or press “+” or “-” to set the cook time.(4) Press “Start/+30Sec./Confirm” to start cooking. | ||||||
| Grill | (1) Press “Function” once and then “G-1” will display.(2) Move the slider or press “+” or “-” to set the cook time.(3) Press “Start/+30Sec./Confirm” to start cooking.Note: When half of the time has passed, the buzzer will sound to remind you to turn the food over. If no operation, the oven will continue working. | |||||
| Combination | (1) Press “Function” once and then “G-1” will display. Press “Function” repeatedly to choose the power you want, and “C-1”, “C-2” will display in order.(2) Move the slider or press “+” or “-” to set the cook time.(3) Press “Start/+30Sec./Confirm” to start cooking.Note: Combination instructions | |||||
| Instructions Display Microwave Grill | ||||||
| 1 C-1 | 55% | 45% | ||||
| 2 C-2 | 36% | 64% | ||||
| Defrost by Weight | (1) Press “Function” twice and then the screen will display “0.1kg”. (2) Move the slider or press “+” or “-” to set the weight.it should be within 100-2000g. (3) Press “Start/+30Sec./Confirm” to start defrosting. | |||||
| Defrost by Time | (1) Press “Function” thrice times and then the screen will display “1:00”. (2) Move the slider or press “+” or “-” to set the time. (3) Press “Start/+30Sec./Confirm” to start defrosting. Note: When the half time of defrost has elapsed, buzzer will sound, turn the food over. If no operation, the oven will continue working. | |||||
| Speed cooking | (1) In waiting state, press “Start/+30Sec./Confirm” to cook food with 100% power level for 30 seconds. Each press on the same key can increase 30 seconds and the maximum time value is 95 minutes. Note: Speedy cooking cannot be set in defrost by weight, multi-stage and auto menu. | |||||
| Lock Function for Children | You can use this function to prevent children from accidentally turning the oven on. To activate the lock: In waiting state, press and hold “Lock/Cancel” for three seconds. A long beep sounds and the locked icon will display. To deactivate the lock: In locked state, press and hold “Lock/Cancel” for three seconds. A long beep sounds. | |||||
| Inquire function | (1) If the clock has been set, the current time will display for three seconds by pressing “Clock/Kitchen Timer” in the cooking state. | |||||
| Auto Menu | (1) In waiting state, press “Auto Menu”, the screen will display “A-1”. (2) Press “Auto Menu” repeatedly to choose the menu you need.8 auto menus are available. (3) Move the slider or press “+” or “-” to set the weight of the food. (4) Press “Start/+30Sec./Confirm” to start cooking. | |||||
AUTO MENU CHART
| Menu | Weight(g) | Display | Power |
| A-1 POTATO | 1 (about 230 g) 1 | P10 2 (about 460 g) 2 | |
| 3 (about 690 g) 3 | |||
| A-2 MEAT | 150 g 150 g | P8 | |
| 300 g 300 g | |||
| 450 g 450 g | |||
| 600 g 600 g | |||
| A-3 FISH | 150 g 150 g | P8 | |
| 250 g 250 g | |||
| 350 g 350 g | |||
| 450 g 450 g | |||
| 650 g 650 g | |||
| A-4 VEGETABLE | 150 g 150 g | P10 | |
| 350 g 350 g | |||
| 500 g 500 g | |||
| A-5 BEVERAGE | 1 cup (240 g) 1 | P10 | |
| 2 cup (480 g) 2 | |||
| 3 cup (720 g) 3 | |||
| A-6 PASTA | 50 g (cold water 450 g) | 50g | P8 |
| 100 g (cold water 800 g) | 100 g | ||
| 150 g (cold water 1200 g) | 150 g | ||
| A-7 POPCORN | 100 g 100 g P10 | ||
| A-8 PIZZA | 200 g 200 g | P10 +G-1 | |
| 400 g 400 g |
Be sure to unplug the appliance from the power supply.
- Clean the cavity of the oven after using with a slightly damp cloth.
- Clean the accessories in the usual way in soapy water.
- The door frame and seal and neighbouring parts must be cleaned carefully with a damp cloth when they are dirty.
- Do not use harsh abrasive cleaners or sharp metal scrapers to clean the oven door glass since they can scratch the surface, which may result in shattering of the glass.
- Cleaning Tip---For easier cleaning of the cavity walls that the food cooked can touch: Place half a lemon in a bowl, add 300ml (1/2 pint) water and heat on 100% microwave power for 10 minutes. Wipe the oven clean using a soft, dry cloth.
Environmental protection and disposal
TROUBLE SHOOTING
| Normal | |
| Microwave oven interfering TV reception | Radio and TV reception may be interfered when microwave oven operating. It is similar to the interference of small electrical appliances, like mixer, vacuum cleaner, and electric fan.It is normal. |
| Dim oven light | In low power microwave cooking, oven light may become dim. It is normal. |
| Steam accumulating on door, hot air out of vents | In cooking, steam may come out of food. Most will get out from vents. But some may accumulate on cool place like oven door. It is normal. |
| Oven started accidentally with no food in. | It is forbidden to run the unit without any food inside. It is very dangerous. |
| Trouble Possible Cause Remedy | ||
| Oven cannot be started. | (1) Power cord is not plugged in tightly. | Unplug. Then plug again after 10 seconds. |
| (2) Fuse blowing or circuit breaker works. | Replace fuse or reset circuit breaker (repaired by professional personnel of our company) | |
| (3) Trouble with outlet. | Test outlet with other electrical appliances. | |
| Oven does not heat. | (4) Door is not closed well. | Close door well. |
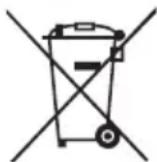
According to Waste of Electrical and Electronic Equipment (WEEE) directive, WEEE should be separately collected and treated. If at any time in future you need to dispose of this product please do NOT dispose of this product with household waste. Please send this product to WEEE collecting points where available.
| Condition | Power consumption | Period after which the equipment reaches automatically the condition |
| Standby mode with information or status display | 0.8W | 20 Min |
©
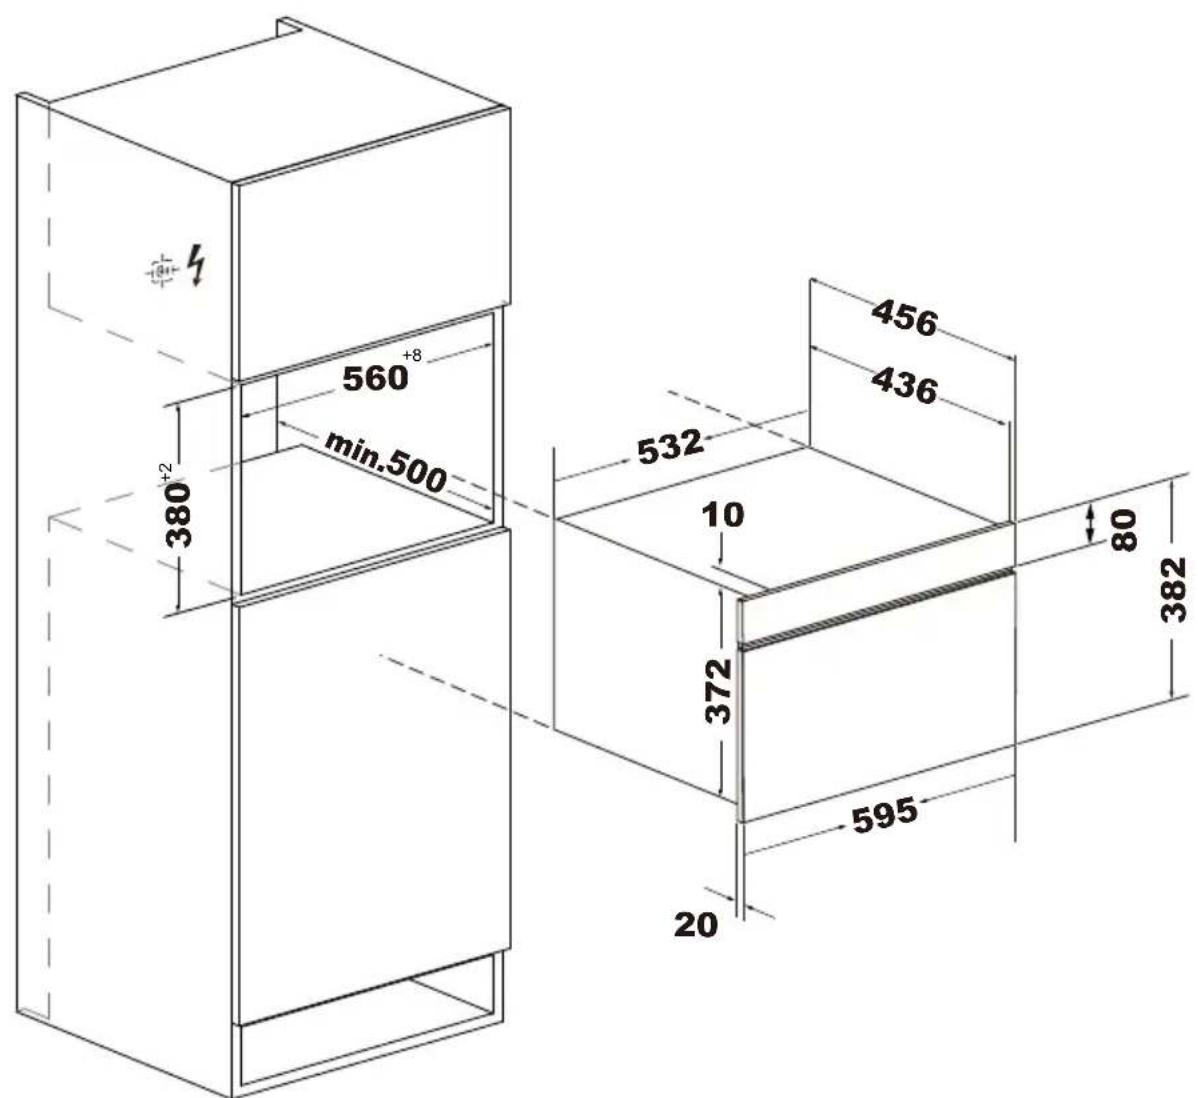
BUILT-IN OVEN
Model: H38DMWID26NB / H38DMWID26NX INSTALLATION
The dimensions attached are in mm.
The units into which the appliance is fitted must be heat-resistant up 95°C.
The minimum installation height is 850mm.
©
Important information without plug
The appliance is designed to be permanently installed with a three-pin power cord and may only be connected by a licensed expert in accordance with the connection diagram.
Only a qualified electrician who takes the relevant regulations into account may replace the power cord. Do not use multiple plugs, power strips or extensions. Overloading causes a risk of lire.
If the connection is no longer accessible following installation, an all-pin isolating switch with a contact gap of at least 3 mm must be provided.
Connect the wires of the mains power cord in accordance with the following colour coding:
Green and yellow Earth wire < (E)
Blue Neutral wire (N)
Brown Live (L)
Great Britain and Australia:
Do not connect the appliance using a 13 A plug or protect it with a 13 A fuse. The appliance must be protected using a fuse that is rated 16 A or higher. The appliance must be disconnected from the power supply during all installation work. When the appliance is installed, protection must be provided against accidental contact in the future.
Haier
Benutzerhandbuch
CANDY HOOVER GROUP—Via Comolli 16, Brugherio—Italien
Zusammenfassung
Glastablett
Hinweis:
EINBAU-MIKROWELLE
Modell: H38DMWID26NB / H38DMWID26NX INSTALLATION
CANDY HOOVER GROUP – Via Comolli 16, Brugherio– Italia
Sommario
Vassoio di vetro
Nota:
FORNO DA INCASSO
Modello: H38DMWID26NB / H38DMWID26NX INSTALLAZIONE
CANDY HOOVER GROUP—Via Comolli 16, Brugherio—Italy
Índice
Bandeja de cristal
Nota:
HORNO ENCASTRABLE
Azul Cable neutro (N)
Marrón Directo (L)
CANDY HOOVER GROUP—Via Comolli 16, Brugherio—Italie
Table des matières
Plateau en verre
Remarque :
FOUR ENCASTRABLE
Modèle : H38DMWID26NB / H38DMWID26NX INSTALLATION
CANDY HOOVER GROUP—Via Comolli 16, Brugherio—Włochy
Spis treści
Szklana taca
UWAGA:
PIEKARNIK W ZABUDOWIE
Model: H38DMWID26NB / H38DMWID26NX MONTAŻ
CANDY HOOVER GROUP – Via Comolli 16 Brugherio– Itália
Nota:
FORNO ENCASTRADO
Modelo: H38DMWID26NB / H38DMWID26NX INSTALAÇÃO
CANDY HOOVER GROUP – Via Comolli 16, Brugherio– Italija
Staklena tacna Sklop prstena okretnog postolja
Uputstvo za upotrebu

Kako postaviti okretno postolje na mesto:
-
Postavite sklop prstena okretnog postolja ③ u udubljenje u odeljku za kuvanje.
-
Postavite staklenu tacnu ① na sklop prstena okretnog postolja ③. Podesite podignute, zakrivljene linije na sredini dna staklene tacne između tri izbočine na držaču. Uverite se da staklena tacna ① naleže na držač okretnog postolja ② na sredini dna odeljka za kuvanje. Valjci na držaču treba da stanu unutar donje ivice okretnog postolja.
Napomena:
| Simbol | Funkcija |
| Mikrotalasna pećnica |
| Funkcija |
 | Sat/kuhinjski tajmer |
| [2350] | Automatski meni |
[T6ST] | Zaključaj/otkaži |
 | Start/+30 sek./Potvrdi |
RAD
| Ime | Opis | |||||
| Podešavanje sata | (1) Pritisnite „Sat/kuhinjski tajmer“ jednom i prikazaće se „00:00”.(2) Pomerite klizač ili pritisnite „+” ili „-” da biste podesili broj sati. Vreme bi trebalo da bude u opsegu 0–23.(3) Pritisnite „Sat/kuhinjski tajmer“ da potvrdite.(4) Pomerite klizač ili pritisnite „+” ili „-” da biste podesili broj minuta. Vreme bi trebalo da bude u opsegu 0–59.(5) Pritisnite „Sat/kuhinjski tajmer“ da potvrdite. | |||||
| Kuhinjski tajmer | (1) Pritisnite „Sat/kuhinjski tajmer“ dva puta i prikazaće se „00:00”.(2) Pomerite klizač ili pritisnite „+” ili „-” da biste podesili vreme. Vreme bi trebalo da bude u opsegu 0:05~95:00.(3) Pritisnite „Start/+30 sek./Potvrdi“ za potvrdu. | |||||
| Mikrotalasna pećnica | Nivo snage | 100% | 80% | 50% | 30% | 10% |
| Displej | P10 | P8 | P5 | P3 | P1 | |
| (1) U stanju čekanja, pritisnite „Mikrotalasna pećnica“ i prikazaće se „P10”.(2) Pritisnite „Mikrotalasna pećnica“ više puta da biste podesili nivo snage. Dostupno je 5 nivoa snage.(3) Pomerite klizač ili pritisnite „+” ili „-” da biste podesili vreme kuvanja.(4) Pritisnite „Start/+30 sek./Potvrdi“ da biste započeli kuvanje. | ||||||
| Roštilj | (1) Pritisnite „Funkcija“ jednom i prikazaće se „G-1”.(2) Pomerite klizač ili pritisnite „+” ili „-” da biste podesili vreme kuvanja.(3) Pritisnite „Start/+30 sek./Potvrdi“ da biste započeli kuvanje.Napomena: Kada prođe pola vremena, oglasiće se zvučni signal da vas podseti da okrenete hranu. Ako ne radi, pećnica će nastaviti da radi. | |||||
| Kombinacija | (1) Pritisnite „Funkcija“ jednom i prikazaće se „G-1“. Pritisnite „Funkcija“ više puta da biste izabrali željenu snagu i redom će se prikazati „C-1“, „C-2”. (2) Pomerite klizač ili pritisnite „+“ ili „-“ da biste podesili vreme kuvanja. (3) Pritisnite „Start/+30 sek./Potvrdi“ da biste započeli kuvanje. Napomena: Uputstva za kombinaciju | |||||
| Uputstva Displej | Mikrotalasna pećnica | Roštilj | ||||
| 1 C-1 | 55% | 45% | ||||
| 2 C-2 | 36% | 64% | ||||
| Odmrzavanje prema težini | (1) Pritisnite „Funkcija“ dva puta i na ekranu će se prikazati „0,1 kg”. (2) Pomerite klizač ili pritisnite „+“ ili „-“ da biste podesili težinu. Trebalo bi da bude u opsegu 100–2000 g. (3) Pritisnite „Start/+30 sek./Potvrdi“ da biste započeli odmrzavanje. | |||||
| Odmrzavanje prema vremenu | (1) Pritisnite „Funkcija“ tri puta i na ekranu će se prikazati „1:00”. (2) Pomerite klizač ili pritisnite “+” ili “-” da biste podesili vreme. (3) Pritisnite „Start/+30 sek./Potvrdi“ da biste započeli odmrzavanje. Napomena: Kada istekne pola vremena predviđenog za odmrzavanje, oglasiće se zvučni signal. Okrenite hranu na drugu stranu. Ako ne radi, pećnica će nastaviti da radi. | |||||
| Brzina kuvanja | (1) U stanju čekanja, pritisnite „Start/+30 sek./Potvrdi“ da biste kuvali hranu sa 100% nivoa snage tokom 30 sekundi. Svaki pritisak na isti taster može da poveća za 30 sekundi, a maksimalna vrednost vremena je 95 minuta. Napomena: Brzo kuvanje ne može da se podesi prilikom odleđivanja prema težini, višefaznom kuvanju i automatskom meniju. | |||||
| Funkcija zaključavanja za decu | Ovom funkcijom možete sprečiti decu da slučajno uključe rernu. Da biste aktivirali zaključavanje:U stanju čekanja, pritisnite i zadržite „Zaključaj/otkaži“ tri sekunde. Oglasiće se dugi zvučni signal i pojaviće se zaključana ikona.Da biste deaktivirali zaključavanje:U zaključanom stanju, pritisnite i zadržite „Zaključaj/otkaži“ tri sekunde. Oglašava se dugi zvučni signal. | |||||
| Funkcija upita | (1) Ako je sat podešen, trenutno vreme se prikazuje na tri sekunde ako pritisnete „Sat/kuhinjski tajmer“ u stanju kuvanja. | |||||
| Automatski meni | (1) U stanju čekanja, pritisnite „Automatski meni“ i na ekranu će se prikazati „A-1“.(2) Pritisnite „Automatski meni“ više puta da biste izabrali meni koji vam je potreban. Dostupno je 8 automatskih menija.(3) Pomerite klizač ili pritisnite „+“ ili „-“ da biste podesili težinu hrane.(4) Pritisnite „Start/+30 sek./Potvrdi“ da biste započeli kuvanje. | |||||
GRAFIKON AUTOMATSKOG MENIJA
| Meni | Težina (g) | Displej | Snaga |
| A-1 KROMPIR | 1 (oko 230 g) 1 | P10 | |
| 2 (oko 460 g) | 2 | ||
| 3 (oko 690 g) 3 | |||
| A-2MESO | 150 g 150 g | P8 | |
| 300 g 300 g | |||
| 450 g 450 g | |||
| 600 g 600 g | |||
| A-3 RIBA | 150 g 150 g | P8 | |
| 250 g 250 g | |||
| 350 g 350 g | |||
| 450 g 450 g | |||
| 650 g 650 g | |||
| A-4 POVRĆE | 150 g 150 g | P10 | |
| 350 g 350 g | |||
| 500 g 500 g | |||
| A-5 NAPITAK | 1 šolja (240 g) 1 | P10 | |
| 2 šolje (480 g) 2 | |||
| 3 šolje (720 g) 3 | |||
| A-6 TESTENINA | 50 g (hladna voda 450 g) | 50 g | P8 |
| 100 g (hladna voda 800 g) | 100 g | ||
| 150 g (hladna voda 1200 g) | 150 g | ||
| A-7 KOKICE | 100 g | 100 g | P10 |
| A-8 PICA | 200 g 200 g | P10 +G-1 | |
| 400 g | 400 g |
Prema Direktivi o otpadnoj električnoj i elektronskoj opremi (WEEE), WEEE oprema bi trebalo odvojeno da se sakuplja i tretira. Ako u bilo kom trenutku u budućnosti treba da odložite ovaj proizvod na otpad, NEMOJTE odlagati ovaj proizvod sa kućnim otpadom. Pošaljite ovaj proizvod na mesta za prikupljanje WEEE opreme gde je to moguće.
Podaci o niskoj potrošnji energije u skladu sa Uredbom Komisije (EU) 2023/826.
| Uslov | Potrošnja energije | Period nakon kog oprema automatski dostiže stanje |
| Režim pripravnosti sa prikazom informacija ili statusa | 0,8W | 20 min. |
UGRADNA PEĆNICA
Model: H38DMWID26NB / H38DMWID26NX
MONTAŽA
CANDY HOOVER GROUP—Via Comolli 16, Brugherio—Itálie
Shrnutí
Skleněný talíř
Poznámka:
VESTAVNÁ TROUBA
Model: H38DMWID26NB / H38DMWID26NX INSTALACE
CANDY HOOVER GROUP – Via Comolli 16, Brugherio – Taliansko
Obsah
Sklenený tanier
Vysoký drôtený stojan. (Na grilovanie, napr. steaky, klobásy a na opekanie chleba. Ako držiak na plytké taniere).
Otočný hriadel'
INŠTALÁCIA OTOČNÉHO TANIERA
Poznámka:
VSTAVANÁ RÚRA
Model: H38DMWID26NB / H38DMWID26NX INŠTALÁCIA
CANDY HOOVER GROUP – Via Comolli 16, Brugherio – Italija
Povzetek
Stekleni pladenj
Kako namestiti vrtljivi pladenj:
Opomba:
VGRADNA PEČICA
Model: H38DMWID26NB / H38DMWID26NX VGRADNJA
Dimenzije so navedene v mm.
Enote, v katere je vgrajen aparat, morajo biti toplotno odporne do 95 °C.
- Aparat popolnoma vstavite ga sredinsko poravnajte.
CANDY HOOVER GROUP – Via Comolli 16, Brugherio – Itaalia
Kokkuvõte
Klaasalus
Märkus.
SISSEEHITATUD AHI
Mudel: H38DMWID26NB / H38DMWID26NX
PAIGALDAMINE
CANDY HOOVER GROUP – Via Comolli 16, Brugherio – Italija
Santrauka
Stiklinis padėklas
Pastabos
JMONTUOJAMOJI KROSNELÈ
Modelis: H38DMWID26NB / H38DMWID26NX JRENGIMAS
Neutralus laidas (N)
Rudas
Laidas su jtampa (L)
CANDY HOOVER GROUP – Via Comolli 16, Brugherio – Itālija
Kopsavilkums
Stikla paplāte
Piezīme.
IEBÜVËJAMA KRÄSNS
Modelis: H38DMWID26NB / H38DMWID26NX
UZSTĀ DĪŠAN A
Üvegtálca
Megjegyzés:
BEÉPÍTETT SÜTŐ
Modell: H38DMWID26NB / H38DMWID26NX
TELEPÍTÉS
CANDY HOOVER GROUP – Via Comolli 16, Brugherio – Italia
Зміст
Примітка:
ВБУДОВАНА ДУХОВА ШАФА
Write here your serial number for future reference.


- HAIER
- SUMMARY
- PRECAUTIONS TO AVOID POSSIBLE EXPOSURE TO EXCESSIVE MICROWAVE ENERGY
- IMPORTANT SAFETY INSTRUCTIONS WARNING
- TO REDUCE THE RISK OF INJURY TO PERSONS GROUNDING INSTALLATION
- DANGER
- WARNING
- PRODUCT DESCRIPTION
- ACCESSORIES
- TURNTABLE INSTALLATION
- NOTE
- HOW THE PRODUCT WORKS
- CONTROL PANEL
- ENVIRONMENTAL PROTECTION AND DISPOSAL
- BUILT-IN OVEN
- MODEL: H38DMWID26NB / H38DMWID26NX INSTALLATION
- IMPORTANT INFORMATION WITHOUT PLUG
- GREAT BRITAIN AND AUSTRALIA
- BENUTZERHANDBUCH
- ZUSAMMENFASSUNG
- HINWEIS
- EINBAU-MIKROWELLE
- MODELL: H38DMWID26NB / H38DMWID26NX INSTALLATION
- SOMMARIO
- NOTA
- FORNO DA INCASSO
- MODELLO: H38DMWID26NB / H38DMWID26NX INSTALLAZIONE
- ÍNDICE
- HORNO ENCASTRABLE
- TABLE DES MATIÈRES
- REMARQUE
- FOUR ENCASTRABLE
- MODÈLE : H38DMWID26NB / H38DMWID26NX INSTALLATION
- SPIS TREŚCI
- UWAGA
- PIEKARNIK W ZABUDOWIE
- MODEL: H38DMWID26NB / H38DMWID26NX MONTAŻ
- FORNO ENCASTRADO
- MODELO: H38DMWID26NB / H38DMWID26NX INSTALAÇÃO
- NAPOMENA
- UGRADNA PEĆNICA
- MODEL: H38DMWID26NB / H38DMWID26NX
- MONTAŽA
- SHRNUTÍ
- POZNÁMKA
- VESTAVNÁ TROUBA
- MODEL: H38DMWID26NB / H38DMWID26NX INSTALACE
- OBSAH
- INŠTALÁCIA OTOČNÉHO TANIERA
- VSTAVANÁ RÚRA
- MODEL: H38DMWID26NB / H38DMWID26NX INŠTALÁCIA
- POVZETEK
- OPOMBA
- VGRADNA PEČICA
- MODEL: H38DMWID26NB / H38DMWID26NX VGRADNJA
- KOKKUVÕTE
- MÄRKUS
- SISSEEHITATUD AHI
- SANTRAUKA
- PASTABOS
- KOPSAVILKUMS
- PIEZĪME
- MEGJEGYZÉS
- BEÉPÍTETT SÜTŐ
- MODELL: H38DMWID26NB / H38DMWID26NX
- TELEPÍTÉS
- ЗМІСТ
- ПРИМІТКА
- ВБУДОВАНА ДУХОВА ШАФА
Brand : HAIER
Model : H38DMWID26NB
Category : Microwave Oven