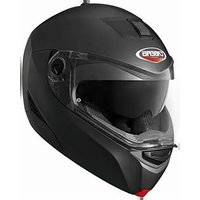
Modus - Motorcycle helmet CABERG - Free user manual and instructions
Find the device manual for free Modus CABERG in PDF.


| Product type | Full-face motorcycle helmet |
| Brand | Caberg |
| Model | Modus |
| Approximate weight | 1500 g |
| Shell material | Injected polycarbonate |
| Safety standard | ECE 22.05 |
| Closure | Micrometric buckle |
| Transparent visor | Removable, anti-scratch treated |
| Sun visor | Integrated, retractable, do not use at night |
| Ventilation | Front air intakes and rear extractors |
| Interior lining | Hand washable, Polygiene-treated lining (antibacterial and anti-odor) |
| Chin curtain | Removable and attachable |
| Lining maintenance | Hand wash with mild soap at max. 30°C, rinse with cold water, dry at room temperature. Do not machine wash or use solvents. |
| Available colors | Consult the Caberg catalog |
| Included accessories | Chin curtain, storage pouch (depending on version) |
Frequently Asked Questions - Modus CABERG
User questions about Modus CABERG
0 question about this device. Answer the ones you know or ask your own.
Ask a new question about this device
Download the instructions for your Motorcycle helmet in PDF format for free! Find your manual Modus - CABERG and take your electronic device back in hand. On this page are published all the documents necessary for the use of your device. Modus by CABERG.
USER MANUAL Modus CABERG
1. INSTRUCTION TO REMOVE/ASSEMBLE THE CLEAR VISOR
1.1 Open the visor until the small arrow printed on the mechanism matches with the notch on the clear visor. Press the release button A by driving it towards the back side of the helmet. Release the visor (as shown in Pic.1).
1.2 To remove the visor entirely, repeat the same operation on the other side.
1.3 To reassemble the clear visor, repeat the above steps in reverse order.
2. INSTRUCTION TO REMOVE THE SMOKED VISOR
2.1 With the chin guard closed, remove the upper front vent cover by pulling slightly outward (Pic.2).
2.2 With the smoked visor lowered, unscrew the screw B (see pic.3)
2.3 Open the chin guard then release the smoked visor by pulling slightly outward (Pic.4).
3. ISTRUCTION TO ASSEMBLE THE SMOKED VISOR
3.1 Drive forward the lever to move the smoked visor (located on the top of the helmet). (Pic.5)
3.2 Take the smoked visor and accommodate its' arms (lateral sides and the centre one) into their seating (Pic.6)
3.3 Drive the visor inside, until the hole on the visor centre arm matches with the screw nut B on the lever on top ( Pic.3). reposition the upper font vent cover.
WARNING! Do not use the smoked visor during night hours or with scarce visibility condition.
WARNING! Any adjustments to the smoked visor must be done with the two-wheeler in still position.
ENG
- INSTRUCTION TO REMOVE THE WASHABLE INNER LINING.
4.1 To Remove the inner lining you can start either form the right or left side.
4.2 Starting from the neck, remove the inner lining slightly pulling it towards the inside of the helmet (pic. 7) and sliding the retention system strap through the eyelet on the cheek pad. Do the same operation for the other cheek pad.
4.3 Remove the neck device by pulling it out. (Pic. 8).
4.4 Release the front plastic frame C (Pic. 9).
4.5 Remove completely the inner lining.
INNER LINING CLEANING
The comfort padding liner is treated with the POLYGIENE process which provides both the anti-bacterial anti-fungous action.
- Long term protection against unpleasant odors
- Preserves the fabric and provides hygienic freshness and greater comfort to the wearer.
- Prevents the growth of bacteria which causes skin irritation.
Wash it strictly by hand with neutral soap and water max 30^ C.
Rinse it in cold water, do not wring it. Dry it at room temperature.
WARNING! Never wash the lining in the washing machine. Never use petrol or other solvents to clean the lining.
5. INSTRUCTION TO ASSEMBLE THE INNER LINING
5.1 Place the main liner padding inside the helmet.
5.2 Insert the plastic frame C in the front and fasten it to the seating attached to the EPS (Pic. 8).
5.3 Attach the side frame starting from the front (Pic. 9) towards the back (Pic. 10). Do the same operation for the other side.
5.4 Place the neck device by inserting its plastic strip between the shell and EPS (Pic. 11).
5.4 Insert the chin guard strip into the eyelet on the cheek pad (Pic.12). Hook the studs on the back.
6. WIND STOP
The wind stop device prevents the incoming of cold air from below.
6.1 INSTRUCTION TO MOUNT THE WIND STOP
Insert and press centrally the stop wind plastic frame between the shell base trim and chin guard. (Pic.13)
6.2 INSTRUCTION TO REMOVE THE WIND STOP
Remove the stop wind by pulling it out gently (Pic.14)
1. INSTRUCTIONS POUR DEMONTAGE/MONTAGE DE L'ECRAN TRANSPARENT
- INSTRUCTION TO REMOVE/ASSEMBLE THE CLEAR VISOR
- INSTRUCTION TO REMOVE THE SMOKED VISOR
- ISTRUCTION TO ASSEMBLE THE SMOKED VISOR
- ENG
- INNER LINING CLEANING
- INSTRUCTION TO ASSEMBLE THE INNER LINING
- WIND STOP
- INSTRUCTION TO MOUNT THE WIND STOP
- INSTRUCTION TO REMOVE THE WIND STOP
- INSTRUCTIONS POUR DEMONTAGE/MONTAGE DE L'ECRAN TRANSPARENT
Brand : CABERG
Model : Modus
Category : Motorcycle helmet