TB-65W60AEZ - TV PANASONIC - Free user manual and instructions
Find the device manual for free TB-65W60AEZ PANASONIC in PDF.

User questions about TB-65W60AEZ PANASONIC
0 question about this device. Answer the ones you know or ask your own.
Ask a new question about this device
Download the instructions for your TV in PDF format for free! Find your manual TB-65W60AEZ - PANASONIC and take your electronic device back in hand. On this page are published all the documents necessary for the use of your device. TB-65W60AEZ by PANASONIC.
USER MANUAL TB-65W60AEZ PANASONIC
You can find instructions for your TV's features in the E-Manual. To access the E-Manual, enter Settings>System>More menu, select Manuals and press OK. For quick access press Settings button and then Info button.
Markings on the Product.... 2
Maintenance....4
Display panel, Cabinet, Pedestal.... 4
Mains plug 4
Assembling / Removing the pedestal 4
When using the wall-hanging bracket.... 5
Environmental Information.... 5
Features 5
Ultra HD (UHD)....6
High Dynamic Range (HDR) / Hybrid Log-Gamma (HLG)....6
Dolby Vision....6
Accessories Included.... 6
Standby Mode Picture 6
Standby Notifications....7
TV Control & Operation 7
Watching TV 8
Inserting the Batteries into the Remote 9
Power Connection 9
Antenna Connection....9
Licence Notification 9
Disposal of Old Equipment and Batteries......10
Declaration of Conformity (DoC) 10
Specification 11
Notice 12
Remote Control 13
Connections.... 15
Switching On/Off....16
First Time Installation.... 16
Media Playback via USB Input 18
Media Browser.... 18
FollowMe TV....19
CEC....19
Game Mode....20
E-Manual 20
Settings Menu Content......21
General TV Operation 29
Using the Channel List 29
Configuring Parental Settings....29
Electronic Programme Guide 29
Teletext Services 30
Software Upgrade.... 30
Troubleshooting & Tips....31
HDMI Signal Compatibility....31
Supported File Formats for USB Mode 32
Video File Formats 32
Picture File Formats 32
Audio File Formats 32
Subtitle File Formats.... 32
Supported DVI Resolutions 33
Connectivity 34
Wired Connectivity.... 34
Wireless Connectivity 34
Handling of the customer information....36
Networked Standby Mode 36
Wireless Display 36
Connecting Bluetooth Devices 36
Connectivity Troubleshooting 37
Using Audio Video Sharing Network Service......38
Apps 38
Internet Browser 38
HBBTV System.... 39
Alexa Ready 39
Google Assistant.... 40
DVB functionality information 41
Safety Information

CAUTION
RISK OF ELECTRIC SHOCK DO NOT OPEN

CAUTION: TO REDUCE THE RISK OF ELECTRIC SHOCK DO NOT REMOVE COVER (OR BACK).

NO USER-SERVICEABLE PARTS INSIDE. REFER SERVICING TO QUALIFIED SERVICE PERSONNEL
In extreme weather (storms, lightning) and long inactivity periods (going on holiday) disconnect the TV set from the mains.
The mains plug is used to disconnect TV set from the mains and therefore it must remain readily operable. If the TV set is not disconnected electrically from the mains, the device will still draw power for all situations even if the TV is in standby mode or switched off.
Note: Follow the on screen instructions for operating the related features.
IMPORTANT - Please read these instructions fully before installing or operating
WARNING: This device is intended to be used by persons (including children) who are capable / experienced of operating such a device unsupervised, unless they have been given supervision or instruction concerning the use of the device by a person responsible for their safety.
- Use this TV set at an altitude of less than 5000 metres above the sea level, in dry locations and in regions with moderate or tropical climates.
- The TV set is intended for household and similar indoor use but may also be used in public places.
- For ventilation purposes, leave at least 5cm of free space around the TV.
- The ventilation should not be impeded by covering or blocking the ventilation openings with items, such as newspapers, table-cloths, curtains, etc.
- The power cord/plug should be easily accessible. Do not place the TV, furniture, etc. on the power cord. A damaged power cord/plug can cause fire or give you an electric shock. Handle the power cord by the plug, do not unplug the TV by pulling the power cord. Never touch the power cord/plug with wet hands as this could cause a short circuit or electric shock. Never make a knot in the power cord or tie it with other cords. When damaged it must be replaced, this should only be done by qualified personnel.
- Do not expose the TV to dripping or splashing of liquids and do not place objects filled with liquids, such as vases, cups, etc. on or over the TV (e.g. on shelves above the unit).
-
Do not expose the TV to direct sunlight or do not place open flames such as lit candles on the top of or near the TV.
-
Do not place any heat sources such as electric heaters, radiators, etc. near the TV set.
- Do not place the TV on the floor or inclined surfaces.
- To avoid danger of suffocation, keep plastic bags out of the reach of babies, children and domestic animals.
- Carefully attach the stand to the TV. If the stand is provided with screws, tighten the screws firmly to prevent the TV from tilting. Do not over-tighten the screws and mount the stand rubbers properly.
- Do not dispose of the batteries in fire or with hazardous or flammable materials.
WARNING
- Batteries must not be exposed to excessive heat such as sunshine, fire or the like.
- Excessive sound pressure from earphones or headphones can cause hearing loss.
ABOVE ALL - NEVER let anyone, especially children, push or hit the screen, push anything into holes, slots or any other openings in the TV.
| Caution | Serious injury or death risk |
| Risk of electric shock | Dangerous voltage risk |
| Maintenance | Important maintenance component |
Markings on the Product
The following symbols are used on the product as a marker for restrictions and precautions and safety instructions. Each explanation shall be considered where the product bears related marking only. Note such information for security reasons.

Class II Equipment: This appliance is designed in such a way that it does not require a safety connection to electrical earth.

Hazardous Live Terminal: The marked terminal(s) is/are hazardous live under normal operating conditions.

Caution, See Operating Instructions: The marked area(s) contain(s) user replaceable coin or button cell batteries.

text_image
CLASS 1 LASER PRODUCTClass 1 Laser Product: This product contains Class 1 laser source that is safe under reasonably foreseeable conditions of operation.
WARNING
• Do not ingest the battery, Chemical Burn Hazard.
- This product or the accessories supplied with the product may contain a coin/button cell battery. If the coin/button cell battery is swallowed, it can cause severe internal burns in just 2 hours and can lead to death.
- Keep new and used batteries away from children.
- If the battery compartment does not close securely stop using the product and keep it away from children.
- If you think batteries might have been swallowed or placed inside any part of the body, seek immediate medical attention.
A television may fall, causing serious personal injury or death. Many injuries, particularly to children, can be avoided by taking simple precautions such as:
- ALWAYS use cabinets or stands or mounting methods recommended by the manufacturer of the television set.
- ALWAYS use furniture that can safely support the television set.
- ALWAYS ensure the television set is not overhanging the edge of the supporting furniture.
- ALWAYS educate children about the dangers of climbing on furniture to reach the television set or its controls.
- ALWAYS route cords and cables connected to your television so they cannot be tripped over, pulled or grabbed.
• NEVER place a television set in an unstable location. - NEVER place the television set on tall furniture (for example, cupboards or bookcases) without anchoring both the furniture and the television set to a suitable support.
- NEVER place the television set on cloth or other materials that may be located between the television set and supporting furniture.
- NEVER place items that might tempt children to climb, such as toys and remote controls, on the top of the television or furniture on which the television is placed.
- The equipment is only suitable for mounting at heights ≤ 2 m.
If the existing television set is going to be retained and relocated, the same considerations as above should be applied.
Apparatus connected to the protective earthing of the building installation through the MAINS connection or through other apparatus with a connection to protective earthing – and to a television distribution system using coaxial cable, may in some circumstances create a fire hazard. Connection to a television distribution system has therefore to be provided through a device providing electrical isolation below a certain frequency range (galvanic isolator).
WALL MOUNTING WARNINGS
- Read the instructions before mounting your TV on the wall.
- The wall mount kit is optional. You can obtain from your local dealer, if not supplied with your TV.
- Do not install the TV on a ceiling or on an inclined wall.
- Use the specified wall mounting screws and other accessories.
- Tighten the wall mounting screws firmly to prevent the TV from falling. Do not over-tighten the screws.
- Using other wall-hanging brackets, or installing a wall-hanging bracket by yourself have the risk of personal injury and product damage. In order to maintain the unit's performance and safety, be absolutely sure to ask your dealer or a licensed contractor to secure the wall-hanging brackets. Any damage caused by installing without a qualified installer will void your warranty.
- Carefully read the instructions accompanying optional accessories, and be absolutely sure to take steps to prevent the TV from falling off.
- Handle the TV carefully during installation since subjecting it to impact or other forces may cause product damage.
- Take care when fixing wall brackets to the wall. Always ensure that there are no electrical cables or pipes in the wall before hanging bracket.
- To prevent fall and injury, remove the TV from its fixed wall position when it is no longer in use.
DAMAGES
- Excepting cases where responsibility is recognised by local regulations, Panasonic accepts no responsibility for malfunctions caused by misuse or use of the product, and other problems or damages caused by use of this product.
- Panasonic accepts no responsibility for loss, etc., of data caused by disasters.
- External devices separately prepared by the customer are not covered by the warranty. Care for the data stored in such devices is the responsibility of the customer. Panasonic accepts no responsibility for abuse of this data.
Figures and illustrations in these operating instructions are provided for reference only and may differ from the actual product appearance. Product design and specifications may be changed without notice.
Maintenance
First, remove the mains plug from the mains socket.
Display panel, Cabinet, Pedestal
Regular care:
Gently wipe the surface of the display panel, cabinet, or pedestal by using a soft cloth to remove dirt or fingerprints.
For stubborn dirt:
- First clean the dust from the surface.
- Dampen a soft cloth with clean water or diluted neutral detergent (1 part detergent to 100 parts water).
- Wring out the cloth firmly. (Please note, do not let liquid enter the TV inside as it may lead to product failure.)
-
Carefully wipe moisten and wipe away the stubborn dirt.
-
Finally, wipe away all the moisture.
Caution
Do not use a hard cloth or rub the surface too hard, otherwise this may cause scratches on the surface.
• Take care not to subject the surfaces to insect repellent, solvent, thinner or other volatile substances. This may degrade surface quality or cause peeling of the paint.
- The surface of the display panel is specially treated and may be easily damaged. Take care not to tap or scratch the surface with your fingernail or other hard objects.
- Do not allow the cabinet and pedestal to make contact with a rubber or PVC substance for a long time. This may degrade surface quality.
Mains plug
Wipe the mains plug with a dry cloth at regular intervals.
Moisture and dust may cause fire or electrical shock.
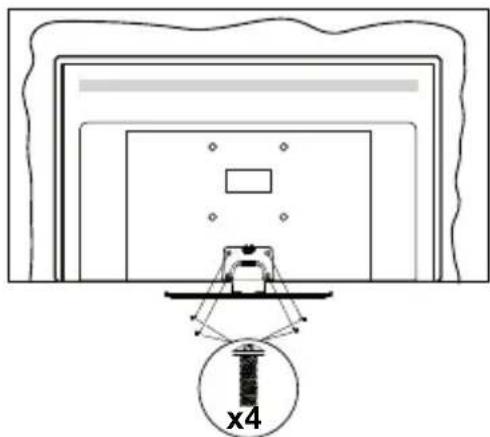
Assembling / Removing the pedestal
Preparations
Take out the pedestal(s) and the TV from the packing case and put the TV onto a work table with the screen panel down on the clean and soft cloth (blanket, etc.)
• Use a flat and firm table bigger than the TV.
• Do not hold the screen panel part.
• Make sure not to scratch or break the TV.
CAUTION: Please refrain from inserting pictured screws to the TV body when not using the TV stand e.g. wall hanging. Inserting screws without pedestal may cause a damage of the TV.
Assembling the pedestal
- The stand of the TV consists of two pieces. Install these pieces together.

natural_image
Technical line drawing of a mechanical assembly with no visible text or symbols- Place the stand(s) on the stand mounting pattern(s) on the rear side of the TV.
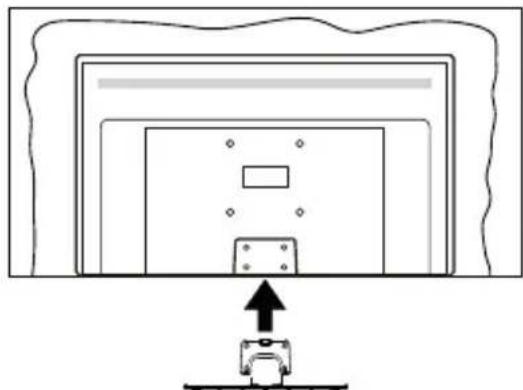
natural_image
Diagram of a device with an upward arrow pointing to a component, no text or symbols present- Insert the screws (M4 x 12 mm) provided and tighten them gently until the stand is properly fitted.
natural_image
Diagram of a mechanical assembly with a bolt and cross symbol, no readable text or labels presentRemoving the pedestal from the TV
Be sure to remove the pedestal in the following way when using the wall-hanging bracket or repacking the TV.
- Put the TV onto a work table with the screen panel down on the clean and soft cloth. Leave the stand(s) protruding over the edge of the surface.
• Unscrew the screws that fixing the stand(s). - Remove the stand(s).
When using the wall-hanging bracket
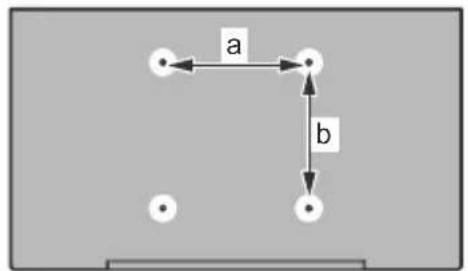
Please contact your local Panasonic dealer to purchase the recommended wall-hanging bracket. Holes for wall-hanging bracket installation;
Rear of the TV
text_image
a b| 43” 50” 55” 65” | ||||
| a (mm) 1 | 00 200 2 | 00 400 | ||
| b (mm) 1 | 00 200 2 | 00 200 | ||
View from the side

text_image
VESA Bracket c d e| (d) (e) | |||||
| 43” 50”55” | 43” 50”55” | ||||
| Diameter M4 M6 M4 | M6 | ||||
| Depth of screw (c) | min. | 7 mm | 5 mm | ||
| max. | 10 mm | 6 mm | |||
| (d) (e) | |||
| 65” | |||
| Depth of screw (c) | min. | 7 mm | |
| max. | 10 mm | ||
| Diameter | M6 | ||
Note: The screws for fixing the TV onto the wall-hanging bracket are not supplied with the TV.
Environmental Information
This television is designed to be environmentally friendly. To reduce energy consumption, you can follow these steps:
If you set the Energy Saving to Minimum, Medium, Maximum or Auto the TV will adjust the energy consumption accordingly. Set as Off to turn this setting off. If you like to set the backlight to a fixed value set as Custom, highlight Backlight (will be located under the Energy Saving setting) and then adjust manually using the Left or Right directional buttons on the remote.
Note: Available Energy Saving options may differ depending on the selected Mode in the Settings>Picture menu.
The Energy Saving settings can be found in the Settings>Picture menu. Go to Home screen and highlight Settings in the Navigation Carousel and press OK to access the Settings menu. Note that some picture settings will be unavailable to be changed.
You can also turn the screen off using the Screen Off option, if you want to hear the sound only and don't need to watch. If pressed Right button or Left button consecutively Screen Off option will be selected and "Screen will be off in 15 seconds." message will be displayed on the screen. Select Proceed and press OK to turn the screen off immediately. If you don't press any button, the screen will be off in 15 seconds. Press any button on the remote or on the TV to turn the screen on again.
Note: Screen Off option is not available if the Mode is set to Game.
When the TV is not in use, please switch off or disconnect the TV from the mains plug. This will also reduce or stop the energy consumption.
Features
• Remote controlled colour TV
• Fully integrated digital terrestrial/cable/satellite TV (DVB-T-T2/C/S-S2)
• HDMI inputs to connect other devices with HDMI sockets
- USB input
- OSD menu system
- Stereo sound system
- Teletext
• Headphone connection
• Automatic programming system
- Manual tuning
• Automatic power down after up to eight hours.
- Sleep timer
- Child lock
• Automatic sound mute when no transmission.
- NTSC playback
• AVL (Automatic Volume Limiting)
• PLL (Frequency Search)
• Game Mode (Optional)
• Picture off function
• Ethernet (LAN) for Internet connectivity and service
• 802.11 a/b/g/n built in WLAN Support
• Audio Video Sharing
• HbbTV
Ultra HD (UHD)
TV supports Ultra HD (Ultra High Definition - also known as 4K) which provides resolution of 3840 x 2160 (4K:2K). It equals 4 times the resolution of Full HD TV by doubling the pixel count of the Full HD TV both horizontally and vertically. Ultra HD content is supported via native and market applications, HDMI, USB input(s) and over DVB-T2 and DVB-S2 broadcasts.
High Dynamic Range (HDR) / Hybrid Log-Gamma (HLG)
Using this feature the TV can reproduce greater dynamic range of luminosity by capturing and then combining several different exposures. HDR/HLG promises better picture quality thanks to brighter, more realistic highlights, more realistic colour and other improvements. It delivers the look that filmmakers intended to achieve, showing the hidden areas of dark shadows and sunlight with full clarity, colour and detail. HDR/HLG content is supported via native and market applications, HDMI, USB inputs and over DVB-S broadcasts. Set the related HDMI source input as Enhanced from the Sources option in the Settings>System menu in order to watch HDR/HLG content, if the HDR/HLG content is received through an HDMI input. The source device should also be at least HDMI 2.0a compatible in this case.
Dolby Vision
Dolby Vision™ delivers a dramatic visual experience, astonishing brightness, exceptional contrast, and vivid colour, that brings entertainment to life. It achieves this stunning image quality by combining HDR and wide colour gamut imaging technologies. By increasing the brightness of the original signal and using a higher dynamic colour and contrast range, Dolby Vision presents amazing true-to-life images with stunning detail that other post-processing technologies in the TV aren't able to produce. Dolby Vision is supported via native and market applications, HDMI and USB inputs. Set the related HDMI source input as Enhanced from the Sources option in the Settings>System menu in order to watch Dolby Vision content, if the Dolby Vision content is received through an HDMI input. The source device should also be at least HDMI 2.0a compatible in this case. In the Settings>Picture>Mode menu two predefined picture modes will be available if Dolby Vision content is detected: Dolby Vision Bright and Dolby Vision Dark. Both allow the user to experience the content in the way the creator originally intended with different ambient lighting conditions.
Accessories Included
- Remote Control
- Batteries: 2 x AAA
- Power Cord
- Quick Start Guide
- Detachable stand
• Stand mounting screws (M4 x 12 mm)
Standby Mode Picture
You can use your TV as a digital picture frame using the Standby Mode Picture feature. In order to do this follow the steps below.
- Set the Standby Mode Picture option in the Settings>System>More menu as On. This option is set as Off by default. You can also define interval for standby mode picture slideshow using the Standby Mode Picture Interval option in this menu.
- Create a separate folder named as standby_picture in the USB storage device's root directory and copy the files you want to use into that folder and then connect the USB storage device to your TV.
- Press the Standby button on the remote briefly to switch your TV into standby mode picture state.
Note that once the Standby Mode Picture option is set as On, the function of the Standby button on the remote will change. After this you will need to press and hold the button to switch the TV into standby mode while the TV is in normal operating mode.
If there are more than 1 picture file available in the folder all picture files will be displayed as a slide show in succession. If the necessary folder is not created or there isn't any picture file in the folder, a warning message will be displayed on the screen for a few seconds and then disappear.
In standby mode picture state the backlight level of the screen will be decreased by 50 % and Smart Center features will not be usable, if Smart Center is available for your TV model.
To switch your TV from standby mode picture state back to normal operating mode press the Standby button on the remote briefly.
Beside the remote control you can also use the control unit on the TV to switch into standby mode picture state and back to normal operating mode. In order to do that follow the same instructions as described in the TV Control & Operation section for switching the TV
into the standby mode. Note that you will not be able to switch the TV into standby mode using the control unit on the TV while the TV is in standby mode picture state.
Note: The availability of this feature depends on the TV model and its features.
Refer to the Supported File Formats for USB Mode section for the supported media file formats.
Standby Notifications
If the TV does not receive any input signal (e.g. from an aerial or HDMI source) for 3 minutes, it will go into standby. When you next switch-on, the following message will be displayed: "TV switched to stand-by mode automatically because there was no signal for a long time." You can disable this functionality by setting the Timer of No Signal option in the Settings>Devices menu accordingly.
The Auto Power Down option (in the Settings>System >More menu) could have been set to a value between 1 and 8 hours by default. If this setting is not set as Off and the TV has been left on and not been operated during the set time, it will switch into standby mode after the set time has expired. When you next switch-on the TV, the following message will be displayed: "TV switched to stand-by mode automatically because no operation was made for a long time." Before the TV switches into standby mode a dialogue window will be displayed. If you do not press any button the TV will switch into the standby mode after a waiting period of about 5 minutes. You can highlight Yes and press OK to switch the TV into standby mode immediately. If you highlight No and press OK, the TV will remain on. You can also choose to cancel the Auto Power Down function from this dialogue. Highlight Disable and press OK, the TV will remain on and the function will be set as Off. You can enable this function again by changing the setting of the Auto Power Down option from the Settings>System>More menu.
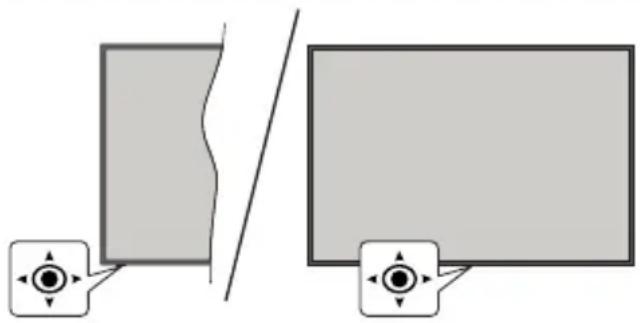
TV Control & Operation
natural_image
Diagram showing two rectangular panels separated by a diagonal line, with corner icons indicating alignment or navigation (no text or symbols)This TV has a joystick as shown in the above drawing. It allows you to control the Volume / Programme / Source and Turn Off - On functions of the TV.
Note: The position of the joystick may differ depending on the model.
To change volume: Increase or decrease the volume by pushing the joystick right or left.
To change channel: Scroll through the stored channels by pushing the joystick forwards or pulling it towards yourself.
To change source: Press the centre of the joystick in, the sources list will appear on the screen. Scroll through the available sources by pushing the joystick forwards or pulling it towards yourself.
To turn the TV off (Hard Standby): Press the centre of the joystick in and hold it down for more than 3 seconds, the TV will turn into hard standby mode.
In hard standby mode the remote control will not function and the standby LED on the TV will not lit. The functions such as networked standby mode (if available) and timers will be disabled. You can turn on the TV from the hard standby only via joystick.
To turn on the TV: Press the centre of the joystick in, the TV will turn on.
Note: Main menu OSD cannot be displayed via joystick.
Operation with the Remote Control
Press the TiVo button on your remote control to display Home screen. Use the directional buttons and OK button to navigate and set. Press Back/Return to quit a menu screen.
Input Selection
Once you have connected external systems to your TV, you can switch to different input sources. Press the Source button on your remote control consecutively to select the different sources.
Changing Channels and Volume
You can change the channel and adjust the volume by using the Programme +/- and Volume +/- buttons on the remote.
Reset and Power Off via Standby Button
Press and hold the Standby button to see additional actions for this button. Restart, Standby (Normal Standby), and Power off (Forced Standby) options will be available. Highlight one and press OK to perform the selected action. If a problem occurs that prevents the TV from switching into standby mode properly, you can use the Power off option to force the TV to switch into standby mode.
If your TV stops responding to commands and the actions menu can not be displayed, the TV will be forced to restart when the button is kept pressed for about 5 seconds. This will terminate the process.
Watching TV
1. Home
The Home screen is your starting point for browsing. It gathers all the TV shows and movies that matter to you - trending titles on all your streaming apps, recently watched shows, live TV channels, and recommended shows based on your ratings and viewing habits.
Content in each carousel changes dynamically based on your usage. Even carousel categories update as TiVo OS gets to know you better. For example, based on what you've been watching, you might see a Comedy Movies or Health & Fitness carousel one day and an Oscar Winners carousel a few days later.
1.1. My Apps Carousel
The My Apps carousel on the Home screen contains all the apps from which TiVo OS is making TV show and movie recommendations. You can select the apps that appear here on the Manage Apps screen.
When you prefer searching and browsing for shows within an app, select the app in this carousel and press OK on your remote control to open it.
1.2. Manage Apps Screen
Use the Manage Apps screen to control which apps TiVo OS uses to recommend titles from on the Home, TV Shows, and Movies screens. The apps you select display in the My Apps carousel on the Home screen. Your app selections do not affect search results. TiVo OS shows results from all apps to help you find what you want to watch. When an app you're not using has the title, you can then decide to sign up for it.
2. Navigation Carousel
The navigation carousel on the Home screen gives you easy access to common features: Guide, All Apps, Sources, Channel List, Recordings (depends on the model), Timers, and Settings.
3. Browse Screens
Selecting Free, TV Shows, Movies, and Watchlist in the Main Menu to focus your browsing on those content types.
4. Content Details
When you find content that interests you, highlight it and press OK on your remote control to view details about it. You can also learn about cast and crew, and see recommendations for similar content.
4.1. Watch Now
Choose to watch the show from any of your selected applications that have the show available. These are the applications you enabled for recommendations on the Manage Apps screen. Others that have the content display in the More Ways to Watch.
4.2. Watchlist
Use the Watchlist to save shows you want to start or continue watching later and favourites to return to. What you add helps personalise recommendations for you.
The titles you add also appear in a Watchlist carousel on the Home screen.
To add a show, select + Watchlist on its Content Details screen. The plus changes to a bookmark.
To remove a show, go to its Content Details screen and select Watchlist. The bookmark changes to a plus.
4.3. Rate
Tell TiVo OS how you feel about a TV show or movie with a Thumbs Up or Thumbs Down. In return you'll get recommendations that better reflect what you enjoy watching. Go to the Content Details screen of a show and select Rate. Choose Thumbs Up or Thumbs Down. Content that you rate Thumbs Down will no longer appear in recommendations.
4.4. Report Content
Go to the Content Details screen of a show and select flag. Report content screen will be displayed. After selecting the pre-defined reasons that suit you, highlight Report and press OK. You can also select the Something else option and enter your reason using the virtual keyboard in case the pre-defined reasons do not suit you.
4.5. Browse All Episodes
Select Episodes on the Content Details screen for an episodic TV show series to see its episodes ordered by Season.
5. Text Search
Select Search in the Main Menu to search for movies and TV shows across all your applications. Press OK and enter a title or actor using the virtual keyboard. Then highlight Done and press OK to start the search. Results display on the screen. Highlight the desired result using the directional buttons and press OK to open.
6. Voice Search and Control
Use your voice to search for TV shows and movies. It's faster and more accurate than typing on a remote control. You can also navigate screens and control volume by speaking naturally. Press the Voice button on your remote control (depends on the model of the remote control and the remote control should be paired with the TV before use; refer to the Remote Control section for more information), then ask for content by criteria like title, genre, actor, director, rating, age appropriateness, quote, or decade. You can continue to talk to refine search results after they display: "Show me Tom Cruise movies. Just the ones from the 90s."
Note: Voice search and voice control may not be available in some countries.
7. Need Help?
Get answers to common questions and learn to experience the most from TiVo OS at: https://www.tivo.com/support
Inserting the Batteries into the Remote
The remote may have a screw that secures the battery compartment cover onto the remote control (or this may be in a separate bag). Remove the screw, if the cover is screwed on previously. Then remove the battery compartment cover to reveal the battery compartment. Insert two 1.5V - size AAA batteries. Make sure the (+) and (-) signs match (observing correct polarity). Do not mix old and new batteries. Replace only with same or equivalent type. Place the cover back on. Secure the cover again with the screw, if any.
A message will be displayed on the screen when the batteries are low and must be replaced. Note that when the batteries are low, the performance of the remote control may be impaired.
Batteries should not be exposed to excessive heat such as sunshine, fire or the like.
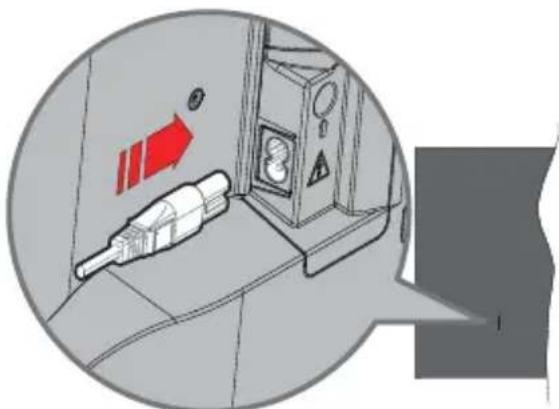
Power Connection
IMPORTANT: The TV set is designed to operate on a 220-240V AC, 50 Hz supply. After unpacking, allow the TV set to reach the ambient room temperature before you connect the set to the mains.
natural_image
Diagram of a fuel pump or fuel injection system inside a vehicle, showing a bottle and valve with warning symbols (no readable text)Plug one end (the two-hole plug) of the supplied detachable power cord into the power cord inlet on the rear side of the TV as shown above. Then plug the other end of the power cord into the mains socket outlet.
Note: The position of the power cord inlet may differ depending on the model.
Antenna Connection
Connect the aerial or cable TV plug to the aerial input (ANT) socket or satellite plug to the satellite input (LNB) socket located on the rear-left side of the TV.
Rear-left side of the TV
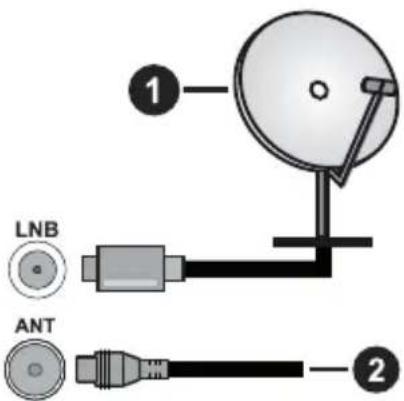
text_image
LNB ANT-
Satellite
-
Aerial or cable

If you want to connect a device to the TV, make sure that both the TV and the device are turned off before making any connection. After the connection is done, you can turn on the units and use them.
Licence Notification
The terms HDMI, HDMI High-Definition Multimedia Interface, HDMI trade dress and the HDMI Logos are trademarks or registered trademarks of HDMI Licensing Administrator, Inc.

Dolby, Dolby Vision, Dolby Atmos, and the double-D symbol are registered trademarks of Dolby Laboratories Licensing Corporation. Manufactured under licence from Dolby Laboratories. Confidential unpublished works. Copyright © 2012-2022 Dolby Laboratories. All rights reserved.
Dolby Vision·Atmos
YouTube and the YouTube logo are trademarks of Google Inc.
The Bluetooth ^® word mark and logos are registered trademarks owned by the Bluetooth SIG, Inc. and any use of such marks by Vestel Elektronik Sanayi ve Ticaret A.S. is under licence. Other trademarks and trade names are those of their respective owners.
This product contains technology subject to certain intellectual property rights of Microsoft. Use or distribution of this technology outside of this product is prohibited without the appropriate licence(s) from Microsoft.
Content owners use Microsoft PlayReady™ content access technology to protect their intellectual property, including copyrighted content. This device uses PlayReady technology to access PlayReady-protected content and/or WMDRM-protected content. If the device fails to properly enforce restrictions on content usage, content owners may require Microsoft to revoke the device's ability to consume PlayReady-protected content. Revocation should not affect unprotected content or content protected by other content access technologies. Content owners may require you to upgrade PlayReady to access their content. If you decline an upgrade, you will not be able to access content that requires the upgrade.
The "CI Plus" Logo is a trademark of CI Plus LLP.
This product is protected by certain intellectual property rights of Microsoft Corporation. Use or distribution of such technology outside of this product is prohibited without a licence from Microsoft or an authorised Microsoft subsidiary.

Advance™
Covered by patents at patentlist.accessadvance.com
Disposal of Old Equipment and Batteries

Only for European Union and countries with recycling systems
These symbols on the products, packaging, and/or accompanying documents mean that used electrical and electronic products and batteries must not be mixed with general household waste.
For proper treatment, recovery and recycling of old products and batteries, please take them to applicable collection points in accordance with your national legislation.
By disposing of them correctly, you will help to save valuable resources and prevent any potential negative effects on human health and the environment.
For more information about collection and recycling, please contact your local municipality.
Penalties may be applicable for incorrect disposal of this waste, in accordance with national legislation.

Note for the battery symbol (bottom symbol):
This symbol might be used in combination with a chemical symbol. In this case it complies with the requirement set by the Directive for the chemical involved.
Declaration of Conformity (DoC)
Hereby, Panasonic Marketing Europe GmbH, declares that this TV is in compliance with the essential requirements and other relevant provisions of the Directive 2014/53/EU.
If you want to get a copy of the original DoC of this TV, please visit the following website:
http://www.ptc.panasonic.eu/compliance-documents
Authorized Representative:
Panasonic Testing Centre
Panasonic Marketing Europe GmbH
Winsbergring 15, 22525 Hamburg, Germany
Web Site: http://www.panasonic.com
Specification
| TV Broadcasting | PAL BG/I/DKSECAM BG/DK | |||
| Receiving Channels | VHF (BAND I/III) - UHF (BAND U) - HYPERBAND | |||
| Digital Reception | Fully integrated digital terrestrial-cable-satellite TV(DVB-T-C-S) (DVB-T2, DVB-S2 compliant) | |||
| Number of Preset Channels | 11 000 | |||
| Channel Indicator On | Screen Display | |||
| RF Aerial Input 75 Ohm (unbalanced) | ||||
| Operating Voltage 220-240V AC, 50Hz. | ||||
| Audio Dolby Atmos | ||||
| Headphone 3.5 mm mini stereo jack | ||||
| Networked Standby Mode Power Consumption (W) | < 2 | |||
| TB-43W60AEZ TB-50 | W60AEZ TB-55W60 | AEZ TB-65W60AEZ | ||
| Audio Output Power (WRMS.) (10% THD) | 2 x 10 W 2 x 10 W 2 x 10 W 2 x 12 W | |||
| Power Consumption (W) | 150 W 135 W 140 W 200 W | |||
| Weight (kg) 7,5 Kg 9,5 Kg 13 Kg 22 Kg | ||||
| TV Dimensions DxLxH (with stand) (mm) | 235 x 965 x 619 235 x 1120 x 706 235 x 1233 x 770 275 x 1453 x 896 | |||
| TV Dimensions DxLxH (without stand) (mm) | 87 x 965 x 561 87 x 1120 x 648 87 x 1233 x 712 82 x 1453 x 836 | |||
| Display | 16/9 43" | 16/9 50" | 16/9 55" | 16/9 65" |
| Operation temperature and operation humidity | 0°C up to 40°C, 85% humidity max | |||
For more product information, please visit EPREL: https://eprel.ec.europa.eu.
EPREL registration number is available on https://eprel.panasonic.eu/product.
Wireless LAN Transmitter Specifications
| Frequency Ranges | Max Output Power |
| 2400 - 2483,5 MHz (CH1 - CH13) < 100 mW | |
| 5150 - 5250 MHz (CH36 - CH48) < 200 mW | |
| 5250 - 5350 MHz (CH52 - CH64) < 200 mW | |
| 5470 - 5725 MHz (CH100 - CH140) < 200 mW |
Country Restrictions
The Wireless LAN equipment is intended for home and office use in all EU countries, the UK and Northern Ireland (and other countries following the relevant EU and/or UK directive). The 5.15 - 5.35 GHz band is restricted to indoor operations only in the EU countries, in the UK and Northern Ireland (and other countries following the relevant EU and/or UK directive). Public use is subject to general authorisation by the respective service provider.
| Country Restriction | |
| Russian Federation Indoor use only | |
The requirements for any country may change at any time. It's recommended that user checks with local authorities for the current status of their national regulations for both 2.4 GHz and 5 GHz wireless LAN's.
Standard
IEEE 802.11.a/b/g/n
Host Interface
USB 2.0
Security
WEP 64/128, WPA, WPA2, TKIP, AES, WAPI
Notice
DVB / Data broadcasting / IPTV functions
- This TV is designed to meet the standards (as of March, 2021) of DVB-T / T2 (MPEG2, MPEG4-AVC(H.264) and HEVC(H.265)) digital terrestrial services, DVB-C (MPEG2, MPEG4-AVC(H.264) and HEVC(H.265)) digital cable services and DVB-S (MPEG2, MPEG4-AVC(H.264) and HEVC(H.265)) digital satellite services.
Consult your local dealer for availability of DVB-T / T2 or DVB-S services in your area.
Consult your cable service provider for availability of DVB-C services with this TV.
- This TV may not work correctly with the signal which does not meet the standards of DVB-T / T2, DVB-C or DVB-S.
- Not all the features are available depending on the country, area, broadcaster, service provider, satellite and network environment.
• Not all CI modules work properly with this TV. Consult your service provider about the available CI module. - This TV may not work correctly with CI module that is not approved by the service provider.
• Additional fees may be charged depending on the service provider. - The compatibility with future services is not guaranteed.
- Internet apps are provided by their respective service providers, and may be changed, interrupted, or discontinued at any time.
Panasonic assumes no responsibility and makes no warranty for the availability or the continuity of the services.
- Panasonic does not guarantee operation and performance of peripheral devices made by other manufacturers; and we disclaim any liability or damage arising from operation and/or performance from usage of such other maker's peripheral devices.
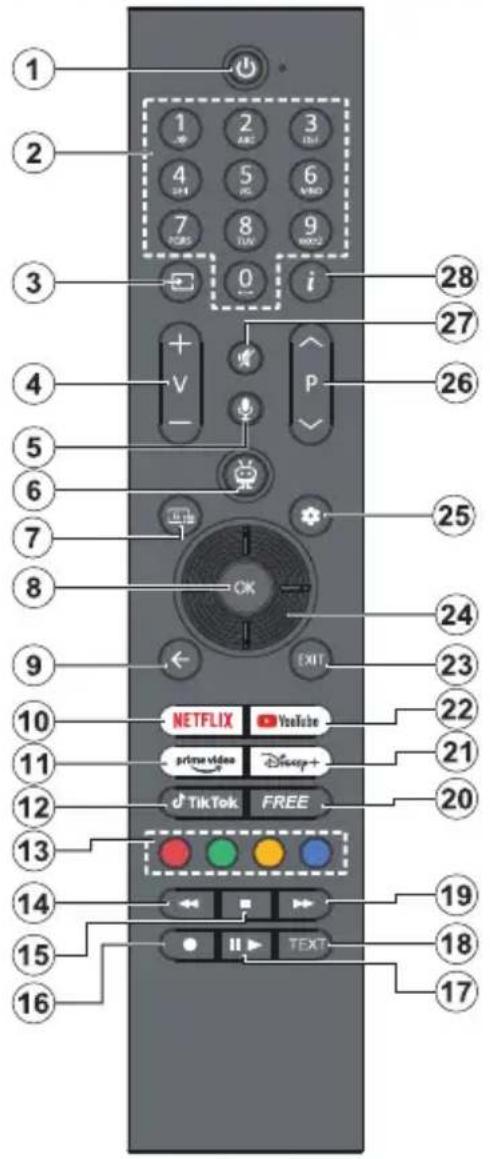
Remote Control
text_image
1 2 3 4 5 6 7 8 9 0 i 28 27 26 4 V - P 25 24 EXIT 23 10 NETFLIX YouTube 22 11 prime video Disney+ 21 12 TikTok FREE 20 13 14 19 15 TEXT 18 16- Standby (*): Standby / On (press briefly) Restart / Power Off (press and hold)
- Numeric buttons: Switches the channel in Live TV mode, enters a number in the text box on the screen
- Source: Shows available broadcast and content sources, is also used in pairing process of the remote
- Volume +/-: Increases/decreases the volume level
- Voice: Activates the microphone on the remote Note: Voice search and voice control may not be available in some countries
- TiVo: Returns you to Home screen within TiVo OS from places like a movie you're watching or the Settings screen
- Guide: Displays the electronic programme guide for digital TV channels. The current channel (if on the TV source) or the last channel watched (if on the Home screen) should be a digital channel
-
OK: Confirms user selections, enters sub-menus, holds the page (in Live TV-Teletext mode), views channel list (in Live TV mode)
-
Back/Return: Returns to previous menu screen, goes one step back, closes open windows, opens index page (in Live TV-Teletext mode). Quickly cycles between previous and current channels or sources
- Netflix: Launches the Netflix application
- Prime Video: Launches the Amazon Prime Video application
- TikTok: Launches the TikTok application
- Coloured Buttons: Follow the on-screen instructions for coloured button functions
- Rewind: Moves frames backwards in media such as movies
- Stop: Stops the media being played
- No function
- Pause: Pauses the media being played Play: Starts to play selected media
- Text: Displays teletext (where available). Press the button a second time to superimpose the teletext over a normal broadcast picture (mix). Press again to close
- Fast Forward: Moves frames forward in media such as movies
- Free: Displays free content from various applications on the Home screen
- Disney+: Launches the Disney+ application
- YouTube: Launches the YouTube application
- Exit: Closes and exits from displayed menus, returns to previous screen, exits from any running application or OSD banner, closes the Home screen and switches to last source used
- Directional buttons: Helps navigate menus, setting options, moves the focus or cursor, etc. and displays the subpages in Live TV-Teletext mode when pressed Right or Left. Follow the on-screen instructions
- Settings: Opens the Settings menu
- Programme +/-: Increases/decreases channel number in Live TV mode
- Mute: Completely turns off the volume of the TV
- Info: Displays information about on-screen content, shows hidden information (reveal - in Live TV-Teletext mode)
(\*) Standby Button
Press and hold the Standby button to see additional actions for this button. Highlight one of the Restart, Standby (Normal Standby), and Power off (Forced Standby) options and press OK to perform the selected action. If your TV stops responding to commands and the actions menu can not be displayed, the TV will be forced to restart when the button is kept pressed for about five seconds.
Press briefly and release the button to switch the TV into standby mode or to switch it on when it's in standby mode.
To pair remote with the TV
In order to pair your remote, you can go to Settings>-Devices>Pair Remote Control or Other Device (Bluetooth) menu, set the Pair Remote Control or Other Device (Bluetooth) option to Enabled, then highlight Discover and press OK to start the device discovery.
Press and hold the Source button on the remote until the LED on the remote starts to blink, then release the Source button. That means the remote is in pairing mode.
Now you will wait for the TV to find your remote. Select the name of your remote and press OK when it appears on the TV screen.
When the pairing process is successful, the LED on the remote will go off. If the pairing process fails the remote will enter sleep mode after 30 seconds.
Connections
| Connector Type | Cables Device | ||
 | HDMI Connection |  |  |
 | SPDIF (Optical Out) Connection |  |  |
HEADPHONE  | Headphone Connection |  | |
 | USB Connection |  |  |
 | CI Connection |  | 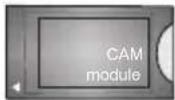 |
LAN  | Ethernet Connection |  LAN / Ethernet Cable LAN / Ethernet Cable | 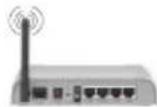 |
When using the wall mounting kit (available from a third party in the market, if not supplied), we recommend that you plug in all cables before mounting the TV on the wall. Insert or remove the CI module only when the TV is SWITCHED OFF. You should refer to the module instruction manual for details of the settings. The/ Each USB input of your TV supports devices up to 500mA. Connecting devices that have current value above 500mA may damage your TV. When connecting equipment using a HDMI cable to your TV, to guarantee sufficient immunity against parasitic frequency radiation and trouble-free transmission of high definition signals, such as 4K content, you have to use a high speed shielded (high grade) HDMI cable with ferrites.

If you want to connect a device to the TV, make sure that both the TV and the device are turned off before making any connection. After the connection is done, you can turn on the units and use them.
Switching On/Off
To Switch the TV On
Connect the power cord to a power source such as a wall socket (220-240V AC, 50 Hz).
To switch on the TV from standby
- Press the Standby button, Programme +/- or a numeric button on the remote control.
- Press the centre of the joystick on the TV in or push it up/down.
To switch on the TV from hard standby
- Press the centre of the joystick on the TV in.
To switch the TV into standby
Press the Standby button on the remote control, the TV will switch into standby mode.
To switch the TV into hard standby
Press the centre of the joystick on the TV in and hold it down for more than 3 seconds, the TV will switch into hard standby mode.
To switch off the TV
To power down the TV completely, unplug the power cord from the mains socket.
Note: When the TV is switched into standby mode, the standby LED can blink to indicate that features such as Standby Mode Search, Over Air Download or Timer is active. The LED can also blink when you switch on the TV from standby mode.
First Time Installation
When turned on for the first time, the language selection screen is displayed. Select the desired language and press OK. In the following steps of the installation guide, set your preferences using the directional buttons and OK button.
After the language selection, you will be asked whether you want to change accessibility settings. Highlight Yes and press OK to change. Refer to the System Menu Content section for detailed information on available options.
Set your country preference on the next screen. Depending on the country selection you may be asked to set and confirm a PIN at this point. You have to enter it if you are asked to enter a PIN for any menu operation later.
You can activate Store Mode in the next step. This feature will configure your TV's settings for store environment and depending on the TV model, the supported features of it may be displayed on the screen as an info banner or the pre-installed video file may be played back. This feature is intended only for store use. It is recommended to select Home Mode for home use. The Store Mode option will be available in the Settings>System>More menu and your preference for this setting can be changed later. Make your selection and press OK to continue.
Depending on the model of your TV, the picture mode selection screen may appear at this point. In order for your TV to consume less energy and be more environmentally friendly select Natural and press OK to continue. If you select Dynamic and press OK, a confirmation dialogue will be displayed. Select Yes and press OK to proceed. You can change your selection later using the Mode option in the Settings>Picture menu.
Depending on the model of your TV and the country selection Summary of Consent Settings screen may appear at this point. Using the options on this screen you can manage your consent settings. Highlight a feature and press OK to enable or disable. Read the related explanations displayed on the screen for each highlighted feature before making any changes. You can press the Right directional button to highlight the text and use the Programme +/- or Up/Down directional buttons to scroll up and down to read the entire text. You will be able to change your preferences at any time later from the Settings>Legal>Consent Settings menu. If the Internet Connection option is disabled the Network/Internet Settings step will be skipped and not displayed. If you have any questions, complaints or comments regarding the privacy policies or their enforcement, please contact by email at privacyrequest@xperi.com and smarttvsecurity@vosshub.com. Highlight Submit Consent Choices and press OK to continue.
On the next screen you need to agree to the terms and conditions of TiVo Smart TV Service to make use of the related services. Scroll the page to read the entire text using the Programme +/- or Up/Down directional buttons. Highlight Accept and press OK on the remote to confirm and proceed. Highlight Cancel and press OK to proceed without confirmation.
You will need to agree to the terms and conditions of the Manufacturer next to make use of the related services. Scroll the page to read the entire text using the Programme +/- or Up/Down directional buttons. Highlight Accept and press OK on the remote to confirm and proceed. Highlight Cancel and press OK to proceed without confirmation.
The Network/Internet Settings screen will be displayed next. Please refer to the Connectivity section if you need information on configuring a wired or a wireless connection (availability depends on the model) and other available options. If you want your TV to consume less power in standby mode, you can disable the Networked Standby Mode option for the selected network type by setting it as Off. After the settings are completed highlight Next and press OK button to continue. If the Network Type is set to Wireless Device, available networks will be listed. Highlight Next again when you are done and press OK to continue.
Depending on the model of your TV and supplied remote controls, an automatic pairing screen may be displayed at this point. Follow the on-screen instructions to pair your wireless remote control (depends on the model of the remote control) with your TV. Refer to the Remote Control section for more information. If you want to pair your remote control at a later time, highlight Setup Later and press OK.
On the next screen the Add Devices menu will be displayed. You can connect external wireless audio devices, remotes, keyboards, and mice to your TV. For audio devices use the Pair Audio Link Device (Bluetooth) option, for wireless remotes, keyboards, and mice use the Pair Remote Control or Other Device (Bluetooth) option. Highlight the option you prefer, press OK and wait for the TV to complete device discovery. If you select Pair Remote Control or Other Device (Bluetooth) option, instructions to pair your remote will be displayed first. Highlight Discover and press OK when you are ready. Available devices will be listed. Highlight your device from the list and press OK. Highlight Connect from the options menu and press OK to complete the pairing process. You can use the Discover option on the bottom side to repeat device discovery. Highlight Continue and press OK to proceed. You can also use the related options in the Settings>Devices menu to add/remove devices later. Refer to the Connectivity section for more information on connecting wireless devices. To continue highlight Next and press OK.
On next screen you can set broadcast types to be searched, set your encrypted channel searching and time zone (depending on the country selection) preferences. Additionally you can set a broadcast type as your favourite one. Priority will be given to the selected broadcast type during the search process and the channels of it will be listed on the top of the channel list. When finished, highlight Next and press OK to continue.
About Selecting Broadcast Type
To turn a search option on for a broadcast type highlight it and press the OK, Left or Right directional button. To turn the search option off press the OK, Left or Right directional button after moving the focus on the desired broadcast type option.
Digital Aerial: If the D. Aerial broadcast search option is turned on, the TV will search for digital terrestrial broadcasts after other initial settings are completed.
Digital Cable: If the D. Cable broadcast search option is turned on, the TV will search for digital cable broadcasts after other initial settings are completed. A dialogue may be displayed depending on the country selection before starting to search asking whether you want to perform cable network search. If you select Yes and press OK you can select Network or set values such as Frequency, Network ID, and Search Step on the next screen. If you select No and press OK or the network search dialogue is not displayed, you can set Start Frequency, Stop Frequency, and Search Step on the next screen. When finished, highlight Next and press OK to continue.
Note: Searching duration will change depending on the selected Search Step.
Satellite: If the Satellite broadcast search option is turned on, the TV will search for digital satellite broadcasts after other initial settings are completed. Before satellite search is performed some settings should be made.
Depending on the model and the selected country the next step may be the selection of the installation type for satellite. You can select to start an operator installation or a standard installation at this point. If you want to perform an operator installation, set the Install Type as Operator and then set the Satellite Operator according to your operator preference. Some of the following steps may differ or be skipped depending on the selected operator in this step. If you set the Install Type as Standard, you can continue with regular satellite installation and watch satellite channels. Press OK to proceed.
Antenna type selection screen may be displayed next. You can select Antenna type as Direct, Single Satellite Cable or DiSEqC switch by using the Left or Right directional buttons. After selecting your antenna type press OK. On the next screen press OK to see the options to proceed. Continue, Transponder list and Configure LNB options may be available. You can change the transponder and LNB settings using the related menu options.
- Direct: If you have a single receiver and a direct satellite dish, select this antenna type. Press OK to continue. Select an available satellite on the next screen and press OK, highlight Continue and press OK again to scan for services.
- Single Satellite Cable: If you have multiple receivers and a single satellite cable system, select this antenna type. Press OK to continue. Configure settings by following instructions on the next screen. Press OK, highlight Continue and press OK again to scan for services.
- DiSEqC switch: If you have multiple satellite dishes and a DiSEqC switch, select this antenna type. Then set the DiSEqC version and press OK to continue. You can set up to four satellites (if available) for version v1.0 and sixteen satellites for version v1.1 on the next screen. Press OK, highlight Continue and press OK again to scan the selected satellite/s.
Note: Depending on the model of your TV, DiSEqC version v1.1 may not be supported and therefore the DiSEqC version selection step may not be available.
Analogue: If the Analogue broadcast search option is turned on, the TV will search for analogue broadcasts after other initial settings are completed.
After the initial settings are completed the TV will start to search for available broadcasts of the selected broadcast types.
While the search continues current scan results will be displayed at the bottom of the screen. You can press the TiVo, Back or Exit button to cancel the search. The channels that have already been found will be stored in the channel list.
After all the available stations are stored, Home screen will be displayed. You can press the Exit button to watch TV channels. You can press the OK button to display the channel list when watching TV channels and customise the channel list according to your preferences using the Edit and Filter tab options.
While the search continues a dialogue may appear, asking whether you want to sort channels according to the LCN(*). Select Yes and press OK to confirm.
(*) LCN is the Logical Channel Number system that organises available broadcasts in accordance with a recognisable channel number sequence (if available).
Note: Do not turn off the TV while performing first time installation. Note that, some options may not be available depending on the country selection.
After the first time installation is completed, HD+ operator application screen may be displayed depending on selections you made during the installation process. In order to access operator services this application needs to be activated. If you activate the application, the elements of the user interface such as channel info banner and electronic programme guide, which are normally provided by the TV, will be replaced by the operator application. If you do not perform satellite or HD+ installation and want to activate the application at a later time, highlight the HD+ application on the Home screen and press OK. You will be directed to a screen where you can carry out the activation.
Media Playback via USB Input
You can connect 2.5" and 3.5" inch (HDD with external power supply) external hard disk drives or USB memory stick to your TV by using the USB input(s) of the TV.
IMPORTANT! Back up the files on your storage devices before connecting them to the TV. Manufacturer will not be responsible for any file damage or data loss. Certain types of USB devices (e.g. MP3 Players) or USB hard disk drives/memory sticks may not be compatible with this TV. The TV supports FAT32 and NTFS disk formatting.
Wait a little while before each plugging and unplugging as the player may still be reading files. Failure to do so may cause physical damage to the USB player and the USB device itself. Do not pull out your drive while playing a file.
You can use USB hubs with your TV's USB input(s). External power supplied USB hubs are recommended in such a case.
It is recommended to use the TV's USB input(s) directly, if you are going to connect a USB hard disk.
Note: When viewing media files the Media Browser menu can only display a maximum of 1000 media files per folder.
Media Browser
You can play back music and movie files and display photo files stored on a USB storage device by connecting it to your TV. Connect a USB storage device to one of the USB inputs located on the side of the TV.
After connecting a USB storage device to your TV a message stating that the USB device is connected will be displayed on the screen. You can access the content of the connected USB device from the Sources menu on the Home screen. You can also press the Source button on the remote and then select your USB storage device from the list of sources.
You can set your media browser preferences by using the Settings menu. Settings menu can be accessed via the information bar which is displayed on the bottom of the screen while playing back a video or an audio file or displaying a picture file. Press the Info button if the information bar has disappeared, highlight the gear wheel symbol positioned on the right side of the information bar and press OK. Picture Settings, Sound Settings, Media Browser Settings and Options menus may be available depending on the media file type and the model of your TV and its features. The content of these menus may also differ according to the type of the currently open media file. Only the Sound Settings menu will be available while playing back audio files.
| Loop/Shuffle Mode Operation | |
| Start playback and activate | All files in the list will be continuously played in original order |
| Start playback and activate | The same file will be played continuously (repeat) |
| Start playback and activate | All files in the list will be played once in random order |
| Start playback and activate | All files in the list will be continuously played in the same random order |
To use the functions on the information bar highlight the symbol of the function and press OK. To change the status of a function highlight the symbol of the function and press OK as much as needed. If the symbol is marked with a red cross, that means it is deactivated.
Custom Boot Up Logo
You can personalise your TV and see your favourite image or photo on the screen each time your TV boots up. To do this, copy your favourite image files onto a
USB disk and open them in the Media Browser. Select USB input from the Sources menu on the Home screen and press OK. You can also press the Source button on the remote and then select your USB storage device from the list of sources. When you have chosen the desired image, highlight it and press OK to view it in full screen. Press the Info button, highlight the gear wheel symbol on the information bar and press OK. Select Options and press OK to enter. Set Boot Logo option will be available. Highlight it and press OK again to choose the image as custom boot logo. A confirmation message will be displayed. Select Yes and press OK again. If the image is suitable (*) you will see it on the screen during the TV's next boot up.
Note: You can use the Restore Default Boot Logo option in the Settings>System>More menu to restore the default boot logo. If you perform First Time Installation the boot logo will also be restored to its default.
(*) Images must have an aspect ratio between 4:3 to 16:9 and they must be in .jpeg or .jpg file formats. The image cannot be set as boot logo, if its resolution doesn't appear on the info banner.
FollowMe TV
With your mobile device you can stream the current broadcast from your smart TV using the FollowMe TV feature. Install the appropriate Smart Center application to your mobile device. Start the application.
For further information on using this feature refer to the instructions of the application you use.
Note: Depending on model, your TV may not support this function. The application may not be compatible with all mobile devices. Both of the devices must be connected to the same network. This feature is only functional on TV source.
CEC
This function allows the user to control the CEC-enabled devices, that are connected through HDMI ports by using the remote control of the TV.
The CEC option in the Settings>Devices menu should be set as Enabled at first. Press the Source button and select the HDMI input of the connected CEC device from the Sources List menu. When a new CEC source device is connected, it will be listed in Sources List menu with its own name instead of the connected HDMI port's name (such as DVD Player, Recorder 1, etc.).
The TV remote is automatically able to perform the main functions after the connected HDMI source has been selected. To terminate this operation and control the TV via the remote again, press and hold the "0-Zero" button on the remote control for 3 seconds.
You can disable the CEC functionality by setting the related option under the Settings>Devices menu accordingly.
The TV supports ARC (Audio Return Channel). This feature is an audio link meant to replace other cables between the TV and an audio system (A/V receiver or speaker system).
When ARC is active, the TV will mute its other audio outputs, except the headphone jack, automatically and volume control buttons are directed to the connected audio device. To activate ARC set the Sound Output option in the Settings>Sound menu as HDMI ARC.
Note: ARC is supported only via the HDMI2 input.
Enhanced Audio Return Channel (eARC)
Similar to ARC, the eARC feature enables the transfer of the digital audio stream from your TV to a connected audio device via the HDMI cable. eARC is an improved version of ARC. It has a much higher bandwidth than its predecessor. Bandwidth represents the range of frequencies or amount of data that is being transferred at a time. Higher bandwidth translates into a higher amount of data that can be transferred. Higher bandwidth also means that digital audio signal doesn't have to be compressed and is much more detailed, rich, and vibrant.
When eARC is enabled from the sound menu, TV first tries to establish eARC link. If eARC is supported by the connected device, the output turns into eARC mode and the "eARC" indicator can be observed on the connected device's OSD. If an eARC link cannot be established (for example, the connected device is not supporting eARC but supporting ARC only) or if eARC is disabled from the sound menu, then TV initiates ARC.
For eARC to function properly;
• The connected audio device should also support eARC.
- Some HDMI cables do not have enough bandwidth to carry high-bit-rate audio channels, use an HDMI cable with eARC support (HDMI High Speed Cables with Ethernet and the new Ultra High Speed HDMI Cable - check hdmi.org for latest info).
- Set the Sound Output option in the Settings>Sound menu to HDMI ARC. The eARC option in the Sound menu will be enabled. Check to see if it is set to On. If not, set it to On.
Note: eARC is supported only via the HDMI2 input.
System Audio Control
Allows an Audio Amplifier/Receiver to be used with the TV. The volume can be controlled using the remote control of the TV. To activate this feature set the Sound Output option in the Settings>Sound menu as HDMI ARC. When HDMI ARC option is selected, CEC option will be set as Enabled automatically, if it is not already set. The TV speakers will be muted and the sound of the watched source will be provided from the connected sound system.
Note: The audio device should support System Audio Control feature.
Game Mode
You can set your TV to achieve lowest latency for games. Go to Settings>Picture menu and set the Mode option to Game. Game option will be available when the TV's input source is set to HDMI. When set the picture will be optimised for low latency.
Auto Low Latency Mode
You can also enable the ALLM (Auto Low Latency Mode) option in the Settings>Devices menu. If this function is enabled the TV automatically switches the picture mode to Game when ALLM mode signal is received from the current HDMI source. TV switches back to previous picture mode setting when the ALLM signal is lost. So you won't need to change the settings manually.
If the ALLM option is enabled, picture mode can not be changed as long as ALLM signal is received from the current HDMI source.
In order for the ALLM feature to be functional the related HDMI source setting should be set to Enhanced. You can change this setting from the Settings>System>Sources menu.
E-Manual
You can find instructions for your TV's features in the E-Manual.
To access the E-Manual, enter the Settings>System>More menu, select Manuals and press OK. For quick access press the Settings button and then the Info button.
By using the directional buttons select a desired topic and press OK to read instructions. To close the E-Manual screen press the Back/Return, Exit or TiVo button.
Note: Depending on model, your TV may not support this function. The content of the E-Manual may vary according to the model.
Settings Menu Content
| Devices Menu Content | |
| Pair Audio Link Device (Bluetooth) | Press OK to open the pairing screen. Using this screen you can discover and connect the Bluetooth wireless technology enabled sound devices to your TV. Refer to the Connecting Bluetooth Devices section for further information. |
| Pair Remote Control or Other Device (Bluetooth) | Press OK to open the pairing screen. Using this screen you can discover and the connect Bluetooth wireless technology enabled remotes, keyboards and mice to your TV. Refer to the Connecting Bluetooth Devices section for further information.Note: Your TV may not be compatible with all keyboard and mouse models in the market. For more information contact your local dealer or retail outlet where you bought your TV. |
| Virtual Remote | Enable or disable the virtual remote feature. |
| Audio Video Sharing | This feature allows you to share files stored on your smartphone or tablet pc. If you have a compatible smartphone or tablet pc and the appropriate software is installed, you can share/play photos, music and videos on your TV. See instructions of your sharing software for more information. |
| ALLM | ALLM (Auto Low Latency Mode) function allows the TV to activate or deactivate low latency settings depending on playback content. If this option is enabled the picture mode will be set to Game automatically when ALLM mode signal is received from the current HDMI source. Refer to the Game Mode section for more information. |
| Timer of No Signal | If your TV does not receive any input signal (e.g. from an aerial or HDMI source) for 3 minutes, it will go into standby mode. You can enable or disable this functionality by setting this option accordingly. |
| CEC | With this setting you can enable and disable CEC functionality completely. Press the Left or Right button to enable or disable the feature. |
| CEC Auto Power On | This function allows the connected HDMI-CEC compatible device to turn on the TV and switch to its input source automatically. Press the Left or Right button to enable or disable the feature. |
| Picture Menu Content | ||
| Mode | You can change the picture mode to suit your preference or requirements. Picture mode can be set to one of these options: Cinema, Game, Sports, Dynamic and Natural.Note: Available options may differ depending on the input source.Dolby Vision Modes: If Dolby Vision content is detected Dolby Vision Dark and Dolby Vision Bright picture mode options will be available instead of Cinema and Natural modes. | |
| Contrast | Adjusts the light and dark values on the screen. | |
| Brightness | Adjusts the brightness values on the screen. | |
| Sharpness | Sets the sharpness value for the objects displayed on the screen. | |
| Colour | Sets the colour value, adjusting the colours. | |
| Energy Saving | For setting the Energy Saving to Custom, Minimum, Medium, Maximum, Auto, Screen Off or Off.Note: Available options may differ depending on the selected Mode. | |
| Backlight | This setting controls the backlight level. This option (will be located under the Energy Saving setting) will be available if the Energy Saving is set to Custom. Highlight and use the Left/Right directional buttons to set. | |
| Picture Zoom | Sets the desired image size format. | |
| Picture Shift | This option (will be located under the Picture Zoom setting) may be available depending on the Picture Zoom setting. Highlight and press OK, then use directional buttons to shift the picture upwards or downwards. | |
| Pixelence Demo | Pixelence function optimises the TV's video settings and helps to acquire a better image quality. Press OK to activate Pixellence demo mode to experience Pixellence quality. Press OK button again to cancel. If the Mode option is set to Game this option will not be available.Note: This option may not be available depending on the TV model and its features. | ||
| Advanced Settings | |||
| Dynamic Contrast | You can change the dynamic contrast ratio to desired value. | ||
| Colour Temp | Sets the desired colour temperature value. Cool, Normal, Warm and Custom options are available. | ||
| White Point | If the Colour Temp option is set as Custom, this setting will be available (will be located under the Colour Temp setting). Increase the 'warmth' or 'coolness' of the picture by pressing Left or Right buttons. | ||
| Vivid Blue | White colour enhancement function that makes white colour more cooler in order to make more bright picture. Set as On to enable. | ||
| Vivid Dimming | Low, Medium, High and Off options are available. While Vivid Dimming is active, it will enhance contrast locally for each defined zone. | ||
| Noise Reduction | Low, Medium, High and Off options are available. If the signal is weak and the picture is noisy, use the Noise Reduction setting to reduce the amount of noise. | ||
| MEMC | Press left/right buttons to set MEMC to Low, Medium, High or Off. While MEMC is active, it will optimise the TV's video settings for motional images to acquire a better quality and readability. | ||
| MEMC Demo | When MEMC option is set to Low, Medium or High, this option will be available. Press OK button to activate the demo mode. While demo mode is active, the screen will be divided into two sections, one displaying the MEMC activity, the other displaying the normal settings for TV screen. Press OK button again to cancel. | ||
| Film Mode | Films are recorded at a different number of frames per second to normal television programmes. Set to Auto when you are watching films to see the fast motion scenes clearly. | ||
| Skin Tone | Skin tone can be changed between -5 and 5. | ||
| Colour Shift | Adjust the desired colour tone. | ||
| Colour Tuner | Opens colour tuner settings. Set the Colour Tuner as Enabled to adjust the Hue, Colour and Brightness values manually. | ||
| Gamut Mapping | You can use this option to set the range of colours displayed on your TV screen. When set as On, colours are set according to the source signal. When set as Off, the TV's maximum colour capacity is used by default (recommended option).Note: This option may not be available depending on the TV model and its features. | ||
| Gamma | You can use this option to set your gamma preference. Press the Left/Right directional buttons to set to Normal, Bright or Dark.Note: This option may not be available depending on the TV model and its features and you may not be able to change this setting depending on the current content. | ||
| HDMI Full Range | While watching from a HDMI source, this feature will be visible. You can use this feature to enhance blackness in the picture. | ||
| 11 Point White Balance Correction | White balance feature calibrates TV's colour temperature in detailed grey levels. By visually or measurement, grey scale uniformity can be improved. Adjust the strength of the Red, Green, Blue colours and Gain value manually. Highlight this option, press OK, and then set the desired white balance correction option (11 point or 2 point) to Enabled to turn it on. | ||
| Reset | Resets the current picture mode settings to factory default settings. | ||
| Sound Menu Content | |||
| Dolby Atmos | Your TV supports Dolby Atmos technology. By means of this technology the sound moves around you in three-dimensional space, so you feel like you're inside the action. You will have best experience if input audio bitstream is Atmos. Auto, On and Off options will be available. If set as Auto, the TV will switch between On and Off modes automatically depending on the input audio bitstream information, if the input audio bitstream is Atmos this feature will work as if it is set as On. Set as Off to disable. | ||
| Mode | Smart, Movie, Music, News, and Off options will be available. Set as Off to disable.Note: Some items in the Sound menu will be greyed out and unavailable if set to an option other than Off. | ||
| Surround Sound | Enables or disables the surround sound mode. | ||
| Sound Output | Sets the sound output preference. TV, S/PDIF, HDMI ARC, Headphone Only and Lineout options will be available. There will be no sound output except through the selected option and the headphone jack. Note that, if this option is set as Headphone Only, TV speakers will be muted when headphone set is plugged in.When you connect an external amplifier to your TV using the headphone jack, you can select this option as Lineout. If you have connected headphones to the TV, set this option as Headphone Only. Please ensure before using headphones that this menu item is set to Headphone Only. If it is set to Lineout, the output from the headphone socket will be set to maximum which could damage your hearing.If the HDMI ARC option is selected, CEC feature will be enabled.Note: Depending on the selected option some items in the Sound menu will appear as greyed out and will be unavailable. | ||
| eARC | When the Sound Output option is set to HDMI ARC, the eARC menu option will be available. Otherwise, it will be greyed out. This option will be set to On by default. Set to Off to disable. Refer to the CEC section for more information. | ||
| AVL (Automatic Volume Limiting) | Sets the sound to obtain fixed output level between programmes.If the Mode menu item is set to an option other than Off the AVL setting options will change. Auto, Night, Normal and Off options will be available. In Auto mode the TV will switch to Normal or Night mode automatically according to the current time information. If no time information is available this option will always function as Normal. When the TV switches to Night mode for the first time after setting this option as Auto, an information bar will pop up on the screen.Please note that compared to Normal mode Night mode provides more aggressive dynamic compression control which is suitable for silent environments. | ||
| Advanced Settings | |||
| Equalizer | Selects the equalizer mode. Custom settings can be made only when in User mode. | ||
| Dynamic Bass | Enables or disables the Dynamic Bass. | ||
| Sound Mode | You can select a sound mode if the channel you are watching supports it. This option will not be available if no channels are installed. | ||
| Digital Out | Sets digital out audio type. PCM, Auto, and Passthrough options will be available.PCM: This option provides two-channel uncompressed digital audio output. You can use this option if you experience compatibility problems such as not hearing sound.Auto: This option provides multi-channel digital audio output (up to 5.1 channel).Passthrough: This option provides original audio output as such in HDMI ARC. It is recommended to use this option if you have an A/V receiver with eARC support. If your A/V receiver does not support source audio format you may experience compatibility problems such as not hearing sound. | ||
| Headphone | Sets headphone volume. This option will not be available if the Sound Output option is set as Lineout.Please ensure before using headphones that the headphone volume is set to a low level, to prevent damage to your hearing. | ||
| Balance | Adjusts the balance level of the TV speakers and headphones together. | ||
| Reset | Resets some of the sound settings to factory defaults. | ||
| Network Menu Content | |||
| Network Type | Disable the network connection or change the connection type. | ||
| Scan Wireless Networks | Start a search for wireless networks. This option will be available if the Network Type is set as Wireless Device. | ||
| Disconnect | To disconnect from a wireless network and delete your saved wireless network profile (if previously saved), highlight this option and press OK. This option will not be available if you did not connect to a wireless network. Refer to Connectivity section for more information. | ||
| Press WPS on your wifi router | If your modem/router device has WPS, you can directly connect to it using this option. Highlight this option and press OK. Go to your modem/router device and press the WPS button on it to make the connection. This option will be available if the Network Type is set as Wireless Device. | ||
| Internet Speed Test | Start a speed test to check your connection bandwidth. The result will be displayed on the screen when finished. | ||
| Advanced Settings | Change the IP and DNS configurations of your TV. | ||
| Networked Standby Mode | Enable or disable this feature by setting it as On or Off. | ||
| Note: For detailed information on the options of this menu refer to the Connectivity section. | |||
| Installation Menu Content | |
| Automatic Channel Scan (Retune) | Displays automatic tuning options. D. Aerial: Searches and stores aerial DVB stations. D. Cable: Searches and stores cable DVB stations. Analogue: Searches and stores analogue stations. Satellite: Searches and stores satellite stations. |
| Manual Channel Scan | This feature can be used for direct broadcast entry. |
| Network Channel Scan | Searches for the linked channels in the broadcast system. D. Aerial: Searches for aerial network channels. D. Cable: Searches for cable network channels. |
| Analogue Fine Tune | You can use this setting for fine tuning analogue channels. This feature is not available if no analogue channels are stored and if currently watched channel is not an analogue channel. |
| Satellite Settings | Displays satellite settings. Satellite list: Displays available satellites. You can Add, Delete satellites or Edit satellite settings on the list. Antenna installation: You can change satellite antenna settings and/or start a satellite scan. |
| Installation Settings (optional) | Displays installation settings menu. Standby Mode Search (*): Your TV will search for new or missing channels while in standby. Any new found broadcasts will be shown. Dynamic Channel Update (*): If this option is set as Enabled, the changes on the broadcasts such as frequency, channel name, subtitle language, etc. will be applied automatically while watching. (*) Availability depends on model. |
| Clear Service List | Use this setting to clear channels stored. This setting is visible only when the Country option is set to Denmark, Sweden, Norway or Finland. |
| Select Active Network | This setting allows you to select only the broadcasts within the selected network to be listed in the channel list. This feature is available only for the country option of Norway. |
| Signal Information | You can use this menu item to monitor signal related information such as signal level/ quality, network name, etc. for available frequencies. |
| Factory Reset | Deletes all stored channels and settings, resets TV to factory settings. |
| System Menu Content | |||
| Accessibility | Displays accessibility options of the TV. Some options will not be available if no channels are installed. | ||
| High Contrast | Increase the contrast of the menu options and texts to make them easier to read. White Text, Yellow Text and Off options will be available. | ||
| Subtitle | Turns the subtitles on or off. | ||
| Hard Of Hearing | Enables any special feature sent from the broadcaster. | ||
| Audio Description | A narration track will be played for the blind or visually impaired audience. Press OK to see all available Audio Description menu options. This feature is available only if the broadcaster supports it.Note: Audio description sound feature is not available in recording or time shifting mode (availability depends on the model of your TV and its features). | ||
| Dialogue Enhancement | This feature provides sound postprocessing options for speech-gated dialogue enhancement. Off, Low, Medium and High options will be available. Set according your preference.Note: This feature has an effect only if input audio format is AC-4 and this effect only applies to TV loudspeaker output. | ||
| Spoken Subtitles | Default preference of spoken subtitles is selected with this setting option. To make spoken subtitles priority higher than normal ones, this option should be set to On. This option may not be available depending on the model of your TV. | ||
| Magnification | Enables the use of button combinations to magnify the screen. On and Off options will be available. Set as On to enable.Magnification support will be enabled or disabled with long-press of the numeric button 5. First top-left quadrant of the screen will be zoomed. After the magnification support is enabled, long-press of the numeric buttons 2, 4, 6, 8 will move the zoomed area to up, left, right and down. | ||
| Minimap | Minimap is enabled and deactivated by default. It will be activated when Magnification feature is enabled. With this option, you can prevent magnification feature from displaying the minimap. | ||
| Highlight programmes with | |||
| [S] Subtitle | If this option is enabled and if any electronic programme guide event has "Subtitle" access service, these events will be highlighted with another colour. | ||
| [SL] Sign Language | If this option is enabled and if any electronic programme guide event has "Sign Language" access service, these events will be highlighted with another colour. | ||
| [AD] Audio Description | If this option is enabled and if any electronic programme guide event has "Audio Description" access service, these events will be highlighted with another colour. | ||
| Language | You may set a different language depending on the broadcaster and the country. | ||
| Conditional Access | Controls conditional access modules when available. | ||
| Parental | Enter correct PIN to change parental settings. You can easily adjust Menu Lock, Maturity Lock, Child Lock or Guidance in this menu. You can also set a new PIN or change the Default CICAM PIN using the related options.Note: Some menu options may not be available depending on the country you selected during the first time installation process. Default PIN could have been set to 0000 or 1234. If you have defined the PIN (is requested depending on the country selection) during the first time installation process, use the PIN that you have defined. | ||
| Date/Time | Sets date and time. | ||
| Sources | Edit the names, enable or disable selected source options. There are also Regular and Enhanced options available for HDMI sources. These options are affecting the colour settings of the selected HDMI source. To be able to watch 4K or HDR/HLG images from an HDMI source, related source setting should be set as Enhanced if the connected device is compatible with HDMI 2.0 and subsequent versions. Set as Regular if the connected device is HDMI 1.4 compatible. Set accordingly or disable the related HDMI source by setting as Disabled. | ||
| Netflix | If this feature is supported by your TV, you can view your ESN(*) number and deactivate Netflix. (*) ESN number is an unique ID number for Netflix, created especially to identify your TV. Note: For 4K video streaming, a minimum 25Mb/s internet connection speed is required - For an example of the requirements for streaming 4K content you may find more information on the Netflix website (https://help.netflix.com/en/node/13444). When you start to stream video content via the internet the quality of your connection will be analysed and the full HD or 4K quality may take a short time to be realised, or in the event of a slow connection not be possible. You should check your internet capabilities with your internet provider if you are at all unsure. | ||
| TiVo | You can view the HSN and DLID information of your TV. | ||
| Voice Assistant | |||
| Works With Alexa | Starts the setup process for this feature manually. If the setup is priorly completed Change Friendly Name and Sign Out options will be available. Refer to Alexa Ready section for more information. | ||
| Change Friendly Name | You can define a new name for your TV using this option. | ||
| Sign Out | You can use this option to sign out. If you sign out Works With Alexa feature will be disabled. | ||
| Google Assistant | Starts the setup process to enable your TV to work with Google Assistant devices. Highlight Start and press OK. If the setup is priorly completed Sign Out option will be available. If you sign out Google Assistant feature will be disabled. Refer to Google Assistant section for more information. | ||
| More | Displays other setting options of the TV. | ||
| Menu Timeout | Changes timeout duration for menu screens. | ||
| Home Screen Saver | Set the screensaver options for Home screen. You can set a wait time for the screensaver or disable it by using the available options. | ||
| Standby Mode LED | If set as Off the standby mode LED will not light up when the TV is in standby mode. | ||
| Device Identification | When this option is enabled it causes a ‘Device ID’ to be generated internally for each Web origin visited. When disabled all the current ‘Device ID’s’ are cleared for each Web origin that was visited. You can enable or disable this feature by setting it as On or Off. | ||
| Software Upgrade | Ensures that your TV has the latest software. Press OK to see the menu options. | ||
| Application Version | Displays current software version. | ||
| Subtitle Mode | This option is used to select which subtitle mode will be on the screen (DVB subtitle / Teletext subtitle) if both are available. Default value is DVB subtitle. This feature is available if channels are installed and the country option is set as Norway during the first time installation. | ||
| Auto Power Down | Sets the desired time for the TV to automatically go into standby mode when not being operated. This option can be set from 1 to 8 hours in steps of 1 hour. You can also disable this option by setting as Off. | ||
| Standby On Mode | Configures your TV’s auto launch preference. The Home Screen and Last Source options are available. | ||
| Sleep Timer | Define a time after which you want your TV to enter sleep mode automatically. Set as Off to disable. | ||
| Biss Key | Biss is a satellite signal scrambling system that is used for some broadcasts. If you need to enter Biss key on a broadcast, you can use this setting. Highlight Biss Key and press OK to enter keys on the desired broadcast. This option will appear if satellite channels are installed. Availability depends on the model of your TV and its features. | ||
| Store Mode | Select this mode for store display purposes. Whilst Store Mode is enabled, some items in the TV menu may not be available. For some models Enabled with video option may also be available. If this option is set, the TV will switch to store mode and the pre-installed video file will be played back. | ||
| Power Up Mode | This setting configures the power up mode preference. Last State and Standby Mode options are available. | ||
| OSS | Displays Open Source Software licence information. | ||
| Restore Default Boot Logo | Restores the default boot logo. A confirmation message will be displayed. Select Yes and press OK. This option may not be available depending on the model of your TV and its features. | ||
| Change Friendly Name | Using this option you can change the device name that is used to identify your TV when connecting a device to the TV wirelessly. The default device name will be restored if the device name is left blank or first time installation is performed. | ||
| Application Priority | You can set your preference regarding the priority between the broadcast applications and CICAM App MMI applications using this option. In case a CICAM is inserted into the TV and a contention occurs between the applications the priority will be given to the selected type of application. | ||
| Dolby Notification | Sets the notification appearance preference for Dolby content. When set as On, Dolby logo will be displayed on the screen when Dolby content is detected. | ||
| Manuals | Displays the E-Manual. You can find instructions for your TV's features in the E-Manual. | ||
| Note: Some options may not be available depending on the model of your TV, its features and the selected during the first time installation process. | |||
| Legal Menu Content | |||
| Privacy Policies | Displays the privacy policy information. | ||
| Terms & Conditions | Displays the terms and conditions for TiVo Smart TV Service and manufacturer. | ||
| Consent Settings | You can use the options here to manage your consent settings. Highlight a feature and press OK to enable or disable. You can read the related explanations displayed on the screen for each highlighted feature before making changes. You can press the Right directional button to highlight the text and then use the Programme +/- or Up/Down directional buttons to scroll up and down to read the entire text. | ||
| Advertising ID | Displays the advertising ID. You can also reset it using the related option here. | ||
| Company Information | Displays the company information. | ||
| Transparency Disclosure | Displays the transparency disclosure. | ||
| Cookies | |||
| Show All Cookies | Displays all saved cookies. | ||
| Delete All Coo- kies | Deletes all saved cookies. | ||
| Do Not Track | You can set your preference regarding the tracking behaviour for HbbTV services using this option. | ||
| Samba TV Privacy Manager | Samba Interactive TV powers recommendations and other apps by gathering data regarding consumption of specific on-screen content to enhance your viewing experience. Using this option you can access Samba Interactive TV settings menu, review Samba TV's Terms of Service, Privacy and manage your advertising preferences, etc. Internet connection will be required in order to access HTML based settings. You can manage your preferences at any time from the Samba Interactive TV menu. This option may not be available depending on the selected country during the First Time Installation process, the model of your TV and its features. | ||
General TV Operation
Using the Channel List
The TV sorts all stored stations in the channel list. You can edit this channel list or set favourites by using the Channels menu options. While watching live TV channels press the OK button to open the channel list or go to the Navigation carousel on the Home screen and select Channel List. You can filter the listed channels or make advanced changes in the current list using the Filter and Edit tab options. Highlight the tab you want and press OK to see available options.
Managing the Favourite Lists
You can create four different lists of your favourite channels. Go to the Navigation carousel on the Home screen and select Channel List to open the Channels menu. Highlight the Edit tab and press OK to see the editing options and select the Tag/ Untag channel option. Select the desired channel on the list by pressing the OK button while the channel is highlighted. You can make multiple choices. You can also use the Tag/Untag all option to select all channels on the list. Then press the Back/Return or Right directional button to return to the Edit menu options. Select the Add/Remove Favourites option and press the OK button again. Favourite channel list options will be displayed. Set the desired list option to On. The selected channel/s will be added to the list. In order to remove a channel or channels from a favourite list follow the same steps and set the desired list option to Off.
You can use the filtering function in the Channels menu to filter the channels in the channel list permanently according to your preferences. For instance, using the options of the Filter tab, you can set one of your four favourite lists to be displayed every time the channel list is opened. The selected filtering options will be shown on the top of the Channels menu screen.
Configuring Parental Settings
The Parental menu options can be used to prohibit users from viewing of certain programmes, channels and the usage of menus. These settings are located in the Settings>System>Parental menu.
To display parental lock menu options, a PIN should be entered. After coding the correct PIN, parental setting options will be displayed.
Menu Lock: This setting enables or disables access to all menus or installation menus of the TV.
Maturity Lock: If this option is set, the TV gets the maturity information from the broadcast and if this maturity level is disabled, prohibits access to the broadcast.
Note: If the country option in the First Time Installation is set as France, Italy or Austria, Maturity Lock's value will be set to 18 as default.
Child Lock: If this option is set to On, the TV can only be controlled by the remote control. In this case the control buttons on the TV will not work.
Guidance: This setting enables or disables access to some of the MHEG applications. Disabled applications can be released by entering the right PIN.
Internet Lock: If this option is set to ON, the internet using applications will be disabled. Set to OFF to release these applications again.
Set PIN: Defines a new PIN number.
Default CICAM PIN: This option will appear as greyed out if no CI module is inserted into the CI slot of the TV. You can change the default PIN of the CI CAM using this option.
Note: Default PIN could have been set to 0000 or 1234. If you have defined the PIN (is requested depending on the country selection) during the First Time Installation use the PIN that you have defined. In case the PIN is entered incorrectly five times in succession, PIN entry will be blocked and it will no longer be possible to make a new entry for 30 minutes. However, you can unblock the PIN entry or reset the retry count to zero by turning the TV off and on.
Some options may not be available depending on the model and/or on the country selection in the First Time Installation.
Electronic Programme Guide
By means of electronic programme guide function of your TV, you can browse the event schedule of the currently installed channels on your channel list. It depends on the related broadcast whether this feature is supported or not.
To access the programme guide, press the Guide button on your remote. You can also use the Guide option on the Home screen.
There are 2 different types of schedule layouts available, Timeline Schedule and Now/Next. To switch between these layouts highlight the tab with the name of the alternative layout on the upper side of the screen and press OK.
Use the directional buttons to navigate through the programme guide. Use the Back/Return button to use the tab options on the upper side of the screen.
Timeline Schedule
In this layout option, all events of the listed channels will be displayed by timeline. You can use the directional buttons to scroll through the list of the events. Highlight an event and press OK to display event options menu.
Press the Back/Return button to use available tab options. Highlight the Filter tab and press OK to see the filtering options. To change the layout highlight Now/Next and press OK. You can use the Previous Day and Next Day options to display the events of the previous and next day.
Highlight the Extras tab and press OK to access below options.
Highlight Genre: Displays the Highlight Genre menu. Select an option and press OK. The events in the programme guide matching the selected genre will be highlighted.
Guide Search: Displays searching options. Using these options, you can search the programme guide database in accordance with the selected criteria. Matching results will be listed.
Now: Returns back to the current time on the timeline.
Zoom: Highlight and press OK to change the time interval on the timeline.
Now/Next Schedule
In this layout option, only the current and next events of the listed channels will be displayed. You can use the directional buttons to scroll through the list of the events.
Press the Back/Return button to use available tab options. Highlight the Filter tab and press OK to see the filtering options. To change the layout highlight
Timeline Schedule and press OK.
Event Options
Use the directional buttons to highlight an event and press the OK button to display the Options menu. The following options are available.
Select Channel: Using this option, you can switch to the selected channel in order to watch it. The programme guide will be closed.
More Info: Display detailed information on the selected event. Use up and down directional buttons to scroll through the text.
Set Timer on Event / Delete Timer on Event: Select Set Timer on Event option and press OK. You can set timers for future events. The event will be added to Timers list. To cancel an already set timer, highlight that event and press the OK button. Then select Delete Timer on Event option. The timer will be cancelled.
Notes: You cannot switch to any other channel while there is an active timer on the current channel.
It is not possible to set timer for two or more individual events at the same time interval.
Teletext Services
Press the Text button to enter. Press again to activate mix mode, which allows you to see the teletext page and the TV broadcast at the same time. Press once more to exit. If available, sections in the teletext pages will become colour-coded and can be selected by pressing the coloured buttons. Follow the instructions displayed on the screen.
Digital Teletext
Press the Text button to view digital teletext information. Operate it with the coloured buttons, directional buttons and OK button. The operation method may differ depending on the content of the digital teletext. Follow the instructions displayed on the digital teletext screen. When the Text button is pressed again, the TV returns to television broadcast.
Software Upgrade
Your TV is capable of finding and updating the software automatically via the broadcast signal or via Internet.
Software upgrade search via user interface
Press the Settings button on the remote or select Settings on the Home screen. Highlight the Software Upgrade option in the System>More menu and press OK. Then highlight the Scan for upgrade option and press OK to check for a new software upgrade. You can select the satellite which is used for updating process and configure its parameters by using the Edit Upgrade for Satellite menu options.
If a new upgrade is found, it starts to download the upgrade. After the download is completed, a warning will be displayed, press OK to complete software upgrade process and restart TV.
3 AM search and upgrade mode
Your TV will search for new upgrades at 3:00 o'clock if the Automatic scanning option is set to Enabled and the TV is connected to an aerial signal or to the Internet. If a new software is found and downloaded successfully, it will be installed at the next power on.
Note: Do not unplug the power cord while led is blinking during the reboot process. If the TV fails to come on after the upgrade, unplug, wait for two minutes then plug it back in.
All updates are automatically controlled. If a manual search is carried out and no software is found then this is the current version.
Troubleshooting & Tips
TV will not turn on
Make sure the power cord is plugged in securely to a wall outlet. Press the Standby button on the remote.
Poor picture
- Check if you have correctly tuned the TV.
- Low signal level can cause picture distortion. Please check antenna connections.
- Check if you have entered the correct channel frequency if you have performed manual tuning.
No picture
• TV is not receiving any signal. Make sure the correct source has been selected.
• Is the antenna connected properly?
• Is the antenna cable damaged?
• Are suitable plugs used to connect the antenna?
- If the content is received through an HDMI input, try changing the related HDMI source input setting to Enhanced or Regular from the Sources option in the Settings>System menu.
• If you are in doubt, consult your dealer.
No sound
- Check if the TV sound is muted. Press the Mute button or increase the volume to check.
- Sound is coming from only one speaker. Check the balance setting from the Sound menu.
- Check if the Sound Output option is set correctly from the Sound menu.
- If the content is received through an HDMI input, try changing the related HDMI source input setting to Enhanced or Regular from the Sources option in the Settings>System menu.
Remote control - no operation
- The batteries may be exhausted. Replace the batteries.
- The batteries maybe inserted incorrectly. Refer to the Inserting the Batteries into the Remote section.
No signal on an input source
• It is possible that no device is connected.
- Check the AV cables and connections from your device.
- Check the device is switched on.
HDMI Signal Compatibility
| Source Supported Signals Available | |||
| HDMI | 480i 60Hz O | ||
| 480p 60Hz O | |||
| 576i, 576p 50Hz O | |||
| 720p 50Hz,60Hz O | |||
| 1080i 50Hz,60Hz O | |||
| 1080p | 24Hz,25Hz,30Hz,50Hz,60Hz | O | |
| 3840x2160p | 24Hz,25Hz,30Hz,50Hz,60Hz | O | |
| 4096x2160p | 24Hz,25Hz,30Hz,50Hz,60Hz | O | |
(X: Not Available, O: Available)
In some cases a signal on the TV may not be displayed properly. The problem may be an inconsistency with standards from the source equipment (DVD, Set-top box, etc.). If you do experience such a problem please contact your dealer and also the manufacturer of the source equipment.
Supported File Formats for USB Mode
Video File Formats
| File Extension | Format | |
| Video Codec Audio | ||
| .mpg/.mpeg/.dat/.vob MPEG1/2, H.264, VC1 MPEG Layer 1/2/3, AC3 | ||
| .ts/.trp/.m2ts MPEG1/2, H.264, VC1, HEVC/H.265 MPEG Layer 1/2/3, AC3, E-AC3 | ||
| .avi MPEG1/2, MPEG4, H.264, MJPEG MPEG Layer 1/2/3, AC3, AAC, WMA | ||
| .mp4/.m4a/.m4v/.mov/.qt/.3gp/.3g2/.3gpp | MPEG1/2, H.263, MPEG4, H.264,HEVC/H.265, AV1 | MPEG Layer 1/2/3, AAC LC, AC3 |
| .mkv | MPEG 1/2, MPEG4, H.264,HEVC/H.265, AV1 | MPEG Layer 1/2/3, AAC, AC3 |
| .flv Sorenson Spark, MPEG4, H.264 MPEG Layer 3, ADPCM, AAC LC | ||
| .asf/.wmv MPEG4, WMV3, VC1 WMA, AMR-NB | ||
| .webm VP9, VP8, AV1 OPUS, Vorbis | ||
Picture File Formats
| File Extension | Format |
| .jpg/.jpeg JPEG, PJPEG | |
| .bmp | BMP |
| .png | PNG |
Audio File Formats
| File Extension | Format | |
| Video Codec | Audio | |
| .mp3 | mp3 | |
| .aac | AAC | |
| .wma | WMA | |
| .wav | MPEG Layer 1/2/3, AAC, PCM | |
| .m4a | M4A | AAC |
Subtitle File Formats
| External Subtitles | |
| Extension Specification | |
| .ssa | SubStation Alpha |
| .ass | Advanced SubStation Alpha |
| .srt Subripper | |
| .sub | Micro DVD / SubViewer |
| .txt | Micro DVD / TMPlayer / MPL2 |
| .smi | Sami |
Internal Subtitles
| Extension | Specification |
| .mkv | VOBSub |
| .mkv | ASS / SSA / TEXT |
| .dat, .mpg, .mpeg, .vob | DVD Subtitle |
| .mp4 | DVD Subtitle, TEXT |
Supported DVI Resolutions
When connecting devices to your TV's connectors by using DVI converter cable (DVI to HDMI cable - not supplied), you can refer to the following resolution information.
| 56Hz 60Hz | 66Hz 70Hz | 72Hz 75Hz | ||||
| 640x480 | X | X | ||||
| 800x600 | X X X | |||||
| 1024x768 | X X X | |||||
| 1280x768 | X | X | ||||
| 1280x960 | X | |||||
| 1360x768 | X | |||||
| 1366x768 | X | |||||
| 1280x1024 | X X X | |||||
| 1400x1050 | X | |||||
| 1600x900 | X | |||||
| 1920x1080 | X |
Connectivity
Wired Connectivity
To Connect to a Wired Network
- You must have a modem/router connected to an active broadband connection.
- Connect your TV to your modem/router via an Ethernet cable. There is a LAN port at the rear-left side of your TV.
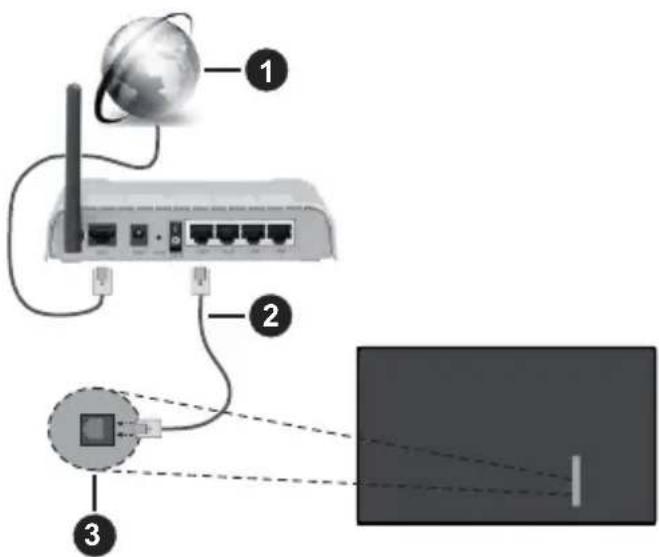
text_image
Diagram showing three labeled components of a network device: a satellite, a router, and a screen with light rays.1 Broadband ISP connection
2 LAN (Ethernet) cable
3 LAN input on the rear-left side of the TV
- You might be able to connect your TV to your LAN depending on your network's configuration. In such a case, use an Ethernet cable to connect your TV directly to the network wall outlet.
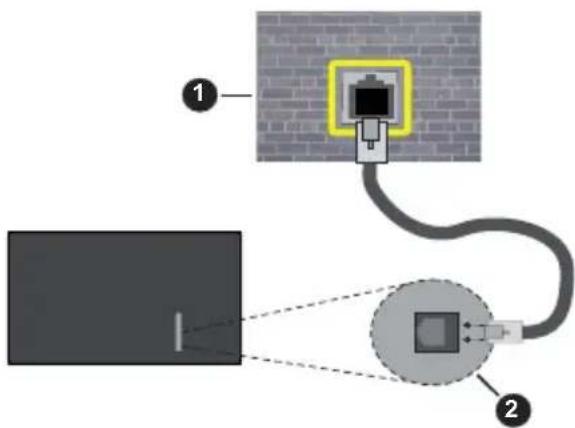
text_image
Diagram showing a surveillance camera setup with labeled components and wiring connections1 Network wall socket
② LAN input on the rear-left side of the TV
Configuring Wired Device Settings
To configure wired connection settings go to the Settings>Network menu.
Network Type
Set Network Type as Wired Device if you are connecting via an Ethernet cable.
Internet Speed Test
Highlight Internet Speed Test and press the OK button. TV will check the internet connection bandwidth and display the result when complete.
Advanced Settings
Highlight Advanced Settings and press the OK button. On the next screen you can change the IP and DNS settings of the TV. Highlight the desired one and press Left or Right button to change the setting from Automatic to Manual. Now you can enter the IP and / or DNS values manually. Select the related item in the drop down menu and enter the new values using the numeric buttons of the remote. Highlight Save and press the OK button to save settings when complete.
Networked Standby Mode
You can enable or disable the Networked Standby Mode feature by setting this option accordingly. Refer to the Networked Standby Mode section for further information.
Other Information
The status of the connection will be displayed Connected or Not Connected and the current IP address, if a connection is established. The MAC address of your TV will also be displayed on the screen.
Wireless Connectivity
To Connect to a Wireless Network
- You must have a wireless modem/router connected to an active broadband connection.
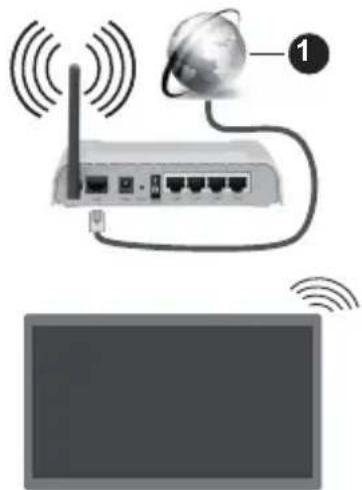
natural_image
Diagram showing a router connected to a globe via wireless signal waves, with a monitor below (no text or symbols)1 Broadband ISP connection
A Wireless-N router (IEEE 802.11a/b/g/n) with simultaneous 2.4 and 5 GHz bands is designed to increase bandwidth. These are optimised for smoother and faster HD video streaming, file transfers and wireless gaming.
The frequency and channel differ depending on the area.
The transmission speed differs depending on the distance and number of obstructions between the transmission products, the configuration of these products, the radio wave conditions, the and the products that you use. The transmission may also be cut off or may get disconnected depending on the radio wave conditions, DECT phones or any other WLAN 11b appliances. The standard values of the transmission speed are the theoretical maximum values for the wireless standards. They are not actual speeds of data transmission.
The location where the transmission is most effective differs depending on the usage environment.
The TV supports 802.11 a, b, g & n type modems. It is highly recommended that you should use the IEEE 802.11n communication protocol in order to avoid any possible problems while watching videos.
You must change your modem's SSID when there are any other modems around with the same SSID. You can encounter connection problems otherwise. Use a wired connection if you experience problems with a wireless connection.
Configuring Wireless Device Settings
To configure wireless connection settings go to Settings>Network menu.
Network Type
Set Network Type as Wireless Device to start connection process.
Scan Wireless Networks
Highlight the Scan Wireless Networks option and press OK to start a search for available networks. All found networks will be listed. Highlight your desired network from the list and press O connect. A network with hidden SSID can not be detected by other devices. If you want to connect to a network with hidden SSID, scroll down the list of detected wireless networks, highlight the Add New Network option and press OK. Enter the name of the network and select the security type using the related options to connect.
Note: If the modem supports N mode, you should set N mode settings.
If the selected network is password-protected, enter the correct key by using the virtual keyboard. You can use this keyboard via the directional buttons and the OK button on the remote control.
Wait until the IP address is shown on the screen. This means that the connection is now established.
Disconnect
If you have connected to a wireless network the Disconnect option will appear in the Network menu and your wireless network profile will also be saved, thus your TV will connect to the same network automatically whenever you switch to wireless connection. To disconnect from a wireless network and delete saved wireless network profile, highlight Disconnect and press OK.
Press WPS on your wifi router
If your router has WPS, you can directly connect to the modem/router without entering a password or adding the network first. Highlight the Press WPS on your wifi router option and press OK. Go to your modem/ the router device and press the WPS button on it to make the connection. You will see a connection confirmation on your TV once the devices have paired. Select OK to proceed. No further configuration is required.
Internet Speed Test
Highlight Internet Speed Test and press the OK button to check your internet connection speed.
Advanced Settings
Highlight Advanced Settings and press the OK button to open the advanced setting menu. Use directional and numeric buttons to set. The procedure is the same as explained for wired connectivity. Highlight Save and press the OK button to save settings when complete.
Networked Standby Mode the
You can enable or disable the Networked Standby Mode feature by setting this option accordingly. Refer to the Networked Standby Mode section for further information.
Other Information
The status of the connection will be displayed
Connected or Not Connected and the current IP addressless if a connection is established. The address of your TV will also be displayed on the screen.
OK to Connecting to your mobile device via WLAN
- If your mobile device has WLAN feature, you can connect it to your TV via a router, in order to access the content in your device. For this, your device must have an appropriate sharing software.
Connect your TV to your router by following the steps mentioned in the sections above.
Afterwards, connect your mobile device to the same network as your TV and then activate the sharing software on your mobile device. Then, select files that you want to share with your TV.
If the connection is established correctly, you be able to access the shared files installed on your mobile device via the Audio Video Sharing feature of your TV.
Go to the Navigation carousel on the Home screen and select Sources. Then highlight the Audio Video Sharing option in the Sources menu and press OK, available media server devices in the network will be
displayed. Select your mobile device and press the OK button to continue.
- If available, you can download a virtual remote controller application from the server of your mobile device application provider.
Note: This feature may not be supported on all mobile devices.
Handling of the customer information
When using Internet connecting function of this TV, after agreeing to Panasonic's terms of service / privacy policy (hereinafter referred to as terms and conditions etc.), Customer Information on the use of this unit may be collected and used according to terms and conditions etc.
For details of terms of service / privacy policy, refer to [TiVo] Settings>Legal
Customer's personal information may be recorded on this TV by broadcasting organisation or application provider. Before repairing, transferring or discarding this TV, erase all the information recorded on this TV according to the following procedure.
[TiVo] Settings>Installation>Factory Reset
Customer information may be collected by provider via application provided by third parties on this TV or website. Please confirm the terms and conditions etc. of provide in advance.
- Panasonic will not be held responsible for collecting or using customer Information via application provided by third party on this TV or website.
- When entering your credit card number, name, etc. pay special attention to the trustworthiness of the provider.
- Registered information may be registered in the server etc. of provider. Before repairing, transferring or discarding this TV, be sure to erase the information according to the terms and conditions etc. of provider.
Networked Standby Mode
Networked Standby Mode is a standard that allows a device to be turned on or woken up by a network message. The message is sent to the device by a program executed on a remote device connected to the same local area network, such as a smartphone.
To enable this feature set the Networked Standby Mode option in the Network menu as On. It is necessary that both the device, from which the network message will be sent to the TV, and the TV are connected to the same network. Networked Standby Mode feature is only supported for Android OS devices and can only be used via YouTube and Netflix applications.
In order to use this feature the TV and the remote device should be connected at least once while the TV is on. If the TV is powered off, the connection should be re-established, the next time it is switched on. Otherwise this feature will be unavailable. This does not apply, when the TV is switched into the standby mode.
If you want your TV to consume less power in standby mode, you can disable this feature by setting the Networked Standby Mode option as Off.
Wireless Display
Wireless Display is a standard for streaming video and sound content. This feature provides the ability to use your TV as wireless display device.
Using with mobile devices
There are different standards which enable sharing of screens including graphical, video and audio content between your mobile device and TV.
Press the Source button on the remote and switch to Wireless Display source.
A screen appears stating that the TV is ready for connection.
Open the sharing application on your mobile device. These applications are named differently for each brand, refer to the instruction manual of your mobile device for detailed information.
Scan for devices. After you select your TV and connect, the screen of your device will be displayed on your TV.
Note: This feature can be used only if the mobile device supports this feature. If you experience problems with the connection check if the operating system version you use supports this feature. There may be incompatibility problems with the operating system versions which are released after the production of this TV. Scanning and connecting processes differ according to the program you use.
Connecting Bluetooth Devices
Your TV supports Bluetooth wireless connection technology too. A pairing is required before using Bluetooth devices with the TV set. You should do the following to pair your device with the TV:
- Set the device to pairing mode
• Start device discovery on the TV
Note: Refer to the user manual of the Bluetooth device to learn how to set the device to pairing mode.
You can connect audio devices, remotes, keyboards, and mice to your TV using the Bluetooth wireless technology. Unplug or switch off any other connected audio device in order for wireless connection feature to work correctly. For audio devices you should use the Pair Audio Link Device (Bluetooth) option, for remotes, keyboards, and mice the Pair Remote Control or Other Device (Bluetooth) option in the Settings>Devices menu. Select the menu option and press the OK button to open the related menu. Using this menu you can discover and connect the devices that use the Bluetooth wireless technology and start to use them. Set the Pair Audio Link Device (Bluetooth)
or Pair Remote Control or Other Device (Bluetooth) option to Enabled, then highlight Discover on the bottom side of the menu screen and press OK to start the device discovery. Follow the on-screen instructions. Start the device discovery. A list of available Bluetooth devices will be displayed. Select the device you want to connect from the list and press the OK button to connect. If "Device connected" message is displayed, the connection is successfully established. If the connection fails try it again.
Note: Your TV may not be compatible with all remote, keyboard and mouse models in the market. For more information contact your local dealer or retail outlet where you bought your TV.
Image transfer and audio streaming
You can also use Bluetooth connection to transfer images or stream audio from your mobile device to your TV.
Pair the mobile device and the TV as described before. Start a device search in your hand-held device. Select your TV from listed devices. Confirm the request for connection on your TV screen and do the same on your hand held device screen. If no pairing is done, image transfer or audio streaming to the TV will not be possible.
The images sent by mobile device will be displayed on the TV without confirmation request, if the image file is suitable. You can also save the image file to a connected USB memory drive or set as boot logo, if this feature is supported and the file is suitable. Press the Exit button to terminate displaying the image.
The audio will be routed through the speakers of the TV, after confirmation is given. To start audio streaming unpair the device from your TV if it is paired with your TV previously. After pairing is completed, a confirmation message will be displayed asking whether you want to start audio streaming from your mobile device. Select Yes and press the OK button on the remote of the TV. If the connection is successful, all audio will be routed through the speakers of the TV. A symbol will appear on the upper side of the TV screen as long as the audio streaming connection is active. To terminate the audio streaming, you should turn off the Bluetooth connection of your mobile device.
Close all running applications and all the menus on the TV for a trouble-free transfer. Only image files with sizes smaller than 5 MB and in the following file formats are suitable; .jpg, .jpeg, .png, bmp. If a file sent by the mobile device does not suit these requirements, it will not be displayed on the TV.
If the Audio Video Sharing option in the Settings>- Devices menu is disabled, the TV will ignore pairing requests and no information message will be displayed on the screen. If a device is already paired prior to disabling the Audio Video Sharing with the TV even if the Audio Video Sharing option is disabled.
Note: Wireless devices may operate within the same radio frequency range and may interfere with one another. To improve the performance of your wireless device place it at least 1 metre away from any other wireless devices.
Connectivity Troubleshooting
Wireless Network Not Available
- Ensure that any firewalls of your network allow the TV wireless connection.
- Try searching for wireless networks again, using the Network menu screen.
If the wireless network does not function properly, try using the wired network in your home. Refer to the Wired Connectivity section for more information on the process.
If the TV does not function using the wired connection, check the modem (router). If the router does not have a problem, check the internet connection of your modem.
Connection is Slow
See the instruction book of your wireless modem to get information on the internal service area, connection speed, signal quality and other settings. You need to have a high speed connection for your modem.
Disruption during playback or slow reactions
You could try the following in such a case:
Keep at least three metres distance from microwave ovens, mobile telephones, bluetooth devices or any other WLAN compatible devices. Try changing the active channel on the WLAN router.
Internet Connection Not Available / Audio Video Sharing Not Working
If the MAC address (a unique identifier number) of your PC or modem has been permanently registered, it is possible that your TV might not connect to the internet. In such a case, the MAC address is authentic each time when you connect to the internet. This is a precaution against unauthorised access. Since your TV has its own MAC address, your internet service provider cannot validate the MAC address of your TV. For this reason, your TV cannot connect to the internet. Contact your internet service provider and request information on how to connect a different device, such as your TV, to the internet.
It is also possible that the connection may not be available due to a firewall problem. If you think this causes your problem, contact your internet service provider. A firewall might be the reason of a connectivity and discovery problem while using the TV in Audio Video Sharing mode or while browsing via Audio Video Sharing feature.
Invalid Domain
Ensure that you have already logged on to your PC with an authorised username/password and also ensure that your domain is active, prior to sharing any files in your media server program on your PC. If the domain
is invalid, this might cause problems while browsing files in Audio Video Sharing mode.
Using Audio Video Sharing Network Service
Audio Video Sharing feature uses a star eases the viewing process of digital electronics and makes them more convenient to use on a home network.
This standard allows you to view and play photos, music and videos stored on the media server connected to your home network.
1. Server Software Installation
The Audio Video Sharing feature cannot be used if the server program is not installed onto your PC or if the required media server software is not installed onto the companion device. Prepare your PC with a proper server program.
2. Connect to a Wired or Wireless Network
See the Wired/Wireless Connectivity sections for detailed configuration information.
3. Enable Audio Video Sharing
Enter the Settings>Devices menu and enable the Audio Video Sharing option.
4. Play Shared Files via Media Browser
Go to the Navigation carousel on the Home screen and select Sources. Then highlight the Audio Video Sharing option in the Sources menu by using the directional buttons and press OK. Available media server devices in the network will be listed. Select one and press OK to continue. The media browser will then be displayed.
Refer to the Media Browser section for further information on file playback.
If a problem occurs with the network, switch your television off at the wall socket and back on again.
PC/HDD/Media Player or any other devices that are compatible should be used with a wired connection for higher playback quality.
Use a LAN connection for quicker file sharing between other devices like computers.
Note: There may be some PC's which may not be able to utilise the Audio Video Sharing feature due to administrator and security settings (such as business PC's).
Apps
You can access the applications installed on your TV from the Home screen. The apps of the streaming services are integrated for the best search and viewing experience. Press the TiVo button on the remote, Home screen will be displayed. Highlight an app and press OK to launch.
Use the Manage Apps screen to control which apps TiVo OS uses to recommend titles from on the Home, Free, TV Shows, and Movies screens. The apps you select display in the My Apps carousel on the Home screen.
Your app selections do not affect search results. TiVo OS shows results from all apps to help you find what card that you want to watch. When an app you're not using has the title, you can then decide to sign up for it.
Notes: While many apps are free, a subscription, rental, or purchase may be needed to watch titles from some apps. Possible application dependent problems may be caused by the content service provider. Third party internet services may change, be discontinued or restricted at any time.
Internet Browser
You can launch the internet browser from the My Apps carousel on the Home screen.
In the initial screen of the browser, the thumbnails of the predefined (if any) links to web sites available will be displayed as Speed Dial options along with the Edit Speed Dial and the Add to Speed Dial options.
To navigate the web browser, use the directional buttons on the remote or a connected mouse. To see the browser options bar, move the cursor to the top of the page. History, Tabs and Bookmarks options and the browser bar which contains previous/next buttons, the refresh button, the address/search bar, the Speed Dial and the Vewd buttons are available.
To add a desired website to the Speed Dial list for quick access, move the cursor to the top of the page. The browser bar will appear. Highlight the Speed Dial - button and press the OK button. Then select Add to Speed Dial option and press the OK button. Fill in the blanks for Name and Address, highlight OK and press the OK button to add. Whilst you are on the site you wish to add to the Speed Dial list, highlight the Vewd button and press the OK button. Then highlight Add to Speed Dial option in the submenu and press the OK button again. Name and Address will be filled automatically according to the site you are visiting. Highlight OK and press the OK button to add.
You can also use the Vewd menu options to manage the browser. Highlight the Vewd button and press the OK button to see available page specific and general options.
There are various ways to search or visit websites using the web browser.
Enter the address of a website(URL) into the search/address bar and highlight the Submit button on the virtual keyboard and press the OK button to visit the site.
Enter keyword/s into the search/address bar and highlight the Submit button on the virtual keyboard and press the OK button to start a search for the related websites.
Highlight a Speed Dial thumbnail and press the OK button to visit the related website.
Your TV is compatible with USB mice. Plug your mouse or wireless mouse adaptor into the USB input of your TV for easier and quicker navigation.
Some web pages include flash content. These are not supported by the browser.
Your TV does not support any download processes from the internet via the browser.
All sites on the internet might not be supported. According to the site; content problems may occur. In some circumstances video content might not be able to be played.
HBBTV System
HbbTV (Hybrid Broadcast Broadband TV) is a new industry standard that seamlessly combines TV services delivered via broadcast with services delivered via broadband and also enables access to Internet only services for consumers using connected TVs and set-top boxes. Services delivered through HbbTV include traditional broadcast TV channels, catch-up services, video-on-demand, electronic programme guide, interactive advertising, personalisation, voting, games, social networking and other multimedia applications.
HbbTV applications are available on channels where they are signalled by the broadcaster. The broadcaster marks one application as "autostart" and this one is started by the platform automatically. The autostart applications are generally launched with a small red button icon to notify the user that there is an HbbTV application on that channel. Press the red button to open the application page. After the page is displayed you can go back to the initial red button icon state by pressing the red button again. You can toggle between the red button icon mode and full UI mode of the application via pressing red button. It should be noted that the red button switching capability is provided by the application and some applications may behave differently (other colour buttons such as green, yellow, blue, may be defined for some other functions, e.g. shortcuts).
If you switch to another channel while an HbbTV application is active (either in red button icon mode or full UI mode), the following scenarios can occur.
• The application can continue running.
• The application can be terminated.
- The application can be terminated and another autostart red button application can be launched.
HbbTV allows the applications to be retrieved both from broadband or broadcast. The broadcaster may enable both ways or one of them. If the platform does not have an operational broadband connection, the platform can still launch applications transmitted on broadcast.
The autostart red button applications generally provide links to other applications. The user then can switch to other applications by using the links provided. The applications should provide a way to terminate themselves, usually the Exit button is used for this.
HbbTV applications use keys on the remote control to interact with the user. When an HbbTV application is launched, the control of some keys are owned by the application. For example, numeric channel selection may not work on a teletext application where the numbers indicate teletext pages.
HbbTV requires AV streaming capability for the platform. There are numerous applications providing VOD (video on demand) and catch-up TV services. The user can use play, pause, stop, forward, and rewind keys on the remote control to interact with the AV content.
If you need to change the audio description settings of your TV you should do it before a HbbTV playback starts. You will not be able to access related settings during a playback. Go to the Settings>System>Accessibility>Audio Description menu and adjust according to your need.
Note: You can enable or disable this feature from the Settings>Legal>Consent Settings menu.
Alexa Ready
Alexa is Amazon's cloud-based voice service available on many voice controlled assistant devices. Your TV is compatible with and ready to be utilised with Alexa devices.
Works With Alexa
By means of the Works With Alexa feature you can control the functions of your TV with Alexa devices. In order to do this, the setup process should be completed. The setup can be carried out by using the Works With Alexa option in the Settings>System>Voice Assistant menu.
Setup process
The wizard will guide you through the setup process.
- On the first screen you will be informed about the feature. Highlight Start and press OK to proceed.
- An authentication code will be created and displayed on the screen. Use your computer or any other device with internet access to go to the internet address (URL) shown on the screen. You will be directed to a page where you can sign in to your Amazon account first, if you are not already signed in. Then you will be directed to a page where you can enter the authentication code you see on the TV and link your TV to your Amazon account.
- If the linking process was successful you will be asked to determine a name for your TV, called 'Friendly Name'(FN). A 'Friendly Name' is a name that reminds you of your TV, such as 'Living Room TV', 'Kitchen TV', 'Dining Room TV', etc. Choose an easy-to-say name. You will say this name to tell Alexa
which TV to control. When you are done, highlight OK and press OK.
- Examples about the use of the feature will be displayed on the next screen. Press OK to finish the setup.
Once the setup is complete, you will be able to control the functions of your TV with Alexa.
Note: Make sure that the devices are connected to the internet.
Example Commands
Here are some voice commands that you can use:
| Command Function | |
| Alexa, turn on ‘FN’ Powers on the TV | |
| Alexa, turn off ‘FN’ Powers off the TV | |
| Alexa, play ‘FN’ Starts media playback | |
| Alexa, pause ‘FN’ Pauses media playback | |
| Alexa, resume ‘FN’ Resumes media playback | |
| Alexa, stop ‘FN’ Stops media playback | |
| Alexa, fast forward on ‘FN’ | Advances media in fast forward mode |
| Alexa, rewind on ‘FN’ Rewinds media | |
| Alexa, set the volume of ‘FN’ to 50 | Sets the volume to the specified level |
| Alexa, turn the volume up on ‘FN’ | Increases volume by 10 units |
| Alexa, turn the volume down on ‘FN’ | Decreases volume by 10 units |
| Alexa, mute ‘FN’ Mutes sound | |
| Alexa, unmute ‘FN’ Unmutes sound | |
| Alexa, change the input to “input_name” on ‘FN’ | The TV switches to the input source with the specified name (e.g. HDMI 1) |
| Alexa, change channel to “channel_number” on ‘FN’ | The TV switches to the channel with the specified number (e.g. channel 200) |
| Alexa, change channel to “channel_name” on ‘FN’ | The TV switches to the channel with the specified name |
| Alexa, channel up on ‘FN’ | The TV switches to the next higher channel, if any available |
| Alexa, channel down on ‘FN’ | The TV switches to the next lower channel, if any available |
| Alexa, next channel on ‘FN’ | The TV switches to the next channel on the channel list |
FN is the abbreviation for 'Friendly Name'.
Google Assistant
Your TV works with Google Home for voice control of your connected devices and appliances.
Works With Google Home
By means of this feature you can control the functions of your TV with Google Assistant devices. In order to do this, the setup process should be completed.
Before the setup
Complete the following procedures before you start the setup on your TV.
• Install the Google Home application on your mobile phone and login to your account
- Add the assistant device to your account
- Select the Vsmart TV action from the list of actions within the application
- A screen will be displayed where you will enter the authentication code which will be created during the setup process on your TV in order to link your TV to your account. Continue with the setup on your TV to get the authentication code
Setup process
The setup can be carried out by using the Google Assistant option in the Settings>System>Voice Assistant menu. The wizard will guide you through the setup process.
- On the first screen highlight Start and press OK to proceed
- You will be asked to determine a name for your TV on the next screen, called 'Friendly Name' (FN). A 'Friendly Name' is a name that reminds you of your TV, such as 'Living Room TV', 'Kitchen TV', 'Dining Room TV', etc. Choose an easy-to-say name. When you are done, highlight OK and press OK
- An authentication code will be created and displayed on the screen. Enter the code you see on the TV on the Google Home application
Once the setup is complete, you will be able to control the functions of your TV with Google Assistant.
Note: Make sure that the devices are connected to the internet. You can link only one TV to your account.
Example Commands
Just say "Hey Google" or "Ok Google" to control your TV using just your voice.
| Command Function | |
| turn on ‘FN’ Powers on the TV | |
| turn off ‘FN’ Powers off the TV | |
| pause on ‘FN’ Pauses media playback | |
| resume on ‘FN’ Resumes media playback | |
| stop on ‘FN’ Stops media playback | |
| volume up on ‘FN’ Increases volume | |
| volume down on ‘FN’ Decreases volume | |
| set mute volume on ‘FN’ Mutes sound | |
| switch input to “input_name” on ‘FN’ | The TV switches to the input source with the specified name (e.g. HDMI 1) |
| switch to “input_name” on ‘FN’ | |
| change channel to “channel_number” on ‘FN’ | The TV switches to the channel with the specified number (e.g. channel 200) |
| change channel to “channel_name” on ‘FN’ | The TV switches to the channel with the specified name |
| channel up on ‘FN’ | The TV switches to the next higher channel, if any available |
| channel down on ‘FN’ | The TV switches to the next lower channel, if any available |
FN is the abbreviation for 'Friendly Name'.
Google is a trademark of Google LLC.
DVB functionality information
This DVB receiver is only suitable for use in the country which it was designed to be used in.
Although this DVB receiver conforms to the latest DVB specifications at the time of manufacture, we cannot guarantee compatibility with future DVB transmissions due to changes that may be implemented in broadcast signals and technologies.
Some digital television functions may not be available in all countries.
We continually strive to improve our products; therefore, specifications may change without prior notice.
For advice on where to purchase accessories, please contact the store where you purchased your equipment.
Inhalt
text_image
CLASS 1 LASER PRODUCTnatural_image
Technical line drawing of a mechanical assembly with no visible text or symbolsnatural_image
Simple line drawing of a monitor with an upward arrow pointing to the bottom portion of the screen (no text or symbols)natural_image
Pure technical diagram of a mechanical assembly without any text, numbers, or symbolsnatural_image
Two abstract geometric shapes with directional arrows, one vertical and one horizontal, connected by a diagonal line (no text or symbols)natural_image
Diagram of a mechanical device with a white connector and red directional arrows indicating motion (no text or symbols)text_image
HE NC Advance™ Covered by patents at patentist.accessadvance.comPanasonic Testing Centre
Panasonic Marketing Europe GmbH
Winsbergring 15, 22525 Hamburg, Germany
Website: http://www.panasonic.com
Technische Daten
WEP 64/128, WPA, WPA2, TKIP, AES, WAPI.
Hinweis
| 56Hz 60Hz 66Hz 70Hz 72Hz 75Hz | ||||||
| 640x480 | X | X | ||||
| 800x600 | X X X | |||||
| 1024x768 | X X X | |||||
| 1280x768 | X | X | ||||
| 1280x960 | X | |||||
| 1360x768 | X | |||||
| 1366x768 | X | |||||
| 1280x1024 | X X X | |||||
| 1400x1050 | X | |||||
| 1600x900 | X | |||||
| 1920x1080 | X | |||||
Konnektivität
text_image
Diagram showing network connection with labeled components: global connectivity, wireless router, and screen displaytext_image
Diagram showing a surveillance camera setup with labeled components and components, including a brick wall and connected devices.natural_image
Illustration of a wireless router connected to a monitor via a network, with no visible text or symbols.natural_image
Technical line drawing of a mechanical assembly with no visible text or symbolsnatural_image
Simple line drawing of a monitor with an upward arrow pointing to a small object on a base (no text or symbols)natural_image
Simple line drawing of a room with a monitor and a circular symbol labeled 'x4' (no text or symbols beyond the label)natural_image
Diagram showing two rectangular shapes with circular arrows pointing to each, separated by a diagonal line (no text or symbols)natural_image
Diagram showing a plug inserted into a device with an arrow indicating direction (no text or symbols present)Covered by patents at patentlist.accessadvance.com
Panasonic Testing Centre
Panasonic Marketing Europe GmbH
Winsbergring 15, 22525 Hamburg, Germany
Site Internet : http://www.panasonic.com
Spécifications
WEP 64/128, WPA, WPA2, TKIP, AES, WAPI
Remarque
| 56Hz 60Hz 66Hz 70Hz 72Hz 75Hz | ||||||
| 640x480 | X | X | ||||
| 800x600 | X X X | |||||
| 1024x768 | X X X | |||||
| 1280x768 | X | X | ||||
| 1280x960 | X | |||||
| 1360x768 | X | |||||
| 1366x768 | X | |||||
| 1280x1024 | X X X | |||||
| 1400x1050 | X | |||||
| 1600x900 | X | |||||
| 1920x1080 | X | |||||
Connectivité
Connexion avec fil
text_image
Diagram showing network connection with labeled components: global connectivity via satellite, wireless router, and screen interface.text_image
Diagram showing a device connected to a wall-mounted sensor or connector, with labeled components and connection points.natural_image
Diagram of a wireless router connected to a monitor via wireless signals, with a globe and antenna labeled (no text or symbols beyond labels)text_image
CLASS 1 LASER PRODUCTnatural_image
Technical line drawing of a mechanical assembly with no visible text or symbolsnatural_image
Diagram of a monitor with an upward arrow pointing to a small electronic device (no text or symbols present)natural_image
Diagram of a mechanical assembly with a central component and a labeled cross-section (x4), no readable text or symbols present.natural_image
Diagram showing two rectangular shapes with directional arrows and a diagonal line, no text or symbols present.natural_image
Diagram of a fuel pump inside an aircraft cabin, showing directional arrows and warning symbols (no readable text or labels)Covered by patents at patentlist.accessadvance.com
Panasonic Testing Centre
Panasonic Marketing Europe GmbH
Winsbergring 15, 22525 Hamburg, Germany
Sitio Web: http://www.panasonic.com
Especificación
WEP 64/128, WPA, WPA2, TKIP, AES, WAPI
Aviso
| 56Hz 60Hz 66Hz 70Hz 72Hz 75Hz | ||||||
| 640x480 | X | X | ||||
| 800x600 | X X X | |||||
| 1024x768 | X X X | |||||
| 1280x768 | X | X | ||||
| 1280x960 | X | |||||
| 1360x768 | X | |||||
| 1366x768 | X | |||||
| 1280x1024 | X X X | |||||
| 1400x1050 | X | |||||
| 1600x900 | X | |||||
| 1920x1080 | X | |||||
Conectividad
Conexión alámbrica
text_image
Diagram showing network connection with labeled components: global connectivity via satellite, wireless router, and screen interface.text_image
Diagram showing a surveillance camera setup with labeled components and wiring connectionsnatural_image
Diagram of a router connected to a globe via wireless signal waves, with a monitor below (no text or symbols)High Dynamic Range (HDR) / Gamma Hybrid Log (HLG)....6
Dolby Vision....6
Accessori inclusi....6
Display Wireless....39
natural_image
Technical line drawing of a mechanical assembly with no visible text or symbolsnatural_image
Simple line drawing of a monitor with an upward arrow pointing to the bottom portion of the screen (no text or symbols)natural_image
Simple line drawing of a monitor setup with a stand and a circular icon labeled 'x4' (no text or symbols beyond the label)text_image
Technical diagram showing a mechanical assembly with labeled component 'C' and directional arrow
text_image
d e| (d) (e) | |||||
| 43" 50" | 55" | 43" 50" | 55" | ||
| Diametro M4 M6 M4 M6 | |||||
| Profondità della vite (c) | min. 7 mm | 5 mm | |||
| max. | 10 mm | 6 mm | |||
| (d) (e) | |||
| 65" | |||
| Profondità della vite (c) | min. | 7 mm | |
| max. | 10 mm | ||
| Diametro | M6 | ||
natural_image
Diagram showing two rectangular panels separated by a diagonal line, with control buttons at the bottom (no text or symbols present)natural_image
Diagram of a vehicle fuel injector with red directional arrows indicating flow or movement (no text or symbols)text_image
HE NC Advance™ Covered by patents at patentist.accessadvance.comPanasonic Testing Centre
Panasonic Marketing Europe GmbH
Winsbergring 15, 22525 Hamburg, Germany
Sito web: http://www.panasonic.com
Specifiche
WEP 64/128, WPA, WPA2, TKIP, AES, WAPI
Avviso
| 56Hz 60Hz 66Hz 70Hz 72Hz 75Hz | ||||||
| 640x480 | X | X | ||||
| 800x600 | X X X | |||||
| 1024x768 | X X X | |||||
| 1280x768 | X | X | ||||
| 1280x960 | X | |||||
| 1360x768 | X | |||||
| 1366x768 | X | |||||
| 1280x1024 | X X X | |||||
| 1400x1050 | X | |||||
| 1600x900 | X | |||||
| 1920x1080 | X | |||||
Connettività
text_image
Diagram showing network connection with labeled components: global connectivity via satellite, wireless router, and screen projectiontext_image
Diagram showing a surveillance camera setup with labeled components and wiring connectionsnatural_image
Diagram of a wireless router connected to a network device with signal waves, no text or symbols presenttext_image
CLASS 1 LASER PRODUCTnatural_image
Technical line drawing of a mechanical assembly with no visible text or symbolsnatural_image
Diagram of a device with an upward arrow pointing to a component, no text or symbols presentnatural_image
Diagram of a device with a central component and a circular symbol labeled 'x4' (no readable text or symbols)natural_image
Diagram showing two rectangular panels separated by a diagonal line, with control buttons at the bottom (no text or symbols present)natural_image
Diagram of a vehicle fuel injection system with a fuel nozzle and directional arrows (no text or labels)Covered by patents at patentlist.accessadvance.com
Panasonic Testing Centre
Panasonic Marketing Europe GmbH
Winsbergring 15, 22525 Hamburg, Germany
Website: http://www.panasonic.com
| Specifikationer | ||||
| TV-udsendelse | PAL BG/I/DK/SECAM BG/DK | |||
| Modtagende kanaler | VHF (BAND I/III) - UHF (BAND U) - HYPERBAND | |||
| Digital modtagelse | Fuldt integreret digital antenne-kabel-satellit TV(DVB-T-C-S)(i overensstemmelse med DVB-T2, DVB-S2) | |||
| Antal forudindstillede kanaler | 11 000 | |||
| Kanalindikator Skæmmenu | ||||
| RF antenneindgang 75 Ohm (ubalanceret) | ||||
| Driftspænding 220-240V AC, 50Hz. | ||||
| Audio Dolby Atmos | ||||
| Hovedtelefon 3.5 mm | mini stereo jack | |||
| Netværksbaseret standby-elforbrug (W) | < 2 | |||
| TB-43W60AEZ TB-50 | W60AEZ TB-55W60 | AEZ TB-65W60AEZ | ||
| Audio udgangseffekt (WRMS.) (10% THD) | 2 x 10 W 2 x 10 W 2 x 10 W 2 x 12 W | |||
| Strømforbrug (W) 150 W 135 W 140 W 200 W | ||||
| Vægt (kg) 7,5 Kg 9,5 Kg 13 Kg 22 Kg | ||||
| TV-dimensioner BxHxD (med stativ) (mm) | 235 x 965 x 619 235 x 1120 x 706 235 x 1233 x 770 275 x 1453 x 896 | |||
| TV-dimensioner BxHxD (uden stativ) (mm) | 87 x 965 x 561 | 87 x 1120 x 648 | 87 x 1233 x 712 | 82 x 1453 x 836 |
| Skærm | 16/9 43" | 16/9 50" | 16/9 55" | 16/9 65" |
| Brugstemperatur og driftsluftfugtighed | 0 °C op til 40 °C, maks. 85 % luftfugtighed | |||
WEP 64/128, WPA, WPA2, TKIP, AES, WAPI
Angående
For at slukke for TV'et.
For at slukke TV'et helt, tag strømledningen ud af stikkontakten.
| 56Hz 60Hz 66Hz 70Hz 72Hz 75Hz | ||||||
| 640x480 | X | X | ||||
| 800x600 | X X X | |||||
| 1024x768 | X X X | |||||
| 1280x768 | X | X | ||||
| 1280x960 | X | |||||
| 1360x768 | X | |||||
| 1366x768 | X | |||||
| 1280x1024 | X X X | |||||
| 1400x1050 | X | |||||
| 1600x900 | X | |||||
| 1920x1080 | X | |||||
text_image
Diagram showing network connection with labeled components: global connectivity via satellite, wireless router, and screen interface1 ISP-bredbåndsforbindelse
2 LAN (Ethernet)-kabel
3 LAN indgang på - venstre bagside af TV'et
text_image
Diagram showing a device connected to a wall-mounted sensor or connector, with labeled components and connection points.natural_image
Diagram showing a router connected to a globe via wireless signal waves, with a monitor below (no text or symbols)1 ISP-bredbändsforbindelse
1. Server software installation
text_image
CLASS 1 LASER PRODUCTnatural_image
Technical line drawing of a mechanical assembly with no visible text or symbolsnatural_image
Diagram of a device with an upward arrow pointing to a component, no text or symbols presentnatural_image
Diagram of a mechanical assembly with a bolt and cross symbol, no readable text or labels presentJalustan irrottaminen televisiosta
natural_image
Diagram showing two rectangular panels with circular arrows pointing to each panel, separated by a diagonal line (no text or symbols)natural_image
Diagram showing a device with a red arrow and warning symbol, enclosed in a circular frame (no readable text or labels)Covered by patents at patentlist.accessadvance.com
Panasonic Testing Centre
Panasonic Marketing Europe GmbH
Winsbergring 15, 22525 Hamburg, Germany
WEP 64/128, WPA, WPA2, TKIP, AES, WAPI
Huomautus
text_image
Labeled image of a remote control with numbered buttons, navigation keys, and function buttons visible.(\*) Valmiustilan painike
| 56Hz 60Hz | 66Hz 70Hz | 72Hz 75Hz | ||||
| 640x480 | X | X | ||||
| 800x600 | X X X | |||||
| 1024x768 | X X X | |||||
| 1280x768 | X | X | ||||
| 1280x960 | X | |||||
| 1360x768 | X | |||||
| 1366x768 | X | |||||
| 1280x1024 | X X X | |||||
| 1400x1050 | X | |||||
| 1600x900 | X | |||||
| 1920x1080 | X |
Liitettävyys
Lankaverkko
text_image
Diagram showing network connection setup with labeled components: global connectivity, router, and screen displaytext_image
Diagram showing a device connected to a wall-mounted device with labeled components and wiring connectionsnatural_image
Diagram showing a router connected to a globe via wireless signal waves, with a monitor below (no text or symbols)text_image
CLASS 1 LASER PRODUCTnatural_image
Technical line drawing of a mechanical assembly with labeled components (no text or symbols present)natural_image
Simple line drawing of a monitor with an upward arrow pointing to a small object on a base (no text or symbols)natural_image
Diagram of a mechanical assembly with a central component and a circular inset labeled 'x4' (no text or symbols on the diagram itself)natural_image
Diagram showing two rectangular panels separated by a diagonal line, with control buttons at the bottom (no text or symbols)natural_image
Diagram showing a fuel pump connected to a control panel with warning symbols (no readable text or labels)text_image
HE NC Advance™ Covered by patenis at patentist.accessadvance.comPanasonic Testing Centre
Panasonic Marketing Europe GmbH
Winsbergring 15, 22525 Hamburg, Germany
Websida: http://www.panasonic.com
Specifikationer
| TV-Sändning | PAL BG/I/DKSECAM BG/DK | |||
| Mottagande Kanaler | VHF (BAND I/III) - UHF (BAND U) - HYPERBAND | |||
| Digital Mottagning | Fullt integrerad digital markbunden kabel-satellit-TV (DVB-T-C-S)(DVB-T2, DVB-S2-kompatibel) | |||
| Antal Förinställda Kanaler | 11 000 | |||
| Kanalindikator Visning på skärmen | ||||
| RF-antenningång 75 | Ohm (obalanserat) | |||
| Driftsvolt 220-240V AC, 50Hz | ||||
| Ljud Dolby Atmos | ||||
| Hörlurar 3,5 mm ministereo-uttag | ||||
| Nätverkets strömförbrukning i standby-läge (W) | < 2 | |||
| TB-43W60AEZ TB-50 | W60AEZ TB-55W60 | AEZ TB-65W60AEZ | ||
| Ljudutgångsström (WRMS.) (10 % THD) | 2 x 10 W 2 x 10 W 2 x 10 W 2 x 12 W | |||
| Strömförbrukning (W) | 150 W 135 W 140 W | 200 W | ||
| Vikt (kg) 7,5 Kg 9,5 Kg | 13 Kg 22 Kg | |||
| TV-dimensioner BxHxD (med stativ) (mm) | 235 x 965 x 619 235 x 1 | 120 x 706 235 x 1233 x | 770 275 x 1453 x 896 | |
| TV-dimensioner BxHxD (utan stativ) (mm) | 87 x 965 x 561 87 x 1 | 120 x 648 | 87 x 1 | 1233 x 712 82 x 1 |
| Skärm | 16/9 43" | 16/9 50" | 16/9 55" | 16/9 65" |
| Driftstemperatur och driftsfuktighet | 0 °C upp till 40 °C, 85 % fuktighet max | |||
WEP 64/128, WPA, WPA2, TKIP, AES, WAPI
Obs:
| 56Hz 60Hz 66Hz 70Hz 72Hz 75Hz | ||||||
| 640x480 | X | X | ||||
| 800x600 | X X X | |||||
| 1024x768 | X X X | |||||
| 1280x768 | X | X | ||||
| 1280x960 | X | |||||
| 1360x768 | X | |||||
| 1366x768 | X | |||||
| 1280x1024 | X X X | |||||
| 1400x1050 | X | |||||
| 1600x900 | X | |||||
| 1920x1080 | X | |||||
Konnektivitet
Trådbunden anslutning
text_image
Diagram showing three labeled components of a network device: a satellite, router, and a screen with light rays.text_image
Diagram showing a device connected to a wall-mounted sensor or connector, with labeled components and connection points.natural_image
Diagram showing a router connected to a globe via wireless signal waves, with a monitor below (no text or symbols)1 Bredband ISP-anslutning
text_image
CLASS 1 LASER PRODUCTnatural_image
Technical line drawing of a mechanical assembly with labeled components (no text or symbols present)natural_image
Simple line drawing of a monitor with an upward arrow pointing to a small object on a base (no text or symbols)natural_image
Diagram of a mechanical assembly with a bolt and cross-sectional view (no text or symbols)natural_image
Diagram showing two rectangular panels separated by a diagonal line, with control buttons at the bottom (no text or symbols present)natural_image
Diagram showing a connector inserted into a device with warning symbols (no readable text or labels)text_image
HE NC Advance™ Covered by patents at patentlist.accessadvance.comPanasonic Testing Centre
Panasonic Marketing Europe GmbH
Winsbergring 15, 22525 Hamburg, Tyskland
Nettsted: http://www.panasonic.com
Spesifikasjon
| Fjernsynssending | PAL BG/I/DK/SECAM BG/DK | |||
| Mottak av Kanaler VHF (BAND I/III) - UHF (BAND U) - HYPERBAND | ||||
| Digitalt mottak | Fullt integrert digital bakkesendt-kabel-satellitt TV(DVB-T-C-S)(kompatibel med DVB-T2, DVB-S2) | |||
| Antall Forhåndsstilte Kanaler | 11 000 | |||
| Kanalindikator Skjermvisning | ||||
| RF-antenneinngang 75 Ohm (ubalansert) | ||||
| Operasjonsspenning 220-240V AC, 50Hz. | ||||
| Lyd Dolby Atmos | ||||
| Hodetelefon 3,5 mm stereo-minijackplugg | ||||
| Nettverksbasert ventemodus Strømforbruk (W) | < 2 | |||
| TB-43W60AEZ TB-50W60AEZ TB-55W60AEZ TB-65W60AEZ | ||||
| Audio Utgangseffekt (WRMS.) (10% THD) | 2 x 10 W 2 x 10 W 2 x 10 W 2 x 12 W | |||
| Strømforbruk (W) 150 W | 135 W 140 W 200 W | |||
| Vekt (kg) 7,5 Kg 9,5 Kg 13 Kg 22 Kg | ||||
| TV-dimensjoner DxLxH (med stativ) (mm) | 235 x 965 x 619 235 x 1120 x 706 235 x 1233 x 770 275 x 1453 x 896 | |||
| TV-dimensjoner VxHxD (uten stativ) (mm) | 87 x 965 x 561 87 x 1120 x 648 87 x 1233 x 712 82 x 1453 x 836 | |||
| Skjerm | 16/9 43" | 16/9 50" | 16/9 55" | 16/9 65" |
| Driftstemperatur og driftsluftfuktighet | 0 °C opptil 40 °C, 85 % fuktighet maks. | |||
WEP 64/128, WPA, WPA2, TKIP, AES, WAPI
Merknad
text_image
Diagram of a remote control with numbered labels pointing to various function keys and buttonsEnhanced Audio Return Channel (eARC)
Auto Low Latency Mode
Du kan også aktivere alternativet ALLM (Auto Low Latency Mode) i menyen Innstillinger>Enheter. Hvis denne funksjonen er aktivert, bytter TV automatisk bildemodus til Spill när ALLM-modussignal mottas fra gjeldende HDMI-kilde. TV går tilbake til forrige bildemodusinnstilling när ALLM-signalet går tapt. Så du trenger ikke å endre innstillingene manuelt.
| 56Hz 60Hz | 66Hz 70Hz | 72Hz 75Hz | ||||
| 640x480 | X | X | ||||
| 800x600 | X X X | |||||
| 1024x768 | X X X | |||||
| 1280x768 | X | X | ||||
| 1280x960 | X | |||||
| 1360x768 | X | |||||
| 1366x768 | X | |||||
| 1280x1024 | X X X | |||||
| 1400x1050 | X | |||||
| 1600x900 | X | |||||
| 1920x1080 | X |