RL48RECPN - Fridge SAMSUNG - Free user manual and instructions
Find the device manual for free RL48RECPN SAMSUNG in PDF.
User questions about RL48RECPN SAMSUNG
0 question about this device. Answer the ones you know or ask your own.
Ask a new question about this device
Download the instructions for your Fridge in PDF format for free! Find your manual RL48RECPN - SAMSUNG and take your electronic device back in hand. On this page are published all the documents necessary for the use of your device. RL48RECPN by SAMSUNG.
USER MANUAL RL48RECPN SAMSUNG
Refrigerator user manual

100% Recycled Paper
This manual is made with 100% recycled paper.
English
imagine the possibilities
Thank you for purchasing a Samsung product.
Free Standing Appliance

safety information
SAFETY INFORMATION
- Before operating the appliance, please read this manual thoroughly and retain it at a safe place near the appliance for your future reference.
- Use this appliance only for its intended purpose as described in this instruction manual.
This appliance is not intended for use by persons (including children) with reduced physical, sensory or mental capabilities, or lack of experience and knowledge, unless they have been given supervision or instruction concerning use of the appliance by a person responsible for their safety. - Warnings and Important Safety Instructions in this manual do not cover all possible conditions and situations that may occur.
It is your responsibility to use common sense, caution, and care when installing, maintaining, and operating your appliance. - Because these following operating instructions cover various models, the characteristics of your refrigerator may differ slightly from those described in this manual and not all warning signs may be applicable.
If you have any questions or concerns, contact your nearest service center or find help and information online at www.samsung.com.
Important safety symbols and precautions :
| WARNING | Hazards or unsafe practices that may result in severe personal injury or death. |
| CAUTION | Hazards or unsafe practices that may result in minor personal injury or property damage. |
| Do NOT attempt. | |
| Do NOT disassemble. | |
| Do NOT touch. | |
| Follow directions carefully. | |
| Unplug the power plug from the wall socket. | |
| Make sure the machine is grounded to prevent electric shock. | |
| Call the contact center for help. | |
| Note. |
These warning signs are here to prevent injury to you and others.
Please follow them carefully.
After reading this section, keep it in a safe place for future reference.

SEVERE WARNING SIGNS FOR TRANSPORTATION AND SITE

- When transporting and installing the appliance, care should be taken to ensure that no parts of the refrigerating circuit are damaged.
• R600a or R134a is used as a refrigerant.
Check the compressor label on the rear of the appliance or the rating label inside the refrigerator to see which refrigerant is used for your refrigerator.
- When this product contains flammable gas (Refrigerant R600a),
- Refrigerant leaking from the pipe work could ignite or cause an eye injury.
If a leak is detected, avoid any naked flames or potential sources of ignition and air the room in which the appliance is standing for several minutes.
- In order to avoid the creation of a flammable gas-air mixture if a leak in the refrigerating circuit occurs, the size of the room in which the appliance may be sited depends on the amount of refrigerant used.
- Never start up an appliance showing any signs of damage. If in doubt, consult your dealer. The room where the refrigerator will be sited must be 1m^3 in size for every 8g of R600a refrigerant inside the appliance. The amount of refrigerant in your particular appliance is shown on the identification plate inside the appliance.
- If the appliance contains isobutane refrigerant (R600a), a natural gas with high environmental compatibility that is, however, also combustible. When transporting and installing the appliance, care should be taken to ensure that no parts of the refrigerating circuit are damaged.
- Contains fluorinated greenhouse gases covered by the Kyoto Protocol.
• Hermetically sealed system. - Do not vent gases into the atmosphere.
Refrigerant type: R-134a
Quantity: 0.145kg
Global Warming Potential (GWP) = 1300 - Foam blown with fluorinated greenhouse gases.

SEVERE WARNING SIGNS FOR INSTALLATION

- Do not install this appliance in a humid, oily or dusty location, in a location exposed to direct sunlight and water (rain drops).
- Deteriorated insulation of electrical parts may cause an electric shock or fire.
- Do not place this refrigerator in direct sunlight or expose to the heat from stoves, room heaters or other appliances.
- Do not plug several appliances into the same multiple power board.
The refrigerator should always be plugged into its own individual electrical outlet which has a voltage rating that matched the rating plate. - This provides the best performance and also prevents overloading house wiring circuits, which could cause a fire hazard from overheated wires. If the wall socket is loose, do not insert the power plug.
- There is a risk of electric shock or fire.
- Do not use a cord that shows cracks or abrasion damage along its length or at either end.
- Do not bend the power cord excessively or place heavy articles on it.
- Do not use aerosols near the refrigerator.
- Aerosols used near the refrigerator may cause an explosion or fire.
- Do not install this appliance in a location where gas may leak.
- This may result in an electric shock or fire.

- The installation or any service of this appliance is recommended by a qualified technician or service company.
- Failing to do so may result in an electric shock, fire, explosion, problems with the product, or injury.
- This refrigerator must be properly installed and located in accordance with the manual before it is used.
- Connect the power plug in proper position with the cord hanging down.
- If you connect the power plug upside down, wire can get cut off and a cause fire or an electric shock.
- Make sure that the power plug is not squashed or damaged by the back of the refrigerator.
- When moving the refrigerator, be careful not to roll over or damage the power cord.
- This constitutes a fire hazard.
- The appliance must be positioned so that the plug is accessible after installation.
- This appliance should be positioned in such a way that it is accessible to the power plug.
- Failing to do so may result in an electric shock or fire due to electric leakage.

- The refrigerator must be grounded.
- You must ground the refrigerator to prevent any power leakages or electric shocks caused by current leakage from the refrigerator.
- Never use gas pipes, telephone lines or other potential lightening rods as ground.
- Improper use of the ground plug can result in an electric shock.

- If the power cord is damaged, have it replaced immediately by the manufacturer or its service agent.
- The fuse on the refrigerator must be changed by a qualified technician or service company.
- Failing to do so may result in an electric shock or personal injury.

CAUTION SIGNS FOR INSTALLATION

- Keep ventilation opening in the appliance enclosure or mounting structure clear of obstruction.
- Allow the appliance to stand for 2 hours after installation.
safety information

SEVERE WARNING SIGNS FOR USING

- Do not insert the power plug with wet hands.
- Do not store articles on the top of the appliance.
- When you open or close the door, the articles may fall and cause a personal injury and/or material damage.
- Do not put items filled with water on the refrigerator.
- If spilled, there is a risk of fire or electric shock.
- Do not let children hang on the door.
- Failure to do so may cause serious personal injury.
- Do not leave the doors of the refrigerator open while the refrigerator is unattended and do not let children enter inside the refrigerator.
- Do not allow babies or children go inside the drawer.
- It can cause death from suffocation by entrapment or personal injury.
- Do not sit on the Freezer door.
- The door may be broken and cause a personal injury.
- To prevent children entrapment, you must reinstall the divider using provided screws after cleaning or other actions if you removed the divider from the drawer.
- Do not store volatile or flammable substances such as benzene, thinner, alcohol, ether or LP gas in the refrigerator.
- The storage of any of such products may cause an explosion.
- Do not store low temperature-sensitive pharmaceutical products, scientific materials or other low temperature-sensitive products in the refrigerator.
- Products that require strict temperature controls must not be stored in the refrigerator.
- Do not place or use electrical appliance inside the refrigerator, unless they are of a type recommended by the manufacturer.
- Do not use a hair dryer to dry the inside of the refrigerator. Do not place a lighted candle in the refrigerator for removing bad odors.
- This may result in an electric shock or fire.
- Do not touch the inside walls of the freezer or products stored in the freezer with wet hands.
- This may cause frostbite.
- Do not use mechanical devices or any other means to accelerate the defrosting process, other than those recommended by the manufacturer.
- Do not damage the refrigerant circuit.
- Never stare directly at the UV LED lamp for long periods of time.
- This may result in eye strain due to the ultraviolet rays.

- This product is intended only for the storage of food in a domestic environment.
- Bottles should be stored tightly together so that they do not fall out.
- In the event of a gas leak (such as propane gas, LP gas, etc.), ventilate immediately without touching the power plug. Do not touch the appliance or power cord.
- Do not use a ventilating fan.
- A spark may result in an explosion or fire.
- Use only the LED Lamps provided by manufacturer or service agent.
- Children should be supervised to ensure that they do not play with and/or climb into the appliance.

- Do not disassemble or repair the refrigerator by yourself.
- You run a risk of causing a fire, malfunction and/or personal injury. In case of malfunction, please contact your service agent.

- If the appliance generates a strange noise, a burning or smell or smoke, unplug the power plug immediately and contact your nearest service center.
- Failing to do so may result in an electric or fire hazards.
- If you experience difficulty when changing the light, contact service agent.
- If the products is equipped with the LED Lamp, do not disassemble the Lamp Cover and LED Lamp by yourself.
- Please contact your service agent.
- If any dust or water is in the refrigerator, pull out power plug and contact your Samsung Electronics service center.
- There is a risk of fire.

CAUTION SIGNS FOR USING

- To get best performance from the product, - Do not place foods too closely in front of the vents at the rear of the appliance as it can obstruct free air circulation in the refrigerator compartment.
- Wrap the food up properly or place it in airtight containers before putting it into the refrigerator.
- Do not put any newly introduced food for freezing near to already existing food.
04_ safety information
- Do not place carbonated or fizzy drinks in the freezer compartment. Do not put bottles or glass containers in the freezer.
- When the contents freeze, the glass may break and cause personal injury and property damage.
- Do not change or modify the functionality of the refrigerator.
- Changes or modifications may result in a personal injury and/or property damage.
Any changes or modifications performed by a 3rd party on this completed appliance are neither covered under Samsung warranty service, nor is Samsung responsible for safety issues and damages that result from 3rd party modifications. - Do not block air holes.
- If the air holes are blocked, especially with a plastic bag, the refrigerator can be over cooled. If this cooling period lasts too long, the water filter may break and cause water leakage.
- Do not put any newly introduced food for freezing near to already existing food.
- Please observe maximum storage times and expiry dates of frozen goods.
- Fill the water tank, ice tray, water cubes only with potable water.
- The water supply to this refrigerator must only be installed/connected by a suitably qualified person and connected to a potable water supply only.
- In order to operate the ice-maker properly, water pressure of 138\~862kpa(1.4\~8.8kgf/cm ^3 ) is required.
- Do not spray volatile material such as insecticide onto the surface of the appliance.
- As well as being harmful to humans, it may also result in an electric shock, fire or problems with the product.

CAUTION SIGNS FOR CLEANING AND MAINTENANCE

- Do not directly spray water inside or outside the refrigerator.
- There is a risk of fire or electric shock.
- Do not use or place any substances sensitive to temperature such as inflammable sprays, inflammable objects, dry ice, medicine, or chemicals near the refrigerator. Do not keep volatile or inflammable objects or substances (benzene, thinner, propane gas, etc.) in the refrigerator.
- This refrigerator is for storing food only.
- This may result in a fire or an explosion.
- Do not spray cleaning products directly on the display.
- Printed letters on the display may come off.
- Remove any foreign matter or dust from the power plug pins.
But do not use a wet or damp cloth when cleaning the plug, remove any foreign material or dust from the power plug pins. - Otherwise there is a risk of fire or electric shock.

- Unplug the refrigerator before cleaning and performing maintenance.

SEVERE WARNING SIGNS FOR DISPOSAL

- Ensure that none of the pipes on the back of the appliance are damaged prior to disposal.
- R600a or R134a is used as a refrigerant. Check the compressor label on the rear of the appliance or the rating label inside the refrigerator to see which refrigerant is used for your refrigerator.
When this product contains flammable gas (Refrigerant R600a), contact your local authority in regard to safe disposal of this product.
Cyclopentane is used as an insulation blowing gas. The gases in insulation material require special disposal procedure.
Please contact your local authorities in regard to the environmentally safe disposal of this product. Ensure that none of the pipes on the back of the appliances are damaged prior to disposal.
The pipes shall be broken in the open space.
- When disposing of this product or other refrigerators, remove the door/door seals, door latch so that small children or animals cannot become trapped inside.
Leave the shelves in place so that children may not easily climb inside.
Children should be supervised to ensure that they do not play with the old appliance.
- Please dispose of the packaging material for this product in an environmentally friendly manner.

ADDITIONAL TIPS FOR PROPER USAGE
- In the event of a power failure, call the local office of your Electricity Company and ask how long it is going to last.
- Most power failures that are corrected within an hour or two will not affect your refrigerator temperatures. However, you should minimize the number of door openings while the power is off.
- Should the power failure last more than 24 hours, remove all frozen food.
- If keys are provided with the refrigerator, the keys should be kept out of the reach of children and not be in the vicinity of the appliance.
- The appliance might not operate consistently (possibility of temperature becoming too warm in the refrigerator) when sited for an extended period of time below the cold end of the range of temperature for which the refrigerating appliance is designed.
- Do not store food which spoils easily at low temperature, such as bananas, melons.
- Your appliance is frost free, which means there is no need to manually defrost your appliance, as this will be carried out automatically.
- Temperature rise during defrosting can comply with ISO requirements. But if you want to prevent an undue rise in the temperature of the frozen food while defrosting the appliance, please wrap the frozen food up in several layers of newspaper.
- Any increase in temperature of frozen food during defrosting can shorten its storage life.
- The temperature of two star section (sections) or compartment (compartments) which have two star symbol ( ^** ) is slightly higher than other freezer compartment (compartments). The two star section (sections) or compartment (compartments) is (are) based on the instruction and/or the condition as delivered.
contents
SETTING UP YOUR REFRIGERATOR 07
06_ safety information
setting up your refrigerator
GETTING READY TO INSTALL THE REFRIGERATOR
Congratulations on your purchase of the Samsung refrigerator. We hope you enjoy the state of art offers.
Selecting the best location for the refrigerator
- A location without direct exposure to sunlight.
- A location with level (or nearly level) flooring.
- A location with enough space for the refrigerator doors to open easily.
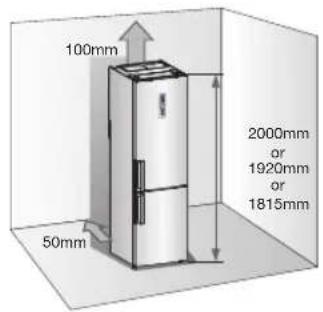
- Allow sufficient space to the right, left, back and top for air circulation.
If the refrigerator does not have enough space, the internal cooling system may not work properly. - Please ensure that appliance can be moved freely in the event of maintenance & service.
text_image
100mm 50mm 2000mm or 1920mm or 1815mm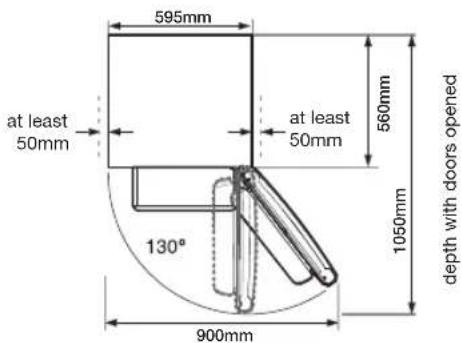
text_image
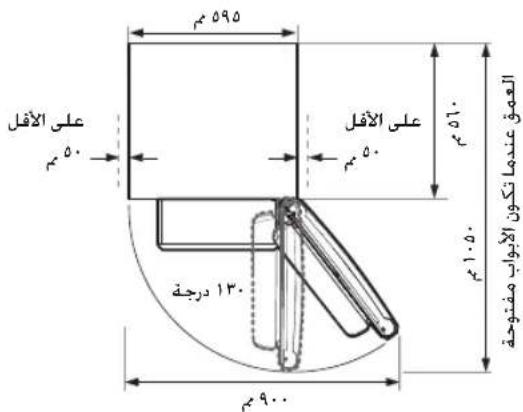
595mm at least 50mm 130° 900mm at least 50mm 560mm 1050mm depth with doors opened- Allow clearance to the right, left, back and top when installing.
This will help reduce power consumption and keep your energy bills lower. - Do not install the Refrigerator where the temperature will go below 50°F (10°C).
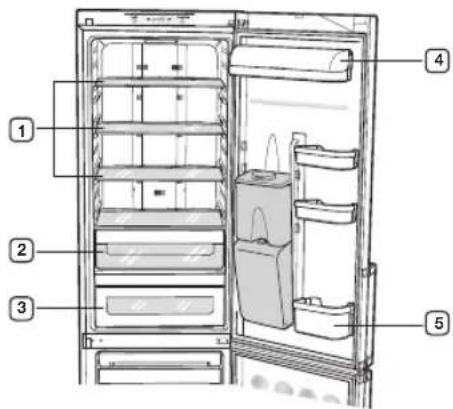
VIEW OF YOUR FRIDGE / FREEZER

text_image
Labeled diagram of a refrigerator interior showing numbered compartments and doors1 Fridge
② Refrigerator shelves
(Tempered glass, depending on the model)
③ Fresh safe drawer (Optional)
④ Fresh safe drawer / Fresh Room / Coolselect Zone (Optional)
5 Freezer
6 Top freezer drawer
7 Freezer drawer
8 Refrigerator light (LED lamp)
9 Dairy guard (Optional)
10 Multi-purpose guard (Optional)
11 Water Dispenser (Optional)
12 Additional Shelf (Optional)
12 Additional Freezer Shelf (Optional)

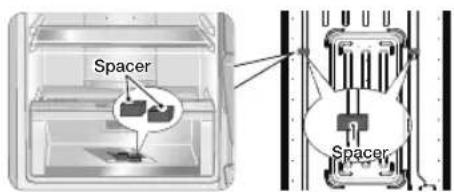
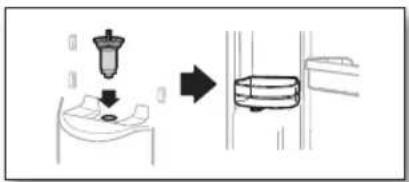
Remove paper on spacer and then attach two spacers (Gray block) on the back side of refrigerator for better performance.
Make sure two spacers fi x like below image when you install the refrigerator.
It is improving the refrigerator performance.
text_image
Spacer Spacersetting up _07
operating your refrigerator
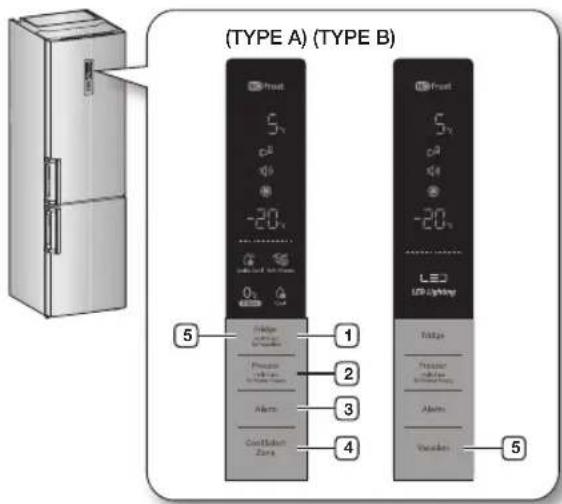
CHECKING THE CONTROL PANEL
text_image
(TYPE A) (TYPE B) 5 1 2 3 4 LED LCD Lighting Front Front 5 pA pA -20. LED LED Lighting Front Front Pension Pension Alarms Alarms Vacation Continuation Zone
Each time you press the button, a short beep will sound.
1 Fridge
Press the Fridge button to set the fridge to desired temperature from the range between 1°C and 7°C. Default set temperature is set on 3°C and each time you press the Fridge button, temperature will change in following order and temperature indicator will display the desired temperature.

Press and hold this button for 3 seconds to activate the Vacation function. (TYPE A)
② Freezer
Press the Freezer button to set the freezer to desired temperature from the range between -14^ and -25^ .
Default set temperature is set on -20^ and each time you press the Freezer button, temperature will change in following order and temperature indicator will display the desired temperature.

08_ operating
Fridge or Freezer temp indicator will blink when temperature in the fridge or freezer compartment goes up dramatically by storing warm food or frequent door opening. Fridge or Freezer temperature indicator will stop blinking when temperature in the fridge or freezer becomes normal. If temperature indicator does not stop blinking after several hours, please contact your service center.
Press this button for 3 seconds to activate the Power Freeze function.
Power Freeze indicator ( ⚙ ) will light up and the refrigerator will speed up the time to needed to freeze products in the freezer.
This function will be activated for 72 hours and freezer indicator will display -25°C.
This function switches off automatically.
When the Power Freeze process is completed, the Power freeze indicator switches off and the freezer switches back to the previous temperature setting.
When you use this function, the energy consumption will increase.
To deactivate this function, press the Freezer button for 3 seconds.

If you need to freeze large amount of food stuff, activate Power Freeze function 24 hours before.
③ Alarm
Press this button to activate the Alarm function.
Alarm indicator ( 📋 ) will light up and the refrigerator will alert you with alarm sound if the refrigerator door is kept open for longer than 2 minutes.
To deactivate the Alarm function, press this button.
4 Cool Select Zone
Quick Cool ( )
- If you want to cool down food quickly, store food in Cool Select Zone and select Quick Cool mode.
• Cool Select Zone will cool food for 60 minutes. - When Quick Cool mode is completed, the Cool Select Zone drawer will automatically set the mode to Cool.
Soft Freeze ( )
- When you select Soft Freeze mode, temperature of the Cool Select Zone will be set on -5°C.
Zero Zone ( 0^ )
- When you select Zero Zone mode, temperature of the Cool Select Zone will be set on 0°C.
Cool ( )
- When you select Cool mode, temperature of the Cool Select Zone will be set on 3°C.
⑤ Vacation
Press the Vacation button to activate the Vacation function.
Vacation indicator (Will light up and the refrigerator will set the temperature to 15°C to minimize the power consumption when you are going on a long vacation or business trip or you do not need to use the refrigerator.
While Vacation function is activated, freezer compartment remains on.
Vacation function will be automatically deactivated if you adjust fridge temperature while Vacation function is on.
Make sure to remove foods in the fridge compartment before using Vacation function.
STORING FOOD
Fridge
When storing food in the appliance, follow the recommendations below.
- Allow warm food and beverages to cool down before storing them in the appliance.
- Ensure that food is well-wrapped or covered with airtight containers before it is stored. This will prevent food from dehydrating, deteriorating in colour or losing flavor and will help maintain freshness. It will also prevent cross-flavouring.
- Never let any oil or grease come into contact with the plastic fittings or door seals, as these materials easily become porous.
- Never store any explosive substances inside the appliance. High-proof alcohol should only be stored upright in tightly sealed containers.
text_image
Diagram of a refrigerator interior with numbered compartments and labeled parts① Transparent, safety glass shelf (Optional)
- Place food in storage containers and lay the items out at suitable intervals.
- The storage shelf is of an unbreakable, transparent material, so that you can use it safely.
② Fresh safe drawer (Optional)
- Vegetable and fruit can be stored in this compartment.
- If you require more space to store fruit and vegetables, it is possible to remove the drawers.
- A declared storage volume of fresh food storage compartment is calculated when the fresh safe drawers are removed.
③ CoolSelect Zone Drawer (Optional)
- Help to preserve the taste of food and prolong its freshness.
Use this to store cheese, meat, poultry fish or any other foods.
Fresh Room (Optional)
- Ideal for storing fish, meat and sausage.
- Temperature in this compartment are lower than in the refrigerator compartment. Temperatures below 0 °C may also occur.
- A declared storage volume of fresh food compartment is calculated with Fresh Room removed.
Do not store fruits or vegetables in the Fresh Room. The fruits or the vegetables could get frozen.
operating _09
④ Dairy and Variety guard
• Store fatty foods, like butter and cheese.
- Store small, packed foods, like milk, yogurt and beverages.
⑤ Bottle guard
- Store small bottles and cartons (1 litre) of beer, milk, juice in the upper part and large bottles and cartons (1.5 litres) in the lower part.
Freezer
Top freezer drawer
- Store packed frozen foods, like ice cream, bacon and pizza.
- Place the ice tray in this drawer in order to achieve optimal ice freezing.
Middle/lower freezer drawer
- Store fresh meat and fish or dried foods, which are divided into suitably sized portions.
- Do not store food which goes bad easily at low temperature, such as bananas, melons.
- Do not put any newly introduced food for freezing near to frozen food.
- Do not place carbonated or fizzy drinks in the freezer compartment.

- Your appliance is frost free, which means there is no need to manually defrost your appliance, as this will be carried out automatically.
- Temperature rising during the defrost can comply with ISO requirement, But if you want to prevent on undue rise in the temperature of the frozen food while defrosting the appliance. Please wrap the frozen food in several layers of newspaper.
- The appliance may not operate consistently (possibility of defrosting the contents or the temperature becoming too warm in the frozen food compartment) when sited for an extended period of time below the cold end of the range of temperatures for which the refrigerating appliance is designed.
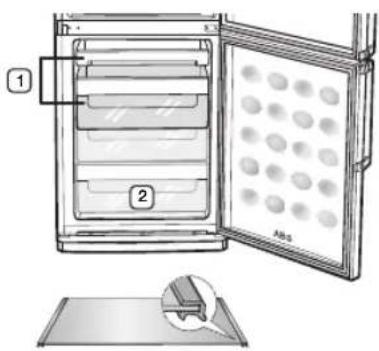
- To get more space in the freezer, you can remove ① drawers. If Additional Freezer Shelf (Optional) is provided, you can remove all Drawers except for bottom drawer ②. It does not affect thermal and mechanical characteristics. A declared storage volume of frozen food storage compartment is calculated with these drawers removed.
text_image
Diagram of a refrigerator with labeled parts and an inset showing a tray with a magnified view.Additional Freezer Shelf (Optional)
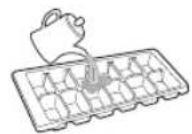
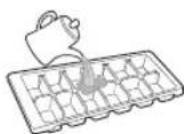
MAKING ICE
- Pour water into the ice cube maker.
- Fill the ice maker up to about 80% with water.
-
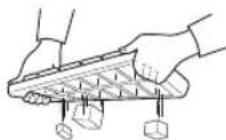
Place the ice cube maker in the top freezer drawer.
-
To take out the ice cubes:
- Twist the ice cube maker slightly.
Danger of explosion WARNING • The coldest parts of
- The coldest parts of the refrigerator is the rear panel. This is the best place to store delicate foodstuffs.
- Glass bottles containing liquids that can freeze should never be stored in the freezer as the glass can explode when the contents freeze.
Making ice quickly
- To make a large quantity of ice quickly, press the "Super Freeze" button to select the fast freeze function.
10_ operating
USING THE WATER DISPENSER
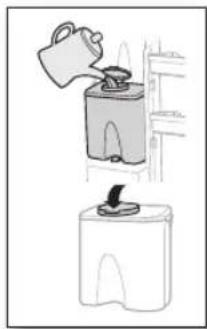
Filling the water
You can fill the water with the water tank sitting inside of the refrigerator or you can remove the water tank to fill the water.
natural_image
Illustration of a kitchen appliance with a lid and a container, showing a pouring step (no text or symbols)- Open the round cap and fill the water tank up with drinking water.
- Do not fill up the water tank too much (just over 4.2 liters). As it could overflow when the door opens and closes.
- Close the round cap by pushing down on it until it clicks into place.

Do not put anything other than water in the water tank.
Getting water from the dispenser
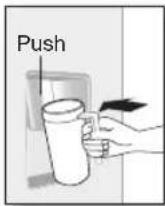
- Place a glass underneath the water outlet.
- Push it gently against the water dispenser lever with your glass.

• Make sure the glass is in line with the dispenser to prevent the water from splashing out.
- Water dispenser may not be available depending on the model.
Installing a regular bottle
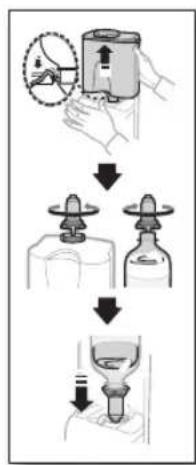
- Press the fixing lever, lift the Water tank upwards and remove it.
- Remove the Dispenser cock from the Water tank.
- Put the Dispenser cock on the regular mineral water bottle and rotate them clockwise to lock the Dispenser cock.
- Put the water bottle with the Dispenser cock in the dispenser hole.
flowchart
graph TD
    A["Step 1: Adding a bottle"] --> B["Step 2: Adding a glass jar"]
    B --> C["Step 3: Adding a gas washing bottle"]
    C --> D["Step 4: Adding liquid"]
    D --> E["End"]

- Gurgling sounds may be heard when air enters the water bottle from regular mineral water or beverage bottles.
- Some regular mineral water or beverage bottles may not fit the Dispenser cock depending on their size.
- If water does not come out satisfactorily when you press the lever, press the lever again.
- Do not use carbonated drinks. When you press the lever, beverage may spurt out due to the pressure of carbonic gas accumulated in the upper part of beverage bottle.
- For better hygiene, beverages with a high sugar content (juice, soft drinks) are not recommended.
- You can use bottled mineral water or boiled tap water as long as it does not contain any particles.
When the water dispenser is not used
- Fix the Dispenser cock tightly into the dispenser hole.
- When the Dispenser cock is pulled out for a long time, Refrigerator may not operate properly because cold air will leak.
- Place a Variety guard in the location of the Water tank and store beverage bottle.
- Two 1.5 liter bottles can be placed.
natural_image
Diagram showing a mechanical assembly process with a drop and arrow indicating direction (no text or symbols)REPLACING THE INTERIOR LIGHT

Please contact service engineer to replace it.
REMOVING THE INTERIOR PARTS
Drawers
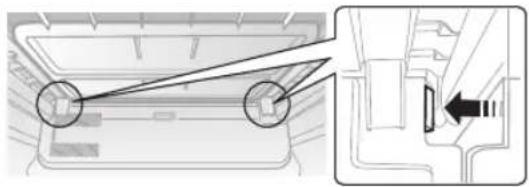
Press the locking device on the rear left and right side of the drawer cover and pull the drawer cover to remove it. (Optional)
operating _11
natural_image
Diagram showing a mechanical component with two circular features and an inset close-up of a connector detail (no text or symbols)Water tank
Firmly grab the water tank with both hands and lift it up towards you gently to remove the water tanks.
natural_image
Illustration of hands cleaning a kitchen appliance with a bag (no text or symbols visible)
Water tank may not be available depending on the model.
REVERSING THE DOOR SWING
Read these instructions completely and carefully.

- Samsung recommends that reversing of the door opening is only completed by Samsung approved Service providers. This will be on a chargeable basis and at the customers expense.

- Any damage caused while attempting to reverse the door opening is not covered under the appliance manufactures warranty. Any repairs requested due to this circumstance will be completed on a chargeable basis at the customers expense.
- Handle parts carefully to avoid scratching the paint.
- Lay out all the screws by their related parts to avoid using them in the wrong places.
- Provide a non-scratching work surface for the doors. (ex:blanket)
- During door reversing, refrigerator should not be stained with oil.
- We recommend to use tools described below. (Possible to use similar size of socket wrench & wrench)
| Not provided | ||
| Phillips Head Driver (+) | Flat Head Driver (-) | 10mm Socket Wrench (for bolts) |
| Not provided Additional | part | |
| 11mm Wrench (for hinge shaft) | Allen Wrench (3/16inch) (for Mid hinge) | Cover Wire Hinge L (In Top Cover) |
• DISASSEMBLY OF THE FRIDGE DOOR
- These operating instructions cover various models.
-
The characteristics of your appliance may differ slightly from those described in this instructions.
-
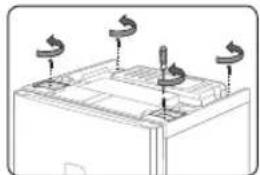
Disassemble the CAP CABI after removing 4 screws.
natural_image
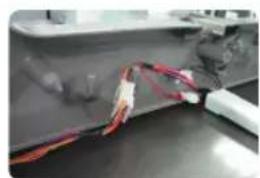
Diagram of a mechanical or electrical component with four curved arrows indicating rotation or movement (no text or symbols present)- Disconnect electric wires inside of the CAP CABI.
natural_image
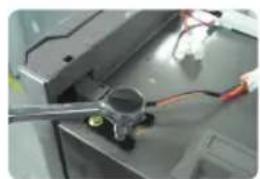
Close-up of a white cable with red wires wrapped around it, partially visible against a dark surface (no text or symbols)- Remove 3 bolts on the top of the refrigerator with 10mm socket wrench. Make sure the door is firmly closed.
natural_image
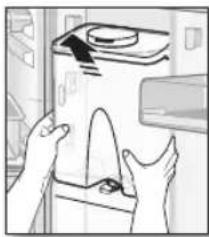
Close-up of a mechanical component with wires and a circular component, no visible text or symbols- Disassemble the Fridge door by lifting it upward. Be careful not to drop and scratch the face of the Fridge door.
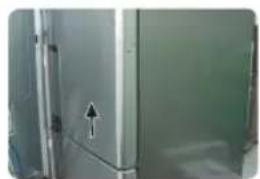
natural_image
Close-up of a metallic door with a white arrow pointing to the door handle (no text or symbols visible)12_ operating
- Disassemble the COVER WIRE DOOR on the top of the fridge door with a flat-head screw driver by putting it into the indicated position ( ).

text_image
COVER WIRE DOOR- Disjoin the COVER WIRE HINGE R from the ASSY HINGE UPP as shown. Take out the electric wire from the COVER WIRE HINGE R.
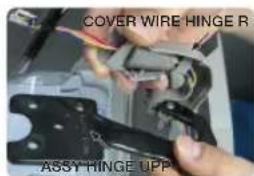
text_image
COVER WIRE HINGE R ASSY HINGE UPP- Switch the direction of the electric wire as below. Take out the COVER WIRE HINGEL from the underneath the CAP CABI and rejoin it with the electric wire.
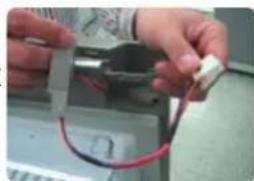
natural_image
Close-up of hands connecting wires to a mechanical component (no visible text or symbols)- With 11mm wrench, separate the HINGE SHAFT and then flip the HINGE and reattach the HINGE SHAFT.
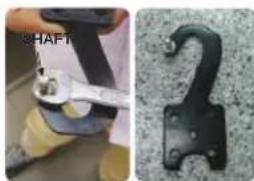
natural_image
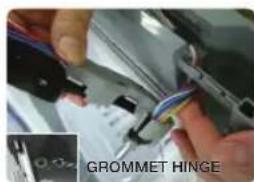
Two-panel image showing a person using a wrench to lift a metal clamp and a black hook attached to a textured surface (no text or symbols visible)9-1. After rejoining the COVER WIRE HINGE L and the ASSY HINGE UPP, Switch the position of the GROMMET HINGE and the CAP SPACE DOOR.
text_image
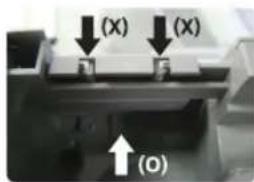
GROMMET HINGE9-2. When disassembling CAP SPACE, do not Push both side hooks but bottom hook as shown.
text_image
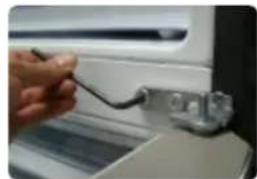
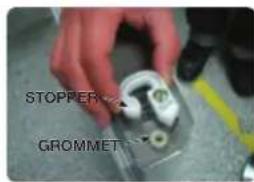
(x) (x) (o)- Switch the position of the STOPPER DOOR and the GROMMET HINGE as shown.

text_image
STOPPER GROMMET• DISASSEMBLY OF THE FREEZER DOOR
- Remove 2 bolts and screw to disassemble the ASSY HINGE MID.
natural_image
Close-up of a hand holding a cable inserted into a small electronic component (no visible text or symbols)- Disassemble the Freezer door by lifting it upward. Be careful not to drop and scratch the Freezer door.
natural_image
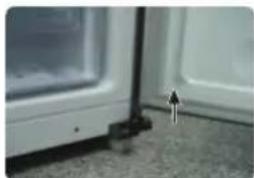
Close-up of a white door with a small arrow pointing to the side panel, placed on a textured floor (no text or symbols visible)- Disassemble the COVER LEG FRONT by removing the 2 screws.
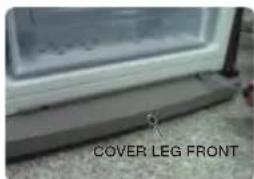
text_image
COVER LEG FRONT- Disassemble the ASSY HINGE LOW as shown and put the AUTO GUIDE upside down, switch the position of the SHAFT.
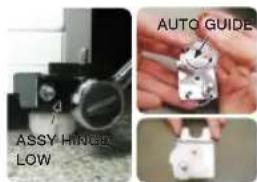
text_image
ASSY HINGER LOW AUTO GUIDE
When joining, tighten a screw not to make unpredicted noise.
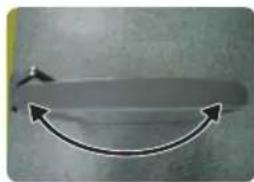
• REVERSING THE HANDLE BAR [FRIDGE/FREEZER]
- Detach the CAP SCREW HANDLE with flat screwdriver and disassemble the HANDLE BARs.
![SAMSUNG RL48RECPN - • REVERSING THE HANDLE BAR [FRIDGE/FREEZER] - 1](/content/2026/04/703242/images/b2dcc041fd62bdd36ecd8782f0e5a7b295e27d7d2c6b242787bd94bfdf1456ea.jpg)
natural_image
Close-up of a wooden door with metal railings and a white cable inserted into a wall (no text or symbols visible)- Switch the position of the CAP HOLE DOORs, pulling out and pushing them in.
![SAMSUNG RL48RECPN - • REVERSING THE HANDLE BAR [FRIDGE/FREEZER] - 2](/content/2026/04/703242/images/c6c46d4d00a9683ec417909581b8a821f543e70ca31ffdbad784a24c0466a6e9.jpg)
natural_image
Close-up of a metallic tool interacting with a wall-mounted device (no visible text or symbols)operating _13
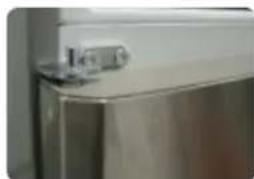
- Reattach the HANDLE BARs on the other side of doors in reverse order.
![SAMSUNG RL48RECPN - • REVERSING THE HANDLE BAR [FRIDGE/FREEZER] - 3](/content/2026/04/703242/images/957f6bd4566b560aea92854142fee575635edc9febfcc99d2b02eea5cb470e08.jpg)
natural_image
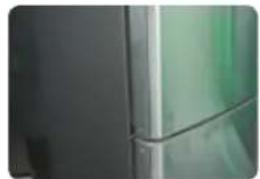
Close-up of a stainless steel refrigerator with a door handle (no visible text or symbols)• ASSEMBLY OF THE FREEZER DOOR
- Exchange the positions of a bolt and the assy HINGE LOW after making a hole with phillips head driver on the left bottom side of the unit.
natural_image
Interior view of a refrigerator with glass door and side panel, showing a curved arrow pointing to the front portion (no text or symbols visible)- After switching the position of the CAP HOLE HINGE LOW, reassemble the COVER LEG FRONT.
natural_image
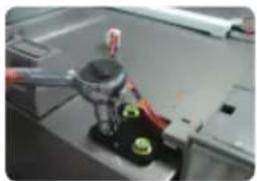
Close-up of a car door handle with an arrow indicating direction (no text or symbols visible)- Switch the position of the CAP HOLE HINGE MID and a screw.
natural_image
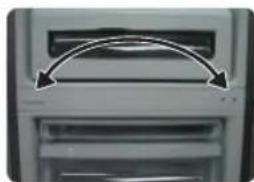
Close-up of a computer tower with an open drive and two curved arrows indicating motion (no text or symbols)- Switch the position of the STOPPER DOOR and the GROMMET HINGE as shown.
text_image
STOPPER GROMMET- Switch the position of the GROMMET HINGE and the CAP HINGE HOLE.
natural_image
Simple curved arrow pointing inward on a textured surface (no text or symbols)- Carefully put the Freezer door back on and assemble HINGE MID with 2 bolts.
natural_image
Close-up of a stainless steel kitchen refrigerator with a small door handle (no visible text or symbols)14_ operating
• ASSEMBLY OF THE FRIDGE DOOR
- Carefully put the Fridge door back on.
natural_image
Close-up of a modern refrigerator with glass panels and a handle (no visible text or symbols)- Secure the ASSY HINGE UPP with 3 bolts as shown. Make sure the Fridge Door is firmly closed.
natural_image
Close-up of a mechanical device with a lever and green components (no visible text or symbols)- Switch the position of the CAP HOLE HINGE UPP.
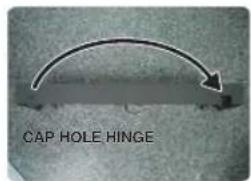
text_image
CAP HOLE HINGE- Reconnect the electric wires and reposition the wires inside of the CAP CABI as shown below.
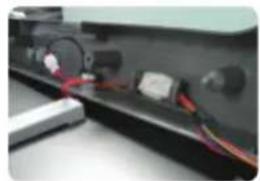
natural_image
Close-up of a black electronic device with red and black wires, no visible text or symbols- Reassemble the CAP CABI after assuring the position of Wires.

natural_image
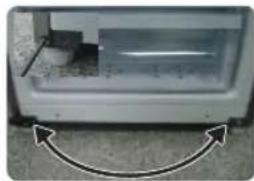
Diagram of a mechanical device with four rotating components (no text or symbols)- Detach the Fridge and Freezer gaskets and attach them after rotating 180°. (Make sure the door gaskets are properly arranged. If not, there can be a noise or dew can be formed which affects performance of the ur
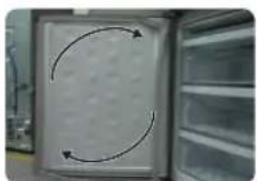
natural_image
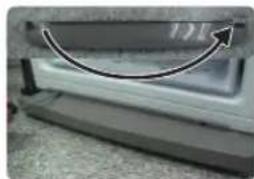
Interior view of a refrigerator with visible door frame and circular arrows indicating rotation (no text or symbols)- Make sure the doors are working properly.

natural_image
Person holding a stainless steel refrigerator drawer in a kitchen setting (no visible text or symbols)troubleshooting
| PROBLEM SOLUTION | |
| The appliance is not operating at all or the temperature is too high. | Check that the power plug is correctly connected.Is the temperature control on the front panel correctly set?Does sun shine on the appliance or are there heat sources nearby?Is the back of the appliance too near to the wall? |
| The food in the refrigerator is frozen. | Is the temperature control on the front panel set to the coldest temperature?Is the surrounding temperature too low?Did you put the hot food in the refrigerator? |
| There are unusual noises. | Check that the appliance is installed on a stable, level floor.Is the back of the appliance too near to the wall?Have any foreign objects fallen behind or under the appliance?Is there noise coming from the compressor in the appliance?A ticking sound may be heard inside the appliance; this is normal.This sound occurs when the various accessories contract or expand. |
| The front corners and sides of the appliance are warm and condensation starts to form. | Heat-proof pipes are installed in the front corners of the appliance to prevent condensation from forming.When the surrounding temperature rises, this may not always be effective. However, this is not abnormal.In very humid weather, condensation may form on the outer surface of the appliance when the moisture in the air comes into contact with the cool surface of the appliance. |
| You can hear a liquid babbling in the appliance. | This is the refrigerant, which cools the inside of the appliance. |
| There is a bad smell inside the appliance. | You did not seal the food.Check food are covered and ensure the cold inlet is clean. |
| There is a layer of frost on the appliance's walls. | Is the air outlet on the appliance plugged up?Space the food out as much as possible to improve ventilation.Is the door fully closed? |
| If condensation forms on the inside wall of the appliance and around vegetables. | Can occur if food with a high water content is stored uncovered with a high humidity level or the door has been left open for a-long time.Store the food with a cover or in sealed containers. |
Ambient Room Temperature Limits
This fridge/freezer is designed to operate in ambient temperatures specified by its temperature class marked on the rating plate.
| Class Symbol Ambient Temperature range(°C) | ||
| Extended Temperate SN +10 to +32 | ||
| Temperate N +16 to +32 | ||
| Subtropical ST +16 to +38 | ||
| Tropical T +16 to +43 | ||

Internal temperatures may be affected by such factors as the location of the fridge/freezer, ambient temperature and the frequency with which you open the door.
Adjust the temperature as required to compensate for these factors.
| English | Correct Disposal of This Product(Waste Electrical & Electronic Equipment) |
| (Applicable in countries with separate collection systems)This marking on the product, accessories or literature indicates that the product and its electronic accessories (e.g. charger, headset, USB cable) should not be disposed of with other household waste at the end of their working life. To prevent possible harm to the environment or human health from uncontrolled waste disposal, please separate these items from other types of waste and recycle them responsibly to promote the sustainable reuse of material resources.Household users should contact either the retailer where they purchased this product, or their local government office, for details of where and how they can take these items for environmentally safe recycling.Business users should contact their supplier and check the terms and conditions of the purchase contract. This product and its electronic accessories should not be mixed with other commercial wastes for disposal. |
Contact SAMSUNG WORLD WIDE
If you have any questions or comments relating to Samsung products, please contact the SAMSUNG customer care center.
| COUNTRY CALL WEBSITE | |||
| MENA | U.A.E 800-SAMSUNG (800 - 726 7864) | www.samsung.com/ae/support (English)www.samsung.com/ae_ar/support (Arabic) | |
| OMAN | 800-SAMSUNG (800 - 726 7864) | www.samsung.com/ae/support (English)www.samsung.com/ae_ar/support (Arabic) | |
| KUWAIT | 183-CALL (183-2255) | www.samsung.com/ae/support (English)www.samsung.com/ae_ar/support (Arabic) | |
| BAHRAIN | 8000-GSAM (8000-4726) | www.samsung.com/ae/support (English)www.samsung.com/ae_ar/support (Arabic) | |
| QATAR | 800-CALL (800-2255) | www.samsung.com/ae/support (English)www.samsung.com/ae_ar/support (Arabic) | |
| EGYPT | 08000-72678616580 | www.samsung.com/eg/support | |
| ALGERIA | 3004 | www.samsung.com/n_africa/support | |
| PAKISTAN | 0800-Samsung (72678) | www.samsung.com/pk/support | |
| TUNISIA | 80-1000-12 | www.samsung.com/n_africa/support | |
| JORDAN | 0800-2227306 5777444 | www.samsung.com/Levant/support (English) | |
| SYRIA | 18252273 | www.samsung.com/Levant/support (English) | |
| MOROCCO | 080 100 22 55 | www.samsung.com/n_africa/support | |
| SAUDI ARABIA | 920021230 | www.samsung.com/sa/supportwww.samsung.com/sa_en/support (English) | |


text_image
Labeled diagram of an refrigerator interior showing numbered compartments and doorstext_image
(TYPE A) (TYPE B) 5 1 2 3 4 LED LED Lighting Power Pressure Airflow Condition Zone 5
Soft Freeze (Congélation douce) (
5 Vacation (Absence)
text_image
Diagram of a refrigerator interior with numbered compartments and labeled parts① Clayette transparente incassable (en option)
text_image
Diagram of an oven with labeled parts and a magnified view showing a tray with a lid and a numbered inset.natural_image
Illustration of a hand pouring liquid into a container and a small container (no text or symbols)flowchart
graph TD
    A["Hand holding container with upward arrow"] --> B["Down to alcohol lamp"]
    B --> C["Down to glass tube"]

text_image
Diagram illustrating a medical procedure with a device and a box, showing step-by-step instructions.REMPLACEMENT DE L'AMPOULE

natural_image
Diagram showing a mechanical component with two circular features and an inset view of a close-up of a component (no text or symbols)Réservoir d'eau
natural_image
Illustration of hands cleaning a kitchen appliance with a door and lid (no text or symbols)
natural_image
Technical line drawing of a mechanical assembly with four curved components mounted on a base (no text or symbols)natural_image
Close-up of a white cable being wrapped in red and black wires, with no visible text or symbols.natural_image
Close-up of a mechanical component with wires and a tool, no visible text or symbolsnatural_image
Exterior view of a metallic industrial cabinet with a white arrow pointing to a component (no visible text or symbols)12 fonctionnement
natural_image
Close-up of hands holding a small electronic component with wires (no visible text or symbols)natural_image
Two-panel image showing a hand using a wrench to adjust a metal clamp and a separate close-up of a hook component (no text or symbols visible)natural_image
Close-up of a hand holding a cable inserted into a small electronic component (no visible text or symbols)natural_image
Close-up of a white door with a small arrow pointing to the side, next to a window (no text or symbols visible)text_image
COUVERCLE DU PIED AVANTnatural_image
Close-up of a metallic door handle and vertical pipe connection (no text or symbols visible)natural_image
Close-up of a metallic tool interacting with a glass door (no visible text or symbols)fonctionnement _13
natural_image
Exterior view of a stainless steel refrigerator with a door handle (no visible text or symbols)• ASSEMBLAGE DE LA PORTE DU CONGELATEUR
natural_image
Close-up of a white rectangular electronic device with a curved arrow pointing to its side (no visible text or symbols)natural_image
Close-up of a car door with a curved arrow indicating motion or direction (no text or symbols visible)natural_image
Close-up of a computer tower with an open drive and two arrows indicating motion (no text or symbols visible)natural_image
Simple curved arrow pointing upward on a plain surface, no text or symbols presentnatural_image
Close-up of a stainless steel kitchen appliance with a small handle (no visible text or symbols)14 fonctionnement
• ASSEMBLAGE DE LA PORTE DU REFRIGERATEUR
natural_image
Close-up of a metallic refrigerator with glass panels and a handle (no visible text or symbols)natural_image
Close-up of a mechanical assembly with red and green components, no visible text or symbols- Changez la position du CACHE ESPACE DE LA CHARNIERE SUPERIEURE.
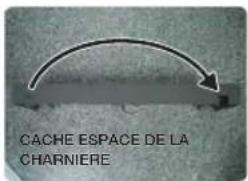
text_image
CACHE ESPACE DE LA CHARNIEREnatural_image
Close-up of a mechanical device with wires and components, no visible text or symbolsnatural_image
Diagram of a mechanical assembly with four curved arrows indicating rotation or force application (no text or symbols present)natural_image
Close-up of a metallic door with three curved arrows indicating rotational motion (no text or symbols)natural_image
Person holding a refrigerator in a kitchen appliance (no visible text or symbols)dépannage
natural_image
Symbol of a trash bin crossed with no text or labels, representing waste sorting or disposal (no text present)natural_image
Close-up of a hand holding a black cable attached to a metallic bracket (no visible text or symbols)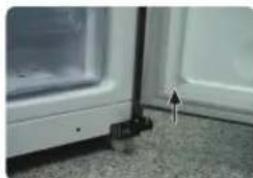
natural_image
Close-up of a white refrigerator with a small mechanical component and a small arrow pointing to the door (no visible text or symbols)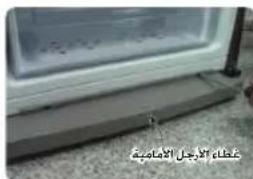
natural_image
Exterior view of a modern office building (no signage)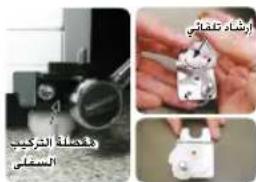
natural_image
Close-up of a door handle and lever mechanism (no text or symbols visible)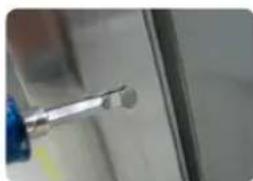
natural_image
Close-up of a metallic tool interacting with a glass surface (no visible text or symbols)natural_image
Close-up of hands holding a small electronic component with wires and wires (no visible text or symbols)text_image
Close-up of hands installing or adjusting a cable or wire component with visible text label '###' in the cornertext_image
Top Level Bottom Levelnatural_image
Technical line drawing of a mechanical assembly with three curved components mounted on a base (no text or symbols)natural_image
Close-up of a white plastic tool interacting with a red and black cable, no visible text or symbolsnatural_image
Close-up of a mechanical component with wires and a circular component, no visible text or symbolsnatural_image
Close-up of a metallic door with a white arrow pointing to the side panel (no visible text or symbols)natural_image
Illustration of hands holding a kitchen appliance with a handle and lid (no text or symbols)text_image
Diagram illustrating a mechanical or fluidic process with labeled components and directional arrows indicating movement.natural_image
Diagram showing a mechanical component with two circular features and an inset view of a connector (no text or symbols)11-تشغيل
استخدام موزع الماء
ملءannah
natural_image
Illustration of a hand pouring liquid into a container and a small container (no text or symbols)flowchart
graph TD
    A["Initial Setup"] --> B["Person applying bottle with upward arrow"]
    B --> C["Add liquid into bottle"]
    C --> D["Add liquid into flask with downward arrow"]
    D --> E["Final Collection"]
عمل الشج
natural_image
Diagram of a refrigerator with labeled compartments and an open door (no text or symbols present)
text_image
Diagram of a refrigerator interior with labeled compartments and doors, showing front, back, and side views.text_image
(B) النوع LED LED Lighting Protein Protein Protein Protein Protein Protein Protein Protein Protein Protein Protein Protein Protein Protein Protein Protein Protein Protein Protein Protein Protein Protein Protein Protein Protein Protein Protein Protein Protein Protein Protein Protein Protein Proteintext_image
Labeled diagram of a refrigerator interior showing numbered compartments and doorsnatural_image
Diagram showing a 3D printer inside an oven with a close-up view of its internal structure (no text or symbols present)