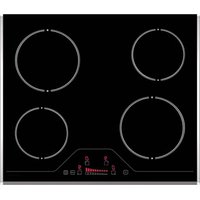
CC60V - Cooker Porter & Charles - Free user manual and instructions
Find the device manual for free CC60V Porter & Charles in PDF.


| Product type | Built-in ceramic hob with touch controls |
| Brand | Porter & Charles |
| Model | CC60V |
| Dimensions of the hob (W x D x H) | 590 x 520 x 41 mm |
| Worktop cut-out dimensions | Cut-out at least 560 x 490 mm |
| Number of cooking zones | 4 (touch control burners) |
| Electrical supply | 230 V ~ 50 Hz, 25 A (residual current device required) |
| Power cable | 3 x 2.5 mm² (AWG 10) type 60227 IEC 53 |
| Maximum power | Approximately 7.2 kW (estimate) |
| Control type | Touch Control with LED displays and audible beeps |
| Cooking functions | Temperature settings 1 to 9, heat boost, individual zone timer |
| Safety functions | Key lock, child lock, automatic safety shut-off, overheat protection, residual heat indicator (H), power failure detection |
| Surface material | Ceramic glass |
| Installation | Built-in, requires worktop with suitable cut-out |
| Care and cleaning | Use a scraper for residue, ceramic glass cleaner, do not use abrasive sponges |
| Minimum distance to combustible walls | 60 mm at the rear, 150 mm on the sides |
| Protection class | Class I (earthing required) |
| Included accessories | Sealing adhesive tape, mounting brackets |
| Warranty | Warranty applicable subject to compliant installation and use |
Frequently Asked Questions - CC60V Porter & Charles
User questions about CC60V Porter & Charles
0 question about this device. Answer the ones you know or ask your own.
Ask a new question about this device
Download the instructions for your Cooker in PDF format for free! Find your manual CC60V - Porter & Charles and take your electronic device back in hand. On this page are published all the documents necessary for the use of your device. CC60V by Porter & Charles.
USER MANUAL CC60V Porter & Charles
natural_image
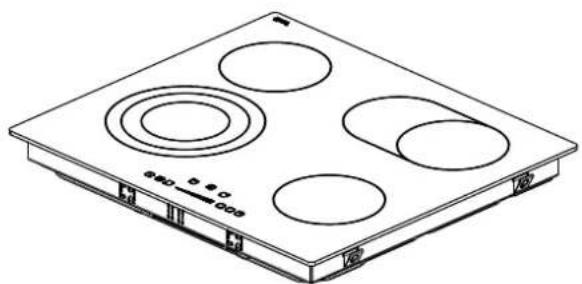
Line drawing of a four-circled electrical heating unit with mounting base (no text or symbols)CONTENTS:
DESCRIPTION OF THE COOKTOP
SAFETY INSTRUCTIONS
INSTALLATON
Locating Your Built-in cooktop Electrical Connection of Your cooktop
USAGE
Turn On and Turn Off The Control
Select Zone
Turn on dual- and triple zones Set Cooking Level With and Without Heat Boost
Turn Off Individual Heaters Timer Function
Key Lock
Child Lock
Stop & Go
TOUCH CONTROL SAFETY FUNCTIONS
Sensor Safety Cut Off
Over Temperature Switch Off
Operating Time Limitations
Residual Heat Functions
CLEANING AND CARE
WARRANTY&SERVICE
DESCRIPTION OF THE HOB
Dear Customer,
It is important that you should read this manual for best performance and to extend the life of your appliance. We recommend you to keep this manual for future reference.
Your new cooktop is guaranteed and will give lasting service. This guarantee is only applicable if the appliance has been installed and operated in accordance with the operating and installation instructions detailed in this manual.
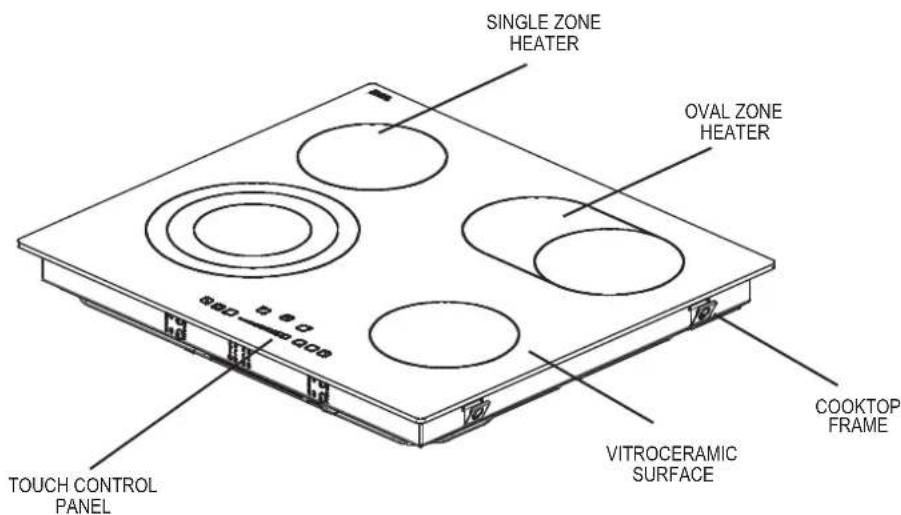
Note: Appearance of your cooktop maybe different than the model shown above due to its configuration.
SAFETY INSTRUCTIONS
READ THESE INSTRUCTIONS CAREFULLY AND COMPLETELY BEFORE USING YOUR APPLIANCE, AND KEEP IT IN A CONVENIENT PLACE FOR REFERENCE WHEN NECESSARY.
THIS MANUAL IS PREPARED FOR MULTIPLE SIMILAR COOKTOPS.YOUR APPLIANCE MAY NOT HAVE SOME OF THE FEATURES THAT ARE EXPLAINED IN THIS MANBEEER TO THE MODEL NUMBER OF YOUR UNIT TO THE EXPRESSIONS THAT HAVE FIGURES,WHILE YOU ARE READING THE OPERATING MANUAL.
General Safety Warnings
- This appliance can be used by children aged from 8 years and above and persons with reduced physical, sensory or mental capabilities or lack of experience and knowledge if they have been given supervision or instruction concerning use of the appliance in a safe way and understand the hazards involved. Children shall not play with the appliance. Cleaning and user maintenance shall not be made by children without supervision.
- WARNING: The appliance and its accessible parts become hot during use. Care should be taken to avoid touching heating elements. Children less than 8 years of age shall be kept away unless continuously supervised.
- WARNING: Unattended cooking on a hob with fat or oil can be dangerous and may result in fire. NEVER try to extinguish a fire with water, but switch off the appliance and then cover flame e.g. with a lid or a fire blanket.
- WARNING: Danger of fire: do not store items on the cooking surfaces.
- WARNING: If the surface is cracked, switch off the appliance to avoid the possibility of electric shock.
- For cooktop incorporating a lid, any spillage should be removed from the lid before opening. And also the hob surface should be allowed to cool before closing the lid.
- The appliance is not intended to be operated by means of an external timer or separate remote-control system.
- Do not use harsh abrasive cleaners or sharp metal scrapers to clean the oven door glass and other surface since they can scratch the surface, which may result in shattering of the glass or damage to the surface.
- Do not use steam cleaners for cleaning the appliance.
- Your appliance is produced in accordance with all applicable local and international standards and regulations.
- Maintenance and repair work must be made only by authorized service technicians. Installation and repair work that is carried out by unauthorized technicians may endanger you. It is dangerous to alter or modify the specifications of the appliance in any way.
- Prior to installation, ensure that the local distribution conditions (nature of the gas and gas pressure or electricity voltage and frequency) and the requirements of the appliance are compatible. The requirements for this appliance are stated on the label.
- CAUTION: This appliance is designed only for cooking food and is intended for indoor domestic household use only and should not be used for any other purpose or in any other application, such as for non-domestic use or in a commercial environment or room heating.
- All possible security measures have been taken to ensure your safety. Since the glass may break, you should be careful while cleaning to avoid scratching. Avoid hitting or knocking on the glass with accessories.
- Ensure that the supply cord is not wedged during the installation. If the supply cord is damaged, it must be replaced by the manufacturer, its service agent or similarly qualified persons in order to prevent a hazard.
Installation Warnings
- Do not operate the appliance before it is fully installed.
- The appliance must be installed by an authorized technician and put into use. The producer is not responsible for any damage that might be caused by defective placement and installation by unauthorized people.
- When you unpack the appliance, make sure that it is not damaged during transportation. In case of any defect; do not use the appliance and contact a qualified service agent immediately. As the materials used for packaging (nylon, staplers, styrofoam...etc) may cause harmful effects to children, they should be collected and removed immediately.
- Protect your appliance against atmospheric effects. Do not expose it to effects such as sun, rain, snow etc.
- The surrounding materials of the appliance (cabinet) must be able to withstand a temperature of min 100°C.
During usage
- Do not put flammable or combustible materials, in or near the appliance when it is operating
- Do not leave the cooker while cooking with solid or liquid oils. They may catch fire on condition of extreme heating. Never pour water on to flames that are caused by oil. Cover the saucepan or frypan with its cover in order to choke the flame that has occurred in this case and turn the cooker off.
- Always position pans over the centre of the cooking zone, and turn the handles to a safe position so they cannot be knocked or accidentally.
- If you will not use the appliance for a long time, unplug it at the main control.
- Make sure the appliance control knobs are always in the "0" (stop) position when it is not used.
During cleaning and maintenance
- Always turn the appliance off at the main control cleaning or maintenance. You can do it after plugging the appliance off or turning the main switches off.
- Do not remove the control knobs to clean the control panel.
TO MAINTAIN THE EFFICIENCY AND SAFETY OF YOUR APPLIANCE, WE RECOMMEND YOU ALWAYS USE ORIGINAL SPARE PARTS AND TO CALL ONLY OUR AUTHORIZED SERVICE AGENTS IN CASE OF NEED EURO PARTS:1800.678.8352.
INSTALLATION
The electrical connection of this cooktop should be carried out by an authorised service technician or a qualified electrician, according to the instructions in this guide and in compliance with the current regulations.
- Before connecting your appliance to the mains at home, make sure to check the conformity of voltage settings, which are specified on the information sticker attached to the appliance and/or packaging, with the usage conditions available.
- The laws, ordinances, directives and standards in force in the country of use are to be followed (safety regulations, proper recycling in accordance with the regulations, etc.)
Installing your built-in cooktop
After removing the packaging material from the appliance and its accessories, ensure that the hob is not damaged. If you suspect any damage, do not use the appliance and contact an authorised service technician a qualified electrician immediately.
- This built-in cooktop is to be inserted into a cut out in a counter.
- Create an opening with the dimensions shown in next picture. The distance between the rear edge of the cooktop and any adjacent wall is depend on wall surface. Please don't use easily combustible material like curtain, paper at nearby cooktop.
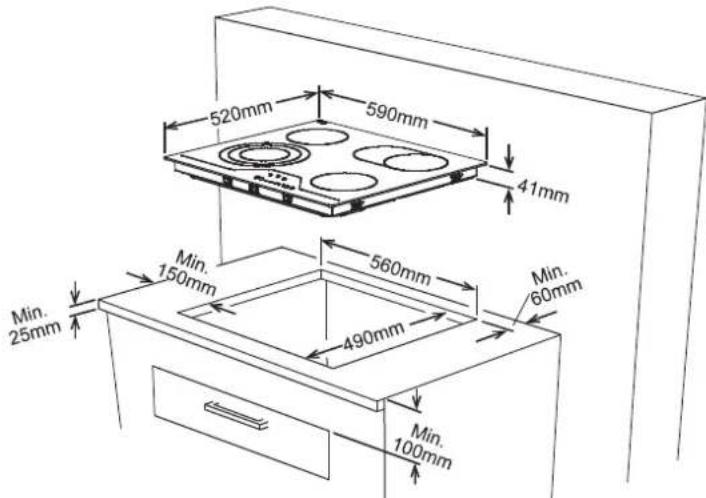
| Neighborhood walls A [mm] B [mm] | ||
| Combustible 60 150 | ||
| Non-combustible 25 40 | ||
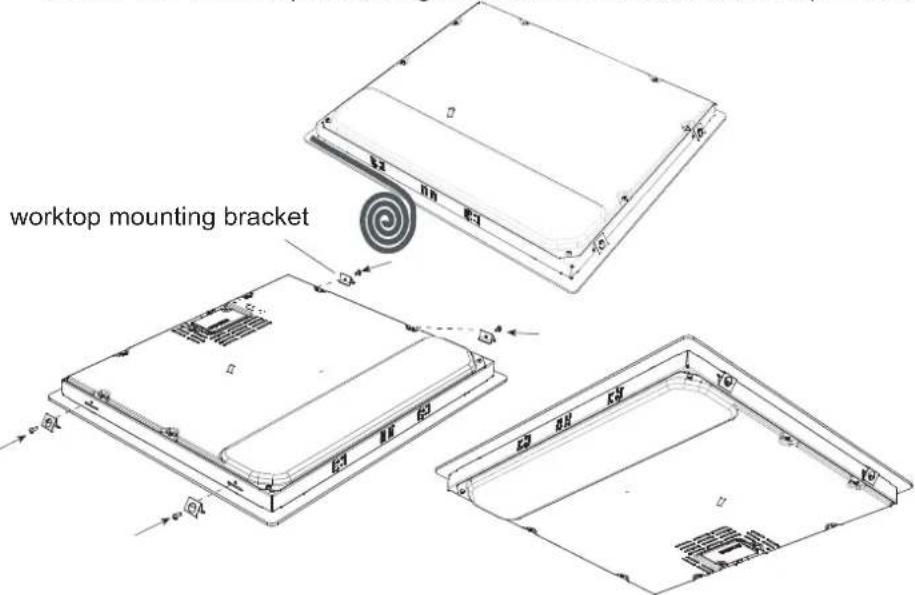
- Apply the one-sided self-adhesive sealing tape supplied all the way round the lower edge of the cooking surface along the outer edge of the glass ceramic panel. Do not stretch it.
- Screw the 4 worktop mounting brackets on the side walls of product.
Making an electrical connection
Before making a connection, check that:
- The mains voltage is the same as that quoted on the rating plate which is situated at the back of your hob.
- The circuit can support the appliance load (see the rating plate).
- The power supply has an earth connection, which complies with the provisions of current regulations and is in good working order.
- The fused switch is easily accessible once the door to open installed.
If there is no dedicated hob circuit and fused switch, they must be installed by a qualified electrician before the isooptected.
An approved suitable cable must be connected from the Consumer Unit main fuse box and be protected by its own 32amp fuse or Micro Circuit Breaker (MCB). The electrician must provide a fused all pole switch, which disconnects both the line (live) and neutral conductors with a contact seperation of at least 3,0 mm.
The fused switch should be fitted to the kitchen wall, above the worksurface and to the side of the hob, not above it, in accordance with IEE regulations. Connect the fused switch to a junction box which should be fitted on the wall about 61cm (24 inches) above floor level and behind the circuit power supply cable can then be connected.
Connect one end to the junction box and connect the other end to the cooktop's power connection box which is located at the back of the hob. Remove the cover of the power connection box and install the cable, in accordance with the connection diagram.
The power supply cable must be positioned away from direct heat sources. It should not be subjected to a temperature rise of more than 50irc C above room temperature.
This appliance conforms with the following EU Dir
Declaration of conformity
We declare that our products meet the applicable European Directives, Decisions and Regulations and the requirements listed in the standards referenced.

Electrical connection diagram
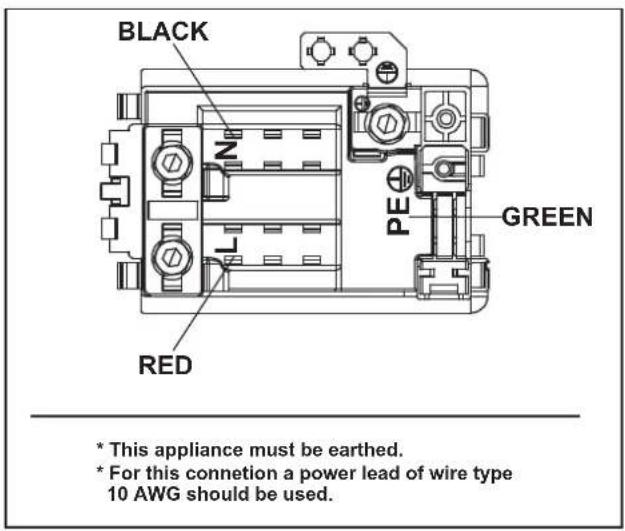
For the induction the table must be suitable for region will be used. You will find the connection diagram shown on the bottom of your appliance.
USAGE
The appliance is operated by touching buttons and the functions are confirmed by displays and acoustic signals.
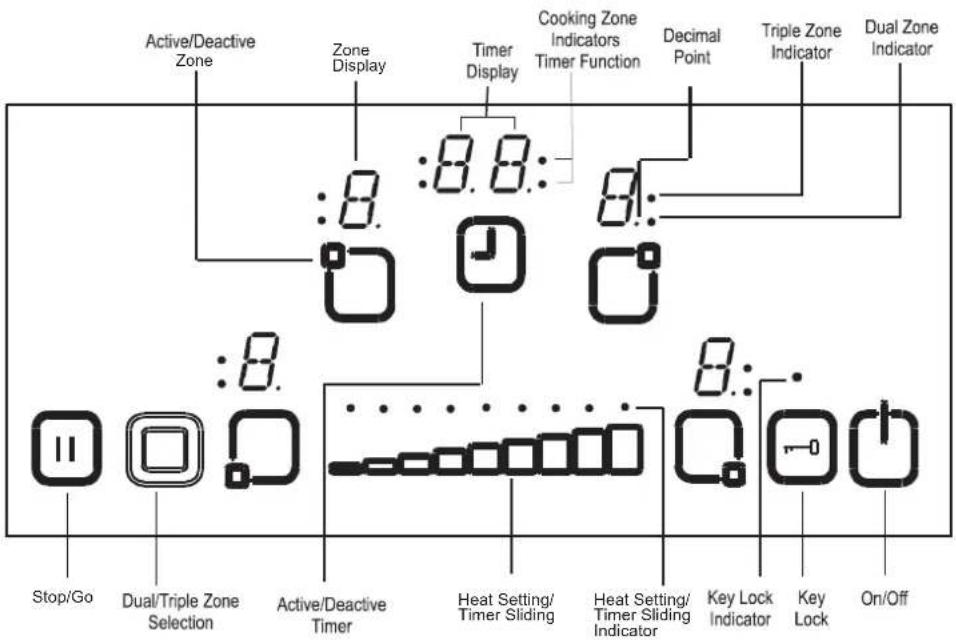
flowchart
graph TD
    A["Stop/Go"] --> B["Active/Deactive Zone"]
    B --> C["Zone Display"]
    C --> D[":8.0"]
    D --> E[":8.0: 8.0: 8.0: 8.0: 8.0: 8.0: 8.0: 8.0: 8.0: 8.0: 8.0: 8.0: 8.0: 8.0: 8.0: 8.0: 8.0: 8.0: 8.0: 8.0: 8.0: -"]
    E --> F["Heat Setting/Timer Sliding"]
    F --> G[":8.0"]
    G --> H[":8.0: 8.0: 8.0: 8.0: 8.0: 8.0: 8.0: 8.0: 8.0: 8.0: 8.0: 8.0: 8.0: 8.0: 8.0: 8.0: 8.0: 8.0: -"]
    H --> I[":8.0"]
    I --> J[":8.0"]
    J --> K[":8.0"]
    K --> L[":8.0"]
    L --> M[":8.0"]
    M --> N[":8.0"]
    N --> O[":8.0"]
    O --> P[":8.0"]
    P --> Q[":8.0"]
    Q --> R[":8.0"]
    R --> S[":8.0"]
    S --> T[":8.0"]
    T --> U[":8.0"]
    U --> V[":8.0"]
    V --> W[":8.0"]
    W --> X[":8.0"]
    X --> Y[":8.0"]
    Y --> Z[":8.0"]
    Z --> AA[":8.0"]
    AA --> AB[":8.0"]
    AB --> AC[":8.0"]
    AC --> AD[":8.0"]
    AD --> AE[":8.0"]
    AE --> AF[":8.0"]
    AF --> AG[":8.0"]
    AG --> AH[":8.0"]
    AH --> AI[":8.0"]
    AI --> AJ[":8.0"]
    AJ --> AK[":8.0"]
    AK --> AL[":8.0"]
    AL --> AM[":8.0"]
    AM --> AN[":8.0"]
    AN --> AO[":8.0"]
    AO --> AP[":8.0"]
    AP --> AQ[":8.0"]
    AQ --> AR[":8.0"]
    AR --> AS[":8.0"]
| Stand-By-Mode S-Mode | The mains are applied to the cooktop control and all zone displays are off or a residual heat display is active. | |
| Operating-Mode | B-Mode | At least one heater display shows a heat setting between '0' and '9' |
| Lock Mode | VR-Mode | The cooktop control is locked. |
Mode Descriptions
Turn On and Turn Off The Appliance
If the appliance is in Stand-By-Mode, it is put in Operating-Mode by pressing the On/Off button ⏻ at least 1 second. A buzzer signal indicates the successful operation acoustically.
On all zones a '0' appears and all Decimal Points of the zone flashes (1 sec on, 1 sec off).
If there is no operation within 10 sec, the display of all zones will turn off.
If the displays are turned off, the zone will be set into Stand-By-Mode.
If ⏻ is pressed more than 2 sec (in Operating-Mode), the appliance is switched off and is set into the S-Mode again. The appliance can be turned off by pressing ⏻ at any time; even if other buttons are pressed simultaneously.
If there is a residual heat of a heater remaining, this will be indicated in the correspondent heat setting Zone Display.
Select Zone
If a singlezone is chosen with the corresponding zone Active/Deactive Zone Button ☐, the Decimal Point of the related Heater Display flashes. selected heater you can set the heat level between 1-9 by touching the For the Heat Setting Slider Buttons ____
The slider button must be pressed within 3 sec, otherwise the zone selection is erased and heat setting dot will disappear (Decimal Point). If there is no further operation within 10 sec, the heater falls back into the S-Mode.
The heat setting can always be changed by pressing—between level 1-9.
Each sliding operation or each display change is quitted by a buzzer signal.
Turn on dual and triple zones (available only in some models)
Turn on the dual zone
The activation of the dual zone is done after selecting the desired zone by actuating Ⓞ. This is confirmed by a buzzer signal. At the same time, the corresponding Dual Zone Indicator goes on statically. Touching Ⓞ for a second time, the status of the dual zone toggles: it changes from dual zone on to dual zone off and back again.
The extension zone can be activated only, after a level between 1-9 is set on the basic zone of the heater.
Turn on triple zones
A dual or triple zone can only be switched on, if the basic zone of a zone is set to level 1–9 and the heater is selected, the dot is on.
If ◎ is pressed, the buzzer signal sounds and the Dual Zone Indicator is statically on. If ◎ is pressed once again, there is another acoustical signal and the triple heater is switched on. The Triple Zone Indicator will be illuminated and the triple zone will be energized.
After touching Ⓞ once again, the triple zone of the heater will be switched off again. Each operation causes a status change of the dual/triple zones following in this manner (Dual zone on, triple zone on, all extended zones off, dual zone on, triple zone on, dual zone on, etc. ...)
Set Cooking Level With and Without Heat Boost
All zones are equipped with heat boost functionality.
If the heat boost is active, than the zone will be operated with maximum power for the period of the heat boost time, that is dependent from the selected heat setting. This is indicated through a flashing 'A', alternating with the heat setting value (e.g. 0,5 sec 'A' and 0,5 sec '9') in the zone display. Once the heat boost time ended only the heat setting will be indicated.
If the heat boost should be used for a zone, touch or slide heat level 0, than touch heat level 9 again. After setting the heat to level 9, 'A' will be indicated alternating. This means that level 9 and heat boost is active now.
The heat boost can be turned off by sliding until heat setting '0' appears.
Turn Off Individual Heaters
A selective zone can be turned off with 3 different ways:
. Simultaneous operation of right and left part of the slider button
- Reduction of the heat setting to '0' by pressing right and the left part of the slider button
- Use of timer turn off function for the corresponding the zone.
Timer Function (available only in some models)
The timer provides following features:
The control can run max. 4 zone assigned timers and 1 minute minder (which is assigned to no heater) simultaneously.
All timers can be used only in B-Mode. A heater timer can only be assigned to a active heater, running in levels between 1-9. The minute minder is independent of any heater.
In order to use both functions, timer function must be activated by the Active/Deactive Timer button ⚫.
Touching ① for the fist time after activating the heaters, the control proposes the minute minder (no Cooking Zone Indicator is flashing, they are all on or off).
Touching ⏻ for the second time, the control proposes the assignment to one of the activated heaters by flashing Cooking Zone Indicator. Now the timer to the linked timer signalised.
Touching 🌐 again, the next timer in the in the clockwise direction, is proposed for assignment of the next active heater. And so on...
Minute Minder
No matter whether a zone is activated or not, the minute minder can be operated by touching ⚙. The appearing '00' shows that timer is active and the dot in the right Timer Display indicates that ____ is now linked for setting the timer value.
The minute minder is selected when all Cooking Zone Indicators are statically on or off (no Cooking Zone Indicator is flashing).
With ____, the timer value can be set.
After successful setting of the minute minder time, the timer starts to decrease the time.
The minute minder will not be stopped by switching off the appliance or activating the key lock function, it will proceed increasing the minutes until run out indication.
After reaching the '00' of the timer, buzzer indicates the run out of time.
To stop the buzzer you have to confirm the 'run out' by touching any button.
Zone timer
Zone timers can be set only for activated zones (zone level must be set between 1-9)
First touch of ⏻, the minute minder is activated. After zone touching second time the timer is assigned to the activated zone The proposed for the assignment is indicated by the related Cooking Zone Indicator, which flashing.
Touching 📍 again zone after activating the first heater timer the control recommendsthe next active zone assigned to the timer in the clockwise direction. The assignment recommendation is indicated by the flashing Cooking Zone Indicator.
Touching ____ , the timer value for the zone can be set.
The running timer of the first set zone timer is indicated by the statically lighting Cooking Zone Indicator.
Touching ⏻ once again further timers can be assigned to other activated zones.
10 sec after the last operation, the timer display changes to the timer that will run out next.
The assignment of that timer is displayed always by a flashing Cooking Zone Indicator. How many timer are running you can identify by the number of Cooking Zone Indicator that are statically on.
By toggling ⚙, you can display the timer values for the zone timer and the minute minder. The assignment is always indicated by the flashing Cooking Zone Indicator. If no Cooking Zone Indicator flashes, the minute minder time is shown in the 2-digit Timer Display.
All zone timers can be erased by switching off the appliance into the S-Mode using ① . A minute minder will not be erased, it will proceed operation until run out.
To erase a timer in Operation Mode, you first have to select the timer by toggling the Active/Deactive Timer Button until it is displayed. The value can be erased then in 2 different ways:
- Decrement by sliding until 00' appears on the Timer Display.
After reaching the '00' of a zone timer, the assigned zone level will be set to '0'.
The zone timer or minute minder run out is indicated acoustically by a buzzer tone. This will be erased by touching any button for acknowledgement.
Key Lock
Key lock functionality is for blocking and sets the appliance into a save mode during operation. Touch modifications for example increase heat settings should not be possible. It is only possible to switch the appliance off.
The lock function is active, if the Key Lock button ⏻ is pressed at least 2 sec. This operation is acknowledged by a buzzer. After successful operation of more than 2 sec, the Key Lock Indicator flashes and thezone is locked.
The zone can only be locked in Operating Mode (B-Mode).
If the zone is locked, only ⏻ can be operated, all other buttons are blocked. If there is any other button operated in the blocked mode, the buzzer signal sounds and the Key Lock Indicator flashes as indication for the activated key lock functionality. Only the switch off by operation of ⏻ is possible. But if you switched off the appliance, you can not restart it again without unlocking.
After pressing ⬤ 2 sec, the Key Lock Indicator disappears. Now, the cooktop control is unlocked and can be operated in normal order.
Child Lock
Child lock functionality is foreseen to lock the appliance in a complicated Multi-Step process.
Child locking and unlocking is only available in the S-Mode.
First ⏻ has to be pressed until the buzzer beeps, then the right and the left of the slider button to be pressed for at least 0.5 sec, but max 1 sec. simultaneously. Following that the appliance can be locked the right of the slider button. Inn 4 zone displays 'L' is shown as a confirmation.
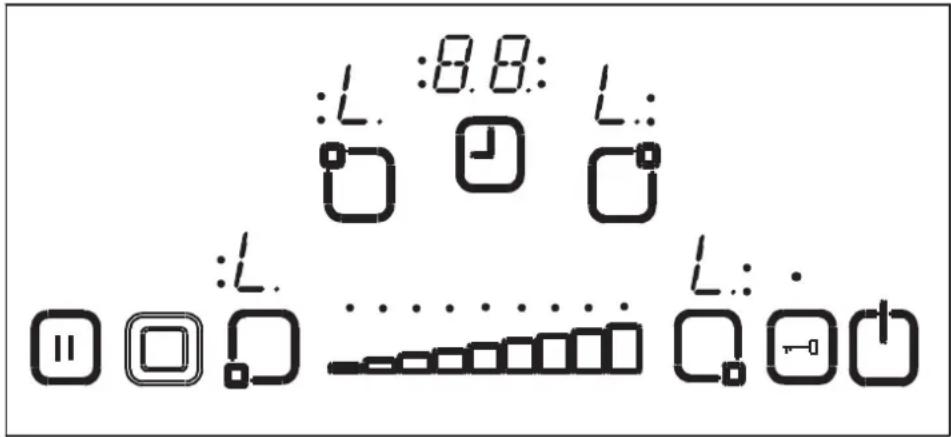
If case the minute minder is still running, it will proceed until '00' is reached and the timer will beep. After confirmation of timer run out, the appliance is fully locked. None of the buttons can be used as long as the appliance is locked.
The same way the child lock is activated, it can also get deactivated. After pressing ⏻ until the beep, then the right and the left of the slider button simultaneously for at least 0 ,5 sec , followed by touching only the left . As a confirmation for successful unlocking, 'L` symbol in the displays will be erased immediately.
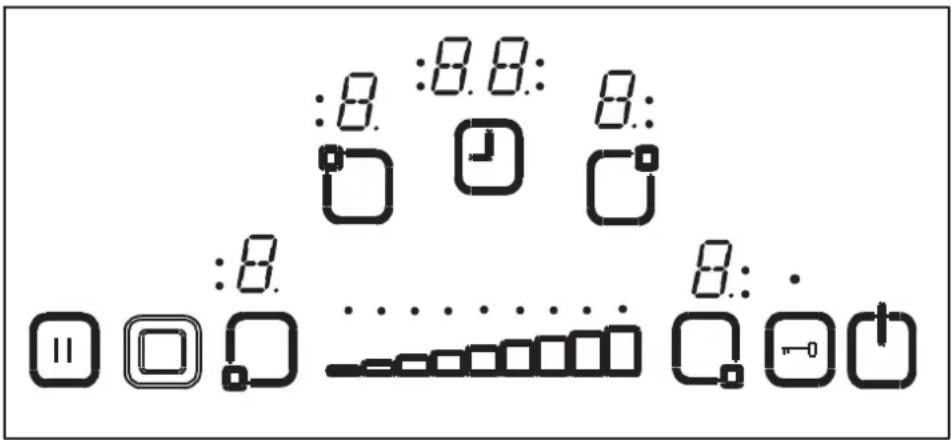
The following safety functions are available to avoid unintended operation of the cooktop control.
Sensor Safety Cut Off
To prevent the appliance from unwanted, random sensor operation, a sensor monitoring is included.
In case of one or more buttons are pressed longer than 12 sec, the sensor monitoring routine indicates acoustically that wrong operation (pot or other object placed on the button, sensor failure, etc.) and switches off the appliance.
The safety turn off causes that the hob control is turned off to the S-Mode. An 'F' will flash in all heater displays.
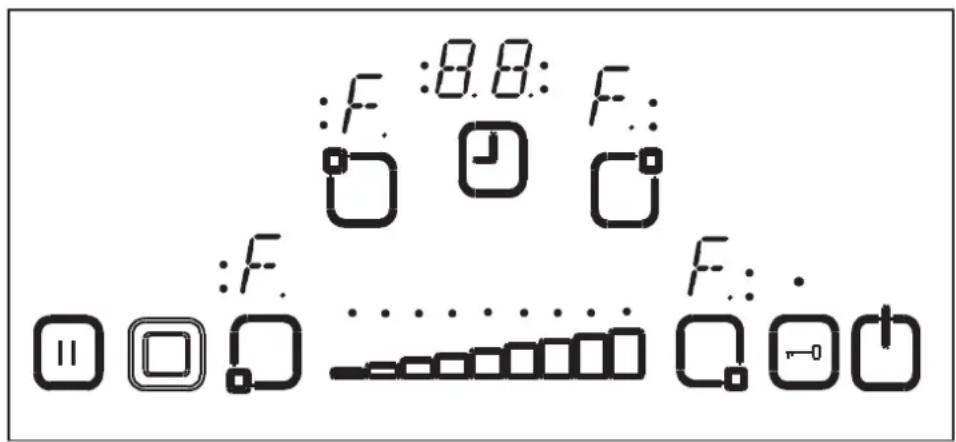
If residual heat is present, it will be displayed in all other zone displays.
The cooktop control will then go in S-Mode At the same time a buzzer signal appears. After 10 minutes the acoustic signaling will stop.
If there is no erroneous operation present any longer, both the visual and the acoustic signal will disappear.
Over Temperature Switch Off
Due to the placement of the control it is very close to the zthe middle front of the cooktop it can, occur that an inconnectly placed partly placed pot on the control and not sensed by the sensor safety cut off (not covering a button) heats up the cooktop to a very high temperature which makes the glass and the buttons untouchable.
To prevent the cooktop control unit from damage, the control continuously all the the temperature and switches off in case of overheating emergency. It is indicated in the zone 4 zone display with the letter 't' for all the time until the temperature decreases.
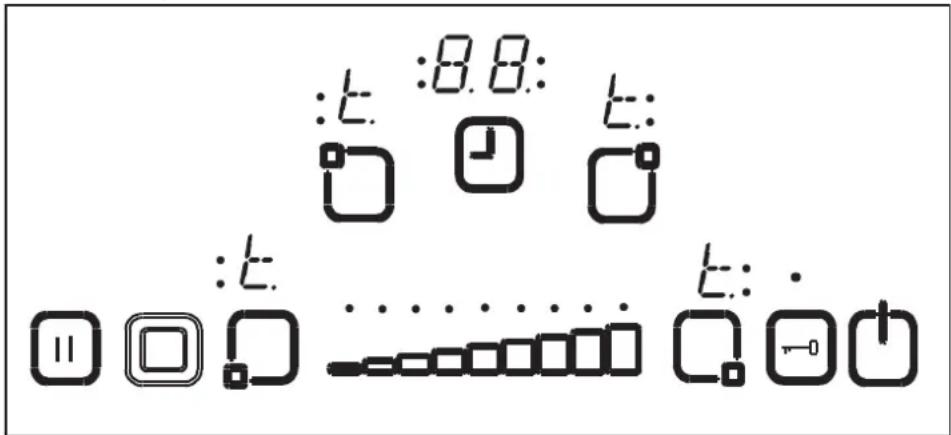
After cooktop temperature falls, the 't' displays will be erased and the cooktop control unit falls back into the S-Mode. This means that the user can reactivate the appliance by touching ⏻.
Operating Time Limitations
The hob control unit has a limitation of operating time. If the heat setting for this zone has not been changed for a certain time, than the zone will turn off automatically (for 10 sec a '0' is displayed, afterwards the residual heat). The limit of the operating time depends of the selected heat setting. If a timer was associated with the heater than a '00' will be displays on the timer display for 10 sec. Afterwards the timer display turns off.
After an automatic turn off of the zone, as described above, the zone is operable again and the maximum operating time for this heat setting is applied.
Residual Heat Functions
After all cooking processes there is some heat stored in the vitroceramic glass called residual heat. The control can calculate roughly how hot the glass is in the worst case. If the calculated temperature is higher than +60 °C, then this will be indicated in the corresponding heater display after the zone or the cooktop control was turned off. The residual heat display is shown as long as the calculated heater temperature is >+60 °C.
The display of the residual heat has the lowest priority and is overwritten by every other display value, during safety turn offs and displaying an error code.
After reapplying the supply voltage to the cooktop control after an interruption of the supply voltage occurred, this causes that the residual heat display flashes, if the corresponding zone had a residual heat of greater + 60 °C before the power interruption occurred. The display will flash until the max. residual heat time has expired or the zone will be selected and activated.
CLEANING AND CARE
Cookware with rough bottoms should not be used since these can scratch the glass ceramic surface. The bottom of the good cookwares should be as thick and flat as possible. Before use, make sure that cookware bottoms are clean and dry.
Always place the cookware on the cooking zone before it is switched on. If possible, always place the lids on the cookware. Bottom of cookwares must not be smaller or larger than the cooking zones, they should be at the proper size as indicated below, not to waste energy.
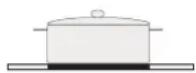
CORRECT FA
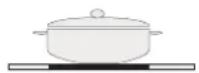
LSE FALSE FALSE
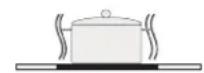

Before cleaning the cooktop, first remove the plug from the electrical supply socket. Then ensure that there is no residual heat stored in the appliance. Vitroceramic glass is very resistant to high temperature and overheating. If there is residual heat stored in the appliance, 'H' is flashing in the Zone Display. In order to avoid burns, let the appliance cool down.
Remove all split food and fat with a window scrape. Then wipe the cooktop with a suitable washing up liquid and a clean damp cloth. Rub the appliance using a clean dry cloth.
If aluminium foil or plastic items are accidentally melt on the cooktop surface, they should be immediately removed from the hot cooking area with a scraper. This will avoid any possible damage to the surface. This also applies to sugar or food containing sugar may be spilled on the hob.
In the event of other food melt on the cooktop surface, remove the dirt when the appliance has cooled down. Use cleaner for glass ceramic or stainless steel when cleaning the surface.
Do not use dishcloth or abrasive sponge to clean the vitroceramic surface. These materials may damage the surface.
Do not use chemical detergents, sprays or spot removers on the vitroceramic surface. These materials may cause fire or vitroceramic color fade. Clean with water and washing up liquid.
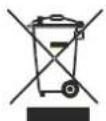
The symbol on the product or on its packaging indicates that this product may not be treated as household waste. Instead it shall be handed over to the applicable collection point for the recycling of electrical and electronic equipment. By ensuring this product is disposed of correctly, you will help prevent potential negative consequences for the environment and human health, which could otherwise be caused by inappropriate waste handling of this product. For more detailed information about recycling of this product, please contact your local city office, your household waste disposal service or the shop where you purchased the product.
INSTRUCTIONS DE FONCTIONNEMENT ET D'INSTALLATION DE LA PLAQUE VITROCÉRAMIQUE ENCASTRABLE
natural_image
Line drawing of a four-circled electrical heating element with mounting base (no text or symbols)TABLE DES MATIÈRES
DESCRIPTION DE LA PLAQUE
INSTRUCTIONS DE SÉCURITÉ
INSTALLATION
natural_image
Simple line drawing of a pot on a surface with a cloth, no text or symbols present
- DESCRIPTION OF THE HOB
- SAFETY INSTRUCTIONS
- General Safety Warnings
- During usage
- INSTALLATION
- The electrical connection of this cooktop should be carried out by an authorised service technician or a qualified electrician, according to the instructions in this guide and in compliance with the current regulations.
- Installing your built-in cooktop
- Making an electrical connection
- USAGE
- Turn On and Turn Off The Appliance
- Select Zone
- Turn on dual and triple zones (available only in some models)
- Turn on the dual zone
- Turn on triple zones
- Set Cooking Level With and Without Heat Boost
- Turn Off Individual Heaters
- Timer Function (available only in some models)
- Minute Minder
- Zone timer
- Key Lock
- Child Lock
- Sensor Safety Cut Off
- Over Temperature Switch Off
- Operating Time Limitations
- Residual Heat Functions
- CLEANING AND CARE
- INSTRUCTIONS DE FONCTIONNEMENT ET D'INSTALLATION DE LA PLAQUE VITROCÉRAMIQUE ENCASTRABLE
- TABLE DES MATIÈRES
Brand : Porter & Charles
Model : CC60V
Category : Cooker