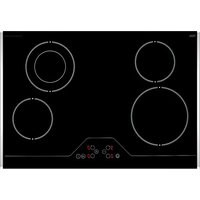
CC76V - Cooker Porter & Charles - Free user manual and instructions
Find the device manual for free CC76V Porter & Charles in PDF.


| Product type | Built-in ceramic hob |
| Brand | Porter & Charles |
| Model | CC76V |
| Dimensions (W x D x H) | 520 x 780 x 41 mm |
| Weight | Approximately 8 kg |
| Power supply | 220-240 V ~ 50/60 Hz |
| Maximum power | 7200 W |
| Rated current | 25 A |
| Control type | Touch controls |
| Number of cooking zones | 4 |
| Surface material | Ceramic glass |
| Emergency stop function | Yes |
| Child lock | Yes |
| Overheat protection | Yes |
| Residual heat indicator | Yes (shows "H") |
| Timer per zone | Yes |
| Boost function | Yes |
| Recommended cleaning | Scraper and specific ceramic glass cleaner |
| Power cable | AWG 10 / 60227 IEC 53 |
Frequently Asked Questions - CC76V Porter & Charles
User questions about CC76V Porter & Charles
0 question about this device. Answer the ones you know or ask your own.
Ask a new question about this device
Download the instructions for your Cooker in PDF format for free! Find your manual CC76V - Porter & Charles and take your electronic device back in hand. On this page are published all the documents necessary for the use of your device. CC76V by Porter & Charles.
USER MANUAL CC76V Porter & Charles
CONTENTS
- DESCRIPTION OF THE COOKTOP
- SAFETY INSTRUCTIONS
- INSTALLATION
- ELECTRICAL CONNECTION
- USAGE
- TOUCH CONTROL SAFETY FUNCTIONS
- CLEANING AND CARE
- WARRANTY&SERVICE
CONTENTS:
DESCRIPTION OF THE HOB
SAFETY WARNINGS
INSTALLATON
Locating Your Built-in Hob
Electrical Connection of Your Cooktop
USAGE
Turn On and Turn Off The Control
Select Heater
Turn on dual- and triple zones
Set Cooking Level With and Without Heat Boost
Turn Off Individual Zones
Timer Function
Key Lock
Child Lock
TOUCH CONTROL SAFETY FUNCTIONS
Sensor Safety Cut Off
Over Temperature Switch Off
Operating Time Limitations
Residual Heat Functions
CLEANING AND CARE
BEFORE USING FOR THE FIRST TIME
Read the instructions carefully before installing and using the appliance.
After unpacking the appliance, make sure it is not damaged. In case of doubt, do not use the appliance and contact your supplier or a qualified technician.
Remove all packaging and do not leave the packing material (plastic bags, polystyrene, bands etc) in easy reach of children as they may cause serious injury. The packaging materials are recyclable.
The appliance should be installed and all the electrical connections made by a qualified technician in compliance with local regulations in force and following the manufacturers instructions.
Do not attempt to modify the technical properties of the appliance, as it may become dangerous to use.
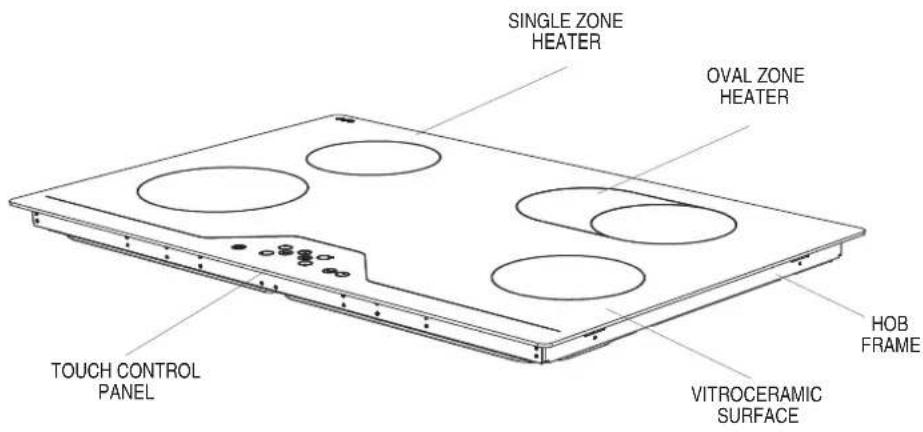
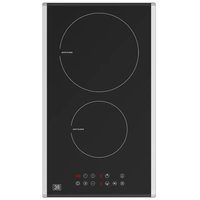
Note: Appearance of your cooktop may be different than the model shown above due to production changes.
READ THESE INSTRUCTIONS CAREFULLY AND COMPLETELY BEFORE USING YOUR APPLIANCE, AND KEEP IT IN A CONVENIENT PLACE FOR REFERENCE WHEN NECESSARY.
THIS MANUAL IS PREPARED FOR MULTIPLE SIMILARCOYOPROPLIANCE MAY NOT HAVE SOME OF THE FEATURES THAT ARE EXPLAINED IN THIS MANUAL. REFER TO THE MODEL A'S THAT HAVE FIGURES, WHILE YOU ARE READING THE OPERATING MANUAL.
General Safety Warnings
- This appliance can be used by children aged from 8 years and above and persons with reduced physical, sensory or mental capabilities or lack of experience and knowledge if they have been given supervision or instruction concerning use of the appliance in a safe way and understand the hazards involved. Children shall not play with the appliance. Cleaning and user maintenance shall not be done by children without supervision.
- WARNING: The appliance and its accessible parts become hot during use. Care should be taken to avoid touching heating elements.
Children less than 8 years of age shall be kept away unless continuously supervised.
- WARNING: Unattended cooking on a cooktop with fat or oil can be dangerous and may result in fire. NEVER try to extinguish a fire with water, but switch off the appliance and then cover flame e.g. with a lid or a fire blanket.
- WARNING: Danger of fire: do not store items on the cooking surfaces.
- WARNING: If the surface is cracked, switch off the appliance to avoid the possibility of electric shock.
- For cooktops incorporating a lid, any spillage should be removed from the lid before opening. And also the cooktop surface should be allowed to cool before closing the lid.
- The appliance is not intended to be operated by means of an external timer or separate remote-control system.
- Do not use harsh abrasive cleaners or sharp metal scrapers to clean the oven door glass and other surface since they can scratch the surface, which may result in shattering of the glass or damage to the surface.
- Do not use steam cleaners for cleaning the appliance.
- Your appliance is produced in accordance with all applicable local and international standards and regulations.
- Maintenance and repair work must be made only by authorized service technicians. Installation and repair work that is carried out by unauthorized technicians may endanger you. It is dangerous to alter or modify the specifications of the appliance in any way.
- Prior to installation, ensure that the local distribution conditions (nature of the gas and gas pressure or electricity voltage and frequency) and the requirements of the appliance are compatible. The requirements for this appliance are stated on the label.
- CAUTION: This appliance is designed only for cooking food and is intended for indoor domestic household use only and should not be used for any other purpose or in any other application, such as for non-domestic use or in a commercial environment or room heating.
- All possible security measures have been taken to ensure your safety. Since the glass may break, you should be careful while cleaning to avoid scratching. Avoid hitting or knocking on the glass with accessories.
- Ensure that the supply cord is not wedged during the installation. If the supply cord is damaged, it must be replaced by the manufacturer, its service agent or similarly qualified persons in order to prevent a hazard.
Installation Warnings
- Do not operate the appliance before it is fully installed.
- The appliance must be installed by an authorized technician and put into use. The producer is not responsible for any damage that might be caused by defective placement and installation by unauthorized people.
- When you unpack the appliance, make sure that it is not damaged during transportation. In case of any defect; do not use the appliance and contact a qualified service agent immediately. As the materials used for packaging (nylon, staplers, styrofoam...etc) may cause harmful effects to children, they should be collected and removed immediately.
- Protect your appliance against atmospheric effects. Do not expose it to effects such as sun, rain, snow etc.
- The surrounding materials of the appliance (cabinet) must be able to withstand a temperature of min 100°C.
During usage
- Do not put flammable or combustible materials, in or near the appliance when it is operating.
- Do not leave the cooktop while cooking with solid or liquid oils. They may catch fire on condition of extreme heating. Never pour water on to flames that are caused by oil. Cover the saucepan or frypan with its cover in order to choke the flame that has occurred in this case and turn the cooktop off.
- Always position pans over the centre of the cooking zone, and turn the handles to a safe position so they cannot be knocked or accidentally.
- If you will not use the appliance for a long time, switch it off at the main controls.
- Make sure the appliance control knobs are always in the "0" (stop) position when it is not used.
During cleaning and maintenance
- Always turn the appliance off at the main control before operations such as cleaning or maintenance.
TO MAINTAIN THE EFFICIENCY AND SAFETY OF YOUR APPLIANCE, WE RECOMMEND YOU ALWAYS USE ORIGINAL SPARE PARTS AND TO CALL ONLY OUR AUTHORIZED SERVICE AGENTS IN CASE OF NEED.
EURO PARTS:1800.678.8352

INSTALLATION
The electrical connection of this cooktop should be carried out by an authorised service technician or a qualified electrician, according to the instructions in this guide and in compliance with the current regulations.
- Prior to installation, ensure that the local distribution conditions and the adjustment of the appliance are compatible.
- The laws, ordinances, directives and standards in force in the country of use are to be followed (safety regulations, proper recycling in accordance with the regulations, etc.)
Installing your built-in cooktop
After removing the packaging material from the appliance and its accessories, ensure that the hob is not damaged. If you suspect any damage, do not use the appliance, contact an authorised service personal or a qualified electrician immediately.
- This built-in hob is to be inserted into a cut out in a counter. It will be electrically connected with the switch box below counter level, especially provided for this purpose.
- Cut an opening with the dimensions shown in the picture below.

| Neighborhood walls | A [mm] | B [mm] |
| Combustible | 60 | 150 |
| Non-combustible | 25 | 40 |
- Apply the one-sided self-adhesive sealing tape supplied all the way round the lower edge of the cooking surface along the outer edge of the glass ceramic panel. Do not stretch it.
- Screw the 4 worktop mounting brackets on the side walls of product.

ELECTRICAL CONNECTION
Electrical connection of your cooktop
The instructions given below must be followed without fail during wiring :
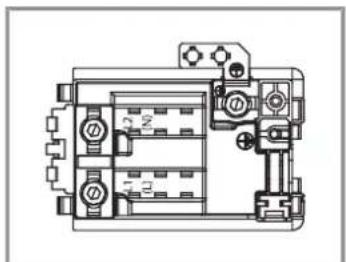
The earthing cable must be connected via the screw with the earthing mark. Supply cable connection must be as shown in Figure 1. If there is no earthed outlet conforming to regulations in the installation environment, call the Authorized Service immediately.
EURO PARTS:1800.678.8352
- The earthed outlet must be in close vicinity of the appliance. Never use an extension cord. The supply cable should not contact the product's hot surface.
- In case of any damage to the supply cable, make sure to call the Authorized Service. The cable must be replaced by the Authorized Service.
- Faulty wiring may damage the appliance. Such damage will not be covered under the warranty.
The Importer declares that it bears no responsibility whatsoever for any kind of damage and loss arising from non compliance with safety requirements!
Wiring of the appliance must be performed by an Authorized Service Technician. The appliance is designed to connect to 208-240V\~ electricity. If the mains electricity is different than the value given, call the Authorized Service immediately. The appliance is designed for fixed connection to the mains. It is necessary that you install a double pole switch between the product and the electricity supply (mains), with a minimum gap of 3 mm between the switch contacts. (32 Arated, delay function type).
The power supply cable must be positioned away from direct heat sources. It should not be subjected to a temperature rise of more than 50° C above room
temperature.
This appliance conforms with the following EU Directives:
• 2006/95/EC Low Voltage Directive
· 2004/108/EC EMC Directive
• 93/68/EEC CE Marking Directive
USAGE
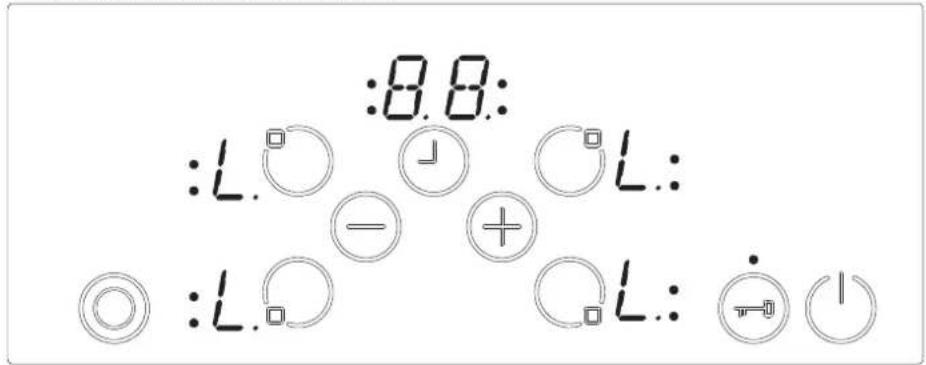
The appliance is operated by touching buttons and the functions are confirmed by displays and acoustic signals.
NOTE: See the section on COORESET if you see a flashing H in any of the displays.

| Stand-By-Mode S-Mode | The mains are applied to the cooktop control and all zone displays are off or a residual heat display is active. | |
| Operating-Mode | B-Mode | At least one zone display shows a heat setting between '0' and '9' |
| Lock Mode | VR-Mode | The controls locked. |
Mode Descriptions
Turning the appliance on / off.
If the appliance is in Stand-By-Mode, it is put in Operating-Mode by pressing the On/Off button ⏻ for at least 1 second. A beep indicates a successful operation.
On all zones a '0' appears and all Decimal Point of the zones flashes.
If there is no operation within 10 sec, the display of all heaters will turn off.
If the displays are turned off, the zones will be set to off.
If ⏻ is pressed more than 2 sec (in Operating-Mode), the appliance is switched off and is set into the off mode again. The appliance can be turned off by pressing ⏻ at any time; even if other buttons are pressed simultaneously.
If there is residual heat remaining, this will be indicated by a flashing H in the corresponding zone Display.
Select Zone
If a single zone is chosen with the corresponding Active/Deactive zone Button ☐, the Decimal Point of the related Heater Display flashes. For the selected zone, you can set the heat level between 1-9 by touching the Heat Setting Buttons ⊕ or −.
The buttons must be pressed within 3 sec, otherwise the zone selection is erased and heat setting dot will disappear (Decimal Point). If there is no further operation within 10 sec, the zone falls back into off mode.
The heat setting can always be changed by pressing or between level 1-9.
Each button operation or each display change is accompanied by a beep.
Set Cooking Level With and Without Heat Boost
All heaters are equipped with heat boost functionality.
If the heat boost is active, then the zone will be operated with maximum power for the period of the heat boost time, which is dependent on the selected heat setting. This is indicated by a flashing 'A', alternating with the heat setting value (e.g. 'A' and then '9') in the heater display. Once the heat boost time has ended, only the heat setting will be displayed.
If you want to use heat boost level 9 must be selected by pressing starting from level 0. After setting the heat to level 9, 'A' and the heat setting will be displayed alternately. This means that level 9 and heat boost is active. Continue to press the button to set a lower heat setting.
The heat boost can be turned off by pressing until heat setting '0' is selected. If the heat boost should be used, it can always be activated by actuating again if the heat setting is set to level 9. In the heat display 'A/9' flashes.
Turn Off Individual Zones
A selective heater can be turned off in two ways:
. Simultaneous operation of + and - buttons - Reduction of the heat setting to '0' by operating - button
Simultaneous operation of ⊕ and ⊖ buttons
The corresponding heater must be chosen with one of the Active/Deactive Zone Button ☐ the Decimal Point of the selected Heater Display flashes. To turn off the zone, + and - must be pressed at the same time. A beep signal sounds and '0' appears in the heat setting display.
If there is a residual heat for this zone remaining, this will be indicated by a static display 'H' in the heat setting display.
Reduction of the heat setting to '0' by operating ⏻ button
The heater can also be turned off by reducing the heat setting to '0'. When zone Display indicates '0', the Decimal Point of the selected zone will also turn off.
If there is a residual heat for this zone remaining, this will be indicated by a static display 'H' in the heat setting display.
Key Lock
Key lock functionality is for blocking and set the appliance into a save mode during operation. Touch modifications, for example increasing and others should not be possible. It is only possible to switch the heat appliance off.
To lock the current operating mode, press the Key Lock button ⬤ for at least 2 seconds. This operation is acknowledged by a beep. The Key Lock Indicator flashes and the controls are locked. The zone can only be locked in Operating Mode.
If the zone is locked, only ⏻ can be operated, all other buttons are disabled. Only the On-Off switch ⏻ will operate. If you switch off the appliance, you must switch it on again and press the lock button to unlock the appliance before you can use it.
After pressing Ⓧ 2 sec the Key, Lock Indicator disappears. Now, the cooktop control is unlocked and can be operated normally.
Child Lock
Child lock functionality is a multiple step process.
Child locking and unlocking is only available in the S-Mode. (stand by)
First ⏻ has to be pressed until the buzzer beeps, then the ⊕ and ⊖ have to be pressed for at least 0.5 sec, but max 1 sec. simultaneously. Following that, the appliance can be locked by touching the ⊕ . All 4 zone displays 'L' is shown as a confirmation.
If the minute minder is still running, it will proceed until '00' is reached and the timer will beep. After confirmation of timer run out, the appliance is fully locked. None of the buttons can be used as long as the appliance is locked.
The same way the child lock is activated, it can also be deactivated. After pressing ⏻ until the beep, then the ⊕ and ⊖ have to be pressed simultaneously for at least 0,5 sec, followed by touching only the ⊖. As a confirmation for successful unlocking, 'L' symbol in the displays will be erased immediately.

6
TOUCH CONTROL SAFETY FUNCTIONS
The following safety functions are available to avoid unintended operations of the cooktop control.
Sensor Safety Cut Off
To prevent the appliance from unwanted, random sensor operation, sensor monitoring is included.
If one or more buttons are pressed longer than 12 sec, the sensor monitoring routine indicates with a beep, that wrong operation (pot or other object placed on the button, sensor failure, etc.) and switches off the appliance.
The safety turn off causes the cooktop to turn off to standby. An 'F' will flash in all zone displays once before switching to standby.


If residual heat is present, 'H' will be displayed in the appropriate zone displays.
Over Temperature Switch Off
Due to the control panel being close to the front two zone it can get too hot to touch if the pans have been badly placed so the bottom edge of the pan is close to but not touching the control buttons.
To prevent the cooktop control unit from damage, the control monitors the temperature and switches off, if the control panel exceeds 60° C. All 4 zone displays show 't', until the cooktop cools down.



After the cooktopcools the 't' displays will be erased and the cooktop control enters standby mode. This means that the user can reactivate the appliance by touching ⏻.
Residual Heat Functions
After the cooktop is turned off when cooking is finished, there is some heat stored in the vitroceramic glass called residual heat. The cooktopcan calculate roughly how hot the glass is. If the calculated temperature is higher than +60 °C, the corresponding zone display will flash an 'H' symbol. The residual heat display is shown as long as the calculated heater temperature is higher than +60 °C.
The display of the residual heat has the lowest priority and is overwritten by every other display value such as safety turn off's and displaying error codes.
COOKTOP RESET
When the cooktop is first turned on after installation or after a power outage during operation, the cooktop will display a flashing 'H' on all or some zone displays.
Which displays flash an 'H' depends on mode of operation when the power outage happened.
This is due to the cooktop retaining zone heat information in its memory, this is not a fault and is normal.
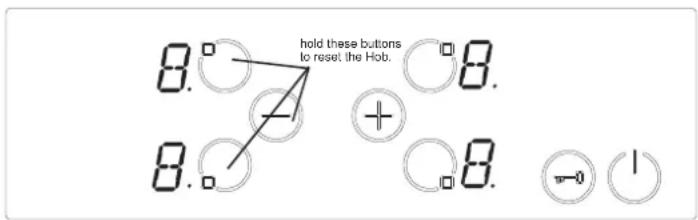
To reset the Hob, press and hold the top left zone, bottom left zone and the ⏻ buttons at the same time for roughly 2 seconds.
Turn on dual and triple zones (available only in some models)
Turn on the dual zone
The activation of the dual zone is done after selecting the desired zone by actuating Ⓞ. This is confirmed by a buzzer signal. At the same time, the corresponding Dual Zone Indicator goes on statically. Touching Ⓞ for a second time, the status of the dual zone toggles: it changes from dual zone on to dual zone off and back again.
The extension zone can be activated only, after a level between 1-9 is set on the basic zone of the heater.
Turn on triple zones
A dual or triple zone can only be switched on, if the basic zone of a heater is set to level 1–9 and the heater is selected, the dot is on.
If Ⓞ is pressed, the buzzer signal sounds and the Dual Zone Indicator is statically on. If Ⓞ is pressed once again, there is another acoustical signal and the triple zone is switched on. The Triple Zone Indicator will be illuminated and the triple zone will be energized.
After touching Ⓞ once again, the triple ring of the zone will be switched off again. Each operation causes a status change of the dual/triple zones following in this manner (Dual zone on, triple zone on, all extended zones off, dual zone on, triple zone on, dual zone on, etc. ...)
CLEANING AND CARE
Cookware with rough bottoms should not be used since these can scratch the ceramic surface. The bottom of the cookware should be as thick and flat as possible. Before use, make sure that cookware bottoms are clean and dry.
Always place the cookware on the cooking zone before it is switched on. If possible, always place the lids on the cookware. Bottom of the cookware must not be smaller or larger than the cooking zones, they should be at the proper size as indicated below.

Before cleaning the cooktop, first disconnect from the electrical supply Then ensure that there is no residual heat stored in the appliance. Vitroceramic glass is very resistant to high temperature and overheating. If there is residual heat stored in the appliance, 'H' is flashing in the zone Display. In order to avoid burns, let the appliance cool down.
CLEANING THE CERAMIC COOKTOP
Before you begin cleaning make sure that the cooktop is switched off. Remove spillages and other types of encrustations.
Dust or food particles can be removed with a damp cloth.
If you use a detergent, please make sure that it is not abrasive. Do not use abrasive cleaners or scouring powders as these can damage the ceramic surface of the cooktop.
All traces of the cleaner must be removed with a damp cloth.
Dust, fat and liquids from food that has boiled over must be removed as soon as possible.
If they are allowed to harden they become increasingly difficult to remove.
This is especially true in the case of sugar/syrup mixtures which could permanently pit the surface of the cooktop if left to burn on it. If any of these products has melted on the ceramic surface, you should remove it immediately (when the surface is still hot) by using a scraper to avoid any permanent damage to the surface of the hob (available from the store where you purchased this appliance).
Do not put articles on the cooktop which can melt: i.e. plastic, aluminium foil, sugar, sugar syrup mixtures etc.
Avoid using a knife or other sharp utensil as these may damage the ceramic surface.
Do not use steel wool or an abrasive sponge which could scratch the surface permanently.
The symbol on the product or on its packaging indicates that this product may not be treated as household waste. Instead it shall be handed over to the applicable collection point for the recycling of electrical and electronic equipment. By ensuring this product is disposed of correctly, you will help prevent potential negative consequences for the environment and human health, which could otherwise be caused by inappropriate waste handling of this product. For more detailed information about recycling of this product, please contact your local city office, your household waste disposal service or the shop where you purchased the product.

CC76V
FR
INSTRUCTIONS DE FONCTIONNEMENT ET D'INSTALLATION DE LA PLAQUE VITROCÉRAMIQUE ENCASTRABLE

TABLE DES MATIÈRES
DESCRIPTION DE LA PLAQUE
INSTRUCTIONS DE SÉCURITÉ
INSTALLATION
- CONTENTS
- BEFORE USING FOR THE FIRST TIME
- GENERAL SAFETY WARNINGS
- INSTALLATION WARNINGS
- DURING USAGE
- DURING CLEANING AND MAINTENANCE
- TO MAINTAIN THE EFFICIENCY AND SAFETY OF YOUR APPLIANCE, WE RECOMMEND YOU ALWAYS USE ORIGINAL SPARE PARTS AND TO CALL ONLY OUR AUTHORIZED SERVICE AGENTS IN CASE OF NEED
- INSTALLATION
- THE ELECTRICAL CONNECTION OF THIS COOKTOP SHOULD BE CARRIED OUT BY AN AUTHORISED SERVICE TECHNICIAN OR A QUALIFIED ELECTRICIAN, ACCORDING TO THE INSTRUCTIONS IN THIS GUIDE AND IN COMPLIANCE WITH THE CURRENT REGULATIONS
- INSTALLING YOUR BUILT-IN COOKTOP
- ELECTRICAL CONNECTION
- ELECTRICAL CONNECTION OF YOUR COOKTOP
- EURO PARTS:1800.678.8352
- USAGE
- TURNING THE APPLIANCE ON / OFF
- SELECT ZONE
- SET COOKING LEVEL WITH AND WITHOUT HEAT BOOST
- TURN OFF INDIVIDUAL ZONES
- KEY LOCK
- CHILD LOCK
- TOUCH CONTROL SAFETY FUNCTIONS
- SENSOR SAFETY CUT OFF
- OVER TEMPERATURE SWITCH OFF
- RESIDUAL HEAT FUNCTIONS
- COOKTOP RESET
- TURN ON DUAL AND TRIPLE ZONES (AVAILABLE ONLY IN SOME MODELS)
- CLEANING AND CARE
- CLEANING THE CERAMIC COOKTOP
- CC76V
- TABLE DES MATIÈRES
Brand : Porter & Charles
Model : CC76V
Category : Cooker