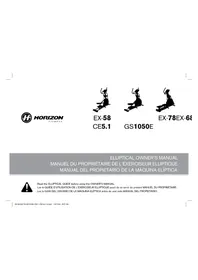
EX-78 - Elliptical Trainer Horizon Fitness - Free user manual and instructions
Find the device manual for free EX-78 Horizon Fitness in PDF.


| Product Type | Elliptical fitness machine |
| Brand | Horizon Fitness |
| Model | EX-78 |
| Maximum user weight | 136 kg (300 lb) |
| Frame warranty | Lifetime (original owner) |
| Brake warranty | Lifetime |
| Electronics and parts warranty | 2 years |
| Labor warranty | 1 year |
| Incline motor warranty | 1 year |
| Display | LED windows: time, distance, calories, heart rate, speed, resistance level, incline |
| Resistance | Adjustable in increments |
| Incline | Motorized, adjustable in 5% increments |
| Workout programs | Rolling, Mountain, Reverse Train, Custom 1, Custom 2, Goal Center |
| Audio connectivity | Audio input jack, audio output jack (headphones), MP3 compartment, speakers |
| Fan | Yes, personal |
| Heart rate monitor | Hand grips with integrated sensors |
| Pedals | With slides |
| Transport | Swivel wheels on stabilizer tube |
| Power supply | Mains, power cord included |
| Assembly | Requires assembly, instructions provided |
Frequently Asked Questions - EX-78 Horizon Fitness
User questions about EX-78 Horizon Fitness
0 question about this device. Answer the ones you know or ask your own.
Ask a new question about this device
Download the instructions for your Elliptical Trainer in PDF format for free! Find your manual EX-78 - Horizon Fitness and take your electronic device back in hand. On this page are published all the documents necessary for the use of your device. EX-78 by Horizon Fitness.
USER MANUAL EX-78 Horizon Fitness
Read the ELLIPTICAL GUIDE before using this OWNER'S MANUAL.
There are several areas during the assembly process that special attention must be paid. It is very important to follow the assembly instructions correctly and to make sure all parts are firmly tightened, if the assembly instructions are not followed correctly, the elliptical could have frame pairs that are not tightened and will seem loose and may cause imitating noises. To prevent damage to the elliptical, the assembly instructions must be reviewed and corrective actions should be taken.
Before proceeding, find your ellipsic's serial number located on the front stabilizer tube and enter it in the space provided below. Also locate the model name which is next to the serial number.
ENTER YOUR SERIAL NUMBER AND MODEL NAME IN THE BOXES BELOW:
- Refer to the SERIAL NUMBER and MODEL NAME when calling for service. - Be sure to enter both the SERIAL NUMBER and MODEL NAME on your warranty card.
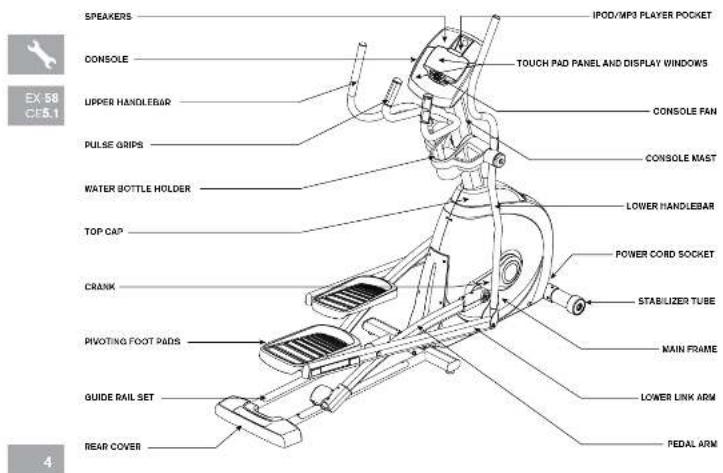

EX-58-EX-78-031050E CEE.1 CM x/ S ind 4-5 871609 807 AM
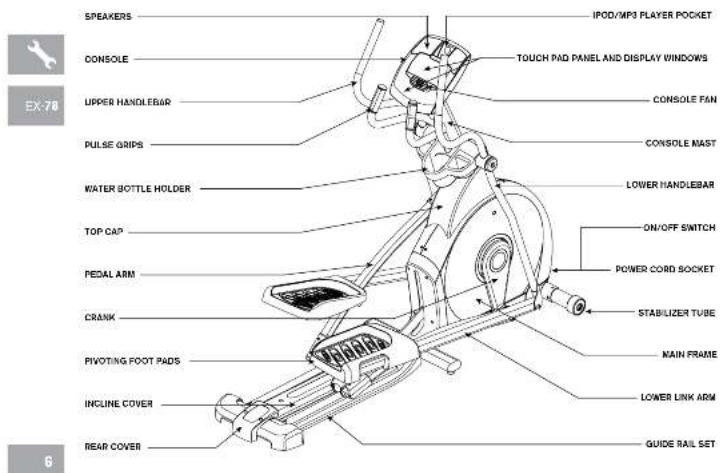
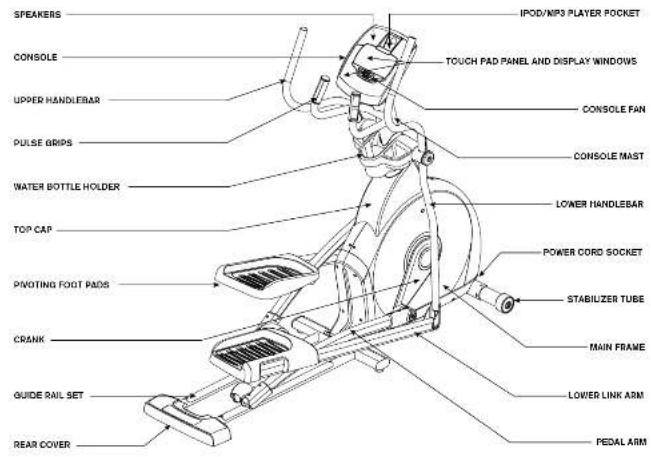
EX-58-EX-78-031050E CEE.1 CM x/ S ind 6-7 871609 Bcr AM
tools inclUDeD:
□ Screwdriver
□ a mm L-Wrench
□ 5 mm L Wrench
5 mm L-Wrench
13/15 mm Flat Wrench
PartS inclUDeD:
□ 1 Main Frame
□ 1 Stabilizer Tube
□ 1 Guide Rail Set
2 Pedal Auto
2 Lower Handlebars
2 Upper Handlebers
2 Lower Link Arms With Ecology
□ Top Can
□ Top Cap Box Cover
(EX-68, EX-78 and GS1050E only)
□ 1 Console Meet
1 Console Must Bool
1 Console
2 Handelker Caps
1. Wristel Bolin Holstein
□ 1 Post Cover/FY 20 vol
□ 1. Audio Adapter Cable
□ Alkaid A##
□ TPOWER CO
□ 2 Hardware Bags
Pre ASSEMBLY
UnPacKinG
Unpack the product where you will be using it. Place the elliptical carton on a level fat surface. It is recommended that you place a protective covering on your floor. Never open box when it is on its side.
NOTE: During each assembly stop, ensure that ALL nuts and bolts are in place and partially threaded in before completely tightening any ONE bolt.
NOTE: A light application of grease may aid in the installation of hardware. Any grease, such as lithium bike grease is recommended.

neeD Help?
If you have questions or if
there are any missing parts
contact Customer Tech
Support. Contact information
is located on the back panel
of this manual


ASSEMBLY SteP 1
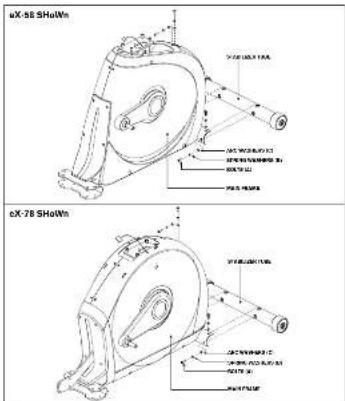
Hardware Bag 1 CONTENTS

A Open HARDWARE BAG 1.
B Attach the STABILIZER TUBE to the MAIN FRAME using 4 BOLTS (A), 4 SPRING WASHERS (B) and 4 ARC WASHERS (C).

EX-58-EX-78-031050E-CE3.1 CM-er* S and 89
ce5.1, eX-58, eX-68, GS1050e ASSEMBLY SteP 2
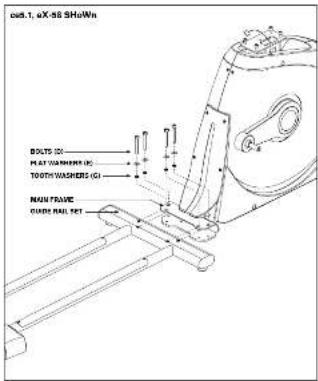
* This step is for CE5.1, EX-58, EX-68, GS1050E models only.
A Open HARDWARE BAG 2.
B Align GUIDE RAIL SET with MAIN FRAME as shown.
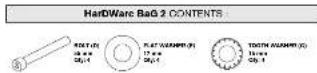
C Attach the GUIDE RAIL SET to the MAIN FRAME using 4 BOLTS (D), 4 FLAT WASHERS (E) and 4 TOOTH WASHERS (G).


21709. 407 AM

eX-78 ASSEMBLY SteP 2
Hardware Bag 2 CONTENTS (For Shape A-B)

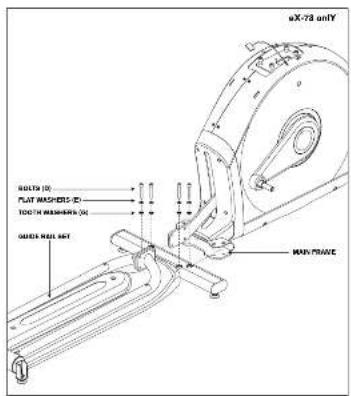
* This step is for EX-78 models only.
* CE5.1, EX-58, EX-68, GS1050E models skip to STEP 3.
A Open HARDWARE BAG 2.
B Attach the GUIDE RAIL SET to the MAIN FRAME using 4 BOLTS (D), 4 FLAT WASHERS (E) and 4 TOOTH WASHERS (G).
eX-78 ASSEMBLY SteP 2
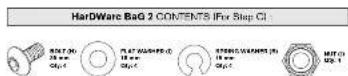
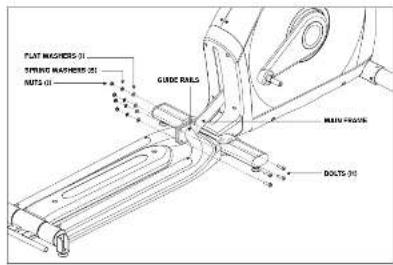
C Attach the GUIDE RAILS to the MAIN FRAME using 4 BOLTS (H), 4 FLAT WASHERS (I), 4 SPRING WASHERS (B) and 4 NUTS (J).


ASSEMBLY SteP 3
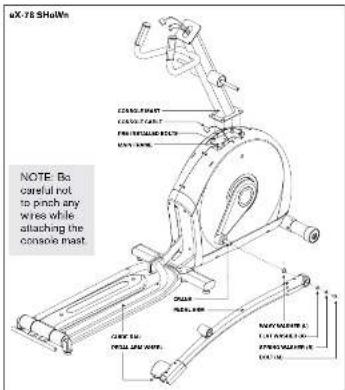
Hardware Bag 3 CONTENTS

A. Open HARDWARE BAG 3.
B Carefully pull the CONSOLE CABLE through the CONSOLE MAST using the twist tie located inside the CONSOLE MAST.
C Gently slide the CONSOLE MAST onto the MAIN FRAME and attach CONSOLE MAST to MAIN FRAME using PRE-INSTALLED BOLTS.
D Slide WAVY WASHER (L) over CRANK followed by PEDAL ARM as shown. Rest PEDAL ARM WHEEL on GUIDE RAIL.
E Attach the PEDAL ARM to the CRANK using 1 FLAT WASHER (K), 1 SPRING WASHER (B) and 1 BOLT (M).
F Repeat steps E-F on the opposite side of the elliptical.
ASSEMBLY SteP 4
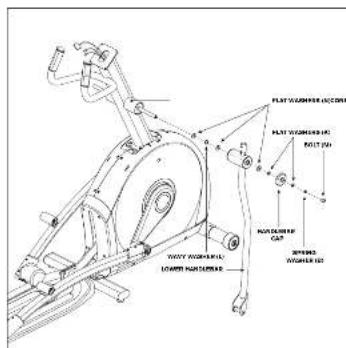
Hardware Bag 4 CONTENTS - MX-78 SHoWn
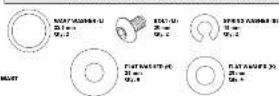
A Open HARDWARE BAG 4.
B. Silde 1 FLAT WASHER (N), 1 WAVY WASHER (L) and another FLAT WASHER (N) onto the CONSOLE MAST.
C Slide LOWER HANDLEBAR onto CONSOLE MAST and attach using 1 FLAT WASHER (N), 1 FLAT WASHER (K), 1 HANDLEBAR CAP, 1 SPRING WASHER (B) and 1 BOLT (M).
D. Repeat steps B-C on the opposite side of the elliptical.

all
MoDe15

ASSEMBLY SteP 5
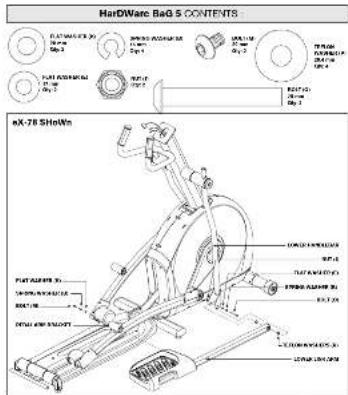
A. Open HARDWARE BAG 5.
B Slide LOWER LINK ARM onto PEDAL ARM BRACKET.
C Attach LOWER LINK ARM to PEDAL ARM using 1 FLAT WASHER (K), 1 SPRING WASHER (B) and 1 BOLT (M).
D Align opposite end of LOWER LINK ARM with bracket on bottom of LOWER HANDLEBAR.
E Place TEFLON WASHERS (P) on both sides of the LOWER LINK ARM. While holding TEFLON WASHERS (P) slide LOWER LINK ARM into bottom end of LOWER HANDLEBAR.
F Secure the joint with 1 FLAT WASHER (E), 1 SPRING WASHER (B), 1 BOLT (O) and secure with 1 NUT (J).
G Repeat steps B–F on the opposite side of the elliptical.
eX-68, eX-78 ASSEMBLY SteP 6

Hardware Bag & CONTENTS: MX-78 SHoWn
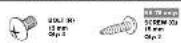
* This step is for EX-58, EX-78, GS1050E models only.
* CE5.1 and EX-58 models skip to next page.
A Open HARDWARE BAG 6.
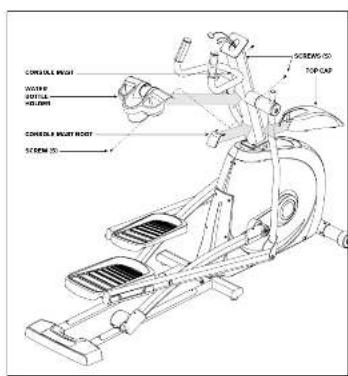
B Silde TOP CAP and TOP CAP REAR COVER over CONSOLE MAST and snap into place.
C Slide CONSOLE MAST BOOT around CONSOLE MAST and insert into TOP CAP.
D. Slide WATER BOTTLE HOLDER over CONSOLE MAST and attach using 3 BOLTS (R).
EX-78 only:
E Slide REAR CAP over REAR STABILIZER and attach using 2 SCREWS (Q).

eX-58, ce5.1 ASSEMBLY SteP 7
Hardware Bag 7 CONTENTS

* This step is for CE5.1 and EX-58 models only.
* EX-58, EX-78, GS1050E models skip to next page.
A Open HARDWARE BAG 7.
B Silde TOP CAP over CONSOLE MAST and snap into place.
C Insert CONSOLE MAST BOOT over TOP CAP and snap into place.
D. Slide WATER BOTTLE HOLDER over CONSOLE MAST and attach using 3 SCREWS (S).
ASSEMBLY SteP 8
Hardware Bag 8 CONTENTS: p5.1, eX-58 Show


A Open HARDWARE BAG 8.
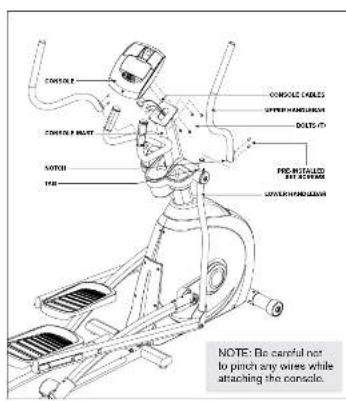
B Attach the conSole cableS to the conSole.
C Carefully tuck the conSole caBleS into the conSole MaSt before attaching the conSole. Attach conSole to conSole MaSt using 4 BoltS (t).
D Slide UPPer HanDleBarS onto IoWer HanDleBarS and align notch with taB making sure handlebars are joined together completely. Secure UPPer HanDleBarS to IoWer HanDleBarS using Pre-attachHeD Set ScreWS.
E Repeat step D on other side.
YOU ARE FINISHED!
This section explains how to use your alloptical's console and programming.
THE BASIC OPERATION section in the ELLIPTICAL GUIDE has instructions for the following
- location of the elliptical
• PaWer/GroUnDinG inSrUctions - Foot Positioning
- Moving The eIIPTical
• leVelinG the elliptical
• Power/Manual incline operation
• USING the Heart rate Function

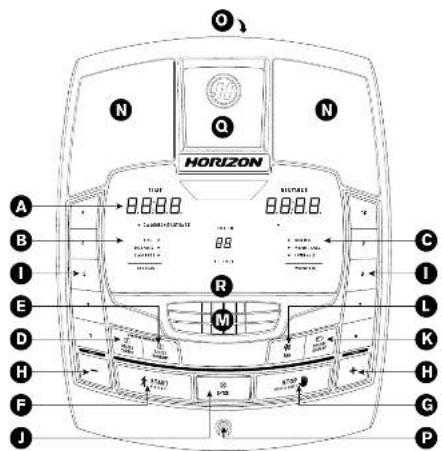
EX-58 EX-78-031050E CEE.1 CM or S ind 20-21
eX-58, ce5.1 conSole oPeration
Note: There is a thin protective sheet of clear plastic on the overlay of the console that should be removed before use.
a) IcD DISPlaY WinDoWS: time, distance, calories, heart rate, speed and resistance level.
B) tarGet led inDicator5: indicate what target (if any) is set for the current program.
c) WorkOut leD InDicator5: indicate what workout (if any) is set for the current program.
D) Select tarGet: press to select your desired target.
e) Select WorkOut: press to select your desired workout.
F) Start: press to begin exercising, start your workout, or resume exercising after pause.
G) StoP: press to pause/end your workout. Hold for 3 seconds to reset the console.
H) + / - KeYS: used to adjust resistance level.
i) qUicK KeYS: used to reach desired resistance level more quickly.
J) enter: used to confirm a selection.
K) cChange DISPLAY: press to change display feedback during workout.
i) Fan KeY: press to turn fan on and off.
M) Fan: personal workout fan.
n) SPeaKerS: music plays through speakers when your CD / MP3 player is connected to the console.
o) aUDio in Jack: plug your CD / MP3 player into the console using the included audio adaptor cable.
P) aUDIO out / HeaDPhone Jack: plug your headphones into this jack to listen to your music through the headphones
Note: when headphones are plugged into the headphone jack the sound will no longer come out through the speakers.
q) MP3 Player Pocket: used to store your MP3 player.
r) reading rack: holds reading material

21:09. 8 p.m

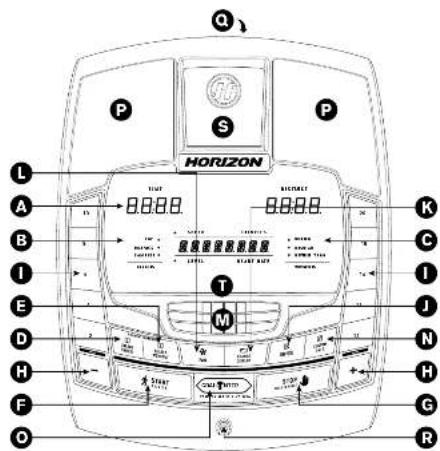
EX-58 EX-78-031050E CEE.1 CM-er 5 ind 22-23
eX-68, GS1050e conSole oPeration
Note: There is a thin protective sheet of clear plastic on the overlay of the console that should be removed before use.
a) IcD DISPlaY WinDoWS: time, distance, calories, heart rate, speed and resistance level.
B) tarGet led inDicator5: indicate what target (if any) is set for the current program.
c) WorkOut leD InDicator5: indicate what workout (if any) is set for the current program.
D) Select tarGet: press to select your desired target.
e) Select WorkOut: press to select your desired workout.
F) Start: press to begin exercising, start your workout, or resume exercising after pause.
G) StoP: press to pause/end your workout. Hold for 3 seconds to reset the console.
H) + / - KeYS: used to adjust resistance level.
i) qUicK KeYS: used to reach desired resistance level more quickly.
J) enter: used to confirm a selection.
K) cChange DISPLAY: press to change display feedback during workout.
i) Fan KeY: press to turn fan on and off.
M) Fan: personal workout fan.
n) cUSToM 1 & 2 Key: press to select custom 1 or custom 2 program.
o) Goal center: press to set or view your goal.
P) SPcaKerS: music plays through speakers when your CD / MP8 player is connected to the console.
g) aAudio In Jack: plug your CD / MP3 players into the console using the included audio adaptor cable.
r) aUDio oUt / HeaDPhone JacK: plug your headphones into this jack to listen to your music through the headphones.
Note: when headphones are plugged into the headphone jack the sound will no longer come out through the speakers.
S) MP3 Player Pocket: used to store your MP3 player.
1) reaDinG racK: holds reading material.

21:09. 8 p.m

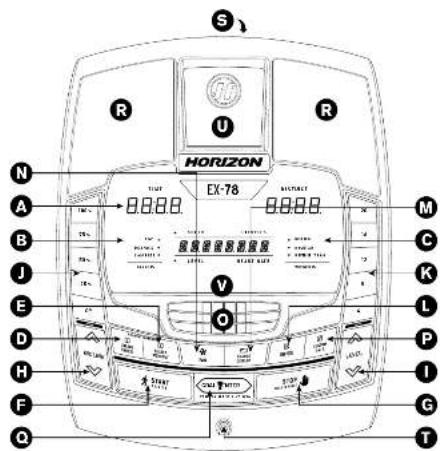
EX-58 EX-78-031050E CE3.1 CM x/ S ind 24-25
eX-78 conSole oPeration
Note: There is a thin protective sheet of clear plastic on the overlay of the console that should be removed before use.
a) Icd DISPLAY WinDoWS: time, distance, calories, heart rate, speed, resistance level and incline level.
B) tarGet led inDicator5: indicate what target (if any) is set for the current program.
c) WorkOut leD InDicator5: indicate what workout (if any) is set for the current program.
D) Select tarGet: press to select your desired target.
e) Select WorkOut: press to select your desired workout.
F) Start: press to begin exercising, start your workout, or resume exercising after pause.
G) StoP: press to pause/end your workout. Hold for 3 seconds to reset the console.
H) Incline ▲/▼KeYS: used to adjust incline in small increments (5% increments).
i) leVel ▲ / KeYS: used to adjust resistance level in small increments.
J) Incline quick KeYS: used to reach desired incline more quickly
K) reS1Stance qUlcK KeYS: used to reach desired resistance level more quickly.
i) enter: used to confirm a selection.
M) cHanGe DISPLAY: press to change display feedback during workout.
n) Fan KeY: press to turn fan on and off.
o) Fan: personal workout fan.
P) cUSToM 1 & 2 Key: press to select custom 1 or custom 2 program.
q) Goal center: press to set or view your goal.
r) SPeakerS: music plays through speakers when your CD / MP3 player is connected to the console.
S) aUDio in JacK: plug your CD / MP3 player into the console using the included audio adaptor cable.
t) aUDIo oUt / HeaDPhone Jack: plug your headphones into this jack to listen to your music through the headphones.
Note: when headphones are plugged into the headphone jack the sound will no longer come out through the speakers.
U) MP3 Player Pocket: used to store your MPS player.
V) readInG rack: holds reading material.

21:09. 8 p.m

DiSPlaY WinDoWS
• TIME: Shown as minutes : seconds. View the time remaining or the time elapsed in your workout.
- Distance: Shown as miles. Indicates distance traveled or distance remaining during your workout.
- SPeeD: Shown as MPH. Indicates how last the foot pedals are moving.
• calories: Total calories burned or calories remaining left to burn during your workout.
- Heart rate: Shown as BPM (beals per minute). Used to monitor your heart rate (displayed when contact is made with both pulse grips).
• level: Shows the current level of resistance.
- incline (eX-78 only): Shown as percent. Indicates the incline level of the power ramp. Will be displayed in the alphanumeric window.
- tarGets:
LED lights up next to currently selected target, if no LED is it, no target is activated.
- WorkoUs:
LED lights up next to currently selected workout.
If no LED is it, no workout is activated.
EX 58, CE6.1 DISPlaYS
| 18:32 | DISTANCE TIME | |
| CALIFORNIA/WEET RATE | SPEED | 2.04 |
| TIME # | 6.3 | MILLING |
| DIMENSIONS | WHIP CREAM LIME | |
| CALIFORNIA | LEVEL | # INTENDED |
| TARGETS | PREENDS | |
EX 68, EX 78, GS1050E DISPLAYS
| 18:32 | DISTANCE TIME | ||
| CALYORISCAPNATE RATE | 2.04 | ||
| TIME (°C) | SPEED | CALORIES | |
| 63 | 74 | ROLLING | |
| TORTLES | LEVEL | BEAST RACE | MOUNTING |
| STAFFIC TOLER | |||
| MINIMUM | |||
Getting Started
1) Check to make sure no objects are nearby that will hinder the movement of the elliptical.
2) Plug in the power cord and turn the elliptical ON. (Switch is located at the bottom front of the elliptical.) NOTE: Some ellipticals may not have a power switch and will turn on when power is supplied.
a) quick Start UP
Simply press the START key to begin working out. The time will count up from 0:00, the resistance level will default to level 1. EX-78 only: incline will default to OK, OR...
B) Select User (eX-68, eX-78, GS1050e only)
Select USER 1, USER 2 or GUEST using the + / - keys and press ENTER.
c) Select a tarGet and WorkOut
1) Select a TARGET using the SELECT TARGET key.
2) Adjust the TARGET settings using the ARROW keys.
3) Press ENTER to advance.
4) Select a WORKOUT using the SELECT
WORKOUT key
5) Press START to begin workout.
NOTE: If no TARGET nor WORKOUT is selected, the program will function as a MANUAL program. All changes in resistance level or incline will need to be from the user in this setting.
eX-68, eX-78, GS1050e only:
cHanGinG YoUr tarGet MiD-WorKoUt
You can change your Target "on-the-fly" without losing your current workout state.
Anytime during your workout, press the SELECT TARGET key until you have selected the new TARGET you would like.
Use the ▲/▼or + / - keys to enter in the value of your new TARGET. All previous workout statistics will be rolled into the new TARGET, so you'll never miss a beat.
NOTE: If you accidentally press the SELECT TARGET key during a workout, if no buttons are pressed after 5 seconds, the current target will resume.
eX-68, eX-78, GS1050e only:
cHanGinG YoUr WorKoUt MiD-WorKoUt
You can change your Workout "on-the-fly"
Anytime during your workout, press the SELECT WORKOUT key until you have selected the new WORKOUT you would like. Press ENTER.
New WORKOUT will begin at the first segment after warm up and all workout statistics will roll over.
NOTE: If you accidentally press the SELECT WORKOUT button during a workout, if no buttons are pressed after 5 seconds the current program will resume.

ProGraM inFormation
tarGet 1 - tIME: Allows user to set a target based on how long they would like to workout. Time targets can range from 15:00 - 99:00(EX-68, EX-78, GS1050E) or 5:00 - 99:00(EX-58, CE6.1). TIME will count down. DISTANCE and CALORIES will count up from zero.
tarGet 2 - DISTANCE: Allows user to set a target based on distance they would like to complete. Distance target can range from 0.25 - 26.25 miles. DISTANCE will count down. TIME and CALORIES will count up from zero.
target 3 - calories: Allows user to set a target based on the number of calories they would like to burn. Calories target can range from 20 - 980 calories. CALORIES will count down. TIME and DISTANCE will count up from zero.
no target: Allows user to select a workout profile that has no specified time, distance, or calorie target. TIME, DISTANCE, and CALORIES will all count up from zero.
eX-58/ce5.1 only:
WorKoUt 1 - rollingG: Resistance program. Mimica the feeling of moving up and down hills by gradually increasing and decreasing the resistance.
WorKoUt 2 - Weight IoSS: Promoles weight loss by increasing and decreasing the resistance, while keeping you in your fat burning zone.
WorKoUt 3 - InterVals: Improves your strength, speed and endurance by increasing and decreasing the resistance throughout your workout to involve your heart and other muscles.
eX-68, eX-78, GS1050e only:
WorKoUt 1 - rollingG: Resistance program. Mimics the feeling of moving up and down hills by gradually increasing and decreasing the resistance.
WorKoUt 2 - MoUntain: Resistance and incline program (only EX-78 has incline). Mimics the feeling of moving up and down mountains by increasing and decreasing the resistance and incline (only EX-78 has incline).
WorKoUt 3 - reVerSe train: Resistance program. Cuss you to pedal forward and backwards for an exciting and challenging workout.
USinG cUStoM ProGramS (eX-68, eX-78, GS1050e only)
1) Use ▲ + / - keys to select USER 1, USER 2 or GUEST. Press ENTER to confirm.
2) Press the CUSTOM 1 and 2 key to select a custom program. Press ENTER to confirm
3) Press SELECT TARGET to select time, distance, or calories goal. The LED will light up next to the target selected. Press ENTER to select desired target. A new target must be selected each time a custom program is selected.
4) Set each resistance profile by using the ▲/▼r + / - keys and press ENTER. Repeat for all 15 resistance profiles.
5) EX-78 only: Set each incline profile by using the ▲ / ▼or + / - keys and press ENTER. Repeat for all 15 incline profiles.
6) Press START to begin.


Goal center™
(eX-68, eX-78, GS1050e only)
Research shows that those who create and track their fitness goals, on average, achieve greater success than those who do not. Because your new elliptical is equipped with Horizon's exclusive GOAL CENTER® Performance Tracker, you've taken an important step towards achieving your fitness goals. GOAL CENTER® is innovative new software, integrated into your elliptical console, that will allow you to track your fitness goals over time, without the need for paper journals or logs. Read further to learn about how GOAL CENTER® can help motivate you to enhance your performance.
Goal center™ Setup
1) Select USER 1 or USER 2 using the ▲/▼or + / - keys.
2) Press and hold GOAL CENTER "for approximately five seconds.
3) Press SELECT TARGET key to select time, distance or calorie goal.
4) Use ▲/▼or + / - keys to select goal value and press ENTER.
5) Use the ▲ /▼ or + / - keys to select the NUMBER OF DAYS to complete the goal.
6) Press ENTER again to exit the setup mode.
NOTE: These steps can also be used to erase an existing goal and set a new one.
VieWinG Goal ProGreSS
When logged into your user profile, you can view progress toward your goal by pressing the GOAL CENTER™ key. The console will scroll the remaining time, distance or calories, depending on the goal selected and will also scroll the time remaining to achieve that goal.
note: For workout data to accumulate towards a user's goal, you MUST first select that user before beginning a workout.
to reSet tHe conSole
Hold STOP key for 3 seconds.
FiniSHinG YoUr WorKoUt
When your workout is complete, the monitor display will flash "FINISHED" and beep. Your workout information will stay displayed on the console for 30-45 seconds and then reset.
clear cUrrrent Selection
To clear the current program selection or screen, hold the STOP button for 3-5 seconds.
USinG YoUr cD / MP3 PlaYer
1) Connect the included AUDIO ADAPTOR CABLE to the AUDIO IN JACK on the top right of the console and the headphone jack on your CD / MP3 player.
2) Use your CD / MP3 player buttons to adjust song settings.
3) Remove the AUDIO ADAPTOR CABLE when not in use.
4) If you don't want to use the SPEAKERS, you can plug your headphones into the AUDIO OUT JACK at the bottom of the console.
LIMITED HOME-USE WARRANTY

WEIGHT CAPACITY
EX-58/CE5.1 = 275 lbs (125 kilograms).
EX·68/EX·78/GS1050E = 300 lbs (136 kilograms).
FRAME • LIFETIME
Horizon Fitness warrants the frame against defects in workmanship and materials for the lifetime of the original owner, so long as the device remains in the possession of the original owner. (The frame is defined as the welded metal base of the unit and does not include any parts that can be removed.)
Horizon Fitness warrants the brake against defects in workmanship and materials for the period specified above from the date of original purchase, so long as the device remains in the possession of the original owner.
ELECTRONICS & PARTS • 1 YEAR (EX-78: 2 YEARS)
Horizon Fitness warrants the electronic components, finish and all original parts for the period specified above from the date of original purchase, so long as the device remains in the possession of the original owner.
LABOR·1 YEAR
Horizon Fitness shall cover the labor cost for the repair of the device for a period of one year from the date of the original purchase, so long as the device remains in the possession of the original owner.
EX-78 ONLY: INCLINE MOTOR • 1 YEAR
Horizon Fitness warrants the incline motor against defects in workmanship and materials for a period of one year from the date of original purchase, so long as the device remains in the possession of the original owner.
EXCLUSIONS AND LIMITATIONS
Who IS covered:
• The original owner and is not transferable.
What IS covered:
- Repair or replacement of a defective motor, electronic component, or defective part and is the sole remedy of the warranty.
What IS NOT covered:
- Normal wear and tear, improper assembly or maintenance, or installation of parts or accessories not originally intended or compatible with the equipment as sold.
- Damage or failure due to accident, abuse, corrosion, discoloration of pant or plastic, neglect, theft, vandalism, fire, flood, wind, lightning. Freezing or other natural disasters of any kind, power reduction, fluctuation or failure from whatever cause. unusual atmospheric conditions, collision, introduction of foreign objects into the covered unit, or modifications that are unauthorized or not recommended by Horizon Fitness.
- Incidental or consequential damages. Horizon Fitness is not responsible or liable for indirect, special or consequential damages, economic loss, loss of property, or profits, loss of enjoyment or use, or other consequential damages of whatever nature in connection with the purchase, use, repair or maintenance of the equipment.
• Equipment used for commercial purposes or any use other than a single family or Household, unless endorsed by Horizon Fitness for coverage.
• Equipment owned or operated outside the US and Canada.
• Delivery, assembly, installation, setup for original or replacement units or labor or other costs associated with removal or replacement of the covered unit.
• Any attempt to repair this equipment creates a risk of injury. Horizon Fitness is not responsible or liable for any damage, loss or liability arising from any personal injury incurred during the course of, or as a result of any repair or attempted repair of your fitness equipment by other than an authorized service technician. All repairs attempted by you on your fitness equipment are undertaken AT YOUR OWN RISK and Horizon Fitness shall have no liability for any injury to the person or properly arising from such repairs.
SERVICE/RETURNS
- In-home service is available within 150 miles of the nearest authorized repair center (Milesge beyond 150 miles from an authorized service center is the responsibility of the consumer).
- All returns must be pre-authorized by Horizon Fitness.
- Horizon Fitness' obligation under this warranty is limited to replacing or repairing, at Horizon Fitness' option, the same or comparable model at one of its authorized service centers.
- A Horizon Fitness authorized service center must receive all equipment for which a warranty claim is made. This equipment must be received with all freight and other transportation charges prepaid, accompanied by sufficient proof of purchase.
- Replacement units, parts and electronic components reconditioned to as-new condition by Horizon Fitness or its vendors may sometimes be supplied as warranty replacement and constitute fulfillment of warranty terms.
- This warranty gives you specific legal rights, and your rights may vary from state to state.

FRANÇAIS
EX-58 EX-78 031050E CE3.1 CM-er* S indu 96-37 8/1700 8:07 AM
ASSEMBLAGE

aVertiSSeMent
EX-58 EX-78 031050E CE3.1 CM-er* S indu 42-41 8/17/00 8:07 AM
oUtils inclUS :
(EX-68, EX-78, GS1050E uniquement)
EX-58-EX-78-031050E CEE.1 CM x/ S indu 54-55
EX-58-EX-18-031050E-CE3.1-CM-xr*5 indd 56-57
EX-58-EX-78-031050E CEE.1 CM x/ S indu 58-59
E) Select Workout (CHOA DES EXERCISES): A copy of the Lasso book in a past edition, which is not to be used. F) Chat (REDADESA): A copy of the book in a past edition, which is not to be used.
faltan cieze, patnoss on
In this case, the
EX-58-EX-18-031050E-CE3.1-CM-er* 5 indd 92-21
FUncionaMiento De la conSola en IoS MoDeloS eX-68, GS1050e
EX-58 EX-78-031050E CE3.1 CM-er S indu 92-23
EX·68/EX·78/GS1050E = 300 lb (136 kg)
BASTIDOR • DE POR VIDA
if you have any problems during assembly or if parts are missing.
For fast and friendly service, please contact one of our trained customer technicians via phone, email or our website.
We want to know if you have a problem and we want to have an opportunity to correct it for you. NOTE: Please read the TROUBLESHOOTING section in the ELLIPTICAL GUIDE before contacting Customer Tech Support. Additional product information is available on our website.

comments@horizonfitness.com
www.horizonfitness.com
Horizon Fitness
1600 Landmark Drive,
Cottage Grove WI, 53527
EX-58, EX-68, EX-78, GS1050E, CE5.1 Rev. 1.4 | © 2009 Horizon Fitness
- TOOLS INCLUDED
- PARTS INCLUDED
- PRE ASSEMBLY
- UNPACKING
- NEED HELP
- EX-58, CE5.1 CONSOLE OPERATION
- EX-68, GS1050E CONSOLE OPERATION
- EX-78 CONSOLE OPERATION
- DISPLAY WINDOWS
- GETTING STARTED
- QUICK START UP
- SELECT USER (EX-68, EX-78, GS1050E ONLY)
- SELECT A TARGET AND WORKOUT
- EX-68, EX-78, GS1050E ONLY
- CHANGING YOUR TARGET MID-WORKOUT
- CHANGING YOUR WORKOUT MID-WORKOUT
- PROGRAM INFORMATION
- EX-58/CE5.1 ONLY
- USING CUSTOM PROGRAMS (EX-68, EX-78, GS1050E ONLY)
- GOAL CENTER™
- (EX-68, EX-78, GS1050E ONLY)
- GOAL CENTER™ SETUP
- VIEWING GOAL PROGRESS
- TO RESET THE CONSOLE
- HOLD STOP KEY FOR 3 SECONDS
- FINISHING YOUR WORKOUT
- CLEAR CURRRENT SELECTION
- USING YOUR CD / MP3 PLAYER
- WEIGHT CAPACITY
- FRAME • LIFETIME
- ELECTRONICS & PARTS • 1 YEAR (EX-78: 2 YEARS)
- LABOR·1 YEAR
- EX-78 ONLY: INCLINE MOTOR • 1 YEAR
- EXCLUSIONS AND LIMITATIONS
- SERVICE/RETURNS
- FRANÇAIS
- ASSEMBLAGE
- AVERTISSEMENT
- OUTILS INCLUS
- FUNCIONAMIENTO DE LA CONSOLA EN IOS MODELOS EX-68, GS1050E
- EX·68/EX·78/GS1050E = 300 LB (136 KG)
- BASTIDOR • DE POR VIDA
Brand : Horizon Fitness
Model : EX-78
Category : Elliptical Trainer