Elite E9 - Elliptical bike Horizon Fitness - Free user manual and instructions
Find the device manual for free Elite E9 Horizon Fitness in PDF.


| Product type | Elliptical |
| Brand | Horizon Fitness |
| Model | Elite E9 |
| Power supply | Mains (220-240 V, power cable included) |
| Display | Color touchscreen (LCD display) |
| Connectivity | Built-in Wi-Fi, Passport connection |
| Workout programs | Manual, Distance, Calories, Intervals (speed, peaks, endurance), Performance, Pace, Custom (2 profiles), Virtual Active (HD videos) |
| Adjustments | Incline (0–20%) and resistance (levels 1–20) with keys + touch keypad |
| Heart rate monitor | Heart rate grip sensors (BPM display) |
| Fan | Built-in personal fan (low, medium, high) |
| Speakers | Built-in speakers for audio playback |
| Audio jack | Audio input (3.5 mm jack) and headphone output |
| USB port | USB port for software update and device charging (max 1 A) |
| Device holder | Phone/media player compartment and reading stand |
| Maximum user weight | 150 kg (estimate) |
| Leveling | Adjustable leveling feet |
| Energy saving mode | Sleep mode after 15 minutes of inactivity (enable/disable) |
Frequently Asked Questions - Elite E9 Horizon Fitness
User questions about Elite E9 Horizon Fitness
0 question about this device. Answer the ones you know or ask your own.
Ask a new question about this device
Download the instructions for your Elliptical bike in PDF format for free! Find your manual Elite E9 - Horizon Fitness and take your electronic device back in hand. On this page are published all the documents necessary for the use of your device. Elite E9 by Horizon Fitness.
USER MANUAL Elite E9 Horizon Fitness
ELITE E7
E9

OPERATION GUIDE
GUIDE D'UTILISATION
H2'4_03_Eliv_Er_E9_Rer_Audl 23.715'14 250PM
This section explains how to use your elliptical's console and programming.
The BASIC OPERATION section in the ELLIPTICAL GUIDE has instructions for the following.
• LOCATION OF THE ELLIPTICAL
• POWER/GROUNDING INSTRUCTIONS
- FOOT POSITIONING
• MOVING THE ELLIPTICAL
• LEVELING THE ELLIPTICAL
• POWER/MANUAL INCLINE OPERATION
• USING THE HEART RATE FUNCTION


H2'4_03_EliE7_E9_RoF_4_kml =5
Note: There is a thin protective sheet of clear plastic on the overlay of the console that should be removed before use.
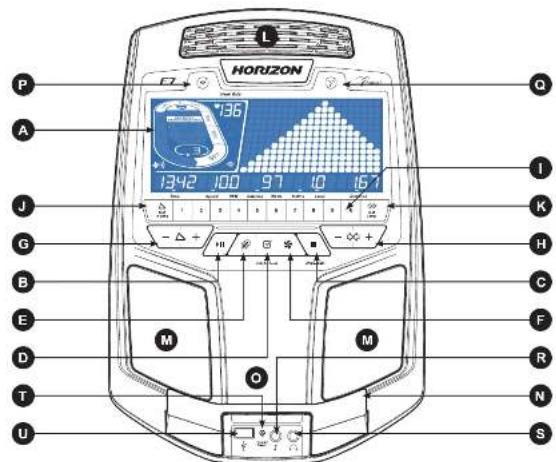
A) LCD DISPLAY WINDOW: time, distance, speed, calories, incline. RPM, Watts, level, laps, and heart rate.
B) START/PAUSE KEY): press to start workout and pause workout.
C) ■TOP KEY): press to stop workout. Hold to reset console.
D) ENTER KEY): press to confirm selection during programming setup. Hold to reset console.
E) CHANGE DISPLAY): press to change display feedback during workout.
E) (AN KEY): press to turn tan on and off
G) INCLINE √-△-KEYS: press to adjust incline level
H) RESISTANCE -∞ + KEYS: press to adjust resistance level
II QUICK ADJUST KEYPAD: quickly access any incline or resistance level by typing the number and pressing SET
INCLINE (J) or SET LEVEL (K) keys. Examples:
• To change the incline to 40%, press 4-0-SET INCLINE
• To change the resistance level to 12, press T-2-SET LEVEL.
J) SET INCLINE KEY: press to change incline to level entered into keypad.
K) SET LEVEL KEY: press to change resistance to level entered into keypad.
L) FAN: personal workout fan.
M) SPEAKERS: plays music through speakers when connected to your media player.
N) READING RACK: holds reading material.
O) PHONE/MEDIA PLAYER POCKET: holds phone or media player.
P) WIFI CONNECT & SYNC: press to reset and connect your wireless internet connection. See Page 8 for more info
Q) PASSPORT CONNECT & SYNC: press to reset and connect your Passport box for Virtual Active programming
R) AUDIO IN JACK: plug your media player into the console using the included audio adaptor cable.
S) AUDIO OUT/HEADPHONE JACK: plug your headphones into the console to use them instead of the console speakers.
T) ENERGY SAVER LIGHT: indicates if machine is in Energy Saver mode.
U) USB PORT: used for software updates or to charge devices less than 1 amp

271814 250 PM

H2'4_00_Ele_Er_E9_Rer'4.mll 8:7:15'14 250 FM
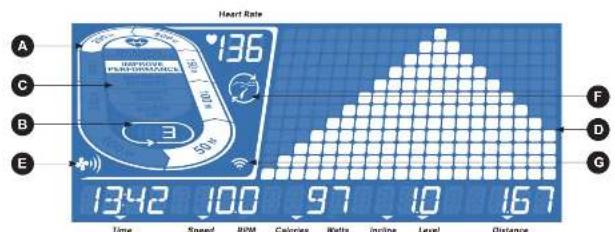
E7 DISPLAY WINDOW
• TIME: Shown as minutes : seconds. View the time remaining or the time elapsed in your workout.
- SPEED: Shown as MPH. Indicates how fast the foot pads is moving.
• CALORIES: Total calories burned or remaining for your workout.
• DISTANCE: Shown as miles. Indicates distance traveled or distance remaining during your workout.
• RPM: Rotations Per Minute
• WATTS: Displays current user power output.
• INCLINE: Shown as percent.
• LEVEL: Shows the current level of resistance.
- HEART RATE: Shown as BPM (beats per minute). Used to monitor your heart rate (displayed when contact is made with both pulse grips)
A) TRACK: Follows progress around a simulated track. Segments light up with every 50 meters completed.
B) LAPS: Shows how many laps have been completed. One lap is 400 meters (1/4 mile).
C) HEART RATE ZONE: Displays what activity zone you are in during your workout (displayed when contact is made with both
pulse grips of when using a wireless heart rate scrap +WARM UP: 0.80% of maximum heart rate
- WEIGHT LOSS: 60-70% of maximum hea
• IMPROVE FITNESS: 70-60% of maximum heart rate
• IMPROVE PERFORMANCE: 80-90% of maximum heart rate
• MAXIMUM PERFORMANCE: 90-100% of maximum heart rate
D) PROGRAM PROFILE: Represents the profile of the program being used (resistance during resistance based programs and
In line during math. Based programs,
E) FAN: Indicates fan setting [low, medium, high]
F) PASSPORT. Indicates Passport box connection is present.
G) WI-FI: Indicates wireless connection is present and the strength (low, medium, high).


SET UP XID ACCOUNT FOR VIA FIT" CONNECTIVITY
Creating an xID account will allow you to save and share workout data using the Via Fit WI-FI. Up to four users can be saved on a machine. This process is the first step in connecting your equipment. It must be done from a computer, tablet, or mobile device.
1) Visit the web site: www.ViaFitness.com
2) Once at the web site, select the CONNECT YOUR EQUIPMENT option on the top menu bar.
3) The first step in connecting your equipment will be creating your xID account. This will be your login to Via Fit.
4) Enter your phone number or another easy-to-remember 10-14 digit number. This will be your account number.
5) Fill in your profile information to finish the xID account set up process. You will be asked to provide an email address not associated with any other xID account. Check your email after the set-up process for a link to validate your account.
CONNECT WI-FI
Once you have created your xID account, you will be able to move on to activating the Wi-Fi on your equipment. Reminder, this requires you to use your computer, tablet, or mobile device that is connected to the internet.
1) Press and hold 3-5 seconds until you see the message ACTIVATED on your screen.
2) On your computer or other device, go to your Wi-Fi settings. You should select the network with your model name. Doing this enables you to connect your equipment to your wireless network.
3) A new window will pop up with the list of wireless networks your equipment can see. Select your home Wi-Fi network and connect.
4) The remaining step is to reconnect your computer or other device back to your Wi-Fi network. Go to your settings again and connect as you normally would.
Congratulations! You are now connected and ready to get started.
8
H2'4_00_Ele_Er_E9_Rer'4.mbl 8.9x15'14 250PM
E7 GETTING STARTED
1) Check to make sure no objects are nearby that will hinder the movement of the elliptical.
2) Plug in the power cord.
3) Select your xID account, User, Guest, or Edit a User using √∞+ and press √
4) When you log in for the first time as User 1-4, you will be prompted to enter your xID information.
a) Enter your xID account number using -∞ and press ☑ to select the numbers. Press ☑ after each input to move to the next digit. After the final input, press ☑
b) Enter your passcode using -∞+ to select the numbers. Press after each input to move to the next digit. After the final input, press
c) If you key the incorrect number at any point while entering your xID or passcode, press and hold ☑ for 3-5 seconds to clear the selection and begin again.
A) QUICK START
Simply press▶ begins working cut. Time will count up from 0:00.
The resistance level will default to level 1. Income will default to 0%
B) SELECT A PROGRAM
1) Select a PROGRAM using -φ+ and press
2) Set workout program information using -∞ + and press ☑ after each selection.
3) Press ▶b begin workout
NOTE: You can adjust the resistance and incline levels during your workout.
When your workout is complete, the console will display "workout complete" and beep. Your workout information will stay displayed on the console for 30 seconds and then reset.
TO CLEAR CURRENT SELECTION
To clear the current program selection or screen, press and hold ■ for 3 seconds.

9

H2'4_03_EliE7_E9_Rer'4_kibl 10-11
Note: There is a thin protective sheet of clear plastic on the overlay of the console that should be removed before use.
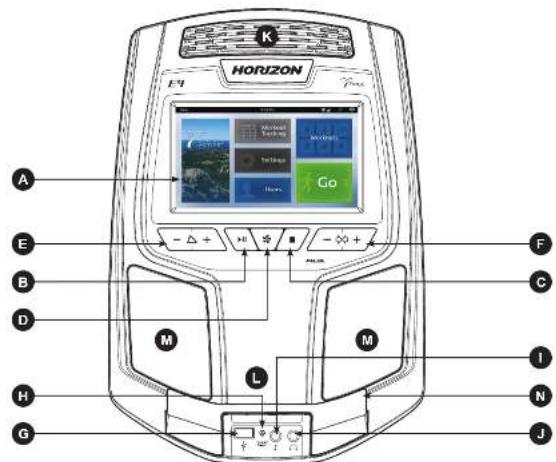
A) TOUCHSCREEN: please see page 12 for more information about the touchscreen.
B) (START/PAUSE KEY): press to start workout, pause workout, and restart after pause.
C) STOP KEY): press to stop workout. Hold to reset console.
D) (MAN KEY): press to turn fan on and off.
E) INCLINE ▼-△-□ KEYS: press to adjust incline level.
F) RESISTANCE -∞+ KEYS: press to adjust resistance level
G) USB PORT used for software updates or to charge devices less than 1 amp.
H) ENERGY SAVER LIGHT: indicates if machine is in Energy Saver mode.
I) AUDIO IN JACK: plug your media player into the console using the included audio adaptor cable.
J) AUDIO OUT/HEADPHONE JACK: plug your headphones into the console to use them instead of the console speakers.
K) FAN: personal workout fan.
L) PHONE/MEDIA PLAYER POCKET: holds phone or media player.
M) SPEAKERS: plays music through speakers when connected to your media player.
N) READING RACK: holds reading material.

1110
271814 250 PM

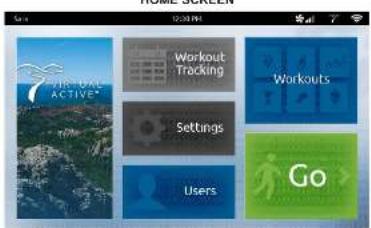
E9 DISPLAY WINDOW
A) VIRTUAL ACTIVE: A series of interactive HD videos filmed in scenic locations around the world. For more info, see page 17.
B) WORKOUT TRACKING: Press to view your workout calendar. The calendar is available to act as a workout tracking function. Press a day on the calendar to see your workout history for that day.
C) SETTINGS: Press to edit your machine's default settings, including screen brightness, volume level, demo mode on/off, clock time, date, language.
D) USERS: Press to logout or edit one of 3 preset users or as Guest.
E) WORKOUTS: Press to take you to the workout selection screen.
F) GO: Press for quick start.
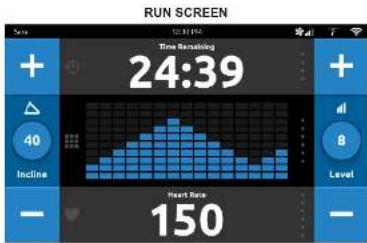
A) USER: the xID account currently logged in.
B) TIME: the current time.
C) FAN: Indicates tan setting (low, medium, high).
D) PASSPORT: Indicates Passport connection is present.
E) WI-Fl: Indicates wireless connection is present and the strength (low, medium, high).
F) INCLINE * / - KEYS: used to adjust incline level.
G) INCLINE VIEW AND KEYBOARD: shows the current incline level. Tap the circle button to make a keyboard appear for custom setting your incline level.
H) LEVEL + / - KEYS: used to adjust resistance level.
1) RESISTANCE LEVEL VIEW AND KEYBOARD: shows the current resistance level. Tap the circle button to make a keyboard appear for custom setting your resistance level.
J) TIME METRICS: customize your time view during your workout. Tap the top third of the screen to choose between time elapsed, time remaining (shown), total time, and clock time. PERFORMANCE WORKOUTS may also show you personalized information
K) DISTANCE METRICS: customize your distance view during your workout. Tap the middle third of the screen to choose between distance, brickyard (shown), current pace, average pace, track, and heart rate graph.
L) PERFORMANCE METRICS: customize your performance metrics view during your workout. Tap the bottom third of the screen to choose between calories, calories/hr, heart rate (shown), watts, METs, and RPM view. PERFORMANCE WORKOUTS will also show you your last and best segment performance times.


GETTING STARTED
CONNECT WI-FI
The Wi-Fi connection for your Horizon Elite E9 is set up directly on the elliptical. The first time you turn on your machine, you will automatically be prompted to set up the internet access.
1) Choose from the available wireless networks detected and shown on screen. If you do not see your network, press REFRESH. If it is still not showing up, you can add if manually via the OTHER option. If you do not want to set up Wi-Fi at this time, press SKIP. NOTE - You can set up or change your Wi-Fi connectivity at any time under the SETTINGS option on the home screen.
2) Use the keyboard to enter your Wi-Fi network password. Press √o confirm.
3) The network will have a buy it to confirm you are connected to the network.
4) Use the Date and Time setup screen to select your lime zone and set the current date and lime.
SET UP XID ACCOUNT FOR VIA FIT™ CONNECTIVITY
Creating an xID account will allow you to save and share workout data using the Vis Fit Wi-Fi. Up to four users can be saved on a machine. Your Horizon Elite E9 elliptical allows you to set up an xID account directly from the console.
1) On the user setup screen, press the CREATE AN xID button.
2) Enter your phone number or another easy-to-remember 10-14 digit number. This will be your account number. Also on this page, you will select your units of measurement. Press √to confirm.
3) Enter your email address. This must be an email address not associated with any other xID account. Press √ to confirm
4) Follow the software to input account information. Press √to confirm.
5) The final step is to confirm your information and review the terms and conditions. Press √o confirm.
6) Select the xID account or unassigned user profile to log in.
7) If you have previously logged in on this machine, you will be asked to enter your 4-digit passcode. Press √ In confirm.
8) If you are logging on to a user profile for the first time, you will be asked to enter your account name and it will now be saved in that spot. Press √o confirm.
9) Next, you will be asked to enter your 4-digit passcode. Press √to confirm.
H2'4_00_Elc_E7_E9_Rcv_4_nbl 1413 67814 2.50 PM
GETTING STARTED
You have the following options to start your workout:
A) QUICK START
Simply press GO to begin working out. Time will count up from 0:00.
The resistance level will default to level 1. Incline will default to 0%.
B) SELECT A PROGRAM
1) Press the VIRTUAL ACTIVE or WORKOUTS tiles to select an initial program.
2) Scroll through the options by dragging your finger across the touch screen.
3) Select your Virtual Active course or workout type by scrolling through the options. Press √o confirm.
4) Set workout program information by touching and dragging the number until you reach your desired setting. Press √ to confirm.
5) Press GO to begin workout.
NOTE: You can adjust the resistance and incline levels during your workout.
When your workout is complete, the console will save your workout data. You will be asked to rate your workout by selecting the corresponding star. Your workout information will stay displayed on the console for 30 seconds and then reset. The information will be saved in your workout calendar.
TO CLEAR CURRENT SELECTION
To clear the current program selection or screen, press and hold ■ for 3 seconds.


PROGRAM INFORMATION
MANUAL: Adjust your resistance and incline manually during your workout. User sets time, resistance level and
DISTANCE: Push yourself and go further during your workout with 13 distance workouts. Choose from 1 mile, 2 miles, 5k, 5 miles, 10k, 8 miles, 15k, 10 miles, 20k, half marathon, 15 miles, 20 miles, and marathon goals. User sets starting resistance level and incline.
CALORIES: Set goals for burning calories with nine workouts. Choose from 100, 200, 300, 400, 500, 600, 700, 800, and 900 calorie burn workouts. User inputs weight and sets starting resistance level and incline. Calories burned are calculated using weight input with the resistance level and incline of the workout.
INTERVALS: An effective fat-burning workout that helps you get improve your fitness level. Choose from Speed Intervals, Peak Intervals, and Endurance Intervals workouts. User sets time and starting level.
PERFORMANCE: Challenge yourself with targeted performance workouts intent on helping you improve specific training elements. Choose from Run/Walk, Hill Training, and Sprint workout programs.
STEPS: Promotes healthy activity with 10 step-based workouts calculated using average slide length. Choose from 1000, 2000, 3000, 4000, 5000, 6000, 7000, 8000, 9000, and 10,000 step workouts. User sets starting resistance level and incline.
CUSTOM (E9): Let's you create and reuse a perfect workout for you with specific resistance, incline and time combination. The ultimate in personal programming. Time-based goal.
1) Select CUSTOM and then select CUSTOM 1 or CUSTOM 2.
2) Press → add a segment to your custom workout. Press to delete a segment.
3) Touch a segment to select it. A selected segment will be highlighted in white. When a segment is highlighted, you may edit the segment time, resistance and incline.
4) Press GO at any time to begin using your custom workout. Your custom workout will be saved automatically.
H2'4_00_Elc_Er_E9_Rcv_4_nbl 18-17 71814 2.50 PM

CUSTOM (E7)
1) Select CUSTOM 1 or CUSTOM 2 using and press.
2) Set the workout time using and press
3) Use to set the RESISTANCE level for each segment. Press to confirm.
4) Use to set the INCLINE for each segment. Press to confirm
5) Press▶ begin workout.

VIRTUAL ACTIVE (E9 ONLY): A series of interactive HD videos filmed in scenic locations around the world.
1) Select VIRTUAL ACTIVE and then select one of the destinations.
2) Set level by touching and dragging the number until you reach your desired setting. Press √ to confirm.
3) Set resistance by touching and dragging the number until you reach your desired setting. Press √o confirm.
4) Press GO to begin workout.
- During the workout, the incline will adjust to reflect the terrain of the destination.
• The intensity is based on the level you selected
The console includes two destinations
Additional destinations can be purchased online at www.passportplayer.com
Once you've purchased destinations from the website, you must download the destination media files to your computer, uncompress them and copy them to a USB flash drive (sold separately). With the destination media properly saved on your USB flash drive, you can use your new destinations with the machine. Simply insert the USB flash drive into the USB port on the console and the new destinations will be available to use in the Virtual Active program.
NOTES: Destination files do not transfer to the console. They must remain on your USB flash drive while inserted into the console in order to use with the Virtual Active program. Because they are HD-quality video, these files can be over 2 GB in size. Broadband Internet connection is required to purchase and download new files. See website for more information.
Touch the center of the screen to expand the video to full screen and touch again to minimize.
Video will not start playing until user begins pedalling.


PROGRAM CHARTS
| Warm-Up | 1~2 | 3~4 | 5~6 | 8~9 | 10~11 | 12 | Cov. Down | ||||||||||
| Type | 1 | 2 | 3 | 10 | 11 | 12 | 10 | 11 | 10 | 11 | 10 | 11 | 10 | 11 | 10 | 11 | |
| Lough 1 | 1 | 2 | 2 | 3 | 5 | 1 | 1 | 5 | 5 | 1 | 5 | 1 | 5 | 5 | 1 | 3 | 2 |
| Lough 2 | 1 | 2 | 2 | 3 | 6 | 1 | 2 | 6 | 7 | 1 | 6 | 8 | 7 | 10 | 1 | 3 | 3 |
| Lough 3 | 1 | 2 | 2 | 4 | 7 | 3 | 3 | 7 | 7 | 3 | 7 | 3 | 7 | 7 | 3 | 4 | 2 |
| Lough 4 | 1 | 2 | 2 | 5 | 8 | 4 | 4 | 8 | 5 | 4 | 8 | 4 | 8 | 3 | 4 | 5 | 2 |
| Lough 5 | 1 | 2 | 2 | 6 | 9 | 5 | 5 | 9 | 5 | 4 | 9 | 5 | 5 | 5 | 4 | 5 | 3 |
| Lough 6 | 2 | 2 | 2 | 7 | 10 | 6 | 8 | 10 | 10 | 8 | 10 | 8 | 10 | 10 | 8 | 7 | 5 |
| Lough 7 | 2 | 2 | 2 | 8 | 11 | 7 | 11 | 11 | 11 | 7 | 11 | 7 | 11 | 11 | 7 | 5 | 5 |
| Lough 8 | 2 | 2 | 2 | 8 | 12 | 8 | 8 | 12 | 12 | 5 | 12 | 5 | 12 | 12 | 8 | 5 | 3 |
| Lough 9 | 3 | 4 | 5 | 10 | 13 | 2 | 9 | 13 | 13 | 9 | 13 | 9 | 13 | 13 | 9 | 10 | 5 |
| Lough 10 | 3 | 4 | 5 | 10 | 14 | 3 | 10 | 14 | 14 | 10 | 14 | 10 | 14 | 10 | 10 | 10 | 5 |
| Lough 11 | 3 | 8 | 10 | 12 | 15 | 11 | 11 | 15 | 15 | 11 | 15 | 11 | 15 | 15 | 11 | 12 | 10 |
| Lough 12 | 3 | 10 | 15 | 15 | 16 | 12 | 12 | 15 | 16 | 12 | 15 | 12 | 15 | 16 | 12 | 15 | 10 |
| Lough 13 | 4 | 10 | 15 | 15 | 16 | 13 | 15 | 17 | 17 | 13 | 15 | 13 | 13 | 15 | 13 | 15 | 10 |
| Lough 14 | 5 | 13 | 15 | 16 | 16 | 14 | 14 | 16 | 16 | 14 | 15 | 14 | 14 | 15 | 14 | 15 | 10 |
| Lough 15 | 5 | 13 | 15 | 16 | 16 | 14 | 14 | 16 | 16 | 14 | 15 | 14 | 14 | 15 | 14 | 15 | 10 |
| Lough 16 | 5 | 13 | 15 | 16 | 16 | 14 | 14 | 16 | 16 | 14 | 15 | 14 | 14 | 15 | 14 | 15 | 10 |
| PEAK INTERVALS - INLINE AND RESISTANCE CHANGE TO LEVELS OF RESISTANCE | |||||||
| Second | 2-00 | 2-00 | 3-00 | 3-00 | 2-00 | 2-00 | |
| Level | Appendix 4 | 70 | 100 | 1 | 2 | 100 | 100 |
| 1 | Level | 1 | 2 | 1 | 4 | 2 | 1 |
| labeled | 16 | 15 | 5 | 15 | 15 | 0 | |
| 2 | Level | 1 | 2 | 2 | 8 | 2 | 1 |
| labeled | 16 | 20 | 30 | 65 | 20 | 15 | |
| 3 | Level | 1 | 2 | 3 | 5 | 2 | 1 |
| labeled | 20 | 80 | 40 | 15 | 80 | 20 | |
| 4 | Level | 1 | 2 | 1 | 6 | 2 | 1 |
| labeled | 20 | 90 | 40 | 85 | 30 | 20 | |
| 5 | Level | 1 | 2 | 3 | 6 | 3 | 1 |
| labeled | 20 | 90 | 45 | 90 | 20 | 25 | |
| 6 | Level | 1 | 2 | 8 | 7 | 2 | 1 |
| labeled | 20 | 90 | 45 | 105 | 35 | 25 | |
| 7 | Level | 2 | 3 | 4 | 7 | 3 | 2 |
| labeled | 20 | 90 | 50 | 100 | 40 | 30 | |
| 8 | Level | 2 | 3 | 4 | 8 | 3 | 2 |
| labeled | 30 | 40 | 55 | 100 | 40 | 30 | |
| 9 | Level | 2 | 3 | 4 | 8 | 3 | 2 |
| labeled | 30 | 40 | 60 | 100 | 50 | 20 | |
| 10 | Level | 2 | 3 | 4 | 9 | 3 | 2 |
| labeled | 30 | 60 | 60 | 100 | 80 | 20 | |
H2'4_03_EliE7_E9_Rav_4_kbl 18-19
| ENDUANCE INTERVALS RESISTANCE | |||||||||||
| MAY-10 | 12 Aug 30/8 | Dec-10 | Total | ||||||||
| Level 1 | Level 2 | 5th Aug | 10th Aug | 5th Aug | 10th Aug | 5th Aug | 10th Aug | 5th Aug | 10th Aug | 1 year | |
| Level 1 | 2.948 | 2.758 | 6.43 | ||||||||
| Level 2 | 3.548 | 3.358 | 6.04 | ||||||||
| Level 3 | 3.887 | 3.67 | 10 | 3.874 | |||||||
| Level 4 | 4 | 3 | 7 | 5 | 0 | 10 | 11 | 12 | 5 | 0 | 7 |
| Level 5 | 5 | 8 | 8 | 9 | 10 | 12 | 11 | 10 | 8 | 5 | |
| Level 6 | 6 | 8 | 10 | 11 | 12 | 13 | 12 | 11 | 10 | 9 | 6 |
| Level 7 | 6 | 8 | 10 | 11 | 12 | 13 | 12 | 11 | 10 | 11 | 6 |
| Level 8 | 6 | 7 | 12 | 12 | 14 | 16 | 14 | 13 | 12 | 10 | 7 |
| Level 9 | 7 | 10 | 13 | 14 | 15 | 16 | 15 | 13 | 11 | 11 | 7 |
| Level 10 | 7 | 10 | 13 | 15 | 16 | 17 | 16 | 15 | 14 | 11 | 8 |
| Level 11 | 8 | 10 | 16 | 15 | 18 | 17 | 18 | 17 | 15 | 15 | 7 |
| Level 12 | 7 | 10 | 15 | 16 | 17 | 18 | 18 | 17 | 16 | 11 | 9 |
| SPRITS (RESTANCE) | |||||||||||||
| 10K2 Sperta Inventory 2004 Beta/Recovery 4004 Beta/Recovery 50.45 Sperta Recovery 100.45 Sperta Recovery | |||||||||||||
| Beginner 73 | Beginner 72 | Beginner 72 | Beginner 72 | Beginner 72 | Beginner 72 | ||||||||
| Intermediate 0 | Intermediate 0 | Intermediate 0 | Intermediate 0 | Intermediate 0 | Intermediate 0 | 0 | Intermediate 0 | 0 | |||||
| Advanced | 10 | 4 | Advanced | 10 | 4 | Advanced | 10 | 4 | Advanced | 9 | 4 | Advanced | 0 |
| RUN T WALK (RESISTANCE) | |||||
| Level | WARM UP | RUN | WALK COOL DOWN | ||
| Bogon | TWO | 2 hrs | 2 hrs | 2 hrs | 2 hrs |
| LWOW | 7 | 6 | 31 | 2 | |
| Intermediate | TWO | 2 hrs | 5 hrs | 7 hrs | 2 hrs |
| LWOW | 2 | 10 | 4 | 2 | |
| Advanced | TWO | 2 hrs | 5 hrs | 7 hrs | 2 hrs |
| LWOW | 7 | 14 | 5 | 2 | |
| HILL TRADING | |||||||||||||
| ITEM | NORM UP WORKS | CODE: DOWN | |||||||||||
| Time | 2 yrs | 2 yrs | 2 yrs | 2 yrs | 2 yrs | 2 yrs | 2 yrs | 2 yrs | 2 yrs | 2 yrs | 2 yrs | 2 yrs | |
| Beginner | 1st to 2nd | 1st to 3rd | 5th to 7th | 4th to 6th | 5th to 7th | 4th to 6th | 15th to 20th | 15th to 25th | .... | 15th to 20th | 2nd to 3rd | 2nd to 3rd | |
| Immediate | 1st to 2nd | 2nd to 3rd | 2nd to 3rd | 2nd to 3rd | 2nd to 3rd | 2nd to 3rd | 2nd to 3rd | 2nd to 3rd | .... | 2nd to 3rd | 2nd to 3rd | 2nd to 3rd | |
| Advanced | 1st to 2nd | 2nd to 3rd | 2nd to 3rd | 2nd to 3rd | 2nd to 3rd | 2nd to 3rd | 2nd to 3rd | 2nd to 3rd | .... | 2nd to 3rd | 2nd to 3rd | 2nd to 3rd | |

1918
271814 250 PM

USING YOUR MEDIA PLAYER
1) Connect the Included AUDIO ADAPTOR CABLE to the AUDIO IN JACK on the left of the console and the headphone jack on your media player.
2) Use your media player buttons to adjust song settings.
3) Remove the AUDIO ADAPTOR CABLE when not in use.
ADJUSTING THE VOLUME
E7 models: To enter the engineering menu, press and hold the RESISTANCE + key and RESISTANCE - key for 3-5 seconds. Use the - + keys to navigate to ENG8 and press Use the - + keys to set Volume. Press and hold the for 3-5 seconds to exit ENG8 and hold again for 3-5 seconds to exit engineering mode.
E9 models: From the home screen, touch settings. Adjust the volume using the volume control bar.
ENERGY SAVER (STANDBY MODE)
This machine has a special feature called Energy Saver™ mode. This mode is NOT automatically activated. When Energy Saver mode is activated, the display will automatically enter standby mode (Energy Saver mode) after 15 minutes of inactivity. This feature saves energy by disabling most power to the machine until a key is pressed on the console. This feature can be turned on or off in the engineering menu.
E7 models: To enter the engineering menu, press and hold the RESISTANCE + key and RESISTANCE - key for 3-5 seconds. Use + to navigate to SWITCH FUNCTION and press - Press - Select Energy Saver mode. use to select ENERGY SAVE ON or OFF. Press and hold ■ (STOP) for 3-5 seconds to exit SWITCH FUNCTION. Press and hold ■ (STOP) again for 3-5 seconds to exit the engineering menu.
E9 models: From the home screen, touch SETTINGS. To turn Energy Saver OFF, touch DEMO ON. To turn Energy Saver ON, touch DEMO OFF
H2'4_03_Ele_Er_E9_Rev_4.html 202'71814 2:50 PM
PASSPORT™ MEDIA PLAYER
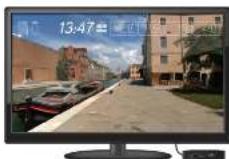
The Passport player, featuring Virtual Active* technology, is a high-definition experience that uses real destination footage and matching ambient sounds from stunning destinations around the world. The ultimate in workout entertainment, Passport lets you escape the confines of a regular workout routine while enjoying a dynamic experience.
A Passport player is available for purchase separately from your Horizon Fitness retailer. Additional courses are available from your Horizon Fitness retailer.
For more information, go to: www.passportplayer.com www.horizonfitness.com
SYNCING CONSOLE WITH PASSPORT
1) Use the arrow keys on the Passport remote to scroll to the setup icon and press select.
2) Follow the on-screen prompts to press (on the equipment console.
3) The message displayed on screen will notify you if the sync was a success or failure.
NOTE: See PASSPORT OWNER'S MANUAL for more information.

FRANÇAIS
FONCTIONNEMENT DE L'EXERCISEUR ELLIPTIQUE
H2'4_03_Elu_Er_E9_Rer_Audl 28:27:1874 2:50 PM
FENÊTRE D'AFFICHAGE DU E7
SE CONNECTER AU RÉSEAU WI-FI
H2'4_03_Eli_Er_E9_Ror_4_kbl 30:31
FONCTIONNEMENT DE LA CONSOLE DU E9
H2'4_00_Ele_Er_E9_Rev_AuBl 323371814 250 PM

POUR COMMENCER
SE CONNECTER AU RÊSEAU WI-FI
H2'4_00_Elc_Er_E9_Rer'_4_nbl 38:37:1814 2.50 PM

CUSTOM (E7) (PROGRAMME PERSONNALISÉ)
| SPRITS | |||||||||||||
| 100 M | Spirits | Acquisition | 200 M | Spirits | Acquisition | 300 M | Spirits | Acquisition | 100 M | Spirits | Acquisition | 600 M | Spirits |
| Decisions | 7 | 2 | Decisions | 7 | 2 | Decisions | 7 | 2 | Decisions | 7 | 2 | Decisions | 7 |
| Intermed sites | 6 | 3 | Intermed sites | 8 | 3 | Intermed sites | 5 | 3 | Intermed sites | 8 | 3 | Intermed sites | 0 |
| Avance | 10 | 4 | Avance | 10 | 4 | Avance | 10 | 4 | Avance | 8 | 4 | Avance | 9 |
| RUN T/WALK (COURSE MARCHE) | |||||
| Name | ECHAUTTLEMENT | COURSE | MARCHE | RECUPATION | |
| Desarant | Curse | 2 gm | 2 gm | 3 gm | 2 gm |
| Niveau | 2 | 6 | 3 | 2 | |
| Intermarshen | Curse | 2 gm | 5 gm | 1 gm | 2 gm |
| Niveau | 2 | 10 | 3 | 2 | |
| Avance | Curse | 2 gm | 8 gm | 1 gm | 2 gm |
| Niveau | 2 | 14 | 5 | 2 | |
| HILL TRANNING (ENTRAJERENT EN MONTAGE) | |||||||||||
| Denum | LICAVELLENT | LINTIRIALS | SOLUTION | ||||||||
| 24th | 25th | 24th | 24th | 25th | 24th | 25th | 24th | 25th | 24th | 25th | |
| Praktorie | Kosno 2 | 9% | Kosno 4 | 9% | Kosno 4 | 10% | Kosno 16 | 9% | Kosno 4 | 10% | |
| Intermediate | Quinu | 2nd | 2nd | Quinu | 10% | Kosno 16 | 10% | Kosno 4 | 25% | Quinu | 25% |
| Praktorie | Kosno 2 | 9% | Kosno 3 | 9% | Kosno 16 | 10% | Kosno 16 | 25% | Quinu | 25% | |
| Assist | Quinu | 2nd | 2nd | Quinu | 10% | Kosno 16 | 10% | Kosno 5 | 25% | Quinu | 25% |
| Praktorie | Kosno 2 | 9% | Kosno 8 | 9% | Kosno 16 | 10% | Kosno 8 | 25% | Quinu R | 10% | |

3938
H2'4_03_Ele_Er_E9_Rer_Knll 38-31
271014 250 PM

UTILISATION DU LECTEUR MULTIMÉDIA

H2'4_03_EliE7_E9_Rer'4_kbl 50.5
H2'4_00_Ele_Er_E9_Rev_AuBl S2S371814 2.50 PM

INICIO
CONECTAR A WI-FI
| CORREICAMINAR | |||||
| Steel | CALENTAMENTO | CORRER | CANVAR | ENFRUMENTO | |
| Pellicante | Tempo | 2 mm | 4 mm | 2 mm | 2 mm |
| Velocated | Nov 2 | Nov 6 | Nov 5 | Nov 2 | |
| Helianide | Tempo | 2 mm | 5 mm | 1 mm | 2 mm |
| Velocated | Nov 2 | Nov 10 | Nov 4 | Nov 2 | |
| Asparcoco | Tempo | 2 mm | 5 mm | 2 mm | 2 mm |
| Velocated | Nov 2 | Nov 14 | Nov 5 | Nov 2 | |
| Expte | ENTRENAMIENTO EN MONTARA | |||||||||||
| CALIDADAMENTO | SERVO DE E-ERCICIO | ENRAYAMIENTO | ||||||||||
| Participante | Tiempo | 2 cm | 0% | 2 cm | 2 cm | 2 cm | 2 cm | 2 cm | 2 cm | 2 cm | 2 cm | 2 cm |
| Petracaje | Nivel 2 | 0% | Nivel 1 | 0% | Nivel 1 | 0% | Nivel 1 | 70% | Nivel 1 | 25% | Nivel 1 | |
| Intermedio | Tiempo | 2 cm | 2 cm | 2 cm | 2 cm | 2 cm | 2 cm | 2 cm | 2 cm | 2 cm | 2 cm | |
| Petracaje | Nivel 2 | 0% | Nivel 3 | 0% | Nivel 3 | 0% | Nivel 3 | 20% | Nivel 3 | 25% | Nivel 3 | |
| Avonado | Tiempo | Nivel 2 | 0% | Nivel 4 | 0% | Nivel 4 | 0% | Nivel 4 | 20% | Nivel 4 | 25% | Nivel 4 |
| Petracaje | Nivel 2 | 0% | Nivel 5 | 0% | Nivel 5 | 0% | Nivel 5 | 20% | Nivel 5 | 35% | Nivel 5 | |
5958
H2'4_03_EliE7_E9_Rav_4_kbl 58-51
271014 250 PM

CÓMO USAR EL REPRODUCTOR
If a question or problem arises please see INFORMATION CARD for contact information.
REMARQUE:
- E7 DISPLAY WINDOW
- SET UP XID ACCOUNT FOR VIA FIT" CONNECTIVITY
- CONNECT WI-FI
- E7 GETTING STARTED
- QUICK START
- SELECT A PROGRAM
- TO CLEAR CURRENT SELECTION
- E9 DISPLAY WINDOW
- GETTING STARTED
- SET UP XID ACCOUNT FOR VIA FIT™ CONNECTIVITY
- PROGRAM INFORMATION
- CUSTOM (E7)
- USING YOUR MEDIA PLAYER
- ADJUSTING THE VOLUME
- ENERGY SAVER (STANDBY MODE)
- PASSPORT™ MEDIA PLAYER
- SYNCING CONSOLE WITH PASSPORT
- FRANÇAIS
- FONCTIONNEMENT DE L'EXERCISEUR ELLIPTIQUE
- FENÊTRE D'AFFICHAGE DU E7
- SE CONNECTER AU RÉSEAU WI-FI
- FONCTIONNEMENT DE LA CONSOLE DU E9
- POUR COMMENCER
- SE CONNECTER AU RÊSEAU WI-FI
- UTILISATION DU LECTEUR MULTIMÉDIA
- INICIO
- CONECTAR A WI-FI
- CÓMO USAR EL REPRODUCTOR
- REMARQUE
Brand : Horizon Fitness
Model : Elite E9
Category : Elliptical bike