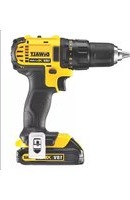
DW921K2 - Drill DEWALT - Free user manual and instructions
Find the device manual for free DW921K2 DEWALT in PDF.


User questions about DW921K2 DEWALT
0 question about this device. Answer the ones you know or ask your own.
Ask a new question about this device
Download the instructions for your Drill in PDF format for free! Find your manual DW921K2 - DEWALT and take your electronic device back in hand. On this page are published all the documents necessary for the use of your device. DW921K2 by DEWALT.
USER MANUAL DW921K2 DEWALT
text_image
Technical diagram of a drill putter with numbered parts for identificationA
text_image
13B
text_image
Technical diagram of a mechanical device with numbered parts and an inset close-up view showing internal components.C
natural_image
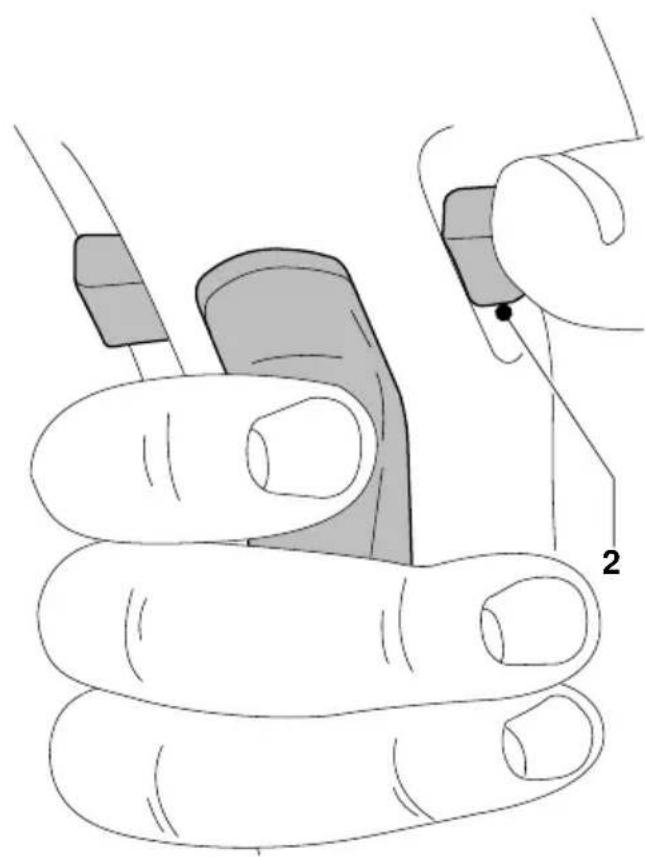
Illustration of a hand holding a medical or surgical device with a tool, no text or symbols presentD

natural_image
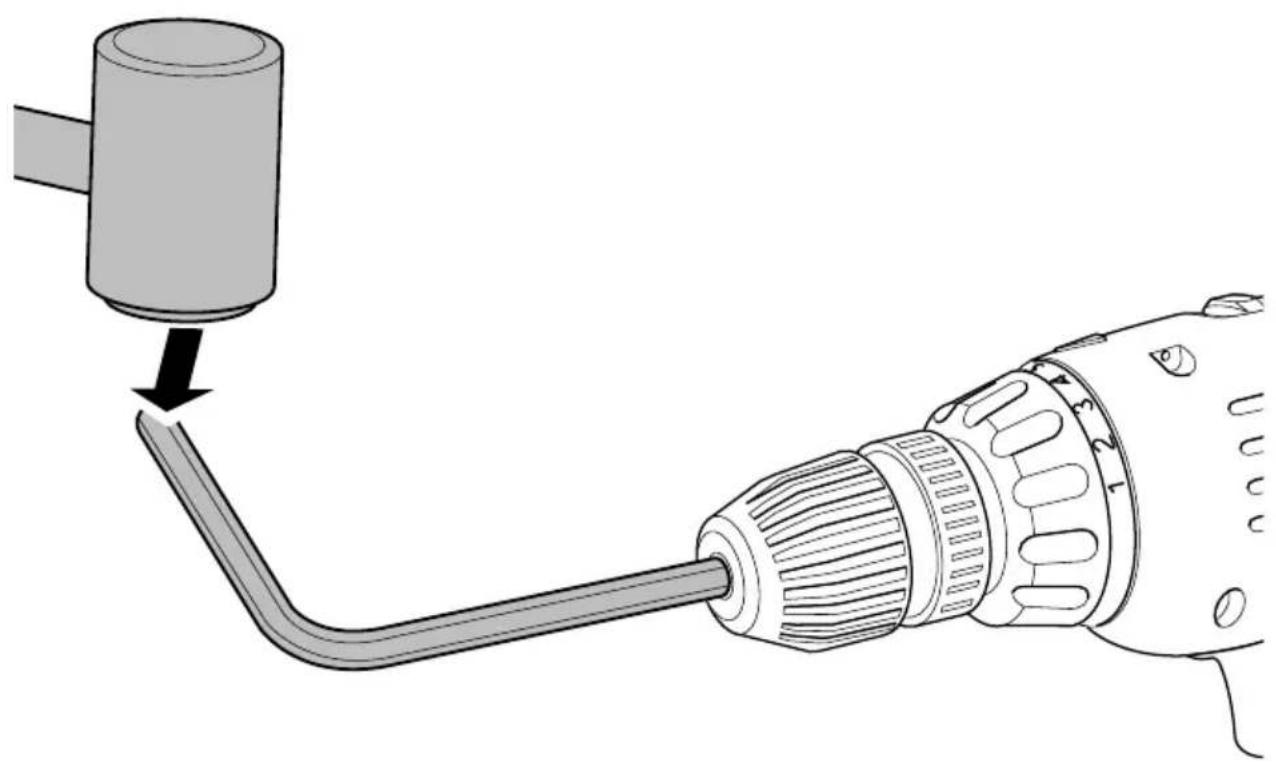
Diagram of a tool being inserted into a cylindrical component, showing the tip and end (no text or symbols present)G
Dansk 1
Deutsch 8
English 16
Español 23
Français 30
Italiano 37
Nederlands 45
Norsk 52
Português59
Suomi 66
Svenska 73
Ελληνικα 80
TRÅDL∅S BORE/SKRUEMASKINE MED MIDTERHÅNDTAG DW917K2/DW921K2/DW922K2
Tillykke!
DW917K2/DW921K2/DW922K2
DW917K2 DW921K2 DW922K2
| L_pA | (lydniveau) dB(A)* <70 <70 <70 |
| L_WA | (akustisk styrke) dB(A) <85 <85 <85 |
DW917K2 DW921K2 DW922K2
| <2,5 m/s2 | <2,5 m/s2 | <2,5 m/s2 |
Europachef
DeWALT, County Durham, U.K.
AKKU-BOHRSCHRAUBER DW917K2/DW921K2/DW922K2
DW917K2/DW921K2/DW922K2
DW917K2 DW921K2 DW922K2
DW917K2 DW921K2 DW922K2
| < 2,5 m/s2 | < 2,5 m/s2 | < 2,5 m/s2 |
Direktor Europa
DeWALT, County Durham, U.K.
Sicherheitshinweise
You have chosen a DEWALT Power Tool. Years of experience, thorough product development and innovation make DEWALT one of the most reliable partners for professional Power Tool users.
Table of contents
| Technical data en - 1 |
| Declaration of conformity en - 2 |
| Safety instructions en - 2 |
| Package contents en - 3 |
| Description en - 3 |
| Electrical safety en - 4 |
| Mains plug replacement (U.K. & Ireland only) en - 4 |
| Using an extension cable en - 4 |
| Assembly and adjustment en - 4 |
| Instructions for use en - 5 |
| Maintenance en - 6 |
| Guarantee en - 7 |
Technical data
| DW917K2* DW921K2* DW922K2* | |||||
| Voltage V 7.2 9.6 12 | |||||
| No load speed | 1st gear | min^-1 | 0-250 | 0-350 | 0-400 |
| 2nd gear | min^-1 | 0-750 | 0-1,000 | 0-1,200 | |
| Chuck capacity | mm 10 | 10 | 10 | ||
| Maximum drilling capacity in steel/wood | 10/15 | 12/20 | 12/22 | ||
| Weight | kg 1.5 1.5 1.6 | ||||
* Supplied with two battery packs
| Battery pack | DE9064 | DE9062 | DE9074 |
| Voltage V 7.2 9.6 12 | |||
| Capacity | Ah 1.25 | 1.25 | 1.25 |
| Weight | kg 0.35 | 0.45 | 0.55 |
| Charger | DE9100 | DE9101 | DE9103 | |
| Mains voltage | V_AC | 230 | 230 | 230 |
| Output voltage | V_DC | 7.2 9.6 12 | ||
| Charge current normal | A 1.55 | 1.55 | 1.35 | |
| maintenance | mA 40 | 40 | 40 | |
| Charging time | h 1 | 1 | 1 | |
| Weight | kg 0.75 | 0.9 1.0 | ||
The following symbols are used throughout this manual:

Denotes risk of personal injury, loss of life or damage to the tool in case of non-observance of the instructions in this manual.

Denotes risk of electric shock.

Fire hazard!
Declaration of conformity

DW917K2/DW921K2/DW922K2
DeWALT declares that these Power Tools have been designed in compliance with: 89/392/EEC, 89/336/EEC, 73/23/EEC, EN 60335, EN 55104, EN 61000 & EN 55014.
Level of sound pressure according to 86/188/EEC & 89/392/EEC, measured according to DIN 45635 Part 1 and Part 2 (EN 50144):
DW917K2 DW921K2 DW922K2
| L_pA | (sound pressure) dB(A)* <70 <70 <70 |
| L_WA (acoustic power) dB(A) <85 <85 <85 |
* at the operator's ear

Take appropriate measures for the protection of hearing if the sound pressure of 85 dB(A) is exceeded.
Weighted root mean square acceleration value according to EN 50144:
DW917K2 DW921K2 DW922K2
| < 2.5 m/s ^2 | < 2.5 m/s ^2 < 2.5 m/s ^2 |
European Director
Product Planning & Development
Brian Cooke
DEWALT, County Durham, U.K.
Safety instructions
When using Power Tools, always observe the safety regulations applicable in your country to reduce the risk of fire, electric shock and personal injury. Read the following safety instructions before attempting to operate this product.
Keep these instructions in a safe place!
General
1 Keep work area clean
Cluttered areas and benches can cause accidents.
2 Consider work area environment
Do not expose Power Tools to humidity. Keep work area well lit. Do not use Power Tools in the presence of inflammable liquids or gases.
3 Guard against electric shock
Prevent body contact with earthed surfaces (e.g. pipes, radiators, cookers and refrigerators). For use under extreme conditions (e.g. high humidity, when metal swarf is being produced, etc.) electric safety can be improved by inserting an isolating transformer or a (FI) earth-leakage circuit-breaker.
4 Keep children away
Do not let children come into contact with the tool or charger. Keep all people away from the work area.
5 Store idle tools
When not in use, Power Tools must be stored in a dry place and locked up securely, out of reach of children.
6 Dress properly
Do not wear loose clothing or jewellery. They can be caught in moving parts. Preferably wear rubber gloves and non-slip footwear when working outdoors. Wear protective hair covering to keep long hair out of the way.
7 Wear safety goggles
Also use a face or dust mask in case the operations produce dust or flying particles.
8 Beware of maximum sound pressure
Take appropriate measures for the protection of hearing if the sound pressure of 85 dB(A) is exceeded.
9 Secure workpiece
Use clamps or a vice to hold the workpiece. It is safer and it frees both hands to operate the tool.
10 Do not overreach
Keep proper footing and balance at all times.
11 Stay alert
Watch what you are doing. Use common sense. Do not operate the tool when you are tired.
12 Remove adjusting keys and wrenches
Always check that adjusting keys and wrenches are removed from the tool before operating the tool.
13 Use appropriate tool
The intended use is laid down in this instruction manual. Do not force small tools or attachments to do the job of a heavy-duty tool. The tool will do the job better and safer at the rate for which it was intended.
Warning! The use of any accessory or attachment or performance of any operation with this tool, other than those recommended in this instruction manual may present a risk of personal injury.
14 Maintain tools with care
Keep the tools in good condition and clean for better and safer performance. Follow the instructions for maintenance and changing accessories. Inspect the tool cords at regular intervals and, if damaged, have them repaired by an authorized DEWALT repair agent. Keep all controls dry, clean and free from oil and grease.
15 Check for damaged parts
Before using the tool, carefully check it for damage to ensure that it will operate properly and perform its intended function. Check for misalignment and seizure of moving parts, breakage of parts and any other conditions that may affect its operation. Have damaged guards or other defective parts repaired or replaced as instructed.
Do not use the tool if the switch is defective. Have the switch replaced by an authorized DEWALT repair agent.
16 Remove the battery pack
Remove the battery pack when not in use, before servicing and when changing accessories.
17 Have your tool repaired by an authorized DEWALT repair agent
This Power Tool is in accordance with the relevant safety regulations. To avoid danger, electric appliances must only be repaired by qualified technicians.
Additional safety instructions for battery packs

Fire hazard! Avoid metal short circuiting the contacts of a detached battery pack (e.g. keys carried in the same pocket as a battery pack).
- The battery fluid, a 25-30% solution of potassium hydroxide, can be harmful. In case of skin contact, flush immediately with water. Neutralize with a mild acid such as lemon juice or vinegar. In case of eye contact, rinse abundantly with clean water for at least 10 minutes. Consult a physician.
- Never attempt to open a battery pack for any reason.
- Use the chargers DE9100, DE9101 & DE9103 with their respective battery packs DE9064, DE9062 & DE9074 only.
Labels on charger and battery pack
In addition to the pictographs used in this manual, the labels on the charger and the battery pack show the following pictographs:

- - - - -
Battery charging

—
Battery charged
Package contents
The package contains:
1 Cordless Midhandle Drill/Screwdriver
2 Battery Packs
1 Battery Charger
1 Kitbox
1 Instruction manual
1 Guarantee card
- Check for damage to the tool, parts or accessories which may have occurred during transport.
- Take the time to thoroughly read and understand this manual prior to operation.
Description (fig. A)
Your DEWALT Cordless Midhandle Drill/Screwdriver has been designed for professional drilling and driving applications.
1 Variable speed switch
2 Forward/reverse slider
3 Keyless chuck
4 Mode selector/torque adjustment collar
5 Two gear selector
6 Ventilation slots
7 Grip
8 Battery pack
Charger
Your DeWALT charger is dedicated to specific voltage battery packs (refer to the technical data).
8 Battery pack
9 Release buttons
10 Charger
11 Charging indicator (red)
12 Charged status indicator (green)
Electrical safety
The electric motor has been designed for one voltage only. Always check that the battery pack voltage corresponds to the voltage on the rating plate. Also make sure that the voltage of your charger corresponds to that of your mains.

Your DEWALT charger is double insulated in accordance with EN 55014 & EN 50144.
Mains plug replacement (U.K. & Ireland only)
- Should your mains plug need replacing and you are competent to do this, proceed as instructed below. If you are in doubt, contact an authorized DEWALT repair agent or a qualified electrician.
- Disconnect the plug from the supply.
- Cut off the plug and dispose of it safely; a plug with bared copper conductors is dangerous if engaged in a live socket outlet.
- Only fit 13 Amperes BS1363A approved plugs fitted with the correctly rated fuse (1).
- The cable wire colours, or a letter, will be marked at the connection points of most good quality plugs. Attach the wires to their respective points in the plug (see below). Brown is for Live (L) (2) and Blue is for Neutral (N) (4).
- Before replacing the top cover of the mains plug ensure that the cable restraint (3) is holding the outer sheath of the cable firmly and that the two leads are correctly fixed at the terminal screws.

text_image
1 2 3 4
Never use a light socket. Never connect the live (L) or neutral (N) wires to the earth pin marked E or 12
Using an extension cable
An extension cord should not be used unless absolutely necessary. Use an approved extension cable suitable for the power input of your charger (see technical data). The minimum conductor size is 0.5 mm ^2 ; the maximum length is 30 m.
Assembly and adjustment

Prior to assembly and adjustment, always remove the battery pack.

Always switch OFF the tool before inserting or removing the battery pack.
Battery pack (fig. A)
Charging the battery pack
When charging the battery pack for the first time, or after prolonged storage, it will only accept an 80% charge. After several charge and discharge cycles, the battery pack will attain full capacity. Always check the mains prior to charging the battery pack. If the mains is functioning but the battery pack does not charge, take your charger to an authorised DEWALT repair agent. Whilst charging, the charger and the battery pack may become warm to touch. This is a normal condition and does not indicate a problem.

Do not charge the battery pack at ambient temperatures < 5^ or >35^ .

Recommended charging temperature: approx. 24 °C.
- To charge the battery pack (8), insert it into the charger (10) as shown and plug in the charger.
Be sure that the battery pack is fully seated in the charger, but do not force it. The red charging indicator (11) will light. After approx. 1 hour, it will switch off and the green status indicator (12) will light. The battery pack is now fully charged and the charger switches to maintenance mode.
- If the green indicator lights too soon the battery pack may be too hot. Remove the battery pack and allow it to cool before re-attempting to charge.
- If the green indicator lights instantly, the battery pack is fully uncharged.
- Leave the battery pack in the charger for several minutes then re-insert.
- The battery pack can be removed at any time or left in the charger indefinitely.
Inserting and removing the battery pack
- Insert the battery pack into the grip (7) until it clicks in place.
- To remove the battery pack, press the two release buttons (9) simultaneously and pull the pack out of the grip (7).
Inserting and removing a bit (fig. A & B)
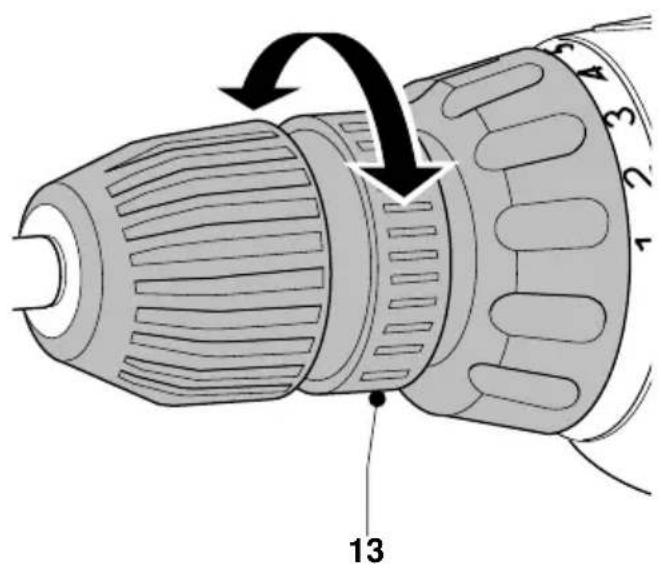
- Open the chuck by turning the sleeve (13) counterclockwise and insert the bit shank.
- Tighten firmly by turning the sleeve clockwise while holding the rear part of the chuck with one hand.
- To remove the bit, proceed in reverse order.
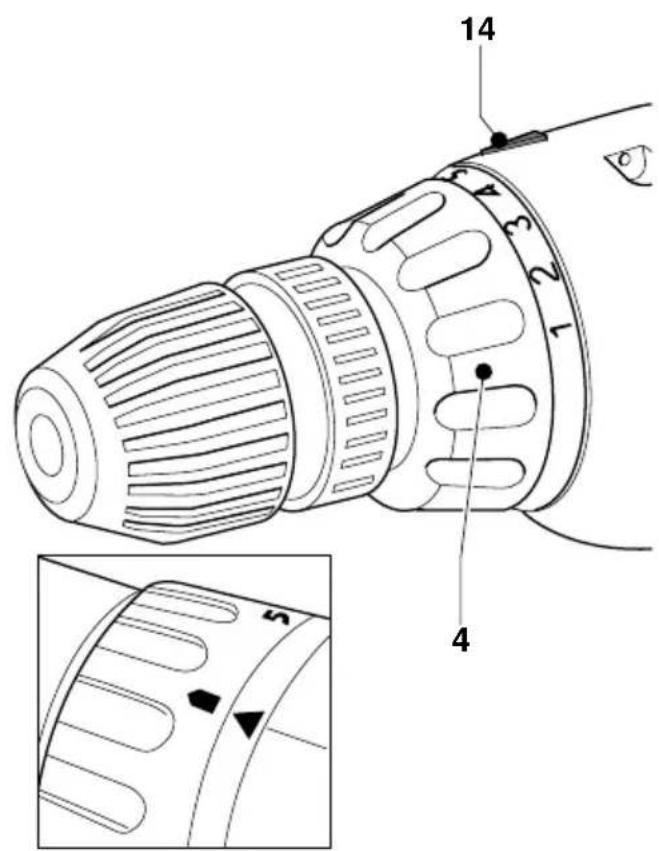
Selecting the operating mode or adjusting the torque (fig. C)
The collar of this tool has 5 positions for the adjustment of the torque to suit the size of the screw and the workpiece material. For torque adjustment, refer to the section “Screwdriving”. Your tool can be used in the following operating modes:

Drilling:
for steel, wood, plastics and masonry

Collar positions:
for screwdriving
- Select the drilling mode or torque by aligning the symbol or number on the collar (4) with the indicator (14) on the housing.
Forward/Reverse slider (fig. D)
- To select forward or reverse rotation, use the forward/reverse slider (2) as shown (see arrows on tool).

Always release the speed switch and wait until the motor has come to a complete standstill before changing the direction of rotation.
Two gear selector (fig. E)
Your tool is fitted with a two gear selector (5) to vary the speed/torque ratio.
1 low speed/high torque
(drilling large holes, driving large screws and mixing paint)
2 high speed/low torque
(drilling smaller holes, drilling in wood)
For speed rates, refer to the technical data.

• Always push the two gear selector completely forward or backward.
- Do not change gears at full speed or during use.
Removing and fitting the chuck (fig. F & G)
- Open the chuck jaws as far as possible.
- Insert a screwdriver into the chuck and remove the chuck retaining screw by turning clockwise as shown in figure F.
- Tighten an Allen key into the chuck and strike it with a hammer as shown in figure G. This will loosen the chuck so that it can be unscrewed by hand.
- To refit the chuck, proceed in reverse order.
Instructions for use

• Always observe the safety instructions and applicable regulations.
- Be aware of the location of pipework and wiring.
- Apply only a gentle pressure to the tool. Excessive force does not speed up drilling but decreases tool performance and may shorten tool life.
- To minimise stalling on break-through, progressively reduce the drill point pressure towards the end of the operation.
- Keep the motor running when pulling the
bit back out of a drilled hole. This will help prevent jamming.
Prior to operation:
- Make sure your battery pack is (fully) charged.
- Insert the appropriate bit.
- Mark the spot where the hole is to be drilled.
- Select forward or reverse rotation.
Switching ON and OFF (fig. A & D)
- To run the tool, press the variable speed switch (1). The pressure exerted on the variable speed switch determines the tool speed.
- To stop the tool, release the variable speed switch (1).
- To lock the tool in OFF-position, move the forward/reverse slider (2) to the central position.

The drill is equipped with a brake to stop the chuck as soon as the variable speed switch is fully released.
Screwdriving (fig. A)
- Select forward or reverse rotation using the slider (2).
- Set the collar (4) to position 1 and begin screwdriving (low torque).
- If the clutch ratchets too soon, adjust the collar to increase the torque as required.
Drilling (fig. A)
- Select the drilling mode using the collar (4).
Drilling in metal
- Use a cutting lubricant when drilling metals. The exceptions are cast iron and brass which should be drilled dry.
Drilling in masonry
- Use carbide-tipped masonry bits at low speeds. Keep even force on the drill. A smooth, even flow of dust indicates the proper drilling rate.
Drilling in wood
- Holes in wood can be made with the same twist drills used for metal. These bits may overheat unless pulled out frequently to clear chips from the flutes.
- For larger holes use Power Drill wood bits.
- Use a block of wood to back up workpieces that may splinter.
Consult your dealer for further information on the appropriate accessories.
Maintenance
Your DEWALT Power Tool has been designed to operate over a long period of time with a minimum of maintenance. Continuous satisfactory operation depends upon proper tool care and regular cleaning.

Lubrication
Your Power Tool requires no additional lubrication.

Cleaning
- Unplug the charger before cleaning the housing with a soft cloth.
- Remove the battery pack before cleaning your Power Tool.
- Keep the ventilation slots clear and regularly clean the housing with a soft cloth.
Rechargeable batteries and the environment
DEWALT cordless tools and battery packs can be charged many times to give long life and repeatedly full power.
This symbol indicates that this tool contains nickel cadmium (NiCd) cells. When your tool or battery pack needs replacement, think of the protection of our environment.
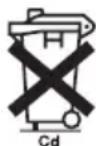
DEWALT recommends the following:
- Discharge the energy from the batteries by running the batteries down completely, then remove them from the tool.
- NiCd cells are recyclable, so do not throw them away with your household waste. They may end up in an incinerator or landfill, which must be avoided.
- Instead, take the battery pack to a DEWALT service centre, your local dealer or your local recycling station. If necessary, contact your local municipality for disposal information.
The collected batteries will be disposed of properly and/or used for recycling purposes.
GUARANTEE
• 30 DAY NO RISK SATISFACTION GUARANTEE •
If you are not completely satisfied with the performance of your DEWALT tool, simply return it within 30 days, complete as purchased, to a participating Dealer, or an authorized DEWALT repair agent, for a full refund or exchange. Proof of purchase must be produced.
• ONE YEAR FREE SERVICE CONTRACT •
If you need maintenance or service for your DEWALT tool, in the 12 months following purchase, it will be undertaken free of charge at an authorized DEWALT repair agent. Proof of purchase must be produced. Includes labour and spare parts for Power Tools. Excludes accessories.
• ONE YEAR FULL WARRANTY •
If your DEWALT product becomes defective due to faulty materials or workmanship within 12 months from the date of purchase, we guarantee to replace all defective parts free of charge or, at our discretion, replace the unit free of charge provided that:
• The product has not been misused.
• Repairs have not been attempted by unauthorized persons.
- Proof of purchase date is produced. This guarantee is offered as an extra benefit and is additional to consumers statutory rights.
For the location of your nearest authorized DEWALT repair agent, please use the appropriate telephone number on the back of this manual.
TALADRO ATORNILLADOR SIN CABLE DW917K2/DW921K2/DW922K2
¡Enhorabuena!
DW917K2/DW921K2/DW922K2
DW917K2 DW921K2 DW922K2
| L_pA | (presión acústica) dB(A)* <70 <70 <70 |
| L_WA | (potenica acústica) dB(A) <85 <85 <85 |
DW917K2 DW921K2 DW922K2
| < 2,5 m/s ^2 | < 2,5 m/s ^2 | < 2.5 m/s ^2 |
Director Europeo
DEWALT, County Durham, U.K.
DW917K2/DW921K2/DW922K2
DW917K2 DW921K2 DW922K2
DW917K2 DW921K2 DW922K2
<2,5 m/s^2 <2,5 m/s^2 <2,5 m/s^2
Directeur européen
DeWALT, County Durham, U.K.
The Ground Truth image displays a single, solid horizontal line. According to Rule 2 (UNDERSCORE & LINE RULES), if the GT contains lines used for stylistic emphasis or as background (like ruled paper), the OCR result must ignore them. The provided OCR content is "____", which consists of four underscores. This is an incorrect interpretation of the line as a placeholder symbol, violating the rule that stylistic lines must be ignored. Therefore, the OCR output is inconsistent with the Ground Truth.
Pack-batteries chargé
L'emballage contient:
Pack-batteries (fig. A)
DW917K2/DW921K2/DW922K2
DW917K2 DW921K2 DW922K2
L_pA (rumorosità) dB(A) ^* <70 <70 <70
L_NA (potenza sonora) dB(A) <85 <85 <85
DW917K2 DW921K2 DW922K2
<2,5 m/s^2 <2,5 m/s^2 <2,5 m/s^2
Direttore Europeo
Ricerca & Sviluppo
Brian Cooke
DEWALT, County Durham, U.K.
DW917K2/DW921K2/DW922K2
DW917K2 DW921K2 DW922K2
L_p:A (geluidsdruk) dB(A)* <70 <70 <70
L_WA (geluidsvermogen) dB(A) <85 <85 <85
* op de werkplek

DW917K2 DW921K2 DW922K2
<2,5 m/s^2 <2,5 m/s^2 <2,5 m/s^2
Direkteur Europa
DEWALT, Spennymoor, County Durham, U.K.
DW917K2/DW921K2/DW922K2
DEWALT erklærer at disse elektroverktøyer er konstruert i henhold til: 89/392/EEC, 73/23/EEC, EN 60335, EN 55104, EN 61000 & EN 55014.
Lydnivået er i overensstemmelse med 86/188/EEC og 89/392/EEC, målt i henhold til DIN 45635 Part 1 & Part 2 (EN 50144):
DW917K2 DW921K2 DW922K2
| L_pA | (lydnivå) dB(A)* | <70 | <70 | <70 |
| L_NA (akustisk effekt) dB(A) <85 <85 <85 |
* ved brukerens øre

DW917K2 DW921K2 DW922K2
| <2,5 m/s ^2 | <2,5 m/s ^2 | <2,5 m/s ^2 |
Europasjef
DeWALT, County Durham, U.K.
Sikkerhetsforskrifter
DW917K2/DW921K2/DW922K2
A DEWALT declara que estas ferramentas eléctricas foram concebidas em conformidade com 89/392/CEE, 89/336/CEE, 73/23/CEE, EN 60335, EN 55104, EN 61000 & EN 55014.
DW917K2 DW921K2 DW922K2
DW917K2 DW921K2 DW922K2
| <2,5 m/s ^2 | <2,5 m/s ^2 | <2,5 m/s ^2 |
Director Europeu
DeWALT International, County Durham, U.K.
15 Tire as chaves de aperto
DW917K2/DW921K2/DW922K2
DW917K2 DW921K2 DW922K2
DW917K2 DW921K2 DW922K2
| < 2,5 m/s2 | < 2,5 m/s2 | < 2,5 m/s2 |
Eurooppapäällikkö
DeWALT, County Durham, U.K.
Turvallisuusohjeet
The Ground Truth image displays a single, solid horizontal line. According to Rule 2 (UNDERSCORE & LINE RULES), this is a stylistic or background line, not a placeholder underscore. Therefore, the OCR result must ignore it and output nothing or only meaningful text. The provided OCR content is "____", which consists of four underscores. This is an incorrect interpretation of the line as a placeholder, violating the rule that stylistic lines must be ignored. The OCR has hallucinated underscores where none should exist based on the GT's visual context. Hence, the OCR result is inconsistent with the Ground Truth.
Akku latautunut
Pakkauksen sisältö
Pakkaus sisältää:
DW917K2/DW921K2/DW922K2
Vi gratulerar!
DW917K2/DW921K2/DW922K2
DW917K2 DW921K2 DW922K2
L_pA (ljudtryck) dB(A) ^* <70 <70 <70
L_WA (ljudeffekt) dB(A) <85 <85 <85
DW917K2 DW921K2 DW922K2
<2,5 m/s^2 <2,5 m/s^2 <2,5 m/s^2
Europachef
DeWALT, County Durham, U.K.
Säkerhetsinstruktioner
DW917K2/DW921K2/DW922K2
Θερμά συγχαρητήρια!
DW917K2/DW921K2/DW922K2
DW917K2 DW921K2 DW922K2
DW917K2 DW921K2 DW922K2
<2,5 m/s^2 <2,5 m/s^2 <2,5 m/s^2
Διενθυντής Ευρώπης
DEWALT, County Durham, U.K.