
Wemo WiFi Smart Dimmer - Wall socket BELKIN - Free user manual and instructions
Find the device manual for free Wemo WiFi Smart Dimmer BELKIN in PDF.

| Product Type | WiFi Smart Dimmer Wall Outlet |
| Brand | Belkin |
| Model | Wemo WiFi Smart Dimmer (WLS0403 / WLS040 / WDS060) |
| Power Supply | 120 V~, 15 A, 60 Hz |
| Maximum Output Power | Resistive load 15 A, incandescent 600 W (WLS0403/WLS040) or 400 W (WDS060) |
| Wireless Connectivity | WiFi 2.4 GHz 802.11n |
| System Requirements | 2.4 GHz wireless router, Android 6.0+ or iOS 11.0+ |
| Operating Temperature | 0 °C to 40 °C |
| Intended Use | Indoor residential, dry location |
| Control | Front touch button or Wemo app |
| Maintenance and Cleaning | Dry cloth, no liquid solution |
| Safety | Complies with FCC and ISDE standards; minimum distance of 20 cm for RF exposure; do not modify without approval |
| Electromagnetic Compatibility | Class B (FCC Part 15, ICES-3/NMB-3) |
| Recommended Conductor Size | 14 AWG minimum, rated 90 °C |
| Support | wemo.com/support |
Frequently Asked Questions - Wemo WiFi Smart Dimmer BELKIN
User questions about Wemo WiFi Smart Dimmer BELKIN
0 question about this device. Answer the ones you know or ask your own.
Ask a new question about this device
Download the instructions for your Wall socket in PDF format for free! Find your manual Wemo WiFi Smart Dimmer - BELKIN and take your electronic device back in hand. On this page are published all the documents necessary for the use of your device. Wemo WiFi Smart Dimmer by BELKIN.
USER MANUAL Wemo WiFi Smart Dimmer BELKIN
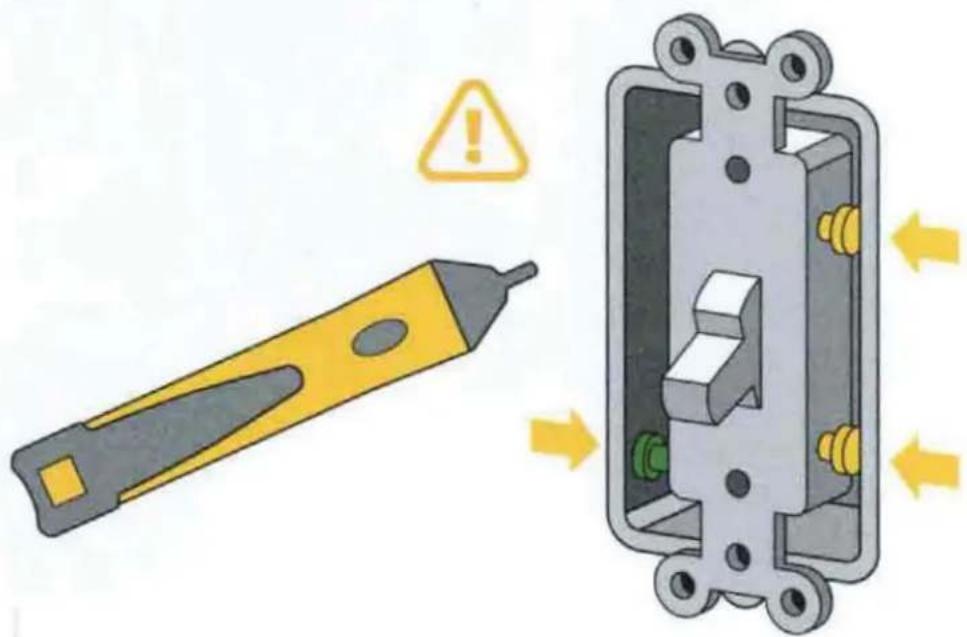
WARNING! Risk of electric shock
Incorrect installation could be dangerous or illegal. Multiple breakers/fuses may need to be turned off for safe installation. Please call a professional electrician if you are unfamiliar or uncomfortable with electrical work.
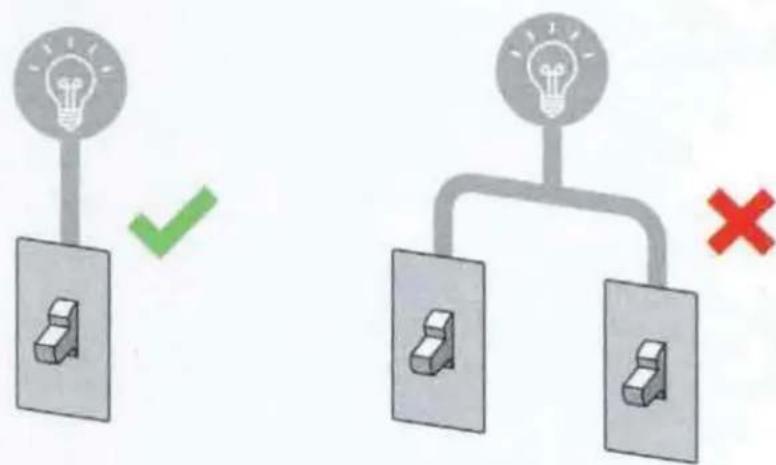
Wemo Smart Dimmer can only replace single-pole switches
If your light can be turned on from two different wall switches, that's a 3-way switch and Wemo Smart Dimmer is not compatible.
Neutral wires are required for setup
These wires are typically white and can be found in your electrical box.
What you'll need
What's included
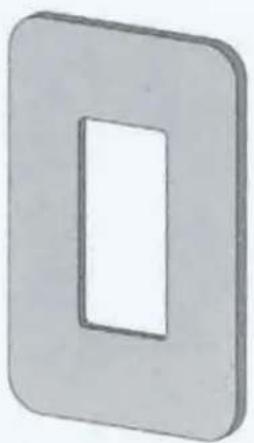
Cover Plate
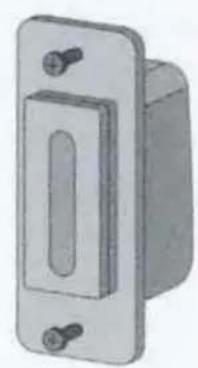
Dimmer and Screws
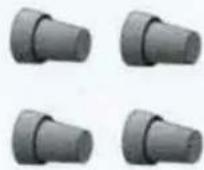
4 Wire Nuts
(use the provided screws and don't over-fighten)
Recommended tools

Phillips screwdriver

Standard screwdriver
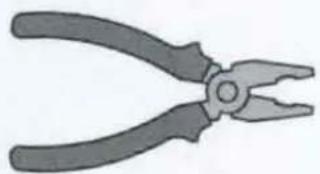
Pliers
(to bend, cut, and strip wires)
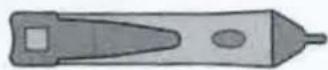
Non-contact voltage tester
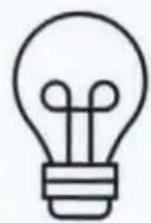
Compatible light bulbs
All incandescent light bulbs are dimmable, but not all LEDs and CFLs are. Go to wemo.com/support/bulbs for more information.
Maximum total wattage
Incandescent
400 watts
250 watts for multi-switch box

LED
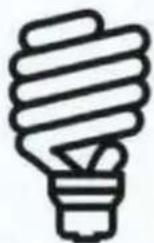
CFL
150 watts
(actual wattage rating, not "equivalent")
Install where your Wi-Fi signal is strong
Use your mobile device to test the signal
- Keep your mobile device close to the Dimmer until you finish setup
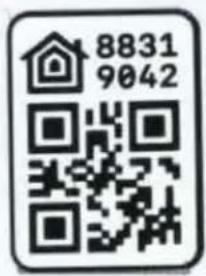
Installing your Dimmer

Installation video
Scan this QR code to watch a video walking through Dimmer installation.

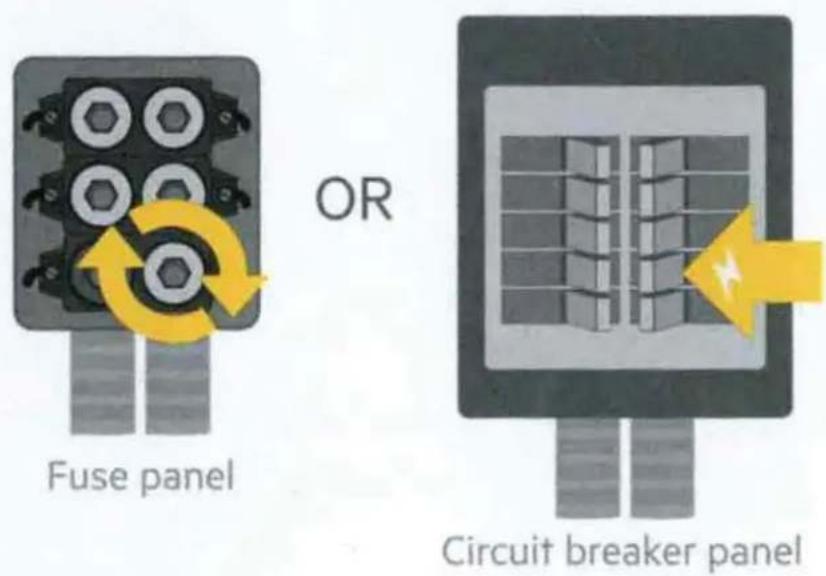
Turn power off
Shut off power to the switch you're replacing at your fuse panel or circuit breaker.
Fuse panel
OR
Circuit breaker panel
WARNING! Risk of electric shock
Incorrect installation could be dangerous or illegal. Multiple breakers/fuses may need to be turned off for safe installation. Please call a professional electrician if you are unfamiliar or uncomfortable with electrical work.
Confirm that power is off
Remove the cover plate from the existing switch. Use a voltage tester to test BOTH sides of the switch. You may need to turn off more than one circuit breaker/fuse.
Cover plate
Find the NEUTRAL wires
Pull out existing switch
Unscrew the switch and gently pull it out of the wall. Do not remove any of the wires yet.
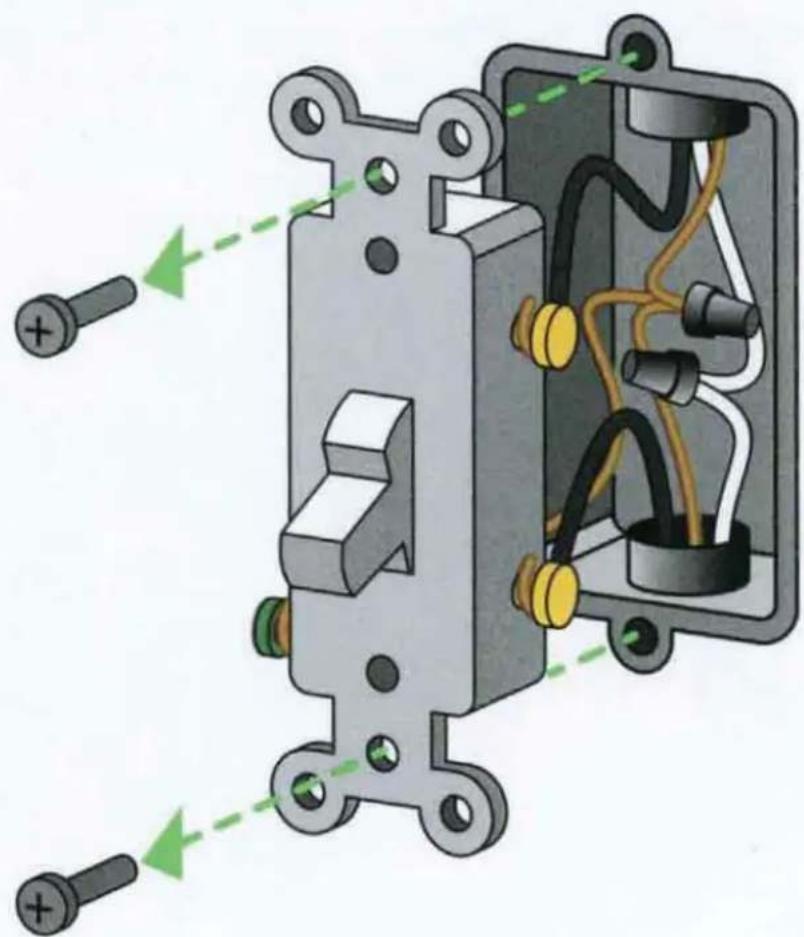
Find the NEUTRAL wires
Look for NEUTRAL wires (usually white) in the wall. You need these to set up the Dimmer.
NOTE:
You may have a different number of neutral wires than shown.
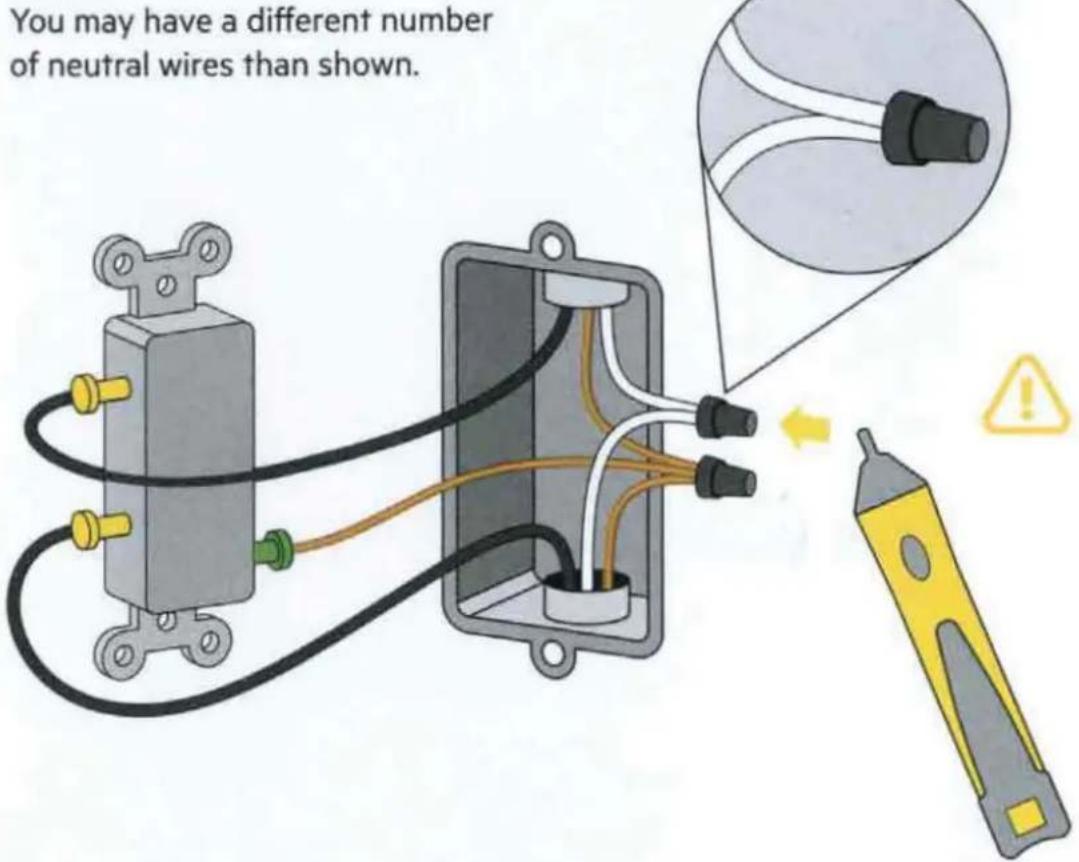
Test the NEUTRAL wires
Use a voltage tester to check that there is no power in the NEUTRAL wires from neighboring circuits. If necessary, shut off additional circuits until no voltage is found.
Disconnect the NEUTRAL wires
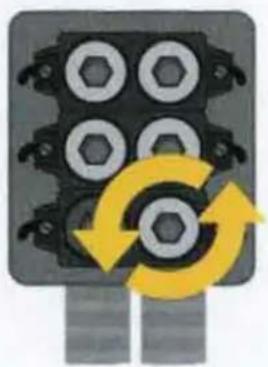
Unscrew the wire nut connecting the NEUTRAL wires.
3
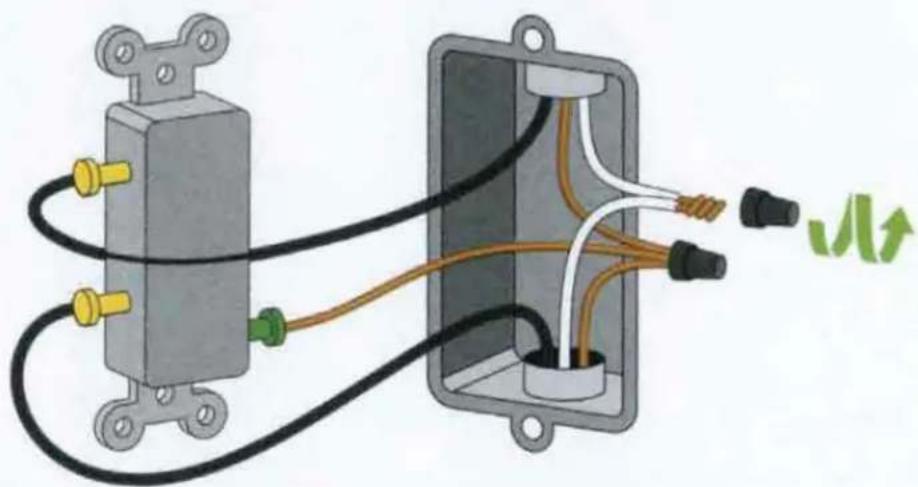
Find the GROUND wires
Look for the GROUND wires (usually green or solid copper) and unscrew the wire nut connecting them.
NOTE: You may have a different number of ground wires than shown.
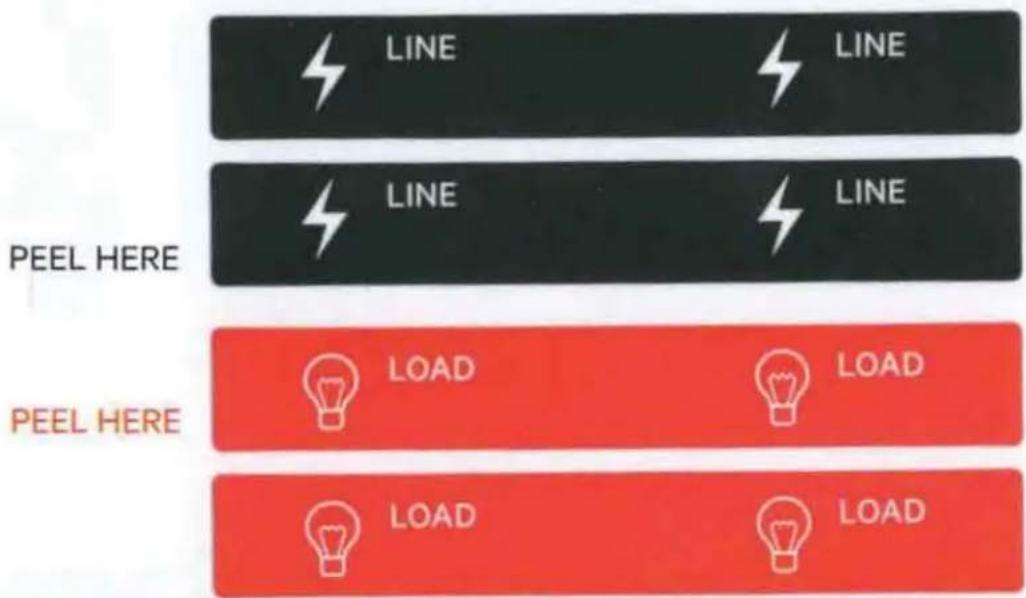
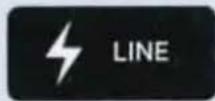
Find and label LINE and LOAD wires
Peel off and apply the LINE and LOAD wire labels below. If you're unsure which wire is which, we'll help you in the next step.

NOTE: Your existing wires may be in different locations than shown.

Never label wires while the power is on.
Help with distinguishing LINE from LOAD
1 Remove existing switch
Disconnect the remaining wires and remove the existing switch.
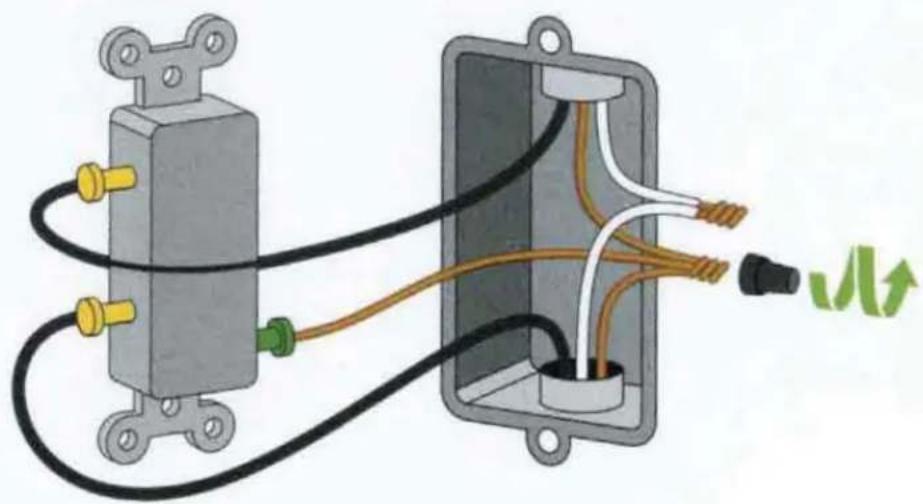
2 Cap LINE and LOAD wires for safety
3 Turn the power back ON
Make sure not to directly touch any wires while the power is on.
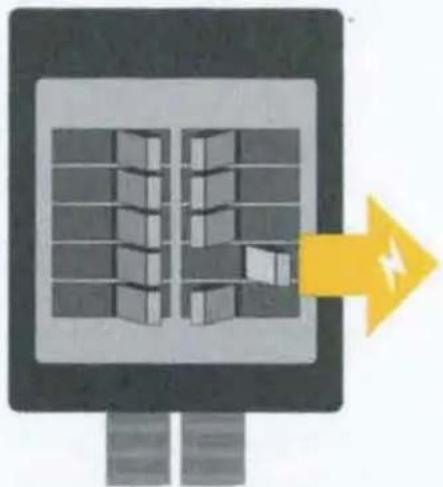
Test to identify the wires
Use a non-contact voltage tester to distinguish the wires:
This wire will have power because it carries electricity to the switch.

This wire will not have power because it carries electricity from the switch to your lights.
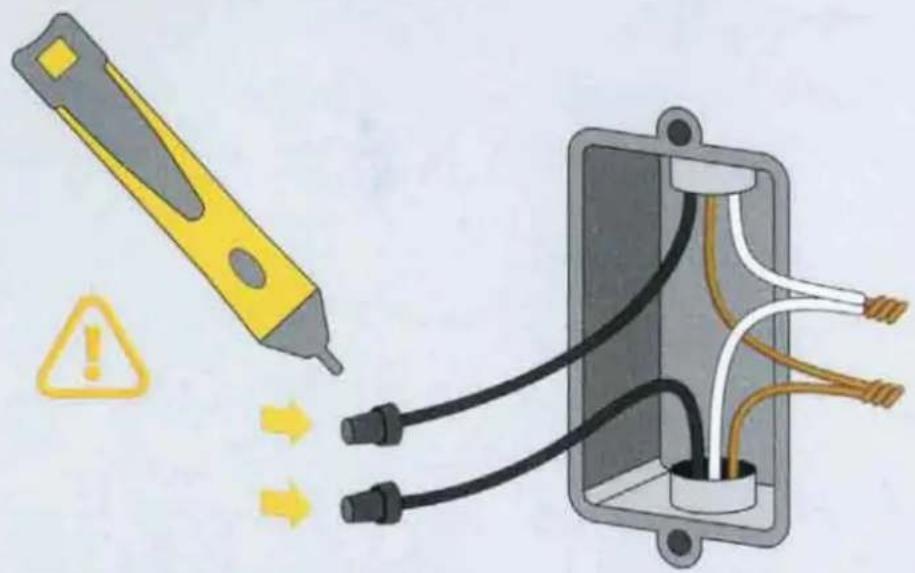
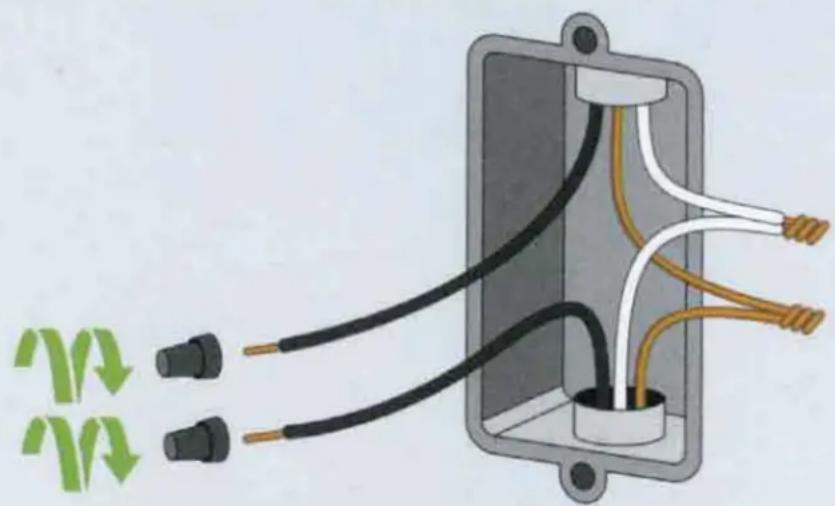
5 Turn the power back OFF

Verify the power is OFF before proceeding.
6 Label the LINE and LOAD wires
5
Connect Wemo Dimmer wires
Make sure power is OFF before proceeding
Remove cover plate
After disconnecting and removing the existing switch, snap the cover plate off of your Wemo Dimmer, and remove the sticker securing the wires.
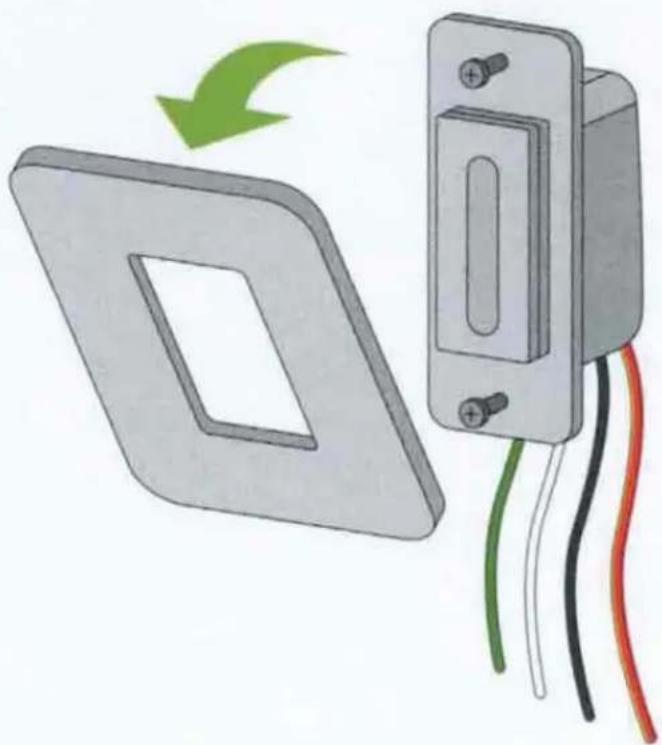
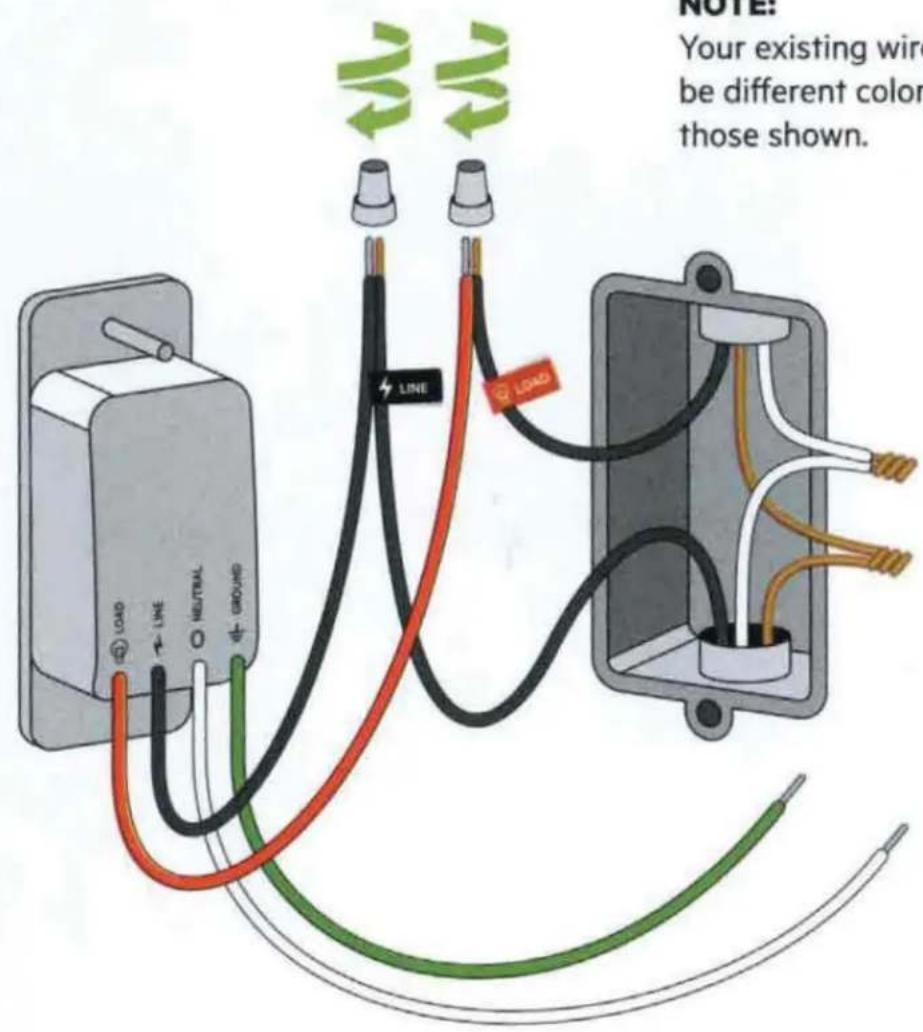
Connect LINE and LOAD wires
Use a wire nut to connect the red LOAD wire on the Dimmer to the LOAD wire in the wall.
Use a wire nut to connect the black LINE wire on the Dimmer to the LINE wire in the wall.
NOTE:
Your existing wires may be different colors than those shown.
Connect NEUTRAL and GROUND wires
Use a wire nut to connect the white NEUTRAL wire on the Dimmer to the NEUTRAL wires (usually white) in the wall.
Use a wire nut to connect the green GROUND wire on the Dimmer to the GROUND wires (usually green or bare copper) in the wall.
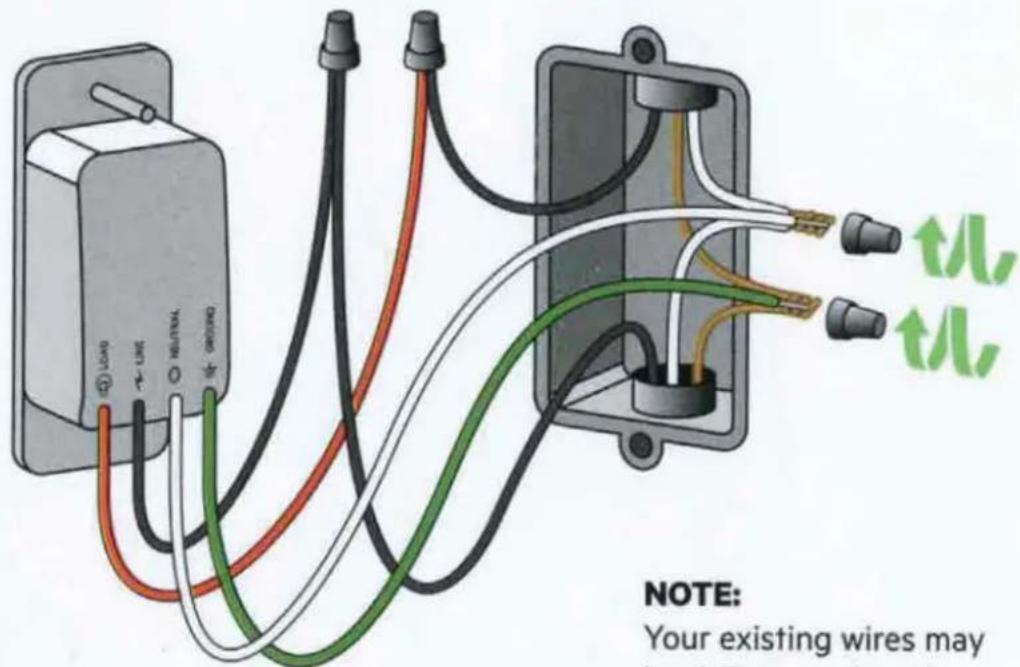
NOTE:
Your existing wires may be different colors than those shown.

Install Dimmer into the wall
Almost done! Tug on each wire nut to make sure they are secure on the wires.
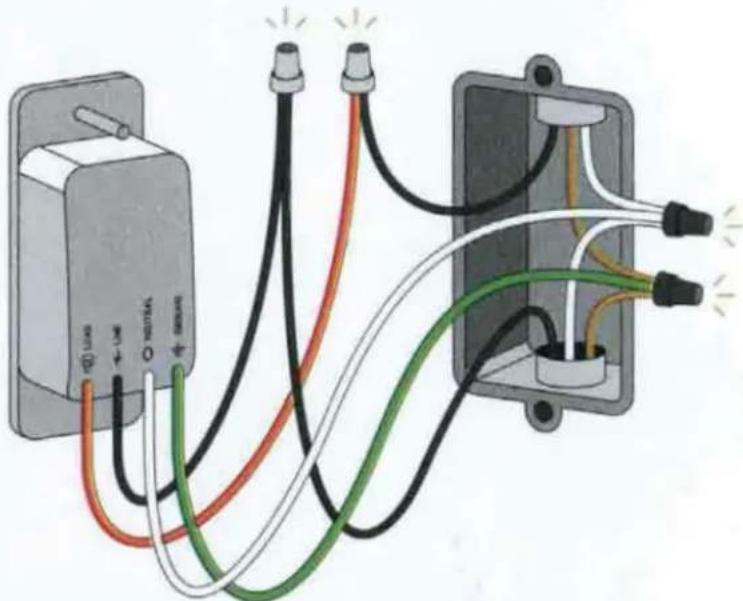
Carefully tuck wires behind the Dimmer
Insert the Dimmer into the box. It could get crowded in there.
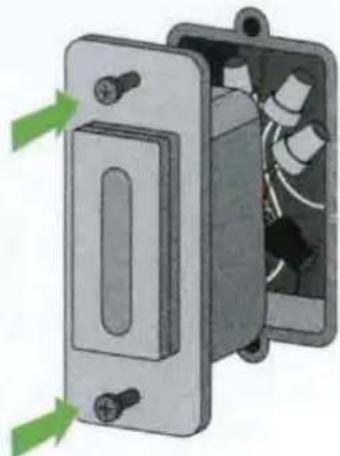
Screw the Dimmer into the wall and snap on the cover plate
Be careful not to over-tighten the screws.
NOTE: Before snapping on the cover plate, you'll notice an 8-digit setup code on the Dimmer. You'll need this during app setup if you have an iPhone.
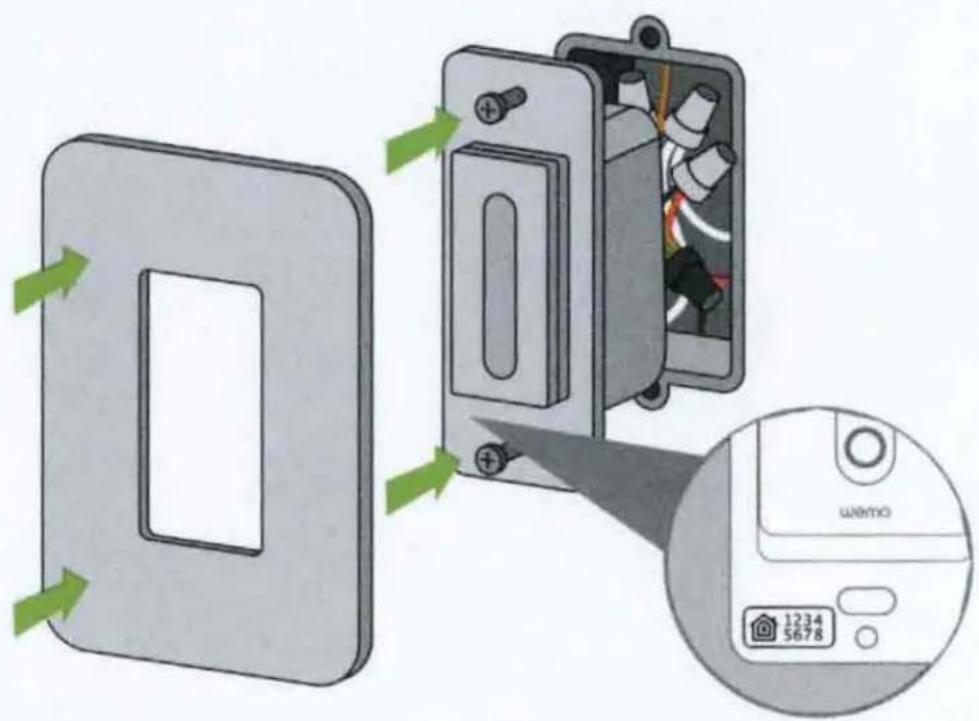
HomeKit Code
Turn on power
Turn on power to your Dimmer at your fuse panel or circuit breaker panel.
Physical installation is complete
The light ring on your Dimmer should start to blink WHITE while starting up and BLUE when ready for app setup.
BLINKING WHITE
Starting up

BLINKING BLUE
Ready for app setup
NOTE:
If your Dimmer did not power up, then your load and line wires may be reversed and you need to switch them.

Go to the app for next steps
Download and launch the Wemo app.


Create a Wemo account in the app, then add your Dimmer.
Use HomeKit Code if prompted
If prompted, scan or type your Wemo's code below.
The 8-digit number should match the code on your Dimmer (behind the cover plate).
WEMO ID
HOMEKIT CODE

Hang onto this guide. The code may come in handy if you ever need to set up this Wemo again.
Connecting to other services
Control your Wemos with voice, create groups, and more.
Connect to these services in the Wemo app.

Works with
Apple HomeKit

works with
Hey Google

WORKS WITH
alexa
Works with
IFTTT
Got questions?
Visit wemo.com/support or call us at 1-844-745-WEMO.
For warranty information, go to wemo.com/warranty.
What does the light tell me?

OFF
Wemo is off.

SOLID WHITE
Wemo is on and working normally.
BLINKING WHITE
Wemo is starting up, updating firmware, or responding to your action.

BLINKING BLUE
Your Wemo is ready for setup.

GREEN
Wemo is running a rule or timer.

RED
Error of low Wi-Fi connection.

WHITE/BLUE/RED
Reset your Dimmer Press and hold the bar below the power button for reset options. Release the button when the light is white to restart, blue to reset Wi-Fi, and red to restore to factory settings.
The following paragraphs are required by the FCC and prove that this product meets all regulatory limits with regard to radio interference and radiation exposure. If you use this product as intended you will have no issues with either.
FCC Statement
DECLARATION OF CONFORMITY WITH FCC RULES FOR ELECTROMAGNETIC COMPATIBILITY
We, Belkin International, Inc., of 12045 E. Waterfront Drive, Playa Vista, CA 90094, declare under our sole responsibility that the products, WLS0403, WLS040, and WDS060, to which this declaration relates, comply with Part 15 of the FCC Rules. Operation is subject to the following two conditions: (1) this device may not cause harmful interference, and (2) this device must accept any interference received, including interference that may cause undesired operation.
Federal Communications Commission Notice
This equipment has been tested and found to comply with the limits for a Class B digital device, pursuant to Part 15 of the FCC Rules. These limits are designed to provide reasonable protection against harmful interference in a residential installation.
This equipment generates, uses, and can radiate radio frequency energy and, if not installed and used in accordance with the instructions, may cause harmful interference to radio communications. However, there is no guarantee that interference will not occur in a particular installation. If this equipment does cause harmful interference to radio or television reception, which can be determined by turning the equipment off and on, the user is encouraged to try to correct the interference by one of the following measures:
- Reorient or relocate the receiving antenna.
- Increase the distance between the equipment and the receiver.
- Connect the equipment to an outlet on a circuit different from that to which the receiver is connected.
- Consult the dealer or an experienced radio/TV technician for help.
FCC Caution: Any changes or modifications not expressly approved by the party responsible for compliance could void the user's authority to operate this equipment.
Radiation Exposure Statement
This equipment complies with FCC radiation exposure limits set forth for an uncontrolled environment.
This equipment should be installed and operated with a minimum distance of 20cm between the radiator and your body.
This transmitter must not be co-located or operating in conjunction with any other antenna or transmitter.
Innovation, Science and Economic Development Canada Statement:
This digital apparatus complies with CAN ICES-3(B)/NMB-3(B).
This device complies with ISED's license-exempt RSS standards. Operation is subject to the following two conditions: (1) This device may not cause harmful interference, and (2) this device must accept any interference received, including interference that may cause undesired operation.
Innovation, Science and Economic Development Canada Radiation Exposure Statement:
This equipment complies with ISED radiation exposure limits set forth for an uncontrolled environment. This equipment should be installed and operated with a minimum distance of 20cm between the radiator and your body.


Recycling programs for this packaging may not exist in your area.
System Requirements:
WiFi router
Android 6.0 or later, iOS 11.0 or later
General Specifications:
Input Electrical Rating: 120V 15A,60Hz
Max Output Electrical Rating: 120V~, 15A Resistive Load, 600W Incandescent (WLS0403 & WLS040), 400W Incandescent (WDS060)
WiFi: 2.4GHz 802.11n
Operating Temperature: 0 - 40^
Care:
- Use dry cloth on exterior of the device. To avoid shock hazard and/or damage to device, DO NOT use any liquid solution.
Caution:
-
Risk of Electric Shock - More than one disconnected switch may be required to de-energize the equipment before servicing.
-
For residential and Indoor Dry Location Use Only.
For supply connections, use 14 AWG or larger wires rated for at least 90^ C.
Changes or modifications not expressly approved by party responsible for compliance could void the user's authority to operate the equipment.
-
To avoid any risk or hazard that may be caused due to the end product connected to 3-Way Light Switch and Wemo Dimmer, please read and understand the operation of the connected equipment before operating with 3-Way Light Switch.
-
If any of the above instructions are not followed, or the equipment is used in a manner not specified by the manufacturer, the protection provided by the equipment may be impaired.
Device can be toggled on/off by touching the white button on the front of the unit, or by using the WEMO® App.
For support, please visit: wemo.com/support.html

- WARNING! Risk of electric shock
- Wemo Smart Dimmer can only replace single-pole switches
- Neutral wires are required for setup
- What you'll need
- What's included
- Recommended tools
- Compatible light bulbs
- Maximum total wattage
- Install where your Wi-Fi signal is strong
- Installing your Dimmer
- Installation video
- Turn power off
- Confirm that power is off
- Find the NEUTRAL wires
- Pull out existing switch
- NOTE:
- Test the NEUTRAL wires
- Disconnect the NEUTRAL wires
- Find the GROUND wires
- Find and label LINE and LOAD wires
- Help with distinguishing LINE from LOAD
- Remove existing switch
- Cap LINE and LOAD wires for safety
- Turn the power back ON
- Test to identify the wires
- Turn the power back OFF
- Label the LINE and LOAD wires
- Connect Wemo Dimmer wires
- Make sure power is OFF before proceeding
- Remove cover plate
- Connect LINE and LOAD wires
- Connect NEUTRAL and GROUND wires
- Install Dimmer into the wall
- Carefully tuck wires behind the Dimmer
- Screw the Dimmer into the wall and snap on the cover plate
- Turn on power
- Physical installation is complete
- BLINKING WHITE
- BLINKING BLUE
- Go to the app for next steps
- Use HomeKit Code if prompted
- Connecting to other services
- Got questions?
- What does the light tell me?
- OFF
- SOLID WHITE
- GREEN
- RED
- WHITE/BLUE/RED
- FCC Statement
- DECLARATION OF CONFORMITY WITH FCC RULES FOR ELECTROMAGNETIC COMPATIBILITY
- Federal Communications Commission Notice
- Radiation Exposure Statement
- Innovation, Science and Economic Development Canada Statement:
- Innovation, Science and Economic Development Canada Radiation Exposure Statement:
- System Requirements:
- General Specifications:
- Care:
- Caution:
Brand : BELKIN
Model : Wemo WiFi Smart Dimmer
Category : Wall socket