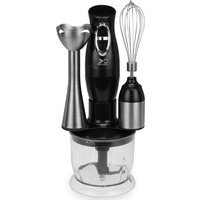
CMM 39732 - Blender KALORIK - Free user manual and instructions
Find the device manual for free CMM 39732 KALORIK in PDF.


| Product Type | Immersion blender (hand blender) |
| Brand | Kalorik |
| Model | CMM 39732 |
| Blade Material | Stainless steel |
| Blender Shaft | Stainless steel, removable |
| Included Accessories | Mixing cup, chopper with lid, stainless steel whisk, accessory holder, whisk base |
| Number of Speeds | 2 (I and II) |
| Motor Unit | Integrated in the handle, ergonomic |
| Power Supply | Electric, mains (220-240 V, 50-60 Hz) |
| Power | Approximately 600 W (estimated) |
| Weight | Approximately 1.2 kg (with accessories) |
| Dimensions (motor unit) | Length ~40 cm, diameter ~6 cm |
| Cup Capacity | 600 ml (estimated) |
| Usage | Blending, chopping, emulsifying, whisking |
| Safety | Unplug before cleaning, do not immerse motor unit, non-slip surface |
| Maintenance and Cleaning | Blades and accessories washable with soapy water, motor unit wiped with a damp cloth |
| Warranty | 1 year (United States and Canada) |
| Spare Parts and Repairability | Contact Kalorik customer service for spare parts |
| General Information | Household use only, 28-page instruction manual |
Frequently Asked Questions - CMM 39732 KALORIK
User questions about CMM 39732 KALORIK
0 question about this device. Answer the ones you know or ask your own.
Ask a new question about this device
Download the instructions for your Blender in PDF format for free! Find your manual CMM 39732 - KALORIK and take your electronic device back in hand. On this page are published all the documents necessary for the use of your device. CMM 39732 by KALORIK.
USER MANUAL CMM 39732 KALORIK
natural_image
Product photo of a kitchen brush and spatula with whisk, beaker, and glass (no text or symbols visible)PARTS DESCRIPTION / DESCRIPTION DES ÉLÉMENTS

PARTS DESCRIPTION / DESCRIPTION DES ÉLÉMENTS
ENGLISH:
- Stainless steel blade
- Removable Stainless steel shaft
- Mixing cup
- Chopper bowl with stainless steel blade
- Chopper lid
-
Accessories holder
-
Whisk base
- Stainless steel whisk
- Motor block / handle
- Speed "I"
- Speed "II"
ESPAÑOL:
When using electrical appliances, basic safety precautions should always be followed, including the following:
1. READ ALL INSTRUCTIONS
- Check that the voltage in your home corresponds to that stated on the rating plate of the appliance, before using.
- To protect against electric shock do not immerse cord, plug, or motor unit in water or other liquid.
- Close supervision is necessary when the appliance is used by or near children.
- Unplug from outlet when not in use, before putting on or taking off parts and before cleaning.
- Avoid touching moving parts.
- Do not operate any appliance with a damaged cord or plug or after the appliance malfunctions, or is dropped or damaged in any manner. Return appliance to the nearest authorized service facility for examination, repair or electrical or mechanical adjustment.
- The use of accessory attachments not recommended by the appliance manufacturer may cause injuries.
- Do not use outdoors.
- Do not let cord hang over edge of table or counter or touch hot surfaces.
- Do not place on or near a hot gas or electric burner, or in a heated oven.
- To disconnect, pull plug from the wall socket. Do not disconnect with wet hands.
- Remove the accessories from the motor unit before washing.
- The blades of the stick mixer are sharp. Handle carefully.
- Keep hands, hair, loose clothes and utensils away from moving blades while processing food to reduce the risk of severe injury to persons or damage to the appliance. A scraper may be used but must be used only when the appliance is not running.
- When mixing liquids, especially hot liquids, use a tall container or make small quantities at a time to reduce spillage.
CAUTION: SPECIAL SAFEGUARDS
Blender attachment
- Always unplug the appliance before changing accessories or approaching parts which move when in use.
- Never touch the blades while the machine is plugged in.
- Never blend hot oil or fat.
Chopper
- Care is needed when handing the cutting blade, especially when removing the blade from the bowl, emptying the bowl and during cleaning. Do not touch the sharp blades!
- Always remove the chopper blade before emptying the bowl. Never remove the cover before the blade has completely stopped.
CAUTION: The corkscrew spiral is sharp. Handle carefully. Keep hands and utensils out of the unit while operating to prevent the possibility of severe personal injury and/or damage to the product or property.
SAVE THESE INSTRUCTIONS HOUSEHOLD USE ONLY
POLARIZED PLUG INSTRUCTIONS
This appliance is equipped with a polarized plug (one blade is wider than the other). To reduce the risk of electric shock, this plug will fit into the polarized outlet only one way. If the plug does not properly fit into the outlet at first, reverse it. If it still does not fit, contact a competent qualified electrician. Do not attempt to modify the plug in any way.
SHORT CORD INSTRUCTIONS
A short power supply cord is provided to reduce the hazards resulting from becoming entangled in, or tripping over a longer cord. Extension cords may be used if care is exercised in their use.
- The electrical rating of the extension cord should be at least that of the appliance. If the electrical rating of the extension cord is too low, it could overheat and burn.
- The resulting extended cord should be arranged so that it will not hang over the counter top or tabletop where it can be pulled on by children or tripped over.
PARTS DESCRIPTION
See page 2-3.
IMPORTANT INFORMATION
This appliance is not for professional use. You should follow the requested breaks. Failure to follow this instruction carefully may result in damage to the motor. Please refer to the rating label for the maximum continuous usage time (KB xx min where xx is the maximum usage time). The breaks should last at least 10 minutes.
Note: the KB indicates a maximum continuous motor usage time. In general, this appliance is used using a pulse pattern, so the real maximum usage time is actually much longer than the KB indicated on the rating label.
HOW TO USE WITH THE BLENDER SHAFT
Your new stick mixer is convenient and easy to use, for powerful high-speed blending. It is great for shakes, soups, sauces, omelets and much, much more.
- Before using for the first time, the appliance should be cleaned with a damp cloth. Ensure the unit is unplugged first!
- Screw the shaft (2) onto the screw thread at the bottom of the motor unit (9). For this, hold the motor block and turn the shaft counter clockwise until it locks in. Gentle pressure by hand will ensure that the shaft is fully tightened on to the motor unit.
- Put the ingredients into a suitable container such as a tall mixing bowl, cooking pan or mixing cup. Do not overfill, to avoid splashing when the motor is switched on.
- Plug into a wall outlet.
- Put the shaft's head vertically into the ingredients before pressing one of the switches. This will prevent splashing when the motor is switched on.
- Switch on motor by choosing “Speed I” (10) or “Speed II” (11) and blend but remember to use for no longer than 1 minute of continuous motor use. The motor must then be rested for 10 minutes.
Note: we recommend starting with the lower speed setting ("I") and then increase the blade rotation speed by selecting speed "II" if needed.
Tips:
- Never fill the mixing cup to more than 2/3 full, to prevent over flowing.
- Always blend ingredients together with water or other liquid with the stick blender.
- Do not use the stick blender to blend dry, hard foods only, such as coffee beans, ice cubes, sugar, cereals, chocolate etc.
• Always use the appliance on a secure, dry level surface.
HOW TO USE WITH THE CHOPPER BOWL
• Make sure the motor block is disconnected from the power outlet.
- Place the chopping blade on the center pin inside the chopper bowl (4). – handle with caution because it is sharp!
- Place the chopper bowl on an anti-slip pad.
- Add food in chopper bowl, such as meat, cheese, onions, herbs, garlic, bread crumbs or crackers, etc.
- Put the chopper lid (5) on the chopper bowl (4), by inserting the grooves on the side of the lid into the pins inside the wall of the bowl and locking it with a twisting motion clockwise.
- Place the motor block (9) onto the chopper's lid and lock it in place by applying a gentle twisting motion clockwise.
- Plug the appliance into a wall outlet.
- Pulse on any switch, “Speed 1” (10) or “Speed II” (11) to operate the chopper. During the processing, hold the motor unit with one hand and the chopper bowl with the other.
- After use, unplug it and take the motor unit off of the chopper cover (with a counter clockwise twisting motion); then remove the
chopper lid (also with a counter clockwise twisting motion) – make sure beforehand that the blades are completely stopped -
- Carefully remove the blade – handle with caution because it is sharp!
- Remove the processed food from the bowl.
Note: remember to use for no longer than 1 minute of continuous motor use. The motor must then be rested for 10 minutes. Keep food quantity to process under 1 lb. (450g).
HOW TO USE WITH THE WHISK ATTACHEMENT
- Make sure the motor block is disconnected from the power outlet.
- Insert the stainless-steel whisk (8) gently on its base (7), until you hear a click sound, indicating that the whisk is securely inserted.
- Screw the whisk assembly (7) + (8) onto the screw thread at the bottom of the motor unit. For this, hold the motor block and turn the whisk assembly counter clockwise until it locks in. Gentle pressure by hand will ensure that the whisk assembly is fully tightened on to the motor unit.
- Put the ingredients into a suitable container such as a tall mixing bowl, cooking pan or mixing cup. Do not overfill, to avoid splashing when the motor is switched on.
- Plug the appliance into a wall outlet.
- Put the whisk vertically into the ingredients before pressing one of the switches. This will prevent splashing when the motor is switched on.
- Switch on motor by choosing "Speed I" or "Speed II" and blend, but remember to use for no longer than 1 minute of continuous motor use. The motor must then be rested for 10 minutes.
GET MORE OUT OF YOUR PRODUCT
Browse Chef-created recipes specifically made for your Kalorik product. Visit our website www.kalorik.com to see our extensive recipe library and start cooking. Sign up for the Kalorik email mailing list to receive special offers and recipes, and connect with us on social media for daily inspiration.
CLEANING
- Caution: Always unplug the unit before cleaning.
- The motor unit should only be wiped down with a moist cloth.
- Unscrew the shaft, or the whisk assembly, from the screw thread at the bottom of the motor unit, by holding the motor block and gently turning the shaft clockwise to dis-assemble it.
- Wash the shaft under running water immediately after use. If it is very dirty, it can be washed in warm soapy water.
- Dry the detachable shaft thoroughly after washing.
- The mixing cup, the chopper bowl, the chopper blade and the stainless-steel whisk (without its base) are dishwasher safe, or can be cleaned in warm soapy water.
- The chopper lid (5) and the whisk base (7) may be rinsed under the tap, but do not immerse in water.
NEVER IMMERSE THE MOTOR UNIT IN WATER OR ANY LIQUID!
STORAGE
To store all the accessories and the unit cleanly and safely, please proceed as follows:
- Assemble the chopper, as explained in the paragraph "How to use with the Chopper bowl".
- Place the accessory holder (6), centered on the lid of the chopper.
- Place the motor block, as explained in the paragraph "How to use with the Chopper bowl".
- Place the whisk assembly on one of the domes of the accessory holder, and lock it in place with a clockwise twisting motion.
- Place the blending shaft on the other dome, and lock it in place with a clockwise twisting motion.
- To disassemble, proceed with reverse action and order.
- Alternatively, you can hang the motor block with only the blending shaft attached to it, using the hanging loop located where the power cord meets the motor block.
We suggest that you complete and return the enclosed Product Registration Card promptly to facilitate verification of the date of original purchase. However, return of the Product Registration Card is not a condition of these warranties. You can also fill out this warranty card online, at the following address: www.KALORIK.com
This KALORIK product is warranted in the U.S.A. and in Canada for 1 year from the date of purchase against defects in material and workmanship. This warranty is not transferable. Keep the original sales receipt. Proof of purchase is required to obtain warranty performance.
During this period, if the KALORIK product, upon inspection by KALORIK, is proven defective, it will be repaired or replaced, at Kalorik's option, without charge to the customer. If a replacement product is sent, it will carry the remaining warranty of the original product.
This warranty does not apply to any defect arising from a buyer's or user's misuse of the product, negligence, failure to follow KALORIK instructions noted in the user's manual, use on current or voltage other than that stamped on the product, wear and tear, alteration or repair not authorized by KALORIK, or use for commercial purposes. There is no warranty for glass parts, glass containers, filter basket, blades and agitators, and accessories in general. There is also no warranty for parts lost by the user.
ANY WARRANTY OF MERCHANTABILITY OR FITNESS WITH RESPECT TO THIS PRODUCT IS ALSO LIMITED TO THE ONE YEAR LIMITED WARRANTY PERIOD.
Some states do not allow limitation on how long an implied warranty lasts or do not allow the exclusion of incidental or consequential damages, so the above limitations may not apply to you. This warranty gives you specific legal rights, and you may also have other rights which vary from state to state.
If the appliance should become defective within the warranty period and more than 30 days after date of purchase, do not return the appliance to the store: often, our Customer Service Representatives can help solve the problem without having the product serviced. If
servicing is needed, a Representative can confirm whether the product is under warranty and direct you to the nearest service location.
If this is the case, bring the product, or send it, postage prepaid by the user (all Kalorik customers are responsible for the initial shipment back to the warranty center), along with proof of purchase and a return authorization number indicated on the outer package, given by our Customer Service Representatives. Send to the authorized KALORIK Service Center (please visit our website at www.KALORIK.com or call our Customer Service Department for the address of our authorized KALORIK Service Center).
When sending the product, please include a letter explaining the nature of the claimed defect.
If you have additional questions, please call our Customer Service Department (please see below for complete contact information), Monday through Thursday from 9:00am - 5:00pm (EST) and Friday from 9:00am - 4:00pm (EST). Please note hours are subject to change.
If you would like to write, please send your letter to:
KALORIK Customer Service Department
Team International Group of America Inc. 16175 NW 49 ^th Avenue Miami Gardens, FL 33014 USA
Or call:
Toll Free: +1 888-521-TEAM / +1 888-KALORIK
Only letters can be accepted at this address above. Shipments and packages that do not have a return authorization number will be refused.
OBTENGA MÁS DE SU PRODUCTO
Team International Group of America Inc.
16175 NW 49 ^th Avenue
Miami Gardens, FL 33014 USA
O llame gratuitamente (U.S.A.) al +1 888-521-TEAM / +1 888-KALORIK
INSTRUCTIONS POUR LES FICHES AVEC MISE A LA TERRE
Team International Group of America Inc.
16175 NW 49 ^th Avenue
Miami Gardens, FL 33014 USA
For questions please contact:
Team International Group of America Inc.
16175 NW 49th Avenue
Miami Gardens, FL 33014 USA
User manual content and recipes courtesy of Team International Group – Do not reproduce without consent of the authors - All rights reserved.


- PARTS DESCRIPTION / DESCRIPTION DES ÉLÉMENTS
- ENGLISH:
- ESPAÑOL:
- When using electrical appliances, basic safety precautions should always be followed, including the following:
- READ ALL INSTRUCTIONS
- CAUTION: SPECIAL SAFEGUARDS
- Blender attachment
- Chopper
- SAVE THESE INSTRUCTIONS HOUSEHOLD USE ONLY
- POLARIZED PLUG INSTRUCTIONS
- SHORT CORD INSTRUCTIONS
- PARTS DESCRIPTION
- IMPORTANT INFORMATION
- HOW TO USE WITH THE BLENDER SHAFT
- Tips:
- HOW TO USE WITH THE CHOPPER BOWL
- HOW TO USE WITH THE WHISK ATTACHEMENT
- GET MORE OUT OF YOUR PRODUCT
- CLEANING
- NEVER IMMERSE THE MOTOR UNIT IN WATER OR ANY LIQUID!
- STORAGE
- KALORIK Customer Service Department
- OBTENGA MÁS DE SU PRODUCTO
- INSTRUCTIONS POUR LES FICHES AVEC MISE A LA TERRE
Brand : KALORIK
Model : CMM 39732
Category : Blender