EK 35321 - Egg cooker KALORIK - Free user manual and instructions
Find the device manual for free EK 35321 KALORIK in PDF.

User questions about EK 35321 KALORIK
0 question about this device. Answer the ones you know or ask your own.
Ask a new question about this device
Download the instructions for your Egg cooker in PDF format for free! Find your manual EK 35321 - KALORIK and take your electronic device back in hand. On this page are published all the documents necessary for the use of your device. EK 35321 by KALORIK.
USER MANUAL EK 35321 KALORIK
natural_image
Black Kalorok electric heater with a conical lid and red control knob (no text or symbols visible on the device itself)EN......4
ES......12
FR.....20
text_image
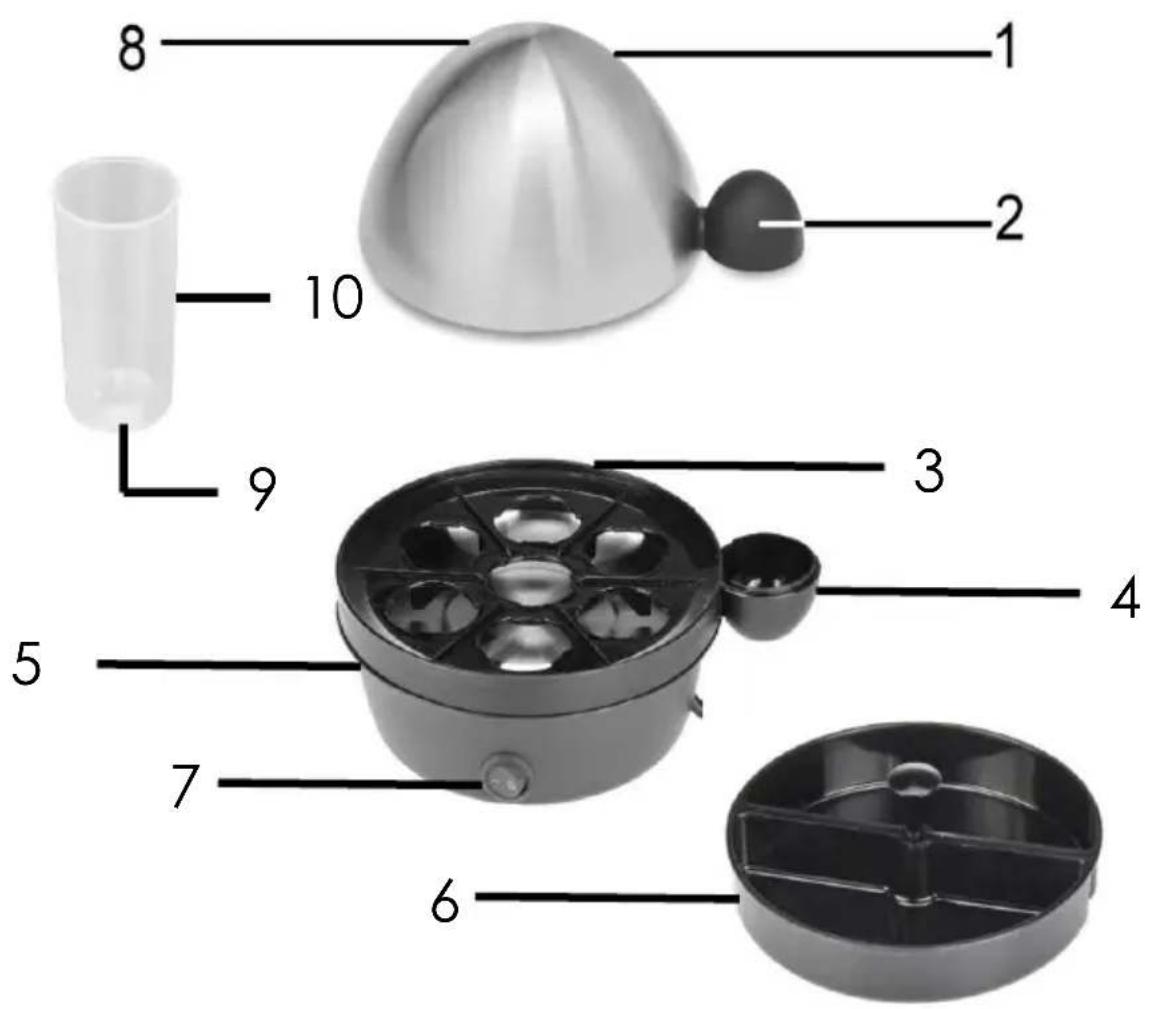
1 2 8 10 3 9 4 5 7 6ENGLISH:
- Lid
- Lid handle
- Egg-rack
- Egg-rack handle
-
Housing
-
Egg Poaching tray
- On/Off Switch with power light
- Steam outlet
- Egg piercer
- Measuring cup
ESPAÑOL:
When using electrical appliances, basic safety precautions should always be followed, including the following:
- READ ALL INSTRUCTIONS
- Check that your mains voltage corresponds to that stated on the rating plate of the appliance before using the appliance.
- Do not touch hot surfaces. Use the handles.
- To protect against electrical shock do not immerse cord, plug, or the appliance in water or other liquid.
- Close supervision is necessary when the appliance is used by or near children.
- Please keep out of reach of children and pets. This product is not intended for use by children, by persons with reduced physical, sensory or mental capabilities, or lacking experience or knowledge, unless they have been given supervision or instruction concerning the use of the product, by a person responsible for their safety. Extra caution is always necessary when using this product.
- Unplug from outlet when not in use and before cleaning. Allow to cool before cleaning the appliance.
- Do not operate any appliance with a damaged cord or plug or after the appliance malfunctions or has been damaged in any manner. Return appliance to the nearest authorized service facility for examination, repair, or adjustment.
- The use of accessory attachments not recommended by the appliance manufacturer may cause injuries.
- Do not use outdoors
- Do not let cord hang over edge of table or counter or touch hot surfaces.
- Do not place on or near a hot gas or electric burner, or in a heated oven.
- Do not handle plug or appliance with wet hands.
- Never immerse the heating base of your appliance in water or any other liquid for any reason whatsoever. Never place any piece of your appliance into the dishwasher.
- Never use the appliance near hot surfaces.
-
Stand the appliance on a flat and stable surface.
-
Unplug the appliance when not in use or immediately after use.
- Make sure the appliance is unplugged before inserting, removing or cleaning one of the accessories. It is absolutely necessary to remove the accessories before cleaning them.
- Make sure to let the appliance cool down before cleaning it, as the plate might be very hot and cause scalding.
- Only cook chicken eggs and nothing else.
- Make sure the cord never comes into contact with the hot parts of the appliance. Never touch the hot parts of the appliance, make use of the plastic handles. Always use gauntlets when handling the appliance. Make sure nothing comes into contact with the heating element of the appliance.
- Be careful not to hurt yourself with the needle (situated underneath the measuring cup) that serves for piercing the egg before cooking it, as it is very sharp. Make sure it is always clean as it comes into direct contact with food.
- Never move the appliance when it is in use.
SAVE THESE INSTRUCTIONS HOUSEHOLD USE ONLY
POLARIZED PLUG INSTRUCTIONS
This appliance is equipped with a polarized plug (one blade is wider than the other). To reduce the risk of electric shock, this plug will fit into the polarized outlet only one way. If the plug does not properly fit into the outlet at first, reverse it. If it still does not fit, contact a competent qualified electrician. Do not attempt to modify the plug in any way.
SHORT CORD INSTRUCTIONS
A short power supply cord is provided to reduce the hazards resulting from becoming entangled in, or tripping over a longer cord. Extension cords may be used if care is exercised in their use.
- The electrical rating of the extension cord should be at least that of the appliance. If the electrical rating of the extension cord is too low, it could overheat and burn.
- The resulting extended cord should be arranged so that it will not drape over the counter top or tabletop where it can be pulled on by children or tripped over.
PARTS DESCRIPTION
See page 2-3.
IMPORTANT
- The cooking time depends on the number and size of eggs.
- Depending on the mineral content of the water in your region you may see a slight decolourisation of the egg shell. This does not affect the taste or the quality of the egg.
HARD OR SOFT BOILING
- Take the appliance out of the gift box. Clean the boiling dish with a damp cloth.
- Put the egg boiler on an even surface.
- Choose the number of eggs that you want to cook. Use the measuring cup for filling the boiling dish with cold water, adapting the quantity of water to the type of cooking you need (soft-, medium- or hard-boiled eggs) and to the number of eggs to be cooked; using the graduation on the measuring cup or your own experience.
NOTE: the harder the egg, the more water is needed. The more eggs to be cooked, the less water is needed.
- Put the egg-rack onto the boiling dish.
- Pierce the largest rounded end of the eggs, with the egg piercer, which you will find underneath the measuring cup, and place the eggs onto the egg rack. Using the egg piercer prevents the eggs from cracking during boiling.
NOTE: Please be very careful when using the egg piercer as the needle is very sharp.
- Place the lid on top of the egg boiler and plug the power plug into the socket. Then switch on the appliance, using the on/off switch. The pilot light will switch on indicating the appliance is heating.
- To avoid any scalding risk, keep your hands away from the steam vent in the lid while the egg boiler is in use. Do not touch the stainless-steel lid as it will get hot too.
- When the eggs are ready, a buzzer sound will ring. Switch the appliance back to off.
- Unplug the appliance.
- Remove the lid using the handle. Take the egg rack immediately to prevent overcooking and rinse the eggs with cold water, or let them cool down.
- If you use your appliance several times, let it cool down between each use.
POACHING
Your egg boiler is supplied with a poaching tray. To use it:
- Place the egg cooker on a clean, dry surface.
- Remove the lid and cooking tray.
- Fill half of the beaker with cold water (approx. 1.9 Fl.Oz / 55ml). Pour the cold water onto heating plate.
- Lightly butter or spray vegetable oil on the poaching tray.
- Break one or 2 eggs for each poaching section – cooks up to four poached eggs.
- Place the cooking rack on the base and place the poaching tray on the top of the cooking rack.
- Place the lid on top of unit
- Plug-in the appliance and switch it on using the on/off switch. The indicator light will be lit.
- When the liquid is sufficiently evaporated, the eggs will be poached.
- When cooking is complete, a continuous audible buzzing tone will sound. Switch off the appliance.
- Switch off and unplug the appliance.
- Remove the poached eggs immediately to prevent overcooking.
MEASURING THE WATER
- If you want to cook 2 soft eggs, fill the measuring cup up to the number 2 of the "SOFT" level and so on. This is valid for soft, medium and hard eggs.
- Below is a table with the approximate amount of water needed to achieve the cooking level you want:
It is recommended to use the included measuring cup.
Please reference the chart below should the special measuring cup be misplaced. Water quantities are approximate.
The measuring cup indicates three different water levels:
SOFT - MEDIUM - HARD.
The table below indicates the corresponding amount of water.
| Quantity of eggs | Soft-boiled | Medium-boiled | Hard-boiled | Poached |
| 1 | 33ml / 1.1Oz | 55ml / 1.9Oz | 94ml / 3.2Oz | 55ml / 1.9Oz |
| 2 | 30ml / 1.0Oz | 51ml / 1.7Oz | 87ml / 2.9Oz | 55ml / 1.9Oz |
| 3 | 26ml / 0.9Oz | 47ml / 1.6Oz | 80ml / 2.7Oz | 55ml / 1.9Oz |
| 4 | 23ml / 0.8Oz | 43ml / 1.5Oz | 73ml / 2.5Oz | 55ml / 1.9Oz |
| 5 | 19ml / 0.7Oz | 39ml / 1.3Oz | 66ml / 2.2Oz | |
| 6 - 7 | 16ml / 0.5Oz | 35ml / 1.2Oz | 59ml / 2.0Oz |
Duration for poached eggs: 8 to 9 minutes.
Please let the appliance cool down before cleaning and rinsing it!
- Unplug the appliance from the supply socket and wait until it has cooled down. Throw away the excess liquid if any.
- When cooled, wipe off the excess water and/or deposit with a wet sponge or towel
- If the mineral deposit is stubborn, let a slightly diluted vinegar and water solution, or a decalcifying solution formulated for coffee makers, stay on the mineral deposit a few minutes, until it is gone.
- Rinse the rack, the accessories (be careful with the needle underneath the measuring cup) and the lid with water.
- Clean the heating plate with a paper towel moistened with one tablespoon of white vinegar.
- Clean the housing and the metallic surface of the lid with a damp cloth. Never use abrasive cleaners. DO NOT immerse the main body in water.
- Place clean cooking tray, poaching tray, measuring cup and egg holders inside the egg cooker for storage. All accessories should fit inside the appliance for storage.
We suggest that you complete and return the enclosed Product Registration Card promptly to facilitate verification of the date of original purchase. However, return of the Product Registration Card is not a condition of these warranties. You can also fill out this warranty card online, at the following address: www.KALORIK.com
This KALORIK product is warranted in the U.S.A. and Canada for 1 year from the date of purchase against defects in material and workmanship. This warranty is not transferable. Keep the original sales receipt. Proof of purchase is required to obtain warranty performance.
During this period, if the KALORIK product, upon inspection by KALORIK, is proven defective, it will be repaired or replaced, at Kalorik's option, without charge to the customer. If a replacement product is sent, it will carry the remaining warranty of the original product.
This warranty does not apply to any defect arising from a buyer's or user's misuse of the product, negligence, failure to follow KALORIK instructions noted in the user's manual, use on current or voltage other than that stamped on the product, wear and tear, alteration or repair not authorized by KALORIK, or use for commercial purposes. There is no warranty for glass parts, glass containers, filter basket, blades and agitators, and accessories in general. There is also no warranty for parts lost by the user.
ANY WARRANTY OF MERCHANTABILITY OR FITNESS WITH RESPECT TO THIS PRODUCT IS ALSO LIMITED TO THE ONE YEAR LIMITED WARRANTY PERIOD.
Some states do not allow limitation on how long an implied warranty lasts or do not allow the exclusion of incidental or consequential damages, so the above limitations may not apply to you. This warranty gives you specific legal rights, and you may also have other rights which vary from state to state.
If the appliance should become defective within the warranty period and more than 30 days after date of purchase, do not return the appliance to the store: often, our Customer Service Representatives can help solve the problem without having the product serviced. If
servicing is needed, a Representative can confirm whether the product is under warranty and direct you to the nearest service location.
If this is the case, bring the product, or send it, postage prepaid by the user (all Kalorik customers are responsible for the initial shipment back to the warranty center), along with proof of purchase and a return authorization number indicated on the outer package, given by our Customer Service Representatives. Send to the authorized KALORIK Service Center (please visit our website at www.KALORIK.com or call our Customer Service Department for the address of our authorized KALORIK Service Center).
When sending the product, please include a letter explaining the nature of the claimed defect.
If you have additional questions, please call our Customer Service Department (please see below for complete contact information), Monday through Thursday from 9:00am - 5:00pm (EST) and Friday from 9:00am - 4:00pm (EST). Please note hours are subject to change.
If you would like to write, please send your letter to:
KALORIK Customer Service Department
Team International Group of America Inc.
1400 N.W 159th Street, Suite 102
Miami Gardens, FL 33169 USA
Or call:
Toll Free: +1 888-521-TEAM / +1 888-KALORIK
Only letters can be accepted at this address above. Shipments and packages that do not have a return authorization number will be refused.
Team International Group of America Inc.
1400 N.W 159th Street, Suite 102
Miami Gardens, FL 33169 USA
O llame gratuitamente (U.S.A.) al +1 888-521-TEAM / +1 888-KALORIK
Team International Group of America Inc.
1400 N.W 159th Street, Suite 102
Miami Gardens, FL 33169 USA
For questions please contact:
KALORIK Customer Service Department
Team International Group of America Inc.
1400 N.W 159th Street, Suite 102
Miami Gardens, FL 33169 USA
Toll Free: +1 888-521-TEAM / +1 888-KALORIK
www.KALORIK.com

text_image
1 AÑO GARANTIA GARANTIE 1 AN • 1 YEAR WARRANTYModel EK 35321
User manual content and recipes courtesy of Team International Group – Do not reproduce without consent of the authors - All rights reserved.
KALORIK®
Since 1930