
502004 - Croque monsieur clip Tecnoinox - Free user manual and instructions
Find the device manual for free 502004 Tecnoinox in PDF.

User questions about 502004 Tecnoinox
0 question about this device. Answer the ones you know or ask your own.
Ask a new question about this device
Download the instructions for your Croque monsieur clip in PDF format for free! Find your manual 502004 - Tecnoinox and take your electronic device back in hand. On this page are published all the documents necessary for the use of your device. 502004 by Tecnoinox.
USER MANUAL 502004 Tecnoinox
General instructions
The appliance referred to in this manual has been manufactured in conformity to the following Directives: 2006/42/EEC "Machinery Directive"; 2004/108/EEC "Electromagnetic Compatibility".
This appliance has been designed exclusively for cooking food, any other use is considered improper. It has been designed for use in community kitchens only and must be operated exclusively by qualified personnel.
The appliance must be installed, connected and serviced properly by qualified personnel according to the regulations and
directives in force in the country where it is installed, as well as the instructions in this manual.
The appliance shall be used exclusively by trained personnel and only for the purpose for which it has been designed. The appliance should be checked once a year by a qualified technician.
The bowl must always be in place when the appliance is working.
Care must be taken when using the appliance because the cooking surfaces are very hot.
Switch the appliance off in the case of a failure or malfunction.
INSTALLING AND CONNECTING TO THE MAINS
The Manufacturer declines all responsibility for damage caused by improper or incorrect installation or maintenance of the appliance or by failure to observe the safety regulations!
Remove the packaging from the appliance as well as the protective plastic sheet, and, if necessary, remove traces of glue with a suitable solvent.
Remove the screw that locks the movable shelf (it is on the back of the appliance).
To dispose of the packaging, follow local directives (for more details see the "PACKAGING" chapter.
When installing the appliance, all the regulations in force shall be observed, such as:
■ all applicable national laws in effect;
■ all regional or local regulations, such as building codes;
■ directives and regulations of the local electrical energy supplier;
■ accident prevention regulations in effect;
■ fire prevention regulations;
The appliance should be installed under an extractor fan for the removal of cooking fumes.
The appliance can be put on a worktop or wall mounted. The distance from adjacent appliances and any flammable surfaces must be at least 200 mm from the sides and 100 mm from the rear wall.
The appliance, and especially the power lead, must not be anywhere near heat sources and the space around the appliance must not exceed a temperature of 50^ C.
If the appliance is installed near walls, partitions or kitchen furniture, etc., these must be made of fire-proof material; if they are not, they must be protected with fire-proof material which insulates from heat.
Before connecting the appliance to the mains, compare the electrical data on the rating plate (on the appliance's back panel) to those of the local electrical energy supply.
The appliance is equipped with a connecting cable to which the installer must connect a circuit breaker which cuts off the flow of electricity in all poles; the distance between the open contacts must be at least 3 mm per pole. The circuit breaker must be easy to reach.
If the supply cable has to be changed, follow the indications given in the wiring diagram enclosed with this manual.
The supply cable's characteristics must be of a HO7 RN-F type, or higher, and its minimum cross-section must be in accordance with the following table:
| MODEL | POWER | CABLE |
| QSE_40/0 | 230 V ~ 1 - 50/60 Hz | 3 × 1.5 mm^2 |
| QSE_60/0 | 230 V ~ 1 - 50/60 Hz | 3 × 2.5 mm^2 |
| QSE_60/4 | 400 V ~ 2N - 50/60 Hz | 5 × 1.5 mm^2 |
CROSS-SI
To access terminal board "M" remove panel "C" from the back, disconnect the wires from the terminal board, loosen the cable clamp, and replace the cable following the procedure in the reverse order.
It is absolutely necessary to earth the appliance. For this purpose you will find the earth connection on the terminal board, identified with the 12 symbol and to which the earth wire must be connected.
The appliance must also be connected to an equipotential earthing circuit. The connection must be made by means of the screw marked to be found on the rear panel of the appliance.
Should the appliance be To fix the brackets to the wall, first make the necessary holes as shown on the installation diagram, and use 4 steel screw anchors suitable for M6 screws (SLM6 Fischer or equivalent.)
wall-mounted, use the appropriate optional brackets which must be requested.
Make sure that the wall is made of masonry, and not any inflammable material, and can bear a load equivalent to a 60 kg in weight.
SWITCHING ON, USING AND SWITCHING OFF
text_image
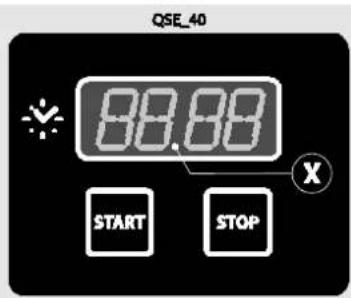
QSE_40 88.88 START STOP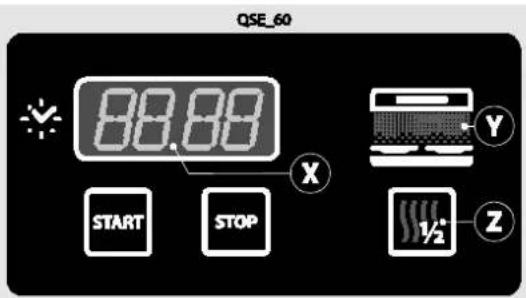
text_image
QSE_60 88.88 START STOP X Y ½+ Z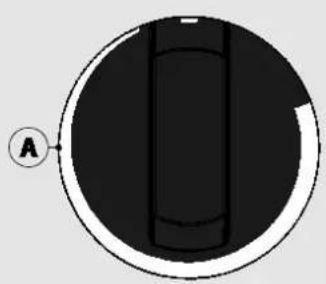
natural_image
Circular diagram with a black rectangle and a labeled point A, no text or symbols present.■ Turn the switch on, upstream from the appliance.
- Turn knob "A" clockwise, setting the cooking time which will be shown on the display (min.sec)
- Now press the "START" key to start cooking. The appliance will stay on for the length of time set and the display will show the time left to turning off, the "X" in the middle of the display flashes.
- By keeping START" pressed while the appliance is working ("X" in the middle of the display flashing) you can see the time set at the start of the current cooking cycle.
- By pressing the "STOP" key you can stop the appliance: the display shows the cooking time set. In these conditions cooking can be started again by pressing "START" again or you can change the time set with knob "A".
■ A buzzer signals when the cooking cycle is finished
- Switch the appliance off by moving the knob round to position "0".
FOR QSE60 ONLY
- By pressing key "Z" you can choose to use half or all the cooking surface, shown when the corresponding pilot light turns on (Y).
FOR QSET_ONLY
text_image
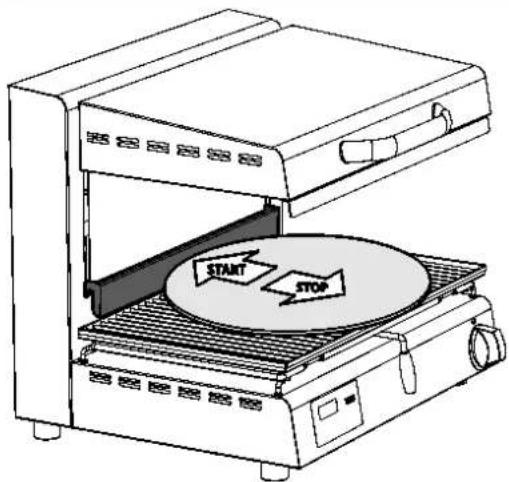
START STOPIf there is a power failure during cooking, when power returns the remaining cooking time will flash on the display. By pressing "START" the appliance will start again from this point.
CLEANING AND CARE
Do not wash the appliance with water jets because if water gets through to the electric components it could cause the appliance and the safety systems to malfunction!
- If the appliance is not going to be used for a long period of time, disconnect it from the mains and clean it with soapy water, rinse it off and dry it carefully. Spread a thin layer of Vaseline oil on the surface.
■ The bowl must be washed with soapy water daily. -
Let the appliance cool down before cleaning the bowl, or any other parts.
-
We also recommend cleaning the glass top regularly, when it is cold, using a few drops of a suitable detergent and rubbing with kitchen paper or a soft cloth. Rinse and dry with kitchen paper or a soft cloth.
- Do not use any kind of abrasive sponge or product, including corrosive detergents, like oven or stain-remover sprays.
- To minimise emission of polluting substances in the environment we suggest cleaning the appliance with products that are more than 90% biodegradable.
WHAT TO DO IF THE APPLIANCE MALFUNCTIONS
Failure to function does not always depend on the quality of the components used. These appliances are manufactured using top quality components. Failures may be caused by voltage surges, or dust and dirt in the operating components.
In any situation where improper functioning of the appliance is suspected, turn it off and disconnect it from the mains. Call the authorised repair service.
Unauthorised persons should never attempt to repair the appliance, or carry out maintenance. Tampering with the appliance voids the warranty!
MAINTENANCE
The appliance needs no specific maintenance besides normal cleaning; we do however suggest having it checked yearly by the assistance
centre for which reason we recommend drawing up a maintenance contract.
ECOLOGY AND THE ENVIRONMENT
Our appliances are studied and optimised, with lab tests, to provide high performance and yields. However, in order to save on power (electricity, gas and water), we suggest you do not use the appliance for any length of time if it is empty or under conditions that compromise optimum yield.
All packaging materials are environment-friendly. They can be kept without problem or burnt in a waste incinerator plant. The plastic components that can be recycled are:
■ Polyethylene: external packaging material and/or pluribol film
■ Polypropylene: straps
■ Polystyrene foam: corner pieces, sheets and protection blocks
At the end of the appliance's useful life, dispose of it properly.
90% of each appliance is made in metal (stainless steel, iron, aluminated sheet, etc.) hence it can be recycled via the relative recycling organisations in compliance with the standards in force in your country.
Prepare the appliance for disposal, so it cannot be used any more, by removing the power cable and any other closing devices to ensure against anyone getting locked inside.
