
DTR 7000 X - Radio GRUNDIG - Free user manual and instructions
Find the device manual for free DTR 7000 X GRUNDIG in PDF.

| Product type | Internet radio DAB+/FM with CD player and Bluetooth |
| Dimensions (W x H x D) | 120 x 300 x 185 mm |
| Weight | 3.2 kg |
| Power supply | Power adapter 15 V=2.4 A (36 W) |
| Standby consumption | < 1 W (normal standby) / < 2 W (network standby) |
| Display | 2.8" TFT colour screen (320 x 240 pixels) |
| Network connectivity | WiFi 802.11 a/b/g/n (2.4 and 5 GHz), Bluetooth 4.2 (A2DP, AVRCP) |
| Radio reception | DAB/DAB+ (Band III), FM (87.5-108 MHz), Internet radio, Podcasts |
| CD player | CD, CD-R, CD-RW, MP3-CD, WMA-CD (no DRM) |
| USB port | USB-A for flash drive (FAT16/32), plays MP3, AAC, FLAC, WMA |
| Auxiliary input | 3.5 mm jack socket (AUX IN) |
| Headphone output | 3.5 mm jack socket |
| Audio power | 2 x 4 W (wideband) + 24 W (bass), RMS |
| Equaliser | Presets (Normal, Flat, Jazz, Rock, Cinema, Classic, Pop, News) + custom (My EQ) |
| Number of presets | Internet radio: 20, Podcasts: 20, Spotify: 10, DAB+: 40, FM: 40 |
| Practical functions | 2 alarms with snooze, sleep timer, standby, adjustable backlight |
| Maintenance and cleaning | Wipe with a soft dry cloth; do not use solvents; turn off before cleaning |
| Safety | Double insulation (class II), do not open the casing, avoid moisture and strong vibrations |
| Spare parts and repairability | Contact Grundig customer service; no spare parts provided; repair by professional |
| General information | Brand: Grundig, Model: DTR 7000 X, Made in China, Power adapter included |
Frequently Asked Questions - DTR 7000 X GRUNDIG
User questions about DTR 7000 X GRUNDIG
0 question about this device. Answer the ones you know or ask your own.
Ask a new question about this device
Download the instructions for your Radio in PDF format for free! Find your manual DTR 7000 X - GRUNDIG and take your electronic device back in hand. On this page are published all the documents necessary for the use of your device. DTR 7000 X by GRUNDIG.
USER MANUAL DTR 7000 X GRUNDIG
natural_image
Black musical note symbol on white background (no text or numbers)DTR 7000
DE - EN - FR
Internetradio, Podcasts
Nach Sendern suchen
23 Risks associated with high volumes
23 Maintenance / Cleaning
24 REMOTE CONTROL
26 GETTING STARTED
26 Connection and Preparation
26 Connecting to the network
26 Using CDs
26 Connecting a USB memory stick
26 Connecting an audio source via AUX in
26 Connecting the headphones
27 GENERAL DEVICE FUNCTIONS
27 Presets
27 Now Playing Information
27 Inputting Characters
27 When the device is overloaded
27 First-time Setup
28 Setting date and time
28 Setting network
28 Use one of the following methods of connection
29 MAIN OPERATION
29 Internet Radio, Podcasts
29 Spotify
29 DAB+ Radio
29 Scanning for stations
30 FM Radio
30 CD
30 USB
31 Bluetooth
31 AUX
31 Sleep
31 Alarm
32 SYSTEM SETTINGS
32 Equaliser
32 Network
32 Time/Date
32 Language
32 Factory Reset
32 Software Update
32 Setup Wizard
32 Info
32 Privacy Policy
32 Backlight
33 TROUBLESHOOTING
34 INFORMATION
- By disposing the device in the future, Please note that all electrical and electronic device must be disposed separately from household waste by disposal centers.
- Avoid damage to the environment and risks to your personal health by disposing of device properly.
■ For further information about proper disposal, contact your local government, disposal bodies or the shop where you bought the device.
■ Dispose of all packaging in an environmentally-friendly manner.
■ Cardboard packaging can be taken to paper
recycling containers or public collection points for recycling.
■ Any film or plastic contained in the packaging should be taken to your public collection points for disposal.
■ Respect the environment. Old batteries must not be disposed of with domestic waste. They must be handed in at a collection point for waste batteries. Please note that batteries must be disposed of fully discharged at appropriate collection points for old batteries. If disposing of batteries which are not fully discharged, take precautions to prevent short circuits.
OVERVIEW
Do not drop the device and do not expose it to liquid, moisture or humidity. These might lead to damage to the device.
If the device is moved from a cold environment into a warmer one, do let it adapt to the new temperature before operate the device. Otherwise, it might lead to condensation and cause malfunctions in the device.
- Do not use the device in the dust environment as dust can damage the interior electronic components and lead to malfunctions in the device.
■ Protect the device from strong vibrations and place it on stable surfaces.
- Do not attempt to disassembly the device.
If the device is not using for a long period of time, disconnect it from the power supply by unplugging the power plug. This is to avoid the risk of fire.
■ The ventilation should not be impeded by covering the ventilation openings with items, such as newspapers, table-cloths, curtains, etc.
■ No naked flame sources, such as lighted candles, should be placed on the apparatus.
■ To maintain the compliance with the WiFi RF exposure requirement, place the product at least 20 cm (8 inches) from nearby persons except when operating the controls.
The functions of Wireless Access Systems including Radio Local Area Networks (WAS/RLANs) within the band 5150-5350 MHz for this device are restricted to indoor use only within all European Union countries (BE/BG/CZ/DK/DE/EE/IE/EL/ES/FR/HR/IT/CY/LV/LT/LU/HU/MT/NL/AT/PL/PT/RO/SI/SK/FI/SE/UK/TR/NO/CH/IS/LI).
Power Supply

The socket outlet should be installed near the device and should be easily accessible.
■ Never touch the power plug with wet hands and never pull on the power cable when pulling the plug out of the power socket.
This lightning flash with arrowhead symbol within an equilateral triangle is intended to alert the user to the presence of non-insulated "dangerous voltage" within the product's enclosure that may be of sufficient magnitude to constitute a risk of electric shock.
■ The exclamation point within an equilateral triangle is intended to alert the user to the presence of important operating and maintenance instructions in the literature accompanying the appliance.
■ Make sure the electrical voltage specified on the device and its power plug is corresponding to the voltage of the power socket. Do not apply excessive or incorrect voltages to the device, the device may not function properly and have an adverse effect on external circuitry. Furthermore, the device itself may become damaged or burnt.
■ The device is connected to the mains with the power cable. Pull out the power cable when you want to completely disconnect the device from the mains.
■ The normal function of the product may be disturbed by strong Electro-Magnetic Interference. If so, simply reset the product to resume normal operation by following the instruction manual. In case the function could not resume, please use the product in other location.
- Risk of explosion if the battery is replaced by an incorrect type-disposal of a battery into fire or a hot even, or mechanically crushing.
■ Leaving a battery in an extremely high temperature surrounding environment that can result in an explosion or the leakage of falmable liquid or gas.
■ A battery subjected to extremely low air pressure that may result in an explosion or leakage of flammable liquid or gas.
■ The device may malfunction when used in areas with strong radio interference. The device will work properly again once there is no more interference.

■ The device is a class II or double insulated electrical appliance. It has been designed in such a way that it does not require a safety connection to electrical earth. The type plate is located on the rear of the device.
Risks associated with high volumes
■ Listening the device with headphones, always reduce the volume before put on the headphones. After the headphones are positioned properly, increase the volume to the desired level.
■ To prevent possible hearing damage, do not listen at high volume for long periods.
Maintenance / Cleaning
■ Always power off the unit when cleaning it.
■ Never use any harsh or strong solvents to clean the device since these may damage the surface of the device. Dry, soft cloth is appropriate, however, if the device is extremely dirty, it may be wiped off with a slightly moist cloth. Make sure the device is dried off after cleaning.
■ Never open the device casing, The manufacturer will not accept any liability for damage resulting from improper handling.
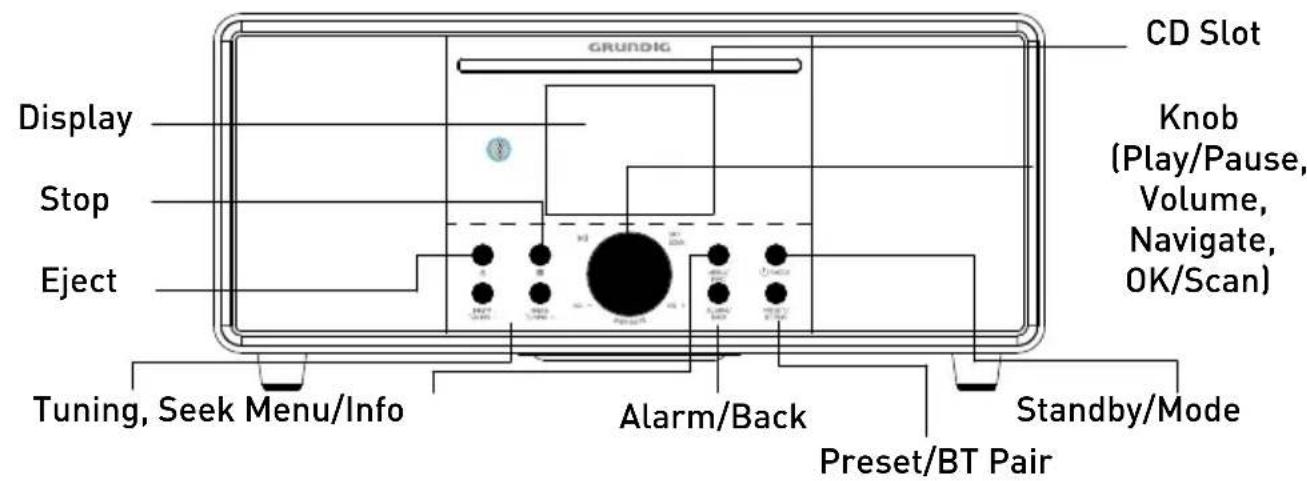
![MODE MENU SNOOZE BT PAIR ALARM 1 ALARM 2 DIMMER FOLDER DOWN FOLDER UP EQ OK [SCAN] BASS + - TREBLE - 1 2 ABC 3 DEF 4 GHI 5 JKL 6 MNO 7 PQRS 8 TUV 9 WXYZ ★ 10/0 INFO GRUNDIG](/content/2026/04/694423/images/4e95df2995c9d22c94b562ca1f616724271ca7db38e95d90f1e7fc8b330d3b6c.jpg)
| ➊ | Device power on/off; alarm off |
| ▲ | Open, close CD tray |
| MODE | Open, close mode selection |
| MENU | Open, close menu |
| ^2 | Set sleep time |
| SNOOZE | Enable snooze during alarm |
| BT PAIR | Hold down to turn Bluetooth discoverable |
| ALARM 1 ALARM 2 | Set Alarm |
| ▶II | Start playback, pause |
| ■ | Internet radio, podcast, CD, USB:Stop music playback |
| FOLDER FOLDER DOWN UP | CD, USB: Seek the folder |
| ◀◀ ▶◀ | Select track |
| ◀◀ ▶▶ | CD, USB:Hold down to seek along the track |
| → | Music: random selection |
| ↔ | Music: repeat selection |
| ▲ | Move up; FM: Set frequency |
| ▼ | Move down; FM: Set frequency |
| ◀ | Move left, step back |
| ▶ | Move right, step next |
| OK | Confirm entry; FM: DAB: slideshow in full screen |
| EQ | Select equalizer preset |
| ◀× | Mute, unmute |
| ◀+◀- | Adjust volume |
| -BASS+ | Adjust bass level as My EQ setting |
| -TREBLE+ | Adjust treble level as My EQ setting |
| 1...10/0 | Number buttons: retrieve saved favorite station, hold down to save station |
| ★ | Select favorite stations, hold down to save favorite |
| INFO | Go to BKSP when inputting charactersDisplay Internet Radio, Podcasts station/ track info (Descriptions, Streaming data, playback buffer)Display Spotify music info (Artist, Album, Streaming data, playback buffer)Display FM station info (Name, PTY, RT, frequency)Display DAB station info (Station, track, artist etc.)Display USB/CD music info (if ID3 Tag available in the music track - album, title, artist) |
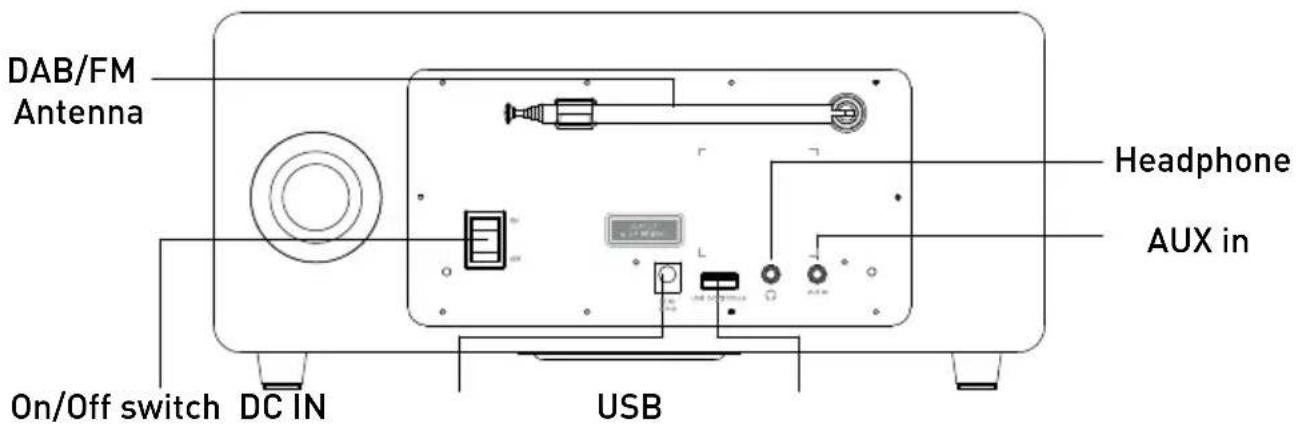
Connection and Preparation
Connect to the speaker and power socket using the AC adaptor. Switch on the device, it starts up.
Connecting to the network
■ Power on your device and connect to a wireless access point, router or similar network device.
■ The network device needs to support WiFi (802.11 a/b/g/n) wireless connection.
Make sure you have setup the wireless network and you have the WEP, WPA or WPA2 security password to activate the connection. You may also use the WPS (WiFi Protected Setup) function for easy pairing between the network device and DTR 7000 2.1 BT DAB+ WEB. Check if the light indicators on the network device are in appropriate status.
Using CDs

The device is suitable for music CDs displaying the logo shown here (CDDA) and for CD-Rs and CD-RWs with audio data. You can play standard 12 cm CDs on your device. The radio is able to play CD-R and CD-RW discs containing MP3 and WMA files. It is assumed in this section that a file is equivalent to a CD track.
An MP3 / WMA CD may not contain more than 999 files and not more than 99 folders. MP3 and WMA files should be created with standard audio sample rate of 44.1kHz.
MP3 and WMA data rates up to 320 kilobits per second are supported. WMA Lossless files are not supported. The unit will not play files which include digital rights management (DRM) protection. When burning CD-R and CD-RW discs with audio files, various problems may arise which could lead to problems with playback. Typically such problems are caused by poor CD writing or audio encoding software, or by the hardware settings of the PC's CD writer, or by the CD being used. Should such problems arise, contact the customer services of your CD writer or software manufacturer or look in their product documentation for relevant information. When you are making audio CDs, take care to observe all legal
guidelines and ensure that the copyright of third parties is not infringed.
Connecting a USB memory stick
Insert the USB plug of a USB memory stick into the USB port at the back of the device. The system of the USB must be FAT 16, FAT 32. It is not compatible with NTFS or other systems.
Connecting an audio source via AUX in
Use a standard 3.5mm audio cable to connect the audio output from the external device to the audio input sockets on the back of the device.
Connecting the headphones
Turn the volume down before using the headphones.
Inset the headphone plug (standard 3.5mm) into the headphone socket at the front of the device.
On the playing screen, rotate the volume knob or press » « / » « on the remote control to adjust the volume. Switch off the sound by pressing » « on the remote control.
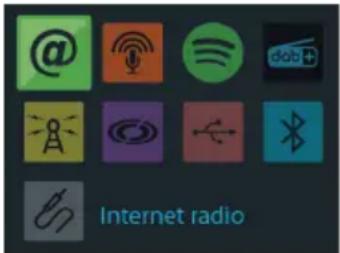
Press »/ MODE« on the device or on the remote control to select modes.
Press »MENU/INFO« to open the menu. Press again to close the menu and return to playing screen.
On the menu, rotate the knob or press arrow keys on the remote control to move along the entries.
Press »OK/SCAN« to confirm; press »ALARM/BACK« or »« on the remote control to step back.
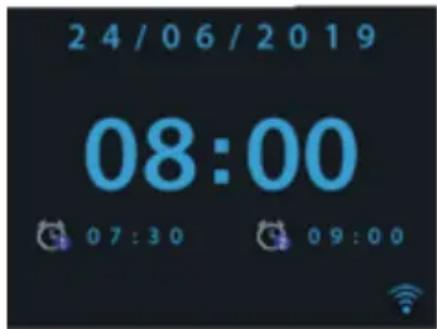
Press and hold » MODE« on the device or press » « on the remote control to switch to standby mode. The time, date and any active alarm times display on the screen.
Press » (1) to wake up from standby.
Presets
Number of presets: Internet Radio: 20 | Podcasts: 20 | Spotify: 10 | DAB+: 40 | FM: 40
To store any preset, press and hold »PRESET/BTPAIR« or »★« until the display shows the Save preset screen. Select one of the presets 1 - 40 by rotating the navigation knob on the device or arrow keys on the remote control and then press OK to save the currently playing station. To
store 1-10 preset stations, directly press and hold the numbers »1...10/0« on the remote control. To play any preset from 1 - 40, press »PRESET/BTPAIR« or »«, then select one of the listed preset stations. When a preset station is playing, it shows n ( 1, 2 etc) at the bottom of the screen. To recall 1-10 preset stations, directly press the number keys on the remote control.
Now playing information
While stream/DAB/FM is playing, the screen shows some information about the station, press »MENU/INFO« or »INFO« to view.
Inputting Character
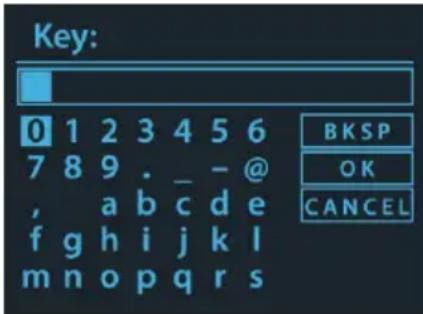
As each character is selected, the key is built up near the top of the display.
There are three options accessible by tuning the navigate reel back before the first characters »BACKSPACE«, »OK« and »CANCEL«.
Press »INFO« to move to the »BACKSPACE« box as a short cut.
When the device is overloaded
The device may process large amount of data after a period of operation, no matter in which mode, it will cause the system freeze or malfunction. Reboot the device if necessary.
First-time Setup
When powering the device on for the first time, it asks to setup the OSD language. Choose your language and confirm. It displays information of privacy policy then. Press »OK/SCAN« to continue. The Wizard installation assistant then appears, which guides you through the installation step by step. Select »YES« and confirm your
selection and launch the setup wizard.
If you select »NO«, the next window will ask you choose if you want to start the setup wizard again next time you power the device on.
Setting date and time
Select "12" for 12-hour display format or "24" for 24-hour display format. If you select the 12-hour format, the display shows "AM" in the morning or "PM" in the afternoon after the time. After this, the following options are available, to define if the time to be synchronized from radios: Update from DAB, Update from FM, Update from Network or No update If you choose "Update from Network" you must indicate your time zone in the next window. Next choose "ON" for summer time, otherwise select "OFF".
If you choose "No update", you will have to enter the date and time manually. "AM" / "PM" displays only if you have chosen the 12-hour time format. Select "AM" for the morning hours or "PM" for the afternoon hours.
Setting network
For Wi-Fi connection, please make sure that the router is switched on via the network. If you want to control the device in all operating modes via the app, select "YES". If choosing "NO", it is not possible to control the device from the app in the (Standby, AUX IN, FM, DAB) operating modes. Note that the power consumption in standby mode will be higher when the network connection is kept up.
Any WLAN networks found are listed on the display, along with their names. After selecting the network, you will be asked for input a standard encryption. To enter the network's key, use the reel or direction keys on the remote control to move the cursor through the characters and press »OK/SCAN« to confirm.
[WPS] There will be hints for the type of network -if your network device supports WPS function.
Use one of the following methods of connection:
- Push button: The device prompts you to press the connect button on the router. Press »OK«on
the device and wait until it appears connected on the display.
- Select the option »PIN« on the device and it will generate 8-digit code number. Enter the PIN number into the router, access point, or similar network device and wait until it appears connected on the display.
- Skip WPS: Enter key as for a standard encrypted network. For more information on setting up a WPS encrypted network, see your WPS router's instructions.
Device attempts to connect to the selected network.
It will show connected if the setup is successful. If connecting fails, it returns to a previous screen to try again. Once it has completed, press »OK/SCAN« to quit the setup wizard.
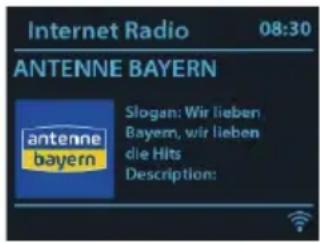
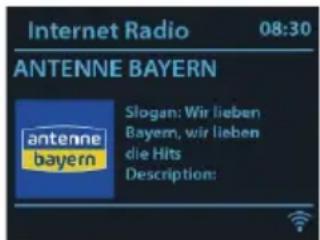
Internet Radio, Podcasts

Device can play thousands of radio stations and podcasts from around the world though a broadband Internet connection. When you select Internet radio or Podcasts mode, the device directly contacts the Frontier Smart Technologies portal to get a list of stations or podcasts.
The list menu is provided from the portal, so it is only accessible when the device is connected to the Internet. The contents and submenus may change from time to time. Choose required category and search the station or podcast to listen. On the screen, press »ALARM/ BACK« or »« on the remote control to view the station list.
Spotify

Use your phone, tablet or computer as a remote control for Spotify. Go to spotify.com/connect to learn how
The Spotify Software is subject to third party licenses found here: http://www.spotify.com/connect/third-party-licenses
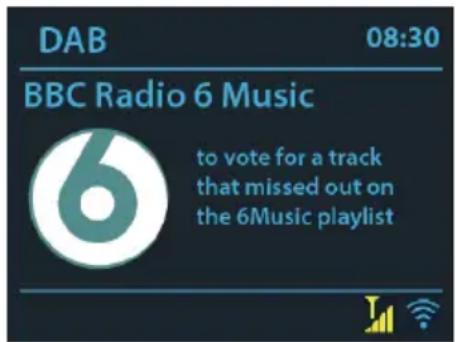
DAB+ Radio
DAB mode receives DAB/DAB+ digital radio and displays information about the station, stream and track playing.
Scanning for stations
The first time you select DAB radio mode, or if the station list is empty, the radio automatically performs a full scan to see what stations are available. You may also need to start a scan manually to update the list of stations.
To start a scan manually, choose Full scan. To scan only stations with good signal strength, select Local scan. Once the scan is complete, the radio shows a list of available stations.
To remove stations that are listed but not unavailable, choose Prune invalid. Turn the navigate reel to view a list of stations and press to select.
Once selected, the station plays and the screen show information about station, track or show as broadcast.
On the screen, press »ALARM/ BACK« or
» « on the remote control to view the station list. When the slideshow is displayed on the playing screen, press »OK/SCAN« to view the full screen size of the picture.
Settings
■ Dynamic range compression (DRC) If you are listening to music with a high dynamic range in a noisy environment, you may wish to compress the audio dynamic range. This makes quiet sounds louder, and loud sounds quieter. You can change DRC as off, low or high.
■ Station order You can choose the order of the DAB station list to be either Alphanumeric, Ensemble or Valid. Ensemble lists groups of stations that are broadcast together on the same ensemble. Valid lists valid stations first, alphanumerically, then off-air stations.
FM Radio
FM radio mode receives analogue radio from the FM band and displays RDS (Radio Data System) information about the station and where broadcast.
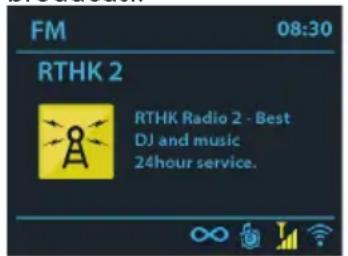
The first time you select FM radio mode, or if the station list is empty, the device will run auto scan and save the stations to the preset list.
To find a station, press »OK/SCAN« The frequency display starts to run up as the device scans the FM band. Alternatively, you can scan up or down by press and hold »TUNING - « or »TUNING + «.
Settings
■ ATS: Run the auto scan function once
- Scan settings By default, FM scans stop at any available station. This may result in a poor signal-to-noise ratio (hiss) from weak stations. To change the scan settings to stop only at stations with good signal strength, select Yes after choosing Strong station only?
■ Audio settings All stereo stations are reproduced in stereo. For weak stations, this may result in a poor signal-to-noise ratio (hiss). To play weak stations in mono, select FM weak reception: Listen in mono only and then YES.
CD
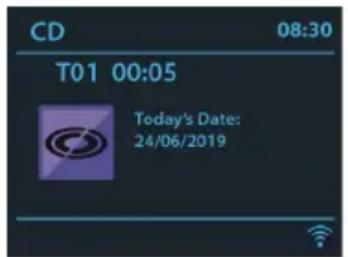
Press »▲ to open the CD compartment. Put in the disc with its label facing upwards.
Press »« to close the CD compartment. The disc
is read and played.
„TOOO“ means the track number.
„FOO“ means the folder number, it displays if you have inserted CD-R or CD-RW disc which contains the music tracks in different folders.
Press »FOLDER DOWN« / »FOLDER UP« to seek the folder.
Besides general playback control, you may do CD track programming as follows: Stop the playback first if any track is playing. Press »PRESET/BTPAIR« to program. Set the first programming track, use »|« »▶|« or to seek the track. Press »OK/SCAN« to confirm and set the next programming track. Repeat the steps. When programming is completed, press »« || to start playing the programmed track(s).
USB
In USB mode, plug in the a USB drive to play.
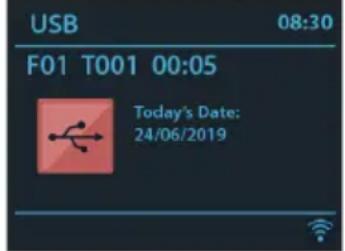
„TOOO“ means the track number.
„FOO“ means the folder number, it displays if the plugged USB drive contains the music tracks in different folders. »FOLDER DOWN« / »FOLDER UP« to seek the folder.
Besides general playback control, you may do USB track programming as follows:
Stop the playback first if any track is playing. Press »PRESET/BTPAIR« to program. Set the first programming track, use »|◀◀ « or »▶▶|« to seek the track. Press »OK/SCAN« to confirm and set the next programming track. Repeat the steps. When programming is completed, press »▶◀to start playing the programmed track(s).
Bluetooth
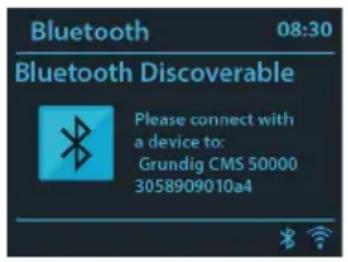
In Bluetooth mode, you can turn on the Bluetooth of your Bluetooth device. Press and hold »BTPAIR« to turns Bluetooth discoverable. From your Bluetooth device, search the HiFi System Grundig DTR 7000 to pairing. When it is waiting for pairing, there is a blinking Bluetooth icon at the bottom. If the pairing is successful, the Bluetooth icon becomes steady. Control the music playback from your Bluetooth device.
AUX
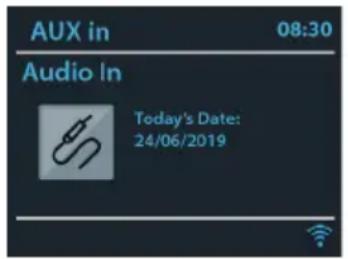
In AUX in mode plays audio from an external source. Turn the volume low on both the radio and, if adjustable, the audio source device. Enter AUX mode, then adjust the volume as required.
Sleep
To set the sleep timer, select Sleep under Main menu. Or press » on the remote control to set. Choose from Sleep OFF, 15, 30, 45 or 60 minutes and confirm. Once you select a sleep period, the system returns to the now playing screen.
Alarm
There are two versatile wake-up alarms with snooze facility. Each alarm can be set to start in a particular mode.
Select Alarms under Main menu to set or change an alarm. Alternately, press and hold »ALARM/BACK« on the device, or press »ALARM1«, »ALARM2« on the remote control to configure.
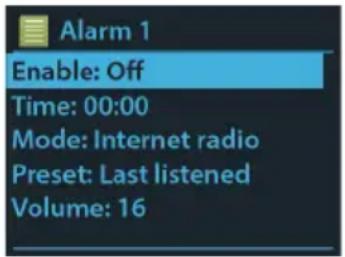
After setup all the parameters, select Save to activate. The screen shows active alarms with an icon at the bottom left.
At the set time, the alarm will sound. To temporarily silence, press »SNOOZE«. You can change the snooze period. The radio returns to standby for the set period, with the silenced alarm icon flashing.
Press and hold » MODE« or press » « on the remote control to turn it off.
System settings
Equaliser
Several preset EQ modes are available: Normal, Flat, Jazz, Rock, Movie, Classic, Pop, News and My EQ. Press »EQ« to select. A user-defined setting is available; create your own EQ with custom bass, treble and loudness settings.
Then choose My EQ to activate the customized EQ settings.
Alternatively, press » - BASS + « / » - TREBLE + « on the remote control to adjust bass or treble, then press »OK/SCAN« to confirm. This will activate My EQ directly.
Network
Network wizard:
Enter to search AP SSID, then input the WEP / WPA key or choose Push Button/Pin/Skip WPS to connect to the wireless network.
PBC Wlan setup:
Push Button Configuration, it is to connect the AP that supports WPS (Wi-Fi Protected Setup).
View settings:
View the information of current connected network: Active connection, MAC address, Wlan region, DHCP, SSID, IP address, Subnet mask, Gateway address, Primary DNS and Secondary DNS.
Manual settings:
Enable or disable DHCP (Dynamic Host Configuration Protocol). Input the SSID, WEP / WPA key and/or other configuration.
Network profile:
The device remembers the last four wireless networks it has connected to, and automatically tries to connect to whichever one of them it can find. From here you can see the list of registered networks. You can delete unwanted networks. Clear network settings: Select "YES" to clear all the current network settings. Select "NO" to cancel.
Keep network connected:
If you choose to keep network connected, the WiFi will not disconnect even you are in standby mode or non-network mode.
Time/Date
Set the time manually or auto update, time
format, time zone and daylight. Details can be referred to Setting date and time under Section First-time setup.
Language
Change it as your preference. Available languages: English, Danish, Dutch, Finnish, French, German, Italian, Norwegian, Polish, Portuguese, Spanish, Swedish, Turkish.
Factory Reset
Resetting all user settings to default values, so that time and date, network configuration and presets are lost. However, current software version of the radio is maintained
Software Update
Auto-check setting: This option automatically checks for new updates from time to time. Automatic updating is enabled by default. Check now: Search for available updates immediately. You will be asked if you want to go ahead with download and installation of an update. After a software upgrade, all user settings are maintained.
NOTE: Before starting a software upgrade, ensure that the radio is plugged into a stable main power connection. Disconnecting power during an upgrade may permanently damage the unit.
Setup Wizard
With this function, you can start the setup wizard at any time. Any parameters or stations entered already are not deleted. For more information, please read the Section First-time setup.
Info
View the firmware version and the radio ID.
Privacy Policy
View the information of Privacy Policy.
Backlight
You may change the power - on backlight level to High, Medium or Low. And adjust the timeout duration which the radio turns to standby backlight level when it has not been controlled. Press » DIMMER « to change the brightness of the backlight.
| Error | Remedy |
| The device does not switch on. | Check it the power plug is connected properly. |
| No sound. 1. Turn on the sound as it may be muted2. Increase the volume.3. Pull any connected headphone or speaker from the connector jack.4. Check the speaker cables. | |
| No network connection can be established. | 1. Check the WLAN function, make sure the password is correct.2. Try to set an IP address at the device.3. Activate the DHCP function on the router and make the connection again at the device.4. A firewall is activated on the network - set the respective program in such a way that access is possible.5. Place the device closer to the router6. Reboot the router |
| No station is found. | 1. The station may not be available currently, try again later.2. The link of the station is changed or the station no longer transmits - ask the provider for information.3. The link of manual added station may not be correct, check and change it. |
| Hiss in FM mode 1. Check/move the antenna.2. Move the radio. | |
| No stations available / burbling / intermittent in DAB mode. | 1. Check/move the antenna.2. Rescan local stations only (high-strength).3. Check the local DAB coverage. |
| USB driver or MP3 player is not detected. | 1. Check if the USB driver or MP3 player is plugged properly.2. Some USB hard disks need external power supply, make sure it is connected to the power.3. Not all MP3 players can be read directly on the device - use an USB drive instead. |
| The CD is not playing or skips during playback. | 1. The device is not in CD mode. Faulty CD inserted.2. The CD is incorrectly inserted. Insert the CD with the labelled side facing upwards.3. The CD is dirty or faulty. Clean the CD, use another CD. |
| All other undetermined cases. | The smart radio may process large amount of data after a period of operation, no matter in which mode, it will cause the system freeze or malfunction. Reboot the device if necessary. |
| Model number DTR 7000 2.1 BT DAB+ WEB | |||||
| Display 2,8", 320 x 240, TFT color display | |||||
| Network supported WLAN IEEE 802.11a/b/g/n wireless;Bluetooth (BT 4.2, supports A2DP and AVRCP profiles) | |||||
| Frequency band WiFi: 2.412 - 2.472 GHz, 5.18 - 5.32 GHz, 5.50 - 5.70GHz,5.745 - 5.825GHz; Bluetooth: 2.402 - 2.48 GHz | |||||
| Radio frequencypower transmitted | WiFi 2.4G: 17.6dBm; WiFi 5G: 16.38dBm; WiFi 5.8G:8.07dBm; Bluetooth: 7.59dBm | ||||
| Encrypted key WEP, WPA, WPA2 (PSK), WPS | |||||
| Streaming SupportedFormats | MP3, AAC/AAC+ (up to 48kHz, 16 bits) | ||||
| USB Supported Formats | Extension | Codec | Frequency | Bit rate | Bit Depth |
| .mp3 | MPEG 1 Layer 3 | 32kHz, 44.1kHz,48kHz | up to 320kbit/s | 16 bit | |
| .w4a,.aac | AAC-LC, HE-AAC | 32kHz, 44.1kHz,48kHz | up to 320kbit/s | 16 bit | |
| .flac | FLAC | 32kHz, 44.1kHz,48kHz | up to 1.5mbit/s | 16 bit, 24bit | |
| CD Supported Formats CD (12 cm), CD-R, CD-RW, MP3-CD, WMA-CDMP3, WMA (DRM not supported), CD-audio | |||||
| DAB / DAB+ Band III, 174,928 - 239,200 MHz | |||||
| FM 87,5 - 108,0 MHz | |||||
| USB Charging Output: DC 5.0V 1.0A = | |||||
| USB Playback System compatibility: FAT 16, FAT 32 | |||||
| Battery (Remote Control) 2 x 1,5 V AAA | |||||
| Standby mode power consumption | < 1,0 W | ||||
| Networked standby power consumption | < 2,0 W | ||||
| Operating Temperature 0 to 35 °C | |||||
| Speaker power output | 2 x 4 W + 24 W RMS | ||||
| Speaker impedance | Full range: 6 Ω, Bass: 4 Ω | ||||
| Signal-to-noise ratio | ≥ 60 dB | ||||
| Frequency response | 50 Hz - 20 kHz | ||||
| Audio Connections | 3,5 mm headphone socket (back)3.5 mm AUX IN socket (back) | ||||
| Dimensions | Main Unit: 300 mm (L) x 120 mm (H) x 185 mm (D) | ||||
| Weight | 3,2 kgs | ||||
| AC Adaptor | |||||
| Manufacturer | ShenZhen Xinspower Technology Co., Ltd | ||||
| Address | B 2F A BLDG 3 Huang Pu Shui Ku Rd., Shajing St Baoan, Shenzhen, 518125 Guangdong, China | ||||
| Type | A361-1502400E | ||||
| Input | 100 - 240V~ 50/60 Hz, 1.5A | ||||
| Output | 15.0V ---2.4A 36.0 W ◇◇◇ | ||||
| Average Active Efficiency | 88.21% | ||||
| Efficiency at Low Load (10%) | 87.14 % | ||||
| No-load Power | 0.09 W | ||||
| Safety Class | II | ||||
Use only original AC adaptor
Use only the power supply listed in the user instructions
Compliance with the WEEE Directive and Disposing of the Waste Product:
This product complies with EU WEEE Directive (2012/19/EU). This product bears a classification symbol for waste electrical and electronic equipment (WEEE).
This symbol indicates that this product shall not be disposed with other household wastes at the end of its service life. Used device must be returned to official collection point for recycling of electrical and electronic devices. To find these collection systems please contact to your local authorities or retailer where the product was purchased. Each household performs important role in recovering and recycling of old appliance. Appropriate disposal of used appliance helps prevent potential negative consequences for the environment and human health.
Compliance with RoHS
Directive
The product you have purchased complies with EU RoHS Directive (2011/65/EU). It does not contain harmful and prohibited materials specified in the Directive.
Package information

Packaging materials of the product are manufactured from recyclable materials in accordance with our National Environment Regulations. Do not dis-
pose of the packaging materials together with the domestic or other wastes. Take them to the packaging material collection points designated by the local authorities.
Technical data
This device is noise-suppressed according to the applicable EU directives.
This product fulfils the European directives 2014/53/EU, 2009/125/EC and 2011/65/EU.
Never open the device casing. The manufacturer will not accept any liability for damage resulting from improper handling.
You can find the CE declaration of conformity for the device in the form of a pdf file on the Grundig Homepage www.grundig.com/downloads/doc.
The type plate is located at the rear of the device.
37 MISE AU REBUT
37 APERÇU
38 SÉCURITÉ
38 Alimentation
45 Radio Internet, Podcasts
45 Spotify
45 DAB+ Radio
45 Rechercher des stations
46 Radio FM
46 CD
46 USB
47 Bluetooth
47 AUX
47 Veille
47 Alarme
48 RÉGLAGES DU SYSTÈME
48 Égaliseur
48 Réseau
48 Heure/Date
48 Langue
48 Réinitialisation
Radio Internet, Podcasts
Rechercher des stations

- Internetradio, Podcasts
- Nach Sendern suchen
- REMOTE CONTROL
- GETTING STARTED
- GENERAL DEVICE FUNCTIONS
- MAIN OPERATION
- SYSTEM SETTINGS
- TROUBLESHOOTING
- INFORMATION
- OVERVIEW
- Power Supply
- Risks associated with high volumes
- Maintenance / Cleaning
- Connection and Preparation
- Connecting to the network
- Using CDs
- Connecting a USB memory stick
- Connecting an audio source via AUX in
- Connecting the headphones
- Presets
- Now playing information
- Inputting Character
- When the device is overloaded
- First-time Setup
- Setting date and time
- Setting network
- Use one of the following methods of connection:
- Internet Radio, Podcasts
- Spotify
- DAB+ Radio
- Scanning for stations
- Settings
- FM Radio
- USB
- Sleep
- Alarm
- System settings
- Equaliser
- Network
- Network wizard:
- PBC Wlan setup:
- View settings:
- Manual settings:
- Network profile:
- Keep network connected:
- Time/Date
- Language
- Factory Reset
- Software Update
- Setup Wizard
- Info
- Privacy Policy
- Backlight
- Compliance with the WEEE Directive and Disposing of the Waste Product:
- Compliance with RoHS
- Directive
- Package information
- Technical data
- MISE AU REBUT
- APERÇU
- SÉCURITÉ
- RÉGLAGES DU SYSTÈME
- Radio Internet, Podcasts
- Rechercher des stations
Brand : GRUNDIG
Model : DTR 7000 X
Category : Radio