DXV34PRO - Industrial vacuum cleaner DEWALT - Free user manual and instructions
Find the device manual for free DXV34PRO DEWALT in PDF.

| Product type | Industrial wet/dry vacuum |
| Brand | DEWALT |
| Model | DXV34PRO |
| Power supply | 230 V, 50 Hz, 1200 W |
| Suction pressure | 17 kPa |
| Airflow rate | 42.5 L/s |
| Tank capacity | 34 L |
| Hose diameter | 48 mm |
| Hose length | 2.1 m |
| Power cord length | 3 m |
| Sound pressure level (LPA) | 78 dBA |
| Sound power level (LWA) | 91 dBA |
| Functions | Dry suction, wet suction, blowing |
| Included filter | Clean Connect high-efficiency washable filter |
| Supplied accessories | Flat nozzle, utility nozzle, floor nozzle, round brush, hose adapter, disposable dust bag, accessory bag |
| Wheel type | Rubber |
| Safety | Automatic float shut-off in wet mode, thermal protection |
| Tool warranty | 3 years limited |
| Filter maintenance | Rinse with clean water, air dry, do not use compressed air |
| Compliance | EN60335-2-69 |
Frequently Asked Questions - DXV34PRO DEWALT
User questions about DXV34PRO DEWALT
0 question about this device. Answer the ones you know or ask your own.
Ask a new question about this device
Download the instructions for your Industrial vacuum cleaner in PDF format for free! Find your manual DXV34PRO - DEWALT and take your electronic device back in hand. On this page are published all the documents necessary for the use of your device. DXV34PRO by DEWALT.
USER MANUAL DXV34PRO DEWALT
natural_image
Line drawing of a DHWALT vacuum cleaner with wheels and control panel (no text or symbols on the device itself)
www.DeWALT.com
DXV34PRO
English (original instructions) ....13
natural_image
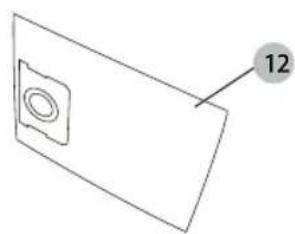
Simple line drawing of a rectangular object with a circular hole and a numbered label '12' (no text or symbols on the object itself)Fig. B
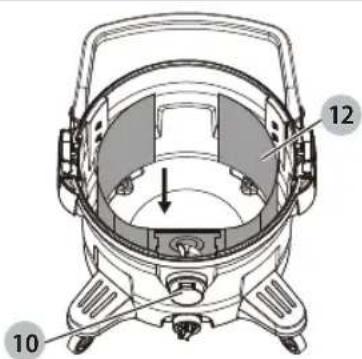
Fig. C
natural_image
Diagram of a mechanical component with an arrow indicating direction (no text or symbols present)Fig. D
natural_image
Diagram of a device component with a labeled section (3), showing internal structure without any text or symbols.Fig. E
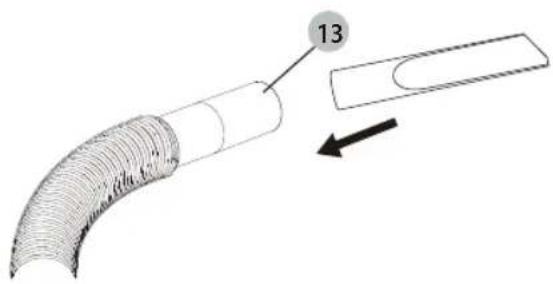
Fig. F Fig. G
natural_image
Technical line drawing of a mechanical device with a screw and wheels (no text or symbols)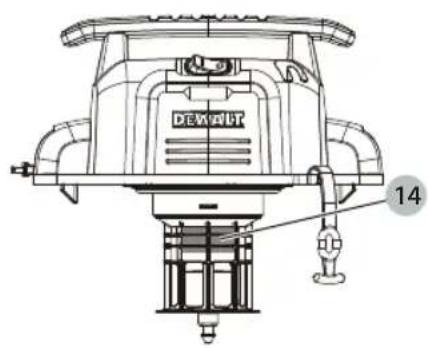
Fig. H
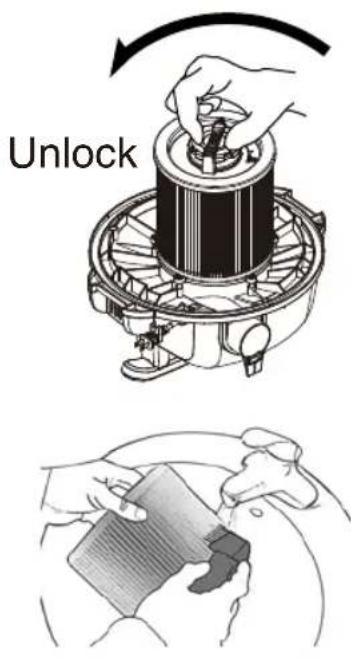
Fig.1
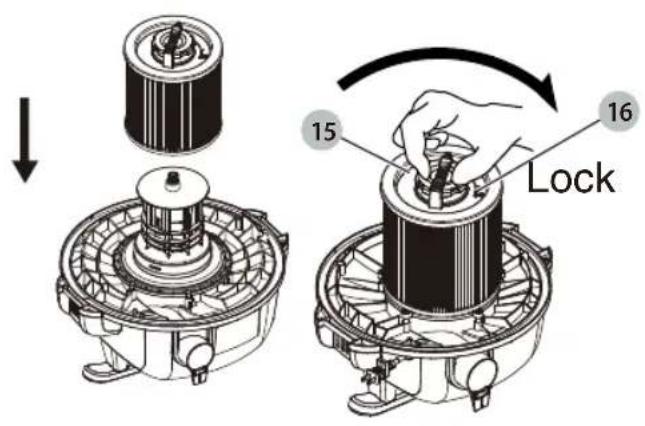
Fig. J
natural_image
Line drawings of three different vacuum cleaner designs with directional arrows indicating assembly or inspection (no text or symbols present)Dansk
PRODUKTSPECIFIKATIONER
PRODUCT SPECIFICATIONS
| Model DXV34PRO | |
| Power 230 V / 50 Hz / 1200W | |
| Seal pressure | 17 Kpa |
| 42.5 L/SAir flow | |
| Tank capacity | 34 L |
| Hose | 48mm x 2.1m |
| Power cord | H05RN-F,2Cx0.75mm ^2 / 3m. Length |
Noise values according to EN60335-2-69
| _PA (emission sound pressure level)L | 78dBA |
| L_WA (sound power level) | 91dBA |
Package Contents
The package contains:
1 48mm x 2.1m Durable Hose
1 Extension Wand
1 Crevice Nozzle
1 Utility Nozzle
1 Accessory Bag
1 High efficiency disposable dust bag
1 Clean Connect™Filter (High Efficiency)
1 Instruction manual
1 Floor nozzle
1 Hose adaptor (drain)
1 Round brush
- Check for damage to the tool, parts or accessories which may have occurred during transport.
• Take the time to thoroughly read and understand this manual prior to operation.
DEFINITIONS: SAFETY GUIDELINES
The definitions below describe the level of severity for each signal word. Please read the manual and pay attention to these symbols.
⚠️ DANGER: Indicates an imminently hazardous situation which, if not avoided, will result in death or serious injury.
⚠ WARNING: Indicates a potentially hazardous situation which, if not avoided, could result in death or serious injury.
⚠ CAUTION: Indicates a potentially hazardous situation which, if not avoided, may result in minor or moderate injury.
NOTICE: Indicates a practice not related to personal injury which, if not avoided, may result in property damage.
IMPORTANT SAFETY INSTRUCTIONS
⚠ WARNING: When using electric appliances, always follow basic safety precautions to reduce the risk of fire, electric shock and personal injury, including the following:
BEFORE USING THIS APPLIANCE, READ AND FOLLOW ALL INSTRUCTIONS.
⚠ WARNING: To reduce the risk of electric shock.
Do not expose to rain. Store indoors.
- Do not leave the appliance when it is connected to a power source. Unplug it from outlet when not in use and before servicing.
- Do not allow the appliance to be used as a toy. Pay close attention when the appliance is used by or near children.
- Use this appliance ONLY as described in the manual. Use only DEWALT recommended attachments.
- Do not use this appliance with a damaged cord or plug. If the appliance is not working correctly, or if it has been dropped, damaged, left outdoors, or dropped in water, return it to a service center.
- Do not pull or carry this appliance by the cord, use the cord as a handle, close a door on the cord, or pull the cord around sharp edges or corners. Do not run the appliance over the cord. Keep cord away from heated surfaces.
- Do not unplug this appliance by pulling on the cord. To unplug, grasp the plug, not the cord.
- Do not handle the plug or appliance with wet hands.
- Do not put any objects into the openings of the appliance. Do not use the appliance with any opening blocked; keep free of dust, lint, hair and anything else that may reduce air flow.
- Keep hair, loose clothing, fingers, and all body parts away from the openings and moving parts.
- Turn off all controls before unplugging appliance.
- Use extra care when cleaning on stairs.
- Do not use the appliance to pick up flammable or combustible liquids, such as gasoline, or use in areas where flammable or combustible liquids are present.
- Static shocks are possible in dry areas or when the relative humidity of the air is low. This is only temporary and does not affect the use of the vacuum. To reduce the frequency of static shocks, add moisture to the air with a console, installed humidifier or use anti-static hose (standard on some models).
- To avoid spontaneous combustion, empty canister after each use.
CAUTION: This appliance is not intended for use by persons (including children) with reduced physical, sensory or mental capabilities, or lack of experience and knowledge, unless they have been given supervision or instruction concerning use of the appliance by a person responsible for their safety.
Children should be supervisde to ensure that they do not play with the appliance.
SAVE THESE INSTRUCTIONS ADDITIONAL SAFETY RULES
- Do not pick up anything that is burning or smoking, such as cigarettes, matches, or hot ashes.
- Do not use to vacuum combustible explosive materials, such as coal, grain, or other finely divided combustible material.
- Do not use to vacuum hazardous, toxic or carcinogenic materials, such as asbestos or pesticide.
- Never pick up explosive liquids (e.g. gasoline, diesel fuel, heating oil, paint thinner, etc.), acids or solvents.
English
- Do not use vacuum without filters in place, except as described under Wet Pickup Applications.
- Some wood contains preservatives which can be toxic. Take extra care to prevent inhalation and skin contact when working with these materials. Request and follow any safety information available from your material supplier.
- Do not use vacuum as a step ladder.
- Do not place heavy objects on vacuum.
- An extension cord must have adequate wire size for safety,
- If an extension cord is to be used outdoors it must be marked
WARNING!
To reduce your exposure to these chemicals, wear approved safety equipment such as dust masks that are specially designed to filterout microscopic particles. For your convenience and safety, the following warning labels are on your vacuum.
ON MOTOR HOUSING :
WARNING!
- TO REDUCE THE RISK OF INJURY, USER MUST READ INSTRUCTION MANUAL. DO NOT RUN UNATTENDED. DO NO T PICK UP FLAMMABLE, COMBUSTIBLE OR HOT MATERIALS. DO NOT USE AROUND EXPLOSIVE DUST, LIQUIDS OR VAPORS. ELECTRICAL DEVICES PRODUCE ARCS OR SPARKS WHICH CAN CAUSE FIRE OR EXPLOSION. DO NOT USE AT FILLING STATIONS OR ANYWHERE GASOLINE IS STORED OR DISPENSED. DO NOT VACUUM TOXIC OR CARCINOGENIC MATERIALS OR OTHER HEALTH ENDANGERING MATERIAL SUCH AS ASBESTOS OR PESTICIDES. ALWAYS USE PROPER EYE AND RESPIRATORY PROTECTION. TO REDUCE THE RISK OF ELECTRICAL SHOCK, DO NOT EXPOSE TO RAIN. STORE INDOORS. WHEN SERVICING, USE ONLY IDENTICAL REPLACEMENT PARTS. NOT TO BE USED AS A STEP STOOL.
SAVE THESE INSTRUCTIONS OPERATING INSTRUCTIONS
UNPACKING & SET-UP SUMMARY
- Pull lid latches in an outward motion, remove power head and some accessories that may have been shipped in the tank.
- Attach heavy-duty rubberized casters following the instructions in this manual.
- Before replacing power head, refer to this manual to ensure you have the proper filters installed for your cleaning operation.
- Replace power head, and apply pressure with thumb to each latch until it snaps tightly in place. Make sure all lid latches are clamped securely.
- Insert the air hose end into inlet of tank.
- Attach the extension wands to the accessory end of
the hose. Apply slight pressure until fitting is tight.
7. Attach one of the cleaning accessories (depending on your cleaning requirements) on the extension wands. Twist slightly to tighten the connection.
8. Plug the cord into the wall outlet. Your cleaner is ready for use.
WARNING!
To reduce the risk of fire or explosion, do not operate this vac in areas with flammable gases, vapors or explosive dust in the air. Flammable gases or vapors include but are not limited to: lighter fluid, solvent-type cleaners, oil-based paints, gasoline, alcohol or aerosol sprays. Explosive dusts include but are not limited to: coal, magnesium, aluminum, and grain or gun powder. Do not vacuum explosive dust, flammable or combustible liquids or hot ashes. Do not use this vac as a sprayer for any flammable or combustible liquid. To reduce the risk of health hazards from vapors or dusts, do not vacuum toxic materials.
IMPORTANT SAFEGUARDS
The symbol on the product or packaging indicates that the product must not be treated as domestic refuse. Instead, it should be handed in to a collection point for the recycling of electrical and electronic components. By ensuring the product is treated in the correct manner, you will help prevent any negative impact on the environment and health that might arise were the product to be discarded as ordinary refuse. For further information about recycling, you should contact your local authorities, refuse collection service or the sales outlet where you bought the goods.
Protecting the environment
Separate collection. Products and batteries marked with this symbol must not be disposed of with normal household waste.
Products and batteries contain materials that can be recovered or recycled reducing the demand for raw materials. Please recycle electrical products and batteries according to local provisions. Further information is available at www.2helpU.com
English
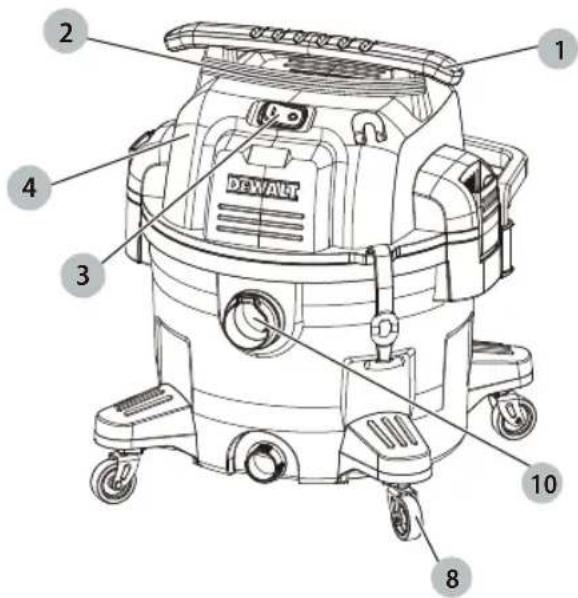
Description (Fig. A)
⚠ WARNING : Never modify the power appliance or any part of it. Damage or personal injury could result.
1 Top handle/cord wrap
2 Power cord
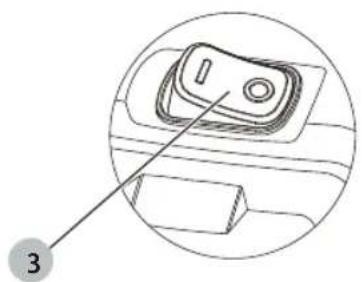
3 On/off power switch
4 Vacuum head
5 Canister latch
6 Canister
7 Suction hose
8 Casters
9 Filters
10 Threaded hose inlet
11 Hose strap
12 Bag
ASSEMBLY AND ADJUSTMENTS (Fig. A-C)
WARNING: To reduce the risk of injury, turn appliance off and disconnect appliance from power source before installing and removing accessories, before adjusting or changing set-ups or when making repairs. An accidental start-up can cause injury.
WARNING: The filters 9 must always be in place while vacuuming, except as described under Wet Pick Up Applications under Operation. When vacuuming fine dust, you may also use an additional paper bag or fleece bag to make emptying the canister easier.
- If optional paper or fleece bag 12 is to be used, install as shown in Figure B.
NOTE: Be careful not to tear the bag. Place bag securely onto inlet 10 to provide a tight seal for maximum dust collection performance.
-
Place the vacuum head 4 onto the canister and secure it by closing the canister latches 5.
-
Insert end of hose 7 into threaded hose inlet 10 and tighten the end of hose on to the tank.
OPERATION
Instructions for Use (Fig. A, D, E)
⚠ WARNING: Always observe the safety instructions and applicable regulations.
⚠ WARNING: To reduce the risk of injury, turn appliance off and disconnect appliance from power source before installing and removing accessories, before adjusting or changing set-ups or when making repairs. An accidental start-up can cause injury.
- Plug the power cord into an appropriate outlet.
- Turn the on/off switch 3 to the ON position (1).
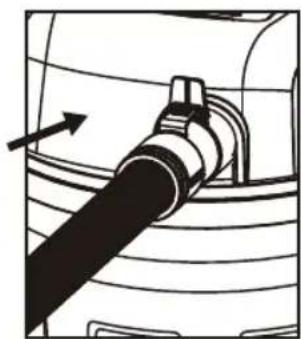
- Your DEWALT construction dust extractor is fitted with the DEWALT connection system. The allows for a fast, secure connection between the suction hose 7 and power tool. The connector 13 connects
directly to DeWALT compatible tools or through the use of an adapter (available from your local DEWALT supplier). Refer to the Accessories section for detail on available adapters.
NOTE: If using an adapter ensure it is firmly attached to the tool outlet before following the steps below.
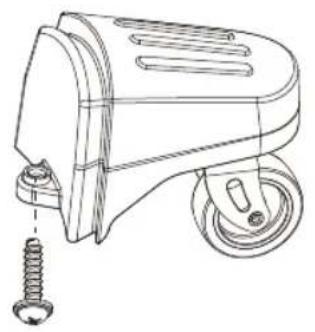
OPERATING INSTRUCTIONS Caster installation (Fig. A, F)
- Invert the dust box and install the casters to the bottom of the dust tank and fix them with screws.
- Return dust tank assembly upright.
Remove / Change Used Dust Collection Bag (Fig. A)
⚠ WARNING: Appropriate personal protective equipment like dust mask and gloves should be used while handling used dust bags.
- Turn off vacuum and unplug cord from outlet.
- Unlatch canister latches 5 and remove vacuum head 4.
- Pull the collection bag carefully from inlet 10
- Seal the collection bag opening tightly when removing it from the machine.
- Dispose of collection bag in appropriate container according to statutory provisions.
Wet Pick Up Applications (Fig. A, G)
⚠ WARNING: If foam or liquid escapes from the machine, switch off immediately.
⚠CAUTION: Clean the water level limiting device regularly and examine it for signs of damage. Refer to Fig. G.
▲ NOTICE: DO NOT remove ball float 14, doing so will cause damage to the vacuum. The ball float keeps water from entering the motor.
Before using the vacuum for wet pick up:
- Ensure the canister is empty and free of excessive dust.
- Remove filters 9.
⚠ WARNING: Do not use the machine with this set up for dust Class L.
To Empty Canister (Fig. A, G)
The ball float valve ^14 will block air to the motor when the canister is full and the sound of the motor will change at once.
When the motor has a high pitched sound and air/water flow stops, empty the canister.
- Turn off vacuum and unplug cord from outlet.
- Unlatch canister latches 5 and remove vacuum head 4.
- Empty contents of canister 6 into a suitable container or drain.
To Convert Back to Dry Vacuum Operation (Fig. A)
- Empty Canister, refer to To Empty Canister instructions.
English
- Place canister upside down position until dry. DO NOT use wet canister for dry pick up.
- Place vacuum head 4 on a level surface until dry.
- Reinstall filters when vacuum head is dry. See Filters under Maintenance.
- When canister is dry place the vacuum head onto the canister and secure it by closing the canister latches 5.
Shut Down/Transportation (Fig. A)
- Turn on/off control switch 3 to the OFF position.
- Unplug the unit.
- Store the power cord 2 wrapping it around the top handle/cord wrap 1 as shown.
- When transporting in vehicles, secure the machine.
MAINTENANCE
Your DEWALT appliance has been designed to operate over a long period of time with a minimum of maintenance. Continuous satisfactory operation depends upon proper appliance care and regular cleaning.
⚠ WARNING: To reduce the risk of injury, turn appliance off and disconnect appliance from power source before installing and removing accessories, before adjusting or changing set-ups or when making repairs. An accidental start-up can cause injury.
⚠ WARNING: For user servicing, the machine must be dismantled, cleaned and serviced, as far as is reasonably practicable, without causing risk to the maintenance staff and others. Suitable precautions include, decontamination before dismantling, provision for local filtered exhaust ventilation where the machine is dismantled, cleaning of the maintenance area and suitable personal protection.
- The manufacturer, or an instructed person, shall perform a technical inspection at least annually, consisting of, for example, inspection of the filter for damage, air tightness of the machine and proper function of the control mechanism.
- When carrying out service or repair operations, all contaminated items which cannot be satisfactorily cleaned, are to be disposed of; such items shall be disposed of in impervious bags in accordance with any current regulation for the disposal of such waste.
- For dust extractors it is necessary to provide for an adequate air change rate L in the room if the exhaust air is returned to the room.
(NOTE: Reference to National Regulations is necessary.)
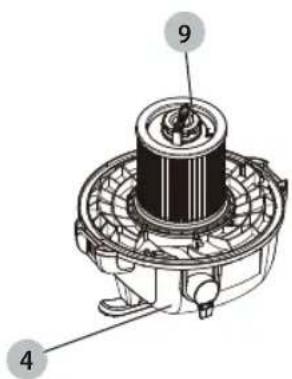
Filter (Fig. A, H, I)
Filter care
The filters included with this vacuum are long life filters. To be effective in minimizing dust recirculation, the filters MUST be installed correctly and in good condition.
⚠ WARNING: Appropriate personal protective equipment like dust mask and gloves should be used while handling the filters.
To Remove Filters
- Turn on/off/tool control switch ^3 to the OFF position (O) and unplug cord from outlet.
- Release canister latches 5 and remove vacuum head 4 . from canister. Place vacuum head on a level surface upside down.
- Turn each filter 9 counterclockwise by gripping it on the plastic end cover as shown, and carefully remove from head, ensuring debris does not fall into mounting hole.
NOTE: Use care to not damage filter material.
- If the bottom side of the vacuum head ^4 needs to be cleaned, use a cloth dampened with water and mild soap and allow it to dry. Dispose of cloth in an appropriate container.
- Inspect filters for wear, tears or other damage.
NOTE: If there is any doubt on the condition of the filters they MUST be replaced. DO NOT continue use if filters are damaged.
⚠ WARNING: Never use compressed air or a brush to clean filters, otherwise damage to the filter membrane will occur which will allow dust to pass through the filter. If needed, gently tap against a hard surface or rinse with room temperature water and let air dry. Cleaning of the filters is typically unnecessary, even if the filter is covered with dust. The automatic filter cleaning system will maintain maximum performance and continue to function. If visual damage to the filter membrane exists, replace filters. Filters typically last between six and twelve months depending on use and care.
To Install Filters
- Ensure filter seal 15 is in place and is secure.
- Line up filter threads 16 to vacuum head threads and using moderate force, turn filter clockwise until tight. NOTE: Use care to not damage filter material.
- Place the vacuum head 4 onto the container and secure it by closing the canister latches 5.
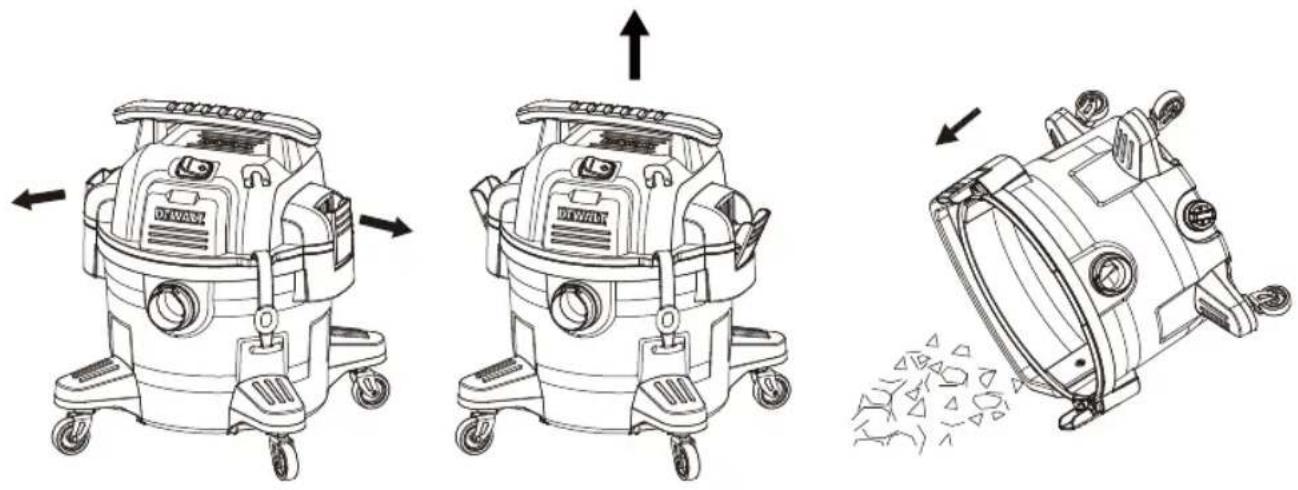
Empty The Tank (Fig. J)
⚠ WARNING: To reduce the risk of injury from accidental starting, unplug power cord before emptying the dust tank.
- Remove the power head assembly of the wet/dry vac bypulling outward on the lid clips located on each side of the vac. Lift off the power head assembly.
- Dump the tank contents into the proper waste disposal container.
BLOWING OPERATION
⚠ WARNING: To avoid injury to bystanders, keep them clear of blowing debris.
⚠️ CAUTION: Wear a dust mask if blowing creates dust which might be inhaled.
⚠️ CAUTION: To reduce the risk of hearing loss, wear ear protectors when using the vac/blower for extended hours or when using it in a noisy area.
English
Blowing Feature (Fig. C)
Your vac contains a blowing feature. It has the capability to blow sawdust and other debris. It can be used to blow dust and debris out of garages or off patios and driveways. Follow the steps below to use your vac as a blower.
- Locate blowing port on your vac.
- Insert one end of the 48mm x 2.1m. hose into the blowing port.
- Turn vacuum "ON".
Storage (Fig. A)
- Empty the canister, refer to To Empty Canister under Operation.
- Clean the vacuum inside and outside. Refer to Cleaning.
- Clean or replace filters, refer to Filters.
- Store the suction hose and the power cord as shown in the illustration. Place the unit in a dry room and secure it from unauthorized use.
Optional Accessories
⚠ WARNING: Since accessories, other than those offered by DEWALT, have not been tested with this product, use of such accessories with this appliance could be hazardous.
To reduce the risk of injury, only DEWALT recommended accessories should be used with this product.
CLEANING
To keep your wet/dry vac looking its best, clean the outside with a cloth dampened with warm water and mild soap.
To clean the tank:
- Dump out debris.
- Wash tank thoroughly with warm water and mild soap.
- Wipe out with dry cloth.
TROUBLESHOOTING
WARNING!
TO REDUCE THE RISK OF INJURY FROM MOVING PARTS AND/OR ELECTRICAL SHOCK, TURN POWER SWITCH OFF AND DISCONNECT GROUNDED PLUG FROM ELECTRICAL OUTLET BEFORE PERFORMING TROUBLESHOOTING CHECKS.
Minor problems often can be fixed without calling customer service.
| PROBLEM SOLUTION | |
| Motor does not run | Check power cord, plugs and outlet. |
| Ensure the on/off switch is in the ON position (1) | |
| Suction capacity decreases | Remove blockages in the suction nozzle, suction tube, suction hose or filters. |
| Replace the paper or fleece bag. | |
| Check for proper installation of the filters. | |
| Clean or replace the filters. | |
| Empty canister, refer to Empty the tank under Operating. instructions | |
| Vacuum stops running | Thermal overload has been tripped: 1. Turn the vacuum off and disconnect vacuum cleaner from power source. 2. Empty the canister, if needed. 3. Allow the unit to cool. 4. Plug the power cord into an appropriate outlet and turn on/off switch to the ON position (1) to test. |
| Dust comes out while vacuuming | Check for proper installation of the filters. |
| Ensure filters are not damaged; replace if necessary. | |
| Ensure filter seals are in place and are secure. | |
⚠ WARNING! If the supply cord is damaged, it must be replaced by the manufacturer, its service agent or similarly qualified persons in order to avoid a hazard.

SPÉCIFICATIONS DU PRODUIT
1 Tuyau durable 48mm x 2.1m
1 Rallonge

The Ground Truth image displays a single, solid horizontal line. According to Rule 2 (UNDERSCORE & LINE RULES), this is a stylistic or background line, not a placeholder underscore. Therefore, the OCR result must ignore it and output nothing or only meaningful text. The provided OCR content is "____", which consists of four underscores. This is an incorrect interpretation of the line as a placeholder, violating the rule that stylistic lines must be ignored. The OCR has hallucinated underscores where none should exist based on the GT's visual context. Hence, the OCR result is inconsistent with the Ground Truth.
Collecte séparée.
PROBLEMEN OPLOSSEN ⚠ WAARSCHUWING!
OM HET RISICO OP LETSEL DOOR BEWEGENDE ONDERDELEN EN/OF EEN ELEKTRISCHE SCHOK TE VERKLEINEN, MOET HET APPARAAT WORDEN UITGESCHAKELD EN DE GEAARDE STEKKER UIT HET STOPCONTACT WORDEN GENOMEN VOORDAT ER CONTROLES VOOR HET OPLOSSEN VAN PROBLEMEN WORDEN UITGEVOERD.
PRODUKT SPESIFIKASJONER
| Modell DXV34PRO | |
| Strøm 230 V / 50 Hz / 1200W | |
| Forseglingstrykk | 17 Kpa |
| 42.5L/SLuftstrøm | |
| Beholder kapasitet | 34 L |
| Slange | 48mm x 2.1m |
| Strømledning | H05RN-F,2Cx0.75mm ^2 / 3m. Lenght |
Støyverdier i henhold til EN60335-2-69
UTPAKKING & OPPSETT SUMMERING
TUOTTEEN TEKNISET TIEDOT
Pokyny k obsluze (Obr. A, D, E)
EC-Declaration of Conformity Machinery Directive
CE
ALTON declares that these products described under
Technical Data are in compliance with:
2006/42/EC, EN60335-1:2012 +A11:2014 EN60335-2-69:2012.
These products also comply with Directive, 2014/30/EU and
2011/65/EU. For more information, please contact ALTON at
the following address:
SAM-Works International BV
Minervum 7228
4817 ZJ BREDA
The Netherlands
T: +31 85 27 333 40
E: sales@sam-works.com
Copyright © 2019 DeWALT.
DEWALT®, the DEWALT® Logo and GUARANTEED TOUGH®
are trademarks of Stanley Black & Decker Inc, or an affiliate thereof and are used under license.
Manufactured under license by Alton Ltd. Group
ADD:1031 N. Raddant Road Batavia, IL 60510, USA
For Customer Service please visit our Online Customer Service Centre at www.2helpU.com