
TKRL 661 NB - Cooker WHIRLPOOL - Free user manual and instructions
Find the device manual for free TKRL 661 NB WHIRLPOOL in PDF.

| Product Type | Built-in gas hob |
| Brand | Whirlpool |
| Model | TKRL 661 NB |
| Category | Cooker (hob) |
| Number of burners | 4 burners: 2 semi-rapid, 1 auxiliary, 1 Mini Wok |
| Total gas power | 7.80 kW (G20/G30/G31) |
| Power supply | 220-240 V ~ 50-60 Hz, 0.6 W |
| Dimensions (W x D x H) | Approximately 60 x 51 x 5.5 cm (standard built-in) |
| Approximate weight | 12 kg |
| Compatible gas types | Natural gas (G20), Butane (G30), Propane (G31) - adaptable via injectors |
| Main functions | Electronic ignition, flame safety, continuous flame adjustment |
| Safety devices | Safety thermocouple, button lock? (not specified), child safety (supervision required) |
| Materials | Glass top, cast iron grates, steel burners |
| Maintenance and cleaning | Removable grates, caps and burners washable by hand or in dishwasher (grates); do not use steam cleaner or abrasive products |
| Spare parts and repairability | Injectors, taps, spark plugs available via authorized after-sales service |
| General information | Manufacturer's warranty, online support via QR code and Whirlpool website, CE certification |
Frequently Asked Questions - TKRL 661 NB WHIRLPOOL
User questions about TKRL 661 NB WHIRLPOOL
0 question about this device. Answer the ones you know or ask your own.
Ask a new question about this device
Download the instructions for your Cooker in PDF format for free! Find your manual TKRL 661 NB - WHIRLPOOL and take your electronic device back in hand. On this page are published all the documents necessary for the use of your device. TKRL 661 NB by WHIRLPOOL.
USER MANUAL TKRL 661 NB WHIRLPOOL
These instructions are valid if the country symbol appears on the appliance. If the symbol doesn't appear on the appliance, it is necessary to refer to the technical instructions which will provide the necessary instructions concerning modification of the appliance to the conditions of use of the country.
⚠️ CAUTION: The use of the gas cooking appliance results in the production of heat, moisture and products of combustion in the room in which it is installed. Ensure that the kitchen is well ventilated especially when the appliance is in use: keep natural ventilation holes open or install a mechanical ventilation device (mechanical extractor hood). Prolonged intensive use of the appliance may call for additional ventilation, such as opening a window, or more effective ventilation, for example increasing the level of mechanical ventilation (if possible).
⚠️ Failure to follow the information in this manual exactly may cause a fire or explosion, resulting in property damage or personal injury.
Before using the appliance, read these safety instructions. Keep them nearby for future reference. These instructions and the appliance itself provide important safety warnings, to be observed at all times. The manufacturer declines any liability for failure to observe these safety instructions, for inappropriate use of the appliance or incorrect setting of controls.
⚠ WARNING: If the hob surface is cracked, don't use the appliance – risk of electrical shock.
⚠ WARNING: Danger of fire: Do not store items on the cooking surfaces.
⚠️ CAUTION: The cooking process has to be supervised. A short cooking process has to be supervised continuously.
⚠ WARNING: Unattended cooking on a hob with fat or oil can be dangerous – risk of fire. NEVER try to extinguish a fire with water, but switch off the appliance and then cover flame e.g. with a lid or a fire blanket.
⚠ Do not use the hob as a work surface or support. Keep clothes or other flammable materials away from the appliance, until all the components have cooled down completely – risk of fire.
⚠️ Very young children (0-3 years) should be kept away from the appliance. Young children (3-8 years) should be kept away from the appliance unless continuously supervised. Children from 8 years old and above and persons with reduced physical, sensory or mental capabilities or lack of experience and knowledge can use this appliance only if they are supervised or have been given instructions on safe use and understand the hazards involved. Children must not play with the appliance. Cleaning and user maintenance must not be carried out by children without supervision.
⚠️ CAUTION: In case of hotplate glass breakage: shut immediately off all burners and any electrical heating element and isolate the appliance from the power supply; do not touch the appliance surface; do not use the appliance.
The glass lid can break in if it is heated up. Turn off all the burners and the electric plates before closing the lid. Do not shout down lid when burner alight.
⚠ WARNING: The appliance and its accessible parts become hot during use. Care should be taken to avoid touching heating elements. Children less than 8 years of age must be kept away unless continuously supervised.
The food must not be left in or on the product for more than one hour before or after cooking.
PERMITTED USE
⚠️CAUTION: the appliance is not intended to be operated by means of an external switching device, such as a timer, or separate remote controlled system. ⚠This appliance is intended to be used in household and similar applications such as: staff kitchen areas in shops, offices and other working environments; farm houses; by clients in hotels, motels, bed & breakfast and other residential environments.
⚠ No other use is permitted (e.g. heating rooms).
This appliance is not for professional use. Do not use the appliance outdoors.
⚠ Use pots and pans with bottoms the same width as that of the burners or slightly larger (see specific table). Make sure pots on the grates do not protrude beyond the edge of the hob.
⚠Improper use of the grids can result in damage to the hob: do not position the grids upside down or slide them across the hob.
Do not let the burner flame extend beyond the edge of the pan.
If the hob surface is in glass material, do not use the cast iron griddles, ollar stones, terracotta pots and pans.
Do not use: heat diffusers such as metal mesh, or any other types; two burners simultaneously for one receptacle (e.g. Fish kettle).
Should particular local conditions of the delivered gas make the ignition of burner difficult, it is advisable to repeat the operation with the knob turned to small flame setting.
In case of installation of a hood above the cooktop, please refer to the hood instructions for the correct distance.
The protective rubber feet on the grids represent a choking hazard for young children. After removing the grids, please ensure that all the feet are correctly fitted.
INSTALLATION
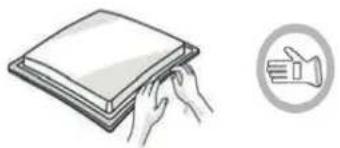
The appliance must be handled and installed by two or more persons - risk of injury. Use protective gloves to unpack and install - risk of cuts.
⚠ The electrical and gas connections must comply with local regulation.
⚠ Installation, including water supply (if any) and electrical connections, and repairs must be carried out by a qualified technician. Do not repair or replace any part of the appliance unless specifically stated in the user manual. Keep children away from the installation site. After unpacking the appliance, make sure that it has not been damaged during transport. In the event of problems, contact the dealer or your nearest After-sales Service. Once installed, packaging waste (plastic, styrofoam parts etc.) must be stored out of reach of children - risk of
suffocation. The appliance must be disconnected from the power supply before any installation operation - risk of electrical shock. During installation, make sure the appliance does not damage the power cable - risk of fire or electrical shock. Only activate the appliance when the installation has been completed.
⚠ WARNING: Modification of the appliance and its method of installation are essential in order to use the appliances safely and correctly in all the additional countries. ⚠ Use pressure regulators suitable for the gas pressure indicated in the instruction.
⚠ The room must be equipped with an air extraction system that expels any combustion fumes.
The room must also allow proper air circulation, as air is needed for combustion to occur normally. The flow of air must not be less than 2 m^3/h per kW of installed power.
The air circulation system may take air directly from the outside by means of a pipe with an inner cross section of at least 100 cm ^2 ; the opening must not be vulnerable to any type of blockages.
The system can also provide the air needed for combustion indirectly, i.e. from adjacent rooms fitted with air circulation tubes as described above. However, these rooms must not be communal rooms, bedrooms or rooms that may present a fire hazard.
⚠ Liquid petroleum gas sinks to the floor as it is heavier than air. Therefore, rooms containing LPG cylinders must also be equipped with vents to allow gas to escape in the event of a leak. As a result LPG cylinders, whether partially or completely full, must not be installed or stored in rooms or storage areas that are below ground level (cellars, etc.). It is advisable to keep only the cylinder being used in the room, positioned so that it is not subject to heat produced by external sources (ovens, fireplaces, stoves, etc.) which could raise the temperature of the cylinder above 50°C.
Should you experience difficulty in turning the burners knobs, please contact After Sales Service for replacement of the burner tap if found to be faulty. The openings used for the ventilation and dispersion of heat must never be covered.
⚠️ Carry out all cabinet cutting works before fitting the appliance in the furniture and remove all wood chips and sawdust.
⚠️ If the appliance is not installed above an oven, a separator panel (not included) must be installed in the compartment under the appliance.
GAS CONNECTION
⚠ WARNING: Prior to installation, ensure that the local distribution conditions (type of gas and gas pressure) and the adjustment of the appliance are compatible.
⚠️ Check that the pressure of the gas supply is consistent with the values indicated in “Burner and nozzle specifications” table.
⚠ WARNING: The configuration conditions for this appliance are stated on the label (or data plate).
⚠ WARNING: This appliance is not connected to a combustion products evacuation device. It must be installed and connected in accordance with current installation regulations. Particular attention must be paid to the relevant requirements regarding ventilation.
⚠️ If the appliances is connected to liquid gas, the regulation screw must be fasted as tightly as possible.
⚠️ IMPORTANT: When the gas cylinder or gas container is installed, it must be properly settled (vertical orientation).
⚠ WARNING: This operation must be performed by a qualified technician.
⚠️ Use only flexible or rigid metal hose for gas connection. ⚠️ Connection with a rigid pipe (copper or steel)
Connection to the gas system must be carried out in such a way as not to place any strain of any kind on the appliance. There is an adjustable L-shaped pipe fitting on the appliance supply ramp and this is fitted with a seal in order to prevent leaks. The seal must always be replaced after rotating the pipe fitting (the seal is provided with the appliance). The gas supply pipe fitting is a threaded 1/2 gas cylindrical male attachment.
⚠️ Connecting a flexible jointless stainless steel pipe to a threaded attachment. The gas supply pipe fitting is a threaded 1/2 gas cylindrical male attachment. These pipes must be installed so that they are never longer than 2000 mm when fully extended. Once connection has been carried out, make sure that the flexible metal pipe does not touch any moving parts and is not compressed. Only use pipes and seals that comply with current National regulations.
⚠️ IMPORTANT: If a stainless steel hose is used, it must be installed so as not touch any mobile part of the furniture (e.g. drawer). It must pass through an area where there are no obstructions and where it is possible to inspect it on all its length.
The appliance should be connected to the main gas supply or to gas cylinder in compliance with the current national regulations. Before making the connection, make sure that the appliance is compatible with the gas supply you wish to use. If this is not the case, follow the instructions indicated in the paragraph "Adapting to different types of gas".
⚠️ After connection to the gas supply, check for leaks with soapy water. Light up the burners and turn the knobs from maximum position 1* to minimum position 2* to check flame stability.
ADAPTING TO DIFFERENT TYPES OF GAS
(This operation needs to be carried out by a qualified technician).
⚠ In order to adapt the appliance to a type of gas other than the type for which it was manufactured (indicated on the rating label), follow the dedicated steps provided after installation drawings.
ELECTRICAL WARNINGS
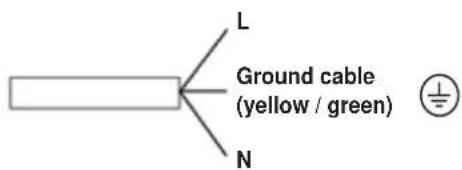
⚠️ IMPORTANT: Information about current and voltage consumption is provided on the rating plate.
⚠ It must be possible to disconnect the appliance from the power supply by unplugging it if plug is accessible, or by a multi-pole switch installed upstream
of the socket in accordance with the wiring rules and the appliance must be earthed in conformity with national electrical safety standards.
⚠ The power cable must be long enough to connect the appliance, once fitted in its housing, to the main power supply. Do not pull the power supply cable.
Do not use extension leads, multiple sockets or adapters. The electrical components must not be accessible to the user after installation. Do not use the appliance when you are wet or barefoot. Do not operate this appliance if it has a damaged power cable or plug, if it is not working properly, or if it has been damaged or dropped.
⚠️ If the supply cord is damaged, it must be replaced with an identical one by the manufacturer, its service agent or similarly qualified persons in order to avoid a hazard - risk of electrical shock.
CLEANING AND MAINTENANCE
⚠ WARNING: Ensure that the appliance is switched off and disconnected from the power supply before performing any maintenance operation; never use steam cleaning equipment - risk of electric shock.
⚠ Do not use abrasive or corrosive products, chlorine-based cleaners or pan scourers.
⚠️ To avoid damaging the electric ignition device, do not use it when the burners are not in their housing.
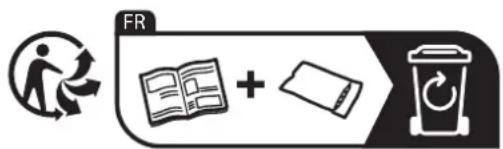
DISPOSAL OF PACKAGING MATERIALS
The packaging material is 100% recyclable and is marked with the recycle symbol.
The various parts of the packaging must therefore be disposed of responsibly and in full compliance with local authority regulations governing waste disposal.
DISPOSAL OF HOUSEHOLD APPLIANCES
This appliance is manufactured with recyclable or reusable materials. Dispose of it in accordance with local waste disposal regulations. For further information on the treatment, recovery and recycling of household electrical appliances, contact your local authority, the collection service for household waste or the store where you purchased the appliance. This appliance is marked in compliance with European Directive 2012/19/EU, Waste Electrical and Electronic Equipment (WEEE) and with the Waste Electrical and Electronic Equipment regulations 2013 (as amended).
By ensuring this product is disposed of correctly, you will help prevent negative consequences for the environment and human health.
The symbol on the product or on the accompanying documentation indicates that it should not be treated as domestic waste but must be taken to an appropriate collection center for the recycling of electrical and electronic equipment.
ENERGY SAVING TIPS
Use pots and pans with bottom width equal to that of the cooking zone.
Only use flat-bottomed pots and pans.
When possible, keep pot lids on during cooking.
Use a pressure cooker to save even more energy and time.
DECLARATION OF CONFORMITY
This appliance meets Ecodesign requirements of European Regulation 66/2014 and The Ecodesign for Energy-Related Products and Energy Information (Amendment) (EU Exit) Regulations 2019 in compliance with the European standard EN 30-2-1.
The information related to low power mode of the appliance in accordance with Regulation (EU) 2023/826 can be found in the following link: https://docs.emeaappliance-docs.eu.
BURNER AND NOZZLE SPECIFICATIONS
CATEGORY II2H3+
| Type of gas used Type | of burner Injector marking | Rated thermal | flow ratekW | Ratedconsumption | Reduced heatcapacitykW | Gas pressurembar | ||
| min. rat. max. | ||||||||
| NATURAL GAS(Methane) G20 | Semi-rapid (SR)Auxiliary (AUX)Mini Wok (MW) | 95 Z72 X138 A | 1,651,003,50 | 157 l/h95 l/h333 l/h | 0,400,402,20 | 17 20 | 25 | |
| LIQUEFIEDPETROLEUM GAS(Butane) G30 | Semi-rapid (SR)Auxiliary (AUX)Mini Wok (MW) | 635093 P | 1,651,003,50 | 120 g/h73 g/h254 g/h | 0,400,402,20 | 20 28-30 35 | ||
| LIQUEFIEDPETROLEUM GAS(Propane) G31 | Semi-rapid (SR)Auxiliary (AUX)Mini Wok (MW) | 635093 P | 1,651,003,50 | 118 g/h71 g/h250 g/h | 0,400,402,20 | 25 37 | 45 | |
| Type of gas used Model configuration | 4 BURNERS | Rated thermal flowrate (kW) | Total rated consumption Air required ( m^-3 ) for burning 1m^3 of gas | |
| G20 | 20 mbar | 2SR - 1AUX - 1MW | 7,80 | 743 l/h |
| G30 | 28-30 mbar | 2SR - 1AUX - 1MW | 7,80 | 567 g/h |
| G31 | 37 mbar | 2SR - 1AUX - 1MW | 7,80 | 557 g/h |
ELECTRIC SUPPLY: 220-240 V \~ 50-60 Hz - 0,6 W
INSTALLATION (CLASS 3)
TECHNICAL INFORMATION FOR THE INSTALLER
- Use protective gloves for handling, preparing, and installing the product.
- This product can be embedded in a worktop 20 ÷ 60 ~mm thick.
- If there is no oven beneath the hob, insert a separator panel with a surface at least equal to the work surface's opening. This panel must be positioned at a maximum distance of 150 mm below the upper surface of the work surface but, in no case less than 20 mm from the bottom of the hob. In case you intend to install an oven beneath the hob, make sure that it is equipped with a cooling system.
DIMENSIONS AND DISTANCES TO BE MAINTAINED
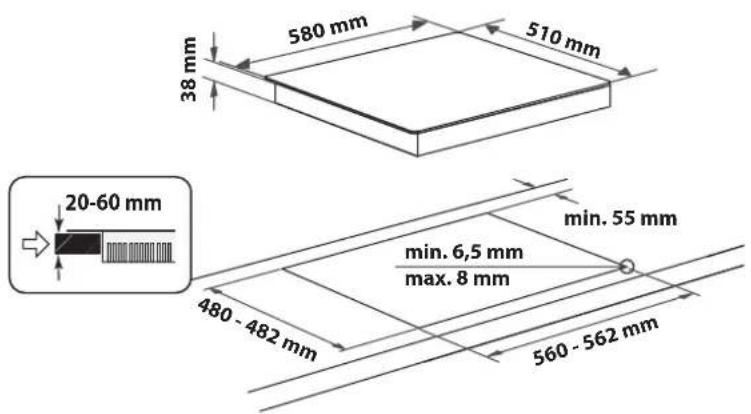

NOTE: If distance "A" between the kitchen cabinets is between 600 mm and 730 mm, height "B" must be at least 530 mm. If distance "A" between the kitchen cabinets is greater than the width of the hob, height "B" must be at least 400 mm. If a hood is installed above the hob, refer to the assembly instructions for the hood to see the necessary distance.
ASSEMBLY
After cleaning the perimeter surface, apply the supplied gasket to the hob as shown in the figure.
Position the hob in the worktop opening made respecting the dimensions indicated in the Instruction.
natural_image
Illustration of hands holding a stack of papers with a circular icon showing a hand gesture (no text or symbols)NOTE: the power supply cable must be long enough to permit its upward extraction.
To secure the hob, use the brackets (A) provided with it. Fit the brackets into the relevant bores shown by the arrow and fasten them by means of their screws in accordance with the thickness of the worktop (see the following figures).

GAS CONNECTION
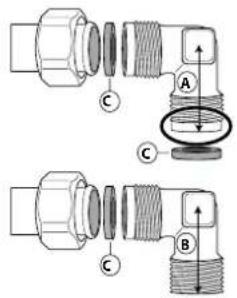
- Connect elbow (A)* or (B)* supplied with to the hob inlet main pipe and interpose the washer (C) supplied, in compliance with EN 549.
* Use elbow (A) for France and elbow (B) for all other destinations.
- After connection to the gas supply, check for leaks with soapy water. Light up the burners and turn the knobs from max position ⚙ to minimum position ⚙ to check flame stability.
ELECTRICAL CONNECTION

THANK YOU FOR BUYING A WHIRLPOOL PRODUCT
In order to receive a more complete assistance, please register your product on www.whirlpool.eu/register.

Before using the appliance carefully read the Safety Instruction.
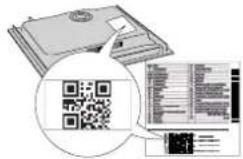
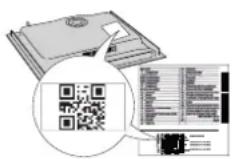
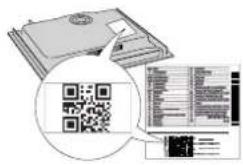
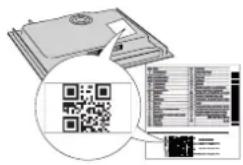
PLEASE SCAN THE QR CODE ON YOUR APPLIANCE IN ORDER TO REACH MORE INFORMATION
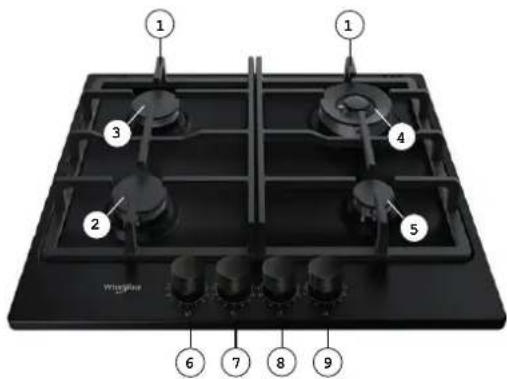
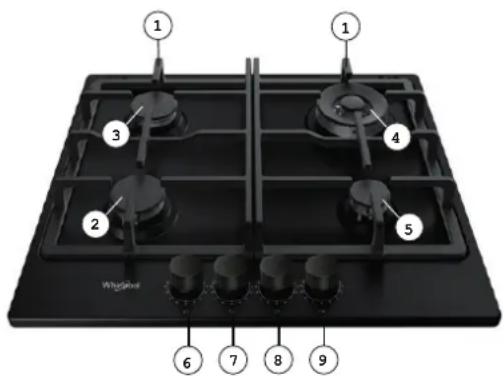
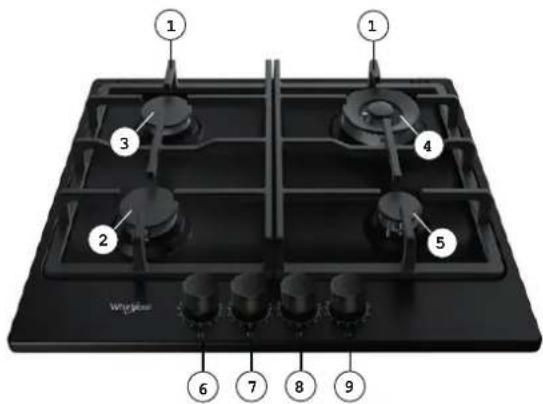
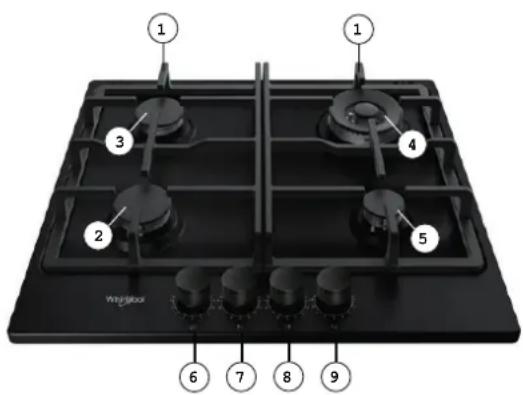
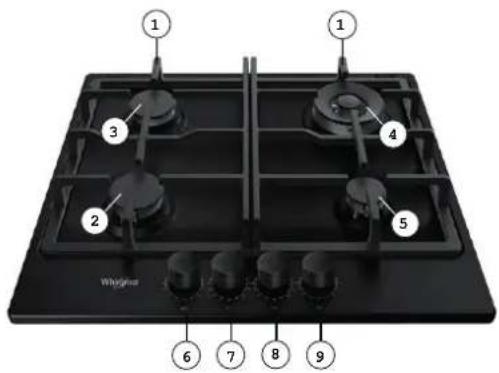
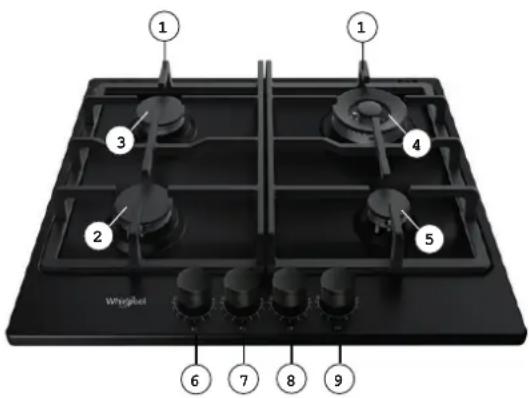
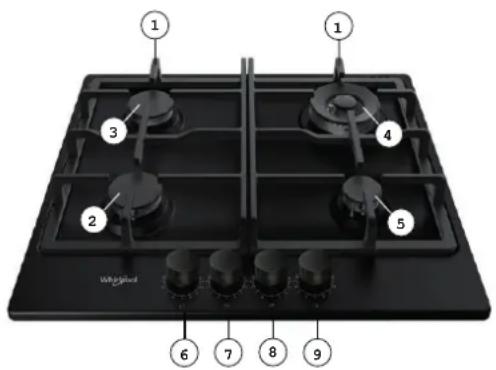
PRODUCT DESCRIPTION
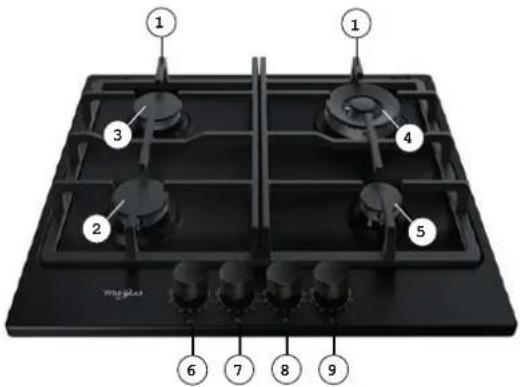
- Removable panstand grids
- Semi-rapid burner
- Semi-rapid burner
- Mini Wok burner
- Auxiliary burner
- Semi-rapid burner control knob
- Semi-rapid burner control knob
- Mini Wok burner control knob
- Auxiliary burner control knob
Symbols
Shaded circle
Tap closed
Large flame
Maximum opening/delivery and electric ignition
Small flame
Minimum opening or reduced delivery


DAILY USE
HOW TO USE THE HOB
Do not let the burner flame extend beyond the edge of the pan.
IMPORTANT: when the hob is in use, the entire hob area may become hot.
- To ignite one of the burners, turn the relative knob anti-clockwise to the maximum flame setting.
- Press the knob against the control panel to ignite the burner.
• After the burner has ignited, keep the knob pressed for about 5-10 seconds to allow proper device operation. - This burner safety device shuts off the gas supply to the burner if the flame goes out accidentally (because of sudden draught, an interruption in the gas delivery, boiling over liquids, etc.).
- The knob must not be pressed for more than 15 sec. If, after that time has elapsed, the burner does not remain lit, wait at least one minute before trying to light it again.
NOTE: should particular local conditions of the delivered gas make the ignition of burner difficult, it is advisable to repeat the operation with the knob turned to the small flame setting.
The burner might go out when the knob is released. This means that the safety device has not warmed up enough. In this case, repeat the operations described above.
If the burner flame is accidentally extinguished, switch off the burner control and do not try to ignite for at least 1 minute.
PRACTICAL ADVICE FOR USING THE BURNERS
This hob has burners of different diameters. For better burner performance, please stick to the following rules:
- use pots and pans with bottoms the same width as that of the burners or slightly larger (see table on the right);
- only use flat-bottomed pots and pans;
- use the correct amount of water for cooking foods and keep the pot covered;
• make sure pots on the grates do not protrude beyond the edge of the hob; - In the case of pans with convex bottoms (WOK), use the support grille (not provided), which should be positioned only on the multi-ring burner;
- avoid accidentally knocking the hob with pans, racks or other kitchen utensils;
- do not leave empty steak grills over the lit burner for longer than 5 minutes.
IMPORTANT: improper use of the grids can damage the hob: do not position the grids upside down or slide them across the hob.
| BURNER POT ∅ | |
| Mini Wok From 24 to 26 cm | |
| Semi-rapid From 15 to 22 cm | |
| Auxiliary) From 10 to 14 cm | |
Do not use:
- cast iron griddles, ollar stones, terracotta pots, and pans;
- heat diffusers such as metal mesh, or any other types;
- two burners simultaneously for one receptacle (e.g., fish kettle).
ADAPTING TO DIFFERENT TYPES OF GAS
This operation must be performed by a qualified technician.
If the appliance is intended to operate with a different gas from the gas type stated on the rating plate and information label on the top of the hob, change the injectors.
Remove the information label and keep it with the instructions booklet.
Use pressure regulators suitable for the gas pressure indicated in the Instruction:
- the gas injector must be changed by After Sales Service or a qualified technician;
- injector not supplied with the appliance must be ordered from After Sales Service;
- adjust the minimum setting of the taps.
NOTE: when liquid petroleum gas is used (G30/G31), the minimum gas setting screw must be tightened as far as it will go.
IMPORTANT: should you experience difficulty in turning the burners knobs, please contact the After Sales Service for the replacement of the burner tap if found to be faulty.
IMPORTANT: when gas cylinder is adopted, the gas cylinder or gas container must be properly settled (vertical orientation).
REPLACING THE INJECTORS (see the injector table in the Safety instructions)
This operation must be performed by a qualified technician.
- Remove grids (A).
- Extract burners (B).
- Using a socket spanner of the appropriate size unscrew the injector (C), to be replaced.
- Replace it with the injector suitable for the new type of gas.
- Re-assemble the injector in (D).
- If you have a multiple crown burner use a side spanner to replace the injector (E).
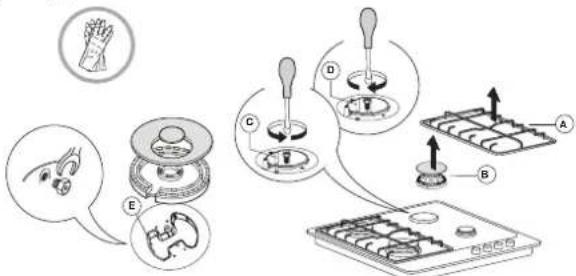
Before installing the hob, remember to affix the gas calibration plate supplied with the injectors in such a way that it covers the existing information relating to gas calibration.
ADJUSTING MINIMUM GAS SETTING OF TAPS
This operation must be performed by a qualified technician.
The adjustment must be performed with the tap in a minimum gas setting position ⚙ (small flame).
The primary air of the burners does not need to be adjusted.
To ensure that the minimum setting is correctly adjusted, remove the knob (F) and proceed as follows:
- tighten the screw to reduce the flame height (-);
- loosen the screw to increase the flame height (+).
At this stage, light up the burners and turn the knobs from max. position ⏻ to minimum position ⬆ to check flame stability.
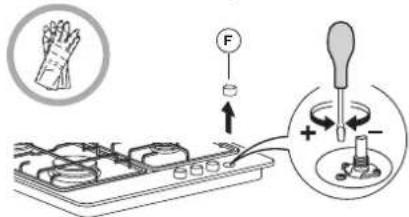
Upon completion of adjustment, reseal using sealing wax or an equivalent material.
COOKING TABLE
| LEVEL | COOKING METHOD/TYPE (SUGGESTED FOR) | COOKING TIPS |
| 1-2 | KEEPWARM | Ideal for softening butter, gently melting chocolate in bagnemarie, thawing small portions, creaming risotto. |
| GENTILE COOK | ||
| 3-4 | SIMMERING | Ideal for slow-cook recipes (rice,sauces,roast,fish) using liquids (water, wine, broth), and for creaming pasta, maintaining a gentle boiling. |
| STEWING | ||
| 5-6 | ROASTING | Ideal for sauteing, stewing vegetables, cooking for longer period, preheating accessories, cooking until creamy. |
| FRYING | ||
| 7-8 | STIR FRYING | Ideal for browning, starting to cook, bringing liquids to the boil quickly, frying deep-frozen products, grilling meat and fish, maintaining a lively boil. |
| GRILLING | ||
| 9 | FAST HEATING | Ideal for rapidly increasing the temperature of food or for heating up liquids (water). |
CLEANING AND MAINTENANCE
⚠️ Disconnect the appliance from the power supply.
CLEANING THE HOB SURFACE
- All the enamelled and glass parts should be cleaned with warm water and a neutral solution.
- Stainless steel surfaces may be stained by calcareous water or aggressive detergents if left in contact for too long. Any food spills (water, sauce, coffee, etc.) should be wiped away before they dry.
- Clean with warm water and neutral detergent, and then dry with a soft cloth or chamois. Remove baked-on dirt with specific cleaners for stainless steel surfaces.
NOTE: clean stainless steel only with soft cloth or sponge.
- Do not use abrasive or corrosive products, chlorine-based cleaners or pan scourers.
- Do not use steam cleaning appliances.
- Do not use flammable products.
- Do not leave acid or alkaline substances, such as vinegar, mustard, salt, sugar or lemon juice on the hob.
CLEANING THE HOB PARTS
- Clean glass and enamelled parts only with soft cloth or sponge.
- Grids, burner caps and burners can be removed to be cleaned.
- Clean them by hand with warm water and non-abrasive detergent, removing any food residues and checking that none of the burner openings is clogged.
- Rinse and dry.
- The cast-iron grates may be cleaned in the dishwasher. Remove any burnt-on food before placing the grates in the lowest rack in the dishwasher.
- Refit burners and burner caps correctly in the respective housings.
- When replacing the grids, make sure that the panstand area is aligned with the burner.
- Models equipped with electrical ignition plugs and safety device require thorough cleaning of the plug end in order to ensure correct operation. Check these items frequently, and if necessary, clean them with a damp cloth. Any baked-on food should be removed with a toothpick or needle.
NOTE: to avoid damaging the electric ignition device, do not use it when the burners are not in their housing.
If the hob does not operate correctly, before calling the After-Sales Service, refer to the Troubleshooting Guide to determine the problem
1. The burner fails to ignite, or the flame is not even
Check that:
- the gas or electrical supplies are not shut off and especially that the gas supply tap is open;
• the gas cylinder (liquid gas) is not empty;
- the burner openings are not clogged;
• the plug end is not dirty;
- all the burner parts have been positioned correctly;
• there are no draughts near the hob.
2. The burner does not stay lit
Check that:
- when lighting the burner, the knob has been pressed for enough time to activate the protection device;
- the burner openings are not clogged near the thermocouple;
• the end of the safety device is not dirty; - the minimum gas setting is correct (see relevant paragraph).
AFTER-SALES SERVICE
In order to receive complete assistance, please register your product on www.whirlpool.eu/register.
BEFORE CALLING THE AFTER-SALES SERVICE:
- See if you can solve the problem by yourself with the help of the TROUBLESHOOTING suggestions.
- Switch the appliance off and back on again to see if the fault persists.
IF AFTER THE ABOVE CHECKS THE FAULT STILL OCCURS, GET IN TOUCH WITH THE NEAREST AFTER-SALES SERVICE.
To receive assistance, call the number shown on the warranty booklet or follow the website's instructions on www.whirlpool.eu.
When contacting our Client After-sales service, always specify:
• a brief description of the fault;
- the type and exact model of the appliance;
3. The containers are not stable
Check that:
- the bottom of the container is perfectly flat;
• the container is centred on the burner; - the grids have not been exchanged or positioned incorrectly.
If after the above checks the fault still occurs, get in touch with the nearest After Sales Service.
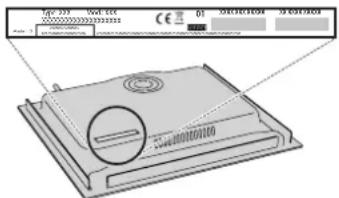
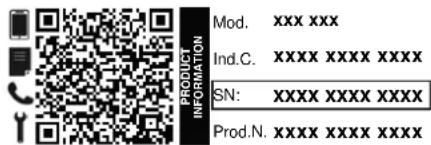
- the serial number (number after the word SN on the rating plate located under the appliance). The serial number is also indicated in the documentation;
- your full address;
- your telephone number.
If any repairs are required, please contact an authorized after-sales service (to guarantee that original spare parts will be used and repairs carried out correctly).
Policies, standard documentation and additional product information can be found by:
• Using QR code in your appliance;
• Visiting our website docs.whirlpool.eu/docs;
• Alternatively, contact our After-sales Service (See phone number in the warranty booklet). When contacting our After-sales Service, please state the codes provided on your product's identification plate.
CONSIGNES DE SÉCURITÉ
DÉCLARATION DE CONFORMITÉ
INSTALLATION (CLASSE 3)
INFORMATIONS TECHNIQUES POUR L'INSTALLATEUR

MERCI D'AVOIR CHOISI UN PRODUIT WHIRLPOOL
DESCRIPTION DU PRODUIT
INSTALACJA (KLASA 3)
INFORMACJE TECHNICZNE DLA INSTALATORA

DZIEKUJEMY ZA ZAKUP PRODUKTU WHIRLPOOL
OPIS PRODUKTU
natural_image
Illustration of hands holding a closed book, next to a circular icon with a hand gesture (no text or symbols)
HVALA, KER STE SE ODLOČILI ZA IZDELEK WHIRLPOOL Če želite celovitejšo pomoč, izdelek registrirajte na spletni strani www.whirlpool.eu/register.

Pred uporabo aparata pozorno preberite varnostna navodila.
ZA PODROBNEJŠE INFORMACIJE POSKENIRAJTE KODO QR NA NAPRAVI
OPIS IZDELKA
Po zaključku nastavitve jih znova zatesnite s tesnilnim voskom ali ustreznim materialom.
RAZPREDELNICA PRIPRAVE JED
| RAVEN | NAČIN PRIPRAVE/VRSTA JEDI (PRIPOROČENO ZA) | NASVETI ZA PRIPRAVO JEDI |
| 1-2 | OHRANJANJE JEDI TOPLE | Idealno za mehčanje masla, nežno taljenje čokolade v vodni kopeli, odmrzovanje majhnih porcij, pripravo kremne rižote. |
| NEŽNO KUHANJE | ||
| 3-4 | POČASNO VRENJE | Idealno za recepte, ki zahtevajo dolgotrajno kuhanje (riž, omake, pečenka, ribe) s tekočinami (voda, vino, juha) in za kremne testenine, z ohranjanjem blagega vrenja. |
| DUŠENJE | ||
| 5-6 | PEČENJE | Idealno za praženje, dušenje zelenjave, daljše pripravljanje jedi, predgretje pribora, pripravo kremastih jedi. |
| CVRTJE | ||
| 7-8 | HITRO CVRTJE | Idealno za površinsko pečenje, začetek kuhanja, hitro zavretje tekočin, cvrtje zamrznjenih izdelkov, pečenje mesa in rib, ohranjanje močnega vrenja. |
| PEKA NA ŽARU | ||
| 9 HITRO | GRETJE Idealno za hitro pogrevanje živil | ali za segrevanje tekočin (vode). |
ČIŠČENJE IN VZDRŽEVANJE

ZAHVALJUJEMO VAM NA KUPOVINI PROIZVODA WHIRLPOOL
Kako bismo vam mogli pružiti potpuniju pomoć, registrirajte svoj uređaj na adresi www.whirlpool.eu/register.

Pažljivo pročitajte sigurnosne upute prije upotrebe uređaja.
SKENIRAJTE QR KOD NA SVOM UREĐAJU DA BISTE DOBILI VIŠE INFORMACIJA
OPIS PROIZVODA
BEZBEDNOSNA UPUTSTVA
VAŽNO JE DA SE PROČITAJU I POŠTUJU
⚠ Ova uputstva su validna ako se simbol zemlje javlja na uređaju. Ako simbol ne postoji na uređaju, potrebno je pogledati tehnička uputstva koja će vam pružiti potrebna uputstva u vezi sa modifikacijom uređaja u skladu sa uslovima korišćenja u zemlji.
⚠ OPREZ: Korišćenje uređaja za kuvanje na gas rezultira proizvodnjom toplote, vlage i proizvoda sagorevanja u prostoriji u kojoj je instaliran. Vodite računa da kuhinja ima dobru ventilaciju, naročito kada se uređaj koristi: držite prirodne otvore za ventilaciju otvorenim ili instalirajte mehanički uređaj za ventilaciju (mehanički aspirator za ekstrakciju). Za dužu intenzivnu upotrebu uređaja može biti potrebna dodatna ventilacija (na primer, otvaranje prozora) ili efikasnija ventilacija (na primer, povećavanje nivoa mehaničke ventilacije, ako je moguće).

HVALA ŠTO STE KUPILI PROIZVOD KOMPANIJE WHIRLPOOL Kako biste dobili kompletniju podršku, registrujte svoj proizvod putem www.whirlpool.eu/register.

OPIS PROIZVODA
-
Rešetke za postavljanje posuđa koje mogu da se skinu
-
Polubrzi gorionik
-
Polubrzi gorionik
-
Mini Wok gorionik
-
Pomoćni gorionik
-
Dugme za upravljanje polubrzim gorionikom
-
Dugme za upravljanje polubrzim gorionikom
-
Dugme za upravljanje gorionikom Mini Wok
-
Dugme za upravljanje pomoćnim gorionikom

Simboli
Zacrnjen krug
- Slavina zatvorena
Velik plamen
Maksimalno otvaranje/dovod i električno paljenje
Mali plamen
Minimalan otvor ili umanjen dovod
PRVA UPOTREBA
KAKO KORISTITI PLOČU ZA KUVANJE
⚠️ Nemojte dozvoliti da se plamen gorionika proširi preko ivica tiganja.
VAŽNO: prilikom korišćenja ploče za kuvanje čitav deo na kome se nalazi ploča za kuvanje može da postane vruć.
- Kako biste upalili jedan od gorionika, okrenite odgovarajuće dugme suprotno od pravca kretanja kazaljke na satu do položaja za najveći plamen.
- Pritisnite dugme do komandne table kako biste upalili gorionik.
- Pošto se gorionik upali, nastavite da pritiskate dugme otprilike 5–10 sekundi kako biste omogućili pravilan rad uređaja.
- Uređaj za zaštitu gorionika prekinuće dovod gasa do gorionika ukoliko se plamen slučajno ugasi (u slučaju iznenadne promaje, prekida u snabdevanju gasom, prekipljenja tečnosti itd.).
- Dugme se ne sme pritiskati više od 15 sekundi. Ukoliko se posle tog vremena gorionik ne upali, sačekajte najmanje jednu minutu pre ponovnog paljenja.
Pre montaže ploče za kuvanje pričvrstite pločicu za kalibraciju gasa isporučenu zajedno sa injektorima na način da pokriva postojeće informacije u vezi sa kalibracijom gasa.
PODEŠAVANJE SLAVINA VEZANO ZA NAJMANJU KOLIČINU GASA
Radove opisane u nastavku treba da izvrši kvalifikovan serviser.
Podešavanje treba izvršiti sa slavinom u položaju za najmanju količinu gasa (fiamma piccola).
Primarni vazduh gorionika ne mora se podesiti.
Posle završetka podešavanja ponovo zaptite voskom za zaptivanje ili ekvivalentnim materijalom.
TABELA ZA KUVANJE
| NIVO | NAČIN/VRSTA KUVANJA (PREPORUČUJE SE ZA) | SAVETI ZA KUVANJE |
| 1-2 | ODRŽAVANJE TOPLOTE | Idealno za omekšavanje putera, sporo topljenje čokolade na pari, otapanje malih porcija, kremasti rižoto. |
| BLAGO KUVANJE | ||
| 3-4 | LAGANO KLJUČANJE | Idealno za recepte sa sporijim kuvanjem (pirinač, soseve, pečenje, ribu) sa tečnostima (vodom, vinom, supom) i za pripremu kremaste paste, uz održavanje blagog ključanja. |
| KRČKANJE | ||
| 5-6 | PEČENJE | Idealno za dinstanje, krčkanje povrća, dugo kuvanje, dodatni pribor za predzagrevanje, kuvanje dok ne postane kremasto. |
| PRŽENJE | ||
| 7-8 | PRŽENJE UZ MEŠANJE | Idealno za stvaranje zapečene korice, početak kuvanja, brzo ključanje tečnosti, prženje duboko zamrznutih proizvoda, grilovanje mesa i ribe, održavanje ključanja. |
| GRILOVANJE | ||
| 9 | BRZO ZAGREVANJE | Idealno za brzo povećavanje temperature hrane ili za brzo zagrevanje tečnosti (voda). |
ČIŠĆENJE I ODRŽAVANJE
Isključite uređaj sa električne mreže.
ČIŠĆENJE PLOČE ZA KUVANJE
- Sve emajlirane i staklene delove treba čistiti toplom vodom i neutralnim rastvorom.
- Površine od nerđajućeg čelika mogu da promene boju ukoliko ostanu predugo u dodiru sa tvrdom vodom ili agresivnim detergentima. Prolivenu tečnost (vodu, sos, kafu itd.) treba obrisati pre nego što se osuši.
- Očistite ploču za kuvanje toplom vodom i neutralnim detergentom, a zatim je obrišite mekanom krpom ili krpom od kože. Skinite skorele ostatke pomoću posebnih sredstava za čišćenje površina od nerđajućeg čelika.
NAPOMENA: površine od nerđajućeg čelika čistite samo mekanom krpom ili sunderom.
natural_image
Illustration of hands holding a stack of papers with a speech bubble showing a thumbs-down gesture (no text or symbols present)
GÁZCSATLAKOZÁS

KÖSZÖNJÜK, HOGY A WHIRLPOOL TERMÉKÉT VÁLASZTOTTA
TERMÉKLEÍRÁS
INSTALAREA (CLASA 3)
INFORMATII TEHNICE PENTRU INSTALATOR

VĂ MULTUMIM CĂ AȚI ACHIZIȚIONAT UN PRODUS WHIRLPOOL
DESCRIEREA PRODUSULUI
ОПИС ВИРОБУ
تم تصنيع هذا جهاز باستخدام مواد قابلة ل NCAA ل NCAA ل NCAA ل NCAA ل NCAA ل NCAA ل NCAA ل NCAA ل NCAA ل NCAA ل NCAA ل NCAA ل NCAA ل NCAA ل NCAA ل NCAA ل NCAA ل NCAA ل NCAA ل NCAA ل NCAA ل NCAA ل NCAA ل NCAA ل NCAA ل NCAA ل NCAA ل NCAA ل NCAA ل NCAA ل NCAA ل NCAA ل NCAA ل NCAA ل NCAA ل NCAA ل NCAA ل NCAA ل NCAA ل NCAA ل NCAA ل NCAA ل NCAA ل NCAA ل NCAA ل NCAA ل NCAA ل NCAA ل NCAA ل NCAA ل NOAA الملحية化妆品 بال Electric persons الم Electric persons الم Electric persons الم Electric persons الم Electric persons الم Electric persons الم Electric persons الم Electric persons الم Electric persons الم Electric persons الم Electric persons الم Electric persons الم Electric persons الم Electric persons الم Electric persons الم Electric persons الم Electric persons الم Electric persons الم Electric persons الم Electric persons الم Electric persons الم Electric persons الم Electric persons الم Electric persons الم Electric persons الم Electric persons الم Electric persons الم Electric persons الم Electric persons الم Electric persons الم Electric persons الم Electric persons الم Electric persons الم Electric persons الم Digital People's Association الل充电 Personal Emergency Emergency Emergency Emergency Emergency Emergency Emergency Emergency Emergency Emergency Emergency Emergency Emergency Emergency Emergency Emergency Emergency Emergency Emergency Emergency Emergency Emergency Emergency Emergency Emergency Emergency Emergency Emergency Emergency Emergency Emergency Emergency Emergency Emergency Emergency Emergency Emergency Emergency Emergency Emergency Emergency Emergency Emergency Emergency Emergency Emergency Emergency Emergency Emergency Emergency Emergency Emergency Emergency Emergency Emergency Emergency Emergency Emergency Emergency Emergency Emergency Emergency Emergency Emergency Emergency Emergency Emergency Emergency Emergency Emergency Emergency Emergency Emergency Emergency Emergency Emergency Emergency Emergency Emergency Emergency Emergency Emergency Emergency Emergency Emergency Emergency Emergency Emergency Emergency Emergency Emergency Emergency Emergency Emergency Emergency Emergency Emergency Emergency Emergency Emergency emergency emergency emergency emergency emergency emergency emergency emergency emergency emergency emergency emergency emergency emergency emergency emergency emergency emergency emergency emergency emergency emergency emergency emergency emergency emergency emergency emergency emergency emergency emergency emergency emergency emergency emergency emergency emergency emergency emergency emergency emergency emergency emergency emergency emergency emergency emergency emergency emergency emergency emergency emergency emergency emergency emergency emergency emergency emergency emergency emergency emergency emergency emergency emergency emergency emergency emergency emergency emergency emergency emergency emergency emergency emergency emergency emergency emergency emergency emergency emergency emergency emergency emergency emergency emergency emergency emergency emergency emergency emergency emergency emergency emergency emergency emergency emergency emergency emergency emergency emergencyEmergency
توصيل الغاز