Phoenix TT-JS-PHX - Battery starter ToughTested - Free user manual and instructions
Find the device manual for free Phoenix TT-JS-PHX ToughTested in PDF.


User questions about Phoenix TT-JS-PHX ToughTested
0 question about this device. Answer the ones you know or ask your own.
Ask a new question about this device
Download the instructions for your Battery starter in PDF format for free! Find your manual Phoenix TT-JS-PHX - ToughTested and take your electronic device back in hand. On this page are published all the documents necessary for the use of your device. Phoenix TT-JS-PHX by ToughTested.
USER MANUAL Phoenix TT-JS-PHX ToughTested
Mizco International Inc.
Cranford, New Jersey 07016
techsupport@mizco.com
www.toughtested.com

TOUGHTESTED®
Thank you for purchasing the Phoenix Jump Starter & Tire Inflator. Before operating your new device, please read this user's manual carefully.
First use & Checking the battery level 04
Using the jumpstarter function 05
battery clip module led lights 06
Using the air inflator & Changing the unit of measure 07
Using the powerbank & Using the light 08
Product specifications 09
Warranty 10
Contact Information 11
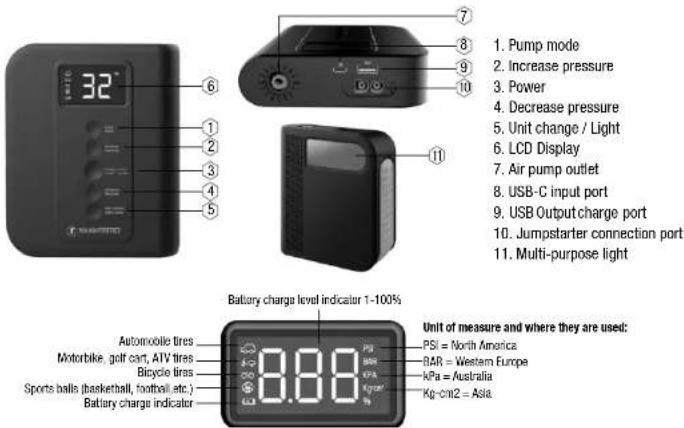
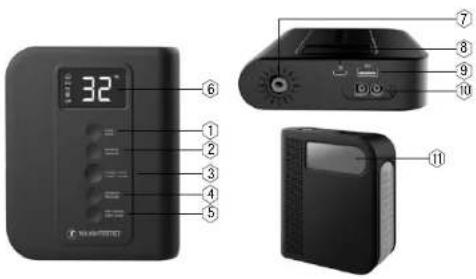
1. Pump mode
2. Increase pressure
3. Power
4. Decrease pressure
5. Unit change / Light
6. LCD Display
7. Air pump outlet
8. USB-C input port
9. USB Output charge port
10. Jumpstarter connection port
11. Multi-purpose light
text_image
Labeled photo of a handheld electronic device with numbered parts for identificationINCLUDES
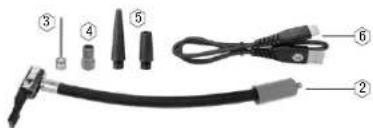
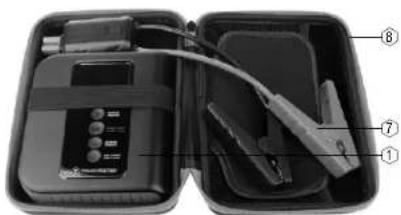
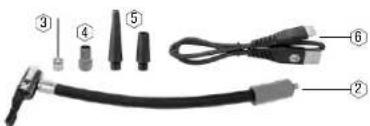
- Jumpstarter/inflator
- Inflator hose with locking standard schrader valve
- Pin adapter for sports balls
- Presta valve bicycle adapter
- Two adapters for beach balls, air mattresses, balloons, etc.
- USB A to USB-C Cable
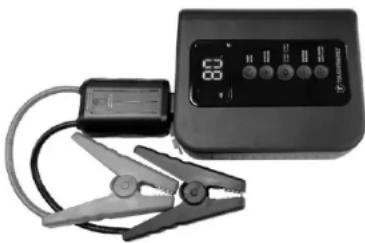
- Positive/negative clips for jumpstarter
- Zippered carry case
text_image
Labeled diagram of a medical or electronic device with numbered components including connectors, cables, and a connector.FIRST USE
- Before first use fully charge the powerbank to 100%.
- The digital display will show the battery capacity.
- the display will blink continuously while charging and the number will slowly increase until it reaches 100% .
CHECKING THE BATTERY LEVEL
- Press and hold the power button for 3 seconds to turn the unit on.
- Press the mode button until you see the battery symbol at bottom left of the display.
- The display will show the remaining charge level as a percentage of 100.
- Do not jumpstart a vehicle if the battery level is below 20%.
USING THE JUMPSTARTER FUNCTION
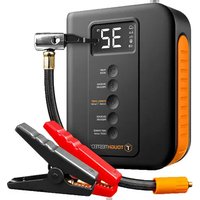
- Connect the jumpstarter cables to the blue port on the side of the unit. The blue LED on the module will turn on.
- Attach the red cable to the positive battery terminal of your vehicle.
- Attach the black cable to the negative battery terminal of your vehicle.
- When both clamps are connected to the battery, the green light will turn on.
- You will hear a clicking sound every second to tell you the jumpstarter is ready.
- Start your vehicle.
- The blue and green lights on the module will turn off once the vehicle has started.
- Remove the cables from the vehicle battery, then unplug the clamps from the unit.
Note: It is not necessary to have the unit powered on to jumpstart your vehicle. If you wish to turn it on, press and hold the power button for 3 seconds, you will see the battery charge level. Press and hold the power button for 3 seconds to turn it off or wait 30 seconds, and it will automatically power off.
BATTERY-OLIP MODULE LED LIGHTS
Blue LED is on, the module is getting power.
Green LED is on., the clamps are connected to the vehicle battery.
Solid red LED + alarm when connected to the vehicle battery means the clamps are not connected correctly. Check the connections.
Make sure the red is on the positive terminal and the black is on the negative terminal.
Solid red LED + alarm when not connected to a vehicle means that the clamp module has
been damaged and will no longer work. Contact techsupport@mizco.com for assistance.
natural_image
Medical or laboratory equipment setup with a digital display and clamp tool (no visible text or symbols)USING THE AIR INFLATOR
- Screw the hose into the threaded hole on the side of the unit.
- Choose the adapter that is right for the item you need to inflate. Attach it to the end of the hose and close the valve locking lever.
- Press and hold the power button for 3 seconds to turn the unit on.
- Use the mode button to choose the type of device you will add air to (car, motorbike, bicycle, ball).
- The unit will default to PSI (pounds per square inch), if your country uses another unit of measure go to "Changing the unit of measure" section.
- Use the up or down arrow keys to set the pressure you need.
- Quick press the power button to start the pump. It will automatically stop when the desired pressure is reached. Note: if you wish to increase the pressure once the pump has automatically stopped, you will need to remove the hose from the tire, ball, etc., reconnect it, and set the new desired pressure value.
- When inflating items other than a vehicle tire it is best to check the pressure by hand as it inflates. Stop the pump when you feel the pressure is right, this will prevent accidental over inflation.
CHANGING THE UNIT OF MEASURE
- Press the Unit change/Light button to change between PSI, BAR, KPA, Kg/cm2.
- When the unit of measure is chosen go back to the section "Using the air inflator", step 5.
USING THE POWERBANK
- Connect a USB cable to the USB-A port (the larger port). Connect the other end to your USB device.
- Press and hold the power button for 3 seconds to turn the unit on.
- Your device will start charging.
- When your device is charged, long press the power button to turn the unit off. Note: It will automatically power off after 30 seconds if it is not being used.
USING THE LIGHT
- Press and hold the Unit/Light button for 3 seconds to switch to light mode.
- The light will cycle thru its modes as indicated here with each press of the button.
- Low → High → Flashing → SOS → Red → Red flashing → Off
- In any of the light modes long press the Unit change/Light button to turn the light off.
Battery capacity: 8800mAh lithium polymer battery
Jump starter output: 500A (800A Peak)
Air inflator: Max 72 PSI pressure
USB-C input port: 5V/2.1A (10.5W)
USB Output charge port: 5V/2A (10W)
Light functions: Low, high, flashing, SOS, red, red flashing
Light max output: 220lm
Thank you for purchasing a ToughTested ^® product from Mizco international, Inc.
We want you to enjoy this product without any problems. However, in the unlikely event that it malfunctions, we will either repair or replace it as part of the product's limited 5 year warranty.
At the first sign of trouble and before returning the product, we encourage you to contact ToughTested ^4 .
If the product has malfunctioned during normal use, the responsibility of ToughTested® is limited solely to the repair or replacement, at its option, of the product. This warranty does not extend to damage or failure that results from misuse, neglect, accidents, alteration, abuse, improper installation or maintenance. This warranty does not extend to equipment used with the product.
All brands represented herein are registered trademarks of their respective manufacturers. Design and specifications are subject to change without notice.
©Mizco International, Inc. All rights reserved.
All trade names are registered trademarks of the respective manufacturers listed.
Cranford, New Jersey 07016
techsupport@mizco.com
www.mizco.com
text_image
32° 6 ① ② ③ ④ ⑤ 7 8 9 10 ⑪text_image
Labeled photo of a handheld electronic device with numbered parts, showing internal components like a power supply box and cable.