Magnifica Evo ECAM290.62.B - Coffee machine DELONGHI - Free user manual and instructions
Find the device manual for free Magnifica Evo ECAM290.62.B DELONGHI in PDF.

| Product type | Super automatic coffee machine |
| Brand | DeLonghi |
| Model | Magnifica Evo ECAM290.62.B |
| Dimensions (W x D x H) | 430 x 370 x 350 mm |
| Weight | 9.5 kg |
| Power supply | 120 V~, 60 Hz, 1250 W |
| Water tank capacity | 1.8 L |
| Bean hopper capacity | 250 g |
| Pump pressure | 15 bar |
| Steam nozzle / milk carafe | Integrated milk carafe LatteCrema System |
| Grinder adjustment | 13 grind settings |
| Main functions | Espresso, long coffee, cappuccino, latte macchiato, doppio+, americano, hot water |
| Auto shut-off timer | 15 min, 30 min, 1 h or 3 h |
| Energy saving | Yes (programmable) |
| Water filter | De'Longhi water softener filter (optional) |
| Descaling | Automatic descaling program with indicator |
| Cleaning | Milk carafe cleaning program and automatic rinsing |
| Safety | Automatic shut-off, burn protection, shutdown in case of malfunction |
| Spare parts and repairability | Removable brewing unit, grounds container, drip tray, detachable milk carafe; repairs by authorized service |
| General information | Instructions in French available; household use only |
Frequently Asked Questions - Magnifica Evo ECAM290.62.B DELONGHI
User questions about Magnifica Evo ECAM290.62.B DELONGHI
0 question about this device. Answer the ones you know or ask your own.
Ask a new question about this device
Download the instructions for your Coffee machine in PDF format for free! Find your manual Magnifica Evo ECAM290.62.B - DELONGHI and take your electronic device back in hand. On this page are published all the documents necessary for the use of your device. Magnifica Evo ECAM290.62.B by DELONGHI.
USER MANUAL Magnifica Evo ECAM290.62.B DELONGHI
natural_image
Exterior view of a Delonghi Magnifica EVO coffee machine with milk being poured into a glass cup (no text or symbols on main subject)COFFEE MAKER
Instructions for use. Keep these instructions
Visit www.delonghi.com for a list of service centers near
you.
ELECTRIC CHARACTERISTICS
120V\~60Hz 1250W
MACHINE À CAFÉ
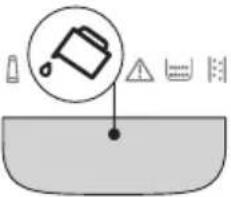
 |  |  |  |  | ||
 50^ 50^ | × × | × | √ | √ | ||
 | √ √ √ | √ √ | ||||
CONTENTS
-
SAFETY WARNINGS ......6
-
GENERAL INFORMATION......6
2.1 Instruction for Use......6
- BEFORE USE......6
3.1 Checking the appliance ....6
3.2 Installing the appliance......6
3.3 Connecting the appliance....6
3.4 Setting up the appliance 6
3.5 Cleaning and maintenance of materials in contact with food....6
3.6 Making cappuccinos and milk-based coffees 7
- INTRODUCTION......7
4.1 Letters in brackets....7
4.2 Troubleshooting and repairs....7
- DESCRIPTION 7
5.1 Description of the appliance - A .....7
5.2 Description of control panel - B......7
5.3 Description of indicator lights - C ......7
5.4 Description of accessories - D* .....7
5.5 Description of milk carafe - E....7
-
SETTING UP THE APPLIANCE 8
-
WATER SOFTENER FILTER 8
7.1 Replacing the filter....9
7.2 Removing the filter 9
-
MEASURING WATER HARDNESS ...... 9
-
TURNING THE APPLIANCE ON......10
-
TURNING THE APPLIANCE OFF ....10
-
MAKING COFFEE DRINKS ......10
11.1 Making coffee using coffee beans .....10
11.2 Making 2 cups of coffee .... 11
11.3 Making coffee using pre-ground coffee 11
11.4 General indications for making coffee-based drinks....11
11.5 Varying the intensity of the coffee .....11
11.6 Rinsing ....12
11.7 Tips for a hotter coffee....12
11.8 Adjusting the coffee grinder......12
11.9 Customizing the quantity in the cup .....12
- MAKING MILK-BASED DRINKS ......12
12.1 What milk to use? 12
12.2 How much milk? 13
12.3 Filling and attaching the milk carafe..... 13
12.4 Selection of coffee intensity or use of pre-ground coffee....13
12.5 Delivering milk-based drinks......13
12.6 Preparing My Latte 14
12.7 Cleaning the milk carafe after each use.14
12.8 Customizing the quantity in the cup .....14
- DELIVERING HOT WATER ......15
13.1 Customizing the quantity of hot water..15
-
TIPS FOR ENERGY SAVING......15
-
SETTINGS MENU ....15
15.1 Restore factory settings....17
-
CLEANING THE MACHINE ....18
-
THOROUGH CLEANING OF MILK CARAFE ..19
-
CLEANING THE INFUSER ....20
-
DESCALING ......21
-
EXPLANATION OF LIGHTS......22
-
TROUBLESHOOTING ......24
IMPORTANT SAFEGUARDS
When using electrical appliances, basic safety precautions should always be followed, including the following.
- Read all instructions carefully.
- Make sure the voltage of your electrical system corresponds to the voltage shown on the bottom of the machine.
- Do not touch hot surfaces. Use handles or knobs.
- To protect against fire, electrical shock and personal injury, do not immerse cord, plug or appliance in water or other liquid.
- Keep the appliance out of the reach of children and do not leave appliance unattended while in operation.
- Unplug from the outlet when not in use and before cleaning.
- Do not operate with a damaged cord or plug, or after the appliance malfunctions, or has been damaged in any manner. Return the appliance to the nearest authorized service facility for examination, repair or adjustment.
- The use of accessory attachments not recommended by the manufacturer may result in fire, electrical shock, or personal injury.
- Do not use outdoors.
- Make sure the power cord does not hang over the edge of the table or counter-top to avoid getting accidentally caught or entangled.
- Do not place the appliance or its electrical parts on or near electric stoves, cooking surfaces, or gas burners.
- Plug cord into the wall outlet. To disconnect, first turn machine "off", then remove plug from wall outlet.
- Do not use the appliance for other than the intended use. This appliance is to be utilized for domestic use only. The manufacturer declines all responsibility for any damage caused by improper, incorrect, or irresponsible use.
WARNING: To reduce the risk of fire or electric shock, do not remove the cover or the exterior of the unit. Don't attempt to repair or modify the machine, doing so will void the warranty. Repair should be done by authorized service personnel only!
SAVE THESE INSTRUCTIONS
THIS APPLIANCE IS FOR HOUSEHOLD USE ONLY
SHORT CORD INSTRUCTIONS
- A short power cord is provided to reduce risks resulting from becoming entangled in or tripping over a longer cord.
- Longer, detachable power supply cords or extension cords are available and may be used if care is exercised in their use.
- If an extension cord is used, the marked electrical rating should be at least as great as the electrical rating of the appliance. If the appliance is provided with 3-wire, grounding type cord, the extension should be a GROUNDING TYPE 3 - WIRE CORD. The longer cord should be arranged so that it will not drape over the counter-top or table top where it can be pulled on by children or tripped over.
- Your product is equipped with a polarized alternating current line plug (a plug having one blade wider than the other). This plug will fit into the power outlet only one way. This is a safety feature. If you are unable to insert the plug fully into the outlet, try reversing the plug. If the plug should still fail to fit, contact your electrician to replace your obsolete outlet. Do not defeat the safety purpose of the polarized plug.
1. SAFETY WARNINGS
Danger!
This is an electrical appliance and may cause electric shock.
You should therefore follow these safety warnings:
- Never touch the appliance with damp hands or feet.
- Never touch the plug with damp hands.
- Make sure the socket used is freely accessible at all times, enabling the appliance to be unplugged when necessary.
- Unplug directly from the plug only. Never pull the cord as you could damage it.
- To disconnect the appliance completely you must unplug it from the mains socket.
- If the appliance is faulty, do not attempt to repair. Turn it off, unplug from the mains socket and contact Customer Services.
- Before cleaning the appliance, turn it off, unplug from the mains socket and allow to cool.
Important!
Keep all packaging (plastic bags, polystyrene foam) away from children.
CHOKING HAZARD. The appliance might contain small parts. Some of those small parts might be required to get disassembled during cleaning and maintenance operations. Handle with care and keep small parts out of reach of children.
Danger of burns!
This appliance produces hot water and steam may form while it is in operation.
During operation (automatic rinsing, hot beverage delivery, steam delivery, cleaning), avoid contact with splashes of hot water or steam.
When the appliance is in operation, the cup shelf could become very hot.
2. GENERAL INFORMATION
2.1 Instruction for Use
Read all the Instruction for Use carefully before using the appliance. Failure to follow this Instruction for Use may result in burns or damage to the appliance.
The manufacturer is not liable for damage deriving from failure to respect this Instruction for Use.
Please note:
These safety warnings are valid for all De'Longhi coffee machines.
Keep this leaflet together with the instructions accompanying the appliance.
If the appliance is passed to other persons, they must also be provided with this Instruction for Use.
3. BEFORE USE
3.1 Checking the appliance
After removing the packaging, make sure the product is complete and undamaged and that all accessories are present. Do not use the appliance if it is visibly damaged. Contact De'Longhi Customer Services.
3.2 Installing the appliance
When you install the appliance, you should respect the following safety warnings:
- The appliance gives off heat. After positioning the appliance on the worktop, leave a space of at least 1.18 in / 3 cm between the surfaces of the appliance and the side and rear walls and at least 5.9 in / 15 cm above the coffee maker.
- Water penetrating the appliance could cause damage. Do not place the appliance near taps or sinks.
- The appliance could be damaged if the water it contains freezes. Do not install the appliance in a room where the temperature could drop below freezing point.
- Arrange the power cord in such a way that it cannot be damaged by sharp edges or contact with hot surfaces (e.g. electric hot plates).
3.3 Connecting the appliance
Check that the mains power supply voltage corresponds to that indicated on the rating plate on the bottom of the appliance. Connect the appliance to an efficiently earthed and correctly installed socket with a minimum current rating of 13A only. If the power socket does not match the plug on the appliance, have the socket replaced with a suitable type by a qualified professional.
3.4 Setting up the appliance
The first time you use the machine, the water circuit is empty and the appliance could be very noisy. The noise becomes less as the circuit fills.
3.5 Cleaning and maintenance of materials in contact with food
- When used for the first time, or after 3 or 4 days without use, clean the appliance and the removable accessories that come into contact with water, coffee and milk, as indicated in the instructions for use. Check in the instructions which accessories are dishwasher safe.
- If the appliance is not used for more than 3 or 4 days, before making the first beverage, rinse the water circuit as described in this Instruction for Use.
- Be certain to take maximum care when carrying out all cleaning and maintenance operations described in the instructions for use and/or prompted by the display or warning lights of the appliance itself.
3.6 Making cappuccinos and milk-based coffees
- The appliance has been tested for use with cow's milk and the following products of plant origin: soya, rice and almond. No other type of milk or product of plant origin may be used.
- To clean the system, following use with any type of milk, please follow the standard procedures described in the instruction manual
- The cleaning methods provided by the manufacturer and described in the instructions do not guarantee the complete removal of allergens.
- In the case of confirmed or suspected allergies and intolerances, make sure that your machine has not been previously used with any milk or product of plant origin containing the allergens you are allergic or the substances you are intolerant to.
4. INTRODUCTION
Take a few minutes to read these Instructions for Use. This will avoid all risks and damage to the appliance.
The Leds and indicator lights on the panel will help in ensuring correct interaction with the machine:
| Off -- | ||
| Permanently alight | Function available | |
| Blinking | Function in progress | |
| Blinking rapidly | User action required |
The same symbols are also used in the Quick Guide provided with the product.
4.1 Letters in brackets
The letters in brackets refer to the description of the appliance on pages 2-3.
4.2 Troubleshooting and repairs
In the event of problems, first try and resolve them by reading the information given in sections "17. Explanation of lights" and "18. Troubleshooting".
If this does not resolve the problem or further information is required, consult the customer services department at the numbers indicated on the website www.delonghi.com.
If repairs are required, contact De'Longhi customer services only. Addresses can be found on the website www.delonghi.com.
5. DESCRIPTION
5.1 Description of the appliance - A
A1. Beans container lid
A2. Coffee grinder adjustment dial
A3. Pre-ground coffee funnel
A4. Beans container
A5. Infuser door
A6. Removable infuser
A7. Power cord
A8. Water tank lid
A9. Water tank
A10. Coffee grounds container
A11. Cup tray
A12. Drip tray grille
A13. Drip tray water level indicator
A14. Drip tray
A15. Condensate tray
A16. Milk viewer
A17. Height-adjustable coffee spouts
A18. Accessories connector access flap
A19. Cup shelf
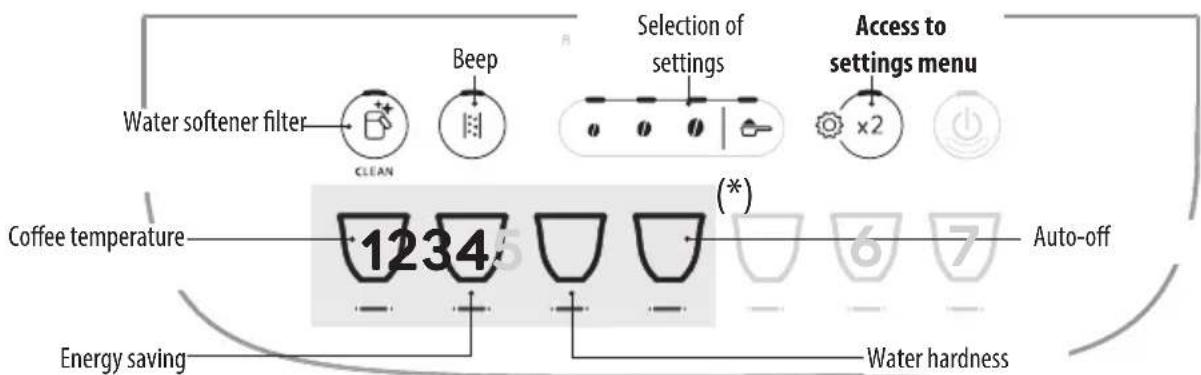
5.2 Description of control panel - B
B1. ON/standby button with built-in Led
B2. X2 button with built-in Led (if pressed and held for 5 seconds, accesses the settings menu)
B3. Pre-ground selection button
B4. Intensity selection buttons (mild, medium, strong)
B5. Descale cycle selection button
B6. Clean button (milk carafe) with built-in Led (if pressed and held for 5 seconds, activates manual rinse)
B7. Drinks selection button with built-in Led (* number and type of drinks differ according to models)
5.3 Description of indicator lights - C
C1. Filter exhausted
C2. No water
C3. General alarm
C4. Grounds container
C5. Descale required
5.4 Description of accessories - D\*
(*number and type differ according to model)
D1. "Total Hardness Test" strip
D2. Pre-ground coffee measure
D3. Descaler
D4. Water softener filter
D5. Hot water spout
5.5 Description of milk carafe - E
E1. Lid with milk frother
E2. Milk spout connector (non removable)
E3. Frothed milk spout
E4. Milk intake tube
E5. Remove carafe/remove carafe connector button
E6. Milk carafe connector
E7. Milk container
6. SETTING UP THE APPLIANCE

Please note:
- When using the machine for the first time, all removable accessories making contact with water or milk should be rinsed with hot water.
- Possible traces of coffee in the grinder are the result of operating tests performed on the appliance before sale, proof of the meticulous care and attention we invest in our products.
- The first time the machine is used, the water circuit will be empty and the appliance could be very noisy. The noise becomes less as the circuit fills.
-
When starting the machine for the first time, make certain that the water spout (D5) is fitted.
-
Connect the appliance to the mains supply (fig. 1).
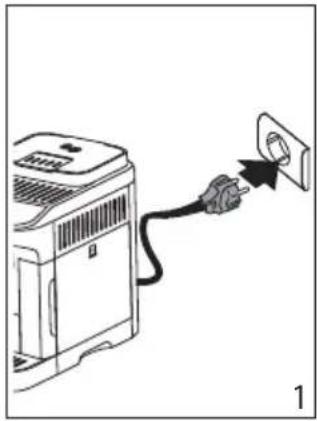
natural_image
Line drawing of a device with a plug inserted into a wall socket (no text or symbols)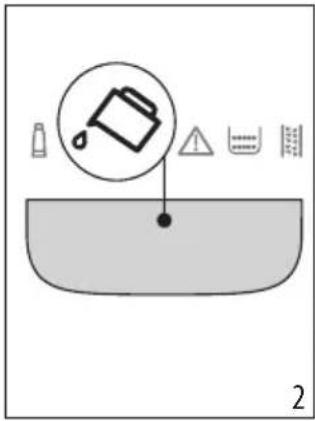
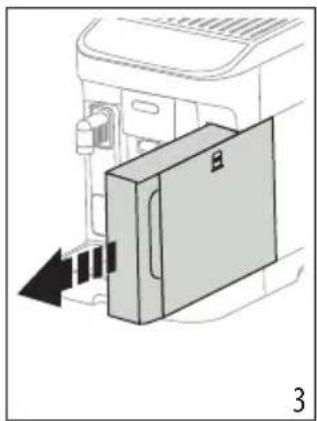
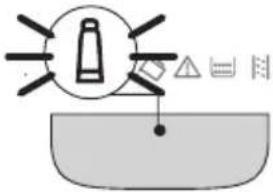
- The indicator (A) will light up on the control panel (B) (fig. 2): remove the water tank (A9) (fig. 3), fill up to the MAX level with fresh drinking water (fig. 4), then reposition in the appliance.
natural_image
Diagram of a device with a labeled component and directional arrow, no readable text or symbols present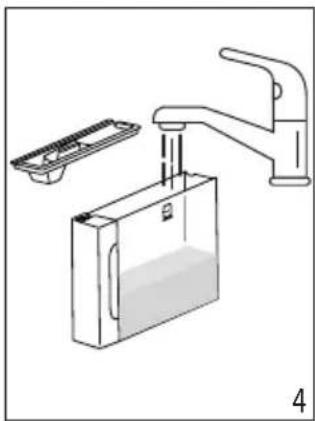
natural_image
Illustration of a kitchen sink with faucet and drain cover (no text or symbols)-
The Led (B2) ×2 on the control panel will blink rapidly.
-
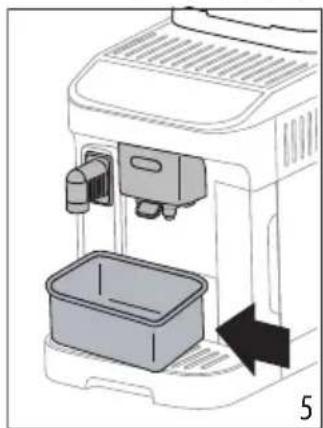
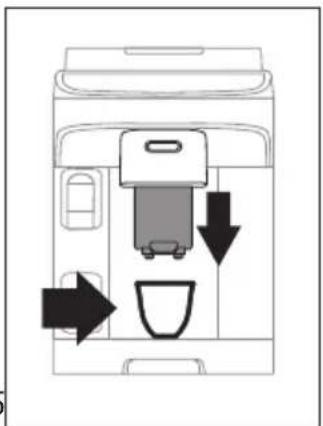
Position a container under the coffee spout (A17) and water spout (D5) (fig. 5).
natural_image
Diagram of a coffee maker with a container and directional arrow indicating flow (no text or symbols)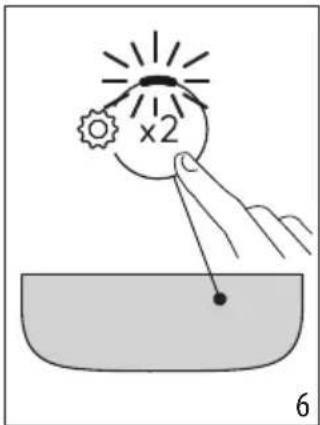
- Press the ☐×2 button (fig. 6): the internal water circuits start to fill and the appliance will release hot water from the water spout.
- The flow will be interrupted, then after a few seconds, the machine releases water from the coffee spout.
When the flow of water stops completely, the machine is ready for use.
Please note:
- The first time the appliance is used, it will be necessary to make 4-5 cappuccinos before the drink in the cup tastes as it should.
- It is recommended that the water filter supplied be installed immediately. After two months (see date indicator), or after 3 weeks if the appliance has not been used, the filter should be replaced or removed even if the warning indicator (C1) is not alight.
- Customize water hardness as soon as possible (section "5. Measuring water hardness").
7. WATER SOFTENER FILTER
To ensure the performance of the machine remains constant over time, we recommend using a De'Longhi water softener filter. For more information, visit the www.delonghi.com website.
WaterFilter EAN: 8004399327252
To use the filter correctly, follow the instructions below.
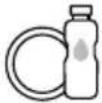
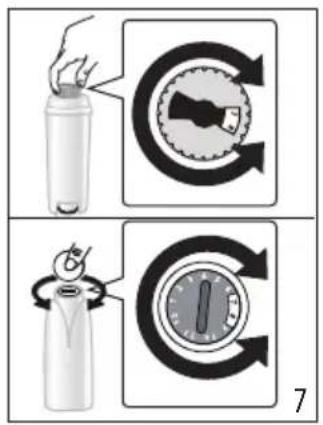
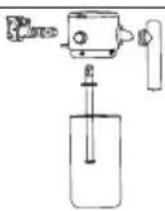
- Remove the filter (D4) from the pack and turn the date indicator so that it shows the next 2 months (fig. 7);
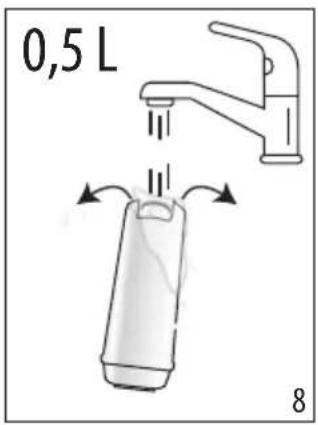
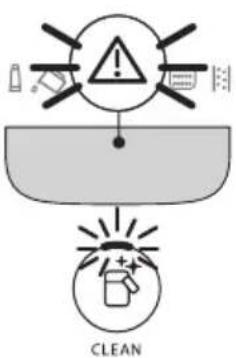
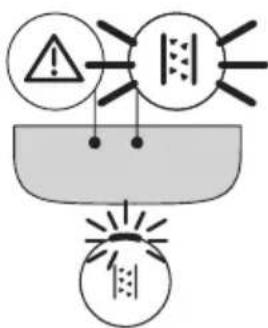
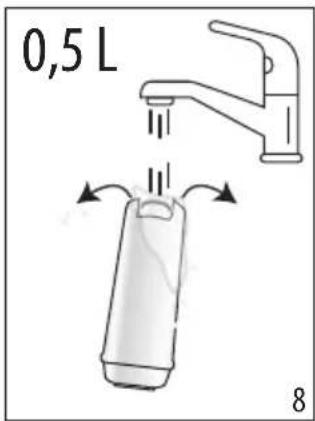
- To activate the filter, run drinking water through the hole in the center of the filter until water comes out of the openings at the side for more than a minute (fig. 8);
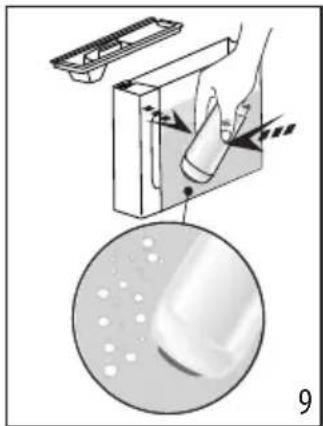
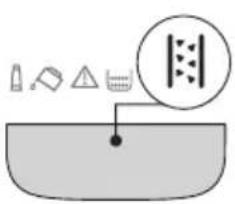
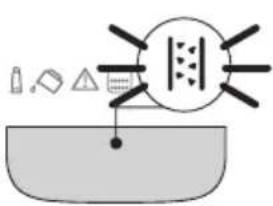
- Remove the tank (A9) from the machine (fig. 4) and fill with fresh drinking water; insert the filter in the water tank, immersing it completely for about ten seconds, while tilting it and applying light pressure so that the air bubbles are able to escape (fig. 9);
natural_image
Diagram showing a hand holding a bottle inside a container with arrows indicating motion, and a magnified view of a droplet on a surface (no text or symbols)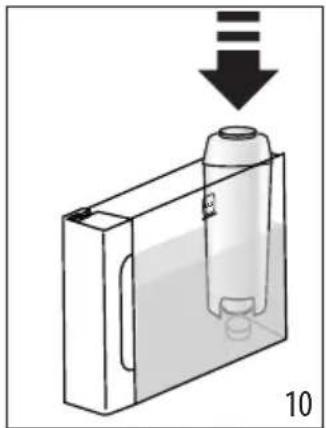
natural_image
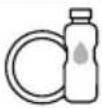
Diagram of a device with a bottle inside a container, showing liquid level and downward arrow (no text or symbols)- Insert the filter in the relative housing and press fully home (fig. 10);
- Close the tank with the lid (A8), then reposition the tank in the machine;
- If not already in place, fit the water spout (D5).
- Place an empty container of at least 0.5 litres capacity under the hot water spout (fig. 5).
- See instructions in section "12. Settings menu" for installation of the filter;
- On the control panel, the filter indicator light (C1) blinks steadily and the Led of the clean carafe/manual rinse button (B6) blinks rapidly;
- Press the clean carafe/manual rinse button (B6) (fig. 11);
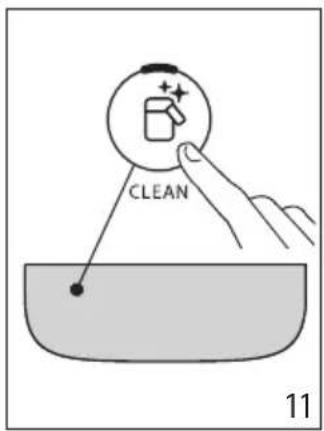
- The appliance delivers hot water, then stops automatically;
- When the flow stops, the filter indicator light extinguishes: the filter is now active and the machine can be used.
Please note:
- If the Led of the button (B6) blinks rapidly, press the button. This will cause the internal circuits of the machine to start filling up, expelling the air bubbles that have been formed and allowing the installation to proceed.
- With installation completed, the drinks Leds blink to indicate that the machine is heating up in readiness for normal use.
7.1 Replacing the filter
Replace the filter (D4) when the indicator (C1) lights up.
- Remove the water tank (A9) and the exhausted filter;
- Follow the operations described in the previous section to activate the filter;
- See instructions in section "12. Settings menu" to set the machine and repeat steps 9 to 12 of the preceding section.
Please note:
After two months (see date indicator), or after 3 weeks if the appliance has not been used, the filter should be replaced even if the warning message has not yet been displayed.
7.2 Removing the filter
If the intention is to use the appliance without the filter (D4), its removal must be indicated in the machine settings.
- Remove the water tank (A9) and the exhausted filter;
- See instructions in section "12. Settings menu" to set the machine accordingly.
Please note:
After two months (see date indicator), or after 3 weeks if the appliance has not been used, the filter should be replaced even if the warning message has not yet been displayed.
8. MEASURING WATER HARDNESS
Setting the water hardness as soon as possible will enable the machine to optimize the frequency of descaling. This means that the descale indicator (C5) will light up as necessary
according to the actual hardness of the local water supply. Proceed as follows:
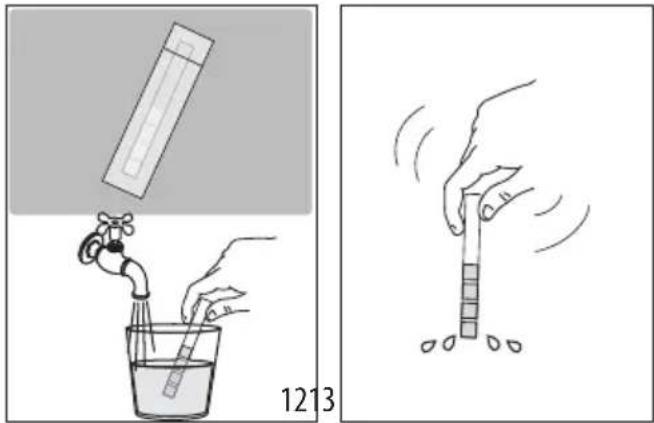
- If a total hardness test strip (D1) is supplied with the model of machine in question, remove it from its wrapper.
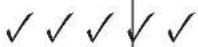
- Immerse the strip completely in a glass of water for about one second (fig. 12).
- Remove the strip from the water and shake lightly (fig. 13). After about a minute, 1, 2, 3, or 4 red squares appear, depending on the hardness of the water. Each square corresponds to one level.
| Total Hardness Test Hardness | |
| 1Low | |
| 2Medium | |
| 3Medium/High | |
| 4High |
See instructions in section "12. Settings menu" to set the machine accordingly.
9. TURNING THE APPLIANCE ON
Danger of scalding!
During the rinse, a little hot water flows from the coffee spouts (A17). Take care to avoid contact with splashes of water. To avoid the need for frequent emptying of the drip tray (A14), place a container under the spouts to collect the rinse water.
- To switch on the machine, press the button (B1): the Led of the on/off button lights up and the drinks Leds blink on the control panel (B) to indicate that the machine is warming up.
During this step, the machine performs a rinse cycle. Besides heating up the boiler, this also serves to circulate hot water through the internal circuits so they too are brought up to temperature.
The appliance is ready for use when the drinks and intensity Leds remain permanently alight.
10. TURNING THE APPLIANCE OFF
Whenever the machine is turned off after being used to make coffee, it performs an automatic rinse cycle.
Danger of scalding!
During the rinse, a little hot water flows from the coffee spouts (A17). Take care to avoid contact with splashes of water. To avoid the need for frequent emptying of the drip tray (A14), place a container under the spouts to collect the rinse water.
- To switch the appliance off, press the button (B1); - the drinks indicator Leds on the control panel will now blink: the appliance performs a rinse cycle, if envisaged, and then switches off (stand-by).
Please note:
If the appliance is not going to be used for some time, unplug it from the mains socket:
- first, turn off the appliance by pressing the button;
- unplug the power cord from the socket.
11. MAKING COFFEE DRINKS
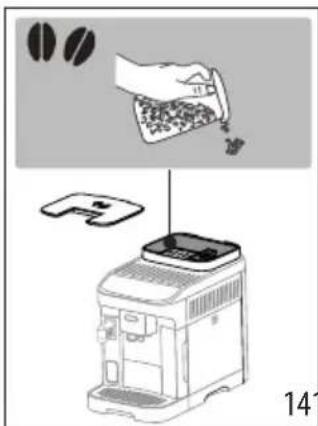
11.1 Making coffee using coffee beans Important!
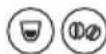
Do not use green, caramelized or candied coffee beans as they could stick to the coffee grinder and make it unusable.
- Fill the container (A4) with coffee beans (fig. 14);
natural_image
Diagram of a coffee maker with arrows indicating flow or movement (no text or symbols)- Place a cup under the coffee spouts (A17) (fig. 15);
-
Lower the spouts as near as possible to the cup: this makes a creamier coffee (fig. 15);
-
Select the required drink:
| Drink(*) | Default quantity (ml) | Programmable quantity (ml) | |
| Espresso 40 | from ≈20 to ≈180 | ||
| → | |||
| [304H] | Coffee 180 | from ≈100 to ≈240 | |
| [808Y] | Long 160 | from ≈115 to ≈250 | |
| [ATCO] | Doppio+120 | from ≈80 to ≈180 | |
 | Americano Espresso: 40 Water: 110 | Espresso: from ≈20 to ≈180 Water: from ≈50 to ≈300 | |
 | Long Black | Water: 120 Espresso: 80 | Water: from ≈50 to ≈300 Espresso: from ≈40 to ≈360 |
| Over ice 100 | from ≈40 to ≈240 | ||
(*) Numbers and types of drinks differ according to model.
- Preparation begins and the Led corresponding to the selection blinks on the control panel (B).
11.2 Making 2 cups of coffee


- Place the cups under the coffee spouts (A17);
- Lower the spouts as near as possible to the cups: this makes a creamier coffee;
- Press the Ⓞ×2 button (B2): the corresponding Led lights up;
- Press the Espresso button (B7);
- Preparation begins and the Led corresponding to the Espresso button blinks on the control panel (B).
11.3 Making coffee using pre-ground coffee


Important!
- Never add pre-ground coffee when the machine is off, or it could spread through and soil the inside of the machine. This could damage the machine.
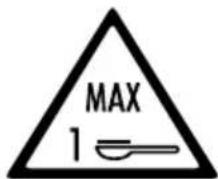
- Never use more than 1 level measure (D2), as this could soil the inside of the machine or block the funnel (A3).
Please note:
When using pre-ground coffee, only one cup can be made at a time.
- Press (B3): the corresponding Led lights up;
- Make sure the funnel is not blocked, then add one level measure of pre-ground coffee (fig. 16).
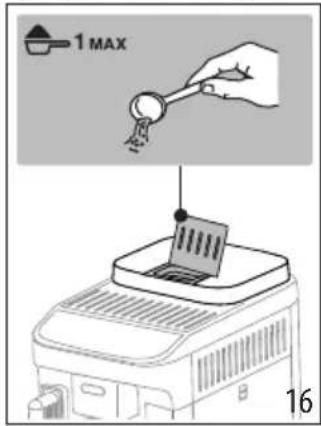
- Place a cup under the coffee spouts (A17) (fig. 15);
- Select the required drink (B7);
- Preparation begins and the Led corresponding to the selection blinks on the control panel (B).
11.4 General indications for making coffee-based drinks
- Indicator lights may appear on the control panel (B) during use. Their meaning is given in section "17. Explanation of lights".
- For hotter coffee, see section "8.7 Tips for a hotter coffee".
- If the coffee is delivered a drop at a time, too weak and not creamy enough or too cold, read the tips in section "18. Troubleshooting".
- To customize the drinks according to personal taste, see sections "8.5 Varying the intensity of the coffee" and "8.9 Customizing the quantity in the cup".
Please note:
In energy saving mode, a few seconds may elapse before the first coffee is delivered as the appliance must heat up again.
11.5 Varying the intensity of the coffee
- Press the button (B4) corresponding to the preferred intensity:
 | Mild |
 | Medium |
 | Strong |
- Select the desired coffee drink.
Please note:
- When the next coffee is made, the machine will show the last intensity setting selected.
- In the event of power failure, the machine will revert to the default setting: medium.
11.6 Rinsing

Using this function, hot water can be delivered from the coffee spouts to clean and heat the internal circuit of the machine.
-
Place a container of at least 100ml capacity under the coffee spouts (A17) (fig. 5).
-
Press the button (B6) and hold for at least 5 seconds: the cycle will start and stop automatically (to terminate the cycle sooner, press this same button a second time).
Please note:
- If the appliance is not used for more than 3-4 days it is highly advisable, when switching on again, to run 2/3 rinse cycles before preparing any drinks;
- It is normal for the grounds container (A10) to contain water following a rinse cycle.
11.7 Tips for a hotter coffee
To make a hotter coffee, proceed as follows:
- run a rinse cycle (see section "8.6 Rinsing");
- warm the cups with hot water, using the Hot Water function;
- increase the coffee temperature (see section "12. Settings menu").
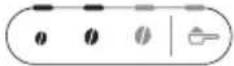
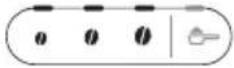
11.8 Adjusting the coffee grinder
The coffee grinder does not require any adjustment, at least initially, as it has been factory set to ensure that coffee is prepared correctly.
Please note:
The adjustment dial must be turned only when the coffee grinder is in operation during the initial step of coffee preparation.
To make an adjustment while the coffee grinder is in operation, turn the dial (A2) as follows:
| If the coffee is delivered too slowly, or not at all.This adjustment will not take effect until at least 2 cups of coffee have been delivered. | Turn one click towards "7"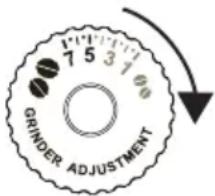 |
| For a fuller bodied creamier coffeeThis adjustment will not take effect until at least 2 cups of coffee have been delivered. | Turn one click towards "1"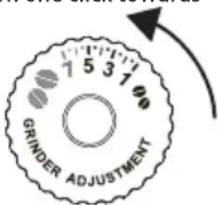 |
11.9 Customizing the quantity in the cup
- Press the button relative to the drink being programmed and hold for a few seconds: when the Led corresponding
to the selection blinks rapidly, the machine is in programming mode. Delivery begins;
- Once the cup is filled to the desired level, press the button a second time. Delivery ceases and the quantity is stored in the memory.
Please note:
To cancel the current setting, press a button corresponding to another drink.
12. MAKING MILK-BASED DRINKS
Please note:
- Before using the carafe, check that all the components are cleaned and assembled as described in section "14. Thorough cleaning of milk carafe"
- To ensure that milk is not under-frothed or topped with large bubbles, always clean the milk container lid (E1) and the carafe connector (E6) as described in sections "9.7 Cleaning the milk carafe after each use", and "14. Thorough cleaning of milk carafe".
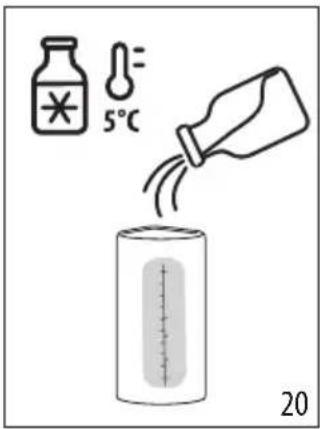
12.1 What milk to use?
The quality of the froth will vary depending on:
- the temperature of the milk or vegetable drink used (for best results, always use milk or vegetable drink straight from the fridge, 5 °C);
- type of milk or vegetable drink;
- the brand used;
• ingredients and nutritional values.
| LatteCremaHOT | |
| Cow's milk | |
| Whole (fat >3,5%) | √ |
| Semi-skimmed (fat between 1.5 and 1.8%) | |
| Skimmed (fat <0.5%) | |
| Vegetable drinks | |
| Soya | √ |
| Almond | √ |
| Oatmeal | √ |
Please note:
For best results when using vegetable drinks, select "Barista" versions of these products to optimize the quality of the froth.
12.2 How much milk?
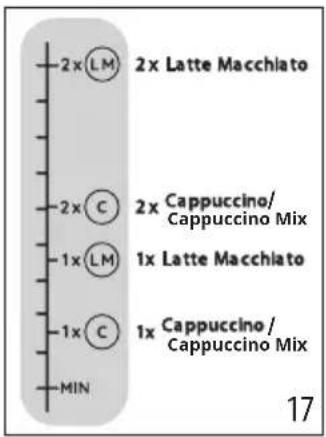
The milk container (E7) is marked with a graduated scale (fig. 17) to help ensure that the ideal quantity of milk will be poured when preparing the drink.
The intermediate marks correspond to increments of 20ml. The "MIN" level corresponds to the minimum programmable quantity (see paragraph "9.8 Customizing the quantity in the cup").
Please note:
- Depending on the type and temperature of the milk used, the recipe can differ slightly from one drink to another.
- If there is insufficient milk in the carafe, the milk spout will produce a dry puff.
12.3 Filling and attaching the milk carafe
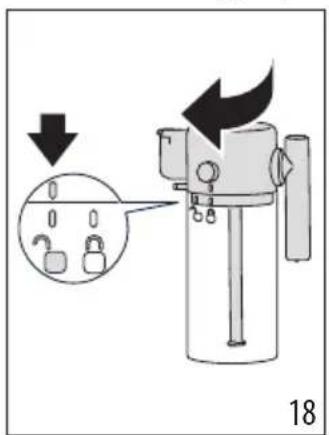
-
Release the lid (E1) by turning clockwise: the reference mark on the lid must be aligned with the symbol (fig. 18);
-
Then lift the lid (fig.19)
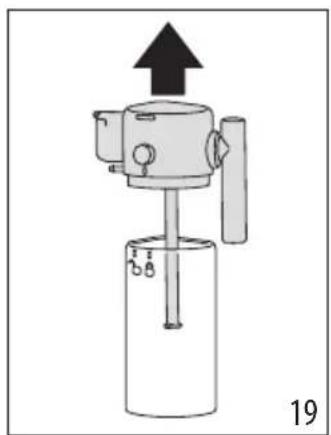
natural_image
Diagram of a mechanical device with an upward arrow and label '19' (no text or symbols on the device itself)- Fill the milk container (E7) with suitable quantity of milk (fig. 17 and 20);
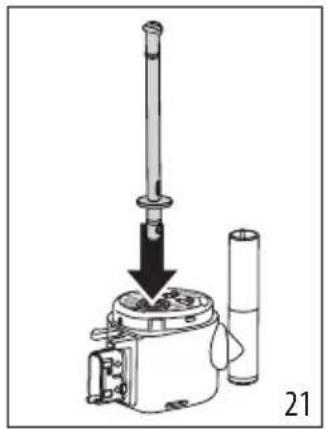
- Make sure the milk intake tube (E4) is secured correctly to the socket on the underside of the milk carafe lid (fig. 21);
natural_image
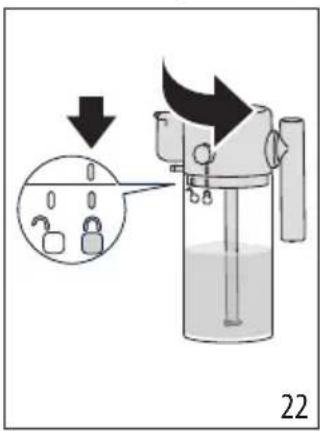
Diagram of a mechanical device with a vertical rod and cylindrical component, no visible text or symbols- Close the carafe: refit the lid (the reference mark on the lid must be aligned with the symbol) then turn toward the symbol until locked in position (fig. 22);
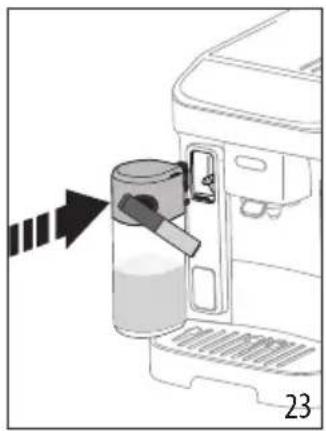
- Attach the container to the nozzle, pushing it fully home (fig. 23). The machine emits a beep (if the beep function is enabled).
natural_image
Diagram of a hand pouring liquid into a container with a brush, next to an open water dispenser (no text or symbols)12.4 Selection of coffee intensity or use of pre-ground coffee
Once the milk carafe has been prepared, before selecting the desired milk-based drink, the intensity of the coffee can be customized as described in section "8.5 Varying the intensity of the coffee", or alternatively, select pre-ground coffee and proceed to add one measure of coffee as indicated in the section "8.3
Making coffee using pre-ground coffee
12.5 Delivering milk-based drinks
- Place a cup of suitable size under the coffee spouts (A17) and under the frothed milk spout (E3) (fig. 24).
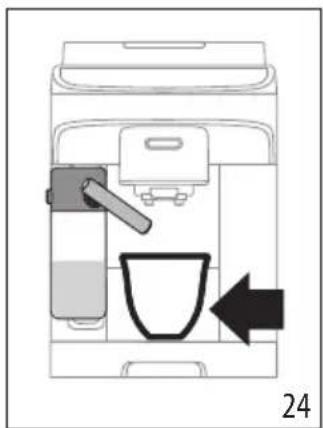
natural_image
Line drawing of a coffee maker with a cup and side panel, no text or symbols present- Select the milk-based drink from the control panel
Please note:
If "Energy Saving" mode is activated (see section "12. Settings menu"), there may be a few seconds delay before the drink is delivered.
12.6 Preparing My Latte

- Fill the milk container (E7) with as much milk or vegetable drink as required, bearing in mind that the machine will deliver the entire amount;
- Replace the lid and position the milk carafe as described in previous sections;
- Select the "My Latte" drink: delivery commences, and will stop when all the milk in the carafe has been used up;
- The machine will then continue with delivery of the coffee.
Please note:
The minimum quantity detectable by the milk viewer (A16) corresponds to the MIN level of the graduated scale on the milk container.
12.7 Cleaning the milk carafe after each use
Following each delivery of a milk-based drink, the Led associated with the clean carafe button (B6) will blink on the control panel (fig. 25).
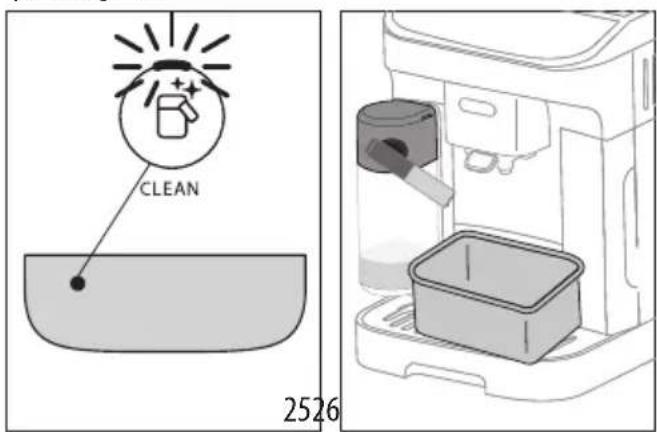
Leave the milk carafe in the machine (there is no need to empty the container);
-
Place a cup or other recipient under the milk spout (fig. 26);
-
Press the button: hot water and steam will be released from the milk spout. Cleaning stops automatically;
Where various drinks are prepared in succession:
• Proceed with cleaning of the carafe after the final preparation.
After multiple preparations, the milk carafe is empty or the milk that remains is not enough to make further drinks
- Having carried out the cleaning step with the button, disassemble the milk carafe and clean all components, proceeding as described in the section "14. Thorough cleaning of milk carafe".
After multiple preparations, there is enough milk left in the carafe to make further drinks
- Having carried out the cleaning step with the button, remove the milk carafe and put it straight in the refrigerator. The carafe still containing milk can be kept in the refrigerator for no more than 2 days, after which time all components should be cleaned, proceeding as described in the section "14. Thorough cleaning of milk carafe".
Important:
If the milk carafe is left out of the refrigerator for more than 30 minutes, disassemble and clean all components, proceeding as described in the section "14. Thorough cleaning of milk carafe".
Following preparation of milk-based drinks — general notes:
- In certain cases, the machine will need to heat up before cleaning can take place.
- Wait for the operation to be completed. The function is automatic. Do not stop the machine while cleaning is in progress.
12.8 Customizing the quantity in the cup
- Press the button relative to the milk-based drink being programmed, and hold for a few seconds. The light blinks rapidly to indicate that the programming menu is active. Delivery begins;
- Once the cup is filled to the desired level, press the drink button again. Delivery of the first ingredient stops and delivery of the second ingredient begins;
- Once the cup is filled to the desired level, press the button a second time. Delivery ceases and the quantity is stored in the memory.
Please note!
- To cancel the current setting, press a button corresponding to another drink.
- For the My Milk drink, only the quantity of coffee can be programmed, while all the milk will be used as in the recipe.
13. DELIVERING HOT WATER
Danger of scalding!
Never leave the machine unattended when hot water is being released.
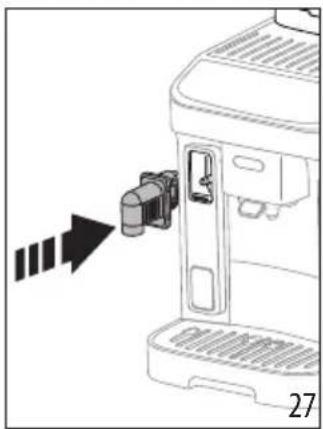
- Insert the hot water spout (fig. 27).
natural_image
Diagram of a blender with a sensor and control panel, showing a black arrow pointing to the sensor (no text or symbols present)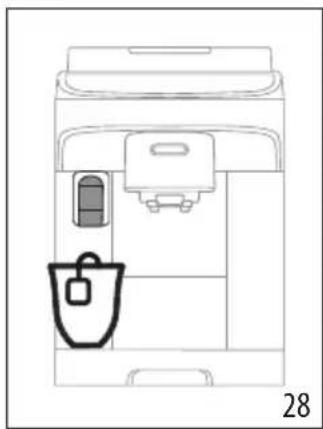
natural_image
Line drawing of a coffee maker with a cup and side panel (no text or symbols)- Place a container under the hot water spout (fig. 28) (as close as possible to avoid splashes).
- Press the Hot water button
- Delivery will stop automatically. To terminate the delivery sooner, press the button a second time.
Please note:
In energy saving mode, a few seconds may elapse before hot water emerges as the appliance must heat up.
13.1 Customizing the quantity of hot water
- Press the Hot water button and hold for a few seconds: the light blinks rapidly to indicate that the programming menu is active. Delivery begins;
- Once the cup is filled to the desired level, press the button a second time. Delivery ceases and the quantity is stored in the memory.
| Default (ml) P | Programmable (ml) | ||
 | Hot water | 250 | from ≈ 20 to ≈ 420 |
Please note!
To cancel the current setting, press a button corresponding to any drink
14. TIPS FOR ENERGY SAVING
- To reduce energy consumption, remove the milk carafe after one or more drinks have been delivered;
- Set auto-off to 15 minutes (see "12. Settings menu");
- Enable Energy Saving (see "12. Settings menu");
• Always carry out the descaling cycle when prompted by the machine.
15. SETTINGS MENU
Having accessed the menu, the buttons that remain active can be used to select the corresponding functions:
(*) Drinks differing according to model
| 1. Access the menu: | |||
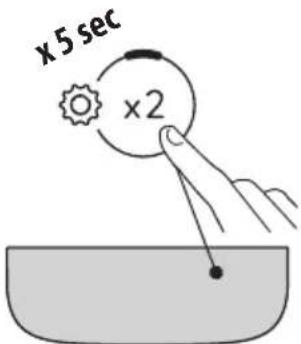 | Press and hold the button for a few seconds:the buttons used for selecting settings will light up.Proceed by pressing the button for the setting to be adjusted. | ||
| 2. Adjust the machine settings: | |||
Water softener filter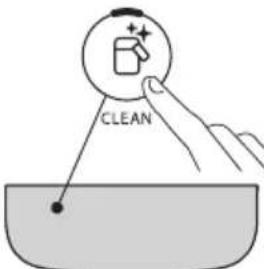 | Press one of the bean symbols to install or replace the water softener filter | INSERTED | Confirm selection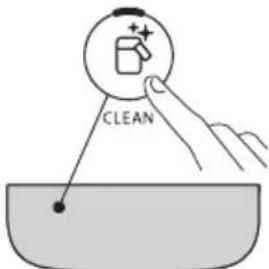 |
| Press the pre-ground symbol to remove the water softener filter | REMOVED | ||
Beep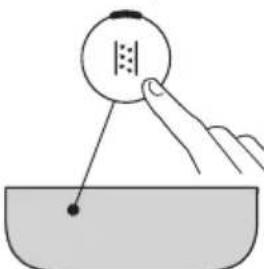 | Press one of the bean symbols to enable the beep | ON | Confirm selection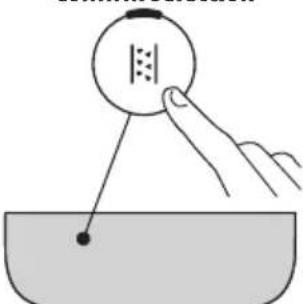 |
| Press the pre-ground symbol to disable the beep | OFF | ||
Coffee temperature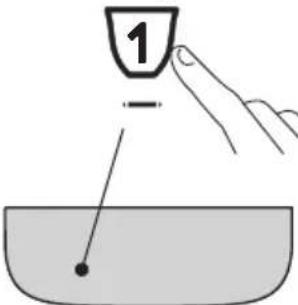 | Press the bean symbol corresponding to the required temperature | LOW | Confirm selection |
MEDIUM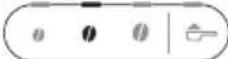 | |||
| HIGH | |||
| → | |||
Energy saving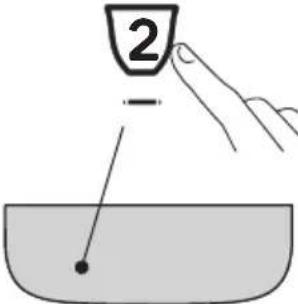 | Press one of the bean symbols to enable energy saving | 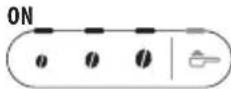 | Confirm selection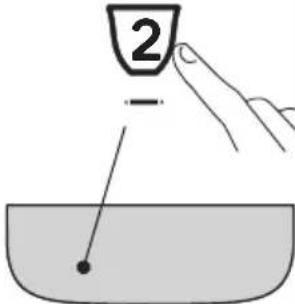 |
| Press the pre-ground symbol to disable energy saving | OFF | ||
Water hardness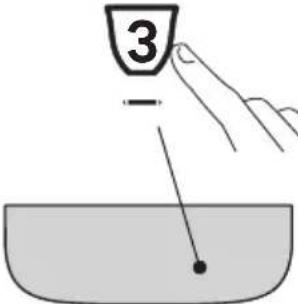 | Press the symbol corresponding to the level being set | LEVEL 1 | Confirm selection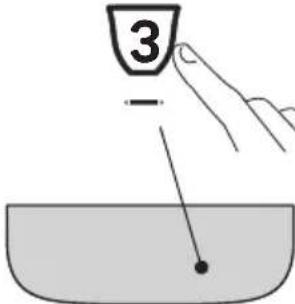 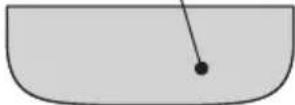 |
LEVEL 2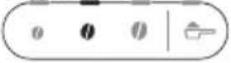 | |||
LEVEL 3 | |||
| LEVEL 4 | |||
Auto-off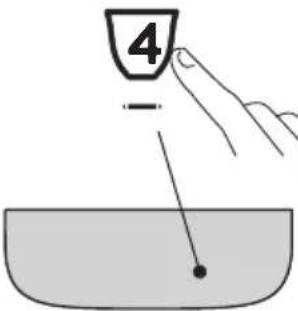 | Press the symbol corresponding to the time being set | 15 MINUTES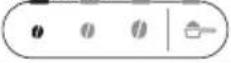 | Confirm selection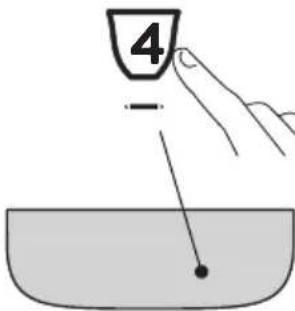 |
| 30 MINUTES | |||
| 1 HOUR | |||
| 3 HOURS | |||
| 3. Exit the menu: | |||
 | Press the button:The machine is ready for use again.Please note!After 30 seconds without a button being pressed, the machine exits the settings menu automatically. | ||
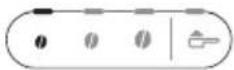
15.1 Restore factory settings
| Make sure the machine is in stand-by (off, but connected to the mains power supply). | 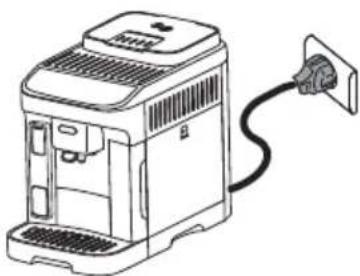 |
| 17 → | |
| Press the buttons corresponding to drinks 1, 2 and hold for 5 seconds: all machine settings and drink quantities will be reset to the default factory values. | 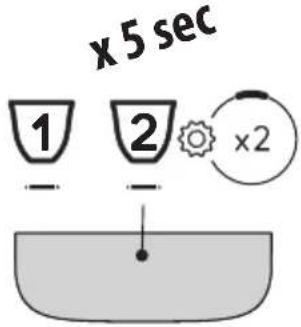 |
| The machine emits a long beep and all indicator lights blink to confirm the reset | 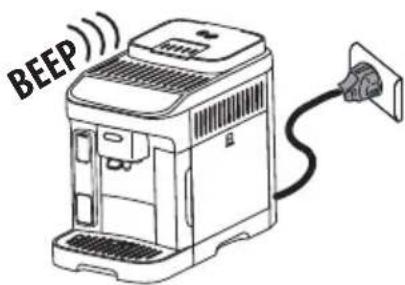 |
16. CLEANING THE MACHINE

Important!
- Do not use solvents, abrasive detergents or alcohol to clean the coffee machine. With De'Longhi superautomatic coffee machines, no chemical products are required for cleaning purposes.
- Do not use metal objects to remove encrustations or coffee deposits as they could scratch metal or plastic surfaces.
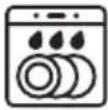
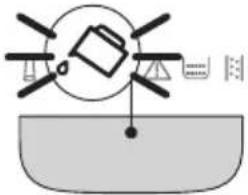
 |  |  |  |  | |
 50°C 50°C |  |  | |||
 |  | ||||
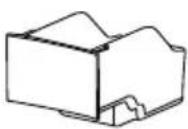
| Component Frequency Procedure | ||
Grounds container | When the indicator lights up, the grounds container must be emptied: the machine cannot now make coffee. | Remove the drip tray, empty and clean.Empty the grounds container and clean thoroughly to remove all residues that may have collected on the bottom.Check the condensate tray (colour red) and if full, empty if out. |
| The appliance cannot be used to make coffee again until the grounds container has been cleaned. Even if not full, the empty grounds container message is displayed 72 hours after the first coffee has been prepared. For the 72 hours to be calculated correctly, the machine must never be disconnected from the mains power supply. | ||
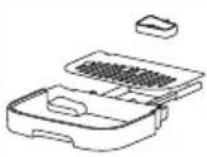
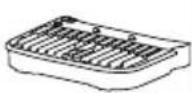
| Component Frequency Procedure | ||
Drip tray components The 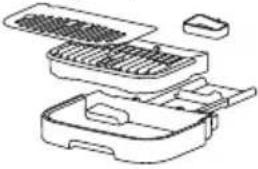 | drip tray is fitted with a level indicator (colour red) showing the level of water it contains.Before the indicator projects from the cup tray, the drip tray must be emptied and cleaned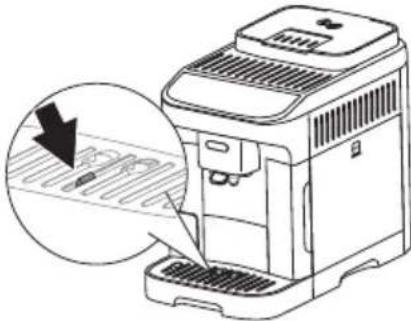 | Remove the drip tray and the grounds container;Remove the cup tray and drip tray grille, then empty the drip tray and the grounds container and wash all components;Check the red condensate tray and, if full, empty if out;Reposition the drip tray complete with grille, and the grounds container.When removing the drip tray, the grounds container must also be emptied, even if it is not completely full. |
Inside of the machine Check 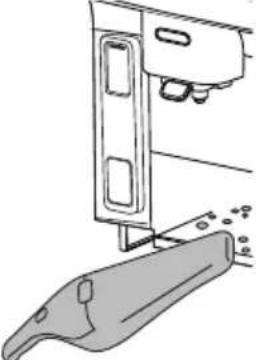 | periodically (about once a month) that the inside of the machine (accessible by removing the drip tray) is not dirty. | Switch the machine off and disconnect from the power supply. Never immerse the machine in water.Remove coffee deposits with a brush and sponge;Remove all residues with a hand vacuum cleaner |
Coffee spouts Clean the coffee  | fee spouts regularly (once a month) | Clean the coffee spouts regularly with a sponge or cloth;Check that the holes in the coffee spout are not blocked. If necessary, remove coffee deposits with a toothpick. |
17. THOROUGH CLEANING OF MILK CARAFE
Clean the milk carafe as described below:
- Release the lid (E1) by turning clockwise: the reference mark
on the lid must be aligned with the symbol (fig. 18); - Now lift the lid (fig. 19).
- Pull out the milk intake tube (29).;
-
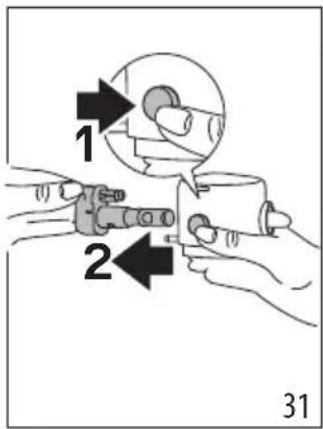
Turn the milk spout at right angles to the body and pull until completely detached (fig. 30).
-
Press the button (E5) to separate the connector (fig. 31).
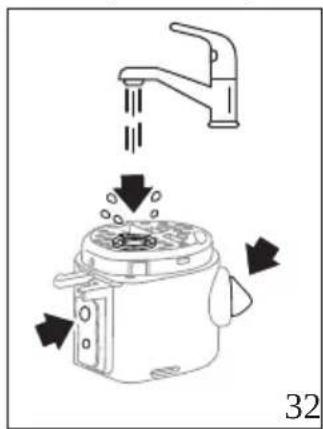
- Wash in a dishwasher (recommended) or by hand as indicated below:
- In a dishwasher: Rinse all the above components and the milk container under hot running drinking water (at least 40 °C), then place them in the top basket of the dishwasher and run a wash programme at 50 °C, e.g. standard ECO. - By hand: Rinse all the components and the milk container thoroughly with hot running drinking water (at least 40 °C) to remove all visible milk residues, making certain to direct the water through all the holes of the lid (fig. 32). Next, immerse all the components in a solution of hot drinking water (at least 40°C) and washing up liquid for at least 30 minutes. Rinse all the components described above thoroughly under hot drinking water, rubbing each one individually between fingers and thumbs.
natural_image
Line drawing of a kitchen pot with water flow arrows indicating water displacement (no text or symbols)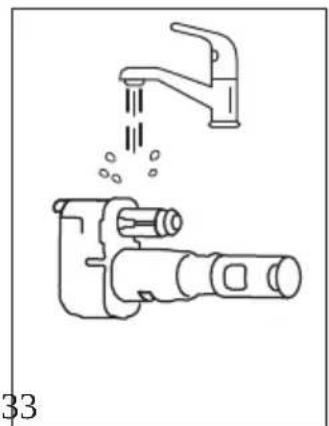
natural_image
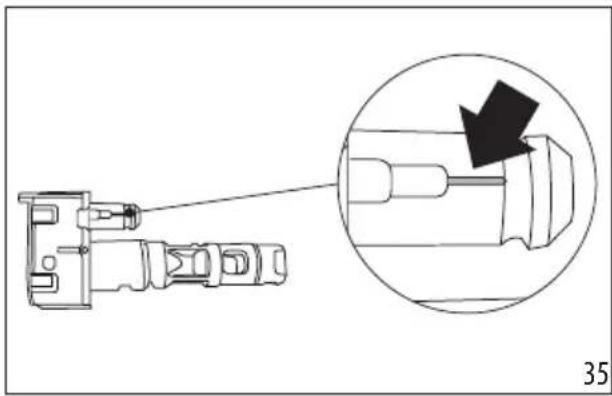
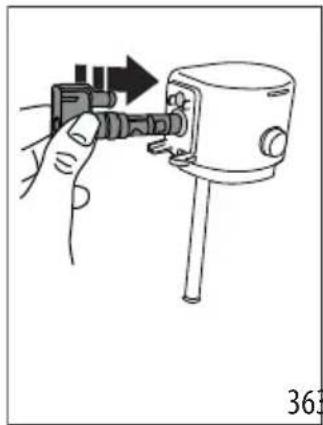
Line drawing of a faucet and a hand tool with liquid, no text or symbols present- Rinse the milk carafe connector (E6) thoroughly (fig. 33). Take particular care to ensure that there are no milk residues in the air channel (see enlargement) (fig. 34): scrape the channel clean if need be, using a toothpick;
natural_image
Technical diagram of a mechanical component with an inset magnified view showing a pin or shaft assembly (no text or symbols)- Dry all the components with a clean dry cloth;
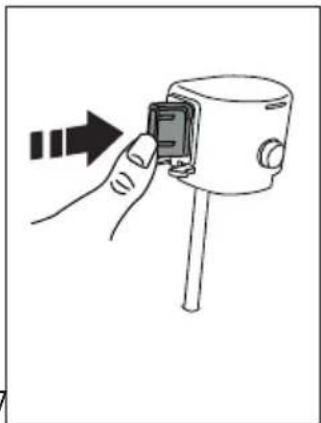
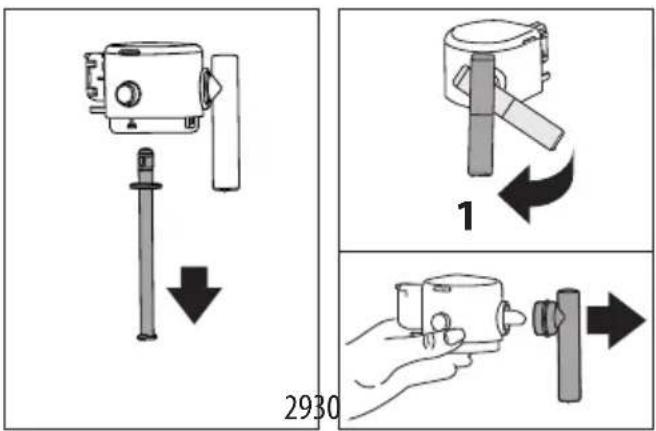
- Push the connector fully home (fig. 36 and 37): when securely inserted, the connector can be detached only by pressing the release button on the lid.
natural_image
Hand holding a mechanical component with an arrow indicating direction (no text or symbols)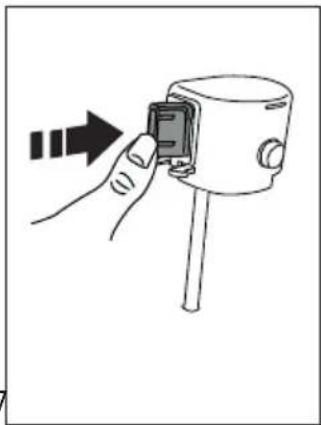
natural_image
Hand inserting a small component into a device (no text or symbols visible)- Reassemble all the lid components:
- Close the carafe: refit the lid (the reference mark on the lid must be aligned with the symbol) then turn toward the symbol until locked in position (fig. 22).
18. CLEANING THE INFUSER
Important!
The infuser (A6) cannot be removed while the machine is on. Press the button (B1) to turn the machine off;
- Remove the water tank (A9);
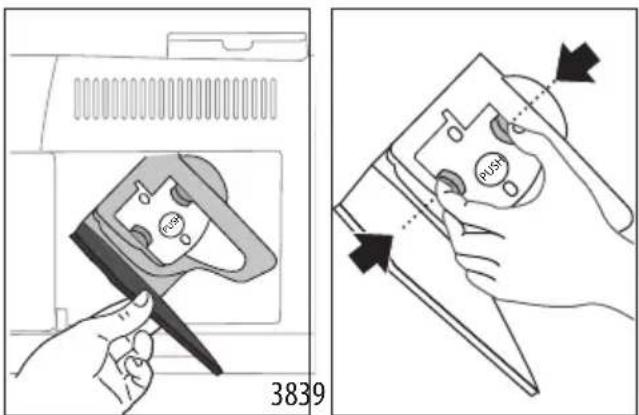
- Open the infuser door, positioned on the right hand side (fig. 38);
- Press the two colored release buttons inwards (fig. 39), at the same time pulling the infuser outwards;
- Immerse the infuser in water for about 5 minutes, then rinse under the tap;
Important!
RINSE WITH WATER ONLY
NO DETERGENTS - NO DISHWASHER
- Do not use detergents when cleaning the infuser, as they could damage it.
- Use a brush to remove any coffee residues left in the infuser housing, which can be seen through the infuser door;
- After cleaning, replace the infuser by sliding it into its housing, then apply pressure to the PUSH symbol until it clicks into place;
Please note:
If the infuser proves difficult to insert, adapt it (before insertion) to the right position by pressing the two levers (fig. 40).
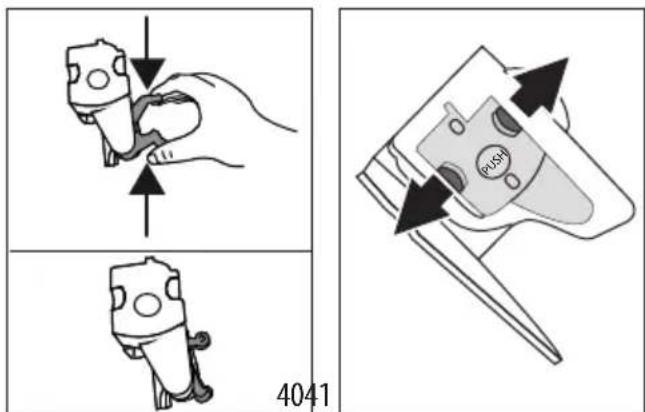
- Once inserted, make sure the two colored buttons have snapped out (fig. 41);
- Close the infuser door;
- Put the water tank back.
19. DESCALING

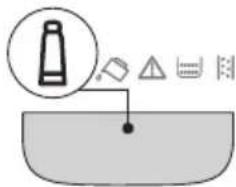
- Before use, read the instructions and the labeling on the descaler pack.
- Use only descaler supplied by De'Longhi. Using unsuitable descaler and/or performing descaling incorrectly may result in faults not covered by the manufacturer's guarantee.
- Descaler can cause damage to delicate surfaces. If the product is accidentally spilt, dry immediately.
| To descale | |
| Descaler De’Longhi descaler | |
| Container Recommended capacity: 2l | |
| Time ~30min | |
| Accessory Hot water spout (D5) | |
Important:
If the water softener filter is installed, it must be removed before adding the descaler solution.
Thereafter, reinstate the filter at the start of step 3
Descale the machine when the indicator lights up on the control panel (C4). This same indicator will blink while the descale cycle is in progress.
Please note:
- Once the descaling cycle has begun, it cannot be interrupted and must be concluded with the full rinse cycle. With this in mind, make sure there is sufficient descaler.
Proceed as follows:
- Make certain that the water spout (D5) is fitted;
Step 1: Descaling action
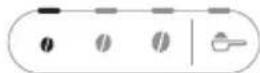
- Press the button (B5) and hold for at least 5 seconds, until the relative Led starts blinking rapidly. The mild intensity Led lights up to indicate that step 1 of the descale cycle is in progress;
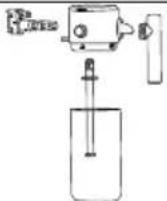
- Empty the drip tray (A14) and the grounds container (A10) and reposition them; empty the water tank completely (A9) and remove the softener filter (if installed);
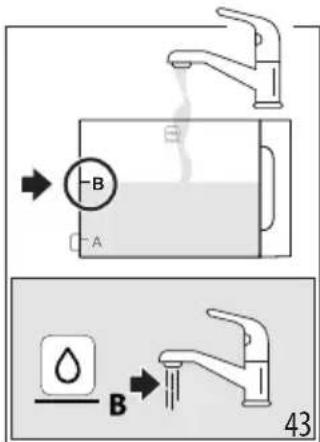
- Pour the descaler into the tank, filling to level A (which corresponds to a 100ml pack) marked on the side (back) of the tank (fig. 42); next, add water (one liter) up to level B (fig. 43); finally, reposition the water tank in the machine;

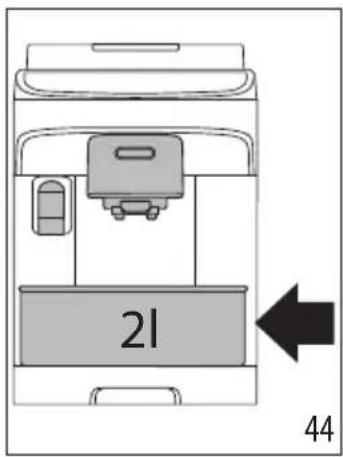
- Place an empty container of at least 2 litres capacity under the coffee spouts (A17) and the water spout (D5) (fig. 44).
- Press the button to start the descaling cycle; the indicator light blinks to confirm that step 1 is in progress;
- For 15 minutes or so, the machine alternates automatically between pausing and releasing liquid from the hot water spout and the coffee spout.
When the first step of the descaling cycle has been completed, the low water level indicator (C2) will light up.
| Step 2: First rinse | 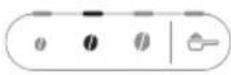 |
- Empty the container used to collect the descaler solution. Remove and empty the water tank, rinse under running water, then fill with fresh drinking water up to the MAX level (fig. 45) and return it to the machine: reposition the container under the spouts;
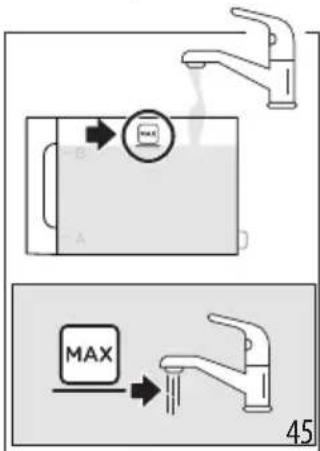
-
Press the button (which blinks rapidly) to start the rinse: the medium intensity Led blinks to indicate that step 2 of the descale cycle is in progress;
-
The machine will proceed automatically with rinsing of the coffee and hot water spouts;
When the second step of the descaling cycle has been completed, the low water level indicator (C2) will light up.
| Step 3: Second rinse | 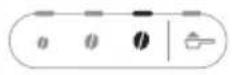 |
- Empty the container used to collect the water from the first rinse. Remove and empty the water tank, then fill
with fresh drinking water up to the MAX level (fig. 48) and reinstate the softener filter, if in use; return the tank to the machine and reposition the container under the spouts;
- Press the button (which blinks rapidly) to start the rinse: the strong intensity Led blinks to indicate that step 3 of the descale cycle is in progress; the rinse fluid will flow from the hot water spout; (*)
| Step 4: Completion of descale procedure | 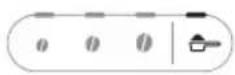 |
-
When the Led relative to the pre-ground function lights up, the descale cycle has been correctly terminated;
-
The indicator of the grounds container (C4)lights up: remove the container in which the rinse water is collected and empty it; take out the drip tray and empty the grounds container, where part of the rinse water will have been collected. Reposition all the parts in the machine.
-
The "no water" indicator (C2) lights up: remove the tank and fill with fresh drinking water. Reposition the water tank in the machine.
The machine is ready for use.
Please note:
• After descaling, it is normal for the grounds container to contain water.
- (*) If the water tank has not been filled to the MAX level, at the end of descaling, the appliance requests a third rinse to guarantee that the descaler solution has been completely eliminated from the machine's internal circuits. In this instance, repeat step 3 from point 11.
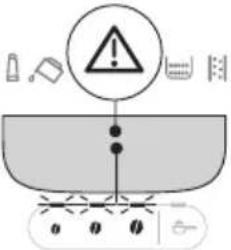
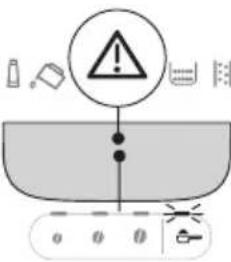
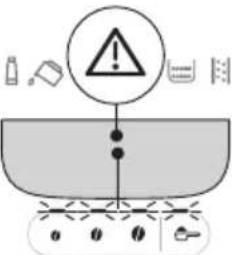
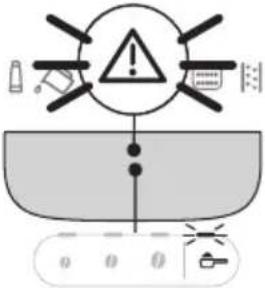
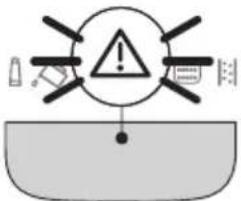
20. EXPLANATION OF LIGHTS
| Indicator/Led Meaning | |
| Drink indicators blinking The machine is warming up: wait | |
| Drink and settings indicators permanently alight | The machine is ready for use: select the desired drink and relative options |
 | Replace the filter (see section “4. Water softener filter”) |
| → | |
 | Insufficient water in tank: fill the tank |
 | The water tank is missing, or is not positioned correctly: ensure the tank is correctly in place |
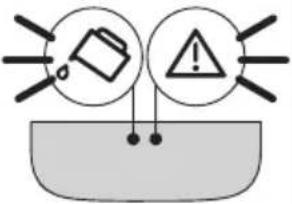
 | General alarm: the inside of the machine is very dirty. Clean the machine thoroughly. If the message is still displayed after cleaning, contact De’Longhi Customer Services and/or an approved Service Centre |
 | The infuser has not been replaced after cleaning: reinstate the infuser as described in section “15. Cleaning the infuser” |
 | No coffee beans: fill the beans container, then press any button to exit the alarm condition. |
 | A selection has been made using pre-ground coffee without putting the coffee in the relative funnel (A3) |
| → | |
| Indicator/Led Meaning | |
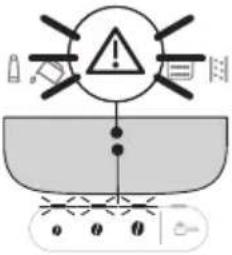 | The beans are too finely ground, so that the coffee is delivered too slowly or not at all. Adjust the coffee grinder (section “8.8 Adjusting the coffee grinder”) |
 | Too much coffee has been used. Select a milder intensity or reduce the quantity of pre-ground coffee |
 | The coffee emerges too slowly or drop-by-drop.. The coffee is ground too finely. Use coffee for espresso machines. |
 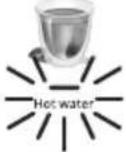 | Hot water has been selected, but the spout is not in place: fit the water spout |
  | The water circuit is empty. Deliver hot water by pressing the corresponding button Hot Water |
| → | |
 | A milk drink has been selected, but the connector (E6) has not been properly inserted: check that the milk carafe is complete with all components correctly assembled (see section "14. Thorough cleaning of milk carafe")The milk carafe was removed during delivery of milk. Reposition the milk carafe: the machine is ready for use againA milk drink has been requested, but there is not enough milk in the container (see paragraphs "9.5 Delivering milk-based drinks"). |
| The grounds container needs emptying (A10) | |
| The grounds container (A10) is missing, or not inserted correctly: insert the drip tray complete with the grounds container and press fully home | |
| → | |
| Indicator/Led Meaning | |
 | Descaling is required ("16. Descaling") |
 | Descaling has been inter-rupted. Complete the cycle, restarting from the step indicated by the intensity selection Leds. |
 | Descaling in progress |
 | Installation/Replacement of water filter softener progress |
21. TROUBLESHOOTING
Possible malfunctions of the machine are listed below.
If the problem cannot be resolved as described, contact customer services.
| Problem Cause Solution | ||
| The appliance does not switch on. The cord is not plugged into the mains socket. | Plug into the mains socket. | |
| → | ||
| The coffee is not hot. The cups were not preheated. Warm the cups by rinsing them with hot water (Please note: the hot water function can be used). | ||
| The machine needs descaling | Run the descale procedure. Next, check the water hardness ("5. Measuring water hardness") and make sure the machine setting matches the local water supply hardness ("12. Settings menu"). | |
| The coffee is weak or not creamy enough. | Coffee ground too coarsely. | Adjust the grinding level ("8.8 Adjusting the coffee grinder"). The effect will not be noticeable until at least 2 coffees have been made. |
| Coffee not suitable. Use coffee for espresso machines. | ||
| Coffee not fresh. The coffee pack has been opened for too long and has lost its taste. | ||
| The coffee emerges too slowly or drop-by-drop. | Coffee ground too finely. | Adjust the grinding level ("8.8 Adjusting the coffee grinder"). The effect will not be noticeable until at least 2 coffees have been made. |
| The machine will not dispense any coffee. | Impurities have been detected in the internal circuits | Wait until the machine is ready for use again, and proceed to select the required drink. Contact customer services if the problem persists. |
| Coffee does not come out of one or both spouts. | Coffee nozzles blocked. Clean the nozzles with a cloth. Any encrust-ed deposits can be removed with a tooth-pick, if necessary. | |
| The coffee delivered is watery. | Pre-ground coffee funnel clogged. | Open the door and clean the funnel with the aid of a brush. |
| The infuser cannot be extracted. | The machine has not been correctly turned off. | Turn the machine off by pressing the button . |
| With the descaling procedure completed, the appliance prompts for a third rinse | During the two rinse cycles, the water tank was not filled to the MAX level | Restart the descaling procedure from "Step 3: Second rinse". |
| → | ||
| The milk presents large bubbles or splashes from the spout(E3), or is under-frothed. | Milk is not cold enough, or is not semi-skimmed or skimmed. | Use skimmed or semi-skimmed milk straight from the refrigerator (temperature about 5°C). If the result is still not as expected, try changing the brand of milk. |
| Milk carafe lid dirty. Disassemble the components and clean thoroughly as described in section “9.7 Cleaning the milk carafe after each use”. Take particular care when cleaning the milk carafe connector (E6). | ||
| Vegetable drinks are being used. | The end-result varies widely depending on the nutritional properties of the drinks. “Barista” versions of these drinks are recommended. | |
| Milk-based drinks are not enabled | Milk carafe missing or not correctly in place. | Prepare the milk carafe and position it correctly in the machine. |
| Several milk drinks have been prepared in succession and the machine needs to heat up to the ideal temperature before making the next drinks. | Wait until milk-based drinks are again enabled on the control panel. | |
| The cup tray on top of the machine is hot Several drinks have been prepared in rapid succession | ||
| The machine emits noises or small puffs of steam while not in use | The machine is ready for use or has just been turned off, and a few drops of condensate are falling into the steamer, which is still hot. | This is to be expected as an aspect of normal operation: to minimize the effect, empty the drip tray regularly. |
| The machine emits puffs of steam from the drip tray and/or there is water on the surface where the machine is positioned. | The drip tray grille has not been replaced after cleaning. | Ensure the grille is repositioned in the drip tray. |
De'Longhi reserves the right to modify the technical specification and styling of its products at any moment, without compromising their functionality and quality.
TABLE DES MATIÈRES
-
MISES EN GARDE DE SÉCURITÉ .....29
-
INFORMATIONS GÉNÉRALES ......29
2.1 Notice....29
- AVANT L'UTILISATION......29
natural_image
Line drawing of a device with a plug inserted into an electrical outlet (no text or symbols)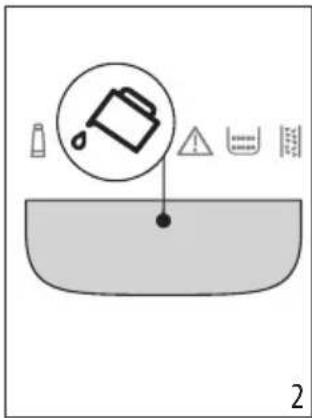
natural_image
Diagram of a device with a door and arrow indicating direction (no text or symbols)
natural_image
Line drawing of a kitchen sink with faucet and drain cover (no text or symbols)natural_image
Line drawing of a coffee maker with a container and directional arrow indicating flow (no text or symbols)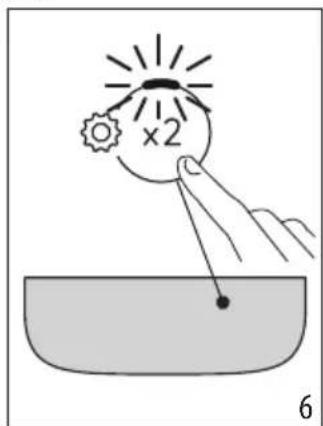
natural_image
Illustration of a hand holding a tool above a wall-mounted device, with a magnified circular view showing particle dispersion (no text or symbols)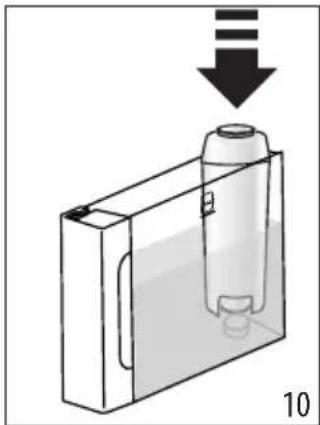
natural_image
Diagram of a device with a bottle and container, showing liquid level and three arrows pointing downward (no text or symbols)natural_image
Illustration showing a hand pouring liquid from a bottle into a glass with a faucet (no text or symbols)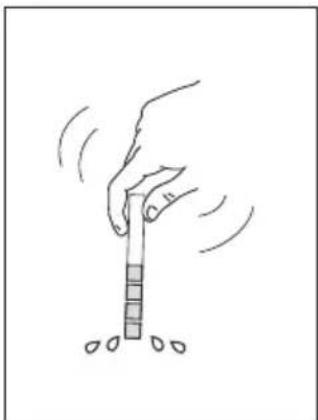
natural_image
Hand holding a stick with motion lines indicating movement (no text or symbols)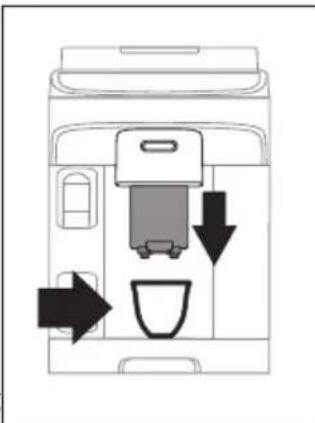
natural_image
Diagram of a kitchen appliance with arrows indicating flow or movement (no text or symbols)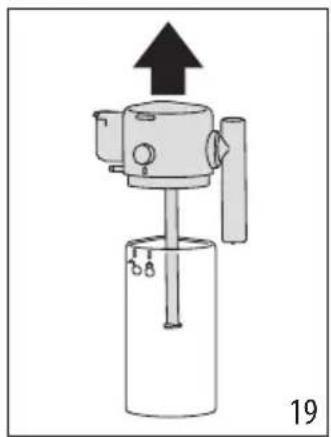
natural_image
Diagram of a mechanical device with an upward arrow and label '19' (no text or symbols on the device itself)natural_image
Diagram of a mechanical device with a vertical rod and cylindrical component, no visible text or symbols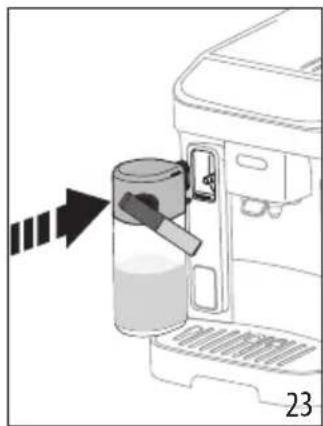
natural_image
Diagram of a hand pouring liquid into a digital water dispenser (no text or symbols visible)Making coffee using pre-ground coffee
natural_image
Diagram of a coffee maker with a cup, handle, and side panel (no text or symbols)natural_image
Diagram showing a kitchen appliance with water flow from a faucet to a cooking pot (no text or symbols)
natural_image
Line drawing of a faucet and a hand tool with liquid, no text or symbols presentnatural_image
Technical line drawing of a mechanical component with an inset magnified view showing a disassembled part (no text or symbols)natural_image
Hand holding a small electronic component with an arrow indicating direction (no text or symbols)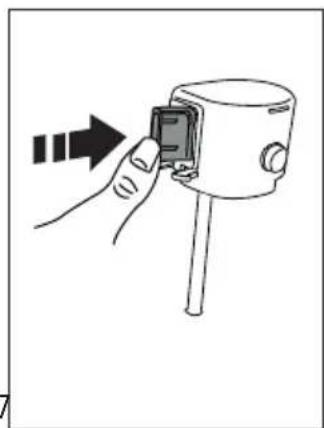
natural_image
Hand inserting a small component into a device (no text or symbols visible)natural_image
Line drawing of a hair dryer connected to an electrical outlet (no text or symbols)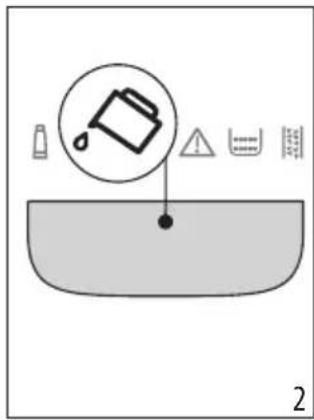
natural_image
Diagram of a device with a door and arrow indicating direction (no text or symbols)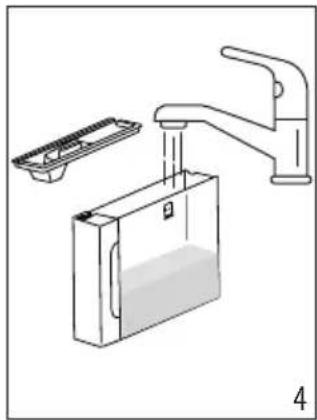
natural_image
Diagram of a kitchen sink with faucet and drain cover (no text or symbols)natural_image
Diagram of a coffee maker with a container and directional arrow indicating flow (no text or symbols)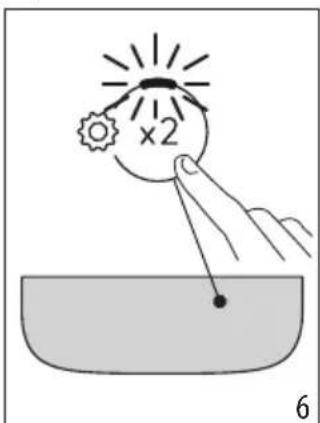
natural_image
Simple line drawing of a hand reaching toward a sun with a gear icon and 'x2' label, no text or symbols present.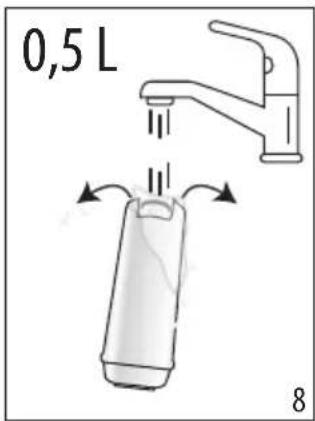
natural_image
Illustration of a hand using a tool to clean or store items, with a magnified inset showing the same object (no text or symbols present)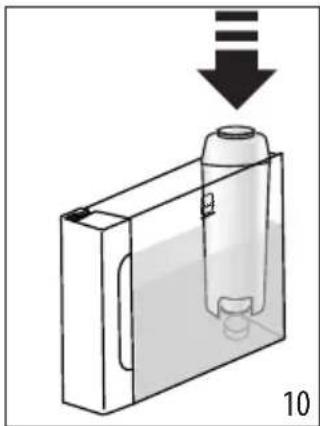
natural_image
Diagram of a container with liquid and a bottle, showing a downward arrow (no text or symbols)natural_image
Illustration showing a hand pouring liquid from a faucet into a glass with a brush (no text or symbols)
natural_image
Hand holding a stick with motion lines indicating movement (no text or symbols)natural_image
Illustration of a hand pouring granular material into a device with a small inset showing a tray (no text or symbols)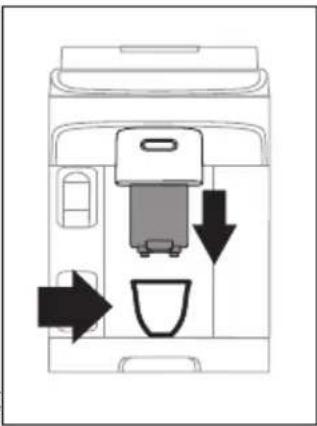
natural_image
Diagram of a kitchen appliance with arrows indicating flow or movement (no text or symbols)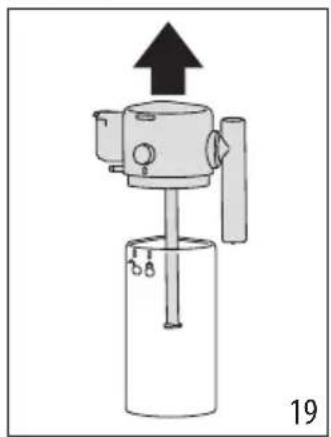
natural_image
Diagram of a mechanical device with an upward arrow and labeled part '19' (no text or symbols on the device itself)natural_image
Diagram of a mechanical device with a vertical rod and cylindrical component, no visible text or symbols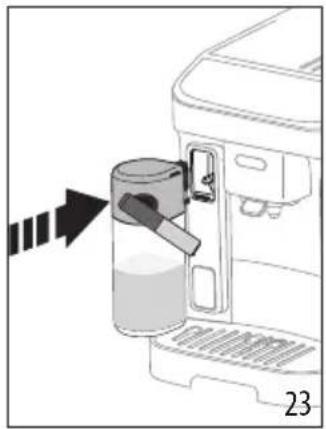
natural_image
Diagram of a water dispenser with a bag pouring liquid into a container, showing a black arrow indicating flow direction (no text or symbols)natural_image
Diagram of a coffee maker with a cup and directional arrow indicating motion (no text or symbols)natural_image
Line drawing of a coffee maker with a container inside, no text or symbols presentnatural_image
Diagram of a kitchen blender with a control panel and indicator light (no text or symbols)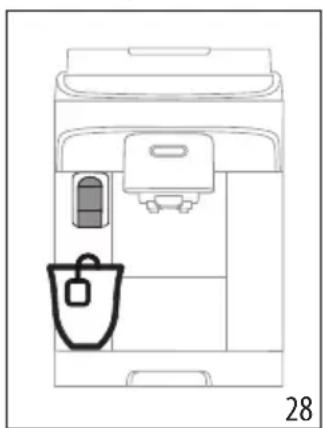
natural_image
Line drawing of a kitchen appliance with a bucket and side panel (no text or symbols)natural_image
Diagram showing a kitchen appliance with water flow arrows indicating process (no text or symbols)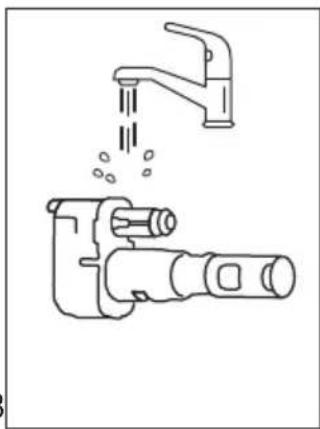
natural_image
Line drawing of a faucet and a tool with liquid, no text or symbols presentnatural_image
Technical line drawing of a mechanical component with an inset magnified view showing a dissection (no text or symbols)natural_image
Hand holding a small mechanical component with an arrow indicating direction (no text or symbols)