306934 - Humidifier Brandson - Free user manual and instructions
Find the device manual for free 306934 Brandson in PDF.


| Product type | Humidifier / Aroma diffuser |
| Brand | Brandson |
| Model | 306934 |
| Power supply | 5 V / 1 A via USB Type-C |
| Tank capacity | 2500 ml |
| Max autonomy | 16 hours (single mode), 8 hours (dual mode) |
| Spray modes | Dual outlet, single outlet, alternating |
| LED lighting | Yes, multicolor with color change |
| Automatic shut-off | Yes (empty tank or timer 8h/16h) |
| Essential oil compartment | Yes, max capacity 10 ml |
| Ambient temperature | 0-40°C |
| Cleaning | Weekly with vinegar |
| Maintenance | Clean the nozzle with alcohol |
| Safety | Do not immerse, do not open, keep out of reach of children |
| Package contents | Diffuser, USB cable, instruction manual |
Frequently Asked Questions - 306934 Brandson
User questions about 306934 Brandson
0 question about this device. Answer the ones you know or ask your own.
Ask a new question about this device
Download the instructions for your Humidifier in PDF format for free! Find your manual 306934 - Brandson and take your electronic device back in hand. On this page are published all the documents necessary for the use of your device. 306934 by Brandson.
USER MANUAL 306934 Brandson
ENG: Current drivers, user manuals and other relevant documents for this product can be found on our homepage.
natural_image
Diagram of a mechanical component with a magnified inset showing a cylindrical part (no text or symbols)- Children under the age of 10 must not use this product. If children must use it, please use it safely under the supervision of an adult.
- Do not disassemble or modify this product without authorisation. Prevent the product from being exposed to vibrations over long distances or falling from a great height.
- Please only use the mains cable supplied with this product. If the cable is lost, please contact customer service. To avoid product failure, do not use other cables with excessive specifications. The current carrying capacity of the cable must not exceed 5V/2A.
-
Only use the device in accordance with the safety standards of the mains adapter. This product has a rated input voltage of 5V/1A, please select the power source in accordance with the specifications on the rating plate.
-
Please use clean tap water (If you use bottled water or purified water, distilled water, etc., the water will produce a peculiar odour due to the rapid proliferation of bacteria, and due to the good water quality, the water will condense and clog the nozzle.
- Do not add oily essential oils to this product to avoid clogging the nozzle.
- Do not touch the nozzle directly with your hands or hard objects. If one side of the nozzle is damaged, it will have a negative effect on the other nozzle.
- Please keep the nozzle clean and free from contamination. If you find scale or condensation on the nozzle, please wipe it with a cotton cloth soaked in white wine or alcohol so as not to impair the spraying effect.
Thank you for purchasing a product from Arendo. Please read the following brief instructions carefully so that you can enjoy your purchased appliance for a long time. Before using the delivered goods, please check that they are complete, free of defects and undamaged.
1. Scope of delivery
- Aroma diffuser
• USB A to USB C power cable - Instruction manual
2. Technical data
| Power supply 5 V / 1 A (via USB Type-C) | |
| Maximum capacity 2500 ml | |
| Ambient temperature 0-40°C | |
| Features Automatic switch-off (as soon as tank is empty; after 8 hours in dual mode; after 16 hours in single mode and in alternative mode) |
3. Product details
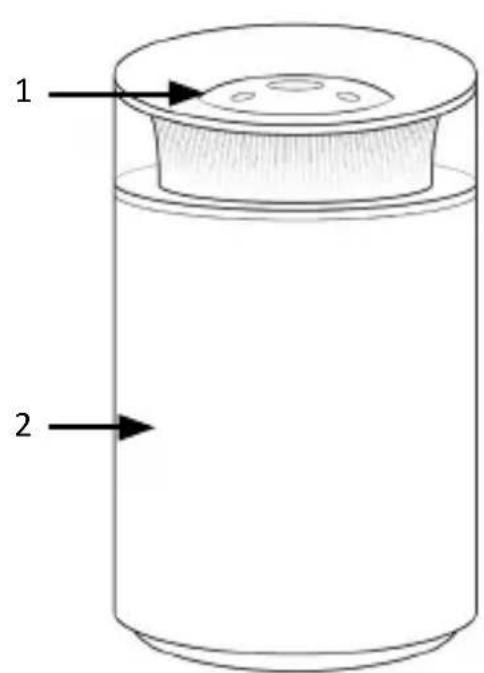
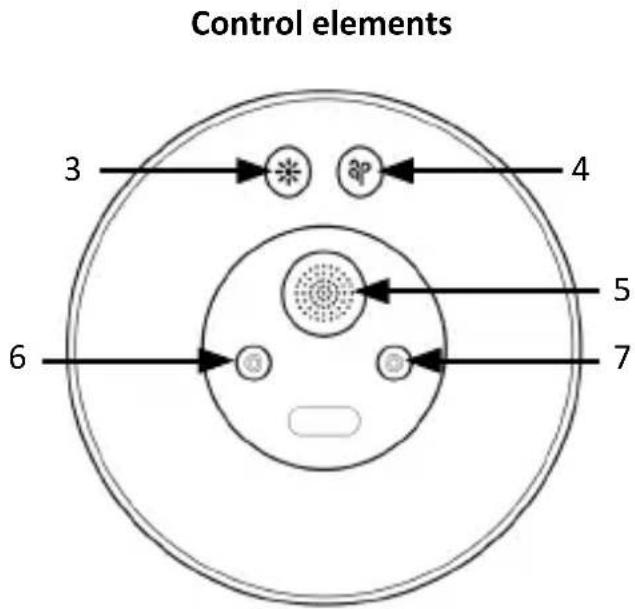
| Number Designation | |
| 1 Control elements | |
| 2 Water tank | |
| 3 "LED on/off" button | |
| 4 "Atomiser" button | |
| 5 Flavour compartment | |
| 6 Steam outlet 1 | |
| 7 Steam outlet 2 |

ATTENTION!
4. Important instructions for using this device
• Only use tap water.
- Disconnect the power supply to the diffuser when cleaning it or filling the tank. Ensure that the tank is empty if the appliance is not in operation.
• Never open the lid while the appliance is in operation.
• Never cover the diffuser with objects.
• Always top up the tank with fresh water to prevent dirt from damaging the appliance.
- Clean the tank once a week with vinegar. Never use chemical products such as corrosive household cleaners.
• Make sure that no water gets into the internal electronics! Otherwise switch off the appliance immediately.
- Do not open the electronics of the appliance and do not carry out any maintenance work yourself!
- Keep the appliance away from children and animals.
• Do not touch the product if your hand is wet.
• Always place the appliance on a flat and level surface.
5. Commissioning
- Remove the appliance from the packaging and remove all packaging material.
- Then open the lid of the diffuser.
- Fill the tank with tap water. Make sure that you do not fill it with more than 2500ml of water.
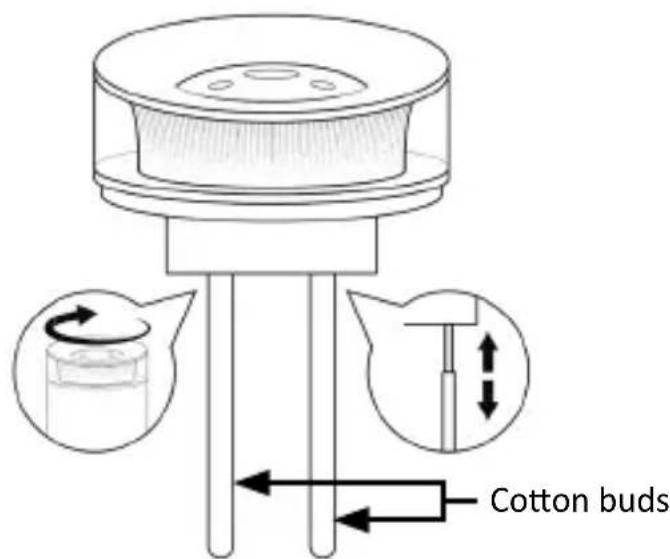
- Remove the two cotton buds, soak both ends of the cotton buds in water and then insert them into the appliance. Make sure that the spring does not fall to the bottom of the cotton bud tube.
-
Then place the lid of the diffuser on the device and make sure that it is fitted correctly.
-
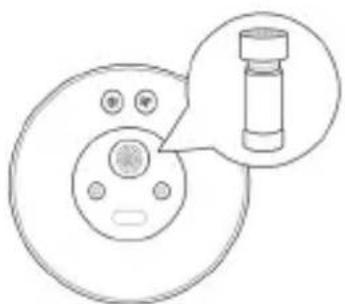
Press on the lid of the essential oil bottle on the top of the humidifier to remove the essential oil bottle.
natural_image
Diagram of a mechanical component with a magnified inset showing a cylindrical part (no text or symbols)- Remove the bottle with the essential oil by hand, pull off the bottle cap and pour the essential oil into the container. Make sure that you do not pour in more than 10 ml and then close the bottle cap.
Note: When closing the oil container, the grooved head of the cap and the notch on the base of the bottle must be aligned so that a straight line is created. Align the guide ribs before inserting the bottle into the appliance. After pressing in, the upper arrow of the bottle is aligned with the arrow at the upper end of the opening of the device.
- Finally, connect the USB cable to the device and connect it to a 5V/1A power adapter and plug it into a properly connected socket. The diffuser is then ready for use.
Note: The appliance has a built-in timer and switches off automatically after 8 hours if both steam outlets are used. If only one steam outlet is used, the appliance switches off automatically after 16 hours.
5.1 Button functions
Atomiser button
Press the „atomiser button“ to switch through the different modes:
- Press the „atomiser button“, both steam outlets are active.
- Press the „atomiser button“ twice; steam outlet 1 is active, steam outlet 2 is inactive.
- Press the „atomiser button“ three times; steam output 1 is inactive, steam output 2 is active.
- Press the „atomiser button“ four times, steam output 1 and 2 are active, but spray alternately
- Press the „atomiser button“ again to deactivate both steam outputs.
"LED on/off" button
The „LED On/Off“ button can be used to adjust the lighting of the diffuser. The first press of the button switches the colour change function on. Pressing the button repeatedly switches between the individual colours.

6. Cleaning and care
Make sure that the appliance is switched off and disconnected from the power supply when you want to clean it. If there is still residual water in the tank, make sure that you do not tip the appliance towards the air inlet when tipping it out. Water may accumulate in the appliance.
Clean the ultrasonic plate weekly with water and distilled vinegar and a soft cloth.
Never clean the diffuser with petrol or household cleaners. Never use chemical or aggressive cleaning agents for cleaning.
When the diffuser is not in use, we recommend always emptying the water tank. Never immerse the appliance in water.
Never pour water onto the air outlet or into any other opening.

ATTENTION!
7. Safety instructions and disclaimer
Never attempt to open the appliance to carry out repairs or modifications. Avoid contact with the mains voltage. Do not short-circuit the product. Lay the connecting cable in a protected location to prevent damage. Only use cables that are approved for outdoor use. Secure the plug connection against moisture.
Do not expose the device to sudden changes in temperature or strong vibrations, as this could damage the electronic components. Check the device for damage before use.
The appliance should not be used if it has been knocked or damaged in any other way. Please observe the national regulations and restrictions. Do not use the device for purposes other than those described in the instructions. This product is not a toy. Keep it out of the reach of children or mentally impaired persons.
Any repair or modification to the appliance that is not carried out by the original supplier will invalidate the warranty or guarantee. The appliance may only be used by persons who have read and understood these instructions. The device specifications may change without prior notice. For information on authorised collection points in your area, please contact your local city or municipal administration.

8. Disposal instructions
According to the European WEEE Directive, electrical and electronic devices may not be disposed of with household waste.
Their components must be recycled or disposed of separately, as toxic and hazardous components can cause lasting damage to the environment if disposed of improperly and recyclable materials can be recycled.
As a consumer, you are obliged under the Electrical and Electronic Equipment Act (ElektroG) to return electrical and electronic equipment free of charge at the end of its life to the manufacturer, the point of sale or to public collection centres set up for this purpose. Details are regulated by the respective state law. The symbol on the product, the operating instructions and/or the packaging refers to these regulations. By separating, recycling and disposing of old appliances in this way, you are making an important contribution to protecting our environment.


WEEE Directive 2012/19/EU
WEEE Register No.: DE 67896761
Hereby, WD Plus GmbH declares that the device 306934/306935 is in compliance with the essential requirements and other relevant regulations. A complete declaration of conformity can be obtained from: WD Plus GmbH, Wohlenbergstraße 16, 30179 Hanover, Germany

natural_image
Diagram of a mechanical component with a magnified inset showing a cylindrical part (no text or symbols)natural_image
Diagram of a mechanical component with a magnified inset showing a cylindrical part (no text or symbols)"Pulsante "LED on/off
natural_image
Diagram of a mechanical component with a magnified inset showing a cylindrical part (no text or symbols)MO-FR 9:30am - 18pm CET

www.arendo.de
WD Plus GmbH
Wohlenbergstraße 16
30179 Hannover, DE
V1.0
Brand : Brandson
Model : 306934
Category : Humidifier