BAD-3636 - Bathroom accessory Badiona - Free user manual and instructions
Find the device manual for free BAD-3636 Badiona in PDF.


User questions about BAD-3636 Badiona
0 question about this device. Answer the ones you know or ask your own.
Ask a new question about this device
Download the instructions for your Bathroom accessory in PDF format for free! Find your manual BAD-3636 - Badiona and take your electronic device back in hand. On this page are published all the documents necessary for the use of your device. BAD-3636 by Badiona.
USER MANUAL BAD-3636 Badiona
natural_image
Black Badiona brand showerbox with cutouts and a 2x product indicator (no text or symbols on the device itself)2x
| Deutsch | 3 |
| English | 9 |
| Français | 15 |
| Español | 21 |
| Italiano | 27 |
| Nederlands | 33 |

text_image
BadionaContact us We speak English
text_image
A B C D E F G x2 x4 x4 x4 x4 x4x1SICHERHEITSHINWEISE
text_image
Diagram illustrating hand gesture and folding process on a device, with Chinese annotations for each step.2. Anbringung der
natural_image
Warning symbol: black exclamation mark inside a triangle (no text or numbers)natural_image
Line drawing of a triangular tray with two pens, labeled 'A' at the base (no text or symbols on the tray itself)text_image
E E E F F Anatural_image
Technical line drawing of a curved metal shelf or venturi component with labeled parts C (no text or symbols beyond labels)natural_image
Technical line drawing of a two-tiered bathroom grater with side panels and handlebars (no text or symbols)ENGLISH
Thank you for your confidence in Badiona. We pursue the highest standards of quality as well as design and wish you much pleasure with your new product.
Please read all instructions and notes carefully. Keep this manual in a safe place for future reference. If you pass the product on to someone else, please also include this manual. This product is intended for private use only and not for industrial use.
SCOPE OF DELIVERY
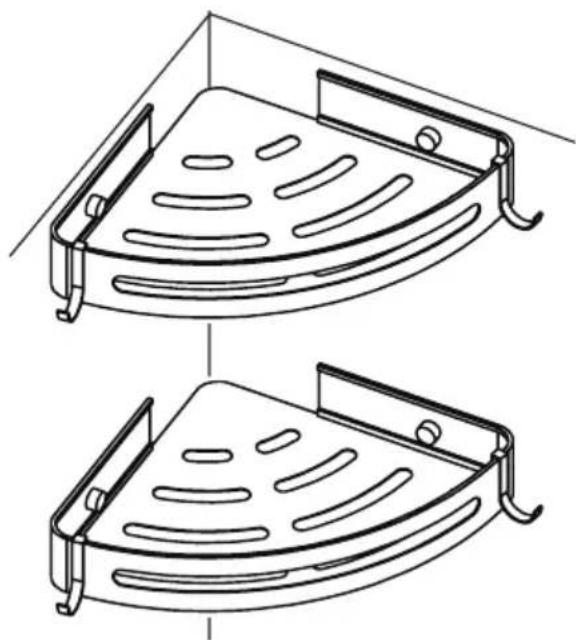
2x aluminum shower baskets, 4x adhesive brackets, 4x hooks, 1x wrench, 4x privacy caps, 4x mounting screws, 4x dowels.

text_image
A B C D E F G x2 x4 x4 x4 x4 x4x1SAFETY INSTRUCTIONS
- Careful assembly: Please make sure the shower basket is attached to a stable surface and that it is securely and firmly installed before using it. The assembly should be done by an adult only.
- Weight limit: Please be careful not to overload the shower basket. Observe the maximum weight specification to ensure safe use.
- Beware of sharp edges: Be especially careful during the assembly process to avoid cuts or injuries from possible sharp edges.
- Cleaning instructions: For a long life of the shower basket, please avoid abrasive cleaners or tools. Instead, use a soft cloth and mild detergent.
MOUNTING INSTRUCTIONS FOR ADHESIVE MOUNT
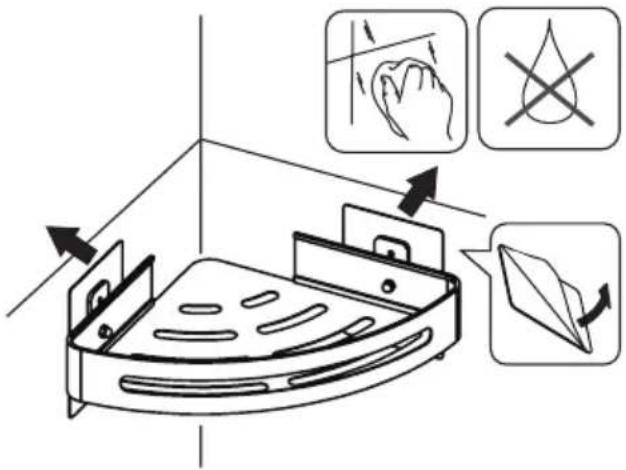
- Preparation: Make sure the wall is clean and dry. This will ensure an optimal hold.
text_image
Diagram illustrating hand gesture and folding process on a 3D object, with Chinese annotations- Attaching the brackets:
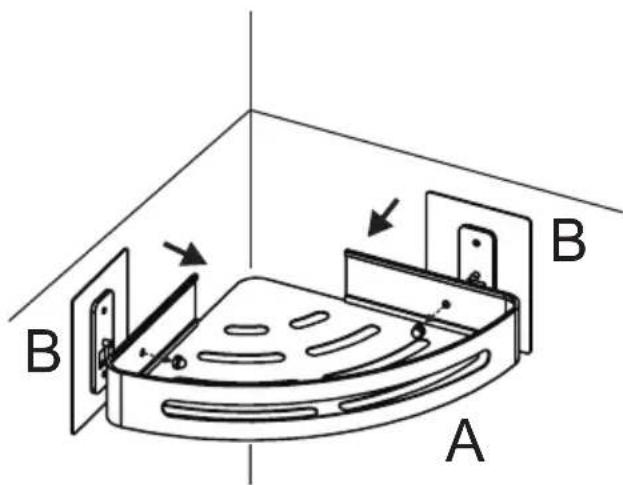
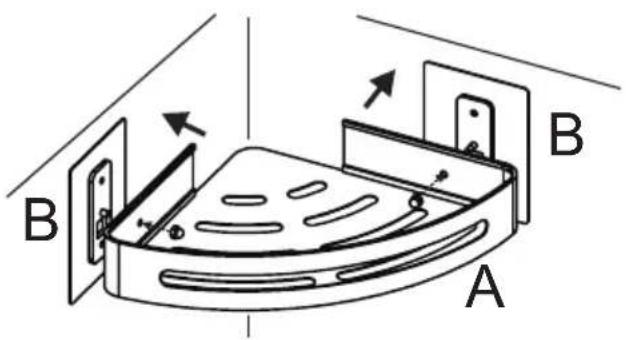
Attach adhesive brackets to shower basket, position brackets and basket in desired location. Tare the brackets as desired and make appropriate marks. Then remove the basket again.
text_image
A B B- Fastening the brackets:
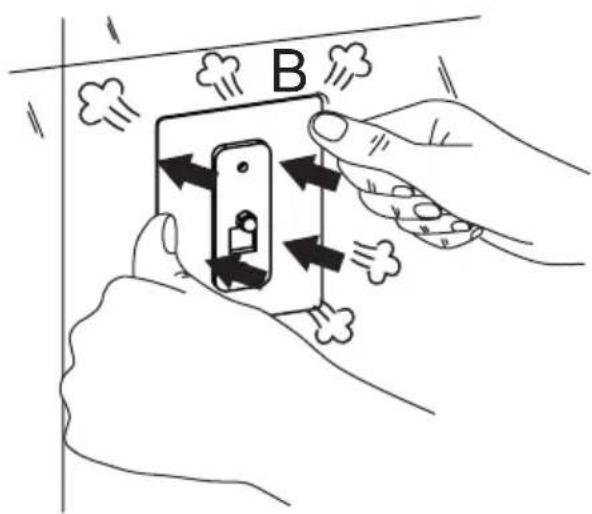
Now take the adhesive brackets, remove the film over the adhesive surface, position them at the previously marked location and press the adhesive brackets firmly against the dry wall. Allow them to adhere briefly afterwards.
text_image
B- Attaching the basket: Then attach the basket to the adhesive brackets.
text_image
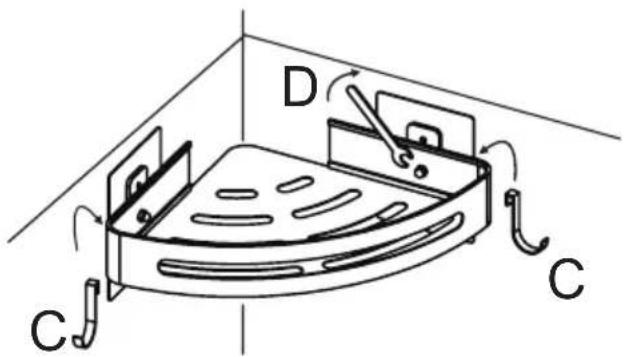
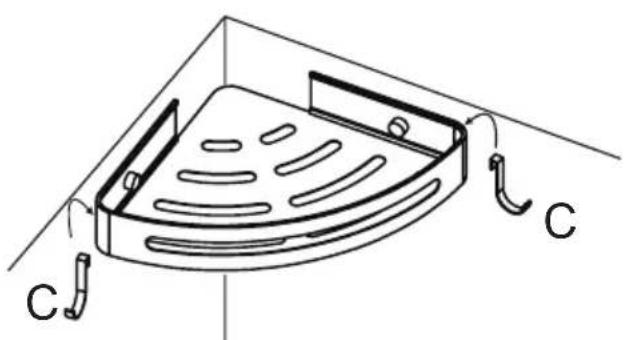
B A B- Tighten the screws: Tighten the screws with the supplied wrench and hang the supplied hangers.
text_image
D C CTipps & Tricks
-
Waiting time: Wait at least 12 hours before loading the basket. This will ensure that the adhesive is fully cured and provides optimal hold.
-
Observe load limit: Avoid overloading the basket. The maximum weight load is 5Kg/basket.
-
Cleaning: Do not clean the glued areas for at least one week after application to avoid affecting the adhesive.
-
Room temperature: make sure the room temperature is above 10^ C when attaching the basket. If the temperature is too low, the adhesive may lose its adhesive power.
-
Regular checks: Check the basket regularly for secure attachment and possible damage. If the basket is loose, this could be a sign that the adhesive is wearing off and the basket needs to be reattached.
-
Avoid moisture: make sure that no water gets on the adhesive mounts for at least 48 hours after installation. This will allow the adhesive to cure properly and provide a long-term, strong attachment.
MOUNTING INSTRUCTIONS FOR MOUNTING WITH SCREWS

natural_image
Warning symbol: black exclamation mark inside a triangle (no text or numbers)CAUTION: Extreme care must be taken when installing the drill attachment. There is a risk that there may be cables or wiring behind the wall. We strongly recommend that you check the location of any electrical wiring, plumbing or other installations in your wall before drilling. Drilling without first checking may result in serious injury and/or damage your wall and the installations running in it. If you are unsure, please consult a professional.
- Preparation: Place the shower basket in the desired position, align it and mark the drill holes.

natural_image
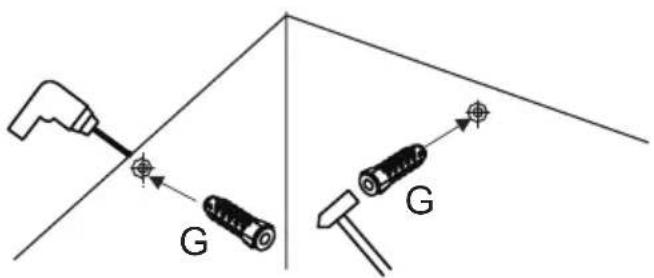
Line drawing of a triangular tray with cutouts and two pens, labeled 'A' (no text or symbols on the tray itself)- Drilling: Use a drill bit suitable for your wall type to drill the holes. After that, remove the dust from the holes and insert the supplied dowels (safety note: always wear safety glasses before you start drilling).
text_image
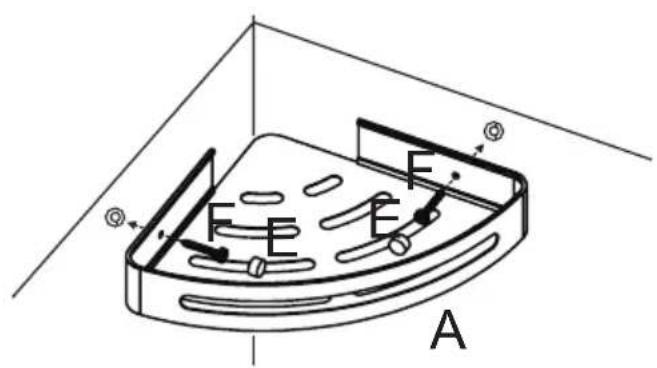
G G- Fixing the basket: Put the shower basket in place and screw the supplied screws into the inserted dowels. Follow up by placing the sight caps on the screw heads for a neat finish.
text_image
A B C D E F G H I J K L M N O P Q R S T U V W X Y Z- Hang hooks: Hang the hooks provided. Washcloths, razors, bath brushes or sponges and more can be attached to these.
natural_image
Technical line drawing of a corner bathroom fixture with labeled parts (no text or symbols)- Stability test: Check the stability of the shower basket by pressing lightly on it. It should be firmly attached to the wall. If it is not, check if the screws are lashed tightly enough. If necessary, they may need to be readjusted.
natural_image
Technical line drawing of a two-tiered bathroom grater with side panels and handlebars (no text or symbols)FRANÇAIS
text_image
A B C D E F G x2 x4 x4 x4 x4 x4x1CONSIGNES DE SÉCURITÉ
text_image
Diagram illustrating hand gesture and folding process on a bathroom sink, with labeled arrows and icons for finger movement and fold change.- Fixation des supports: