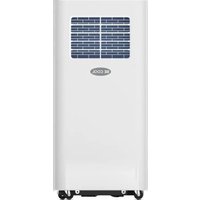
BC9KL2201FW - Air Conditioning Be Cool - Free user manual and instructions
Find the device manual for free BC9KL2201FW Be Cool in PDF.


| Brand | Be Cool |
| Model | BC9KL2201FW |
| Product type | Mobile monoblock air conditioner |
| Cooling capacity | 9,000 BTU / 2.569 kW |
| Max electric power | 1,000 W |
| Voltage / Frequency | 220-240 V~ / 50 Hz |
| Refrigerant | R290 (propane) - Charge 0.210 kg - GWP = 3 |
| Energy efficiency class | A |
| Max airflow | 330 m³/h |
| Noise level (acoustic power) | 65 dB(A) |
| Dimensions (W x D x H) | 325 x 295 x 702 mm |
| Net weight | 25 kg |
| Operating modes | Cooling, Fan, Dehumidification |
| Adjustable temperature range | 16 °C - 30 °C |
| Fan speeds | 2 (High, Low) |
| Timer | Programmable (1-24 h) on/off |
| Sleep mode | Yes |
| Remote control | Remote control + Wi-Fi (Smart Life app) |
| Wi-Fi connectivity | 2.4 GHz - Max transmission power 100 mW |
| Air filter type | Washable - Clean every 2 weeks |
| Air exhaust | Flexible hose (28-150 cm) - Window kit included |
| Water drainage | Periodic (internal tank) or continuous (hose) |
| Safety features | Frost protection, full tank shut-off (FL), compressor shut-off/overheat |
| Manufacturer warranty | 2 years (valid in Austria, conditions apply) |
Frequently Asked Questions - BC9KL2201FW Be Cool
User questions about BC9KL2201FW Be Cool
0 question about this device. Answer the ones you know or ask your own.
Ask a new question about this device
Download the instructions for your Air Conditioning in PDF format for free! Find your manual BC9KL2201FW - Be Cool and take your electronic device back in hand. On this page are published all the documents necessary for the use of your device. BC9KL2201FW by Be Cool.
USER MANUAL BC9KL2201FW Be Cool
natural_image
White industrial air purifier with blue brick pattern and 'BE COOL' branding (no other text or symbols visible)natural_image
Technical line drawing of a mechanical device with internal components and a pipe connection (no text or symbols)Abb.1
Fensterschiene Montage
natural_image
Pure diagram of a door with double-headed arrows indicating direction, no text or symbols presentAbb. 3
natural_image
Diagram showing two configurations of a small air conditioner unit with attached tubing, mounted on a wall (no text or symbols present)Anmerkung:
1) Ein/Aus-Taste
5) Timer-Taste
natural_image
Line drawing of a server rack with a bucket and cable, no text or symbols presentTimer
natural_image
Diagram of a refrigerator with cooling fans and a rotary dial indicator (no text or symbols)Hinweise:
natural_image
Line drawing of a server rack with a bucket being inserted, no text or symbols presentScan QR code
Registrierung
BE COOL
BE COOL
natural_image
White industrial air purifier unit with blue brick pattern and 'BE COOL' branding (no other text or symbols)FÉLICITATIONS ! MERCI D'AVOIR CHOISI UN PRODUIT BE COOL.
BE COOL


natural_image
Technical line drawing of a mechanical device with internal components and a pipe connection (no text or symbols)Fig.1
natural_image
Pure diagram of a door with double-headed arrows indicating direction, no text or symbols presentFig. 3
natural_image
Diagram showing two configurations of a small air conditioner unit connected to a wall-mounted air conditioner unit, with no text or symbols present.Remarque:
natural_image
Line drawing of a server rack with a bucket being inserted, showing internal ventilation and scroll (no text or symbols)BE COOL
Minuterie
natural_image
Diagram of a refrigerator with cooling fans and wheels, showing a rotation arrow and a bolt symbol (no text or labels)Notes :
natural_image
Line drawing of a refrigerator with a bucket being inserted, no text or symbols presentNETTOYAGE ET ENTRETIEN
Scan QR code
Inscription
BE COOL
BE COOL
natural_image
White industrial air purifier unit with blue brick pattern and 'BE COOL' branding (no other text or symbols visible)CONGRATULAZIONI! GRAZIE PER AVER SCELTO UN PRODOTTO BE COOL.
BE COOL


natural_image
Technical line drawing of a mechanical device with internal components and a pipe connection (no text or symbols)Fig.1
natural_image
Pure diagram of a door with double-headed arrows indicating direction, no text or symbols presentFig. 3
natural_image
Diagram showing two views of a small air conditioner unit with attached hose, mounted on a wall (no text or symbols present)Nota:
natural_image
Line drawing of a refrigerator with a bucket being inserted, showing internal panel structure and no text or symbols.Timer
natural_image
Diagram of a mechanical component with a rotating arrow and base, no text or symbols presentNote:
natural_image
Line drawing of a server rack with a bucket being inserted, no text or symbols presentIMMAGAZZINAMENTO
Scan QR code
Registrazione
BE COOL
BE COOL
natural_image
White industrial air purifier with blue brick pattern and 'BE COOL' branding (no other text or symbols)GEFELICITEERD! BEDANKT VOOR HET KIEZEN VAN EEN PRODUCT VAN BE COOL.
BE COOL


natural_image
Technical line drawing of a mechanical device with internal components and a pipe connection (no text or symbols)Fig.1
Vensterrail installatie
natural_image
Pure diagram of a door with double-headed arrows indicating direction, no text or symbols presentFig. 3
De airconditioner installeren
natural_image
Diagram showing two configurations of a small air conditioner unit with airflow direction indicators (no text or symbols)Opmerking:
1) Aan/uit-knop
5) Timerknop
natural_image
Line drawing of a server rack with a bucket inserted, showing internal ventilation and a bucket pouring into the air (no text or symbols)Timer
natural_image
Diagram of a vehicle air conditioner unit with cooling fan and valve mechanism (no text or symbols)Opmerkingen:
natural_image
Diagram of a server rack with a bucket being inserted, showing internal structure and no text or symbolsREINIGING EN ONDERHOUD
natural_image
Technical line drawing of a multi-tiered industrial air conditioner unit with ventilation grilles and wheels (no text or symbols)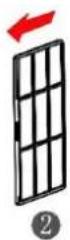
natural_image
Diagram of a grid structure with an arrow indicating direction, no text or symbols presentBE COOL
OPSLAG
Scan QR code
Registratie
BE COOL

works with the Google Assistant
BE COOL
| Technische gegevens WiFi | |
| Draadloze technologie: | Wifi (WLAN) |
| Radiofrequentie | 2412 MHz-2472 MHz |
| BLE-frequentie | 2402 MHz-2480 MHz |
| Modulatietype | 802.11b: DSSS802.11g: OFDM802.11n (20 MHz): OFDM |
| Vaste frequentie-software | SecureCRT.exe |
| Antenneversterking | 2,5 dBi |
| Antennetype | PCB |
| Zendvermogen | :520dBm |
natural_image
White industrial air purifier with blue brick pattern and 'BE COOL' branding (no other text or symbols)natural_image
Technical diagram of a mechanical device with internal components and a cylindrical shaft, showing no text or symbols.Fig.1
natural_image
Pure diagram of a door with double-headed arrows indicating direction, no text or symbols presentFig. 3
natural_image
Diagram showing two views of a small air conditioner unit with airflow direction arrows, no text or symbols present.Observación:
natural_image
Line drawing of a server rack with a bucket inserted, showing internal ventilation and a bucket pouring into the air (no text or symbols)Temporizador
natural_image
Diagram of a mechanical component with a rotating arrow and circular symbols (no text or labels)Notas:
natural_image
Line drawing of a server rack with a bucket being inserted, no text or symbols presentLIMPIEZA Y MANTENIMIENTO
Scan QR code
Registro
BE COOL

works with the Google Assistant
BE COOL
natural_image
White industrial air purifier with blue brick pattern and 'BE COOL' branding (no other text or symbols)GRATULUJEME!
DĚKUJEME, ŽE JSTE SI VYBRALI PRODUKT OD SPOLEČNOSTI BE COOL.
BE COOL


natural_image
Technical diagram of a mechanical device with internal components and a cylindrical shaft, showing no text or symbols.Obr.1
natural_image
Pure diagram of a door with double-headed arrows indicating direction, no text or symbols presentObr. 3
natural_image
Diagram showing two configurations of a small air conditioner unit with airflow direction indicators (no text or symbols)Poznámka:
5) Tlačítko časovače
natural_image
Diagram of a refrigerator with ventilation grilles and a bucket pouring liquid from a cable (no text or labels)Časovač
natural_image
Diagram of a mechanical component with rotating parts and a curved arrow indicating rotation (no text or symbols)Poznámky:
natural_image
Line drawing of a server rack with a bucket inserted, showing internal panel structure and no text or symbolsČIŠTĚNÍ A ÚDRŽBA
Scan QR code
Registrace
WORKS WITH amazon alexa

works with the Google Assistant
BE COOL
natural_image
White industrial air purifier with blue brick pattern and 'BE COOL' branding (no other text or symbols)GRATULUJEME!
ĐAKUJEME, ŽE STE SI VYBRALI PRODUKT OD SPOLOČNOSTI BE COOL.
BE COOL
SK

natural_image
Technical diagram of a mechanical device with internal components and a pipe connection (no text or symbols)Obr.1
natural_image
Pure diagram of a door with double-headed arrows indicating direction, no text or symbols presentObr. 3
natural_image
Diagram showing two configurations of a small air conditioner unit connected to a wall-mounted air conditioner unit, with no text or symbols present.Poznámka:
1) Tlačidlo zapnutia/vypnutia
- Zapnutie a vypnutie zariadenia.
BE COOL
6) Displej
7) Tlačidlo °C/°F
- Na nastavenie zobrazenia teploty medzi °C a °F.
8) Tlačidlo SLEEP
natural_image
Line drawing of a refrigerator with a bucket inserted, showing internal seating and ventilation system (no text or symbols)Časovač
natural_image
Diagram of a refrigerator with cooling fans and wheels, showing a rotation arrow (no text or symbols)Poznámky:
natural_image
Diagram of a server rack with heat exchangers and a bucket pouring liquid into it (no text or symbols)BE COOL
ČISTENIE A ÚDRŽBA
Scan QR code
Registrácia
Automatické pridanie zariadenia
BE COOL
| Technické údaje WiFi | |
| Bezdrôtová technológia: | Wifi (WLAN) |
| Frekvencia rádiového prevádzky | 2412 MHz – 2472 MHz |
| Pracovná frekvencia BLE | 2402 MHz – 2480 MHz |
| Typ modulácie | 802.11b: DSSS802.11g: OFDM802.11n (20 MHz): OFDM |
| Softvér s pevnou frekvenciou | SecureCRT.exe |
| Zosilnenie antény | 2,5 dBi |
| Typ antény | PCB |
| Prenosový výkon | :520 dBm |
natural_image
White industrial air purifier with blue brick pattern and 'BE COOL' branding (no other text or symbols)FELICITĂRI! VĂ MULȚUMIM CĂ AȚI ALES UN PRODUS BE COOL.
BE COOL


natural_image
Technical diagram of a mechanical device with internal components and a cylindrical shaft, showing no text or symbols.Fig.1
natural_image
Pure electrical circuit lines without any symbolsFig. 3
natural_image
Diagram showing two configurations of a small air conditioner unit with airflow direction indicators (no text or symbols)Notă:
natural_image
Line drawing of a refrigerator with a bucket inserted, showing internal compartments and wheels (no text or symbols)Cronometru
natural_image
Diagram of a refrigerator interior with cooling fans and a valve, showing a rotation arrow (no text or symbols)Note:
natural_image
Diagram of a vertical industrial machine with a bucket inserted, showing internal structure and no text or symbols.BE COOL
Scan QR code
Înregistrare
WORKS WITH amazon alexa

works with the Google Assistant
BE COOL
natural_image
White industrial air purifier with blue brick pattern and 'BE COOL' branding (no other text or symbols)GRATULACJE!
DZIEKUJEMY ZA WYBRANIE PRODUKTU OD BE COOL.
BE COOL


natural_image
Technical line drawing of a mechanical device with internal components and a pipe connection (no text or symbols)Rys.1
natural_image
Pure diagram of a door with double-headed arrows indicating direction, no text or symbols presentRys. 3
natural_image
Diagram showing two configurations of an air conditioner unit with a hose, mounted on a wall (no text or symbols present)Uwaga:
5) Przycisk timera
natural_image
Line drawing of a server rack with a bucket inserted, showing internal ventilation and scroll wheel (no text or symbols)Timer
natural_image
Diagram of a vehicle cooling system with a valve and rotating component (no text or symbols)Uwagi:
natural_image
Diagram of a multi-chamber refrigerator with a bucket lifting a bucket (no text or symbols)BE COOL
CZYSZCZENIE I KONSERWACJA
natural_image
Line drawing of a multi-tiered industrial air conditioner unit with ventilation grilles and wheels (no text or symbols)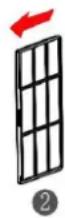
natural_image
Diagram of a grid structure with an arrow pointing to it, no text or symbols presentScan QR code
Rejestracja
BE COOL
natural_image
White industrial air purifier with blue brick pattern and 'BE COOL' branding (no other text or symbols)ČESTITAMO! HVALA, KER STE IZBRALI IZDELEK BE COOL.
BE COOL


Aktualna navodila za uporabo in drugi jeziki
natural_image
Technical line drawing of a mechanical device with internal components and a cylindrical shaft (no text or symbols)Slika 1
natural_image
Pure diagram of a door with double-headed arrows indicating direction, no text or symbols presentSlika 3
natural_image
Diagram showing two configurations of a small air conditioner unit with attached tubing, mounted on a wall (no text or symbols present)Opomba:
1) Gumb za vklop/izklop
• Vklop in izklop naprave.
5) Gumb časovnika
natural_image
Line drawing of a refrigerator with a bucket being inserted, no text or symbols presentČasovnik
natural_image
Line drawing of a multi-chamber refrigerator with a bucket pouring liquid into it (no text or symbols)BE COOL
ČIŠČENJE IN VZDRŽEVANJE
natural_image
Line drawing of a multi-tiered industrial air conditioner unit with cooling fans and wheels (no text or symbols)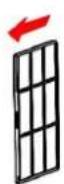
2
1
SKLADIŠČE
Scan QR code
Registracija
Samodejno dodajanje naprave
BE COOL
| Tehnični podatki WiFi | |
| Brezžična tehnologija: | Wifi (WLAN) |
| Frekvenca delovanja radijskega signala | 2412 MHz–2472 MHz |
| BLE-frekvenca delovanja | 2402 MHz–2480 MHz |
| Tip modulacije | 802.11b: DSSS802.11g: OFDM802.11n (20 MHz): OFDM |
| Programska oprema s fiksno frekvenco | SecureCRT.exe |
| Ojačitev antene | 2,5 dBi |
| Tip antene | PCB |
| Prenosna moč | :520dBm |
natural_image
White industrial air purifier unit with blue brick pattern and 'BE COOL' branding (no other text or symbols)ČESTITAMO!
HVALA VAM ŠTO STE ODABRALI PROIZVOD BE COOL.
BE COOL


Aktualni korisnički priručnici i drugi jezici
Preuzmite aktualne upute za uporabu na raznim jezicima putem poveznice www.schuss-home.at/downloads ili skenirajte prikazani QR kod. Slijedite upute na web stranici.

MOLIMO VAS, PAŽLJIVO PROČITAJTE UPUTE ZA KORISNIKE PRIJE POČETKA SASTAVLJANJA, INSTALACIJE, RADA ILI ODRŽAVANJA. ZAŠTITITE SEBE I DRUGE PRIDRŽAVANJEM SIGURNOSNIH UPUTA. NEPRIDRŽAVANJE UPUTA MOŽE REZULTIRATI OSOBNIM OZLJEDAMA I/ILI ŠTETOM NA IMOVINI I/ILI PONIŠTENJEM JAMSTVA!
VAŽNE SIGURNOSNE INFORMACIJE, LOKACIJA I ELEKTRIKA POVEZIVANJE.
- Prije uporabe uređaja pažljivo pročitajte sve upute.
- Koristite ovaj uređaj samo u skladu sa smjernicama u Priručnik s uputama. Svaka druga uporaba koju proizvođač ne preporučuje može rezultirati požarom, strujnim udarom ili ozljedama.
- Ovaj uređaj je namijenjen isključivo za klimatizaciju stambenih prostora u kućanstvima i ne smije se koristiti u druge svrhe.
- Uređaj nije prikladan za kontinuirani i precizan rad i ne bi se trebao koristiti za hlađenje električnih sustava (npr. u serverskim sobama).
- Zabranjeno je prilagođavati ili modificirati karakteristike ovog uređaja na bilo koji način i koristiti samo rezervne dijelove i dodatnu opremu preporučenu od strane proizvođača (u suprotnom gubi se jamstvo).
- Za bilo kakve popravke uređaja, utikača ili kabela, uvijek i samo kontaktirajte servisne centre ovlaštene od strane proizvođača. Točkama korisničke službe možete pristupiti online na https://schuss-home.at/ dohvatiti.
- Uklonite ambalažu i uvjerite se da klima uređaj nije oštećen. Ako ste u nedoumici, nemojte koristiti klima uređaj i obratite se servisnom centru ili svom prodavaču.
BE COOL
1 ručka za nošenje
2 rešetke za ulaz zraka
3 upravljačka ploča
4 kotačića
5 podesivih ventilacijskih klapni
6 Ispušni otvor za zrak
7 odvod vode
8 rešetki za ulaz zraka
MONTAŽA I STAV
- Pažnja: Prije prve uporabe mobilnog klima uređaja ostavite ga na miru najmanje dva sati dugo stajati.
- Prijevoz i potez Ona the Uređaj samo u uspravniji Položaj.
- Postavite klima uređaj na ravnu, ravnu i suhu površinu, čuvajte ga Održavajte minimalnu udaljenost od 50 cm oko uređaja za optimalnu učinkovitost Kruženje zraka.
natural_image
Technical line drawing of a mechanical device with internal components and a pipe connection (no text or symbols)Sl.1
natural_image
Pure diagram of a door with double-headed arrows indicating direction, no text or symbols presentsl. 3
Klima uređaj instalirati
Mjesto Ona the Uređaj s montiran ispušno crijevo u the Blizina iz Prozor. Promatrajte Ona tamos minimalnim razmakom od 50 cm između Uređaj i the susjedni zidova ili Protiv-stoji (sl. 4).
BE COOL
Bilješke:
natural_image
Diagram showing two configurations of a shared air conditioner unit with airflow direction indicators (no text or symbols)Bilješka:
5) Gumb mjerača vremena
- Ako the Jedinica klima uređaja uključeno je, pritisnite Ona the dugme oko mjerač vremena za isključivanje Program za gašenje do aktivirati. Ako se the Uređaj u Način mirovanja nalazi se, aktiviran tipku TIMER the automatski Program za uključivanje.
- Nakon pritiska na tipku, zaslon treperi; vrijeme je podešeno aktuatorom gen Gore dolje Skenirati.
- The Prozor za podešavanje vremena laži između 1 i 24 sati i the Podešavanje odvija se u intervalima iz 1 Sat.
BE COOL
6) Zaslon
7) Gumb °C/°F
- Za prilagoditi the Prikaz temperature između °C i °F.
8) Gumb SLEEP
- Pritisnite ovaj gumb, oko Odaberite način mirovanja.
UPUTE ZA UPOTREBU
COOL
- Pritisnite Ona the dugme MODA do the Svjetlosni indikator COOL (cool) na dem Zaslon svijetli.
- Pritisnite tipke GORE/DOLJE za podešavanje temperature u rasponu od 16°C do 30°C.
- Pritisnite Ona the dugme UBRZATI, oko the željeni Razina ventilatora (VISOKO ili NISKO) odabrati.
PROZRAČIVATI
- Pritisnite Ona the tipka MODE do the Svjetlosni indikator VENTILATOR svijetli.
- S the dugme UBRZATI može Ona the Brzina ventilatora postaviti. VISOKO i NISKO postati odabrano ciklički (Visoko> Nisko > Visoko).
• The temperatura može ne postaviti postati.
SUHO
- Pritisnite Ona the tipka MODE do the Svjetlosni indikator SUHO svijetli.
- U ovom načinu rada možete postaviti brzinu ventilatora i temperaturu ne postaviti.
- Odvijte čep za pražnjenje posude i otvorite donji čep za pražnjenje.
- Spojite jedan kraj odvodnog crijeva na odvodni otvor do
- Umetnite drugi kraj crijeva a Kanta ili slična posuda.
- Napomena: rastavite na suhom način rada the ispušno crijevo, tamo inače the Performanse oštećena postaje i alarm za punu vodu Čuje se "FL".
natural_image
Line drawing of a server rack with a bucket inserted, showing internal ventilation and connection lines (no text or symbols)mjerač vremena
- U stanju mirovanja možete aktivirati program automatskog uključivanja (1 do 24 sata) pritiskom na tipku TIMER. Upalit će se svjetlo indikatora TIMER-a i zaslon će početi treperiti.
- Kada je klima uređaj uključen, pritisnite tipku TIMER za aktiviranje programa za
BE COOL
automatsko gašenje. Indikator TIMER se pali i zaslon treperi.
NAČINI ODVODNJE
Periodički drenaža
- Ako the Uređaj zaustavlja, jer the Kat kada je puna, isključite je i Vuci the Utikač za napajanje.
- Napomena: Premjestite klima uređaj oprezan, inače može the Voda iznutra prelijevati se.
- Stavite kantu ispod otvora za vodu na stražnjoj strani uređaja.
- Zavrnite čep za otvorite odvod i izvucite čep podnog odvoda, s njim the Voda automatski u spremnik protok može.
Bilješke:
natural_image
Line drawing of a server rack with a bucket being inserted, no text or symbols presentBE COOL
ČIŠĆENJE I ODRŽAVANJE
Prekidač Ona the Uređaj prije čišćenje i Radovi na održavanju od i Vuci Ona the Utikačod the Utičnica za napajanje.
čišćenje
natural_image
Line drawing of a multi-tiered industrial air conditioner unit with ventilation grilles and wheels (no text or symbols)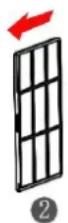
SKLADIŠTENJE
- Odvijte poklopac odvoda i otvorite čep. Ostavi to Ispustite svu preostalu vodu u lavor ili lagano zakrenite uređaj unatrag, oko vode u a spremnik do dovesti.
- Ostavite uređaj u FAN modu (ventilacija) na toplom mjestu pola dana i suha prostor za trčanje, oko Stvaranje plijesni u uređaju spriječiti.
- Prekidač i staviti Ona the Uređaj od, omotati Ona the Kabel za napajanje oko the držač kabela, staviti kapa i Poklopna ploča odvoda opet a.
- Rastaviti Ona the ispušno crijevo i čuvati na sigurnom Ona mu.
- Ukloniti Ona the Baterije od the Daljinski upravljač.
- Pokrijte uređaj plastičnom folijom. Pospremite klima uređaj negdje čist, suha i bez prašine Mjesto, vani the doseg iz djece.
BE COOL
RJEŠAVANJE PROBLEMA
Scan QR code
Registracija
BE COOL
| Tehnički podaci WiFi-ja | |
| Radio tehnologija: | Wi-Fi (WLAN) |
| Radna frekvencija radija | 2412 MHz - 2472 MHz |
| Radna frekvencija BLE- a | 2402 MHz - 2480 MHz |
| Vrsta modulacije | 802.11b: DSSS802.11g: OFDM802.11n (20 MHz) : OFDM |
| Softver s fiksnom frekvencijom | SecureCRT.exe |
| Pojačanje antene | 2,5 dBi |
| Vrsta antene | PCB |
| Prijenosna snaga | :520dBm |
| Tehničke informacije | |
| Broj stavke | BC9KL2201FW |
| Učinkovitost hlađenja | 9000 BTU |
| Potrošnja energije max | 1000 W |
| Ulazni napon | 220-240 V ~ |
| frekvencija | 50 Hz |
| Frekvencija WIFI prijenosa: | 2,4 GHz |
| Snaga prijenosa: | maks. 100 mW |
| Rashladno sredstvo/punjenje/GWP | R290/0,210 kg/3 |
| Energetska učinkovitost EER | 2.6 |
| Klasa energetske učinkovitosti | A |
| Kruženje zraka | 330m3/h |
| Razina buke (snaga zvuka) | 65 dB |
| Težina | 25 kg |
| Dimenzije | 325x295x702 mm |
| Kontakt adrese za dodatne informacije | Schuss Home Electronic GmbHScheringgasse 3, A-1140 BečTel: +43 (1) 97 0 21 – 0Servisna linija: +43 (1) 97 0 21 – 502https://schuss-home.at/FB broj: 236974 t / FB sud: Beč |
BE COOL
| Zahtjevi za informacije za jednocijevne i dvocijevne klima uređaje | P | ||
| Podaci koji identificiraju model(e) na koje se podaci odnose: | |||
| Opis | simbol | Vrijednost | Jedinica |
| Nominalni kapacitet hlađenja | P_rated za hlađenje | 2.569 | kW |
| Nazivna snaga za grijanje | P_rated za grijanje | - | kW |
| Nazivna potrošnja energije za hlađenje | P_EER | 0,963 | kW |
| Nazivna potrošnja energije za grijanje | P_COP | - | kW |
| Nominalni omjer energetske učinkovitosti | EER_d | 2,67 | - |
| Nominalni koeficijent snage | COP_d | - | - |
| Podaci koji identificiraju model(e) na koje se podaci odnose: | |||
| Opis | simbol | Vrijednost | Jedinica |
| Potrošnja energije u isključenom načinu rada termostata | P_TO | N/A | W |
| Potrošnja energije u stanju pripravnosti P | P_SB | 0,87 | W |
| Potrošnja energije jednokanalnih ili dvokanalnih uređaja (zasebno navesti za hlađenje i grijanje) | Q_SD | SD: 0,963(hlađenje) | kWh/h |
| Razina zvučne snage | L_WA | 65 | dB(A) |
| Potencijal globalnog zagrijavanja | GWP | 3 | kgCO2 eq. |
| Kontaktni podaci za daljnje informacije | Schuss Home Electronic GmbHScheringgasse 31140 Beč, AustrijaTelefon: +43 (1) 97 0 21 – 0www.becool.at | ||
BE COOL
JAMČITI
natural_image
White industrial air purifier with blue brick pattern and 'BE COOL' branding (no other text or symbols)CONGRATULATIONS! THANK YOU FOR CHOOSING A PRODUCT FROM BE COOL.
BE COOL


Current operating instructions and other languages
Download the latest operating instructions in various languages via the link www.schuss-home.at/downloads or scan the QR code shown. Follow the instructions on the website.

PLEASE READ THE OPERATING INSTRUCTIONS CAREFULLY BEFORE STARTING ASSEMBLY, INSTALLATION, OPERATION OR MAINTENANCE. PROTECT YOURSELF AND OTHERS BY FOLLOWING THE SAFETY INSTRUCTIONS. FAILURE TO FOLLOW INSTRUCTIONS COULD RESULT IN PERSONAL INJURY AND/OR PROPERTY DAMAGE AND/OR VOID THE WARRANTY!
IMPORTANT SAFETY INFORMATION, LOCATION AND TO THE ELECTRICAL CONNECTION.
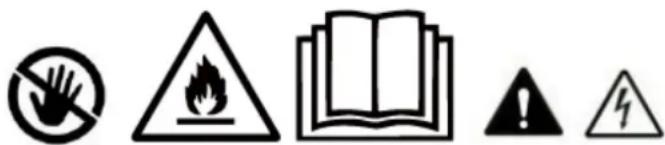
- Please read all instructions carefully before using the appliance.
- Only use this appliance in accordance with the guidelines in the operating instructions. Any other use not recommended by the manufacturer could result in fire, electric shock or personal injury.
- This appliance is intended exclusively for the air conditioning of living spaces in households and must not be used for any other purpose.
- The appliance is not suitable for continuous and precision operation and should not be used for cooling electrical systems (e.g. in server rooms).
- It is forbidden to adapt or modify the characteristics of this appliance in any way and only use spare parts and accessories recommended by the manufacturer (failure to do so will invalidate the guarantee and warranty).
- For any repairs to the appliance, mains plug or cable, always and only contact customer service centers authorized by the manufacturer. You can find the customer service centers online at https://schuss-home.at/.
- Remove the packaging and ensure that the air conditioner is not damaged. If in doubt, do not use the air conditioner and contact the service center or your dealer.
- Keep children away from packaging material. Choking hazard if swallowed!

BE COOL
- If the power supply cable is damaged, it must be replaced by the manufacturer or an authorized service centre in order to avoid all possible risks.
- The appliance must be installed in accordance with local installation and operating regulations for electrical systems.
- The electrical socket into which you connect the appliance must not be defective or loose and must be suitable for the required current load and, above all, reliably earthed. If in doubt, have your electrical installation checked by a qualified electrician.
- Before connecting to the mains, you must check that the type of current and mains voltage match the specifications on the appliance rating plate on the back.
- Avoid using an extension cable, as this could overheat and cause a fire.
-
Do not twist or kink the mains cable.
-
This device may only be used by adults.
- Children under 8 years of age and persons with reduced physical, mental, sensory or intellectual capabilities or lack of experience and knowledge may only use this appliance if they have been given supervision and instruction concerning use of the appliance in a safe way and if the hazards involved have been clearly explained.
- Do not allow children to play with the packaging and make sure that children do not play with the appliance.
- Do not use the air conditioner outdoors.
- Do not use the appliance with wet hands.
- Never operate the appliance in rooms where gas, oil or sulphur are present.
- Do not place the appliance near heat sources (e.g. next to heating systems and gas boilers) and avoid direct sunlight.
- Keep a minimum distance of at least 50 cm from flammable substances (e.g. alcohol, etc.) or pressurized containers (e.g. spray containers).
- Do not use the air conditioner near water or high humidity, e.g. in a damp cellar, next to a swimming pool, bathtub or shower. Ensure that no water enters the appliance.
- Do not place any heavy or hot objects on the appliance and never cover the appliance.
- Never insert fingers, pens or other objects into the appliance and ensure that the air inlet and outlet are never blocked.
- Always switch off the appliance before unplugging the mains plug.
- Do not pull on the mains cable to disconnect the appliance from the mains. Always pull the plug to disconnect the mains cable. Do not touch the plug with wet hands to avoid electric shocks.
- Unplug the appliance when not in use, before cleaning, maintenance or moving from one place to another.
- If the appliance is faulty, switch it off using the on/off button on the control panel and contact the customer hotline.
- Keep the air conditioner in good condition by maintaining and cleaning the appliance.
- The air filter must be cleaned at least once a week.
- Store the appliance upright in a safe, dry place that is inaccessible to children when it is not in use. Do not cover the appliance with plastic packaging.
BE COOL
- Store the appliance in a room without any operating ignition sources (e.g. open fire, an operating gas appliance or an electric heater with an open heat source).
- The air conditioner must be transported in an upright position or slightly on its side. Empty the internal condensation container beforehand. Wait at least one hour after transporting the appliance before switching it on.
- For any repairs to the appliance, the mains plug or the cable, always and only contact customer service centers authorized by the manufacturer.
- Do not use any means to accelerate or eliminate the defrosting process, the appliance will do this automatically.
- If you have any questions about maintenance, you can contact the customer hotline/service center authorized by the manufacturer.
WARNING
The main switch and the On/Off switch should not be used as the sole means of disconnecting the power supply. Always disconnect the mains plug before starting ____ maintenance work or moving the appliance.
To avoid the risk of electric shock, disconnect the plug from the socket when the appliance is not in use and before cleaning.
BE COOL
SPECIFIC INFORMATION ON THE REFRIGERANT R290
- R290 is a refrigerant in accordance with EC environmental regulations.
- The refrigerant is odorless.
- The appliance must be installed in a room where there are no sources of ignition during operation (e.g.: open fire, operating gas and electrical appliances with an open heat source)
- Do not perforate or burn the air conditioner.
- Ensure that the cooling circuit is not drilled into.
- Non-ventilated rooms in which the appliance is installed, operated or stored must be constructed in such a way that any refrigerant losses do not accumulate. This prevents the risk of fire or explosion caused by ignition of the refrigerant by electric ovens, stoves or other ignition sources.
- The device must be stored in such a way that no mechanical damage can occur.
- The persons who work on a refrigeration circuit or carry out interventions must be in possession of a valid certificate issued by an authorized authority, which certifies their expertise in handling refrigerants by means of an assessment specification recognized by the industry associations.
- Repairs must be carried out in accordance with the instructions of the appliance manufacturer. Repair and maintenance work that requires the intervention of other specialist personnel must be carried out under the supervision of the specialist responsible for handling flammable refrigerants.
BE COOL
Recycling, disposal, declaration of conformity
 | RECYCLINGThe packaging materials can be recycled. It is therefore recommended to dispose of them in sorted waste |
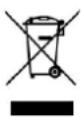 | DISPOSALThe "crossed-out dustbin" symbol requires the separate disposal of waste electrical and electronic equipment (WEEE). Electrical and electronic equipment may contain hazardous and environmentally harmful substances. Therefore, do not dispose of them in unsorted residual waste, but at a designated collection point for waste electrical and electronic equipment. This will help to protect resources and the environment. For further information, please contact your dealer or the local authorities. Directive 2012/19/EU |
 | BATTERY DISPOSALIn accordance with current legislation regarding batteries, accumulators, and related waste, the symbol of the crossed-out bin on the battery indicates that it is prohibited to dispose of used batteries in household waste. Batteries and accumulators contain highly polluting substances. The user is obliged to dispose of used batteries at designated collection points in the municipality or in the appropriate containers. This service is free of charge. In this way, legal requirements are met and the environment is protected.These symbols can be found on batteries:Li = Battery contains lithiumAl = Battery contains alkaliMn = Battery contains manganeseCR 2025 (Li); AA (Al, Mn); AAA (Al, Mn) |
 | DECLARATION OF CONFORMITYWe hereby confirm that this product complies with the essential requirements, regulations and directives of the EU. You can view the detailed declaration of conformity at any time under the following link:https://www.schuss-home.at/downloads |
Errors and technical changes excepted.
BE COOL
SCHEMATIC REPRESENTATION
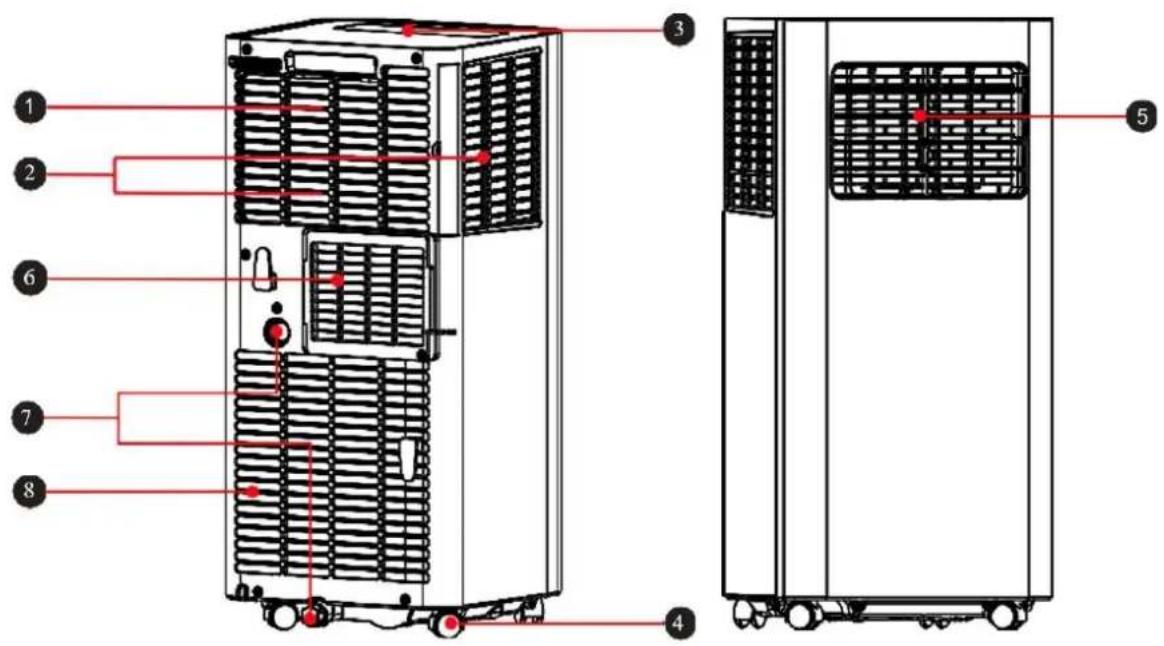
1 Carrying handle
2 Air inlet grille
3 Control panel
4 Castors
5 Adjustable ventilation flaps
6 Exhaust air outlet
7 Water drain
8 Air inlet grille
INSTALLATION AND SETTING
- Caution: Before using the mobile air conditioner for the first time, leave it to stand for at least two hours.
- Only transport and move the device in an upright position.
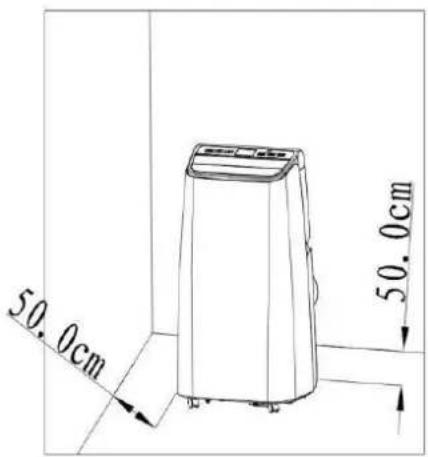
- Place the air conditioner on a level, flat and dry surface and keep a minimum distance of 50 cm around the device to ensure optimum air circulation.
Installing the exhaust air hose
- Screw the exhaust air hose (with adapter) to the exhaust air outlet at the rear of the appliance (counterclockwise, fig. 1).
BE COOL

natural_image
Technical diagram of a mechanical device with internal heat exchangers and a pipe, showing no text or symbols.Fig.1
Window rail installation
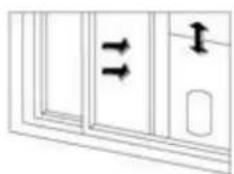
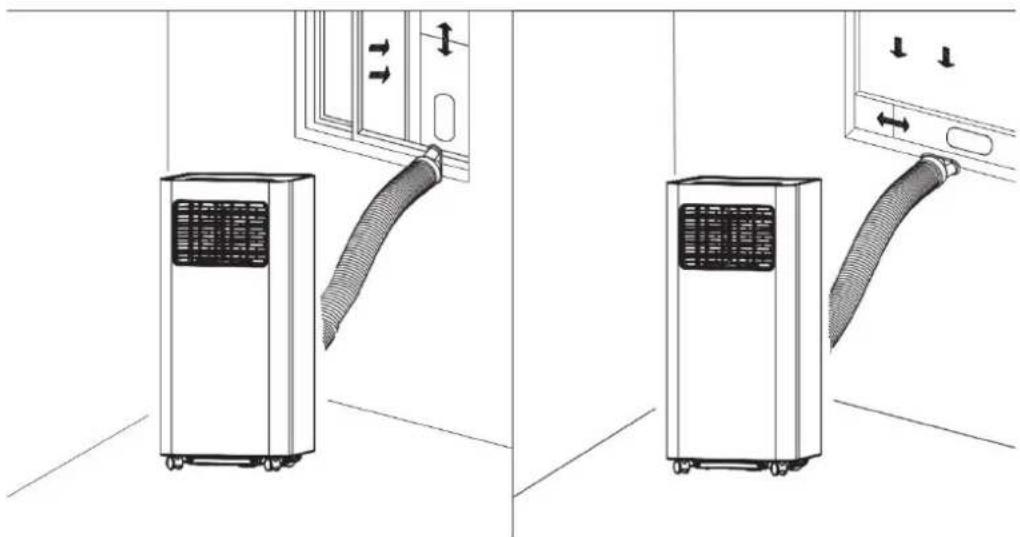
Open the window halfway and attach the window rail to the window frame (see Figures 2 and 3). Installation can be carried out in a horizontal and vertical direction.
- Adjust the window rail to the size of the window by aligning its ends with the window frame and fixing it in place.
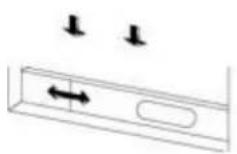
Abb. 2
natural_image
Pure diagram of a door with double-headed arrows indicating direction, no text or symbols presentFig. 3
Installing the air conditioner
Place the appliance with the exhaust air hose fitted near the window. Observe the minimum distance of 50 cm between the appliance and adjacent walls or objects (fig. 4).
BE COOL
Notes:
- The flat end of the exhaust air hose must be properly engaged.
- The air hose must not be twisted or have large bends (more than 45^ ). Do not place any obstacles near the air inlet or air outlet of the system.
- Pull the ends of the exhaust air hose apart and connect the flat end of the connected exhaust air hose to the oval opening on the window rail.
Fig. 4
natural_image
Diagram showing two configurations of a portable air conditioner unit with airflow direction indicators (no text or symbols)Note:
- The exhaust air hose can be extended from 28 cm to 150 cm; its length is designed to fit this product. Do not extend it any further and do not replace it with another hose, as this could negatively affect the function of the air conditioner.
• Always leave the air outlet free to protect the appliance from overheating
BE COOL
CONTROL PANEL AND REMOTE CONTROL
Control panel & remote control
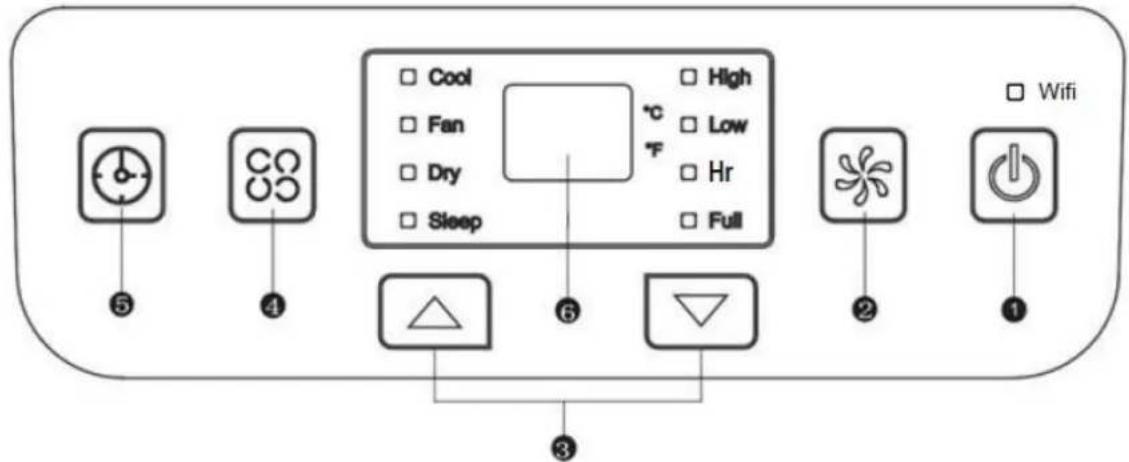
1) On/off button
• To switch the device on and off.
- In cooling or fan mode to select between high and low wind speed.
- The button cannot be used in "Dry" mode as the lowest wind speed is pre-programmed.
3) Up and down buttons
- To adjust the temperature or timer settings (increase/decrease).
- To switch between degrees Celsius and Fahrenheit, press both buttons simultaneously.
4) Operating mode
- To select a mode, press this button, the following modes are available: cool, dry or ventilate.
5) Timer button
- When the air conditioner is switched on, press the button to activate the switch-off timer switch-off program. If the appliance is in sleep mode, the TIMER button activates the automatic switch-on program.
- After pressing the button, the display flashes; the time is set by pressing the up and down buttons.
- The time setting window is between 1 and 24 hours and the adjustment is made at intervals of 1 hour.
BE COOL
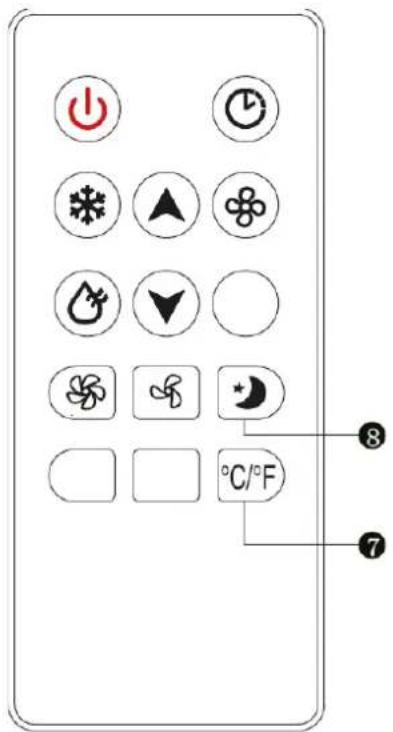
6) Display
7) °C/°F button
- For adjusting the temperature display between ^ and ^ .
8) SLEEP button
- Press this button to select SLEEP mode.
OPERATING INSTRUCTIONS
COOLING
- Press the MODE button until the COOL indicator light lights up on the display.
- Press the UP/DOWN buttons to set the temperature in the range from 16 °C to 30 °C.
- Press the SPEED button to select the desired fan speed (HIGH or LOW).
VENTILATE
- Press the MODE button until the FAN indicator light illuminates.
- You can set the fan speed using the SPEED button. HIGH and LOW are selected cyclically (High> Low> High).
- The temperature cannot be set.
DRYING
- Press the MODE button until the DRY indicator light illuminates.
- You cannot set the fan speed and temperature in this mode.
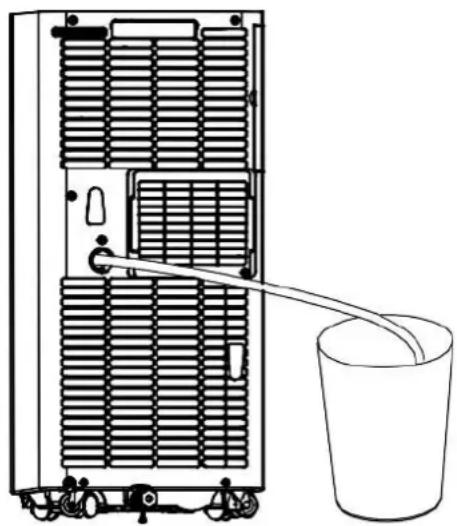
- Unscrew the drain cover of the container and open the bottom drain plug.
- Connect one end of the drainage hose to the drain opening
- Place the other end of the hose in a bucket or similar container. container.
- Note: Please remove the exhaust air hose in dry mode, otherwise the performance will be impaired and the water full alarm "FL" will sound.
natural_image
Line drawing of a server rack with a bucket inserted, showing internal ventilation and scroll wheel (no text or symbols)Timer
- In sleep mode, you can activate the automatic switch-on program (1 to 24 hours) by pressing the TIMER button. The TIMER indicator light lights up and the display starts to flash.
- When the air conditioner is switched on, press the TIMER button to activate the automatic switch-off program. The TIMER indicator light lights up and the display flashes.
BE COOL
DRAINAGE METHODS
Periodic drainage
- If the appliance stops because the floor pan is full, switch it off and unplug it.
- Note: Move the air conditioner carefully, otherwise the water inside may overflow.
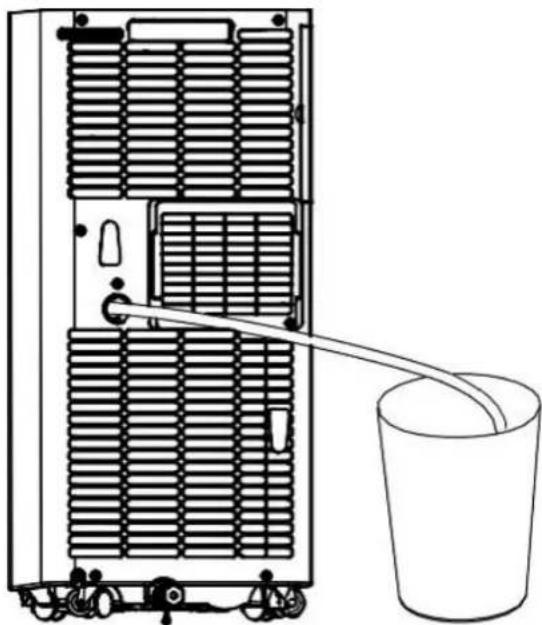
- Place a bucket under the water outlet on the back of the appliance.
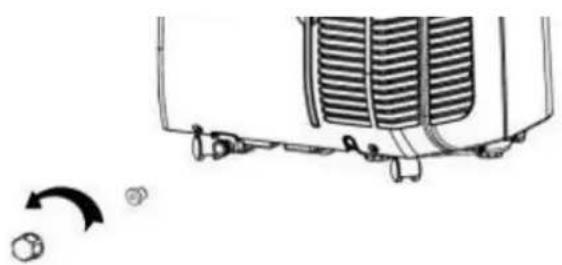
- Unscrew the drain cap and pull the floor drain plug so that the water can flow automatically into the container.
natural_image
Diagram of a vehicle cooling system with cooling unit and directional arrow (no text or symbols)Notes:
- Keep the container drain cover and the plug within reach.
- You can tilt the appliance slightly backwards.
- If the water tank does not absorb all the water at once, close the floor drain plug early enough to prevent water from flowing onto the floor or carpet.
- When no more water is leaking, insert the floor drain plug and close the container drain cover again.
Note: Do not forget to reinsert the floor drain plug before switching the system back on.
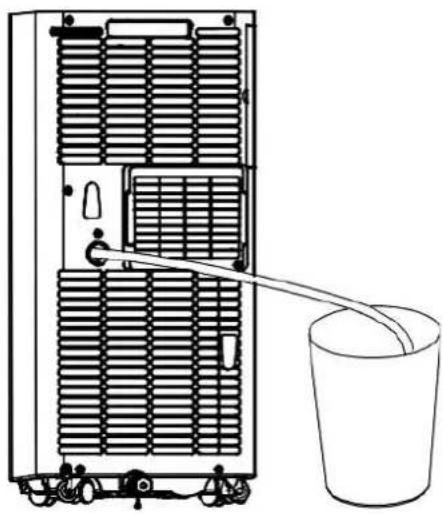
Continuous emptying
- Can only be used in cooling and dehumidifying mode.
- Unscrew the container drain cover and open the floor drain plug.
- Connect one end of the drainage hose to the drain opening
- Place the other end of the hose in a bucket.
natural_image
Line drawing of a refrigerator with a bucket pouring liquid from its side panel (no text or symbols)BE COOL
CLEANING AND MAINTENANCE
Switch off the appliance before cleaning and maintenance work and remove the plug from the socket.
Cleaning
- Wipe the device with a slightly damp, soft cloth. Do not use any chemical solvents such as gas, alcohol or similar.
- If the appliance is very dirty, also use a little neutral detergent.
Maintenance
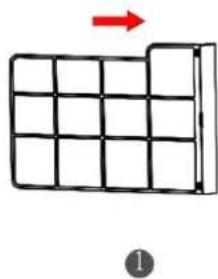
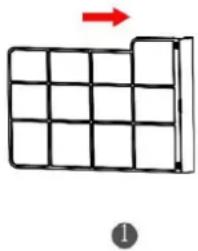
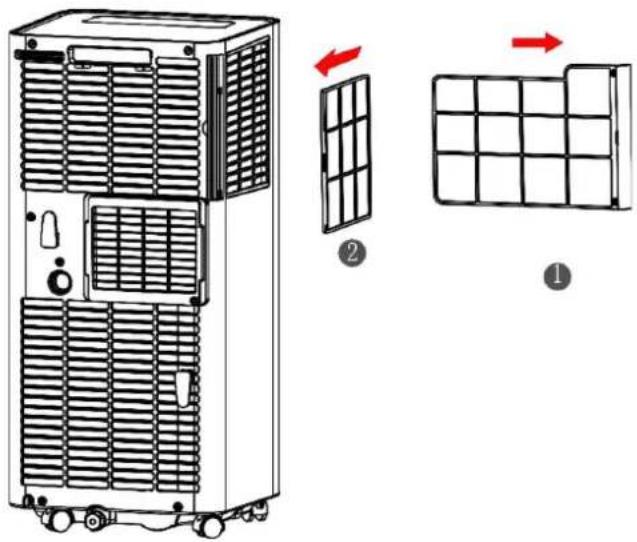
If the filter frame and filter are dusty, the performance of the air conditioner will be reduced. Clean the filter every two weeks.
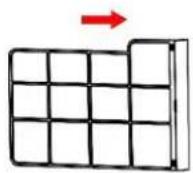
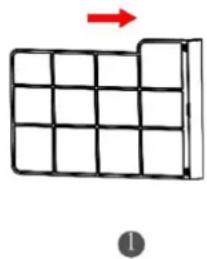
- Carefully pull out the filter frames by the handle in the direction of the arrow, as shown in the picture.
- First remove filter unit 1 and then filter unit 2.
- Wash the air filter by carefully soaking it in warm water (approx. 40 °C) with a neutral detergent. Rinse the filter and leave it to dry in a shady place.
- Replace the filter after cleaning.
- Insert filter unit 2 first, and then filter unit 1.
STORAGE
- Unscrew the drain cover and open the cap. Drain all the residual water into a basin or swivel the appliance slightly backwards to direct the water into a container.
- Leave the appliance running in FAN mode (ventilate) for half a day in a warm and dry room to prevent mold from forming in the appliance.
- Switch off and unplug the appliance, wrap the power cable around the cable holder and replace the cap and drain cover plate.
• Dismantle the exhaust air hose and store it. - Remove the batteries from the remote control.
- Cover the appliance with a plastic film. Store the air conditioner in a clean, dry and dust-free place, out of the reach of children.
BE COOL
TROUBLESHOOTING
| Problem | Possible cause | Solution |
| E1 is displayed | Fault in the exhaust air hose system temperature sensor | Check the sensor and the affected circuit |
| E2 is displayed | Room temperature error Sensor | Check the sensor and the affected circuit |
| E4 is displayed | Protection against freezing | The ambient temperature must exceed 8°C. |
| The device does not work | No power | Insert the plug and switch on the device |
| Display shows FL | Empty the water tank | |
| It's not cold enough | Direct sunlight | Close the curtains |
| Doors and windows are open, the room is full of people or there are other heat sources. sources | Close doors and windows or add another air conditioning unit | |
| The filters are dirty | Clean or replace the Filter | |
| Air inlet/air outlet is obstructed stuffs | Remove all Foreign body | |
| The noise level is too high | The cooling unit is uneven po positioned | Set the device on a level surface |
| The compressor is not working | The overheating protection is active | Allow the appliance to cool down for 3 minutes before you switch it on again |
- Do not attempt to disassemble or repair the appliance yourself. Unqualified attempts to repair the appliance may result in serious personal injury or considerable material damage and will invalidate any warranty claims.
- If problems occur that are unknown or the recommended solution does not work, please contact a specialist.
BE COOL
Smart Home Wi-Fi Connection Guide
IMPORTANT
Please note that only 2.4GHz networks are supported!
Transmission power: max. 100mW
App installation
Download the "Smart life" app from the Play Store (Android) or the App Store (iOS). The following QR code will take you directly to the app download:

Scan QR code
Registration
If you do not yet have a Smart Life account, you can register or log in with a verification code that will be sent to you via SMS.
To register:
- Navigate to the registration area in the app.
- The system will automatically detect your country or region. You also have the option of selecting the country code manually. Enter your mobile phone number or email address and tap "Continue."
- If you choose the mobile phone number option, enter the verification code you received via SMS. Then set a password and tap "Confirm" to complete the registration.
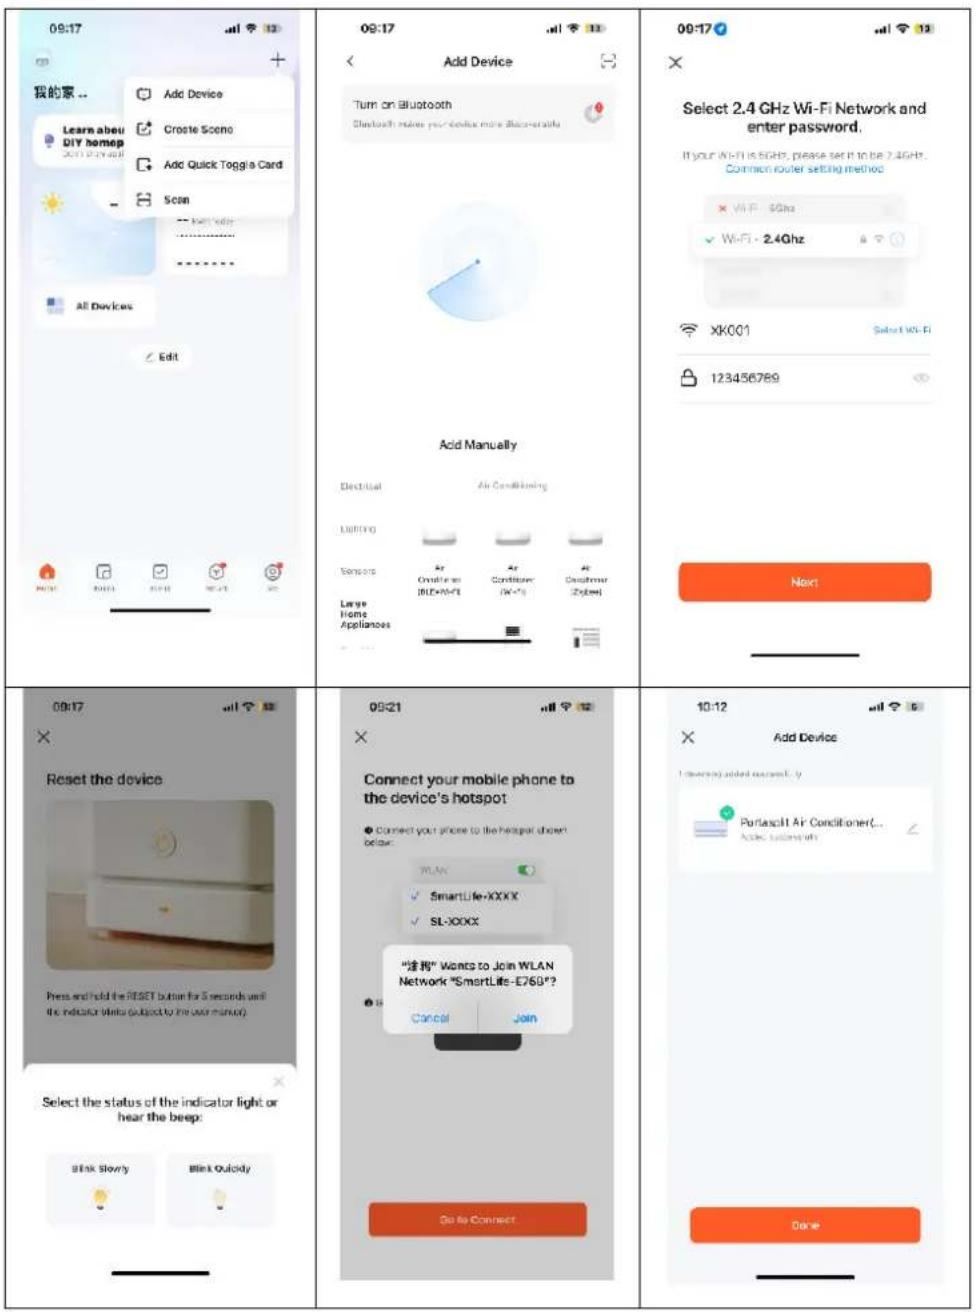
Adding a device manually:
- When the air conditioner is in standby mode, press and hold the FAN button on the control panel for 3 seconds to enter Wi-Fi connection mode. The Wi-Fi signal light will start flashing.
- Open the Smart Home app and tap "+" in the upper right corner to add a new device via the network.
- Make sure the operating light is flashing, tap "Confirm" that the light is flashing, and follow the instructions on the screen.
- Select the Wi-Fi network (note: the network must be in the 2.4 GHz band) and enter the password. The device will start the pairing process and connect to the app.
- Once the device has been successfully configured, the air conditioner will be displayed on the Smart Home page. Tap on it to access the device controls.
BE COOL
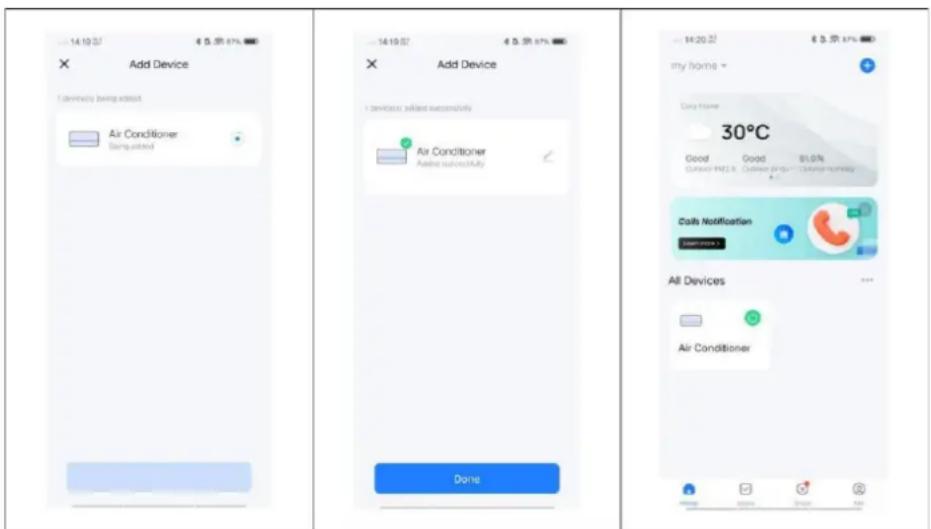
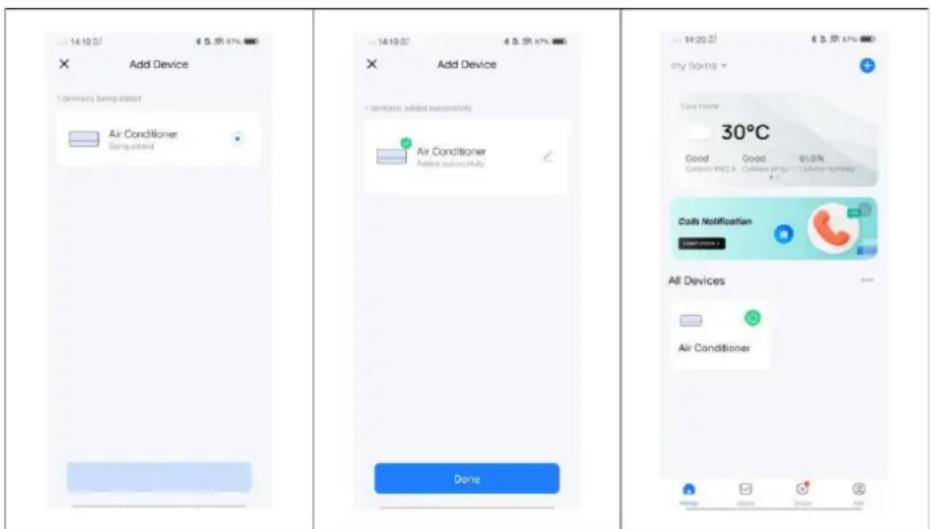
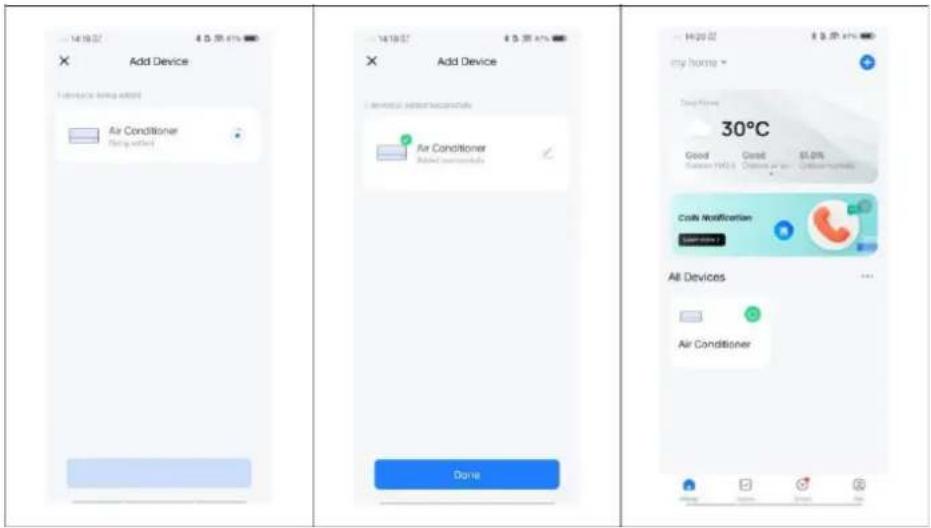
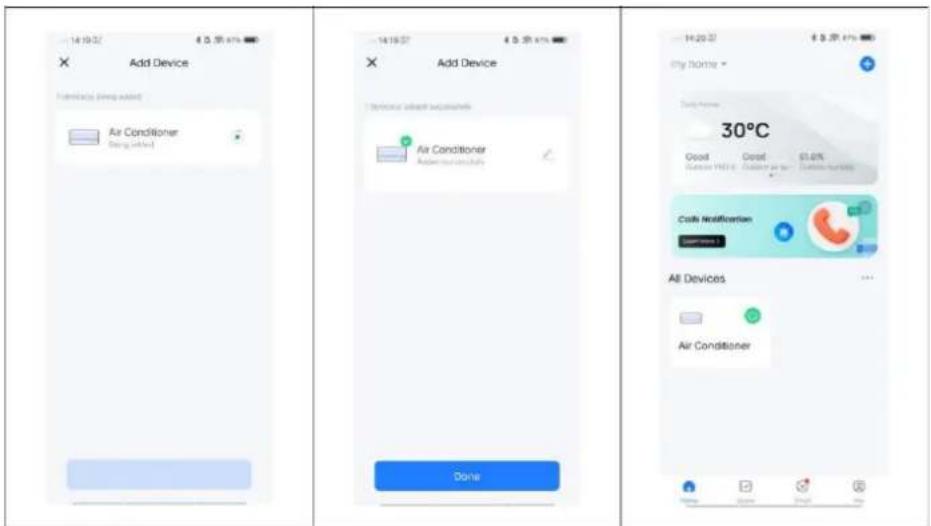
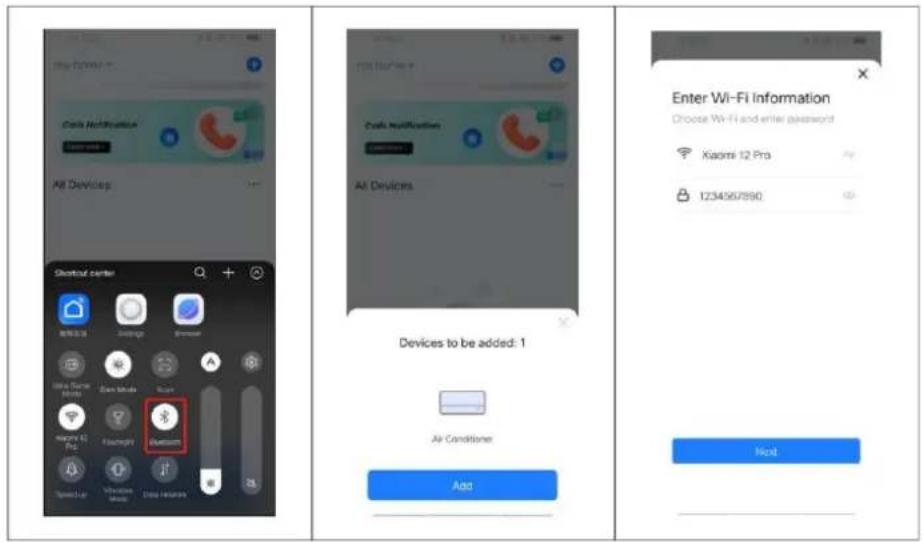
Adding a device automatically
- Make sure the device is in standby mode before connecting.
- Press the "FAN" button for 3 seconds to switch to Wi-Fi connection mode, and the Wi-Fi signal light will start flashing.
■ Activate Bluetooth on your phone. - Open the app and wait a moment until the device is automatically detected and displayed.
- Click the "Add" button to connect.
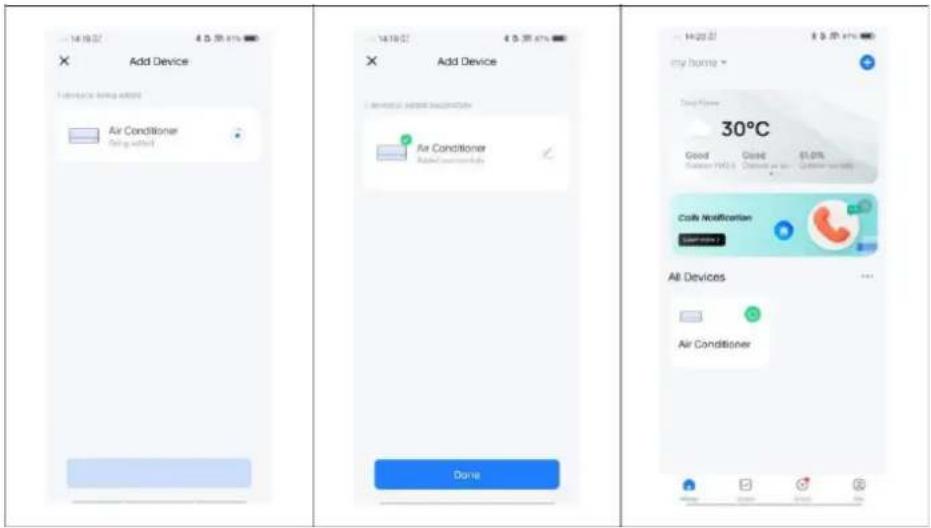
- Enter the WiFi SSID (WiFi connection name), enter the WiFi password, and click "Next" to continue with the setup. (Note: The network must be in the 2.4 GHz band.)
- When the progress bar is complete, the device pairing interface will be displayed and the device will be successfully connected.
- Click the "Done" button to go to the device control interface.
BE COOL
The application also works with Amazon Alexa and Google Assistant.

WORKS WITH amazon alexa

works with the Google Assistant
BE COOL
| Technical Specifications WiFi | |
| Wireless technology: | WiFi (WLAN) |
| Radio operating frequency | 2412MHz-2472MHz |
| BLE operating frequency | 2402 MHz–2480 MHz |
| Modulation type | 802.11b: DSSS802.11g: OFDM802.11n (20 MHz): OFDM |
| Fixed frequency software | SecureCRT.exe |
| Antenna gain | 2.5 dBi |
| Antenna type | PCB |
| Transmission power | :520dBm |
| Technical information | |
| Item number | BC9KL2201FW |
| Cooling capacity | 9,000BTU |
| Max. Power consumption | 1000W |
| Input voltage | 220-240V~ |
| Frequency | 50Hz |
| WIFI transmission frequency: | 2.4 GHz |
| Transmitting power: | max. 100 mW |
| Refrigerant/charge/GWP | R290/0.210kg/3 |
| Energy efficiency EER | 2.6 |
| Energy efficiency class | A |
| Air circulation | 330m3/h |
| Noise level (sound power) | 65dB |
| Weight | 25kg |
| Dimensions | 325x295x702mm |
| Contact addresses for further information | Schuss Home Electronic GmbHScheringgasse 3, A-1140 ViennaTel: +43 (1) 97 0 21 - 0Service line: +43 (1) 97 0 21 - 502https://schuss-home.at/FB-No.: 236974 t / FB-Court: Vienna |
BE COOL
| Information requirements for single duct and double duct air conditionier | P | ||
| Information to identify the model(s) to which the information relates to: | |||
| Description | Symbol | Value | Unit |
| Rated capacity for cooling | P_rated for cooling | 2.569 | kW |
| Rated capacity for heating | P_rated for heating | - | KW |
| Rated power input for cooling | P_EER | 0.963 | kW |
| Rated power input for heating | P_COP | - | kW |
| Rated Energy efficiency ratio | EER_d | 2.67 | - |
| Rated Coefficient of performance | COP_d | - | - |
| Information to identify the model(s) to which the information relates to: | |||
| Description | Symbol | Value | Unit |
| Power consumption in thermostat-off mode | P_TO | N/A | W |
| Power consumption in standby P mode | P_SB | 0.87 | W |
| Electricity consumption of single/double duct appliances (indicate for cooling and heating separately) | Q_SD | SD: 0.963 (cooling) | kWh/h |
| Sound power level | L_WA | 65 | dB(A) |
| Global warming potential | GWP | 3 | kgCO2 eq. |
| Contact details for obtaining more information | Schuss Home Electronic GmbH Scheringgasse 31140 Vienna, AustriaTel.: +43 (1) 97 0 21 – 0www.becool.at | ||
BE COOL
WARRANTY
With this quality product from BE COOL, you have made a decision for innovation, durability and reliability.
For this BE COOL appliance we grant a warranty period of 2 years from the date of purchase valid in Austria!
If, contrary to expectations, service work on your device should nevertheless be necessary during this period, we hereby guarantee you a free repair (spare parts and labor) or (at Schuss's discretion) replacement of the product. If neither repair nor replacement is possible for economic reasons, we reserve the right to issue a time value credit note.
In the case of air conditioners, please always contact the customer hotline as a first step (see sticker on the appliance or the front page of the operating instructions); in the case of fans, please contact your specialist dealer or us directly. Please note that repair work not carried out by an authorized workshop in Austria will immediately invalidate this warranty.
This guarantee does not cover
- Repair or replacement of parts due to normal wear and tear
- Damage due to non-compliance with the operating instructions
Devices that are used - even partially - for commercial purposes
• devices mechanically damaged by external influences (fall, impact, breakage, improper use, etc.) as well as signs of wear and tear of an aesthetic nature.
• Devices that have been handled improperly
• Devices that have not been opened by our authorized service workshop.
• Damage caused by improperly closed condensation drain valves on air conditioning units or incorrectly inserted water tanks. - Unfulfilled consumer expectations.
• Damage caused by force majeure, water, lightning, overvoltage. - Devices where the type designation and/or serial number on the device has been changed, deleted, made illegible or removed.
- services outside our authorized workshops, the transport costs to an authorized workshop or to us and back, as well as the associated risks.
We would like to emphasize that within the warranty period, a lump sum of € 60,- (indexed based on CPI 2010, June 2015) will be charged for operating errors or if no error was detected.
The provision of a warranty service (repair or replacement of the device) does not extend the absolute warranty period of 2 years from the date of purchase.
The 2-year guarantee is only valid on presentation of the proof of purchase (must include the name and address of the dealer and the full name of the appliance) and the corresponding guarantee certificate, on which the appliance type and the serial number (visible on the box and on the back or underside of the appliance) must be noted! Without the warranty certificate, only the statutory warranty applies!
We expressly point out that the statutory warranty rights are not affected by this guarantee and remain unaffected.
Schuss Home Electronic GmbH and its vicarious agents shall only be liable for damages in the event of gross negligence or intent. Liability for loss of profit, expected but unrealized savings, consequential damages and damages from third party claims is excluded. Damage to or for recorded data is always excluded from the liability for damages.
Congratulations on your choice. We hope you enjoy using your BE COOL appliance!
ADDRESS
Schuss Home Electronic GmbH
1140 Vienna, Scheringgasse 3
Tel.: +43 (0)1/ 970 21
Type designation: ....
Serial number: ....
In the event of a warranty claim, this warranty certificate must be handed over together with the device to the authorized service workshop or the dealer from whom you purchased the device!
BE COOL
WICHTIG!
These instructions are only for the BE COOL-Service center!
A Service or repairing of the device must only be performed by a qualified technician who is allowed to handle the R290 refrigerant.
Do not attempt to repair or open the case of the air conditioner yourself, this leads to the immediate loss oft he warranty.
INSTRUCTIONS FOR REPAIRING APPLIANCES CONTAINING R290
1 GENERAL INSTRUCTIONS
1.1 Checks to the area
Prior to beginning work on systems containing flammable refrigerants, safety checks are necessary to ensure that the risk of ignition is minimized. For repair to the refrigerating system, the following precautions shall be complied with prior to con-ducting work on the system.
1.2 Work procedure
Work shall be undertaken under a controlled procedure so as to minimize the risk of a flammable gas or vapor being present while the work is being performed.
1.3 General work area
All maintenance staff and others working in the local area shall be instructed on the nature of work being carried out. Work in confined spaces shall be avoided. The area around the workspace shall be sectioned off. Ensure that the conditions within the area have been made safe by control of flammable material.
1.4 Checking for presence of refrigerant
The area shall be checked with an appropriate refrigerant detector prior to and during work, to ensure the technician is aware of potentially flammable atmospheres. Ensure that the leak section equipment being used is suitable for use with flammable refrigerants, i.e. non sparking, adequately sealed or intrinsically safe.
1.5 Presence of fire extinguisher
If any hot work is to be conducted on the refrigeration equipment or any associated parts, appropriate fire extinguishing equipment shall be available to hand. Have a dry powder or CO 2 fire extinguisher adjacent to the charging area.
1.6 No ignition sources
BE COOL
No person carrying out work in relation to a refrigeration system which involves exposing any pipe work that contains or has contained flammable refrigerant shall use any sources of ignition in such a manner that it may lead to the risk of fire or explosion. All possible ignition sources, including ecigarette smoking, should be kept sufficiently far away from the site of installation, repairing, removing and disposal, during which flammable refrigerant can possibly be released to the surrounding space. Prior to work taking place, the area around the equipment is to be surveyed to make sure that there are no flammable hazards or ignition risks. "No Smoking" signs shall be displayed.
1.7 Ventilated area
Ensure that the area is in the open or that it is adequately ventilated before breaking into the system or conducting any hot work. A degree of ventilation shall continue during the period that the work is carried out. The ventilation should safely disperse any released refrigerant and preferably expel it externally into the atmosphere.
1.8 Checks to the refrigeration equipment
Where electrical components are being changed, they shall be fit for the purpose and to the correct specification. At all times the manufacturer's maintenance and service guidelines shall be followed. If in doubt consult the manufacturer's technical department for assistance. The following checks shall be applied to installations using flammable refrigerants: the charge size is in accordance with the room size within which the refrigerant containing parts are installed; the ventilation machinery and outlets are operating adequately and are not obstructed; if an indirect refrigerating circuit is being used, the secondary circuit shall be checked for the presence of refrigerant; marking to the equipment continues to be visible and legible. Markings and signs that are illegible shall be corrected; refrigeration pipe or components are installed in a position where they are unlikely to be exposed to any substance which may corrode refrigerant containing components, unless the components are constructed of materials which are inherently resistant to being corroded or are suitably protected against being so corroded.
1.9 Checks to electrical devices
Repair and maintenance to electrical components shall include initial safety checks and component inspection procedures. If a fault exists that could compromise safety, then no electrical supply shall be connected to the circuit until it is satisfactorily dealt with. If the fault cannot be corrected immediately but it is necessary to continue operation, an adequate temporary solution shall be used. This shall be reported to the owner of the equipment so all parties are advised.
Initial safety checks shall include: Those capacitors are discharged: this shall be done in a safe manner to avoid possibility of sparking; that there no live electrical components and wiring are exposed while charging, recovering or purging the system; that there is continuity of earth bonding.
2 REPAIRS TO SEALED COMPONENTS
2.1 During repairs to sealed components, all electrical supplies shall be disconnected from the equipment being worked upon prior to any removal of sealed covers, etc. If it is absolutely necessary to have an electrical supply to equipment during servicing, then a permanently operating form of leak detection shall be located at the most critical point to warn of a potentially hazardous situation.
2.2 Particular attention shall be paid to the following to ensure that by working on electrical components, the casing is not altered in such a way that the level of protection is affected.
This shall include damage to cables, excessive number of connections, terminals not made to original specification, damage to seals, incorrect fitting of glands, etc. Ensure that apparatus is mounted securely. Ensure that seals or sealing materials have not degraded such that they no longer serve the purpose of preventing the ingress of flammable atmospheres. Replacement parts shall be in accordance with the manufacturer's specifications.
NOTE The use of silicon sealant may inhibit the effectiveness of some types of leak detection equipment. Intrinsically safe components do not have to be isolated prior to working on them.
3 REPAIR TO INTRINSICALLY SAFE COMPONENTS
BE COOL
Do not apply any permanent inductive or capacitance loads to the circuit without ensuring that this will not exceed the permissible voltage and current permitted for the equipment in use.
Intrinsically safe components are the only types that can be worked on while live in the presence of a flammable atmosphere. The test apparatus shall be at the correct rating. Replace components only with parts specified by the manufacturer. Other parts may result in the ignition of refrigerant in the atmosphere from a leak.
4 CABLING
Check that cabling will not be subject to wear, corrosion, excessive pressure, vibration, sharp edges or any other adverse environmental effects. The check shall also take into account the effects of aging or continual vibration from sources such as compressors or fans.
5 DETECTION OF FLAMMABLE REFRIGERANTS
Under no circumstances shall potential sources of ignition be used in the searching for or detection of refrigerant leaks. A halide torch (or any other detector using a naked flame) shall not be used.
6 LEAK DETECTION METHODS
The following leak detection methods are deemed acceptable for systems containing flammable refrigerants. Electronic leak detectors shall be used to detect flammable refrigerants, but the sensitivity may not be adequate, or may need recalibration. (Detection equipment shall be calibrated in a refrigerant-free area.) Ensure that the detector is not a potential source of ignition and is suitable for the refrigerant used. Leak detection equipment shall be set at a percentage of the LFL of the refrigerant and shall be calibrated to the refrigerant employed and the appropriate percentage of gas (25 % maximum) is confirmed. Leak detection fluids are suitable for use with most refrigerants but the use of detergents containing chlorine shall be avoided as the chlorine may react with the refrigerant and corrode the copper pipe-work. If a leak is suspected, all naked flames shall be removed/extinguished. If a leakage of refrigerant is found which requires brazing, all of the refrigerant shall be recovered from the system, or isolated (by means of shut off valves) in a part of the system remote from the leak. Oxygen free nitrogen (OFN) shall then be purged through the system both before and during the brazing process.
7 REMOVAL AND EVACUATION
When breaking into the refrigerant circuit to make repairs – or for any other purpose – conventional procedures shall be used. However, it is important that best practice is followed since flammability is a consideration. The following procedure shall be adhered to: remove refrigerant; purge the circuit with inert gas; evacuate; purge again with inert gas; open the circuit by cutting or brazing. The refrigerant charge shall be recovered into the correct recovery cylinders. The system shall be “flushed” with OFN to render the unit safe. This process may need to be repeated several times. Compressed air or oxygen shall not be used for this task. Flushing shall be achieved by breaking the vacuum in the system with OFN and continuing to fill until the working pressure is achieved, then venting to atmosphere, and finally pulling down to a vacuum. This process shall be repeated until no refrigerant is within the system. When the final OFN charge is used, the system shall be vented down to atmospheric pressure to enable work to take place. This operation is absolutely vital if brazing operations on the pipework are to take place.
Ensure that the outlet for the vacuum pump is not close to any ignition sources and there is ventilation available.
8 CHARGING PROCEDURES
In addition to conventional charging procedures, the following requirements shall be followed.
- Ensure that contamination of different refrigerants does not occur when using charging equipment. Hoses or lines shall be as short as possible to minimize the amount of refrigerant contained in them.
- Cylinders shall be kept upright.
- Ensure that the refrigeration system is earthed prior to charging the system with refrigerant.
- Label the system when charging is complete (if not already).
• Extreme care shall be taken not to overfill the refrigeration system. - Prior to recharging the system it shall be pressure tested with OFN. The system shall be leak Tested on completion of charging but prior to commissioning. A follow up leak test shall be Carried out prior to leaving the site.
9 DECOMMISSIONING
Before carrying out this procedure, it is essential that the technician is completely familiar with the equipment and all its detail. It is recommended good practice that all refrigerants are recovered safely. Prior to the task being carried
BE COOL
out, an oil and refrigerant sample shall be taken in case analysis is required prior to re-use of reclaimed refrigerant. It is essential that electrical power is available before the task is commenced.
- Become familiar with the equipment and its operation.
- Isolate system electrically.
- Before attempting the procedure ensure that :mechanical handling equipment is available, if required, for handling refrigerant cylinders; all personal protective equipment is available and being used correctly; the recovery process is supervised at all times by a competent person; recovery equipment and cylinders conform to the appropriate standards.
- Pump down refrigerant system, if possible.
- If a vacuum is not possible, make a manifold so that refrigerant can be removed from various parts of the system.
- Make sure that cylinder is situated on the scales before recovery takes place.
- Start the recovery machine and operate in accordance with manufacturer's instructions.
- Do not overfill cylinders. (No more than 80 % volume liquid charge).
- Do not exceed the maximum working pressure of the cylinder, even temporarily.
- When the cylinders have been filled correctly and the process completed, make sure 11. that the cylinders and the equipment are removed from site promptly and all isolation
- valves on the equipment are closed off.
- Recovered refrigerant shall not be charged into another refrigeration system
- unless it has been cleaned and checked.
10 LABELLING
Equipment shall be labelled stating that it has been de-commissioned and emptied of refrigerant. The label shall be dated and signed. Ensure that there are labels on the equipment stating the equipment contains flammable refrigerant.
11 RECOVERY
When removing refrigerant from a system, either for servicing or decommissioning, it is recommended good practice that all refrigerants are removed safely. When transferring refrigerant into cylinders, ensure that only appropriate refrigerant recovery cylinders are employed. Ensure that the correct number of cylinders for holding the total system charge is available. All cylinders to be used are designated for the recovered refrigerant and labelled for that refrigerant (i.e. special cylinders for the recovery of refrigerant). Cylinders shall be complete with pressure relief valve and associated shut-off valves in good working order. Empty recovery cylinders are evacuated and, if possible, cooled before recovery occurs.
The recovery equipment shall be in good working order with a set of instructions concerning the equipment that is at hand and shall be suitable for the recovery of flammable refrigerants. In addition, a set of calibrated weighing scales shall be available and in good working order. Hoses shall be complete with leak-free disconnect couplings and in good condition. Before using the recovery machine, check that it is in satisfactory working order, has been properly maintained and that any associated electrical components are sealed to prevent ignition in the event of a refrigerant release. Consult manufacturer if in doubt.
The recovered refrigerant shall be returned to the refrigerant supplier in the correct recovery cylinder, and the relevant Waste Transfer Note arranged. Do not mix refrigerants in recovery units and especially not in cylinders.
If compressors or compressor oils are to be removed, ensure that they have been evacuated to an acceptable level to make certain that flammable refrigerant does not remain within the lubricant. The evacuation process shall be carried out prior to returning the compressor to the suppliers. Only electric heating to the compressor body shall be employed to accelerate this process. When oil is drained from a system, it shall be carried out safely.
Competence of service personnel
General
Special training additional to usual refrigerating equipment repair procedures is required when equipment with flammable refrigerants is affected.
In many countries, this training is carried out by national training organizations that are accredited to teach the relevant national competency standards that may be set in legislation. The achieved competence should be documented by a certificate.
BE COOL
Training
The training should include the substance of the following:
Information about the explosion potential of flammable refrigerants to show that flammables may be dangerous when handled without care.
Information about potential ignition sources, especially those that are not obvious, such as lighters, light switches, vacuum cleaners, electric heaters.
Information about the different safety concepts:
Unventilated – (see Clause GG.2) Safety of the appliance does not depend on ventilation of the housing. Switching off the appliance or opening of the housing has no significant effect on the safety. Nevertheless, it is possible that leaking refrigerant may accumulate inside the enclosure and flammable atmosphere will be released when the enclosure is opened.
Ventilated enclosure – (see Clause GG.4) Safety of the appliance depends on ventilation of the housing. Switching off the appliance or opening of the enclosure has a significant effect on the safety. Care should be taken to ensure a sufficient ventilation before.
Ventilated room – (see Clause GG.5) Safety of the appliance depends on the ventilation of the room. Switching off the appliance or opening of the housing has no significant effect on the safety. The ventilation of the room shall not be switched off during repair procedures. Information about the concept of sealed components and sealed enclosures according to IEC 60079-15:2010.
Information about the correct working procedures:
1. Commissioning
o Ensure that the floor area is sufficient for the refrigerant charge or that the ventilation duct is assembled in a correct manner.
o Connect the pipes and carry out a leak test before charging with refrigerant.
o Check safety equipment before putting into service.
2. Maintenance
o Portable equipment shall be repaired outside or in a workshop specially equipped for servicing units with flammable refrigerants.
o Ensure sufficient ventilation at the repair place.
Be aware that malfunction of the equipment may be caused by refrigerant loss and a refrigerant leak is possible.
Discharge capacitors in a way that won't cause any spark. The standard procedure to short circuit the capacitor terminals usually creates sparks.
o Reassemble sealed enclosures accurately. If seals are worn, replace them.
o Check safety equipment before putting into service.
- Repair o Portable equipment shall be repaired outside or in a workshop specially equipped for servicing units with flammable refrigerants.
o Ensure sufficient ventilation at the repair place.
o Be aware that malfunction of the equipment may be caused by refrigerant loss and a refrigerant leak is possible.
o Discharge capacitors in a way that won't cause any spark.
When brazing is required, the following procedures shall be carried out in the right order:
- Remove the refrigerant. If the recovery is not required by national regulations, drain the refrigerant to the outside. Take care that the drained refrigerant will not cause any danger. In doubt, one person should guard the outlet. Take special care that drained refrigerant will not float back into the building.
• Evacuate the refrigerant circuit.
- Purge the refrigerant circuit with nitrogen for 5 min.
- Evacuate again.
- Remove parts to be replaced by cutting, not by flame.
• Purge the braze point with nitrogen during the brazing procedure.
- Carry out a leak test before charging with refrigerant.
• Reassemble sealed enclosures accurately. If seals are worn, replace them.
- Check safety equipment before putting into service.
BE COOL
- Decommissioning o If the safety is affected when the equipment is put out of service, the refrigerant charge shall be removed before decommissioning.
o Ensure sufficient ventilation at the equipment location.
o Be aware that malfunction of the equipment may be caused by refrigerant loss and a refrigerant leak is possible.
o Discharge capacitors in a way that won't cause any spark.
Remove the refrigerant. If the recovery is not required by national regulations, drain the refrigerant to the outside. Take care that the drained refrigerant will not cause any danger. In doubt, one person should guard the outlet. Take special care that drained refrigerant will not float back into the building.
o Evacuate the refrigerant circuit.
o Purge the refrigerant circuit with nitrogen for 5 min.
o Evacuate again.
o Fill with nitrogen up to atmospheric pressure.
o Put a label on the equipment that the refrigerant is removed.
- Disposal o Ensure sufficient ventilation at the working place.
Remove the refrigerant. If the recovery is not required by national regulations, drain the refrigerant to the outside. Take care that the drained refrigerant will not cause any danger. In doubt, one person should guard the outlet. Take special care that drained refrigerant will not float back into the building.
o Evacuate the refrigerant circuit.
o Purge the refrigerant circuit with nitrogen for 5 min.
o Evacuate again.
o Cut out the compressor and drain the oil.
Transportation, marking and storage for units that employ flammable refrigerants
Transport of equipment containing flammable refrigerants
Attention is drawn to the fact that additional transportation regulations may exist with respect to equipment containing flammable gas. The maximum number of pieces of equipment or the configuration of the equipment, permitted to be transported together will be determined by the applicable transport regulations.
Marking of equipment using signs
Signs for similar appliances used in a work area generally are addressed by local regulations and give the minimum requirements for the provision of safety and/or health signs for a work location.
All required signs are to be maintained and employers should ensure that employees receive suitable and sufficient instruction and training on the meaning of appropriate safety signs and the actions that need to be taken in connection with these signs.
The effectiveness of signs should not be diminished by too many signs being placed together. Any pictograms used should be as simple as possible and contain only essential details.
Disposal of equipment using flammable refrigerants See national regulations.
Storage of equipment/appliances
The storage of equipment should be in accordance with the manufacturer's instructions. Storage of packed (unsold) equipment Storage package protection should be constructed such that mechanical damage to the equipment inside the package will not cause a leak of the refrigerant charge. The maximum number of pieces of equipment permitted to be stored together will be determined by local regulations.
BE COOL
EU-DECLARATION OF CONFORMITY
SCHUSS HOME ELECTRONIC
This declaration of conformity is issued under the sole responsibility of the manufacturer.
Schuss Home Electronic GmbH
Scheringgasse 3
1140 Wien, AUSTRIA
Declares, that the product
Manufacturer
Hersteller
is conformity with following directives, norms and/or regulations:
DIRECTIVE 2014/53/EU OF THE EUROPEAN PARLIAMENT AND OF THE COUNCILof 16 April 2014
on the harmonisation of the laws of the Member States relating to the making available on the market of radio equipment and repealing Directive 1999/5/EC EU L 153/62 22.5.2014
Article 3.1(a) Safety:
EN 60335-2-40:2003+A11:2004+A12:2005+A1:2006+A2:2009+A13:2012
EN 60335-1:2012+A11:2014+A13:2017+A1:2019+A14:2019+A2:2019
EN62233: 2008
Article 3.1(a) Health:
EN 50665:2017, EN 62311:2008
Article 3.1(b) EMC:
EN 301 489-1 V2.2.3
EMC Directive (EMC): 2014/30/EU Directive of the European Parliament and of the Council of 26 February 2014 on the harmonisation of the laws of the Member States relating to electromagnetic compatibility; Official Journal of the EU L96, 29/03/2014, p. 79–106
Low Voltage Directive (LVD):2014/35/EU Directive of the European Parliament and of the Council of 26 February 2014 on the harmonisation of the laws of the Member States relating to the making available on the market of electrical equipment designed for use within certain voltage limits; Official Journal of the EU L96, 29/03/2014, p. 357–374
Ökodesign-Richtlinie Energy-Related-Products-Directive (ErP)2009/125/EC;
Official Journal EU L285/10-35 (31.10.2009) and associated regulation 2015/1188
RoHS Directive: 2011/65/EU Directive of the European Parliament and of the Council of 8 June 2011 on the restriction of the use of certain hazardous substances in electrical and electronic equipment; Official Journal of the EU L174, 1/07/2011, p. 88–110
Reach SVHC(EC)NO. 1907/2006 Schuss Home Electronic GmbH hereby confirms that in the products we supply, there are no substances of very high concern (SVHC) in the candidate list (last ECHA update from June 14, 2023, 235 substances) above 0.1% in accordance with Article 33 of the REACH Regulation (EC) No .1907/2006 are included.
Place and date of issue:
Vienna, 2025-11-19
Scharl, Alexander
Senior product and purchasing manager i.V.
Name, Funktion / name, function
Unterschrift / signature
Declaration reference:
SCHUSS HOME ELECTRONIC GMBH
Scheringgasse 3, 1140 Wien, AUSTRIA


- Fensterschiene Montage
- Anmerkung:
- 1) Ein/Aus-Taste
- 5) Timer-Taste
- Timer
- Hinweise:
- Registrierung
- BE COOL
- Remarque:
- Minuterie
- Notes :
- NETTOYAGE ET ENTRETIEN
- Inscription
- Nota:
- Note:
- IMMAGAZZINAMENTO
- Registrazione
- Vensterrail installatie
- De airconditioner installeren
- Opmerking:
- 1) Aan/uit-knop
- 5) Timerknop
- Opmerkingen:
- REINIGING EN ONDERHOUD
- OPSLAG
- Registratie
- Observación:
- Temporizador
- Notas:
- LIMPIEZA Y MANTENIMIENTO
- Registro
- Poznámka:
- 5) Tlačítko časovače
- Časovač
- Poznámky:
- Registrace
- 1) Tlačidlo zapnutia/vypnutia
- 6) Displej
- 7) Tlačidlo °C/°F
- 8) Tlačidlo SLEEP
- ČISTENIE A ÚDRŽBA
- Registrácia
- Automatické pridanie zariadenia
- Notă:
- Cronometru
- Înregistrare
- Uwaga:
- Uwagi:
- CZYSZCZENIE I KONSERWACJA
- Rejestracja
- Opomba:
- 1) Gumb za vklop/izklop
- 5) Gumb časovnika
- Časovnik
- ČIŠČENJE IN VZDRŽEVANJE
- SKLADIŠČE
- Registracija
- Samodejno dodajanje naprave
- Aktualni korisnički priručnici i drugi jezici
- MONTAŽA I STAV
- Klima uređaj instalirati
- Bilješke:
- Bilješka:
- 6) Zaslon
- 7) Gumb °C/°F
- 8) Gumb SLEEP
- UPUTE ZA UPOTREBU
- COOL
- PROZRAČIVATI
- SUHO
- mjerač vremena
- NAČINI ODVODNJE
- Periodički drenaža
- ČIŠĆENJE I ODRŽAVANJE
- čišćenje
- SKLADIŠTENJE
- JAMČITI
- Current operating instructions and other languages
- WARNING
- SPECIFIC INFORMATION ON THE REFRIGERANT R290
- SCHEMATIC REPRESENTATION
- INSTALLATION AND SETTING
- Installing the exhaust air hose
- Window rail installation
- Installing the air conditioner
- Notes:
- CONTROL PANEL AND REMOTE CONTROL
- 1) On/off button
- 3) Up and down buttons
- 4) Operating mode
- 5) Timer button
- 6) Display
- 7) °C/°F button
- 8) SLEEP button
- OPERATING INSTRUCTIONS
- COOLING
- VENTILATE
- DRYING
- DRAINAGE METHODS
- Periodic drainage
- Continuous emptying
- CLEANING AND MAINTENANCE
- Cleaning
- Maintenance
- STORAGE
- Smart Home Wi-Fi Connection Guide
- IMPORTANT
- App installation
- Registration
- To register:
- Adding a device manually:
- Adding a device automatically
- WARRANTY
- This guarantee does not cover
- WICHTIG!
- INSTRUCTIONS FOR REPAIRING APPLIANCES CONTAINING R290
- GENERAL INSTRUCTIONS
- Checks to the area
- Work procedure
- General work area
- Checking for presence of refrigerant
- Presence of fire extinguisher
- No ignition sources
- Ventilated area
- Checks to the refrigeration equipment
- Checks to electrical devices
- REPAIRS TO SEALED COMPONENTS
- REPAIR TO INTRINSICALLY SAFE COMPONENTS
- CABLING
- DETECTION OF FLAMMABLE REFRIGERANTS
- LEAK DETECTION METHODS
- REMOVAL AND EVACUATION
- CHARGING PROCEDURES
- DECOMMISSIONING
- LABELLING
- RECOVERY
- Competence of service personnel
- General
- Training
- Commissioning
- Maintenance
- EU-DECLARATION OF CONFORMITY
Brand : Be Cool
Model : BC9KL2201FW
Category : Air Conditioning