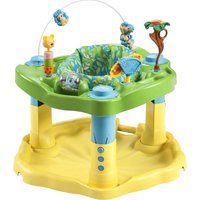
Exersaucer Zoo Friends - Baby products Evenflo - Free user manual and instructions
Find the device manual for free Exersaucer Zoo Friends Evenflo in PDF.


| Product Type | Baby activity center (ExerSaucer) |
| Brand | Evenflo |
| Model | Exersaucer Zoo Friends |
| Category | Baby products |
| Adjustable height | 3 positions (approximately 60 to 81 cm) |
| Base diameter | Approximately 66 cm |
| Product weight | Approximately 5 kg |
| Recommended age | From 4 months (child must hold head and neck upright) until child walks, measures 76 cm, or climbs out of product |
| Maximum child weight | Up to 11 kg (or up to 76 cm) |
| Main features | 360° swivel seat, tray with interactive toys, 3 heights, anti-tip feet, seat wheels for rotation |
| Power | None (mechanical play) |
| Cushion care | Machine wash cold, delicate cycle; tumble dry low 10-15 min; do not use bleach or dry clean |
| Cleaning plastic parts | Wipe with a soft cloth and mild soap |
| Safety | Never leave child unattended; do not use near stairs, heat sources, pools; fasten straps if provided |
| Warranty | 90 days limited (defects in material or workmanship) |
| Customer service | ParentLink: 1-800-233-5921 (USA) / 1-937-773-3971 (Canada); www.evenflo.com |
| Product registration | Recommended for safety alerts: www.evenflo.com/registerproduct |
| Spare parts | Contact Evenflo (ParentLink) |
Frequently Asked Questions - Exersaucer Zoo Friends Evenflo
User questions about Exersaucer Zoo Friends Evenflo
0 question about this device. Answer the ones you know or ask your own.
Ask a new question about this device
Download the instructions for your Baby products in PDF format for free! Find your manual Exersaucer Zoo Friends - Evenflo and take your electronic device back in hand. On this page are published all the documents necessary for the use of your device. Exersaucer Zoo Friends by Evenflo.
USER MANUAL Exersaucer Zoo Friends Evenflo
Read all instructions BEFORE assembly and USE of product. KEEP INSTRUCTIONS FOR FUTURE USE
Assembling the ExerSaucer 2
Attaching the Toys 5
Care and Maintenance 5
Limited Warranty 5
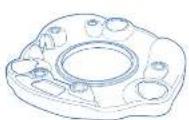
Tray (1) Seat Pod (1)
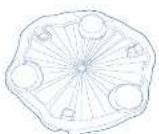
Base (7) Seat Ring (1)
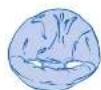


Upper Leg (3)

lower leg (3)
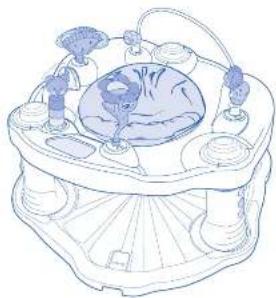
natural_image
Illustration of a scientific apparatus with central body and surrounding components (no text or symbols)(1) Hardware Kit Bag
-
Transversion
-
Large shipments
-
360: 4195
- (tah#tes fast
5 SHOYALAY FEE
(1) Toy Kit Box
-
Tcos
-
adv
-
Spec
-
2017年
ParentLink.
answers, advice, affirmation.
• www.evenflo.com • USA: 1-800-233-5921 8 AM - 5 PM ET.
- Canada: 1-937-773-3971 - México: 01-800-706-12-00
Warnings
WARNING
READ AND FOLLOW ALL WARNINGS AND INSTRUCTIONS! FAILURE TO DO SO COULD RESULT IN SERIOUS INJURY OR DEATH!
• NEVER leave child unattended.
• ALWAYS keep child in view while in the exerspacer ^2
- Read all instructions before assembly and use of the ExerSaucer.
- Keep instructions for future use.
- Keep children away from unassembled product.
• Adult assembly required. Take care when unpacking and assembling; contains small parts and some items with sharp edges.
• To prevent a possible choking hazard, remove and immediately discard packing material before using this product.
• STRINGS CAN CAUSE STRANGULATION
- DO NOT place the ExerSaucer anywhere near cords from window blinds, draperies, phone, etc.
- DO NOT place items with a string around your child's neck such as hood strings or pacifier cords.
- DO NOT suspend strings over product or attach strings to toys.
• NEVER use near stairs or steps.
- NEVER use ExerSaucer near ranges, radiators, space heaters, and fireplaces.
• NEVER use ExerSaucer in or near swimming pools or other bodies of water.
• DO NOT fill the ExerSaucer tray with water
• DO NOT fold or adjust height while baby is sitting in ExerSaucer.
• DO NOT use the ExerSaucer if any parts are missing or broken.
• NEVER use as a sled.
• DO NOT allow child to sleep in ExerSaucer.
• DO NOT spin baby in seat. Only permit baby to rotate the seat.
• For use by children who are at least 4 months old AND can hold up their head and neck unassisted.
- Stop using ExerSaucer when your child reaches any of the following developmental stages.
- Can walk by himself/herself.
- Is over 30" (76 cm) tall.
- Can climb out of the product.
- Can stand hot-looted in the ExerSaucer in the highest adjustment level.
- Allow only the baby's toes to touch the base. DO NOT allow the baby to stand flat-footed on the base.
• DO NOT use or store this product outdoors.
• To avoid up-over, place product on flat, level floor.
Registration Information
Please register this product so we can reach you if there is a safety alert or recall. We will not sell, rent, or share your personal information. To register your product, please complete and mail the card that came with it or visit our online registration at:
www.evenflo.com/registerproduct.
For future reference, record the Model Number and Date of Manufacture below.
Model Number: Date of Manufacture:
Assembling the ExerSaucer
Assembling the ExerSaucer
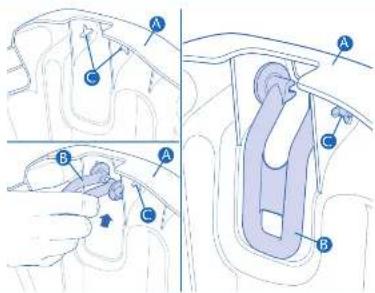
- Turn ExerSaucer base ① upside down and locate three (3) stabilizer feet ②. Insert one side of foot ③ into the foot bracket hole ④ and twist the foot until the other side snaps into the opposite hole ⑤. Repeat until all three (3) stabilizer feet are installed.
To use stabilizer feet:
Flip the three (3) stabilizer feet out from beneath base to prevent ExerSaucer from rocking.
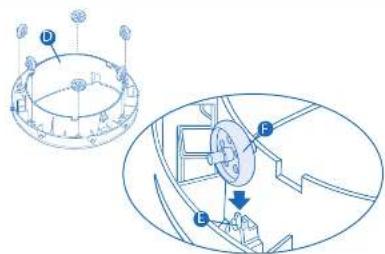
- Place seat ring ① upside down and locate the wheel holders ②. Snap six (6) seat wheels ③ into wheel holders, as shown.
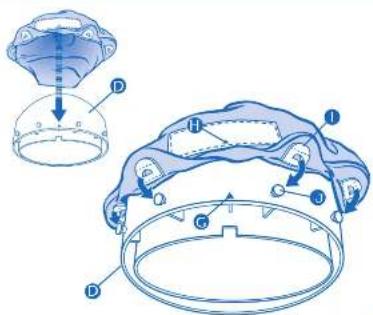
3.Turn seat ring right side up.
Align the triangle 6 on the back of the seat ring with the triangle 4 on the seat pad label. Snap the plastic tabs 1 on the pad over the pegs 3 on the seat ring.
Continue this process until all labs are attached to all pegs, then push the seat pad down inside the seat ring.
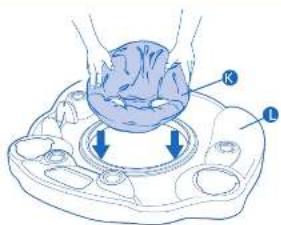
- Press assembled seat ring ⑧ down firmly onto the top of the tray ⑪ until it snaps into place and spins freely.
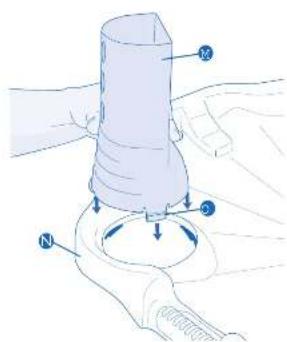
- Locate three lower legs ① and the base ⑧. Align the tabs ⑩ on the lower legs with the slots in the base, then snap the lower legs onto the base. Repeat for all three lower legs.
Note: Make sure the labs on the lower legs have locked completely into the base, as shown, by moving the legs from side-to-side. If they are not completely locked in place, repeat this step until they are locked securely.

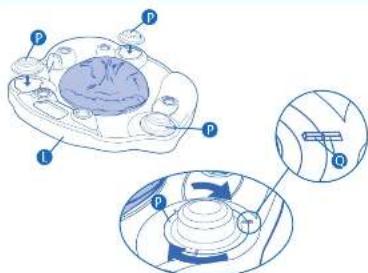
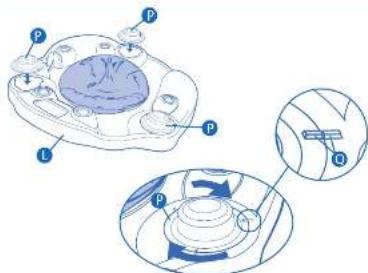
- Locate the tray L and three spring domes P. Place each spring dome onto the tray over each leg opening, as shown. Press the spring dome downward while turning until it locks into place.
▲WARNING
If you don't line up the alignment guides properly, the spring dome may come off of the tray and cause injury.
Make sure the alignment guides Ⓤ line up properly, as shown.
Assembling the ExerSaucer
Attaching the Toys
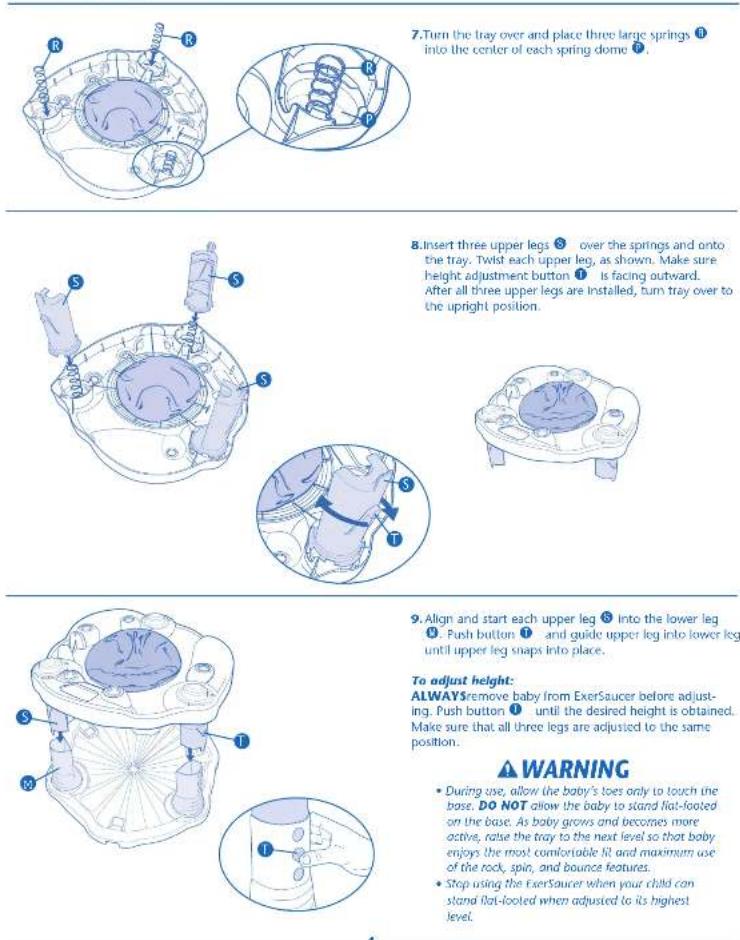
7. Turn the tray over and place three large springs into the center of each spring dome.
8. Insert three upper legs ③ over the springs and onto the tray. Twist each upper leg, as shown. Make sure height adjustment button ① is facing outward. After all three upper legs are installed, turn tray over to the upright position.
9. Align and start each upper leg ⑥ into the lower leg ⑧. Push button ① and guide upper leg into lower leg until upper leg snaps into place.
To adjust height:
ALWAYSremove baby from ExerSaucer before adjusting. Push button ① until the desired height is obtained. Make sure that all three legs are adjusted to the same position.
WARNING
- During use, allow the baby's toes only to touch the base. DO NOT allow the baby to stand flat-footed on the base. As baby grows and becomes more active, raise the tray to the next level so that baby enjoys the most comfortable fit and maximum use of the rock, spin, and bounce features.
- Stop using the ExerSaurer when your child can stand flat-looted when adjusted to its highest level.
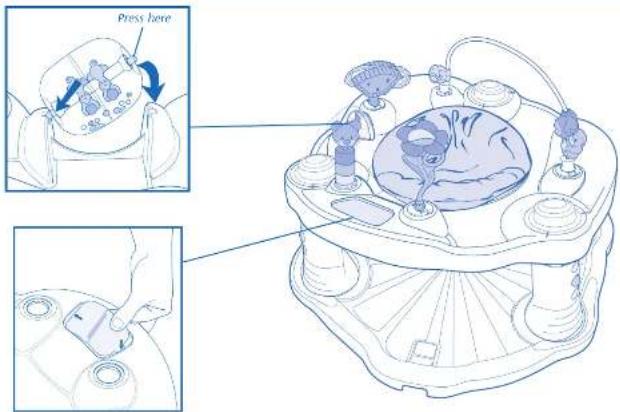
Care and Maintenance
Machine wash pad in cold water, delicate cycle. Tumble dry, low heat for 10 to 15 minutes. DO NOT use harsh detergents or bleach. DO NOT dry clean. Wipe plastic parts with mild soap and water.
Limited Warranty
For a period of 90 days from the original purchase of this Product, Evenllo warrants to the original end user ("Purchaser") this Product (including any accessories) against defects in material or workmanship. Evenllo's sole obligation under this express limited warranty shall be, at Evenllo's option, to repair or replace any Product that is determined to be defective by Evenllo and determined to be covered by this warranty.
Repair or replacement as provided under this warranty is the exclusive remedy of the Purchaser. Proof of purchase in the form of a received invoice or bill of sale evidencing that the Product is within the warranty period must be presented to obtain warranty service. This express limited warranty is extended by Evenflo ONLY to the original Purchaser of the Product and is not assignable or transferable to subsequent purchasers or end users of the Product. For warranty service, contact Evenflo's ParentLink Consumer Resource Center at (800) 233-5921 or www.evenflo.com.
EXCEPT TO THE EXTENT PROHIBITED BY APPLICABLE LAW, ANY IMPLIED WARRANTY OF MERCHANTABILITY OR FITNESS FOR A PARTICULAR PURPOSE ON THIS PRODUCT IS HEREBY DISCLAIMED. EVENFLO SHALL NOT BE LIABLE FOR ANY INCIDENTAL, CONSEQUENTIAL, SPECIAL OR PUNITIVE DAMAGES OF ANY KIND FOR BRLACH OF THE EXPRESS LIMITED WARRANTY ON THIS PRODUCT, OR ANY WARRANTY IMPLIED BY OPERATION OF LAW. OTHER THAN THE EXPRESS LIMITED WARRANTY SET FORTH ABOVE, THERE ARE NO OTHER WARRANTIES THAT ACCOMPANY THIS PRODUCT AND ANY ORAL WRITTEN OR ANY OTHER EXPRESS REPRESENTATION OF ANY KIND IS HEREBY DISCLAIMED.
ParentLink.
answers, advice, affirmation.
• www.evenflo.com • USA: 1-800-233-S921 8 AM - S PM E.T.
• Canada: 1-937-773-3971 • México: 01-800-706-12-00
Table des matières
Avertissements 7
natural_image
Illustration of a futuristic scientific apparatus with central body and surrounding components (no text or symbols)answers, advice, affirmation.
answers, advice, affirmation.
natural_image
Illustration of a scientific apparatus with central body and surrounding components (no text or symbols)answers, advice, affirmation.
• www.evenflo.com • USA: 1-800-233-5921 8 AM a 5 PM hora del Este
• México: 01-800-706-12-00
ADVERTENCIA
answers advice affirmation.
• www.evenflo.com • USA: 1-800-233-5921 8 AM a S PM hora del Este • México: 01-800-706-12-00
- ParentLink.
- Warnings
- WARNING
- READ AND FOLLOW ALL WARNINGS AND INSTRUCTIONS! FAILURE TO DO SO COULD RESULT IN SERIOUS INJURY OR DEATH!
- Registration Information
- Assembling the ExerSaucer
- To use stabilizer feet:
- 3.Turn seat ring right side up.
- ▲WARNING
- To adjust height:
- Limited Warranty
- Table des matières
- ADVERTENCIA
Brand : Evenflo
Model : Exersaucer Zoo Friends
Category : Baby products