SF120DCPB - Air Conditioning Fuave - Free user manual and instructions
Find the device manual for free SF120DCPB Fuave in PDF.


User questions about SF120DCPB Fuave
0 question about this device. Answer the ones you know or ask your own.
Ask a new question about this device
Download the instructions for your Air Conditioning in PDF format for free! Find your manual SF120DCPB - Fuave and take your electronic device back in hand. On this page are published all the documents necessary for the use of your device. SF120DCPB by Fuave.
USER MANUAL SF120DCPB Fuave
natural_image
Line drawing of a standard outdoor fan with a vertical pole and fan blade, no text or symbols present.VLOERVENTILATOR FLOOR FAN BODENVENTILATOR VENTILATEUR DE SOL
Fuave is a registered
trademark of Coolblue B.V.
Weena 664
3012CN, Rotterdam
The Netherlands
Made in China



FUAVE
FUAVE SF120DCPW (WHITE)
Product ID: 941124
Power supply: 220-240V\~50Hz
Rated power: 19W
B0000
Serial Number:
Fuave is a registered
trademark of Coolblue B.V.
Weena 664
3012CN, Rotterdam
The Netherlands
Made in China




Inhoudsopgave
Voorwoord
4
1. Veiligheid 6
text_image
Exploded diagram of a fan assembly with numbered parts for identificationnatural_image
Technical illustration of a mechanical component with a downward arrow and close-up view of its circular component (no text or symbols)natural_image
Diagram of a laboratory pipette with directional arrows indicating motion (no text or symbols)natural_image
Diagram of a wind turbine blade assembly showing gear meshing and fan blade alignment (no text or labels)natural_image
Diagram of a fan blade assembly with internal gear mechanism and circular components (no text or labels)text_image
Diagram illustrating the working principle of a fan with labeled parts and directional arrows indicating rotation or adjustment.natural_image
Diagram showing two different fan-shaped devices with a magnified inset illustrating the change in their internal structure (no text or symbols present)natural_image
Diagram showing two views of a mobile phone casing with battery and internal components, no text or symbols present1.1. Safety warnings and regulations 36
1.2. Safety instructions: installation 37
1.3. Safety instructions: use 38
1.4. Safety instructions: batteries 40
1.5. Safety regulations: electrical safety 42
1.6. Explanation of graphic symbols on the product and packaging 43
2. Product features 44
2.1. System overview 44
2.2. Technical data 44
2.3. Warranty 45
3. Installation 45
3.1. Important information 45
3.2. Unpacking the appliance 45
3.3. Installing the appliance 47
4. Use 50
4.1. Important information 50
4.2. Key components 51
4.3. Turning the appliance on and off 52
4.4. Using the device 52
5. Cleaning and maintenance 55
5.1. Important information 55
5.2. Cleaning the housing 56
5.3. Thorough cleaning 56
5.4. Replacing the battery in the remote control 56
6. Faults and solutions 57
7. Taking out of service 58
8. Waste disposal 59
8.1. Dispose of the appliance as waste 59
8.2. Dispose of the packaging material as waste 59
8.3. Dispose of the batteries as waste 59
Foreword
About this document
- This user manual contains all information for correct, efficient and safe use of the device.
• This user manual is intended for the end user and/or buyer of this device. - Installation of the appliance, use and all cleaning and maintenance activities as described in the instructions may be carried out by the end user, unless clearly indicated to the contrary.
- Please make sure that you have completely read and understood the instructions in this manual before you install or use the device. Keep this document for future use as long as you are using and/or are in possession of this device.
- Please retain this document for future use as long as you use and/or own the appliance and pass it on to subsequent users of the appliance.
- Coolblue B.V. cannot be held responsible in any way for immaterial damage to you or others, or material damage to the device, your property or the property of others caused by not or not correctly following the instructions in this manual.
- The Fuave floor fan is also called appliance in this manual.
- If you contact our customer service, make sure you have the model number ready. The information can be found on the type plate or on the front of this manual.
- You can also find the latest version of this manual online, at www.coolblue.nl/en if you search by item number.
Original instructions
This user manual was originally written in Dutch. All other languages are translated documents. In case of translation errors, the Dutch version shall prevail.
Used symbols
| SYMBOL DESCRIPTION | |
 DANGER! DANGER! | Indicates fire hazard and/or flammable materials. |
 WARNING! WARNING! | Indicates a hazardous situation which, if not avoided, could result in serious immaterial damage to you or others.Indicates a hazardous situation which, if not avoided, could result in light immaterial damage to you or others. |
 | Indicates a situation related to material damage. |
 | Indicates useful, additional information. |
Copyright
The data displayed in this manual, including text, photographs, graphic drawings, graphic brands, (trade) names and logos are the property of Coolblue B.V. and are protected by copyright, trademark law and/or any other intellectual property right, unless these data belong to a third party. You are never permitted to reproduce, transfer, distribute, store, or make available to third parties for payment, the contents of this user manual in its entirety or partially without prior written permission from Coolblue B.V. and/or the third party the data belongs to.
Compliance
SF120DCPB
Coolblue B.V. hereby declares that the appliance complies with Regulation (EU) 327/2011. The full text of the EU declaration of conformity can be consulted at: www.coolblue.nl/product/941123
SF120DCPW
Coolblue B.V. hereby declares that the appliance complies with Regulation (EU) 327/2011. The full text of the EU declaration of conformity can be consulted at: www.coolblue.nl/product/941124
Contact details
Fuave is a registered brand of Coolblue B.V. Customer service can be reached at: www.coolblue.nl/en/customer-service
Coolblue B.V.
Weena 664
3012 CN Rotterdam
The Netherlands
Made in China
1. Safety
Read this manual and safety instructions carefully and make sure you understand the contents before using the appliance with the appropriate parts. Failure to comply with all instructions can cause material damage and/or serious injury.
1.1. Safety warnings and regulations

DANGER!
- Fire hazard. The appliance must be stored in a room free of naked flames, gas-powered appliances or electric heaters.
- Fire hazard. Do not use the appliance close to a fire source, close to splashing oil, direct sunlight or splashing water.

WARNING!
Danger of entrapment.
- This appliance may be used by children from eight years of age and above and by persons with reduced physical, sensory or mental capabilities or lack of experience and knowledge, provided that they are under supervision or have been trained in the safe use of the appliance and that they understand the associated dangers.
- This appliance must not be used by children under 8 years of age.
- This appliance and its components are not toys, so children should not play with the appliance or its components.
- Children, legally incompetent persons and domestic animals must be supervised while using the appliance. Children must be supervised to ensure that they do not play with the
appliance.
- Store the appliance out of reach of unauthorised persons and do not allow anyone unfamiliar with the appliance and these instructions to use it.
- Electrocution hazard due to short circuit. Cleaning and user maintenance must not be carried out by children without supervision.
- Risk of suffocation. Keep packaging materials out of reach of children. Packaging materials are not toys.

Risk of damage to the device.
- This appliance is for indoor use only. This appliance should not be used outdoors.
- This appliance is intended for domestic use and similar applications, such as:
– staff kitchens in shops, offices and other work environments
– farms and guests in hotels, motels, B&B, and other residential environments,
– catering and similar non-retail applications.
- The appliance must be stored in such a way so as to prevent mechanical failure.
1.2. Safety instructions: installation

DANGER!
- Fire hazard. Install the appliance in accordance with the installation instructions.

- Trip hazard. Ensure that the plug and socket are clearly visible and accessible at all times.

- Risk of damage to the appliance. Use only the accessories provided for the installation.
- Risk of damage to the appliance. Do not pass the power cable under a carpet or cover it with mats, runners and the like. This can lead to unforeseen heat generation.
1.3. Safety instructions: use
1.3.1. Safety of persons

WARNING!
Danger of entrapment.
• Always be alert and careful. Do not use electrical appliances if you suffer from impaired concentration or lack of awareness, or if you are under the influence of drugs, alcohol or medications. Even the slightest distraction can lead to serious accidents and injuries when using electrical appliances.
- Always operate and use the appliance as described in these instructions for use. Assume that anything not specified here is also not possible.
1.3.2. Safety in use

DANGER!
- Risk of fire and explosion. Do not use the appliance in the vicinity of highly flammable or explosive substances or fuels. Keep it at least one metre away.
- Risk of fire and explosion. Never expose the appliance to a naked flame.
Fire hazard.
- Unplug the appliance if you hear strange noises, smell an odour or see smoke.
- Do not place objects on the appliance and never cover the appliance. Never block the grilles for incoming and outgoing air, not even partially.
- Do not leave the appliance unattended with the plug in the socket.

WARNING!
Electrocution hazard due to short circuit.
- Do not expose the appliance to rain or use it in damp or wet environments, such as the bathroom and laundry room, nor near a bath, shower or swimming pool.
- Do not spill or pour any water, oil or liquid onto or into the appliance.
- Do not operate the appliance if you notice damage to the appliance, the power cable or the plug, or if does not work properly, has fallen or otherwise malfunctions. Contact customer service for further information (See Foreword for contact details).
- If the appliance is not in use, or when cleaning it, carrying out maintenance or moving it, first switch it off and then remove the plug from the socket.
- Danger of entrapment. Always move and/or relocate the appliance calmly.
- Danger of entrapment. Do not insert fingers or objects such as pens through the grilles in the appliance and especially warn children of these dangers.
- Cutting hazard. Once assembled, the protective covers should not be removed during use.
Risk of damage to the device.
- Follow the maintenance instructions for trouble-free use and long service life.
- Do not expose the appliance to direct sunlight to avoid discolouration of the housing.
- Do not use paint, cleaning sprays, anti-insect sprays, etc. on or near the appliance. This may cause deformation of the housing or electrical damage.
- Never use aggressive cleaning agents, white spirit, detergents, impregnated wipes or other cleaning solutions. These can damage the housing and appliance.
- Do not climb, sit or stand on the appliance.
- Do not place heavy objects on the appliance. This can cause deformations and damage to the appliance.
1.4. Safety instructions: batteries
DANGER!
- Fire hazard. Do not short-circuit batteries and do not immerse them in liquids. This causes a risk of explosion, fire, heat, smoke and/or gas development.
- Fire hazard. If the battery has accidentally fallen into the water, remove it immediately. Put the battery in a safe, open spot and stay away from it until it is completely dry. Do not reuse dried batteries, but dispose of them according to the instructions in section 8.3. Dispose of the batteries as waste.

WARNING!
Risk of chemical combustion.
- Keep batteries out of reach of children. Ingestion of batteries can lead to chemical burns, soft tissue perforation and severe burns. Serious burns may occur within two hours after
ingestion. Seek immediate medical attention if you suspect a battery has been swallowed.
- Dispose of used batteries immediately. Keep new and used batteries away from children. If you think that batteries have been swallowed or placed in a part of the body, you must seek medical attention immediately.
- Remove leaking, deformed or corroded batteries from the product and dispose of them properly with appropriate protective equipment. If a battery is leaking: avoid contact with skin, eyes and mucous membranes. If necessary, rinse affected areas with water and seek immediate medical attention.
- Depleted batteries should be immediately removed from the appliance and disposed of properly. Depleted batteries can corrode, releasing chemicals that damage your health and the appliance. If you do not use it for a long time, remove the batteries from the appliance to prevent them from leaking.
- Do not deform, burn or disassemble batteries and never drill with a sharp object. Extreme heat can lead to explosion and/or leakage of corrosive fluid. Mechanical damage can result in the release of gaseous substances, which can be highly irritating, flammable or toxic.
- Do not allow children to replace batteries without adult supervision.

Risk of damage to the device.
- Never use batteries if they are dented, leaking or damaged.
- Different types of batteries or new and used batteries may not be used together.
- Clean the battery contacts and also those of the appliance before installing the battery.
- When installing the batteries, pay attention to the correct polarity. The orientation of the positive (+) and negative (−)
terminals of the battery must correspond to the + and - on the battery compartment.
- Only use AAA batteries in the remote control. Do not use any other batteries.
- Store unused batteries in their original packaging, away from metal objects. If already unpacked, do not mix batteries.
1.5. Safety regulations: electrical safety
DANGER!
Fire hazard.
- Before use, check that the voltage on the socket you want to use matches that on the type plate of the appliance (220-240 V; 50/60 Hz). Damage caused by faulty voltage is not covered by the guarantee.
- Fully unroll the appliance's power cable before plugging it into the socket. This is to prevent heat generation in the cable.
- Do not pass the power cable under a carpet or cover it with mats, runners and the like. This can lead to unforeseen heat generation.
- Regularly check the appliance for damage to the power cable and plug. If there is visible damage, a strong smell, or parts become excessively hot, stop using it immediately and remove the plug from the socket.

WARNING!
Electrocution hazard due to short circuit.
- Only use the appliance's factory-fitted plug and never change it. The plug must match the type of socket used to reduce the risk of electric shocks.
-
The connector has an earth connection. Do not remove the earth contacts from the plug.
-
Do not connect the appliance to the power supply until it is installed as instructed.
- Never pull the power cable to carry or move the appliance or to disconnect the plug from the socket.
- Keep the power cable away from heat, oil, sharp edges or corners and moving parts.
- Do not make any changes to the power cable or submerge it in water or other liquids.
- Do not turn or kink the power cable, do not roll up the power cable too tightly after use and do not wind it up around the appliance; this may damage the insulation layer! Damaged or tangled power cables increase the risk of electric shocks.
- Do not touch the appliance, plug or power cable with wet or damp hands.
- Never spray the appliance and make sure no water gets into it.
- It is not permitted to open, change or repair the appliance yourself. Do not drill holes into the appliance anywhere to avoid dangerous situations. The appliance, plug and/or cable must be repaired and/or replaced by an electrician or an equivalent qualified person. Repairs by amateurs invalidate the guarantee and can cause dangerous situations!
1.6. Explanation of graphic symbols on the product and packaging
| SYMBOL MEANING | |
| CE | The CE marking on this appliance indicates that Coolblue B.V. declares that this appliance meets the requirements of the relevant European legislation relating to health, safety and environmental protection. The declaration of conformity is available on request from Coolblue B.V. See Foreword for the contact details. |
 | The electrical safety class II on this appliance indicates that it is double insulated or has an extra strong insulating housing. |
 | Indicates that the instructions must be read carefully before continuing to use the appliance. |
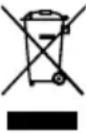 | This symbol on the appliance, accessories or packaging indicates that this appliance must not be disposed of with ordinary household waste but must be returned to a collection point. |
2. Product features
2.1. System overview
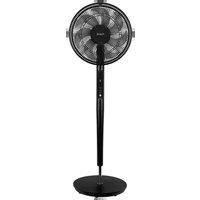
The Fuave floor fan is intended to blow air around a room to create a pleasant perceived temperature.
The Fuave SF120DCPB/SF120DCPW floor fan is supplied in separate parts and can be assembled in a few simple steps before use.
2.2. Technical data
The technical data are also indicated on the type plate on the appliance (also printed on page 2).
| PARAMETER UNIT | ||
| Product name Floor fan | ||
| Model / Type SF120DCPB | SF120DCPW | |
| Housing colour Black | White | |
| Net weight | 5.4 kg | |
| Gross weight | 6.3 kg | |
| Dimensions folded (L × W × H): | 40 × 40 × 125 cm | |
| PARAMETER UNIT | ||
| Dimensions fully unfolded (L × W × H): | 40 × 40 × 125 cm | |
| Diameter 40 cm | ||
| Nominal voltage, frequency and current | 220 - 240 V~ 50/60 Hz | |
| Input power 19 W | ||
| Energy consumption in standby mode (Psb) | 0.61 W | |
| Maximum noise level 53 dB | ||
| Maximum fan flow rate ≥28 | m3/min | |
| Tropical climate (yes/no) No | ||
| Suitable for room temperature >40 °C | Not suitable | |
2.3. Warranty
This appliance comes with a guarantee period of two years after purchase. For more information on guarantee conditions, please visit www.coolblue.nl/en/customer-service. In any case, you must have the proof of purchase with purchase and/or delivery date in order to be able to claim the guarantee.
3. Installation
3.1. Important information
Read and follow all the instructions in section 1. Safety.
3.2. Unpacking the appliance

WARNING!
- Risk of suffocation. Keep packaging materials out of reach of children. Packaging materials are not toys.


- Risk of damage to the appliance. Never use batteries if they are dented, leaking or damaged.
- Remove all packaging material and any transport attachments present (e.g. tape, tie-wraps, cable ties and protective film).
- Check that all parts are present and that there is no damage to the appliance or accessories.
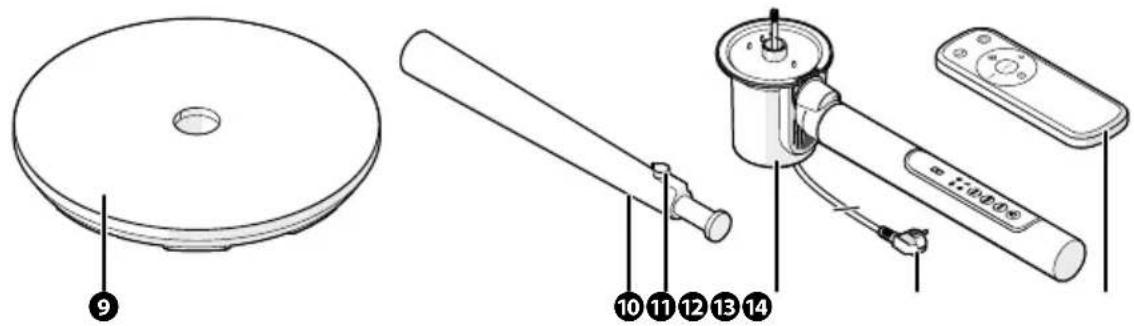
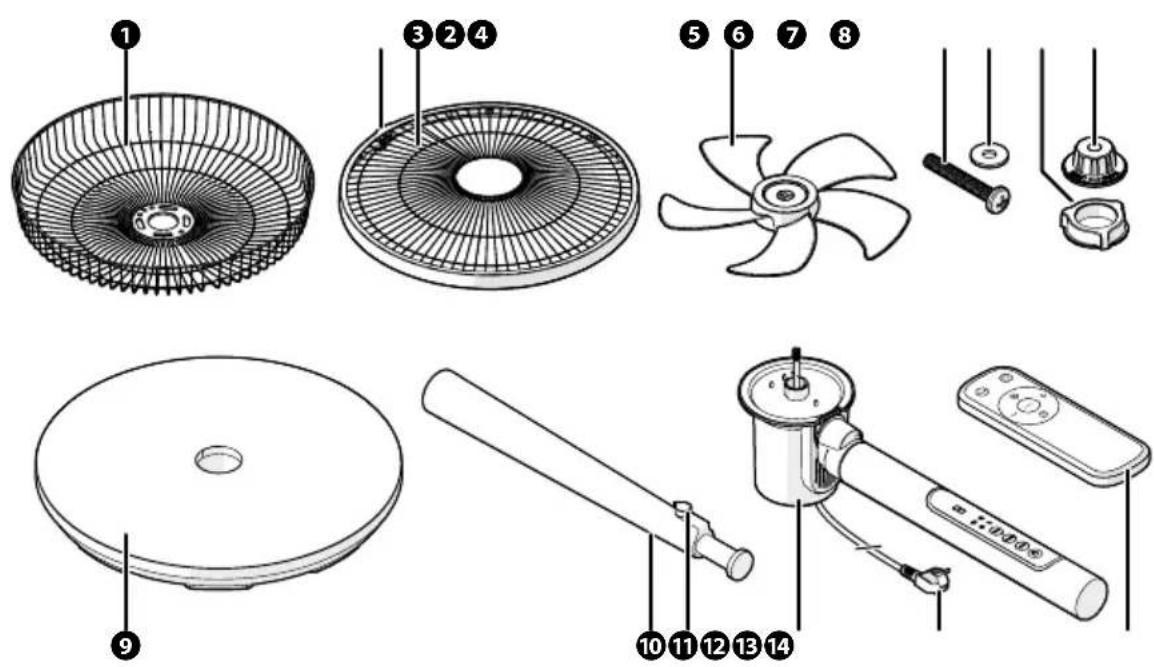
Parts of the appliance
text_image
Exploded diagram of household air conditioner components with numbered parts for identification1 Rear guard
2 Guard clip with screw
3 Front guard
4 Fan blade
5 Bolt
6 Washer
7 Guard nut
8 Blade nut
9 Base
10 Extension
11 Adjustment knob
12 Fan motor with tripod
13 Power cord
14 Remote control
3.3. Installing the appliance

WARNING!
- Electrocution hazard due to short circuit. Do not connect the appliance to the power supply until it is installed as instructed.

- Risk of damage to the appliance. Do not pass the power cable under a carpet or cover it with mats, runners and the like. This can lead to unforeseen heat generation.
natural_image
Technical illustration of a mechanical component with a downward arrow and close-up view showing internal components (no text or symbols)-
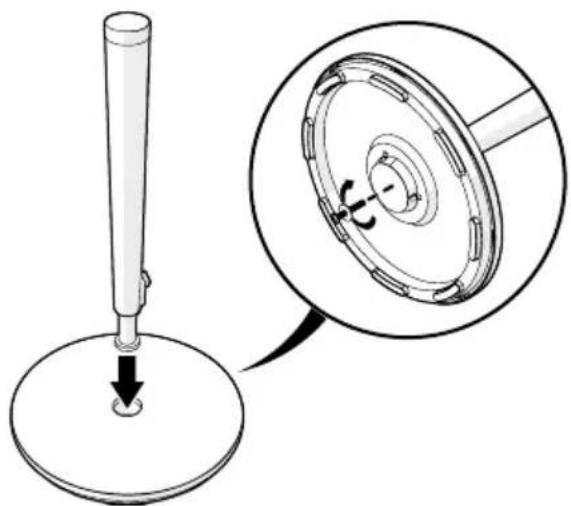
Put the extension piece into the base.
-
Gently turn the base with the extension piece upside down.
-
Press the extension piece into the base while using the screwdriver to tighten the washer and bolt at the bottom of the base.


natural_image
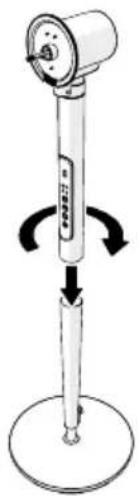
Diagram of a laboratory pipette with directional arrows indicating motion (no text or symbols)- Put the base back upright.
- Tighten the fan motor clockwise in the extension piece.
Make sure all parts are securely fastened before the other parts are fitted.
natural_image
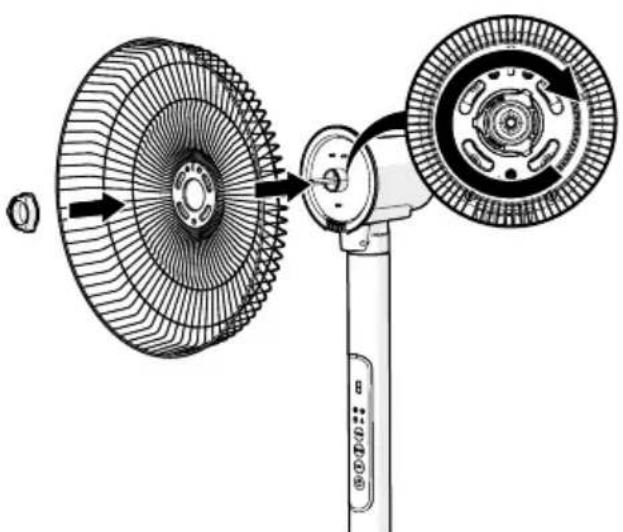
Diagram of a wind turbine blade assembly showing rotor blades and mounting mechanism (no text or labels)- Place the rear guard on the fan motor.
- Hold the rear guard and turn the cap nut clockwise to hold the fan motor.
natural_image
Diagram of a fan-shaped mechanical device with internal blades and a circular inset showing rotational flow (no text or symbols)-
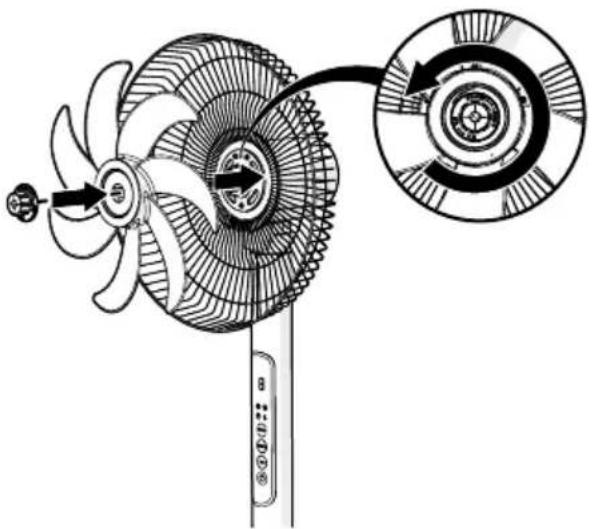
Place the fan blade on the fan shaft. The notch in the back of the fan blade should fall over the (perpendicular) pin of the shaft.
-
Hold the fan blade and tighten the blade nut against the fan shaft anti-clockwise.
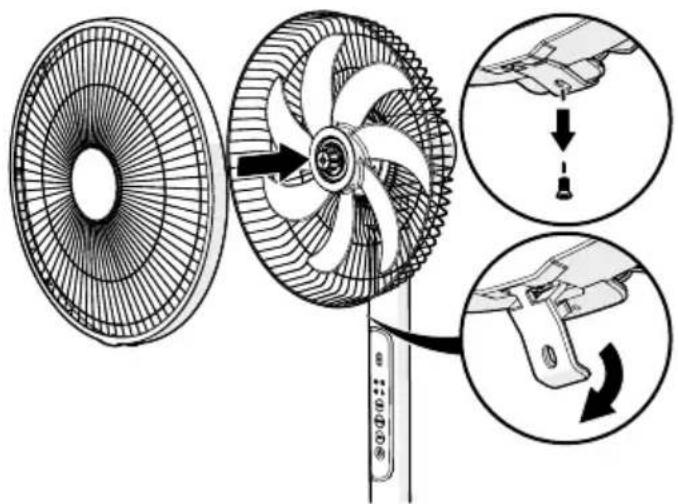
text_image
Diagram illustrating the working principle of a fan blade, showing how to change the blade's internal structure and rotation.-
Remove the screw from the guard clip.
-
Hinge the guard clip backwards.
-
Place the front guard on the rear guard.

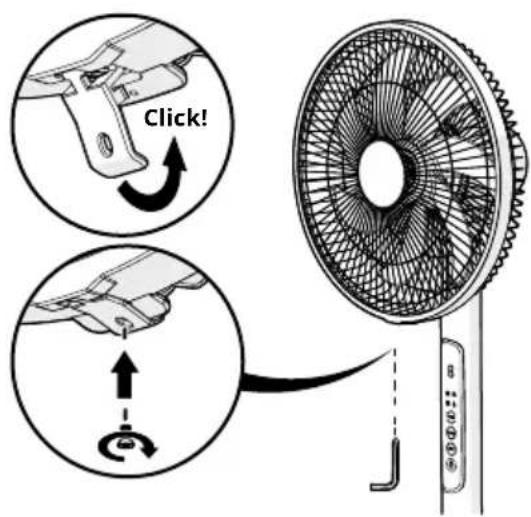
text_image
Click!- Click the guard clip on the rear guard.
- Tighten the screw in the hole of the guard clip with a screwdriver to secure the front guard.
- Place the battery in the remote control. Follow the instructions in section 5.4. Replacing the battery in the remote control.
- Fully roll off the appliance's power cable. Insert the plug in the socket.
4. Use
4.1. Important information
Read and follow all the instructions in section 1.Safety.
DANGER!
• Fire hazard. Do not leave the appliance unattended with the plug in the socket.
Select a suitable place for use that satisfies the following points:
• A firm, flat and horizontal surface;
• Near an electrical socket;
- On all sides of the appliance always at least 10 cm free space and away from curtains;
- At least one metre from televisions or radios to prevent electromagnetic interference.
4.2. Key components
The control panel
The touch-sensitive control panel allows all functions to be selected and set. Operate a button with a slight touch.
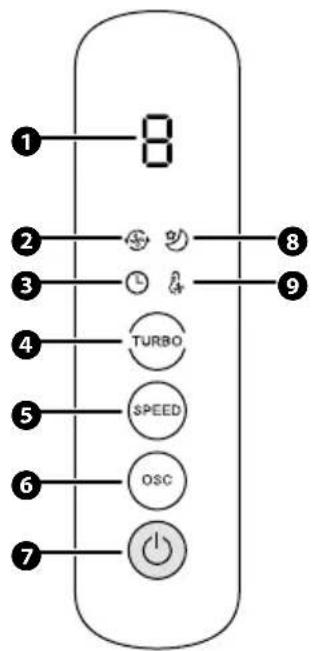
text_image
1 2 3 4 5 6 7 8 9 TURBO SPEED OSC① Display
② High fan speed indicator
③ Timer indicator
4 High fan speed button
5 Fan speed button
⑥ Oscillation button
⑦ On/Off switch
8 Sleep mode indicator
9 Temperature-controlled fan speed indicator

The remote control

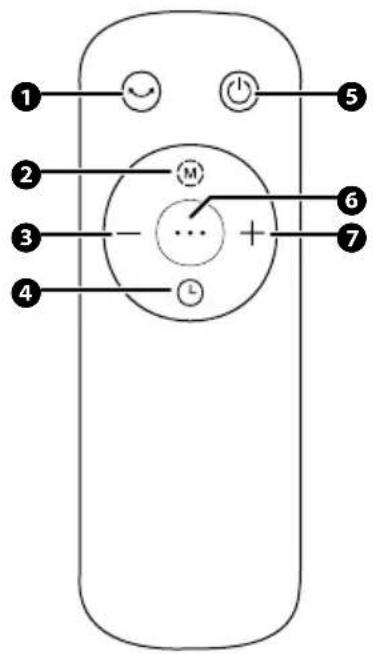
text_image
1 2 3 4 5 6 7① Oscillation button
② Fan speed button
3 Minus button
4 Timer
⑤ On/Off switch
6 Temperature-controlled fan speed button
⑦ Plus button
4.3. Turning the appliance on and off
Before using the appliance, check that:
- The appliance is installed according to the regulations and safety instructions. Do not use the appliance until installed as instructed!
• The appliance does not show any damage or defects. -
The socket to be used supplies the voltage on the appliance's type plate (220-240 V; 50/60 Hz).
-
Insert the appliance's plug into the socket. The appliance will make a beep.
- Press the on/off button to turn on the appliance.
4.4. Using the device
The functions in the table below can be selected with both the control panel and the remote control.
Operating panel
| BUTTON DESCRIPTION | |
 | Press the on/off button to switch the appliance on or off. |
 | The oscillation angle can be adjusted by repeatedly pressing the oscillation button. The angles 60°, 90° and 120° are selected consecutively, with the oscillation switched off at intervals (60°→off → 90°→off → 120°→off → 60° etc.).The selected angle is displayed on the display as follows:60°90°120° |
 | Briefly press the fan speed button to adjust the fan speed.Press and keep the fan speed button depressed to adjust the wind type (normal wind → gentle wind→ sleep wind→ normal wind and so on). |
 | Briefly press the high fan speed button to turn the high fan speed on or off.Keep the high fan speed button depressed to turn the temperature-controlled fan speed on or off. |
 | The figures on the display show the currently selected fan speed, ranging from 1 to 9. If the appliance is set to normal wind or soft wind, no indicator will be displayed on the display. |
 | The high fan speed indicator is displayed on the display when the high fan speed is switched on. In addition, the display shows H instead of a number. |
 | The sleep mode indicator is displayed on the display when the wind sleep mode is switched on. In sleep mode, the appliance is quieter than with the other wind types. |
 | The temperature-controlled fan speed indicator is shown on the display when the fan speed is adjusted based on the ambient temperature. This function can intelligently adjust the fan speed based on changes in ambient temperature. |
 | The timer indicator is displayed on the display when the timer is turned on. The timer can only be switched on or off with the remote control. |
Remote control
| BUTTON DESCRIPTION | |
 | Press the on/off button to switch the appliance on or off. |
 | Press the fan speed button to set the fan speed. The display shows the current fan speed. |
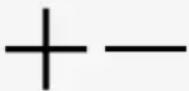 | Press the plus or minus button to adjust the fan speed. |
 | Press the oscillation button to allow the appliance to oscillate from left to right or to disable the oscillation. |
 | Press the temperature-controlled fan speed button to turn the temperature-controlled fan speed on or off. |
 | 1. Press and hold the timer button for three seconds to set the timer.The display shows Oh.2. Press the plus or minus button to adjust the number of hours in one-hour steps.Wait three seconds to confirm the timer time.Set the timer time to 0 hours to turn off the timer. |
Setting the height of the appliance
The height of the appliance can be adjusted by adjusting the fan motor with tripod.
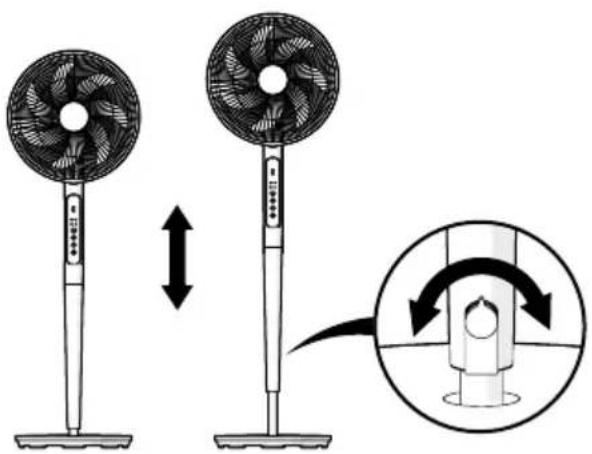
natural_image
Diagram showing two different fan-shaped devices with a magnified inset illustrating the change in their internal structure (no text or symbols present)- Remove the plug from the socket.
- Loosen the adjustment knob a little.
- Adjust the height of the appliance.
- Keep the appliance in the desired position and tighten the adjustment knob.
5. Cleaning and maintenance
5.1. Important information
Carry out cleaning and maintenance as indicated. This extends the life of the appliance and will keep it working properly.

WARNING!
ELECTROCUTION HAZARD DUE TO SHORT CIRCUIT.
- Before cleaning and maintenance, turn off the appliance with the power button and remove the plug from the socket. Ensure that the plug is not accidentally plugged into the socket during the activities.
- Never spray the appliance and make sure no water gets into it.
- Cleaning and user maintenance must not be carried out by children without supervision.

- Risk of damage to the appliance. Never use aggressive cleaning agents, white spirit, detergents, impregnated wipes or other cleaning solutions. These can damage the housing and appliance.

5.2. Cleaning the housing
- Press the on/off switch to switch off the device.
- Remove the mains plug from the socket.
- Use a soft damp cloth to wipe the housing.
- Then wipe the appliance dry with a soft cloth.
5.3. Thorough cleaning
Depending on the degree of use and the operating environment, dust and other dirt may have ended up in the air inlet and outlet. In this case, more thorough cleaning is required.
- Press the on/off switch to switch off the device.
- Remove the mains plug from the socket.
- Loosen the screw from the guard with a screwdriver.
- Detach the guard clip from the rear guard and remove the front guard.
- Hold the fan blade and loosen the blade nut clockwise from the fan motor shaft.
- Remove the blade nut and fan blade from the fan shaft.
- Use a soft damp cloth to wipe the fan blade and guards.
- Then wipe the fan blade and guards dry with a soft cloth.
- Follow the steps in the 3.3. Installing the appliance section to reassemble the appliance.
5.4. Replacing the battery in the remote control

- Risk of damage to the appliance. When installing the batteries, pay attention to the correct polarity. The orientation of the positive (+) and negative (−) terminals of the battery must correspond to the + and − on the battery compartment.
- Risk of damage to the appliance. Only use AAA batteries in the remote control. Do not use any other batteries.
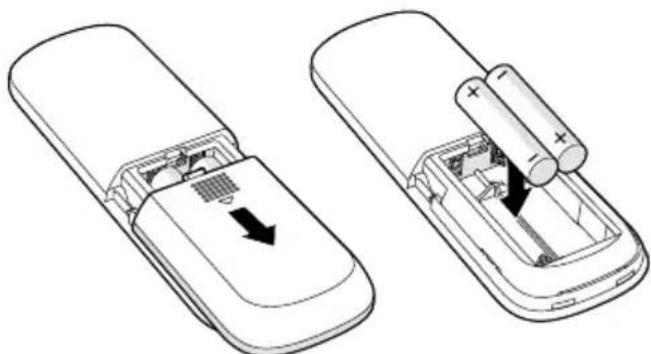
natural_image
Two views of a mobile phone showing internal battery casing and rear panel with arrows indicating direction (no text or symbols)- Hold the remote control so that the buttons face downwards.
- Slide the battery cover backwards.
- Remove the old batteries.
- Insert the new batteries into the battery compartment recess.
- Slide the battery cover back into the remote control.
6. Faults and solutions
| PROBLEM CAUSE SOLUTION | ||
| The appliance does not start when the on/off button is pressed. | The appliance is not powered. | Check that the plug is in the socket and that the cable or plug is not damaged. |
| Check that the RCD is switched on. | ||
| Check that there is no power failure. | ||
| The battery in the remote control is empty. | Replace the battery of the remote control. See section 5.4.Replacing the battery in the remote control for more information. | |
| A fuse has blown in the meter cabinet. | 1. Remove the appliance's plug from the socket.2. Check the fuses in the meter box.If the problem persists, contact Customer Service. | |
| The appliance stops automatically. | The appliance is automatically disabled by the timer setting. | Press the on/off button to switch the appliance back on. |
| PROBLEM CAUSE SOLUTION | ||
| A bad smell comes out of the appliance. | The fan blade and/or guards are dusty or dirty. | Clean the appliance according to the instructions in 5.Cleaning and maintenance. |
| The appliance makes a noise. | The surface on which the appliance is placed is not firm, flat or horizontal. | Move the appliance to a place with a firm, flat and horizontal surface. |
7. Taking out of service

- Risk of damage to the appliance. Do not place heavy objects on the appliance. This can cause deformations and damage to the appliance.
If the appliance is stored for a longer period, the following measures must be taken:
- Press the on/off switch to switch off the device.
- Remove the mains plug from the socket.
- Clean the appliance according to the instructions in 5.Cleaning and maintenance.
- Remove the battery from the remote control following the instructions in section 5.4. Replacing the battery in the remote control.
- Pack the appliance in its original packaging or in a plastic bag and put it in a dry place.
8. Waste disposal
8.1. Dispose of the appliance as waste
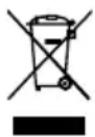
This symbol on the product indicates that this product must not be treated as normal household waste, but should be collected separately. Return the product to a collection point for recycling waste electrical and electronic equipment if you live within the EU or in other European countries that have separate collection systems for waste electrical and electronic equipment. By properly disposing of the product as waste, you help to avoid potential environmental and public health risks that could otherwise arise from mishandling discarded equipment. Recycling materials contributes to the conservation of our natural resources.
8.2. Dispose of the packaging material as waste
Dispose of the packaging material through your local recycling facility. By properly disposing of packaging material and packaging waste, you help prevent potential risks to the environment and public health. The symbol on the packaging indicates that the packaging is made of cardboard.
8.3. Dispose of the batteries as waste

The appliance contains batteries. Batteries may not be disposed of in ordinary household waste. The batteries may contain toxic substances and are subject to specific regulations. Always return batteries to a designated collection point.
Inhalt
Vorwort
61
1. Sichereit 63
text_image
Exploded diagram of a fan assembly with numbered parts for identificationnatural_image
Technical illustration of a mechanical component with a downward arrow and close-up view of its circular cross-section (no text or symbols)natural_image
Diagram of a laboratory pipette with directional arrows indicating motion (no text or symbols)natural_image
Diagram of a wind turbine blade assembly showing rotor blades and hub connections (no text or labels)natural_image
Diagram of a fan blade assembly with internal gear mechanism and circular component (no text or labels)text_image
Diagram illustrating the working principle of a fan with labeled parts and directional arrows indicating rotation or adjustment.natural_image
Diagram showing two identical outdoor fan holders with a magnified inset illustrating the change in fan rotation (no text or symbols present)natural_image
Two line drawings of a mobile phone casing showing internal components and battery insertion (no text or symbols)text_image
Technical diagram showing exploded view of a fan assembly with numbered parts and component details