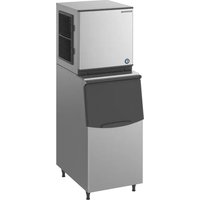
KMD-210ABE-HC - Ice Maker Hoshizaki - Free user manual and instructions
Find the device manual for free KMD-210ABE-HC Hoshizaki in PDF.


| Product Type | Commercial Ice Machine |
| Brand | Hoshizaki |
| Model | KMD-210ABE-HC |
| Power Supply | 220-240 V AC, 10 A, 50/60 Hz |
| Control Box Fuse | 5 A, 250 V |
| Refrigerant | R290 (propane), HFC-free |
| Ambient Temperature Range | 7°C to 40°C |
| Water Temperature Range | 7°C to 35°C |
| Water Supply Pressure | 0.07 to 0.8 MPa (0.7 to 8 bar) |
| Maximum Water Hardness | 50 mg/l |
| Maximum Silica Level | 30 mg/l |
| Recommended Clearances | 15 cm from rear, left side, and top; 30 cm from right side |
| Materials | HFC-free foam insulation, stainless steel |
| Air Filter Maintenance | Every 15 days |
| Water System Cleaning | At least twice a year by a qualified technician |
| Condenser Cleaning | At least once a year |
| Warranty | 2 years from the date of installation |
Frequently Asked Questions - KMD-210ABE-HC Hoshizaki
User questions about KMD-210ABE-HC Hoshizaki
0 question about this device. Answer the ones you know or ask your own.
Ask a new question about this device
Download the instructions for your Ice Maker in PDF format for free! Find your manual KMD-210ABE-HC - Hoshizaki and take your electronic device back in hand. On this page are published all the documents necessary for the use of your device. KMD-210ABE-HC by Hoshizaki.
USER MANUAL KMD-210ABE-HC Hoshizaki
MODULAR CRESCENT CUBER
MACHINE A GLACONS CROISSANT MODULAIRE
(original instructions)
NOTICE D'UTILISATION
natural_image
Exterior view of a stainless steel industrial air conditioner unit (no visible text or symbols)KMD-210ABE-HC
IMPORTANT SAFETY INFORMATION
Throughout this manual, notices appear to bring your attention to situations which could result in death, serious injury, or damage to the unit.
| WARNING | Indicates a hazardous situation which, if not avoided, could result in death or serious injury. |
| CAUTION | Indicates a hazardous situation which, if not avoided, could result in minor or moderate injury. |
| NOTICE | Indicates a hazardous situation which, if not avoided, could result in damage to the unit. |
| HYGIENE | Indicates important precautions for hygiene and food safety. |
| IMPORTANT | Indicates important information about the use and care of the unit. |
This icemaker uses HFC-free refrigerant (propane) and HFC-free foam insulation that are non-ozone-depleting and environmentally sustainable materials having very low global warming potential.
| WARNING |
| This icemaker contains flammable refrigerant in its cooling unit; installation, handling, servicing and disposal must therefore only be carried out by authorized technicians. |
| The refrigerant contained in this icemaker is flammable and sealed in the refrigeration system. Although the refrigerant does not leak out under normal usage, take utmost care when handling this icemaker so as not to cause any damages to the system. |
| In the case of accidental damage to the refrigeration system causing refrigerant leak:* Do not create a source of ignition in the area.* Do not operate electrical switches or plugs in the area.* Do not use naked flame.* Immediately ventilate the area by opening doors and/or windows.* Call service engineer. |
| IMPORTANT |
| This booklet is an integral and essential part of the product and should be kept and preserved by the user. |
| Please read carefully the guidelines and warnings contained herein as they are intended to provide the installer/user with essential information for the proper installation and the continued safe use and maintenance of the product. |
| Please preserve this booklet for any further consultation that may be necessary. |
| WARNING |
| This is a commercial icemaker, and should be destined only to be used for the purpose for which it has been expressly designed.Any other use should be considered improper and therefore dangerous. The manufacturer will not be held liable or responsible for any damage caused by improper, incorrect and unreasonable use. |
| The installation, and relocation if necessary, must be carried out by qualified personnel, in accordance with current regulations, according to the manufacturer's instructions. |
| Keep ventilation openings, in the appliance enclosure or in the built-in structure, clear of obstruction. |
| Do not use mechanical devices or other means to accelerate the defrosting process, other than those recommended by the manufacturer. |
| The use of any electrical appliance involves the observance of some fundamental rules. In particular:* Instances of high humidity and moisture increase the risk of electrical short circuits and potential electrical shocks. If in doubt, disconnect the icemaker.* Do not damage the power cord or pull it in order to disconnect the icemaker from the electrical supply network.* If the supply cord is damaged, it must be replaced by a replacement cord available from Hoshizaki Parts/Service Centres.* Do not touch the electrical parts or operate the switches with damp hands.* This appliance is not intended for use by persons (including children) with reduced physical, sensory or mental capabilities, or lack of experience and knowledge, it can however be used by children aged from 8 years and above and persons with reduced physical, sensory or mental capabilities, or lack of experience and knowledge providing they have been given supervision or instruction concerning use of the appliance by a person responsible for their safety.* Children shall not play with the appliance.* Cleaning and user maintenance shall not be made by children without supervision.* Do not attempt to modify the icemaker. Only qualified personnel may disassemble or repair the appliance. |
I. INSTALLATION INSTRUCTIONS
1. UNPACKING
WARNING
Children should not be allowed in reach of the packaging elements (plastic bags and expanded polystyrene) as they are potential sources of danger.
CAUTION
Remove shipping carton, tape(s) and packing. If packing material is left in the icemaker, it will not work properly.
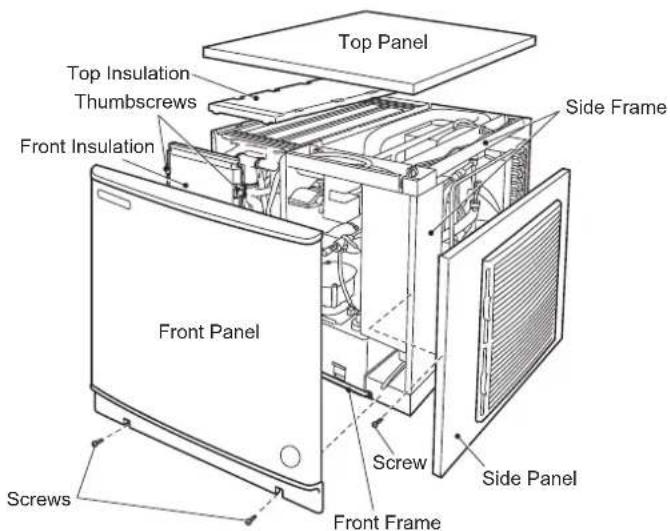
Fig. 1
1) After removing the packaging, make sure that the icemaker is in good condition. If in doubt, please do not use the equipment but apply to professionally qualified personnel.
2) Remove shipping tape holding the components.
3) Remove the protective plastic film from the exterior. If the icemaker is exposed to the sun or to heat, remove the film after the icemaker cools.
4) Remove the package of accessories, and check the contents:
a) Power Supply Cord 1
b) Mounting Bracket 2
c) Bolt 2
2. LOCATION
IMPORTANT
- This icemaker is not intended for outdoor use. Normal operating ambient temperature should be within 7°C to 40°C. Normal operating water temperature should be within 7°C to 35°C. Operation of the icemaker, for extended periods, outside of these normal temperature ranges may affect production capacity.
- The icemaker should not be located next to ovens, grills or other high heat producing equipment.
- The location should provide a firm and level foundation for the equipment.
- Allow 15 cm clearance at rear, left side and top and 30 cm clearance at right side for proper air circulation and ease of maintenance and/or service should they be required.
- This appliance is not suitable for installation in an area where a water jet could be used and where dripping is not allowed.
- Do not place anything on top of the icemaker or in front of the louver.
- This icemaker will not work at subfreezing temperatures. To prevent damage to the water supply line, drain the icemaker
when air temperature is below zero (see "II. 2. PREPARING THE ICEMAKER FOR LONG STORAGE").
- Avoid prolonged exposure of the appliance to direct sunlight.
3. INSTALLATION
* Incorrect installation can cause harm to people, animals or things, for which the manufacturer cannot be held responsible.
* Place the icemaker on top of the storage bin/dispenser unit by holding the bottom.
* Place the icemaker in the selected permanent site.
* The appliance must be positioned so that the plug is accessible.
* Level the dispenser unit/ice storage bin in both the left-to-right and front-to-rear directions. If using an ice storage bin, adjust the ice storage bin legs to level. See Fig. 2.
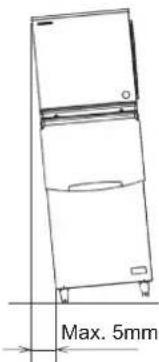
Fig. 2
4. BIN CONTROL INSTALLATION
1) Remove the front panel, then remove the front insulation.
2) Loosen the two thumbscrews securing the pump motor bracket. See Fig. 3.
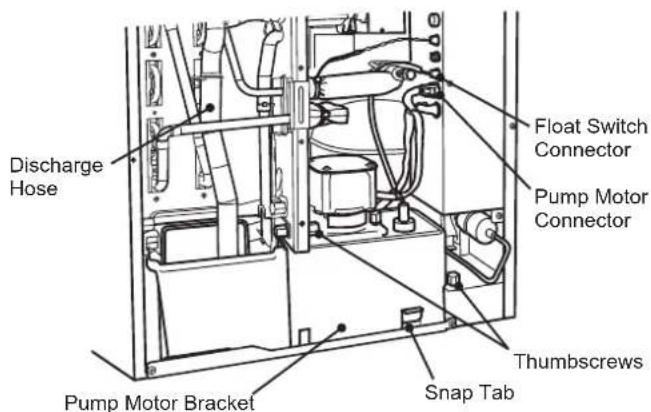
Fig. 3
3) Disconnect the discharge hose.
4) Disconnect the pump motor connector and float switch connector from the side of the control box.
5) Pull out the water tank, cube guide, pump motor bracket, pump motor and float switch together. See Fig. 4.
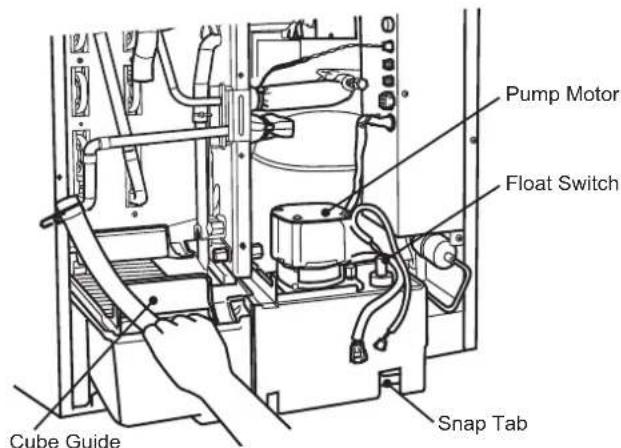
Fig. 4
6) Route the bin control lead through the hole in the base, then into the bushing provided. See Fig. 5.
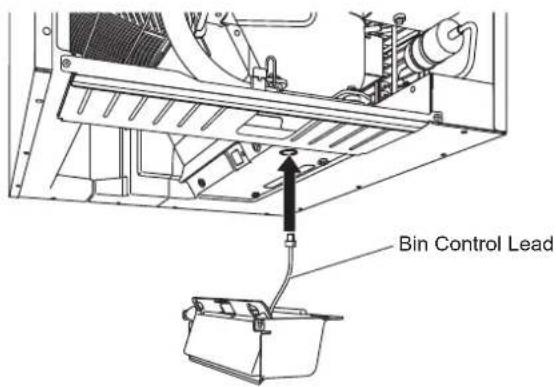
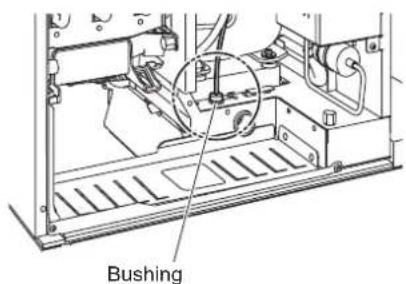
Fig. 5
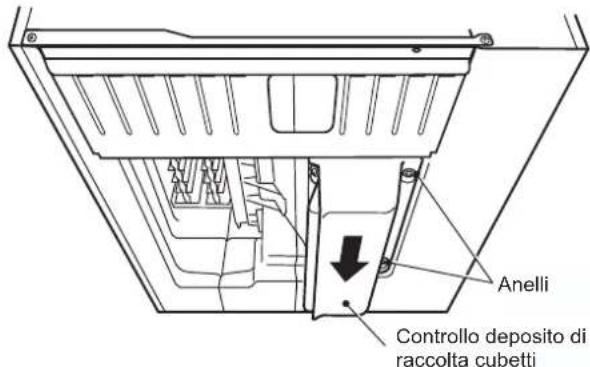
7) While pulling up the bin control lead, hook the bin control on the right side interior wall. Then push the bin control up against the bottom of the unit, and slide to the back until it snaps in place. Make sure the slotted holes at the right side of the bin control are securely placed on the collars at the bottom of the unit. See Fig. 6.
CAUTION
Make sure the bin control is securely in place. Otherwise, ice may get between gaps and damage the bin control.
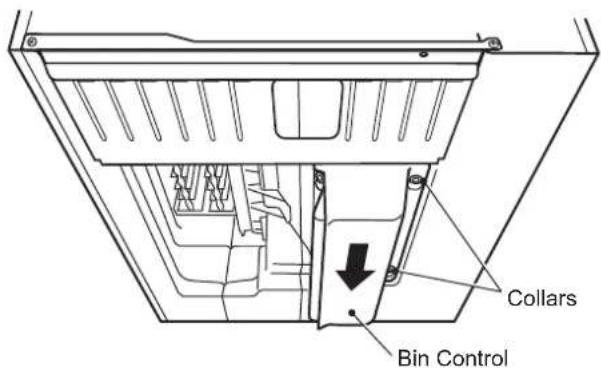
Fig. 6
8) Pull up any slack in the bin control lead, then put the bushing attached to the bin control lead back into the hole in the base.
9) Connect the bin control connector to the side of the control box.
10) Replace the water tank, cube guide, pump motor bracket, pump motor and float switch in their correct positions. The pump motor bracket must be attached securely to the back so that the thumbscrews can be tightened.
CAUTION
Be sure to let the discharge hose pass behind the copper tube and connect it securely in position. See Fig. 3. Otherwise, the discharge hose may be caught in the front insulation, leading to improper results.
11) Secure the pump motor bracket with the two thumbscrews.
12) Reconnect the pump motor connector and float switch connector.
13) Replace the front insulation and front panel in their correct positions.
5. ELECTRICAL CONNECTIONS
WARNING
THIS APPLIANCE MUST BE EARTHED
This icemaker requires an earth that meets the national and local electrical code requirements. To prevent possible severe electrical shock to individuals or extensive damage to equipment, install a proper earth wire to the icemaker. Remove the plug from the mains socket before any maintenance, repairs or cleaning is undertaken.
* This appliance requires a separate 220 - 240VAC, 10A supply. The electrical supply must be protected by a suitable circuit breaker.
* The main control box fuse is rated at 5A, 250V and should only be replaced by a qualified service engineer.
* Usually an electrical permit and services of a licensed electrician are required.
For the U.K. and the Republic of Ireland only
* The wires in the mains lead are coloured in accordance with the following code:
Green & Yellow = Earth
Blue = Neutral
Brown = Live
As the colours of the wire in the mains lead of this appliance may not correspond with the coloured markings identifying the terminals in your plug, proceed as follows:
The wire which is coloured Green-and-Yellow must be connected to the terminal in the plug which is marked with the letter E or by the symbol 12 or coloured Green or Green-and-Yellow. The wire which is coloured Blue must be connected to the terminal which is marked with the letter N or coloured Black. The wire which is coloured Brown must be connected to the terminal which is marked with the letter L or coloured Red.
* Should the socket outlets in the installation site not be suitable for the plug supplied with your product, the plug must be removed (cut off if it is moulded on plug) and an appropriate plug fitted.
If the non-rewirable plug has been cut from the power supply cord, it must be disposed of. There should be no attempt to reuse it. Inserting such a plug into a socket elsewhere presents a serious risk of electrical shock.
* The non-rewirable plug must never be used without a fuse cover being fitted.
The correct replacement for the detachable fuse cover is identifiable from the manufacturer's reference number stamped on the plug.
Supply of replacement fuse covers can be obtained from Hoshizaki Parts/Service Centres.
Fuses should be rated at 10A and approved to BS 1362.
6. WATER SUPPLY AND DRAIN CONNECTIONS WARNING
Connect to potable water supply only.
* The connections to the mains water supply must be made in accordance with the countries' current requirements of the Water Supply or Water Fittings Regulations.
* To avoid performance reduction or malfunction caused by scaling, the water supply should have a hardness of not more than 50 mg/L and a silica content of not more than 30 mg/L. Otherwise, installation of a proper water treatment device will be required.
* Water supply pressure should be minimum 0.07 MPa (0.7 bar) and maximum 0.8 MPa (8 bar). If the pressure exceeds 0.8 MPa (8 bar), use a pressure reducing valve. Do NOT throttle back the supply tap.
* A plumbing permit and services of a licensed plumber may be required in some areas.
* Water should drain into an open trap.
* The icemaker drain is gravity flow, so ensure drain pipe has an adequate pitch or fall.
* A vented tee connection is required for proper drain flow. See Fig. 7.
* The icemaker drain line must be run separately from the storage bin/ dispenser unit drain line. See Fig. 7.
* There should be no backflow in the water circuit.
* Water supply connection is intended to be made by means of a pipe, not a hose set.
Note: Jointing compounds should be approved and suitable for potable water use.
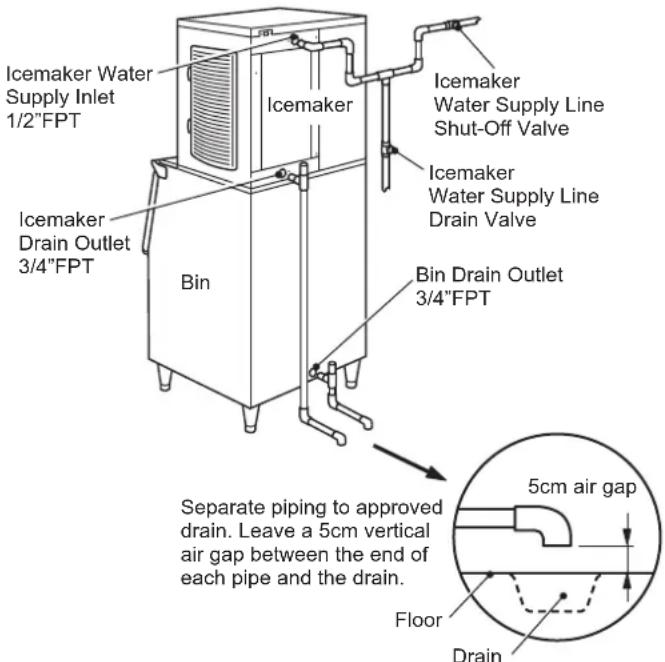
Fig. 7
II. OPERATING INSTRUCTIONS
WARNING
- This icemaker is designed to produce edible ice. To keep the icemaker hygienic:
* Wash your hands before removing ice. Use the plastic scoop provided (accessory).
* The storage bin is for ice use only. Do not store anything else in the bin.
* Clean the storage bin before use (see "III. 1. CLEANING").
* Keep the scoop clean. Clean it by using a neutral cleaner and rinse thoroughly.
* Close the door after removing ice to prevent entrance of dirt, dust or insects into the storage bin.
- All parts are factory-adjusted. Improper adjustments may result in failure.
- If the unit is turned off, wait for at least 3 minutes before restarting the icemaker to prevent damage to the compressor.
1. OPERATION
The installer will normally commission the icemaker to start the automatic icemaking process. To ensure continuous operation, make sure that:
* The water supply tap is on,
* The icemaker is plugged into the power supply.
2. PREPARING THE ICEMAKER FOR LONG STORAGE
1) Turn off the circuit breaker.
2) Close the water supply line shut-off valve.
3) Remove all ice from the storage bin/dispenser, and clean the bin/dispenser.
4) Ask for draining of the icemaker by professional qualified personnel.
III. MAINTENANCE
1. CLEANING
WARNING
- Before carrying out any cleaning or maintenance operations, unplug the icemaker from the electrical supply network.
- Ask a trained service person to clean and sanitise the icemaker water system at least twice a year and to check and clean the condenser at least once a year.
- This appliance must not be cleaned by use of a water jet.
- Do not use any alcohol for cleaning/sanitisation of the icemaker. It may cause cracks on the plastic parts.
- To prevent possible damage, do not clean the plastic parts with water above 40^ C or in a dishwasher.
[1] Machine and Bin Exterior
Wipe the exterior at least once per week with a clean, soft cloth. Use a damp cloth containing a neutral cleaner to wipe off grease or dirt.
[2] Scoop
1) Either mix 3 litres of water with 11 ml of 5.25% sodium hypochlorite solution in a suitable container, or the recommended Hoshizaki sanitiser as directed.
2) Soak the scoop in the solution for more than 3 minutes. Rinse thoroughly, and shake to remove surplus liquid.
Note: Using a cloth to dry may re-contaminate.
[3] Storage Bin Interior Cleaning/Sanitisation (Weekly)
1) Open the storage bin door, and remove all ice.
Note: Hoshizaki recommends various types of storage bin for the icemaker which vary in size and design. The following instructions are therefore for general guidance only.
2) Wash the bin liner and door inner surface with a neutral non-abrasive cleaner. Rinse thoroughly with a clean cloth and fresh water.
3) Either mix 5 litres of water with 18ml of 5.25% sodium hypochlorite solution in a suitable container or the recommended Hoshizaki sanitiser as directed.
4) Soak a clean sponge or cloth with the solution, and wipe the bin liner and door inner surface.
5) Rinse thoroughly with fresh water and a clean cloth to wipe off the solution. Close the bin door.
Note: Some solutions may cause damage to the bin liner surfaces or corrosion on the metal parts. Always rinse the sanitiser unless directed otherwise by Hoshizaki guidelines.
[4] Air Filter
Plastic mesh air filters remove dirt or dust from the air, and keep the condenser from getting clogged. If the filters get clogged, the icemaker's performance will be reduced. Remove and clean the air filters at least twice per month:
1) Remove the air filter.
Note: Do not put your hand inside the machine compartment.
2) Clean the air filter by using a vacuum cleaner. When severely clogged, use warm water and a neutral cleaner to wash the air filter.
3) Rinse and dry the air filter thoroughly, and place it in position.
[5] Icemaking Water System
To keep the icemaker hygienic, periodic cleaning of the icemaking water system is recommended. Always ask a trained service person to clean the water system.
2. BEFORE CALLING A SERVICE AGENT
WARNING
Do not damage the refrigerant circuit.
If the icemaker does not work properly or does not work at all, before calling for service, check that:
* The power is supplied to the unit.
* The water is turned on.
* The air filter is clean.
For further assistance or advice, contact your local Hoshizaki service agent.
3. WARRANTY
Hoshizaki warrants to the original owner/user that all Hoshizaki branded products shall be free of defects in material and/or workmanship for the duration of the “warranty period”. The warranty shall be effective for two years from the date of installation.
Hoshizaki's liability under the terms of the warranty are limited and shall exclude routine servicing, cleaning, essential maintenance and/or repairs occasioned by misuse and installations not in accordance with Hoshizaki guidelines.
Warranty repairs should be completed by an approved Hoshizaki dealer or service agency using genuine Hoshizaki components.
To obtain full details of your warranty and approved service agency, please contact your dealer/supplier, or the nearest Hoshizaki Service office:
Europe, Middle East, Africa
Hoshizaki UK - UK, Ireland
TEL: +44 845 456 0585
FAX: +44 132 283 8331
uksales@hoshizaki.uk
Hoshizaki Deutschland - Germany, Switzerland, Austria, Poland, Czech Republic, Slovakia
TEL: +49 5121 697370
FAX: +49 5121 6973719
Hoshizaki France - France
TEL: +33 1 48 63 93 80
FAX: +33 1 48 63 93 88
info@hoshizaki.fr
Hoshizaki Iberia - Spain, Portugal
TEL: +34 93 478 09 52
FAX: +34 93 478 08 00
info@hoshizaki.es
Hoshizaki Middle East - Middle East
TEL: +971 48 876 612
FAX: +971 48 876 613
sales@hoshizaki.ae
Hoshizaki Benelux - Netherlands, Belgium, Luxembourg
Tel: +31 85 018 83 70
info@hoshizaki.nl
Hoshizaki Italia - Italy
TEL: +39 344 0616467
TEL: +39 348 3022156
info@hoshizaki.it
Hoshizaki Europe B.V. - all other countries within Europe and Africa
TEL: +31 20 6918499
FAX: +31 20 6918768
sales@hoshizaki.nl
Asia, Oceania
Hoshizaki Singapore
TEL: +65 6225 2612
FAX: +65 6225 3219
sales@hoshizaki.com.sg (Sales)
serviceadmin@hoshizaki.com.sg (Technical support)
Hoshizaki Taiwan
TEL: +886 2 2706 8818
FAX: +886 2 2708 7999
Hoshizaki Hong Kong
TEL: +852 2866-2108
FAX: +852 2866-2109
IV. DISPOSAL
Comply with local regulations regarding disposal of this appliance and its refrigerant gas. Before you scrap the appliance, take off the door to prevent children trapped.
Correct disposal of this product:
This marking indicates that this product should not be disposed with other household wastes throughout the EU. To prevent possible harm to the environment or human health from uncontrolled waste disposal, recycle it responsibly to promote the sustainable reuse of material resources.
To return your used device, use the return and collection systems or contact the retailer where the product was
purchased. They can take this product for environmental safe recycling
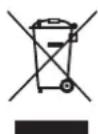
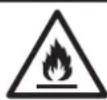
WARNING
The insulation foaming agent used for the unit body contains flammable gas cyclopentane. With this in mind, dispose of the product properly.
INFORMATIONS DE SECURITE IMPORTANTES
Hoshizaki France - France
TEL: +33 1 48 63 93 80
FAX: +33 1 48 63 93 88
info@hoshizaki.fr
Hoshizaki Iberia - Espagne, Portugal
TEL: +34 93 478 09 52
FAX: +34 93 478 08 00
info@hoshizaki.es
Hoshizaki Middle East - Moyen Orient
TEL: +971 48 876 612
FAX: +971 48 876 613
sales@hoshizaki.ae
Abb. 5
2. VOORDAT U BELT VOOR SERVICE WAARSCHUWING
Fig. 5
sales@hoshizaki.com.sg (Vendite)
serviceadmin@hoshizaki.com.sg (Assistenza tecnica)
Hoshizaki Taiwan
TEL: +886 2 2706 8818
FAX: +886 2 2708 7999
Hoshizaki Hong Kong
TEL: +852 2866-2108
FAX: +852 2866-2109
IV. SMALTIMENTO
- NOTICE D'UTILISATION
- IMPORTANT SAFETY INFORMATION
- INSTALLATION INSTRUCTIONS
- UNPACKING
- WARNING
- CAUTION
- LOCATION
- IMPORTANT
- INSTALLATION
- BIN CONTROL INSTALLATION
- ELECTRICAL CONNECTIONS
- THIS APPLIANCE MUST BE EARTHED
- For the U.K. and the Republic of Ireland only
- WATER SUPPLY AND DRAIN CONNECTIONS WARNING
- OPERATING INSTRUCTIONS
- OPERATION
- PREPARING THE ICEMAKER FOR LONG STORAGE
- MAINTENANCE
- CLEANING
- [1] Machine and Bin Exterior
- [2] Scoop
- [3] Storage Bin Interior Cleaning/Sanitisation (Weekly)
- [4] Air Filter
- [5] Icemaking Water System
- BEFORE CALLING A SERVICE AGENT
- WARRANTY
- Europe, Middle East, Africa
- Asia, Oceania
- DISPOSAL
- INFORMATIONS DE SECURITE IMPORTANTES
- VOORDAT U BELT VOOR SERVICE WAARSCHUWING
- SMALTIMENTO
Brand : Hoshizaki
Model : KMD-210ABE-HC
Category : Ice Maker