SHXA700-WiFi - Heating SHX - Free user manual and instructions
Find the device manual for free SHXA700-WiFi SHX in PDF.

User questions about SHXA700-WiFi SHX
0 question about this device. Answer the ones you know or ask your own.
Ask a new question about this device
Download the instructions for your Heating in PDF format for free! Find your manual SHXA700-WiFi - SHX and take your electronic device back in hand. On this page are published all the documents necessary for the use of your device. SHXA700-WiFi by SHX.
USER MANUAL SHXA700-WiFi SHX
https://www.schuss-home.at/downloads
natural_image
Technical line drawing of a mechanical component labeled 'WALL' with no readable text or symbols beyond the label
text_image
3 WALL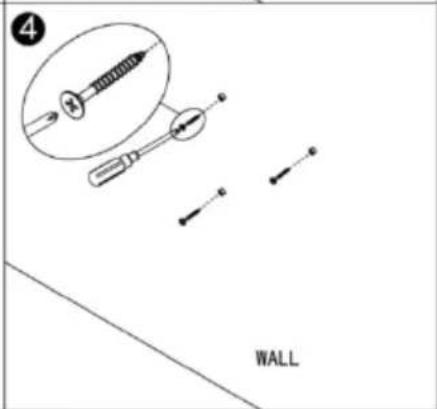
text_image
4 WALL
text_image
5 WALL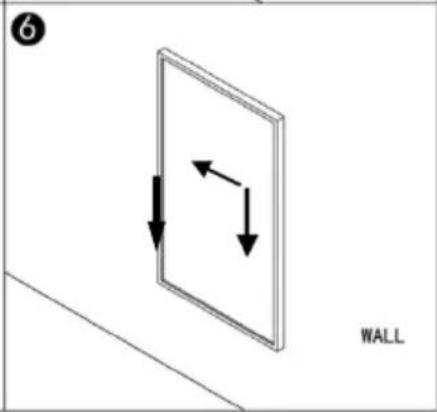
natural_image
Diagram showing two opposing arrows inside a wall frame, labeled 'WALL' (no text or symbols on the diagram itself)text_image
QR code with a blue house icon in the center, likely linking to a digital service or application.text_image
3:08 Jack Welcome home Set your home location, get more information 3 All devices Living Room Bedroom Save ... Add Device
text_image
3:08 Cancel Add Manually Add Device Benchical Smart Lighting Fan Stand Heating Air Cleaner Home Appliances 1 Home Appliance... Battery Humidifier Air Pulsar Kitchen Security & Sensor Air Skin Taylor Pulsifier Disturability Sport & Health Others Tilapia Lighting Reactor Product (Kit heater) Thermocast Device (Option) CurrentsSchritt 1:
DÉCLARATION DE CONFORMITÉ
https://www.schuss-home.at/downloads
text_image
1 2 3 4 8 5 → 88:88 6 → 88°C 7 → M P Bnatural_image
Simple line drawing of a mechanical component with a labeled 'WALL' (no other text or symbols)
text_image
3 WALL
text_image
4 WALL
text_image
5 WALL
text_image
6 WALLtext_image
QR code with a blue house icon in the center, likely linking to a digital service or application.text_image
3:08 Jack Welcome home Set your home location, get more information > All devices Living Room Bedroom Save ... Add Device
text_image
3:08 Cancel Add Device Add Manually Bathroom Smart Lighting Fan Seed Lighting Air Cleaner Home Appliances I Home Appliance... Hybrid Air Poultry Kitchen Security & Sensor Air Skin Myster Poultry Disturable Sport & Health Others Tilapia Litterfly Heather Product (2x heater) Thermocyst Device Digital CurrentsÉtape 1 :
DÉCLARATION DE CONFORMITÉ
Schuss Home Electronic GmbH Scheringgasse 3 - 1140 Vienne - Autriche
Directive CEM 2014/30/UE, directive LVD 2014/35/UE, directive RED2014/53/UE,
Directive ErP-2009/125/EC Règlement (CE) No / Regulation (EV) No. EU 206/2012
Directive RoHs 2011/65/UE & (UE) 2015/863
Directive RED 2014/53/UE
La sécurité :
EN 60335-2-30:2009+A11:2012+A1:2020+A12:2020
EN 60335-1:2012+A11:2014+A13:2017+A1:2019+A2:2019+A14:2019
EN 60335-2-30:2009+A11:2012+A1:2020
EN 60335-1:2012+A11:2014+A13:2017+A1:2019+A2:2019+A14:2019
Santé :
EN 62233:2008
EN 62233:2008
EN 62311:2008, EN 50665:2017
EMC :
EN 301 489-1 V2.2.3(2019-11)
EN 301 489-17 V3.2.4(2020-09)
EN 55014-1:2017+A11:2020, EN 55014-2:2015
EN IEC 61000-3-2:2019, EN 61000-3-3:2013+A1:2019
Radio :
EN 300 328 V2.2.2 (2019-07)
Authorized representative of manufacture
natural_image
Simple line drawing of a mechanical device with a labeled 'WALL' at the bottom (no other text or symbols)
text_image
3 WALL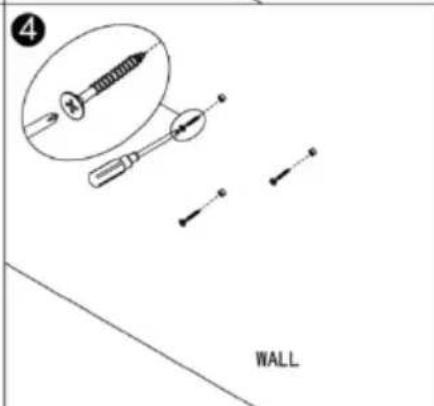
text_image
4 WALL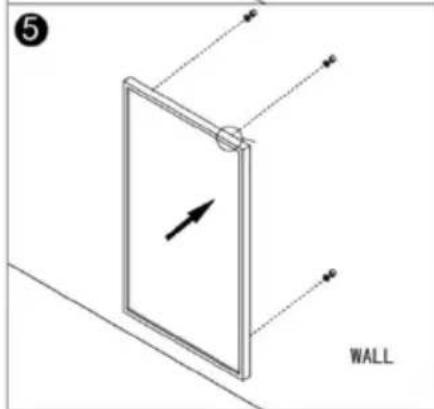
text_image
5 WALL
natural_image
Diagram showing two opposing arrows inside a wall frame, labeled 'WALL' (no text or symbols on the diagram itself)text_image
QR code with a blue home icon in the center, likely linking to a smart home or app interface.text_image
3:08 Jack Welcome home Set your home location, get more information. ? All devices Living Room Bedroom See ... Add Device 3:08 Cancel Add Device Add Manually Search Device Medical Smart Lighting Eye Sound TV Subwoofts Air Cutter Home Appliances I Home Appliance... Smart & Sensor Air Subs Water Putter Delivered/Dis Sport & Health Others Sleep Lamp Heater Prevent adjustment Of Heater Thrombot Device (Optics) CableFase 1:
Authorized representative of manufacture
text_image
1 2 3 4 8 5 → 88:88 6 → 88°C 7 → M P Bnatural_image
Simple line drawing of a mechanical component with a labeled 'WALL' at the bottom (no other text or symbols)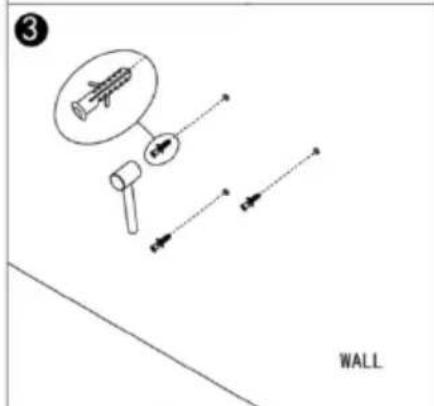
text_image
3 WALL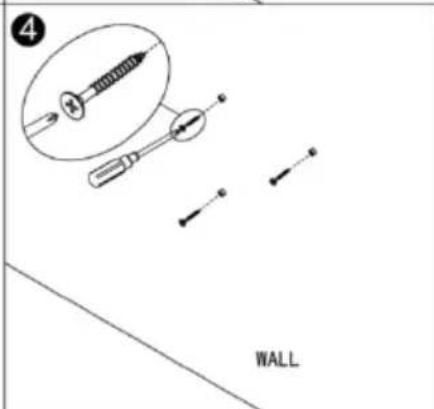
text_image
4 WALL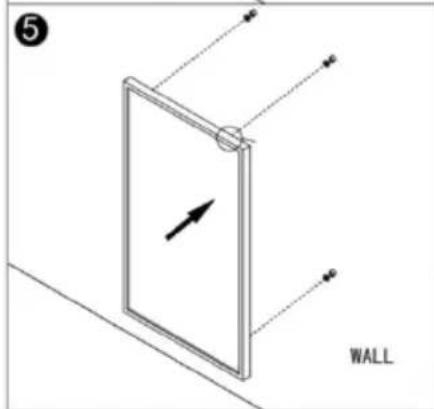
natural_image
Diagram of a wall-mounted device with an arrow indicating direction, no text or symbols present
natural_image
Diagram showing two opposing arrows inside a wall frame, labeled 'WALL' (no text or symbols on the diagram itself)Smartlife APP downloaden
text_image
QR code with a blue home icon in the center, likely linking to a digital service or application.text_image
3:08 Jack Welcome home Set your home location, get more information ) All devices Living Room Bedroom See Add Device 3:08 Cancel Add Device Add Manually Search Device Electrical Smart Lighting Fan Insol Thermal Desinoids Air Cutter Home Appliances I Home Appliance... Humidifier Air Putter Kitchen Security & Sensor Air Tools Water Putter Delivery Sport & Health Others Sleep Lighting Heater Pressur Oil heater Thermostat Device OpticsStap 1:
natural_image
Simple line drawing of a mechanical device with a labeled 'WALL' at the bottom (no other text or symbols)
text_image
3 WALL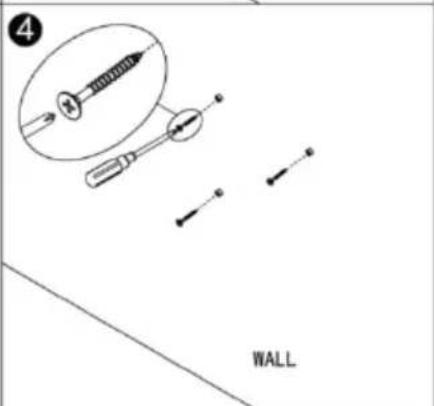
text_image
4 WALL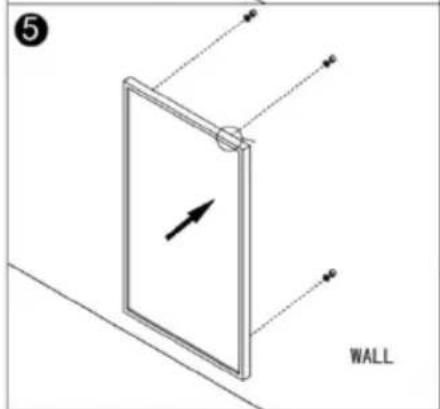
text_image
5 WALL
text_image
6 WALLtext_image
QR code with a blue home icon in the center, likely linking to a digital service or application.Conexión con WLAN:
text_image
3:08 Jack Welcome home Set your home location, get more information .) All devices Living Room Bedroom See ... Add Device 3:08 Cancel Add Device Add Manually Search Device Medical Smart Lighting Fyn Sound Temperature Solutions Air Cleaner Home Appliances I Home Appliance... Hyundai Air Putter Kitchen Security & Sensor Air Tube Water Heater Durable/Blue Sport & Health Others Sleep Lamp Heater Prepared in/outdoor/ Oil Heater Thrombot Device (Optics)Primer paso:
natural_image
Simple line drawing of a mechanical component with a labeled 'WALL' (no other text or symbols)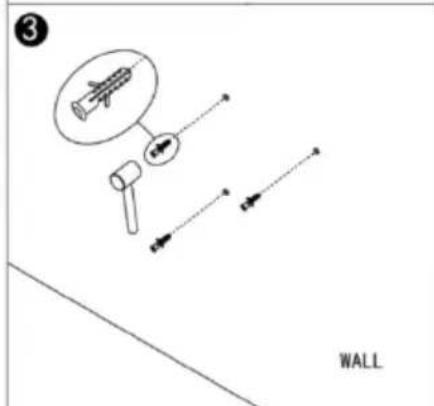
text_image
3 WALL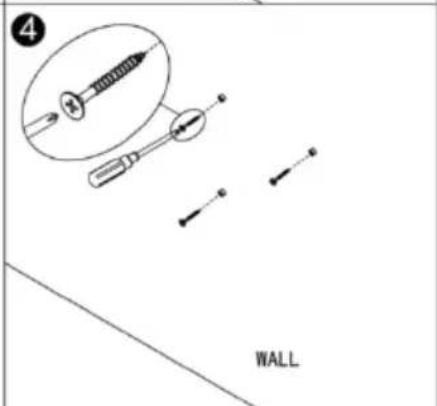
text_image
4 WALL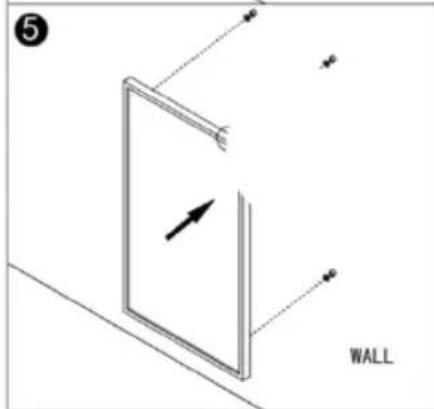
text_image
5 WALL
text_image
6 WALLtext_image
QR code with a blue home icon in the center, likely linking to a digital service or application.text_image
3:08 Jack Welcome home Set your home location, get more information > All devices Living Room Bedroom Stop ... Add Device 3:08 Cancel Add Device Add Manually Search Device Bed/Cond Smart Lighting Fan Sound (12mm) Air Cleaner Home Appliances! Home Appliances... Air Purifier Kitchen Security & Sensor Air Sub Water Purifier Dihydrift/ Sport & Health Others Sleep Lighting Heater Heater (Optimal) Oil heater Throatzer Decor OtherKrok 1:
text_image
1 2 3 4 8 5 → 88:88 6 → 88:88 7 → M P Bnatural_image
Simple line drawing of a mechanical device with a labeled 'WALL' at the bottom (no other text or symbols)
text_image
3 WALL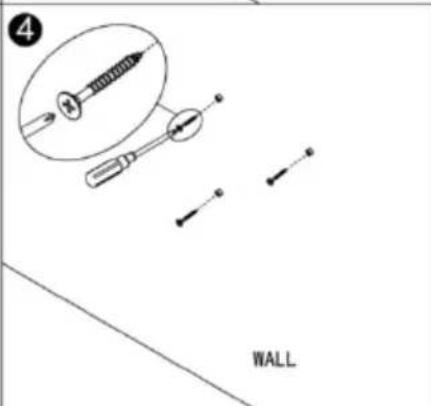
text_image
4 WALL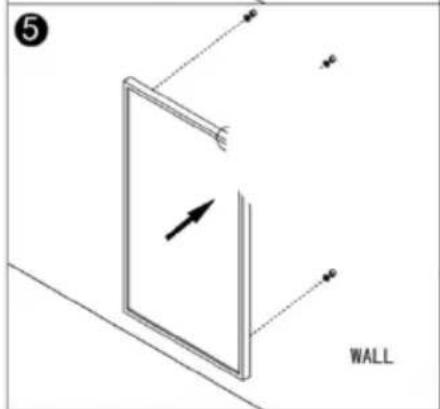
text_image
5 WALL
natural_image
Diagram showing two opposing arrows inside a rectangular frame labeled 'WALL' (no text or symbols beyond label)text_image
QR code with a blue house icon in the center, likely linking to a digital service or application.text_image
3:08 Jack Welcome home Set your home location, get more information > All devices Living Room Bedroom S Add Device 3:08 Cancel Add Device Add Manually Search Device Electrical Smart Lighting Fuel Seed Machine Air cooler Home Appliances 1 Home Appliance... Air Heater Air Refriger Kitchen Security & Sensor Air Sensor Water & Heat Sport & Health Others Sleep Lamp Heater Heater (non-heat) Oil Heater Thermosat Device (Unpilot) Home Other CustomsKrok 1:
Ovládajte vypínač, stlačte tlačidlo zapnutia/vypnutia. Nápis WLAN začne rýchlo blikat'. Otvorte aplikáciu APP v smartfóne a pridajte svoje zariadenie. Vyberte "Add device" (Pridat' zariadenie), potom "Add manually" (Pridat' ručne), "Household appliances (small)" (Domáce spotrebiče (malé)) a potom "Heating" (Vykurovanie) na pridanie zariadenia.
Krok 2:
Authorized representative of manufacture
text_image
1 2 3 4 8 5 → 88:88 6 → 88°C 7 → M P Bnatural_image
Simple line drawing of a mechanical device with a labeled 'WALL' at the bottom (no other text or symbols)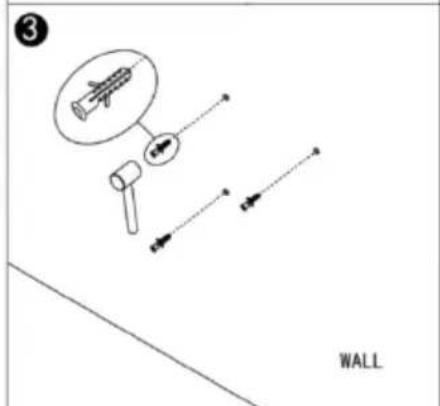
text_image
3 WALL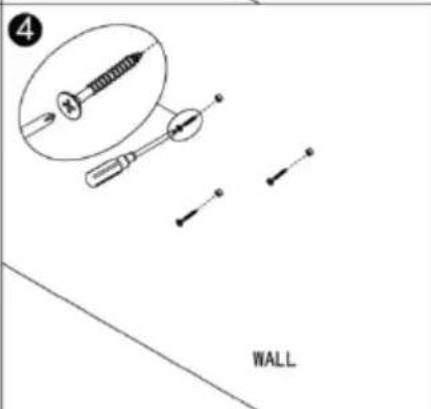
text_image
WALL
text_image
5 WALL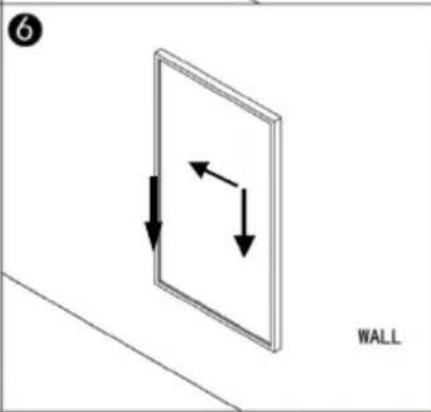
natural_image
Diagram showing a wall with bidirectional arrows indicating movement, labeled 'WALL' (no text or symbols beyond label)text_image
QR code with a blue home icon in the center, likely linking to a digital service or application.Conexiune cu WLAN:
text_image
3:08 Jack Welcome home Set your home location, get more information 3 All devices Living Room Bedroom Sep ... Add Device 3:08 Cancel Add Device Add Manually Search Device Bed/Cond Smart Lighting Top Sound (white) Air Cleaner Home Appliances I Home Appliances... Rainy Lighting Humidifier Air Purifier Kitchen Security & Sensor Air Sub Water Purifier Diminidifier Sport & Health Others Sleep Lamp Window Interior air cooling Oil heater Throatzer Decora GreenPasul 1:
INFRARED HEATING with Wi-Fi
SHXA350-WIFI - SHXA700-WIFI - SHXA1000-WIFI
CONGRATULATIONS!
THANK YOU FOR PURCHASING THIS SHX PRODUCT.

This product is intended for use in well-insulated areas and for occasional use only.
TABLE OF CONTENTS
| EN |
| Important information on safety, place of use and electrical connections |
| Recycling, disposal and Declaration of Conformity |
| Scope of delivery |
| Description of the appliance |
| Safety information for installation |
| Before assembly |
| Installation instructions |
| Starting up and functions |
| Wi-Fi and app operation |
| Cleaning and maintenance |
| Technical information |
| Required data for single-room electrical heating devices |
PLEASE READ THE OPERATING MANUAL CAREFULLY BEFORE BEGINNING ASSEMBLY, INSTALLATION, OPERATION OR MAINTENANCE. PROTECT YOURSELF AND OTHERS BY FOLLOWING THE SAFETY INSTRUCTIONS. FAILURE TO COMPLY WITH THESE INSTRUCTIONS MAY RESULT IN PERSONAL INJURY AND/OR PROPERTY DAMAGE AND/OR LOSS OF CLAIMS UNDER WARRANTY.
Intended Use
This appliance is intended exclusively for the heating of domestic living spaces and may not be used for any other purpose.
IMPORTANT INFORMATION ON SAFETY, STANDARDS AND ELECTRICAL CONNECTIONS

1. Safety instructions
TO REDUCE THE RISK OF FIRE, ELECTRIC SHOCK OR INJURY
1.1 Product related safety warnings
- SHX infrared heaters operate at a surface temperature of around 95^ C when wall mounted. Do NOT touch the heater when switched on.
- Prolonged contact may cause injuries or burns.
- Do NOT cover the heater with anything. Covering may cause overheating and can result in fire.
- The heater should NOT be used to dry textiles and no objects shall be placed or leaned against the heater.
- Keep a distance of at least 40cm in the front and 20cm on the sides to any object, wall. Failure to do so will cause heat to build up behind the heater and will void your warranty.
- This heater is designed to be wall mounting, please don't mount them on the ceiling.
- This heater can be easily operated using your smartphone, via the same WLAN, via a different WLAN, or via a 3G or 4G mobile network. This makes it possible to operate your heater remotely, without your direct supervision. However, please make sure that all safety precautions stated in this manual must be taken even with remote operation.
1.2 Dangers for children and persons with limited abilities
- This appliance can be used by children aged from 8 years and above and persons with reduced physical, sensory or mental capabilities or lack of experience and knowledge if they have been given supervision or instruction concerning use of the appliance in a safe way and understand the hazards involved. Children shall not play with the appliance. Cleaning and user maintenance shall not be made by children without supervision.
• Children of less than 3 years should be kept away unless continuously supervised.
• Children aged from 3 years and less than 8 years shall only switch on/off the appliance provided that it has been placed or installed in its intended normal operating position and they have been given supervision or instruction concerning use of the appliance in a safe way and understand the hazards involved. Children aged from 3 years and less than 8 years shall not plug in, regulate and clean the appliance or perform user maintenance
- CAUTION — Some parts of this product can become very hot and cause burns. Particular attention has to be given where children and vulnerable people are present.
- If the supply cord is damaged, it must be replaced by the manufacturer, its service agent or similarly qualified persons in order to avoid a hazard.
- Do NOT operate the heater in small rooms when occupied by people not capable of leaving the room by themselves. The surface of the heater can reach a surface temperature of up to 95^ C , keep out of reach of children and disabled persons.
- Keep away babies and children from all packaging material such as plastic bags to avoid danger of suffocation.
1.3 Electric safety directions
- When installing, repairing, or servicing the heater it must be turned off and disconnected from power. Before installation, please check if the heater is free of damages.
- If the heater or the power cord is damaged in any form do NOT use the heater and contact your SHX dealer for repair
or replacement. Repairs, maintenance or any changes must be carried out by an authorized SHX dealer.
- DO NOT attempt to repair the heater by yourself, this will void your warranty.
- If the heater has been dropped do NOT operate it and contact your SHX dealer to make sure it is free of any damages.
- This heater is designed to operate at 230V, 50Hz AC. If your supply mains do not comply with this, do NOT use the heater.
- the heater must not be located immediately below a socket-outlet
- WARNING: The glass heater must not be used if the glass surface is damaged.
- WARNING: Do not use this heater in small rooms when they are occupied by persons not capable of leaving the room on their own, unless constant supervision is provided.
2. How to care for your SHX heater
2.1 Cleaning
Always unplug your heater and let it cool down completely before cleaning. Never dip into water and never splash water on it. Clean the heater with a soft damp cloth. For glass models use a soft cloth and glass cleaner. Never use a wet cloth and make sure to dry the heater when clean with a dry cloth. Do not use any abrasive materials, solvents or harsh cleaning sponges as this could cause scratches or
other irreparable damage. Before operating the heater again it must be completely dry.
2.2 Using/Working
Please note that the heater may discolour with use. This is due to airborne pollution and is not a fault. Do not cover your heater with a picture foil and do not paint or print the heater yourself. This might cause damage to the heating element and will void your warranty.
If you notice any noise, smells, visible changes or exceptionally high temperatures please discontinue use and contact an authorised SHX dealer.
ATTENTION | RISK OF INJURYThe appliance becomes hot while it is in operation!Never touch the appliance while it is in operation → this may result in severe BURNS. |
WARNING | RISK OF FIREWARNING: To prevent the heater becoming overheated, do not cover it or place any item over it. |
ATTENTION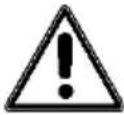 | SAFE DISTANCEMaintain a safe distance of at least 1 metre from highly flammable items such as furniture, curtains, paper and similar!PLACE OF USEPosition the appliance in such a way that air can flow in and out without hindrance.RISK OF BURNSThis appliance becomes very hot during use and can cause burns. Take particular care if children or vulnerable persons are present.RISK OF OVERHEATINGDo not use the appliance in rooms with a volume less than 4m^3 . |
Symbol markings on the appliance
Symbol:
Meaning:
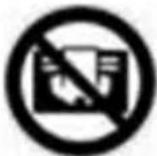
Attention! Do not cover
The symbol on the device indicates that it is not permitted to suspend any item (e.g. towels, clothing etc.) above the appliance or directly in front of it. To prevent overheating and the risk of fire, the heater must not be covered!
Recycling, disposal and Declaration of Conformity
 | RECYCLINGThe packaging materials can be recycled. It is recommended that you dispose of them in separated waste. |
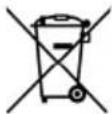 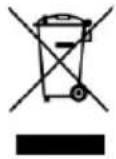 | DISPOSAL OF BATTERIESIn accordance with Legislative Decree no. 188 of 20 November 2008 implementing Directive 2006/66/EC on batteries, accumulators and their associated waste, the symbol of the crossed-out dustbin shown on the battery indicates that it is prohibited to dispose of batteries in household waste. Batteries and accumulators contain environmentally hazardous substances. Users are obliged to dispose of used batteries at municipal collection centres or in collectors set up for the purpose. This service is free of charge. This ensures that the legal requirements are complied with and the environment is preserved.You may find the following symbols on batteries:Li = battery contains lithiumAl = battery contains alkaliMn = battery contains manganeseCR 2025 (Li); AA (Al, Mn); AAA (Al, Mn)DISPOSALThe pictogram with the crossed out dustbin indicates that electrical and electronic appliances must be disposed of separately from household waste (WEEE). Electrical and electronic appliances can contain harmful and environmentally hazardous materials. Do not dispose of them in unsorted residual waste, but at a registered collection centre for waste electrical and electronic equipment. By doing so, you will help to conserve resources and protect the environment. For further information please consult your dealer or your local authorities. Directive 2012/19/EU |
 | DECLARATION OF CONFORMITYWe hereby confirm that this article complies with the essential requirements, regulations and guidelines of the EU. The detailed declaration of conformity can be viewed at any time via following link:https://www.schuss-home.at/downloads |
Errata and technical changes reserved.
PREPARING THE REMOTE CONTROL
Please follow the steps below to make it operate correctly:
- To operate the remote control, open the battery compartment and insert batteries.
- To change the battery, carry out the following steps: Pull out the battery holder on the back of the remote control, remove the old battery and then insert a new one:
- Please always pay attention to the polarity markings (+/-) on the battery and the battery holder.
- Then insert the battery holder back into the remote control.
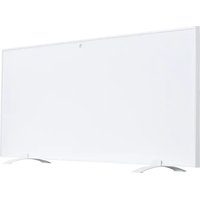
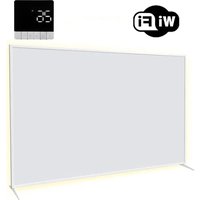
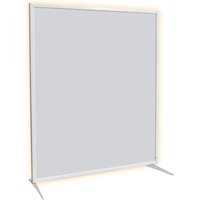
Scope of delivery
- Heating panel
- Remote Control
- Stand feet
■ Wall mounting accessories - Operating manual
Description of the appliance
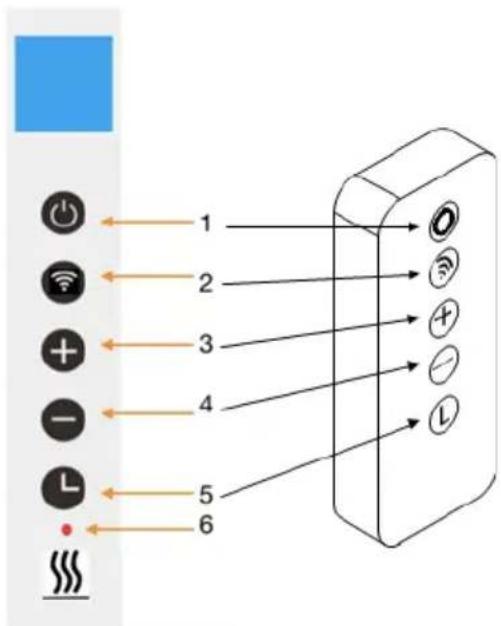
■ 1. Power button
■ 2. WIFI button
■ 3. “+” button
4. “-” button
■ 5. Timer button
■ 6. Heating status indicator
text_image
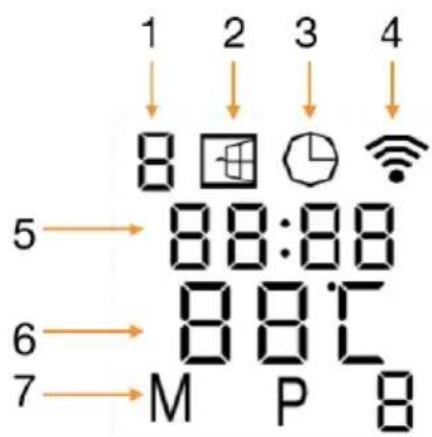
1 2 3 4 5 6Screen display:
■ 1. Weekday
■ 2. Open window Sign
■ 3. Timer Sign
■ 4. WIFI Sign
■ 5. Time
■ 6. Temperature
text_image
1 2 3 4 8 5 → 88:88 6 → 88°C 7 → M P BGeneral introduction of the control system
The XA-WIFI range has an integrated WIFI control box, meaning there is no other additional thermostat needed to control the heater. Once the heater has been connected to the APP, the smartphone will take control and communicate with the control box. If your home internet is not working, it is still possible to operate the heater via the control box manually, once the heater is reconnected to the WIFI, the smart phone will take control again.
Installation instructions
Note: The kit supplied in the scope of delivery is designed for vertical installation to a stable wall. For installation on other types of walls, you will need the appropriate fittings (not included in the scope of delivery). Please make sure that heating panel can be securely installed. We highly recommend having the panel installed by a qualified electrician or SHX authorised installation technician. The heater must be installed at least 20 cm away from all items, walls, etc. A space of at least 20 cm must be kept to the floor, and a distance of at least 20 cm above the heater must also be kept.
SAFETY INFORMATION FOR INSTALLATION
The heating panel can be mounted on walls or other vertical surfaces.
Please note the following points for installation:
- Make sure that the wall or vertical surface you mount the heating panel on can carry the weight of the appliance.
- To avoid overloading the circuit, do not connect the panel to a circuit to which other devices are already connected.
- Do not mount the heating panel directly under a wall socket, since the strong heat development takes place above the panel and the socket could be damaged.
- A space of at least 50 cm should be kept above, below and to the sides of the heating panel and other objects (window sill, power socket, etc.). A space of at least 1–2 metres should be kept to large items and flammable objects.
- Make sure that there is no material in the immediate surrounding of the heating panel that can deform or discolour when the temperature is above 100^ C.
- In order not to impair the heating efficiency, do not position any furniture or other objects in front of the heating panel.
- Never install the cable behind the panel.
NOTE
We recommend that assembly be carried out by two people in order not to damage the heating panel.
Before assembly
- Open the box and take out the appliance.
- Remove all packaging from the appliance.
- Next, check the appliance for any damage.
- Carefully unwind the power cable and check it for damage too.
text_image
① a b c wall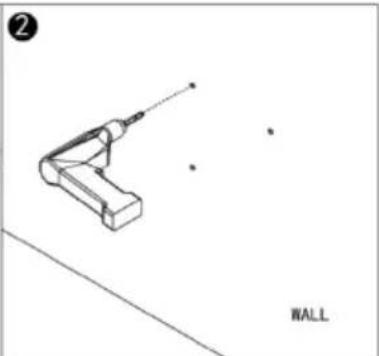
natural_image
Simple line drawing of a mechanical component with a labeled 'WALL' (no other text or symbols)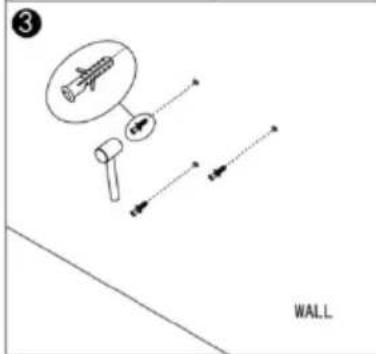
text_image
3 WALL
text_image
4 WALL
natural_image
Diagram of a rectangular panel with an arrow indicating direction, labeled 'WALL' at the bottom (no other text or symbols)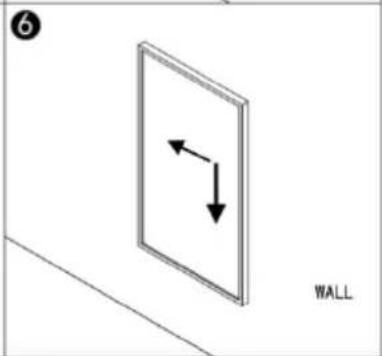
natural_image
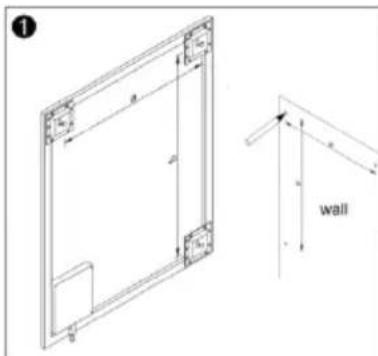
Simple line drawing of a wall with two opposing arrows indicating vertical and horizontal directions (no text or symbols)Step 1. Measure the distance between the mounting hooks and mark the position on the wall.
Step 2. Drill holes using a 8mm drill.
Step 3. Insert the dowels into the holes.
Step 4. Screw in the supplied screws to the wall.
Step 5. Mount the panel on the screws.
Step 6. Move the panel to the left and then down until it's secured.
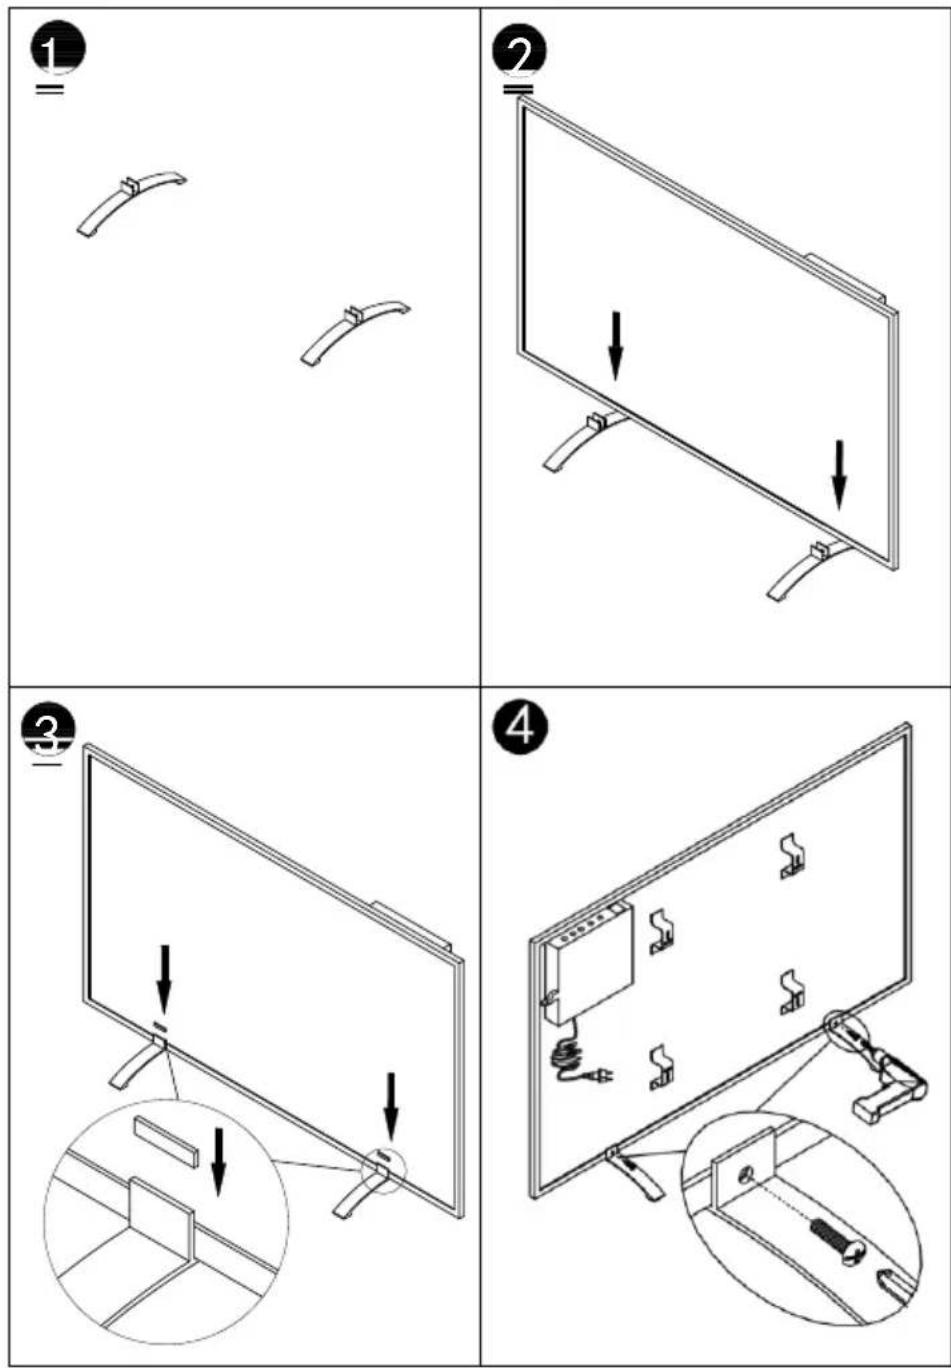
Please refer to the bellowing instruction to assemble the feet stand for portable usage.
Open window detection:
This heater is equipped with an open window detection function. If our control system detects that the room temperature decreases dramatically in short period when the heater is in the heating status, it will recognize that a window is open. The window sign on the screen will start to flash and the heater will power off for 30 minutes and get back to the previous setting automatically after 30 minutes. You can deactivate and activate this function by long pressing for 5 seconds the “-” button, and the open window sign on the screen will disappear and appear accordingly.
Temperature calibration
Hold the '+' button on the control panel for 5 seconds to access the temperature calibration. Adjust the number by pressing the '-' or '+' buttons. Calibration ranges from -5 to +5 degrees.
Activate/deactivate WIFI function
Long press “Timer” button for 10 seconds to deactivate the WIFI function of this heater and the WIFI sign on the screen will disappear, long press “Timer” button for 10 seconds to activate it on again.
Manual control:
To enter the manual mode, activate the power switch, press power button to power on the heater and the “M” sign will show on the screen. Now the heater operates in the manual mode, adjust your desired temperature by pressing “-” or “+” button, 2 seconds later the screen will retain to the reading of current room temperature.
If you would like to set up the timer, press timer button and "00H" will appear on the screen and you can set the timer by press "-" and "+" button to start the count-down timer.
IMPORTANT
Please note that only 2.4 GHz networks are supported!
Transmitting power: max. 100 mW
WI-FI and APP operation:
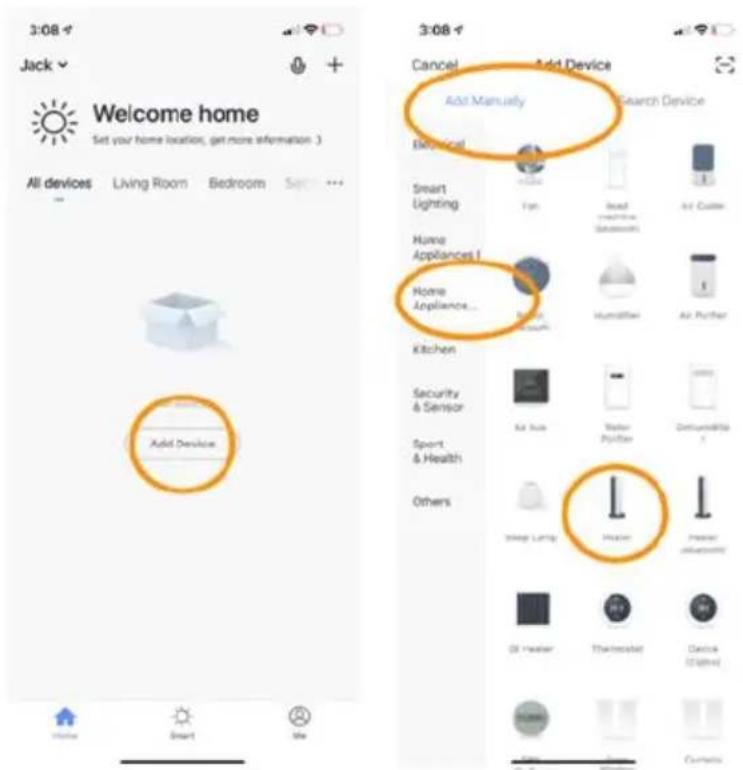
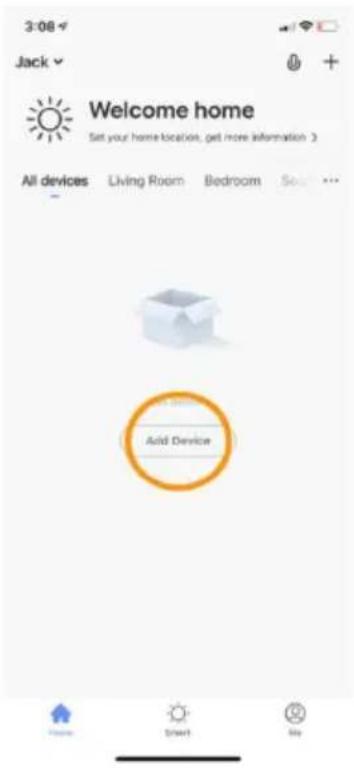
Download the Smartlife APP
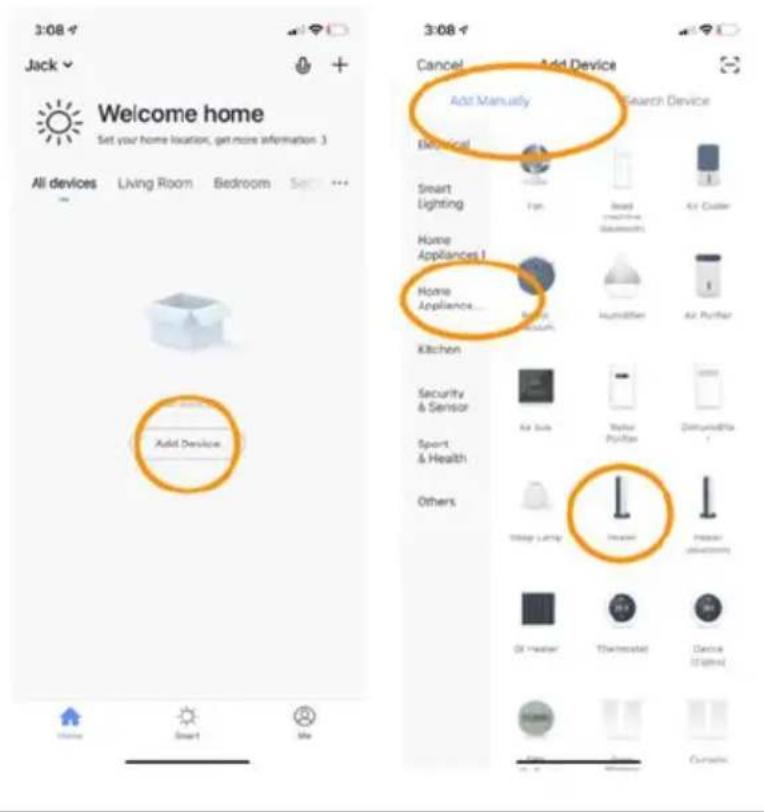
Scan the QR code below to download the ‘Smartlife’ app, or search for the ‘Smartlife’ app in the App Store or in Google Play to start the procedure to download the app. Open the app and register your telephone number or email address.

text_image
QR code with a blue home icon in the center, likely linking to a smart home or app interface.Connecting to Wi-Fi:
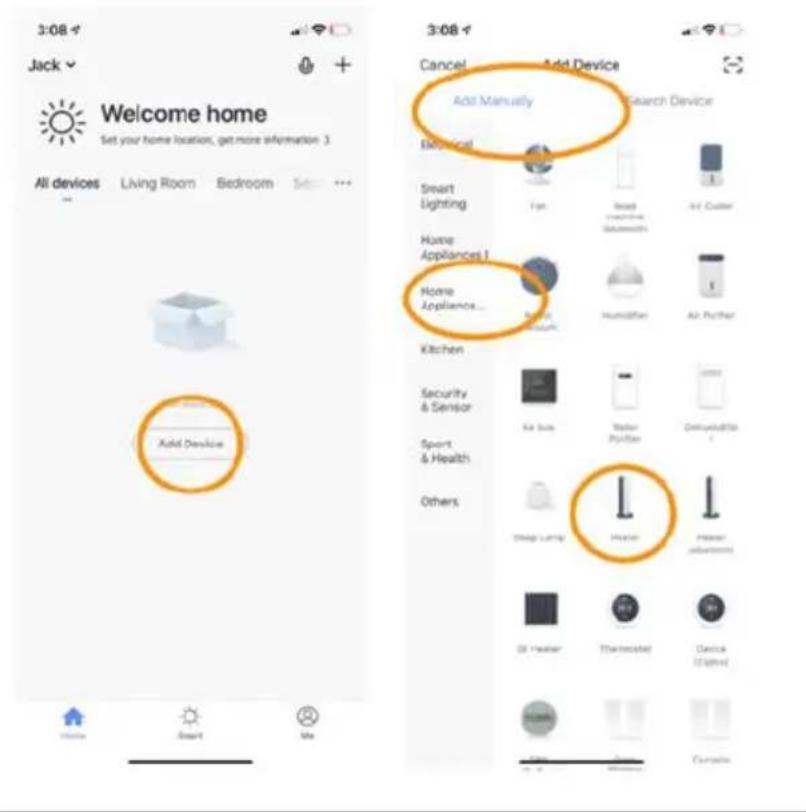
Step 1: Activate the
ON/OFF switch. Press the ON/OFF button. The WI-FI symbol will start to flash rapidly.
Open the APP on your smartphone and add your device. Select
'Add device', then
'Add manually',
'Home appliances (small)' and then select 'Heater' to add the appliance.
Step 2: Enter the
your home network's WI-FI password. Make sure that your home Wi-Fi is working and position the heater and the smartphone as close as possible to the Wi-Fi
router.
text_image
3:08 Jack Welcome home Set your home location, get more information > All devices Living Room Bedroom See ... Add Device Start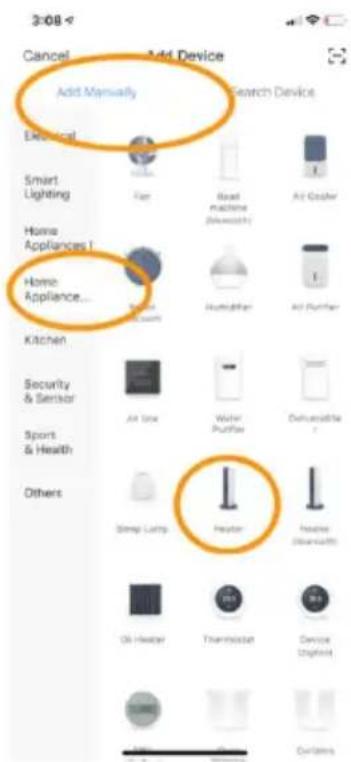
text_image
Cancel Add Device Add Manually Search Device Electrical Smart Lighting Fan Rack machine (Bluetooth) Air Cleaner Home Appliances I Home Appliance... Bottle Mushifier Air Purifier Kitchen Security & Sensor Air Line Water Purifier Deluxeable Sport & Health Others Slamp Lamps Heater Heater (Shamette) Oil Heater Thermosheet Device EnglishPlease note that this heater only works with 2.4 GHz WI-FI networks. It does not currently support 5 GHz networks. Also, make sure that your internet router has enough capacity to add a new device.
Step 3: Wait till the connecting status shows 100% to finish the settings, and the WI-FI signal on the control box will stop flashing.
If no connection could be established, switch off the heater and power it back on again after a few seconds. Press and hold the WI-FI button on the control box until the WI-FI symbol is flashing slowly, and then repeat the connection process.
Note:
The developers of the app are constantly striving to improve the app, meaning that changes in the operation may occur. You can use the QR code shown below to download the latest version of the WI-FI app.
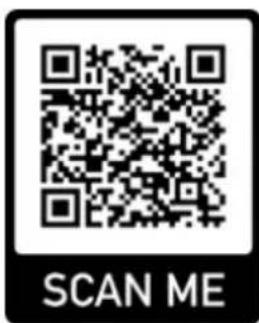
text_image
SCAN MEDisconnecting the WI-FI connection
To disconnect the WI-FI of your current heater, press and hold the WI-FI button for 5 seconds until the WI-FI indicator begins flashing again. Now the heater can be operated manually, without having to establish a connection to Wi-Fi.
Cleaning and maintenance
Keep the heating panel clean. Before cleaning or performing maintenance, switch the appliance off, remove the plug from the socket and allow to cool.
Clean the outside of the heating panel regularly with a dry or very slightly moistened cloth. Do not use any abrasive soap, spray, detergents or scouring agents, wax, glazing agents or other chemical solutions. Dust can be removed from the rear of the appliance with a duster. To clean the back of the appliance thoroughly, unscrew the heating panel from the wall.
Technical information
| Model | Weight | Heating temperature range: | Power range: | Dimensions H x W x D | Montage |
| SHXA350-WIFI | 1.8 kg | 5–37 °C | 350W | 50 x 60 x 4,5 cm | Wall or Stand |
| SHXA700-WIFI | 2.9 kg | 5–37 °C | 700W | 50 x 120 x 4,5 cm | Wall or Stand |
| SHXA1000-WIFI | 3.6 kg | 5–37 °C | 1000W | 70 x 120 x 4,5 cm | Wall or Stand |
| Article number: | SHXA350-WIFISHXA700-WIFISHXA1000-WIFI |
| Input voltage: | 220-240 V |
| Frequency: | 50 Hz |
| Remote control: | 2x AAa Battery 1,5V (not included) |
| WI-FI Transmission frequency: | 2.4 GHz |
| Transmitting power: | max. 100mW |
| IP Protection | IP44 |
| Protection class: | I |
| Contact address for further information: | Schuss Home Electronic GmbHScheringgasse 3, A-1140 Vienna, AustriaServiceline: +43 (1) 97 0 21www.schuss-home.atFB no.: 236974 t / FB court: Vienna |
Required data for single-room electrical heating devices
| Article number SHXA350-WIFI | ||||||
| Information | Symbol | Value | Unit | Information | Unit | |
| Heat output | Single-room electric storage heaters only:Method of heat transfer control | |||||
| Nominal heat output | P_nom | 0.35 | kW | Manual control of heat transfer with integrated thermostat | No | |
| Minimum heat output (guideline) | P_min | 0.0 | kW | Manual control of heat transfer with feedback of room and/or outside temperature | No | |
| Auxiliary current consumption | Fan-assisted heat outlet | No | ||||
| At Nominal heat output | eI_max | 0.35 | kW | Type of heat output/room temperature control | ||
| At Minimum heat output | eI_min | 0.0 | kW | Single heat output level, no room temperature control | No | |
| In standby mode | eI_SB | 0.001 | kW | Two or more manually settable output levels, no room temperature control | No | |
| Room temperature control with mechanical thermostat | No | |||||
| With electronic room temperature control | No | |||||
| Electronic room temperature control and timed control through the day | No | |||||
| Electronic room temperature control and timed control through the week | Yes | |||||
| Other control options | ||||||
| Room temperature control with presence detection | No | |||||
| Room temperature control with detection of open windows | No | |||||
| With remote control option (WiFi) | Yes | |||||
| With adaptive start-up control | No | |||||
| With operating time limiter | No | |||||
| With ball-type sensor | No | |||||
| Contact information: | Schuss Home Electronic GmbHScheringgasse 3 - 1140 Vienna - AustriaTel.: +43 (0)1/ 970 21www.shx.at | |||||
Required data for single-room electrical heating devices
| Article number SHXA700-WIFI | ||||||
| Information | Symbol | Value | Unit | Information | Unit | |
| Heat output | Single-room electric storage heaters only:Method of heat transfer control | |||||
| Nominal heat output | P_nom | 0.7 | kW | Manual control of heat transfer with integrated thermostat | No | |
| Minimum heat output (guideline) | P_min | 0.0 | kW | Manual control of heat transfer with feedback of room and/or outside temperature | No | |
| Auxiliary current consumption | Fan-assisted heat outlet | No | ||||
| At Nominal heat output | eI_max | 0.7 | kW | Type of heat output/room temperature control | ||
| At Minimum heat output | eI_min | 0.0 | kW | Single heat output level, no room temperature control | No | |
| In standby mode | eI_SB | 0.001 | kW | Two or more manually settable output levels, no room temperature control | No | |
| Room temperature control with mechanical thermostat | No | |||||
| With electronic room temperature control | No | |||||
| Electronic room temperature control and timed control through the day | No | |||||
| Electronic room temperature control and timed control through the week | Yes | |||||
| Other control options | ||||||
| Room temperature control with presence detection | No | |||||
| Room temperature control with detection of open windows | No | |||||
| With remote control option (WiFi) | Yes | |||||
| With adaptive start-up control | No | |||||
| With operating time limiter | No | |||||
| With ball-type sensor | No | |||||
| Contact information: | Schuss Home Electronic GmbHScheringgasse 3 - 1140 Vienna - AustriaTel.: +43 (0)1/ 970 21www.shx.at | |||||
Required data for single-room electrical heating devices
| Article number SHXA1000-WIFI | ||||||
| Information | Symbol | Value | Unit | Information | Unit | |
| Heat output | Single-room electric storage heaters only:Method of heat transfer control | |||||
| Nominal heat output | P_nom | 1.0 | kW | Manual control of heat transfer with integrated thermostat | No | |
| Minimum heat output (guideline) | P_min | 0.0 | kW | Manual control of heat transfer with feedback of room and/or outside temperature | No | |
| Auxiliary current consumption | Fan-assisted heat outlet | No | ||||
| At Nominal heat output | eI_max | 1.0 | kW | Type of heat output/room temperature control | ||
| At Minimum heat output | eI_min | 0.0 | kW | Single heat output level, no room temperature control | No | |
| In standby mode | eI_SB | 0.001 | kW | Two or more manually settable output levels, no room temperature control | No | |
| Room temperature control with mechanical thermostat | No | |||||
| With electronic room temperature control | No | |||||
| Electronic room temperature control and timed control through the day | No | |||||
| Electronic room temperature control and timed control through the week | Yes | |||||
| Other control options | ||||||
| Room temperature control with presence detection | No | |||||
| Room temperature control with detection of open windows | No | |||||
| With remote control option (WiFi) | Yes | |||||
| With adaptive start-up control | No | |||||
| With operating time limiter | No | |||||
| With ball-type sensor | No | |||||
| Contact information: | Schuss Home Electronic GmbHScheringgasse 3 - 1140 Vienna - AustriaTel.: +43 (0)1/ 970 21www.shx.at | |||||
WARRANTY
By purchasing this SHX quality product, it means you have decided to place trust in durability, reliability and innovation.
For this SHX appliance, we grant a warranty period of 2 years from the date of purchase valid in Austria and Germany!
If, contrary to expectations, service work on your appliance is still necessary during this period, we hereby guarantee either free repairs (spare parts and working time) or (at the discretion of Schuss) that we will replace the product. If it is not possible to either repair or exchange the product for economic reasons, we reserve the right to create a time value credit.
In any case, please contact the customer hotline as a first step (see the operating manual – ‘contact addresses for further information and service line’).
We would like to point out that repair work that has not been performed by authorised contract workshops will immediately terminate the validity of this warranty.
This warranty does not cover:
- Damage due to non-adherence to the operating manual
• Repair or replacement of parts due to normal wear and tear
• Appliances that are used commercially, even in part - Appliances mechanically damaged due to external influence (any fall(s), impact(s), breakage(s), improper use, etc.) as well as signs of wear and tear of an aesthetic nature
• Appliances that have been improperly treated
- Appliances that have not been opened by our authorised service workshop
• Unfulfilled consumer expectations
- Damage caused by force majeure, water, lightning and overvoltage
- Appliances that have had their type designation and/or serial number on the appliance changed, deleted, made illegible or removed
• Defects due to extreme contamination
• Services outside our contract workshops, the transport costs to either an authorised workshop or to us and back, and the associated risks
We would like to expressly point out that a fixed amount of €60 (indexed basis CPI 2015, June 2020) will be charged within the warranty period in the event of operating errors or if no error has been detected.
The provision of a warranty service (repairs or replacement of the appliance) does not extend the absolute warranty period of 2 years from the date of purchase.
The 2-year warranty is only valid upon presentation of the proof of purchase (name and address of the dealer as well as the complete appliance designation must be included) and the corresponding warranty certificate, on which the appliance type and the serial number (on the box and on both the back and underside of the appliance) are to be noted! Without presenting the warranty certificate, only the legal warranty applies! We would like to expressly point out that the statutory warranty rights are unaffected by this warranty and continue unabated.
A liability for damage on the part of Schuss Home Electronic GmbH and its vicarious agents only exists in the event of gross negligence or intent. In any event, liability for lost profits, expected but not occurred savings, consequential damage and damage arising from claims of third parties is excluded.
The contact address of the respective service workshop is available on our homepage www.schuss-home.at.
Congratulations on making your choice. We wish you a lot of pleasure with the SHX appliance!
ADDRESS
SHX Vertrieb
Schuss Home Electronic GmbH
A-1140 Vienna (Austria), Scheringgasse 3
Tel.: +43 (0)1/ 970 21
Type designation:....
Serial number:
DECLARATION OF CONFORMITY
Schuss Home Electronic GmbH Scheringgasse 3 – 1140 Vienna – Austria
Declares that the product
Description: INFRAREDHEATER with Wi-Fi
Model no.: SHXA350-WIFI - SHXA700-WIFI - SHXA1000-WIFI
complies with following directives, standards and/or regulations:
EMC Directive 2014/30/EU, LVD Directive 2014/35/EU, RED Directive 2014/53/EU,
ErP Directive 2009/125/EC Regulation (EC) No. / Regulation (EC) No. EU 206/2012
RoHs Directive 2011/65/EU and (EU) 2015/863
RED Directive 2014/53/EU
Safety:
EN 60335-2-30:2009+A11:2012+A1:2020+A12:2020
EN 60335-1:2012+A11:2014+A13:2017+A1:2019+A2:2019+A14:2019
EN 60335-2-30:2009+A11:2012+A1:2020
EN 60335-1:2012+A11:2014+A13:2017+A1:2019+A2:2019+A14:2019
Health:
EN 62233:2008
EN 62233:2008
EN 62311:2008, EN 50665:2017
EMC:
EN 301 489-1 V2.2.3 (2019-11)
EN 301 489-17 V3.2.4 (2020-09)
EN 55014-1:2017+A11:2020, EN 55014-2:2015
EN IEC 61000-3-2:2019, EN 61000-3-3:2013+A1:2019
Radio:
EN 300 328 V2.2.2 (2019-07)
CE marking on the product:

Declaration reference:
Schuss Home Electronic GmbH
Scheringgasse 3 – 1140 Vienna – Austria
text_image
SCHUSS HOME ELECTRONIC GMBH 1140 Wixl. Solringasse 3 Tel. 430-55/061, Fax 958-222 www.schuss-home.al Bevollmächtigter Vertreter des Herstellers Authorized representative of manufactureAuthorised representative of the manufacturer
Place and date of issue: Vienna, 2024-03-21

INSTRUKCJA OBSŁUGI
OGRZEWANIE NA PODCZERWIEN WiFi SHXA350-WIFI - SHXA700-WIFI - SHXA1000-WIFI
GRATULACJE!
DZIEKUJEMY ZA WYBÓR TEGO PRODUKTU FIRMY SHX.

natural_image
Simple line drawing of a mechanical component with a labeled 'WALL' (no other text or symbols)
text_image
3 WALL
text_image
4 WALL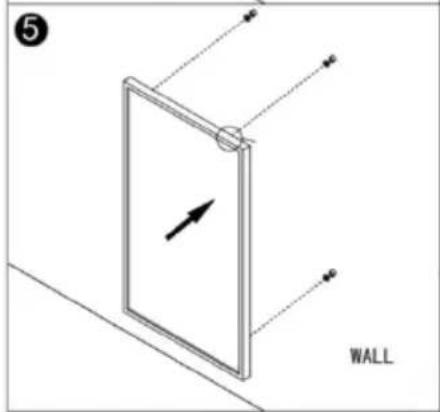
text_image
5 WALL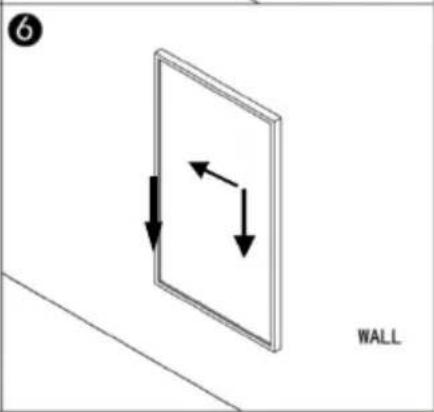
text_image
6 WALLtext_image
QR code with a blue house icon in the center, likely linking to a digital service or application.text_image
3:08 Jack Welcome home Set your home location, get more information 3 All devices Living Room Bedroom Sep ... Add Device 3:08 Cancel Add Device Add Manually Search Device Bed/Cond Smart Lighting Top Sound cooling Air Cleaner Home Appliances I Home Appliances... Water Recovery Humidifier Air Pyrifax Kitchen Security & Sensor Air Sub Water Pyrifax Dimensibility Sport & Health Others Sleep Lamp Heave Heater abhorizing Oil Heater Thermosat Device OptedKrok 1:
text_image
1 2 3 4 8 5 → 88:88 6 → 88:88 7 → M P Bnatural_image
Simple line drawing of a mechanical device with a labeled 'WALL' at the bottom (no other text or symbols)
text_image
3 WALL
text_image
4 WALL
text_image
5 WALL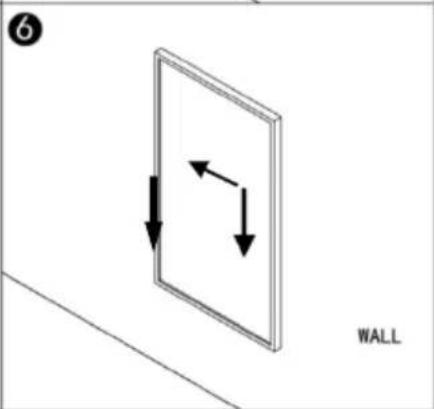
text_image
6 WALLKorak 1: Izmerite razdaljo med pritrdilnimi kavlji in označite položaj na steni.
Korak 2: Izvrtajte luknje z 8 mm svedrom.
text_image
QR code with a blue house icon in the center, likely linking to a digital service or application.Povezava z WLAN:

text_image
3:08 4 Jack Welcome home Set your home location, get more information 3 All devices Living Room Bedroom Set ... Add Device 3:08 4 Cancel Add Device Add Manually Search Device Bed/Cond Smart Lighting Top Sound (12mm) Air Cleaner Home Appliances I Home Appliances... Rainy Recovery Humidifier Air Puyter Kitchen Security & Sensor Air Sub Water Puyter Diminished Sport & Health Others Sleep Lamp Heater Heater (e.g. water) Oil heater Throatzer Decker (e.g. air)Korak 1:
Pritisnite stikalo za vklop/izklop, pritisnite gumb za vklop/izklop. Znak WLAN začne hitro utripati. V pametnem telefonu odprite aplikacijo APP in dodajte svojo napravo. Izberite "Dodaj napravo", nato "Dodaj ročno", "Gospodinjski aparati (majhni)" in nato "Ogrevanje", da dodate napravo.
Korak 2:
Authorized representative of manufacture
text_image
1 2 3 4 8 5 → 88:88 6 → 88°C 7 → M P Bnatural_image
Simple line drawing of a mechanical component with a labeled 'WALL' (no other text or symbols)
text_image
3 WALL
text_image
4 WALL
text_image
5 WALL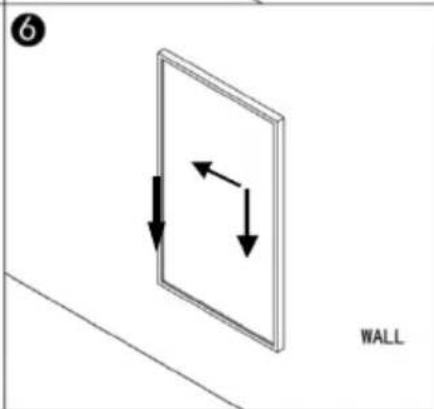
natural_image
Diagram showing two opposing arrows inside a wall frame, labeled 'WALL' (no text or symbols on the diagram itself)text_image
QR code with a blue home icon in the center, likely linking to a digital service or application.Veza na WiFi: