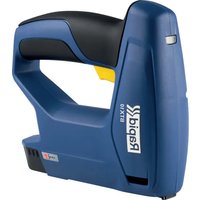
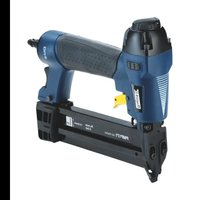
BTX10 - Stapler RAPID - Free user manual and instructions
Find the device manual for free BTX10 RAPID in PDF.


| Product type | Battery stapler |
| Brand | RAPID |
| Model | BTX10 |
| Compatible staple type | Rapid 53 |
| Staple length | 4 to 10 mm |
| Magazine capacity | 100 staples maximum |
| Dimensions (H x W x D) | 156 x 58 x 170 mm |
| Weight | 0.774 kg |
| Battery type | Lithium-ion 3.6 V |
| Battery capacity | 1300 mAh |
| Charger | External USB charger (5 V, max 3.0 A) |
| Charging time | 100 minutes |
| Battery life (shots per charge) | Approximately 900 shots |
| Maximum firing speed | 20 shots/min |
| Sound pressure level (LpA) | 71.8 dB(A) (uncertainty K=3 dB) |
| Sound power level (LwA) | 82.8 dB(A) (uncertainty K=3 dB) |
| Total vibrations | 2.447 m/s² (uncertainty K=1.5 m/s²) |
| Status indicator | Green LED (ready), red (charging), blinking (low battery) |
| Maintenance | Clean with dry or damp cloth; do not use solvent; do not oil |
| Jammed staple clearance | Open magazine, remove staples, use a pin to remove stuck staple |
Frequently Asked Questions - BTX10 RAPID
User questions about BTX10 RAPID
0 question about this device. Answer the ones you know or ask your own.
Ask a new question about this device
Download the instructions for your Stapler in PDF format for free! Find your manual BTX10 - RAPID and take your electronic device back in hand. On this page are published all the documents necessary for the use of your device. BTX10 by RAPID.
USER MANUAL BTX10 RAPID
natural_image
Black Rapid BTX10 handheld device with handle and control panel (no visible text or symbols on body)



GB BATTERY TACKER
DE AKKUTACKER
FR AGRAFEUSE A BATTERIE
NL ACCUTACKER
II GRAFFATRICE A BATTERIA
ES GRAPADORA CON BATERIA
GB Operator's manual - Original instructions 7
DE Betriebsanleitung - Übersetzung der ursprünglichen 19
FR Notice technique - Traduction de l'original 35
NL Bedieningsvoorschriften - vertaling van het origineel 50
IT Istruzioni per l'uso - traduzione dell'originale 65
ES Manual de instrucciones - traducción del original 79
Instruções de utilização - tradução do original 93
SE Bruksanvisning - översättning av den ursprungliga 108
DK Betjeningsvejledning - oversættelse af den oprindelige 121
NO Instruksjoner for bruk - oversettelse av den opprinnelige 134
F1 Käyttöohjeet - käännös alkuperäisestä 147
EE Kasutusjuhend - Originaali tõlge 160
LT Naudojimosi instrukcijos - originalaus teksto vertimas 173
Lietošanas instrukcija - tulkojums no origināla 186
GR Οδηγίες λειτουργίας - μετάφραση του πρωτοτύπου 200
INTRODUCTION
This tool is intended for tacking of fabric, leather, cardboard, paper and similar materials on surfaces of softwood or materials similar to wood. The tacker should be used only for the intended purposes. This tool is for private use only.
TECHNICAL SPECIFICATIONS
| Battery Tacker, model number BTX10 | |
| Staple type Rapid 53 | |
| Staple length 4-10 mm | |
| Magazine capacity staple, max 100 pcs | |
| Tool Dimensions H x W x L 156 x 58 x | 170 mm |
| Weight | 0.774 |
| Battery type, Voltage Li-Ion, 3.6 V | |
| Battery capacity 1300 mAh | |
| Battery charger | External USB charger 5VDC max 3.0 A |
| Charging time 100 minutes | |
| Shots per charge, max ≈ 900 shots | |
| Stapling speed, max continuous 20 shots/minute |
TOOL ELEMENTS ①
A LED B Micro-USB port
© Integrated battery pack
E Magazine latch F Magazine
G Staple indicator
① Micro-USB cable
D Trigger
H Safety yoke
GENERAL POWER TOOL SAFETY WARNINGS
WARNING Read all safety warnings, instructions, illustrations and specifications provided with this power tool.
Failure to follow all instructions listed below may result in electric shock, fire and/or serious personal injury.

Save all warnings and instructions for future reference.
The term "power tool" in the warnings refers to your mains-operated (corded) power tool or battery-operated (cordless) power tool.
1) WORK AREA SAFETY
a) Keep your work area clean and well lit. Cluttered benches and dark areas invite accidents.
b) Do not operate power tools in explosive atmospheres, such as in the presence of fl ammable liquids, gases, or dust. Power tools create sparks which may ignite the dust or fumes.
c) Keep children and bystanders away while operating a power tool. Distractions can cause you to lose control.
2) ELECTRICAL SAFETY
a) Power tool plugs must match the outlet.
Never modify the plug in any way. Do not use any adapter plugs with earthed (grounded) power tools. Unmodified plugs and matching outlets will reduce risk of electric shock.
b) Avoid body contact with earthed or grounded surfaces such as pipes, radiators, ranges and refrigerators. There is an increased risk of electric shock if your body is grounded.
c) Do not expose power tools to rain or wet conditions. Water entering a power tool will increase the risk of electric shock.
d) Do not abuse the cord. Never use the cord for carrying, pulling or unplugging the power tool. Keep cord away from heat, oil, sharp edges or moving parts. Damaged or entangled cords increase the risk of electric shock.
e) When operating a power tool outdoors, use an extension cord suitable for outdoor use. Use of a cord suitable for outdoor use reduces the risk of electric shock.
f) If operating a power tool in a damp location is unavoidable, use a residual current
device (RCD) protected supply. Use of a RCD reduces the risk of electric shock.
3) PERSONAL SAFETY
a) Stay alert, watch what you are doing and use common sense when operating a power tool. Do not use a power tool while you are tired or under the influence of drugs, alcohol or medication. A moment of inattention while operating power tools may result in serious personal injury.
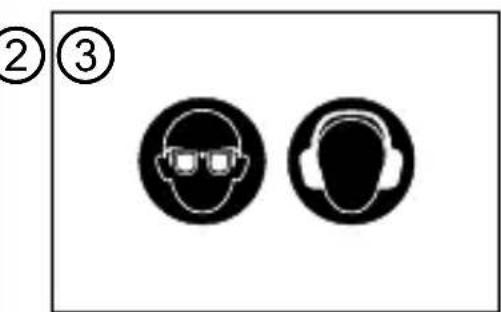
b) Use personal protective equipment. Always wear eye protection. Protective equipment such as dust mask, non-skid safety shoes, hard hat, or hearing protection used for appropriate conditions will reduce personal injuries.
c) Prevent unintentional starting. Ensure the switch is in the off-position before connecting to power source and/or battery pack, picking up or carrying the tool.
Carrying power tools with your fi nger on the switch or energizing power tools that have the switch on invites accidents.
d) Remove any adjusting key or wrench be-fore turning the power tool on. A wrench
or a key left attached to a rotating part of the power tool may result in personal injury.
e) Do not overreach. Keep proper footing and balance at all times. This enables better control of the power tool in unexpected situations.
f) Dress properly. Do not wear loose clothing or jewellery. Keep your hair and clothing away from moving parts. Loose clothes, jewellery or long hair can be caught in moving parts.
g) If devices are provided for the connection of dust extraction and collection facilities, ensure these are connected and properly used. Use of dust collection can reduce dust-related hazards.
h) Do not let familiarity gained from frequent use of tools allow you to become complacent and ignore tool safety principles. A careless action can cause severe injury within a fraction of a second.
4) POWER TOOL USE AND CARE
a) Do not force the power tool. Use the correct power tool for your application. The correct power tool will do the job better and
safer at the rate for which it was designed.
b) Do not use the power tool if the switch does not turn it on and off. Any power tool that cannot be controlled with the switch is dangerous and must be repaired.
c) Disconnect the plug from the power source and/or remove the battery pack, if detachable, from the power tool before making any adjustments, changing accessories, or storing power tools. Such preventive safety measures reduce the risk of starting the power tool accidentally.
d) Store idle power tools out of the reach of children and do not allow persons unfamiliar with the power tool or these instructions to operate the power tool. Power tools are dangerous in the hands of untrained users.
e) Maintain power tools. Check for misalignment or binding of moving parts, breakage of parts and any other condition that may affect the power tool's operation. If damaged, have the power tool repaired before use. Many accidents are caused by poorly maintained power tools.
f) Keep cutting tools sharp and clean.
Properly maintained cutting tools with sharp cutting edges are less likely to bind and are easier to control.
g) Use the power tool, accessories and tool bits etc. in accordance with these instructions, taking into account the working conditions and the work to be performed. Use of the power tool for operations different from those intended could result in a hazardous situation.
h) Keep handles and grasping surfaces dry, clean and free from oil and grease. Slip-pery handles and grasping surfaces do not allow for safe handling and control of the tool in unexpected situations.
5) BATTERY TOOL USE AND CARE
a) Recharge only with the charger specified by the manufacturer. A charger that is suitable for one type of battery pack may create a risk of fire when used with another battery pack.
b) Use power tools only with specifi cally designated battery packs. Use of any other battery packs may create a risk of injury and fi re.
c) When battery pack is not in use, keep it away from other metal objects, like paper clips, coins, keys, nails, screws or other small metal objects, that can make a connection from one terminal to another. Shorting the battery terminals together may cause burns or a fire.
d) Under abusive conditions, liquid may be ejected from the battery; avoid contact. If contact accidentally occurs, fl ush with water. If liquid contacts eyes, additionally seek medical help. Liquid ejected from the battery may cause irritation or burns.
e) Do not use a battery pack or tool that is damaged or modified. Damaged or modified batteries may exhibit unpredictable behaviour resulting in fire, explosion or risk of injury.
f) Do not expose a battery pack or tool to fi re or excessive temperature. Exposure to fi re or temperature above 130 °C/265 °F may cause explosion.
g) Follow all charging instructions and do not charge the battery pack or tool outside the temperature range specified in
the instructions. Charging improperly or at temperatures outside the specified range may damage the battery and increase the risk of fire.
6) SERVICE
a) Have your power tool serviced by a qual- ifi ed repair person using only identical replacement parts. This will ensure that the safety of the power tool is maintained.
TACKER SAFETY WARNINGS
- Always assume that the tool contains fasteners. Careless handling of the tacker can result in unexpected fi ring of fasteners and personal injury.
- Do not point the tool towards yourself or anyone nearby. Unexpected triggering will discharge the fastener causing an injury.
- Do not actuate the tool unless the tool is placed firmly against the workpiece. If the tool is not in contact with the work piece, the fastener may be deflected away from your target.
- Use caution while removing a jammed fastener. The mechanism may be under
compression and the fastener may be forcefully discharged while attempting to free a jammed condition.
- Do not use this tacker for fastening electrical cables. It is not designed for electric cable installation and may damage the insulation of electric cables thereby causing electric shock or fire hazards.
- A-weighted sound pressure level LpA= 71.8 dB(A), uncertainty K=3 dB(A). A-weighted sound power level LwA= 82.8 dB(A), uncertainty K=3 dB(A). Recommendation for the operator to wear hearing protection.
- Vibration total value =2.447 m/s ^2 , uncertainty K=1.5 m/s ^2 . The declared vibration total value has been measured in accordance with a standard test method and may be used for comparing one tool with another. The declared vibration total value may also be used in a preliminary assessment of exposure.
WARNING
The vibration emission during actual use of the power tool can differ from the declared total value depending on the ways in which the tool is used. It's needed to identify safety measures to protect the operator that are based on an estimation of exposure in the actual conditions of use (taking account of all parts of the operating cycle such as the times when the tool is switched off and when it is running idle in addition to the trigger time).

ASSEMBLY
LOAD STAPLES INTO THE MAGAZINE
1 Turn the tool upside down.
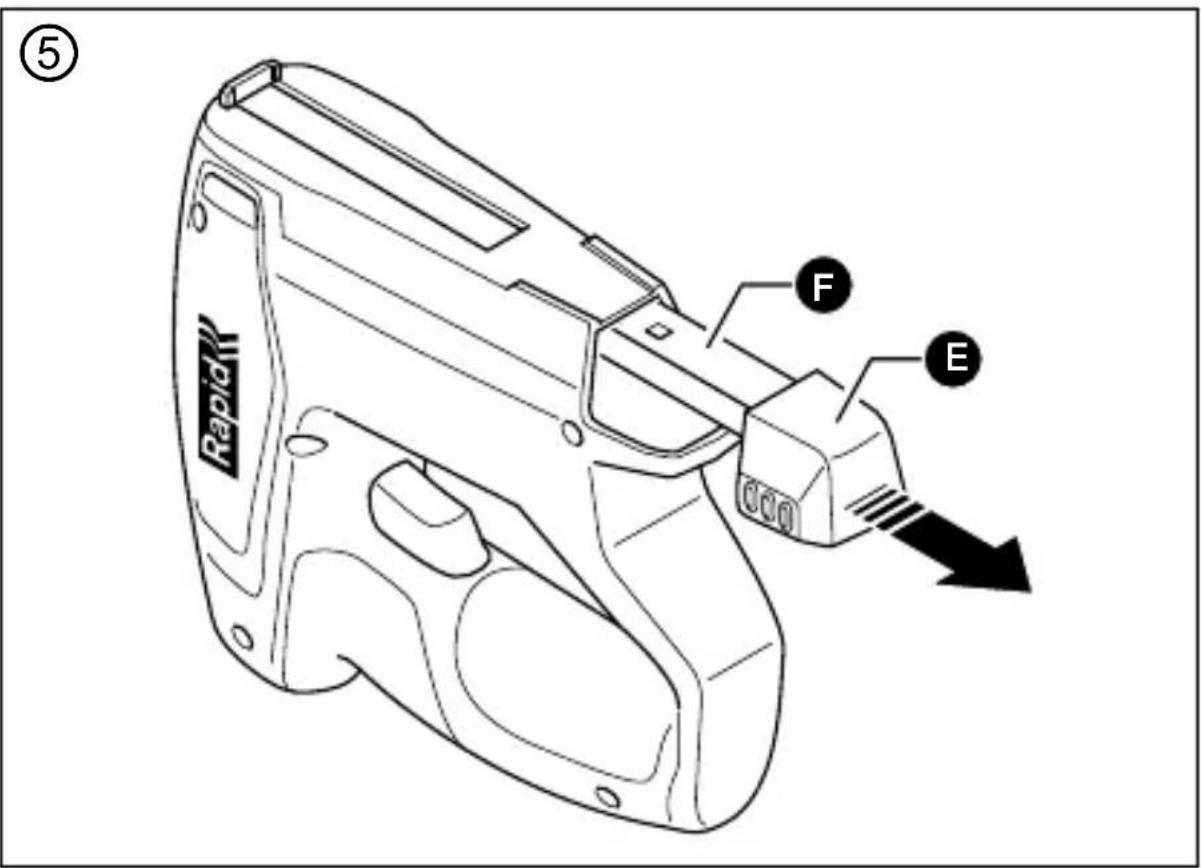
2 Press the magazine latch Ⓔ to unlock it from the tacker body.
3 Slide the magazine Ⓕ backwards. ⑤
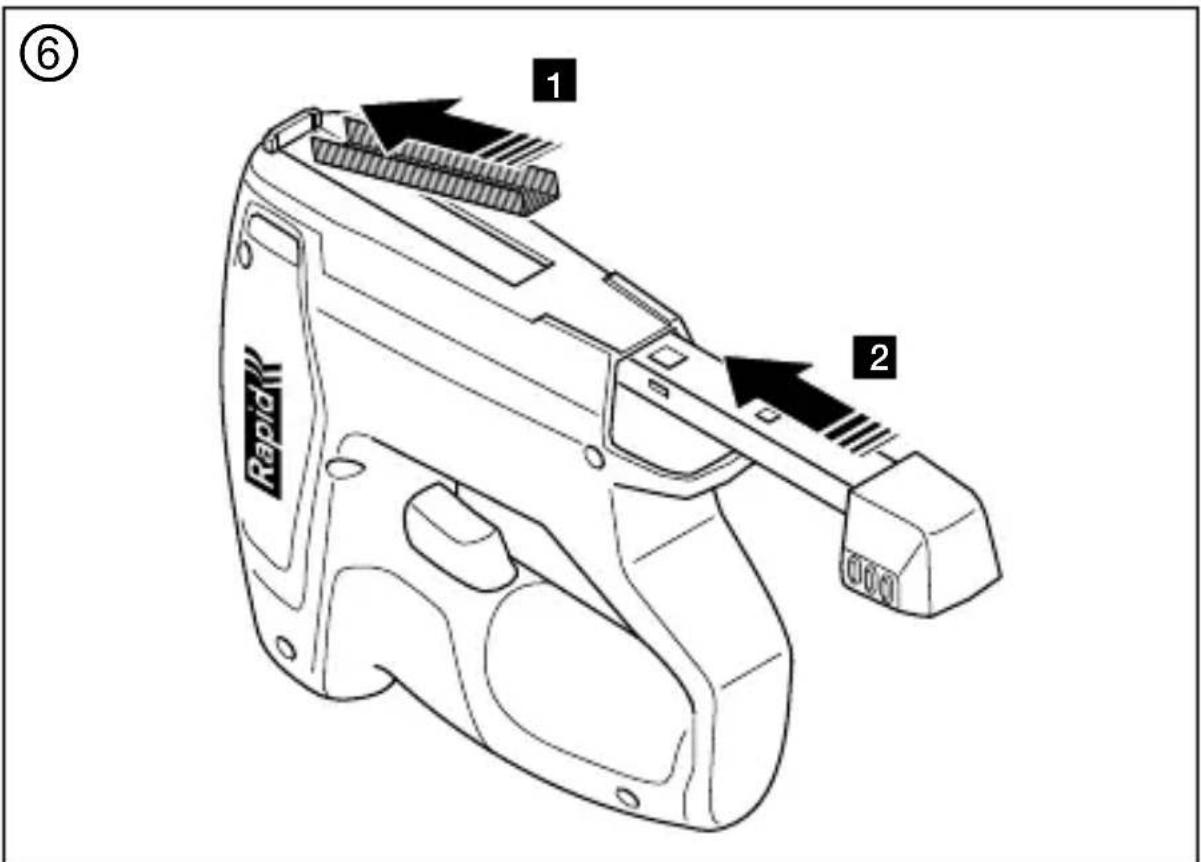
4 Insert a staples strip ⑥. Make sure to use only Type 53 staples.
5 Close the magazine. Make sure it is safely locked.
REMOVE STAPLES FROM THE MAGAZINE
1 Press the magazine latch Ⓔ to unlock it from the tacker body.
2 Slide the magazine Ⓕ backwards.
3 Remove the staples from the magazine.
4 Close the magazine. Make sure it is safely locked.
OPERATION
ACTIVATING THE TOOL
1 Make sure the tool is in good working condition.
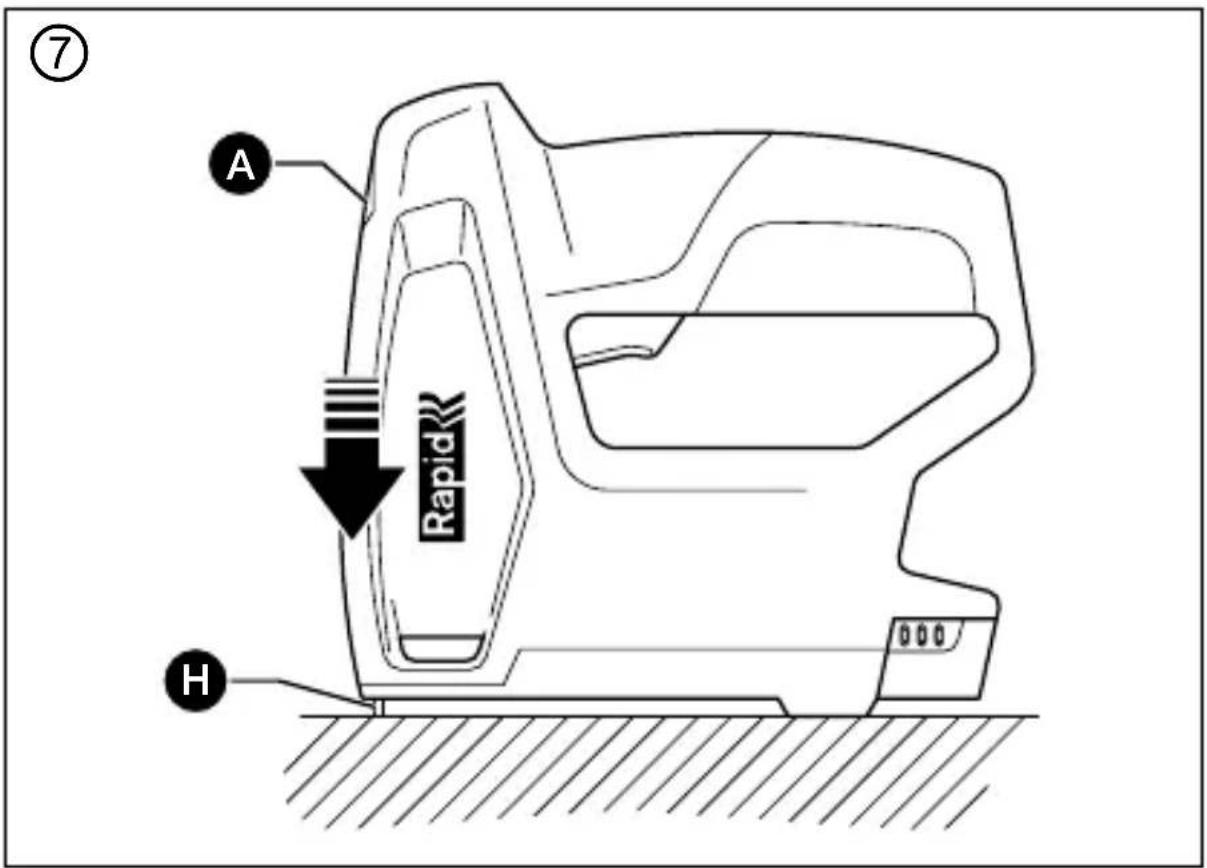
2 Firmly press the safety yoke Ⓗ against the workpiece until it is pushed in a few millimeters ⑦. The LED Ⓔ lights green. The tool is active now and ready for stapling.
STAPLING
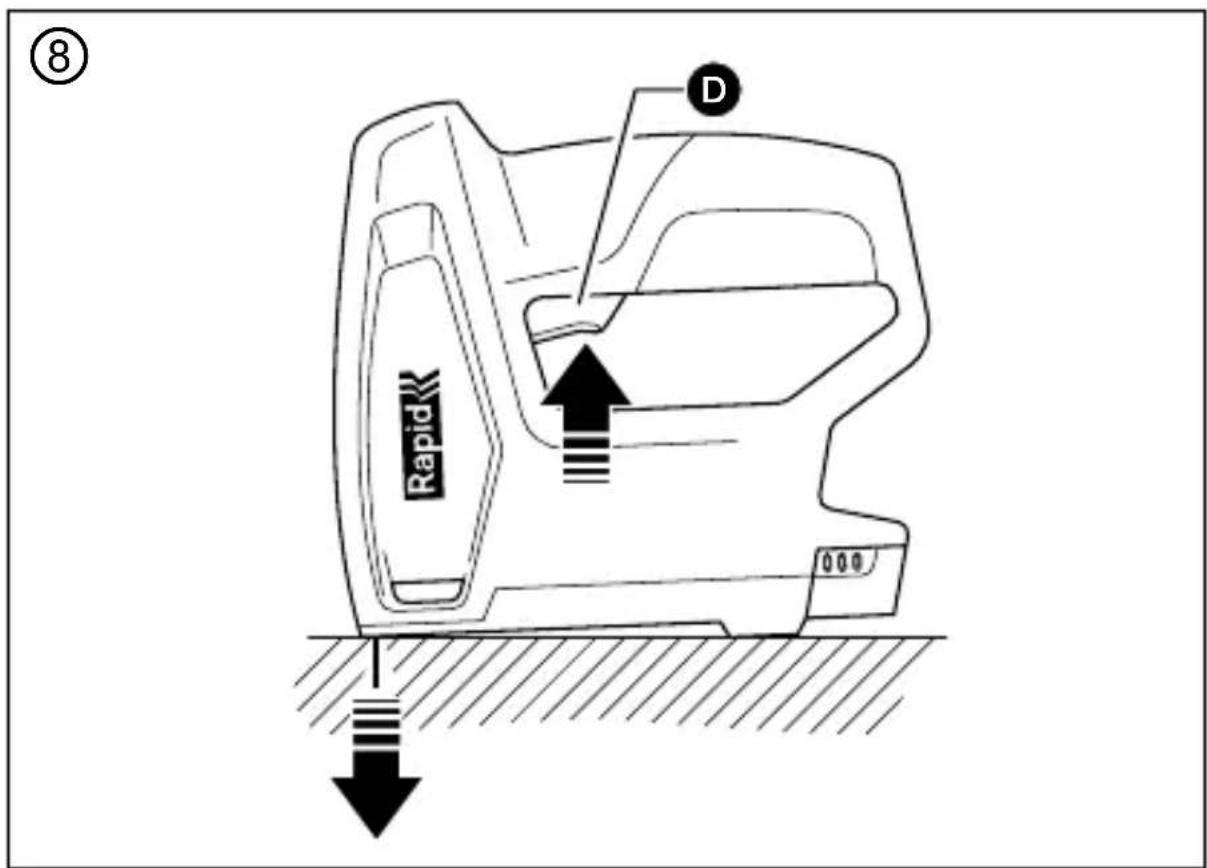
1 Firmly press the safety yoke Ⓗ against the workpiece until it is pushed in a few millimeters.
2 Briefly press the trigger D. ⑧
3 Release the trigger and remove the tool from the workpiece.
4 To fi re again, do steps 1 thru 3 again.
ACTIVE MODE/SLEEP MODE
- When the tool is in active mode it stays in this mode for 15 seconds when there is no activity.
- After 15 seconds of inactivity, the tool goes into sleep mode. The spring decompresses and you hear a sound. This is normal.
- Press the safety yoke Ⓗ to activate the tool again.
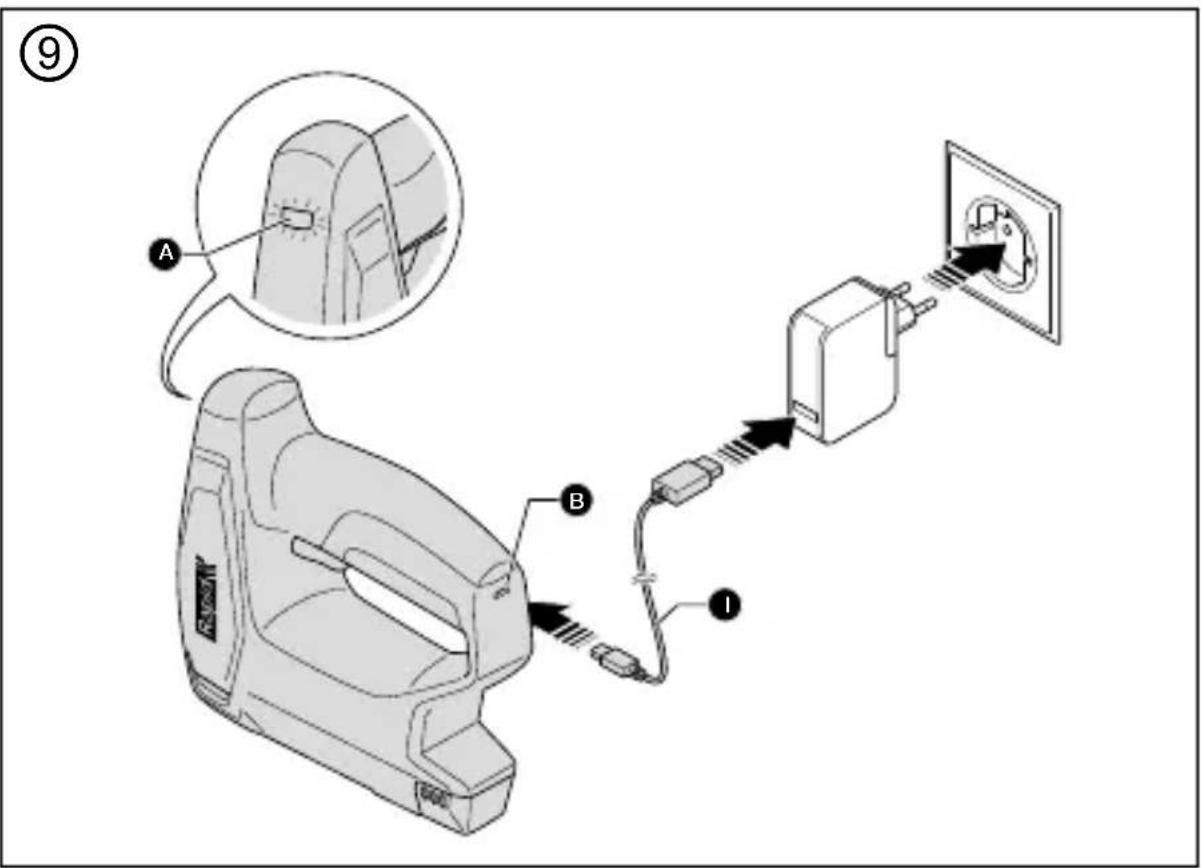
CHARGING OPERATING INSTRUCTIONS ⑨
! Do not use the tool whilst charging.
1 Connect the Micro-USB cable ① to the Micro-USB port ⑧.
2 Connect the Micro-USB cable to a USB-charger (not included).
3 Connect the USB-charger to a wall socket. The LED Ⓐ flashes red during the charging process.
4 When the battery is fully charged, the LED turns green.
5 Disconnect the Micro-USB cable and remove the USB-charger from the wall socket.
! Charge only at ambient temperature between 10°C and 50°C.
! During the process of charging, the charger can become warm: this is normal.
! Do not store the tool in locations where the temperature may exceed 50^ C.
EXPLANATION OF LED LIGHT
| Operation/Usage | ||
| LED red LED green | ||
 |  | LED is continuously greenTool is active and ready for next staple |
 |  | LED fl ashes red and green alternatelyBattery is low/empty |
| Charging with USB-charger | ||
| LED red LED green | ||
 |  | LED fl ashes redBattery is charging |
 |  | LED is continuously greenBattery is fully charged |
! For better performance, press the tool firmly against the workpiece.
! Look through the staple indicator Ⓖ to see if the tool still has suffi cient staples.
! In case of a jammed staple, read the maintenance section. DO NOT re-fi re the tool in order to clear the jam as this may damage the tool.
! During operation, the tool may feel warm. This is normal but if the tool starts to feel hot stop using the tool until it has cooled down.
MAINTENANCE
STANDARD MAINTENANCE
1 Inspect all screws and tighten if necessary.
2 Keep all vents free from dust and dirt.
3 Clean the tool with a dry or damp cloth. NEVER use any solvent.
4 Keep the magazine channel clean.
5 DO NOT oil or grease any parts.
6 Make sure the tool is not damaged. In case of damage, replace or repair the tool prior to use.
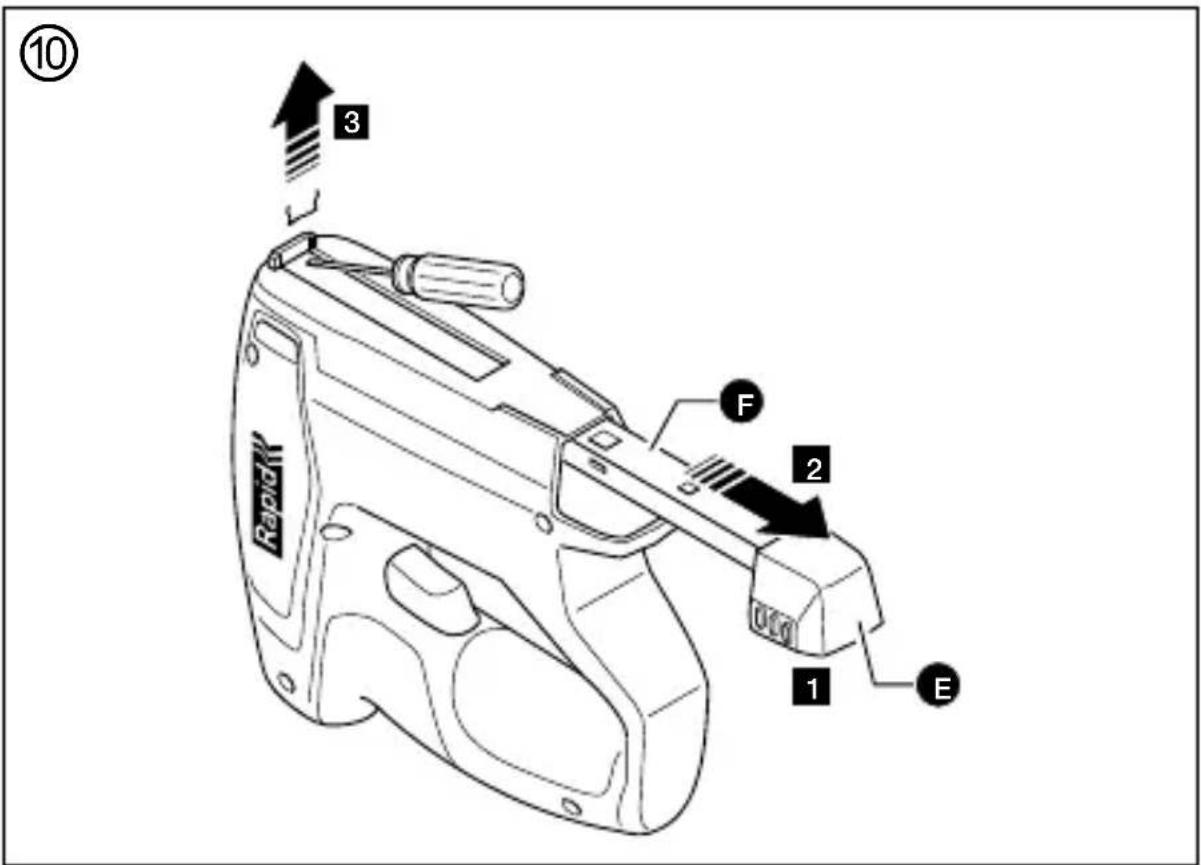
CLEARING A JAMMED STAPLE ⑩
1 Press the magazine latch Ⓔ to unlock it from the tacker body.
2 Slide the magazine Ⓕ backwards.
3 Take out the loose staples from the magazine.
4 Use a pin with a sharp end to remove the jammed staple.
WARNING
Changes to the tool and technical modifi cations are not permitted. This can lead to personal injury.

If the tool fails despite the care taken in manufacturing and testing procedures, repair shall be carried out by an after-sales service centre for Rapid tools.
DISPOSAL
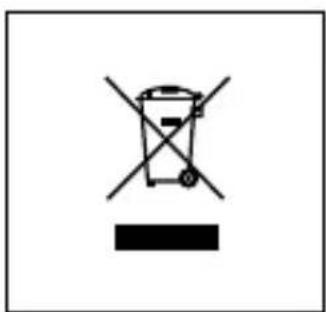
EN Waste Electrical and Electronic Equipment (WEEE)
This symbol indicates that this device must not be treated as unsorted municipal waste, but must be collected separately! Dispose of the device via a collection point for the recycling of waste electrical and electronic equipment within the EU and in other European countries that operate separate collection systems for waste electrical and electronic equipment. By disposing of the device in the proper manner, you help to avoid possible hazards for the environment and public health that could otherwise be caused by improper treatment of waste equipment. The recycling of materials contributes to the conservation of natural resources.

BTX10 Akkutacker
natural_image
Two black-and-white icons: a warning triangle with an exclamation mark and a person reading a document (no text or symbols present)VEILIGHEIDSWAARSCHUWINGEN VOOR TACKERS
natural_image
Two black-and-white icons: a warning triangle with an exclamation mark and a person reading a document (no text or symbols present)2) SICUREZZA ELETTRICA
natural_image
Two black-and-white icons: a warning triangle and a person reading a document (no text or symbols)LADDA KLAMMER I MAGASINET
FÖRKLARING AV LED-LJUS
FORKLARING PÅ LED-LYS
natural_image
Two black-and-white icons: a triangular warning triangle with an exclamation mark and a person using a laptop (no text or symbols)belyst. Det kan lett oppstå ulykker på rotete eller mørke arbeidsområder.
STANDARD VEDLIKEHOLD
natural_image
Two black-and-white icons: a warning triangle and a person reading a book (no text or symbols)natural_image
Two black-and-white icons: a triangular warning triangle above a person reading a book, and a circle with a person holding a laptop (no text or symbols)natural_image
Two black-and-white icons: a warning triangle and a person reading a document (no text or symbols present)UK Importer and authorised representative:
ACCO UK Limited
Oxford House Oxford Road
Aylesbury HP21 8SZ
United Kingdom

Isaberg Rapid AB
335 71 Hestra, Sweden
www.rapid.com

- INTRODUCTION
- TOOL ELEMENTS ①
- GENERAL POWER TOOL SAFETY WARNINGS
- 3) PERSONAL SAFETY
- 6) SERVICE
- TACKER SAFETY WARNINGS
- WARNING
- ASSEMBLY
- LOAD STAPLES INTO THE MAGAZINE
- REMOVE STAPLES FROM THE MAGAZINE
- OPERATION
- ACTIVATING THE TOOL
- STAPLING
- ACTIVE MODE/SLEEP MODE
- CHARGING OPERATING INSTRUCTIONS ⑨
- MAINTENANCE
- STANDARD MAINTENANCE
- CLEARING A JAMMED STAPLE ⑩
- DISPOSAL
- EN Waste Electrical and Electronic Equipment (WEEE)
- BTX10 Akkutacker
- VEILIGHEIDSWAARSCHUWINGEN VOOR TACKERS
- 2) SICUREZZA ELETTRICA
- LADDA KLAMMER I MAGASINET
- STANDARD VEDLIKEHOLD
Brand : RAPID
Model : BTX10
Category : Stapler