
REF30BMBIXRT - Refrigerator BERTAZZONI - Free user manual and instructions
Find the device manual for free REF30BMBIXRT BERTAZZONI in PDF.

| Product Type | Refrigerator with Freezer |
| Brand | Bertazzoni |
| Model | REF30BMBIXRT |
| Rated Voltage | 115 V |
| Rated Frequency | 60 Hz |
| Refrigerant | R600a (isobutane) |
| Refrigerant Charge (Refrigerator) | 1.7 oz (48 g) |
| Refrigerant Charge (Freezer) | 2.1 oz (60 g) |
| Total Rated Current | 3.0 A |
| Defrost Heater | 214 W |
| Climate Classes | SN (50°F-90°F), N (61°F-90°F), ST (64°F-100°F), T (64°F-109°F) |
| Control Type | Electronic with Touch Screen |
| Interior Lighting | LED |
| Ice Maker | Integrated, with SuperIce function and size adjustment |
| Water Connection | Yes, pressure 8-75 PSI, tube 1/4" |
| Water Filter | Yes, replacement every 12 months or 3000 liters |
| FlexMode | Freezer, Fresh (28°F-36°F), Refrigerator |
| Special Functions | Shopping, Vacation, Quick Bottle Refrigeration, Shabbat |
| Condenser Cleaning | Every 6 months, with reminder |
| Warranty | 2 years parts and labor, 5 years sealed system |
| Spare Parts Availability | 10 years after end of production |
| Maximum Operating Altitude | 13,000 ft (3,962 m) |
Frequently Asked Questions - REF30BMBIXRT BERTAZZONI
User questions about REF30BMBIXRT BERTAZZONI
0 question about this device. Answer the ones you know or ask your own.
Ask a new question about this device
Download the instructions for your Refrigerator in PDF format for free! Find your manual REF30BMBIXRT - BERTAZZONI and take your electronic device back in hand. On this page are published all the documents necessary for the use of your device. REF30BMBIXRT by BERTAZZONI.
USER MANUAL REF30BMBIXRT BERTAZZONI
REF...BMBI...TT Series
1 IMPORTANT SAFETY AND ENVIRONMENTAL INFORMATION 4
1.1 For your safety 4
1.2 Important information when using the appliance 5
1.3 Caring for the environment 6
1.4 Cleaning, sanitising and maintaining the ice 6
1.5 Information for regulatory authorities 7
1.6 To save energy 7
1.7 Warning and danger 8
2 INSTALLATION 10
2.1 Installation 10
2.2 Connecting to the water system 10
2.3 Connecting to the electrical power supply 11
2.4 Refrigerant 11
3 BEFORE STARTING 12
3.1 Know your refrigerator 12
3.2 Manufacturer's liability 12
3.3 Technical support 12
3.4 Technical data 12
3.5 Product plate 13
3.6 Overview of main components 14
3.7 Electronic Control 15
3.8 Main control panel 15
4 SWITCHING THE APPLIANCE ON AND OFF 16
4.1 Switching on and off 16
4.2 How to adjust the temperature to meet different needs 18
4.3 Warning notifications on the display 19
5 CUSTOMIZING FUNCTIONS AND SETTINGS 20
5.1 Functions 20
5.2 Settings 26
6 INTERNAL LAYOUT 32
6.1 Internal layout (positioning, adjusting and removing components) 32
7 ACTIVATING AND USING THE ICE MAKER 33
7.1 Activating and using the Ice Maker 33
7.2 Water Filter 34
8 LIGHTING 35
8.1 Lighting 35
9 FOOD STORAGE 35
9.1 General instructions 35
9.2 How to best preserve food quality 36
9.3 Tips for food storage and preservation 37
10 CARE AND CLEANING 40
10.1 Care and Cleaning 40
10.2 Cleaning the interior 40
10.3 Cleaning of the ventilation grill, filter and condenser 41
11 TROUBLESHOOTING GUIDE 42
11.1 Troubleshooting Guide 42
11.2 Malfunction messages appearing on the display 44
12 LIMITED WARRANTY STATEMENT 45
1.1 For your safety
If this appliance is replacing an existing appliance which must be removed or disposed of, cut the old appliance's power supply cable. This will make it impossible to close the door and ensure that it does not become a dangerous trap for children. Take the same precaution at the end of the new appliance's lifespan.
This appliance is not designed to operate with external timers or with remote-control systems.
This appliance is designed to refrigerate beverages and foods and is intended for domestic use.
This appliance is for the refrigeration and cold storage of fresh and frozen foods in the home. Any other use is considered inappropriate.
The appliance must be installed according to the instructions in the Installation Guide. Particular care should be taken not to obstruct the vent openings of the appliance or of the built-in units.
The appliance features a concentrated lighting system with LED lamps. Do not stare at these lamps when they are on, as this could damage your vision. This warning is also included on the label attached to the inside of the refrigerator door.
When the freezer is operating, do not touch the interior stainless steel surfaces with wet or damp hands, , as skin may stick to the very cold surfaces.
Do not use any type of electrical equipment inside of the food storage compartments.When positioning the shelves, do not place fingers in the shelf slide guides.
Do not place containers of flammable liquid near the appliance.
Never attempt to extinguish a flame/fire with water: Turn off the appliance and cover the flame with a fireproof blanket.
Switch the appliance off completely and unplug the power supply cable during cleaning operations. If the plug is not easily reached, it is a good idea to turn off the breaker or remove the fuse that controls the receptacle that the appliance is connected to.
The packaging materials can be dangerous for children. Do not allow children to play with the plastic bags, plastic film or Styrofoam.
Any repairs must be performed by a qualified service technician.
This appliance is not intended for use by individuals (including children) with reduced physical or sensory capabilities or lack of experience and knowledge unless they are supervised or have been given instruction concerning the use of the appliance by a person responsible for their safety. Children should be supervised to ensure that they
do not play with the appliance.
Do not damage the appliance's refrigerant circuit pipes.
Do not store explosive substances, such as aerosol cans with a flammable propellant, inside this appliance.
If the power cord of this appliance is damaged, it must be replaced by the manufacturer, customer service or a similarly qualified person. Improper installations and repairs may put the user at considerable risk.
Repairs may be performed by the manufacturer, customer service or a similarly qualified person only.
Plug into a grounded 3-prong outlet.
Do not remove the ground prong.
Do not use an adapter.
Do not use an extension cord.
Disconnect power to all units before servicing.
If the power cord is damaged, it must be replaced by the manufacturer, its service agent or a similar qualified person in order to ensure against hazards.
Children should be supervised to ensure that they do not play with the appliance.
Do not modify this appliance.
Do not insert pointed metal objects (kitchen utensils or tools) into the slots in the appliance.
Do not touch (especially with wet hands) frozen products or put them in your mouth directly.
Do not store inflammable, explosive or volatile substances inside the appliance.
Do not store explosive substances, such as spray bottles with flammable propellants, in the appliance.
Bottles containing beverages with a high alcohol content must be tightly closed and stored vertically.
Organic compounds, acids and essential oils can corrode the seals and plastic surfaces if left in contact with them for extended periods.
Turn off the appliance and unplug it from the mains before cleaning or maintenance operations.
Do not pull on the cable to unplug the appliance.

Caution
Risk of Fire or Explosion:
This product uses flammable refrigerant.
Do not use mechanical devices to defrost the refrigerator.
Do not use chemicals for cleaning.
Do not pierce the refrigerant tubing.

Note
If the appliance is damaged or if you see a gas leak, please keep away from the gas. It may cause ice burn if it comes into contact with the skin.

Note
The type of gas used in the product is listed on the rating label, which is located on the left interior wall of the refrigerator.

Warning
Never attempt to burn the product as a means of disposal.
1.2 Important information when using the appliance
Cleaning and maintenance meant to be performed by the user must not be carried out by unsupervised children.
Never use electrical appliances inside the appliance (e.g. heater, electric ice maker, etc.). Explosion hazard!
Never defrost or clean the appliance with a steam cleaner! The steam may penetrate electrical parts and cause a short-circuit. Risk of electric shock!
Do not use pointed or sharp-edged implements to remove frost or layers of ice. You could damage the refrigerant tubes. Leaking refrigerant may cause eye injuries or ignite.
Take care that no objects get stuck in the doors.
Do not store products which contain flammable propellants (e.g. spray cans) or explosive substances in the appliance.
Do not stand on or lean heavily against the base of the appliance, its drawers or doors, etc.
Before cleaning the appliance, pull out the power cord plug or switch off the fuse. Do not pull out the power cord plug by tugging on the power cord.
Bottles containing beverages with a high alcohol content must be tightly closed and stored vertically.
Keep plastic parts and the door seal free of oil and grease. Otherwise, parts and door seal will become porous.
Never cover or block the appliance's ventilation openings.
According to current regulations, children between 3 and 8 years of age may remove food from or load it into the appliance, but we highly discourage allowing children under 8 years of age to perform these operations or to use the appliance in general.
Explosion hazard!
Keep children under the age of 8 at a safe distance unless they are constantly supervised and make sure that they do not play with the appliance.
Do not use mechanical, electrical or chemical devices other than those recommended by the manufacturer to speed up the defrosting process.
Do not damage the cooling circuit (whether or not it can be accessed).
Do not use electrical appliances inside food storage compartments unless these are of a type recommended by the manufacturer.
▶In the event of damage to the cooling circuit, avoid the use of open flames and ventilate the area properly.
Do not use the appliance or parts of it in any way other than those specified in this manual.
Keeping the door open for long periods can cause the temperature in the appliance compartments to rise considerably.
Perform cleaning of surfaces that may come into contact with food and of accessible drainage systems regularly.
Store raw meat and fish in suitable containers in the refrigerator, so that it does not come into contact with other food or drip onto it.
If the appliance is left empty for long periods of time, switch it off, thaw it, clean it, dry it and leave the door open to prevent the development of mould inside.
Never rest sharp metal objects such as knives, forks, spoons and lids on the appliance during use.
Do not use abrasive or corrosive cleaning agents (e.g. scouring powders, stain removers or metallic scouring pads and sponges) on glass parts.
Do not sit on the appliance.
Do not sit or lean on the door or on any open drawers.
Do not put pressure on the door or use it to move the appliance.
Do not use electrical appliances (e.g. hair dryers) or sprays for defrosting; the plastic parts could be damaged.
Do not use the appliance to cool rooms for any reason.
Always unplug the appliance in the event of a malfunction or when performing cleaning or maintenance.
Do not keep liquids in tins or glass containers in the freezer.
Do not place heavy objects on top of the appliance.
Symbols used in the Guide:

Note
Recommendations for correct use of the appliance

Important
Information to prevent damage to the appliance

Warning
Information to prevent injury
1.3 Caring for the environment

Pay special attention to correct disposal procedures for all of the packaging materials in accordance with federal or local regulations.

Power voltage
Danger of electrocution
Disconnect the mains power supply. Unplug the appliance.
The appliance must not be disposed of with municipal waste. Contact local waste disposal centres about how to dispose of recyclable waste.
To dispose of the appliance: Cut the power cable and remove it.
Prior to disposal, cut the power supply cord and make it impossible to close the door.
During disposal, avoid damage to the refrigeration circuit.
The appliance does not contain hazardous substances for the atmospheric ozone layer, neither in the refrigeration circuit nor in the insulation.
Our appliances are packaged in non-polluting and recyclable materials.
Deliver the packing materials to the appropriate recycling centre.

Plastic packaging
Danger of suffocation
Do not leave the packaging or any part of it unattended.
Do not let children play with plastic bags.
1.4 Cleaning, sanitising and maintaining the ice
Failure to follow the instructions regarding sanitising can compromise the hygienic safety of the water dispensed.
When using the appliance for the first time, and every time the filter is changed, it is recommended that you let water flow through the circuit by implementing "Manual Cleaning" and discard the ice produced in the first 24 hours.
Clean the ice bucket or drawer regularly but use only drinking water.
The filter must be changed when indicated on the control panel or when the ice dispenser has not been used for more than 30 days.
With each filter replacement, sanitise the ice making system using a food grade disinfectant (with sodium hypochlorite), which does not alter the characteristics of the materials. Rinse with at least 2 litres of water before use.
Only genuine spare parts supplied by the manufacturer should be used when replacing components in the ice and water dispenser.
Any work on the appliance must be carried out by a qualified technician or by After-Sales Service.

Warning
To avoid contamination of food, please heed the following information and instructions:
Opening the door for long periods can cause a significant increase in temperature inside the appliance compartments.
Perform regular cleaning of surfaces that may come in contact with food and of accessible drainage systems.
Store raw meat and fish in suitable containers in the refrigerator, so that it does not come into contact with other food or drip onto it.
Two-star frozen-food compartments are suitable for storing pre-frozen food, storing or making ice cream and making ice cubes.
One-, two- and three-star compartments are not suitable for the freezing of fresh food.
If the refrigerator is left empty for a long period, switch it off, defrost, clean and dry it, and leave the door open to prevent mould developing within the appliance.
1.6 To save energy
Correct use of the appliance, correct packaging of foodstuffs, a constant temperature and food hygiene all have effects on the quality of storage.
Keep the number of times that the doors are opened and the length of time they remain open to a minimum to protect the compartments from excessive warming.
Clean the condenser (if it can be accessed) at the rear of the appliance periodically to prevent the appliance from losing efficiency.
Defrost frozen food in the refrigerator compartment in order to make use of the cold stored in the frozen foods.
1.5 Information for regulatory authorities
For Ecodesign tests, the installation and set-up of the appliance must comply with federal or local regulations.
Ventilation requirements, dimensions and minimum space from the rear wall are provided in the "Installation" chapter of this manual.
Contact the manufacturer for additional information.
1.7 Warning and danger

This is the safety alert symbol. This symbol alerts you to potential hazards that can kill or hurt you and others. All safety messages will follow the safety alert symbol and either the word "DANGER" or "WARNING." These words mean:

DANGER
You can be killed or seriously injured if you don't follow instructions.

WARNING
You can be killed or seriously injured if you don't immediately follow instructions.
All safety messages will tell you what the potential hazard is, tell you how to reduce the chance of injury, and tell you what can happen if the instructions are not followed.
SAVE THESE INSTRUCTIONS!

WARNING
IMPORTANT SAFETY INSTRUCTIONS
This manual contains operational instructions for the users of the appliance. Keep this manual in an easily accessible place for future reference. Improper installation, adjustment, alteration, service or maintenance can cause property damage, injury, or death. Read the installation, operating, and maintenance instructions thoroughly before installing or servicing this equipment.
To reduce risk of fire, electric shock, or injury to persons when using your appliance, follow basic precautions, including the following:
Children should be supervised to ensure that they do not play with the appliance.
This appliance is not intended for use by persons (including children) with reduced physical, sensory or lack of experience and knowledge unless they have been given supervision or instruction concerning use of the appliance by a person responsible for their safety.
This appliance is designed to refrigerate beverages and foods and is intended for domestic use.
This appliance is intended to be used in household and similar applications such as: staff kitchen areas in shops, offices, and other working environments; farm houses and by clients in hotels, motels, and other residential-type environments; bed and breakfast-type environments; and catering and similar non-retail applications.
Do NOT use an extension cord or adapter.
Plug into a grounded 3 prong outlet.
Do not remove ground prong.
If available, ice make kit can be added to some models. See serial tag inside the food compartment of appliance for ice maker kit model information.
A qualified service technician must connect ice maker (if available) and the appliance to the water supply system (if the appliance has water load included).
If present, clean the ice bucket or drawer regularly but using only drinking water.
The appliance should be supplied only with drinkable water (if is --- a water connection).

WARNING
In the event of a power failure, do not attempt to operate this appliance.

WARNING
Keep the appliance area free and clear from combustibles or flammable materials and vapors.

WARNING
Keep ventilation openings, in the appliance enclosure or in the built-in structure, clear of obstruction. Do not obstruct the air intake or exhaust openings of the appliance.

WARNING
Do not store explosive substances such as aerosol cans with a flammable propellant in this appliance.
WARNING
Do not use electrical appliances inside the food storage compartments of the appliance, unless they are of the type recommended by the manufacturer.
IMPORTANT SAFETY INSTRUCTIONS FOR PROPER DISPOSAL OF YOUR OLD REFRIGERATOR
WARNING
Suffocation Hazard
Remove doors or lid from your old appliance.
Failure to do so can result in death or brain damage.
WARNING
Risk of child entrapment.
Before you throw away your old refrigerator or freezer:
Take off the doors.
Leave the shelves in place so that children may not easily climb inside.
IMPORTANT: Child entrapment and suffocation are not problems of the past. Junked or abandoned refrigerators are still dangerous, even if they will sit for "just a few days." If you are getting rid of your old refrigerator, please follow these instructions to help prevent accidents.
Important information to know about disposal of refrigerants:
Dispose of refrigerator in accordance with federal and local regulations. Refrigerants must be evacuated by a licensed. EPA-certified refrigerant technician in accordance with established procedures.
IMPORTANT SAFETY INSTRUCTIONS FOR MAINTENANCE AND CARE
! DANGER
Risk of fire or explosion due to puncture of refrigerant tubing; follow handling instructions carefully. Flammable refrigerant used.
WARNING
To be repaired only by trained service personnel. Use only manufacturer-authorized service parts, Do not use replacement parts that have not been recommended by the manufacturer (e.g., parts made at home using a 3D printer). If power supply cord is damaged, it must be replaced by the manufacturer, its service agent, or a similarly qualified person in order to avoid a hazard. Any repair equipment used must be designed for flammable refrigerants. Follow all manufacturer repair instructions. Use nonflammable cleaner.
WARNING
Do not puncture refrigerant tubing, do not damage the refrigerant circuit.
WARNING
Do not use mechanical devices or other means to accelerate
the defrosting process, other than those recommended by the manufacturer.
TIP OVER HAZARD
WARNING
Refrigerator is top heavy and tips easily when not completely installed; to avoid a hazard due to instability of the appliance, it must be fixed in accordance with the instructions (see instruction manual provided).
Keep doors taped closed until refrigerator is completely installed.
Use two or more people to move and install refrigerator.
Failure to do can result in death or serius injury.
2.1 Installation
Make sure that the installation is performed correctly, in accordance with all of the instructions in the specific installation manual provided with the appliance.

Warning
Always connect the water before connecting the power.
The appliance must be connected to ground in compliance with electrical system safety standards.
Position the appliance with the aid of a second person.
Never use the open door to lever the appliance into place when fitting.
Avoid exerting too much pressure on the door when open.
The appliance must not be installed near heat sources. If this is not possible, suitable insulation must be used.
The appliance must not be exposed to direct sunlight.
Do not use the appliance outdoors.
Installation and servicing should be carried out by qualified personnel in accordance with current standards.
Ensure that an authorised technician performs the electrical connection.
If the power supply cable is damaged, ensure against hazards by contacting technical support immediately and they will replace it, so as to prevent any risk.
Always put on the necessary/required Personal Protective Equipment (PPE) before performing any work on the appliance (installation, maintenance, positioning or movement).
Before performing any operation involving the appliance, switch off the power supply.
This appliance can be used up to a maximum altitude of 13,000 feet above sea level.
If installed near another refrigerator or freezer, keep it at a minimum distance of 13/16".
Do not try to repair the appliance yourself or without the assistance of a qualified technician.
Do not install/use the appliance outdoors.
CAUTION: Make sure that the power supply cable does not become caught or damaged when positioning the appliance.
To ensure the appliance is stable, install and secure it correctly as described in the instructions provided in this manual.
2.2 Connecting to the water system
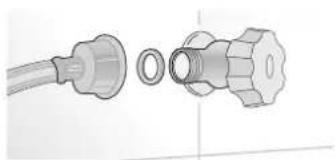
natural_image
Technical illustration of a mechanical connector assembly (no text or symbols)Models equipped with an Ice Maker require a connection to the domestic water supply system. This can be established solely by using the provided 14 " water line.
The system pressure must be between 8 to 75 PSI. Any pressure outside of this range may cause the water system to malfunction or leak. This appliance should be supplied only with potable water.
Warning
This appliance should be supplied only with potable water.

Warning
Make sure that installation is performed correctly and in accordance with all of the instructions in the specific installation manual provided with the appliance.

Warning
Do not attempt to use a locally-sourced threaded garden hose adapter or braided supply line. It will strip the threads on the appliance's water connection solenoid.

2.3 Connecting to the electrical power supply
The appliance is equipped with a NEMA 5-15P plug and must be connected to the electrical power supply through a corresponding receptacle.
Do not use extension cords and/or multiple adapters for the power supply connection.

natural_image
Illustration of hands inserting a plug into an electrical outlet (no text or symbols)
Important
Do not use extension cords and/or multiple adapters for the power supply connection.
2.4 Refrigerant
The appliance's refrigerant circuit contains the refrigerant isobutane (R600a), a natural gas with a high degree of environmental compatibility, which is nevertheless flammable.
During transportation and installation of the appliance, be certain that none of the components of the refrigerant circuit become damaged.
If the refrigerant circuit should become damaged: - avoid open flames and sources of ignition;
- thoroughly ventilate the room in which the appliance is situated.

ISO 7010 W021

Caution:
Fire hazard / Flammable materials.

Important
Use special care during transportation, installation and/or cleaning so as to avoid damaging the refrigeration circuit.
3.1 Know your refrigerator
Congratulations on having purchased your new refrigerator! From now on you can use our innovative cold storage system, which will allow you to store all of your food in the best possible way.
This manual will answer most of your questions about the product's features. Should you require further information or technical assistance, please contact your dealer or visit our website:
in the US
https://us.bertazzoni.com/more/support
in Canada
https://ca.bertazzoni.com/more/support
3.2 Manufacturer's liability
The manufacturer declines all liability for injury or property damage caused by:
uses of the appliance other than those specified;
failure to comply with the instructions in the user manual;
tampering with any part of the appliance;
use of non-original spare parts.
3.3 Technical support
In the event of appliance failure, contact technical support and have the repair carried out by qualified personnel only.
Make sure you have the model and serial number on hand (located on the identification plate).
Use original spare parts only.
Do not try to repair the appliance yourself or without the assistance of a qualified technician; this has safety repercussions and may void the warranty.
Original spare parts remain available for 10 years after the model ceases to be manufactured.
The following spare parts are available only for authorized repair technicians: electronic boards, thermostats, temperature sensors, hinges, lamps, door handles.
Important
Before calling, make a note of the appliance's serial number, found on the warranty certificate and on the serial number plate located inside the refrigerator compartment on the side opposite the door opening.
Before calling, make sure you have the following information on hand:
- date of purchase
- name of the dealer
3.4 Technical data
The type of refrigerant, the capacity and other technical data are provided on the product label.
3.5 Product plate
The product plate shows the technical data, the serial number and the model. The product plate must never be removed.

| Fridge Gas Fill Charge | 1.7 oz | MODEL REF36BMBIPRT | Model. |
| Quantité de Gaz Réfrigerateur | 2.1 oz | CODE ZS360TST6IU | Code . |
| Freezer Gas Fill Charge | 3.0 A | TECHNICAL CODE HPNADLCFVL.UA | Technical Code . |
| Quantité de Gaz Congélateur | 115 V | SER.NO./N° SERIE | Serial Number . |
| Total Absorbed Current | 60 Hz | F20221001000026 | |
| Courtant Absorbée Totale | R600a | ETL LISTED Conforms to UL 60335-1 and UL 60335-2-24 | |
| Voltage | 214 W | Certified to CSA C22.2#60335-1 | |
| Tension | CSA C22.2#60335-2-24 | ||
| Frequency | |||
| Refrigerant Gas Type | HFO | ||
| Type de Gaz Refrigerant | |||
| Defrost Heater | |||
| Chauffage de Dégivrage | |||
| Chemical name of blowing gas | |||
| Nom chimique du gaz souffiant | |||
| IP number | |||
| Adresse IP | |||
| Made in Italy |
Climate classes
SN (Sub Normal) from 50°F to 90°F
N (Normal) from 61°F to 90°F
ST (Sub Tropical) from 64°F to 100°F
T (Tropical) from 64°F to 109°F
3.6 Overview of main components
1) Stainless steel body
2) Interactive control panel
3) Water filter
4) Height-adjustable shelves
5) Fridge compartment drawers.
6) Ice maker container
7) Door shelves
8) LED lights for the freezer compartment, bottom drawer
9) Bottom freezer drawer, convertible into a fridge compartment or Fresco compartment (FlexMode functionality)
10) Removable Grill (condenser)
3.7 Electronic Control
The innovative electronic control system maintains a constant temperature in the compartments and displays it on the control panel. It also allows user interaction, making it possible to personalize the various function settings and to receive sound alerts and/or visual messages should any malfunction occur in the appliance.
3.8 Main control panel

⊕
△

△
←

Turning On/Off:
Touch the icon to turn the unit on or off.

Home
Touch the Home icon to go back to the home screen.

Alarm
Touch the icon to view the alarm tone functions and to deactivate them.

Back
Touch the arrow icon to go back to the previous screen.
4.1 Switching on and off
First time starting the unit
Touch the Ⓧ button. The following launch screens are displayed:

1) Bertazzoni Logo

2) Initial test (lasts 3 minutes)
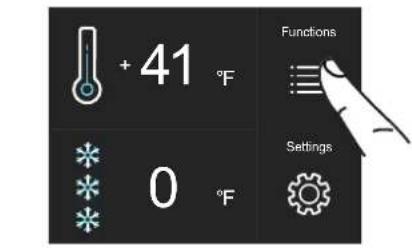
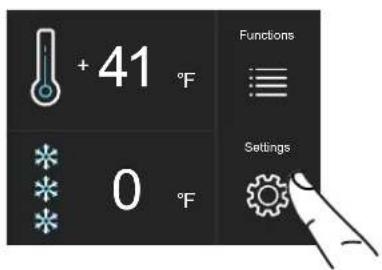
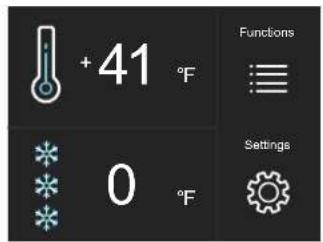
3) The home screen is displayed, showing the ambient temperature as measured inside the fridge compartments. The unit automatically starts to cool until it reaches the set temperatures.
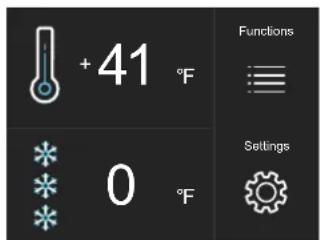
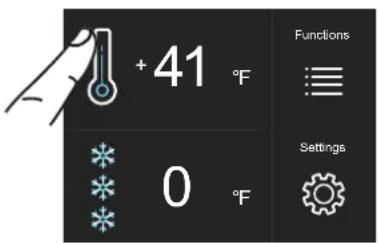
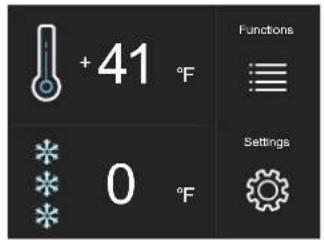
4) Home screen.
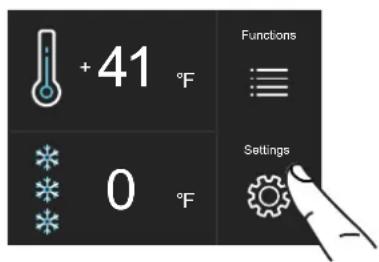
- fridge compartment 41°F
- FlexMode compartment 0°F
The FlexMode compartment is set to freezer mode [-18^(0^)] . To change this setting, see function 5 in section 5.1.
When the appliance is first switched on, it is recommended to wait at least 12 hours before opening the doors or placing any food inside the unit. During this time, deactivate any error messages by touching the Alarm ⚠ button.
Switching off the unit

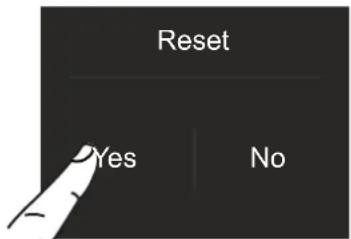
1) Touch the Off ⏻ button.
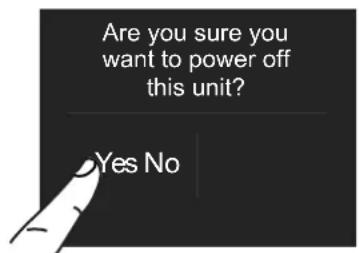
2) Touch "Yes" to switch off

3) Confirm shutdown by touching "Yes".

When the unit is off there are no warning lights to show that the appliance is plugged into a receptacle.
Switching off the fridge only
The fridge compartment can be switched off individually, whereas the FlexMode drawer can't be turned off unless the entire unit is switched off.
1) Home screen.

2) Touch "Off".

3) Touch the "Yes" to turn the compartment off.

4) Touch "Yes" to confirm switch-off.

5) On the home screen, the Off icon 📁 appears, indicating that the fridge compartment is off.
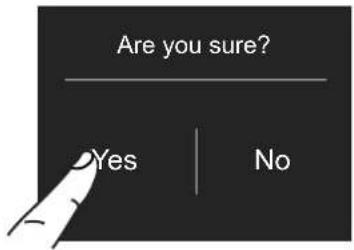
4) Touch "Yes" to confirm activation.
5) Now the fridge compartment will turn back on. The home screen will appear again.
Turning the fridge back on
To turn the unit back on, press the ⏻ button. The display will turn on and the start screen and the home screen will be shown, once again displaying the temperature measured inside the fridge compartments. The fridge will start cooling until it reaches the set temperatures.
Turning the compartment back on.
If you wish to turn the fridge back on:
1) Home screen. For example, to turn the fridge compartment back on, touch "Off".

2) Touch "On".

3) Touch "Yes".
Switching off for long periods
During long periods of absence it is recommended that you switch off the refrigerator by pressing the Unit ⏻ button for three seconds and disconnecting the electrical plug or the breaker controlling the socket.
Empty the refrigerator completely, clean and dry it and leave the doors and drawers partially open to prevent unpleasant odours.

If, at first startup, another message appears instead of the Standby message, it means that the appliance has already started the cooling process.
During the first startup, it will not be possible to use the Menu to modify the factory settings until the preset temperature has been reached.

Each time the appliance is switched on, it goes through a self-diagnosis procedure lasting three minutes before starting up completely.
If only the refrigerator compartment is switched off, that specific fan will continue to operate in order to prevent the unpleasant odours and mould from developing.
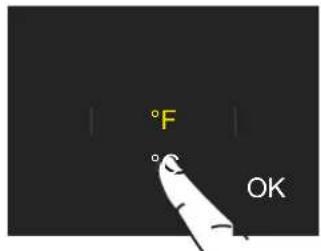
4.2 How to adjust the temperature to meet different needs
Each model has been carefully tested before leaving the factory and is adjusted so as to ensure high performance and low energy consumption. Usually, it is not necessary to modify the settings.
Modifying the compartment temperatures
Example: How to modify the Fridge compartment temperature.

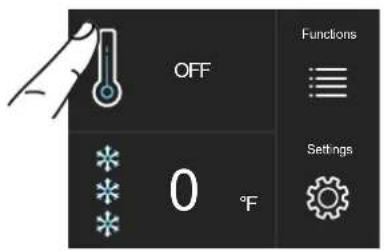
1) Home screen. Touch the 📁 icon for the fridge compartment.


2) Scroll up/down to select the desired temperature
(fridge: from 36°F to 46°F)

3) Touch "OK" to confirm the desired temperature.
The same procedure is used to set the temperature in the FlexMode drawer in Fresco mode (from 28^ F to 36^ F) or in Freezer mode (from +5^ F to -8^ F).

The temperature shown can vary slightly with respect to the set temperature following frequent opening of the doors, the insertion of room temperature foods or of large quantities of food.
6 to 12 hours are required to reach the selected temperature.
Padlock icon
The padlock icon is displayed when the temperatures are set up.
The open/closed padlock indicates whether or not it is currently possible to modify the compartment's temperatures.

Usually an open yellow padlock is displayed; in this case you can scroll up or down with a finger on the display, select the desired temperature and press OK to confirm.

However, a closed padlock can be seen if the user has activated certain functions that modify the Refrigerator Compartment and Freezer Compartment settings. In this event, the user will no longer be able to change the temperature in the compartments.
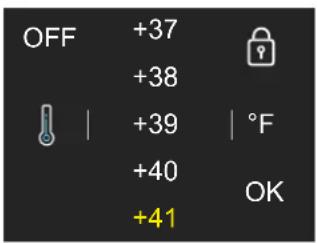
If the user touches the Functions icon and sets up a specific function (Vacation, Shopping FlexMode, etc.), a closed yellow padlock will be displayed and it will no longer be possible to change the temperature of the compartments until the function is completed or manually deactivated.
4.3 Warning notifications on the display
A built-in control system provides information using warning lights or text notifications, shown on the display.
The voiced notification that accompanies some of the warning notifications can be turned off by touching the Alarm ⚠ button on the main control panel.
You can find the list of the warning notifications at the end of this manual.

natural_image
Simple line drawings of a hand pointing to a circular icon with a skull and triangle, no text or symbols present.TIPS FOR USINGTHE DISPLAY
You can tailor the operation of your unit to suit the different ways in which you might want to use it.
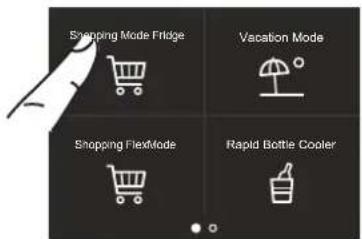
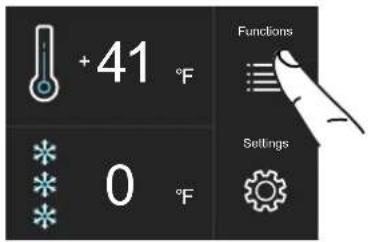
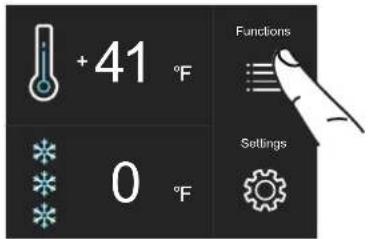
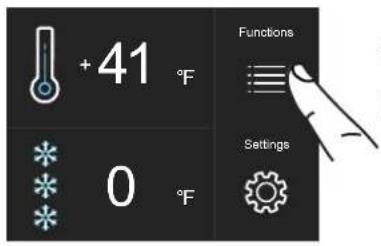
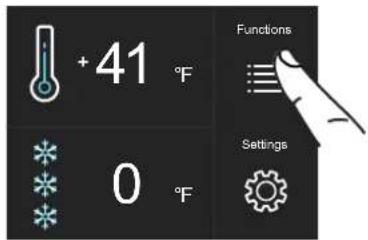
5.1 Functions
After touching the Functions 📄 icon on the home screen, icons will be displayed for the following available functions.

1) Shopping Mode Fridge

2) Vacation
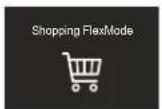
3) Shopping FlexMode
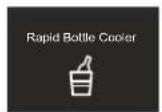
4) Bottle Cooler

5) Ice Maker

6) Water filter

7) Circuit cleaning
1) Shopping Mode Fridge
This feature lowers the refrigerator temperature to 36^ F ( 2^ C) for an interval ranging from 1 to 12 hours, permitting more rapid cooling of food that has just been placed inside. At the end of the set interval, the function deactivates automatically, returning the fridge to the previously set temperature. It is possible to set a timed activation of this function. After an extended period without power, the function will have to be reactivated.
A) Home screen. Touch the Functions icon.
B) Touch the Shopping Mode Fridge icon.
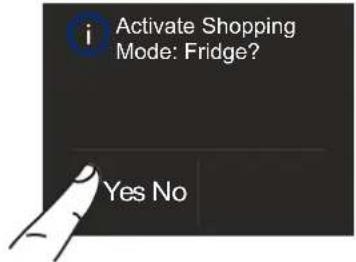
c) Touch "Yes" to activate the function.
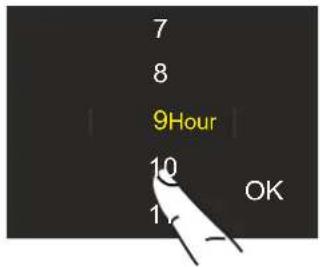
D) Scroll up/down to set the desired time and then press "OK".
It is possible to programme the function 1 to 24 hours in advance.
2) Vacation
This function (recommended in the event of an extended absence, since it allows for considerable energy savings) brings the refrigerator compartment temperature to +57°F.
It is possible to programme the duration or it can be manually deactivated upon returning after a period of absence. This function remains active even if, during the period of absence, there is an extended interruption of electrical power.
It is possible to programme a period from 1 to 90 days.
3) Shopping FlexMode
This function must be activated at least 24 hours before inserting room temperature items into the freezer or several hours before putting into the freezer previously frozen items that have been subjected to a slight temperature rise.
This function is automatically deactivated when the programmed time period is up. It is possible to programme timed activation of this function.
If interrupted by an extended interruption of electrical power, the function will have to be reactivated.
A) Home screen. Touch the Functions icon.
A) Home screen. Touch the Functions icon.
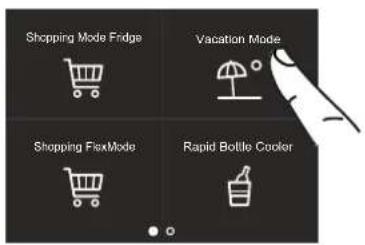
B) Touch the Vacation Mode icon.
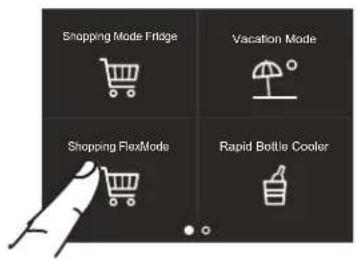
B) Touch the Shopping Mode FlexMode icon.
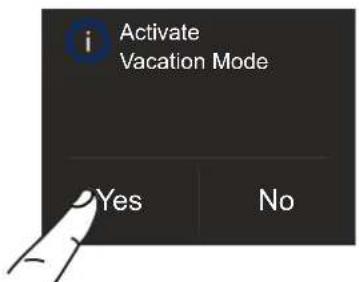
C) Touch the Yes button to activate the function.

c) Touch the On button to activate the function.
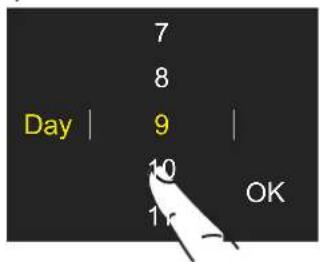
D) Scroll up/down to set the desired time (in days) and then press "OK".

D) Scroll up/down to set the desired time (in hours) and then press "OK".
It is possible to programme a period from 1 to 90 days.
It is possible to programme a period from 1 to 24 hours.
4) Rapid Bottle Cooler
This function can be activated when it is necessary to cool off beverages quickly by placing them inside the freezer compartment.
It is possible to select a duration of 1 to 45 minutes. A signal will sound to notify you when the optimal temperature has been reached.
After removing the beverages, deactivate the signal by pressing the Alarm ⚠ button.
5) Turning on the Ice Maker
A pre-wash of the water circuit should be performed before turning on the Ice Maker for the first time. After a few minutes the Ice Maker can be turned on. (See section 7.1).

Important
Do not activate the Ice Maker unless the appliance is connected to the water mains.

A) Home screen. Touch the Functions icon.

A) Home screen. Touch the Functions icon.

B) Touch the Rapid Bottle Cooler icon.
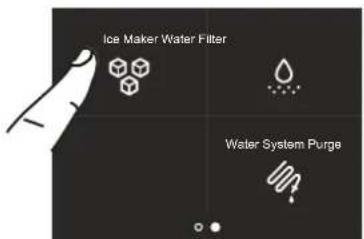
B) Scroll right twice and then touch the Ice Maker icon.

C) Touch the On button to activate the function.

C) Touch the Yes button to turn on the ice maker.
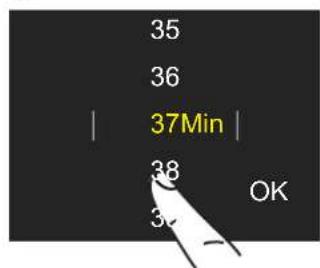
D) Scroll up/down to set the desired time (in minutes) and then press "OK".
5a) Setting the ice cube size - SuperIce
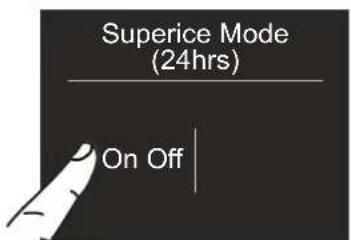
The Ice Maker function makes it possible to select the size of the ice cubes by choosing between Large or Medium (default setting) and to activate the SuperIce function, which increases the quantity of ice produced.
The SuperIce function deactivates automatically after 48 hours.
6) Activating the Water Filter Reminder
The water filter is essential for purifying the water used to make ice or to clean the circuit. The display allows you to switch on a warning to remind you of the time left before the filter expires and needs to be replaced.

A) Home screen. Touch the Functions icon.

B) Scroll right twice and then touch the Ice Maker icon.

C) Touch the Set Cube Size icon. The default cube size is "medium".
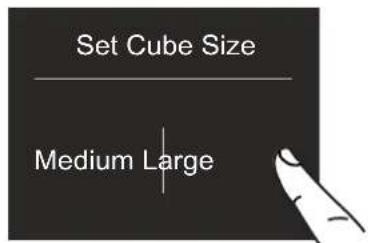
D) Touch the medium/large icon to set the desired cube size.

E) If you would like to increase the quantity of ice produced, touch the SuperIce icon. This will enable the freezer to produce more ice, up to 1.5 kg a day.
F) Confirm whether or not to activate the function by touching the On or Off button.

A) Home screen. Touch the Functions icon.

B) Swipe once right and then touch the water filter icon.

C) Confirm the function by touching On button.
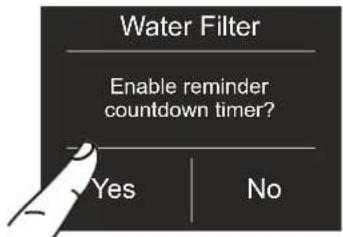
D) Confirm the function by touching the Yes button.
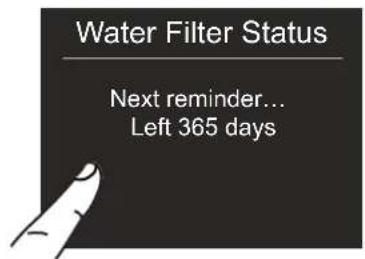
E) The number of days remaining before the next filter replacement date is displayed.
Touch the home button.
6a) Water Filter Reminder Deactivation
To deactivate an active filter-reminder countdown, follow these steps:
6b) Resetting the Filter
The Reset Filter function resets to zero the time left before the filter needs to be replaced. The meter must be reset to zero each time the cartridge is replaced.
A) Home screen. Touch the Functions icon.
A) Home screen. Touch the Functions icon.

B) Swipe once right and then touch the water filter icon.

B) Swipe once right and then touch the Water Filter icon.

C) Push "Off" to deactivate the Water Filter Reminder.
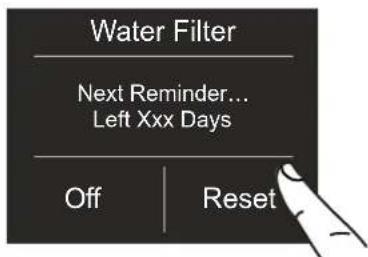
c) Touch the reset button.
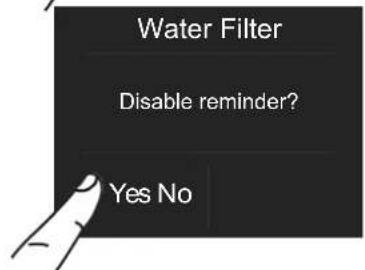
D) Confirm the function by touching the Yes button.

D) Touch the Yes button to proceed.

E) You will be shown the full lifespan of the Water Filter cartridge.

Touch the Home button to go back to the home screen or touch "Yes" to deactivate the filter reminder.
7) Manually Cleaning the Water Filter
If ice production has been switched off or remained unused for a long period, it is recommended that you run the Manual Cleaning function.
Before proceeding, it is important to turn off the ice maker.

A) Home screen. Touch the Functions icon.

B) Touch the Water System Purge icon.

c) Touch "Yes" to activate manual cleaning.
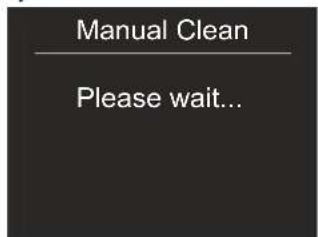
D) Please wait...
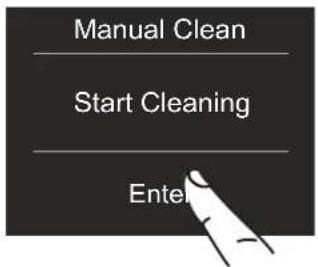
E) Touch "OK" to start the cleaning.
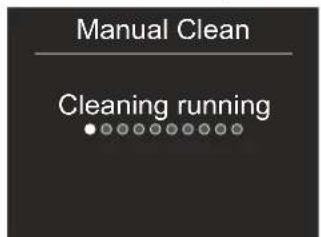
F) Cleaning running...

G) When the cleaning has finished, press "OK" and empty any water from the ice bin.

H) After a few seconds the main menu screen will appear.
Repeat the cleaning until the water in the ice compartment tray is clean.

Position the ice tray or a suitable bowl for collecting any water correctly beneath the ice maker and then close the drawer. When the process is complete, clean the ice tray.
Bypass filter
The built-in filtration system can be bypassed when the home water system provides water of excellent quality. Simply remove the water filter from the adapter and the system will automatically bypass the cartridge.
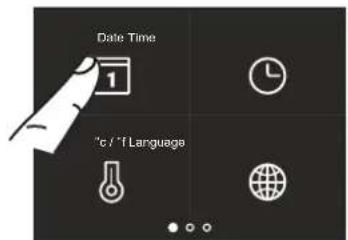
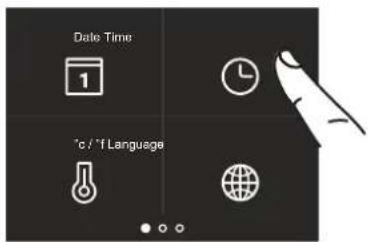
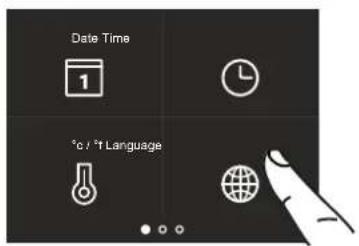
5.2 Settings
You can tailor the settings of your fridge to suit the different ways you might want to use it.
1) Date
The display will show the date in the format day:month:year.
You can modify the settings by touching the display.

1) Date
2) Time
3) Celsius and Fahrenheit
4) Language
5) FlexMode
6) Sabbath
7) Reset
8) Demo Mode
9) Maintenance
10) Service
11) Info System
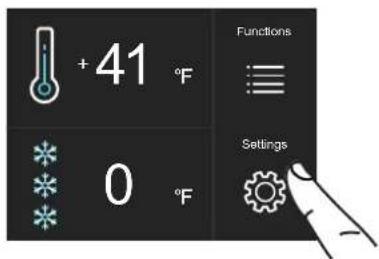
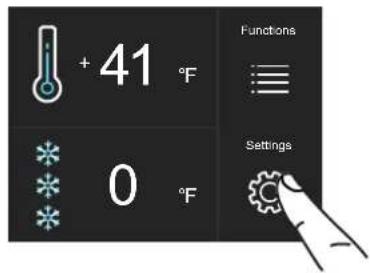
A) Home screen. Touch the Settings icon.
C) Scroll up or down to select the desired day, then touch "OK".

D) Scroll up or down to select the desired month, then touch "OK".
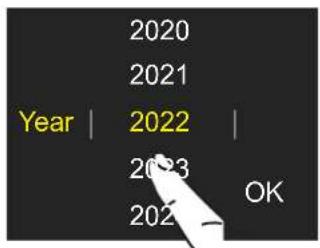
E) Scroll up or down to select the desired year, then touch "OK".
2) Time
The display shows the hours and minutes in the format hh:mm.
This function allows you to select a 12 or 24 hr. clock mode.

A) Home screen. Touch the Settings icon.
C) Touch the mode in which you want to see the time: 12 or 24 hr.

D) Scroll up / down to set the hours, then touch "OK".

E) Scroll up / down to set the minutes, then touch "OK".
3) SET °C/°F
This function allows the temperature to be displayed in degrees Centigrade or Fahrenheit. By default, the appliance is set to display in degrees Centigrade.

A) Home screen. Touch the Settings icon.
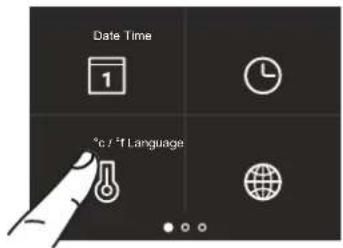
B) Touch the °C/°F icon.
C) Scroll up/down to select either Centigrade or Fahrenheit, then touch "OK".
5. CUSTOMIZING FUNCTIONS AND SETTINGS
4) Language
To set the language of the fridge, simply touch the settings button on the display.
5) FlexMode
The Freezer compartment (from +5°F to -8°F) can, if needed, be converted to a refrigerator compartment (from 36°F to 46°F) or a Fresco compartment (from 28°F to 36°F).

A) Home screen. Touch the Settings icon.
A) Home screen. Touch the Settings icon.
B) Touch the Language icon.

B) Swipe twice right and touch the FlexMode button.
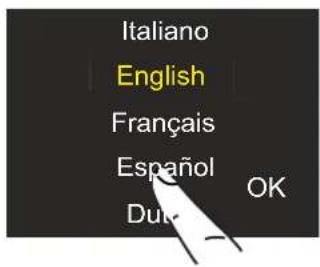
c) Scroll up/ down to select the desired language, then touch "OK".

c) Scroll up / down and select one of the three functions.
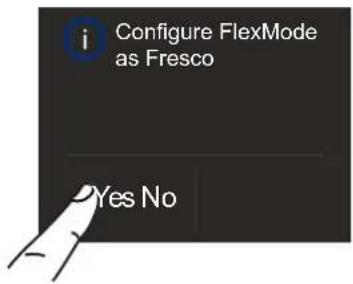
D) Touch "Yes" to confirm the function.
6) Sabbath Mode
The function makes it possible to comply with certain religious observances requiring that the operation of the appliance not be affected by the opening or closing of the doors (the thermostatic control, interior lighting and ice maker are all deactivated).

A) Home screen. Touch the Settings icon.
7) Reset
Makes it possible to restore the default factory settings, cancelling out all changes made thereafter.
A) Home screen. Touch the Settings icon.

B) Swipe right twice and touch the Sabbath icon.
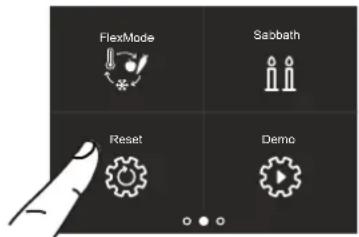
B) Swipe right twice and touch the Reset icon.
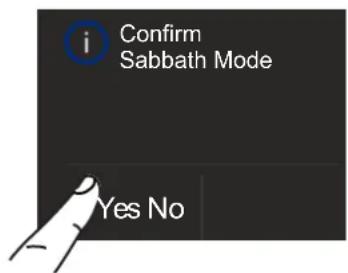
c) Touch the Yes button to activate the function.

c) Touch the Yes button.

D) Touch the Yes button to activate the function.
E) The fridge will work according to this configuration.
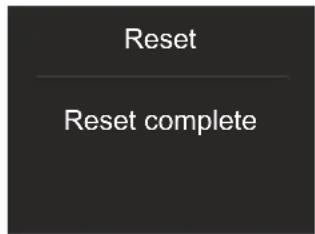
E) The reset has been performed. The fridge's factory settings have been restored.

Important
If you restore the default settings ("Reset"), you will have to reset the function of the FlexMode drawer to fridge or Fresco mode, if one of those two settings had been selected before the reset.
8) Demo Mode
You can simulate fridge operation for showroom display or for fairs.

A) Home screen. Touch the Settings icon.

B) Swipe right twice and touch Demo Mode.
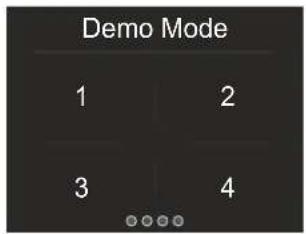
C) Insert the password to activate.
(Default password: 1-2-3-4)

D) Push "Yes" or "No".
9) Maintenance (prompted by an alert).
For the entire unit to function as designed, it is important to periodically clean the toe-kick cover access panel, the filter and the condenser.
The unit's default setting is "Warning disabled".
A reminder for the required cleaning every 6 months is provided via an sound alert and visual notification on the display. It is possible to disable the alert and view the time remaining until the next required cleaning.
See the following pages for details.
A) Home screen. Touch the Settings icon.

B) Swipe to the right three times and touch the Maintenance icon.

C) To enable it, touch "Yes".
D) To enable it, touch "Yes".

E) The display shows the time remaining until the next cleaning.
F) However, if you want to disable a warning previously set up, touch the Reset icon.

G) To disable the warning, touch the Yes button.
11) Info System
The Info System function displays the product data, such as the software code, the serial number and the fridge's factory codes.
A) Home screen. Touch the Settings icon.
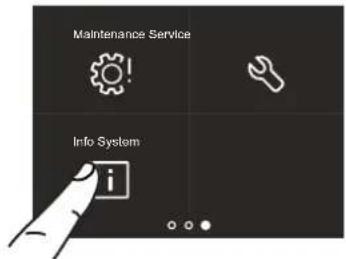
B) Touch the Info System icon.
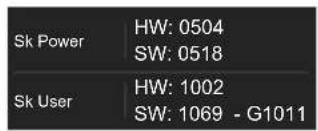
c) Information about the unit is displayed.
10) Service
The Service function is reserved for Customer Support.
6.1 Internal Layout (positioning, adjusting and removing components)
Refrigerator Drawer
Installed on the slide guides with two knurled-head thumbscrews.
To remove the drawer, unscrew the thumbscrews.

natural_image
Line drawing of a hand opening a drawer with drawers (no text or symbols)FlexMode Drawer
The FlexMode drawer can be removed using the same method used for the refrigerator drawer, unscrewing its thumbscrews.
When putting the drawers back in, make certain the backs of the drawers engage under the clips on the slide guides.

natural_image
Illustration of a hand opening a large rectangular object with grid patterns (no text or symbols)Ice Tray
Located in the upper drawer of the freezer compartment; in some models it is installed using thumbscrews.
When putting it back in after removal, be sure to reposition it correctly.
natural_image
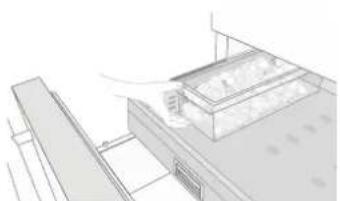
Architectural line drawing of a building interior with storage tanks and structural elements (no text or symbols)
Warning
Do not place hands or fingers near the Ice Maker when it is in operation.
Shelves
The shelves are adjustable and can be easily repositioned by the user as follows:
grasp the sides of the shelf and push it upwards to detach it from the side rails, then pull it outwards.
lift or lower the shelf to the desired position
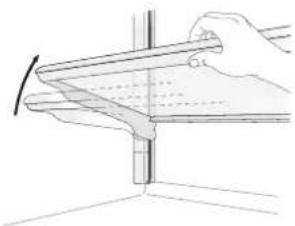
natural_image
Line drawing of a hand holding a tool interacting with a vertical rod (no text or symbols)to remove a shelf, you must first slide it up to the top

natural_image
Illustration of a hand holding a metal bracket with arrows indicating force or movement (no text or symbols)Door Shelves
The door shelves can be easily removed for cleaning.
Grasp the sides of the door shelf and push it upwards to release it from its seat, then pull it outwards.
Reverse the procedure to reinstall.
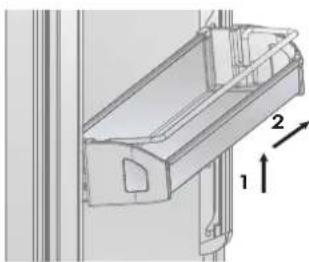
natural_image
Technical line drawing of a mechanical component with numbered callouts (1, 2) and directional arrows, no readable text or symbols.7.1 Activating and using the Ice Maker

Note
If the ice is not used frequently, is advisable to empty the ice bin once every 8-10 days. It is normal for some ice cubes to stick to one another. If the ice is not frequently used, the older cubes can become opaque, will have a strange flavour and become smaller. The Ice Maker automatically switches off if the Vacation function is activated. When the Ice Maker is started for the first time, it is recommended to dispose of the first full bin of ice. If the equipment has been switched off for a month or more, it is recommended to perform a water and filter cleaning cycle. The Ice Maker produces ice if the FlexMode compartment is set to Freezer mode.

Warning
The ice maker will continue to operate even if the ice bin is not in position.
To activate the Ice Maker after the appliance is installed, touch the Function icon and then the Ice Maker icon within Functions. Please note that 12 to 24 hours are required before ice production can begin.
The production is 10 cubes per cycle, with approximately 10 cycles every 24 hours
The yield depends on the temperature set in the freezer, the ambient temperature and how frequently the door is opened. If the appliance is operating without being connected to the water system, make sure that the Ice Maker is deactivated by touching the icon. The Ice Maker produces ice until the ice tray is full and will automatically stop once the maximum level is reached. With the Super Ice function, it is possible to increase the quantity of ice produced every 24 hours, while the Set Cube Size function allows you to select the size of the ice cubes produced.
Do the ice cubes have an unusual odour?
Ice is a porous material which can absorb odours from its surrounding environment. Ice cubes which have been in the ice cube container for a long time may absorb odours, stick together and slowly become smaller.
We recommend that old ice cubes not be used. Other means of preventing odours:
The ice cube container should be cleaned occasionally with warm water. Make sure that you switch off the ice maker before clearing the container. Rinse it out and wipe it dry.
Check the contents of the freezer for spoiled or out-of-date food. All odorous foods should be wrapped thoroughly or stored in airtight containers to prevent the odours from accumulating.
The water filter may have to be replaced in some models.
In some cases, the quality of the water connection in the house should be checked.
Operating noises
Normal noises
Hum: The refrigerator unit is running. The fan in the air recirculation system is running.
Bubbling, humming or gurgling noises: refrigerant is flowing through the tubes.
Clicking: motor is switching on or off. Solenoid valve on the water connection is opening/closing.
Rumbling: ice cubes are falling into the ice cube container.

The appliance is powered by two independent compressors. It is therefore normal to always have one of the two compressors in operation.

Warning
Do not place any bottles or food in the ice cube container for rapid cooling. The ice maker may become blocked and be damaged.
7.2 Water Filter

natural_image
Illustration of a person in medical attire holding an object near a table (no text or symbols visible)The Water Filter makes it possible to have high-quality water for ice cube production. It can filter up to 3000 litres of water over a maximum time period of 12 months.
Filter Replacement
The filter (code: Z330001) is located inside the refrigerator compartment, above the top glass panel. Prior to changing the filter, switch off the ice maker by touching the Ice Maker icon.
Open the top glass panel and carefully rotate the filter cartridge counter-clockwise for one quarter rotation until it detaches from its housing. It is normal for a small amount of water to come out. Remove the cap from the new cartridge and insert it into the housing by gently rotating it clockwise for one quarter rotation until it locks into place.
Access the Menu and use the 📄 icon to select the "Manual Clean" function. At the end of the cleaning cycle, remove the water from the ice tray and wipe it dry.
If you choose not to use the water filter (if, for instance, you are connecting the appliance to an already filtered water source) then it is suggested that you also set the Water Filter function using the icon. Touch the Reset icon and disable the warning to avoid receiving reminders to change the filter (since you are not using it).
For more details and for how to adjust this function setting, follow the instructions contained in this manual in the "Functions" section.
8.1 Lighting

natural_image
Pure diagram of a refrigerator with three doors and three windows, no text or symbols presentTo provide optimum interior lighting, LED strips illuminate the refrigerator compartment from the top and sets of LED lights directly illuminate different areas of the refrigerator compartment, of the refrigerator drawers and the freezer drawer.
In case of malfunction and/or wearing out of the lighting system, repairs should be carried out by a qualified Service technician.
9.1 General instructions
Your refrigerator is designed to ensure constant accurate temperatures and appropriate humidity levels in all compartments.
In addition, the double refrigeration ensures that frozen foods and ice do not absorb the odour of fresh foods and that the humidity in the refrigerator does not freeze, resulting in frost build-up.
Nevertheless, to properly preserve all of your foods, it is not enough to have an excellent refrigerator. It is also necessary to know the rules of correct cold food storage.
Do bear in mind that all foods will inevitably change their characteristics with the passage of time. This change begins long before the food is consumed, since foods contain micro-organisms which multiply and can cause deterioration. This process occurs more rapidly in the case of improper handling and of incorrect storage temperatures and humidity levels.
We therefore recommended that you follow the instructions provided below which will allow you to use your refrigerator/freezer in the safest and most effective manner, to keep your foods in the best possible way for as long as possible.
Bear in mind that the Fresco drawer is the area for preserving the most delicate fresh foods, since it ensures constant average temperature near freezing.
Periodically check that all foods are in a proper state of preservation. It is usually quite clear when a food item has deteriorated, due to mould, an unsavoury odour and an unpleasant aspect. Nevertheless, there are cases in which these conditions are not so evident. If you believe that a food item has been kept for an excessive period of time and may have deteriorated, do not consume this item or even taste it, even if it still seems to be well preserved, since the bacteria that cause deterioration in food can also cause poisoning and illness. When in doubt, throw the food away.
9.2 How to best preserve food quality
When buying groceries
Always take the following precautions:
Place any packages of raw meat, fish or poultry in plastic bags so that they do not drip onto other foods.
Purchase meat, poultry and fish last. Do not leave your groceries in a warm car after shopping. Keep a freezer bag in your car and use it when the outside temperature is high and for long trips.
Check the production dates and "Best before" dates on foods to be sure that they are fresh.
Be very careful when buying fresh foods, and only buy a quantity that can be consumed during your planned storage period.
When possible, let warm foods adjust to room temperature for at least two hours before placing them in the refrigerator, unless you have activated the Shopping function ahead of time.
When placing foods in the fridge
Check the refrigeration temperature of the various compartments using the control panel:
The refrigerator temperature must be 46^ F or lower and the freezer temperature must be 0^ F.
Follow the recommendations regarding the storage periods and temperatures provided in the tables below.
Keep raw meat, fish and poultry separate from other foods and avoid any possible leaks or drips.
When placing foods in the fridge
When placing your meat, fish or poultry in the refrigerator, leave them in their original packaging, unless it is ripped or punctured. Repeated handling could introduce bacteria into these foods.
When storing food in the freezer, it is a good idea to use freezer containers.
Label and date the packages.
Be careful to correctly position the food items on the shelves in a way that does not obstruct the air circulation vents inside the compartment.

Notes
When the place where the unit is located is very humid or damp or there is a high level of moisture in the foods that are placed inside of the Fresco drawer, the
bottom of the Fresco compartment might become covered in some water or ice (if the temperature is set between 32^ F and 28^ F).
This is normal and is due to the high humidity levels in the Fresco compartment; high humidity together with low temperatures is what guarantees that foods can be preserved for a longer time.
Water or ice can disappear on its own if the air humidity level drops; it is also possible to remove the water with a towel. If a thin layer of ice has formed, set the temperature of the Fresco compartment to 36^ F and, after one day, remove the water with a towel.
If the layer of ice is thicker, it might be necessary to shut off the Fresco compartment for one day in order to melt it.

Warning
After a prolonged interruption of electrical power, once the electrical power is reactivated a sound alert will indicate if the temperature has risen above normal levels. In addition to this, the highest temperature detected inside the compartments will be shown on the display for one minute, to allow the user to decide how to best use the food items.
After one minute the display will resume its normal operation, although the Alarm ▲ button will continue to blink.
Press the Alarm 🔊 button to display the highest recorded temperatures.
9.3 Tips for food storage and preservation
Temperatures
The appliance's working temperatures are set to the recommended 41°F for the refrigerator and 0°F for the freezer, 32°F for Fresco.
FOOD ARRANGEMENT
Refrigerator door
Refrigerator compartment door
Keep eggs, butter, cheese etc. in the upper and central parts.
Keep drinks, bottles, cans etc. in the lower part.
Refrigerator compartment
Keep preserves, wine, biscuits etc. in the upper part.
Keep dairy products, pre-prepared foods, pastries, fruit juices, beer, etc. in the central part.
Keep meats, cold cuts, etc. in the lower part.
Keep fresh and tropical fruit, vegetables, carrots, potatoes, onions, etc. in the fruit and vegetable drawer.
Freezer compartment
The type of food, quantity and date of freezing should be marked on the container/packaging.
Use small containers, if possible already cold.
The amount of fresh food which can be frozen at once is provided on the plate inside the refrigerator compartment.
Use suitable freezer bags, tinfoil, cling-film for use with food, and freezer containers.
Do not use paper bags, cellophane for non-food use, shopping bags or previously-used freezer bags.
Prevent frozen food from coming into contact with fresh food to be frozen.
Keep frozen vegetables, ice, ice cream, etc. in bags.
| FRESH FOODS STORAGE AREA | TIME | |
| Raw meats | ||
| Large cuts | Refrigerator - Fresco Compartment | 4 days |
| Steak, poultry and wild game | Refrigerator - Fresco Compartment | 3 days |
| Ground meat | Refrigerator - Fresco Compartment | 1-2 days |
| Carpaccio | Refrigerator - Fresco Compartment | Immediately |
| Cooked meat | ||
| Boiled and roasted meats Refrigerator Compartment | 2 days | |
| Meat-based sauces | Refrigerator Compartment | 6 days |
| Fish | ||
| Raw and cooked fish | Refrigerator - Fresco Compartment | 2 days |
| Other | ||
| Soups and broths | Refrigerator Compartment | 2 days |
| Pasta | Refrigerator Compartment | 2 days |
| Opened cold cuts | Refrigerator - Fresco Compartment | 3 days |
| Fresh cheeses | Refrigerator - Fresco Compartment | 2-3 days |
| Well-sealed aged cheeses | Refrigerator Compartment | Several months |
| Eggs (fresh and unwashed) | Refrigerator Compartment | 2 weeks |
| Opened tins | Refrigerator Compartment | 2-3 days |
| Raw vegetables (in perforated bags) | Refrigerator - Fresco Compartment | 1 week |
FROZEN FOODS STORAGE AREA TIME
Beef, veal, lamb and goat meat Freezer Compartment (steaks) 6-12 months Beef, veal, lamb and goat meat Freezer Compartment (Meat with bone in) 4-6 months Ground beef Freezer Compartment 1-2 months Pork Freezer Compartment (Boneless) 4-6 months Pork Freezer Compartment (With bone in) 2-3 months Ground pork Freezer Compartment 1-2 months Meat leftovers Freezer Compartment 2-3 months
FROZEN FOODS STORAGE AREA TIME
Whole chicken and turkey Freezer Compartment 8-12 months
Goose, duck and pheasant Freezer Compartment 4-8 months
Fish Freezer Compartment 1-2 months
Shellfish Freezer Compartment 2-3 months
Cooked food Freezer Compartment 1-2 months
Vegetables Freezer Compartment 8-12 months
Fruit Freezer Compartment 6-12 months
Desserts and cakes Freezer Compartment 2-3 months
10.1 Care and Cleaning
To clean parts and surfaces made of steel, use a microfibre cloth and the sponge provided in the kit with the appliance. Always use the cloth and sponge in the direction of the steel's satin finish.
Every now and then, to polish the steel, wipe with a slightly damp microfibre cloth.
Do not use the sponge on aluminium parts, such as the handles and the edging on the glass shelves.
Take special care to keep the ventilation openings in the appliance or in the cabinet that houses it free of obstructions.

Scrupulously follow the detailed instructions that can be found in the kit provided and never use abrasive or metallic products which could scratch and permanently damage the satin finishing on the appliance. Before performing any sort of cleaning, disconnect the appliance from the electrical power supply.
Make sure you do not damage the refrigerant circuit in any way.

Warning
The use of chlorine-based cleaning products or other products that contain chlorine should be avoided (bleach, hypochlorite, etc.).
10.2 Cleaning the interior
Clean the interior of the appliance and its removable parts by cleaning them with a solution of lukewarm water mixed with a small amount of dishwashing detergent.
Rinse and dry right away.
Do not use mechanical devices or other methods to speed up defrosting.

Warning
Do not use water on the electrical parts, lights or control panel.

Warning
The use of chlorine-based cleaning products or other products that contain chlorine should be avoided (bleach, hypochlorite, etc.).

Do not bring cold glass parts into contact with hot water.
Do not wash any parts of the refrigerator in a dishwashing machine, as this could damage or irreparably warp the parts.
10.3 Cleaning of the ventilation grill, filter and condenser
In order for the unit to operate correctly, the ventilation grill, filter and condenser must be cleaned periodically.
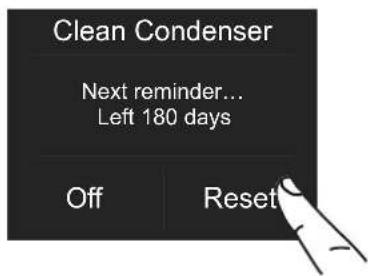
A reminder for this periodic cleaning, to be performed every 6 months, is provided through sound alerts and a notification shown on the display. The alert can be disabled and the time remaining before the next cleaning viewed before it has to be performed.
Behind the frontal ventilation grill (situated on the lower part of the unit) is the condenser.
To clean it, use a Hoover with a soft brush attachment at maximum power, sweeping it along the vent slits. In the event of significant dust build up, the ventilation grill can be removed to allow a more thorough cleaning of the filter.
After the unit has been installed and turned on, you can set the condenser cleaning warning in the maintenance settings.
If the alert is enabled, it will sound every 6 months to inform you that it is time to clean the condenser.
After cleaning it, touch the Reset icon to reactivate the alert in another 6 months.
If you do not want the alert reminding you to clean the condenser to sound any more, touch "Off".
To learn how to use the Maintenance display, see function 9 in section 5.2.
See the instructions in section 11.2.
The lower condenser
To clean the condenser, follow these instructions:
Switch off the appliance by pressing and holding the Unit ⏻ button on the main control panel for approx. 3 seconds.
Wait approx. 30 minutes, until the condenser cools down to room temperature.
Remove the removable grill from under the door.

natural_image
Diagram of a door frame with an open door and a slatted panel, showing structural components without any text or symbols.Clean off any dust build-up completely, as shown in the picture, taking care not to damage it.
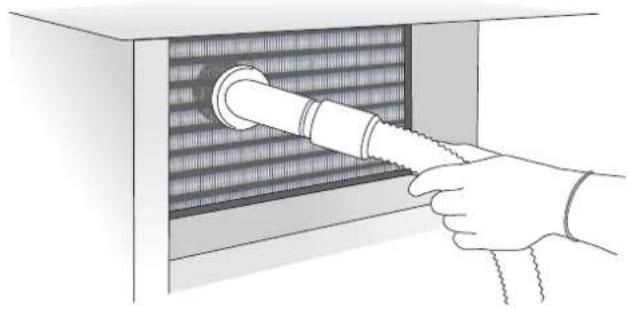
natural_image
Illustration of a hand inserting a tube into a ventilation duct (no text or symbols)Restart the unit by once again pressing and holding the Unit ⏻ button for three seconds.

Warning
The edges of the condenser are sharp, therefore use suitable protection for your hands and arms when cleaning the condenser.
11.1 Troubleshooting Guide
If you notice any malfunctioning of your appliance, use this guide before calling for service. This guide can help you to solve the problem on your own or could provide important information that you can convey to the Service technician in order to ensure rapid and effective repair.
Display messages and sound alerts.
A malfunction is usually indicated on the display. Problems that cannot be solved by the user are reported through a fault code. Keep in mind, however, that these may appear in messages or alarms under particular conditions of use or during start-up. In such an event, deactivate the sound alert by pressing the Alarm ▲ button, leave the appliance running and open the doors as infrequently as possible for 10-12 hours.
The refrigerator or the freezer is not working.
Is the appliance connected to the electrical power supply? Is electrical power being supplied from the electrical receptacle? Is the Unit @button activated? Is the unit in "Demo" Mode?
The refrigerator or freezer is warmer than usual.
Does the display show a malfunction code? Is the temperature adjusted correctly? Were the doors or drawers open for a long period of time? Were large quantities of food recently placed inside? Is the unit in "Demo" Mode?
The appliance keeps running for a long time.
Bear in mind that during very hot weather and with very high temperatures in the room it is normal for the compressor to remain on for extended periods of time. Were the doors or drawers open for a long period of time? Were large quantities of food recently placed inside? Check that the doors are closed and that food or containers are not keeping the door from fully closing. Are one or more of the compartments in Shopping Mode?
If you hear unusual noises
It is normal to hear noises from the ventilators or compressors during operation or during the defrost phase.
The noise could be more noticeable depending on the position of the appliance and the surrounding environment.
Condensation inside and outside of the refrigerator.
If the atmospheric conditions are very humid or damp, the formation of condensation is normal. Opening the door or drawers for extended periods of time can contribute to the formation of condensation. In any case, make sure that the doors are always fully closed.
Ice or frost build-up inside the refrigerator or freezer.
Did you leave the doors open for a long period of time? Are the doors closing completely? If the doors will not fully close, contact your installer. In the event of frost or ice build-up in the Fresco compartment due to frequent and extended opening of the doors, deactivate the Fresco function via the button on the control panel. Wait until the frost or ice melt, then remove the drawer and dry the sides and bottom of the compartment.
Unpleasant odours inside the refrigerator.
Clean the appliance thoroughly according to the instructions. Hermetically cover all of the food. Do not store food for extended periods of time.
The doors are difficult to open.
The appliance is designed to ensure a fully hermetic closure. When the door is closed, a vacuum condition can be created: in such an event, it is necessary to wait a few seconds until the pressure balances before opening the door.
The appliance is cooling, but the lights and display are not working.
Check to see if the appliance was accidentally put into Sabbath Mode.
The Ice Maker does not work.
Make sure that the Ice Maker is on (icon).
To switch the Ice Maker on, press the button. Make sure that the appliance is connected to the water supply.
The Ice Maker does not produce sufficient amounts of ice.
On average, the Ice Maker produces approximately 10 cubes of ice every two and a half hours.
The ice cubes freeze into one block.
If the ice is not used frequently, it is possible that blocks of ice may form. It is recommended that you remove the block of ice cubes and then let the Ice Maker fill the ice tray again.
The ice has an unusual flavour or colour.
When the Ice Maker is started for the first time, it is recommended to empty out the first full tray of ice cubes.
If the refrigerator was switched off for more than one month or if the cartridge was not changed for more than six months, it could be necessary to replace the filter cartridge.
Contact a plumber or a water treatment expert to make sure that the problem is not due to the water supply.

If the unit you purchased was used as a showroom model, it may be in a special energy-saving mode called Demo Mode, in which the appliance appears to be operating (lights work and false temperatures are displayed) but no cooling actually takes place. If you suspect your appliance is in Demo Mode, please contact your point of purchase for assistance with disabling this feature.
11.2 Malfunction messages appearing on the display
| Display message Malfunction description | |
| Power Failure!! | Extended interruption of electrical powerThe appliance automatically resumes operation and the display shows the warmest temperatures reached |
| Upper unit open | Fridge door openThis message appears when the door has been open for a few minutes |
| Lower unit open | Freezer door openThis message appears when the door has been open for a few minutes |
| Replace filter | Replace filter cartridgeThis message appears when only 30% of filter capacity remains |
| Fresco too warm | Fresco too warmSee Troubleshooting Guide |
| Fresco too cold | Fresco too coldWait for 12 hours.If the malfunction persists, call Customer Care for advice. |
| Refrigerator too warm | Refrigerator Compartment too warmSee Troubleshooting Guide |
| Refrigerator too cold | Refrigerator Compartment too coldWait for 12 hours.If the malfunction persists, call Customer Care for advice. |
| Lower unit too warm | Freezer too warmSee Troubleshooting Guide |
| Lower unit too cold | Freezer too coldWait for 12 hours.If the malfunction persists, call Customer Care for advice. |
| Error Code... | Operating problemsCall Customer Care, who may help you to solve the problem or put you in touch with the nearest Service Agent. |
| Check condenser | Check CondenserEvery 6 months the display shows the message “Check Cond”. Clean the condenser and press and hold the Enter button for 5 seconds to reset. |
In the event of a malfunction, touch the Alarm ▲ button and the display will show the fault message along with its error code.
The message will be shown for 3 seconds, then it will go back to the home screen.
To hold the message on the screen, press the info (i) button on the display. The message will remain on the screen for 30 seconds, then it will go back to the home screen.
In the event that there is more than one error message, the display will show the different fault messages in chronological order.
Limited two-year warranty
The Warranty coverage provided by Bertazzoni SpA ("Bertazzoni") in this statement applies exclusively to the original Bertazzoni appliance ("Product") sold to the consumer ("Purchaser") by an authorized Bertazzoni dealer/distributor/retailer, purchased and installed in the United States, District of Columbia, or Canada which has always remained within the country of original purchase (United States, District of Columbia, or Canada).
Warranty coverage is activated on the date of original retail purchase of the Product and has a duration of two(2) years.
Limited five year parts and labor warranty on sealed system
After year two(2) through year five(5) from original purchase date, Bertazzoni warranty covers all parts and labor to repair or replace any components that prove to be defective in materials or workmanship in the sealed system. The "Sealed System" means only the compressor, condenser, evaporator, drier and all connecting tubing.
Warranty coverage is non-transferrable.
In the event of parts replacement or entire product replacement, the replacement Product (or parts) shall assume the remaining original Warranty activated with original retail purchase document. This Warranty shall not be extended with respect to such replacement.
Bertazzoni SpA will repair or replace any component/part which fails or proves defective due to materials and/or workmanship within 2 years from the date of original retail purchase and under conditions of normal residential, non-commercial use.
Repair or replacement will be free of charge, including labor at standard rates and shipping expenses. Purchaser is responsible for making the Product reasonably accessible for service. Repair service must be performed by a Bertazzoni Authorized Service company during normal working hours. Labor performed at overtime or premium rates shall not be covered by Warranty. IMPORTANT: retain proof of original purchase to establish warranty period.
Bertazzoni's liability on any claim of any kind, with respect to the goods and/or services provided, shall in no event exceed the value of the goods or service or part thereof which gives origin to the claim.
30 Day Cosmetic warranty
Inspection of the product must be made by Purchaser at time of delivery.
Bertazzoni warrants that the Product is free from manufacturing defects in materials and workmanship for a period of thirty (30) days from date of original retail purchase of the Product.
This coverage includes:
Paint blemishes
Chips
Macroscopic finish defects
Cosmetic warranty does NOT cover:
issues resulting from incorrect transport, handling and/or installation (i.e: dents, broken, bowed or deformed structures or components, shattered glass components)
slight color variations in painted/enameled components
differences caused by natural or artificial lighting, location or other analogous factors.
Stains/corrosion/discoloration caused by external substances and/or environmental factors
labor costs, display, floor, B-stock, out-of-box, "as is" appliances and demo units.
How to obtain service
To receive warranty service, the Purchaser must contact Bertazzoni Service for problem determination and correct service procedures. Model number, serial number and date of original retail purchase will be requested.
IMPORTANT: retain proof of original purchase to establish warranty period.
If located in the USA
866 905 0010
https://us.bertazzoni.com/more/support
If located in CANADA
800 561 7265
https://ca.bertazzoni.com/more/support
Warranty exclusions – what is not covered
Use of the Product in any non-residential, commercial application
Use of the Product for anything other than its intended scope
Repair service provided by other than a Bertazzo ni authorized service agency.Damage or repair service to correct service provided by an unauthorized agency or the use of unauthorized parts.
Installation not in accordance with local/state/city/county fire codes, electrical codes, gas codes, plumbing codes, building codes, regulations, or laws.
Defects or damage due to improper storage of the Product.
Defects or damage or missing parts on products sold out of the original factory packaging or from displays.
Service calls or repairs to correct the incorrect installation of the product and/or related accessories.
Replacement of parts/service calls to connect, convert or otherwise re-pair the electrical wiring and/or gas line to properly use the product.
Replacement of parts/service calls to provide instructions and education on the use the Product.
Replacement of parts/service calls to correct issues due to product usage in manner other than what is normal and customary for residential use.
Replacement of parts/service calls due to wear and tear such as gaskets, knobs, pan supports, shelving, cutlery baskets, buttons, touch displays, scratched or broken ceramic glass tops
Replacement of parts/service calls for lack of/improper maintenance such as but not limited to: residue build up, stains, scratches, discoloration, corrosion
Replacement of glass components and light bulbs if claim arises after 30 days from original retail purchase date.
Defects and damages arising from accidents, alteration, misuse, abuse, improper installation.
Defects and damages arising from transport, logistics and handling of the Product. Inspection of the product must be made at time of delivery. Any issues from handling, transport and logistics must be notified to selling dealer/delivery company after receipt and inspection.
Defects and damage arising from external forces beyond the control of Bertazzoni SpA including but not limited to wind, rain, sand, fires, floods, mud
slides, freezing temperatures, excessive moisture or extended exposure to humidity, power surges, lightning, structural failures surrounding the appliance and other acts of God.
Products with altered/damaged/tampered serial number.
In no case shall Bertazzoni be liable or responsible for damage to surrounding property, including furniture, cabinetry, flooring, panels and other structures surrounding the Product.
Bertazzoni is not liable nor responsible for the Product if located in a remote area or an area where certified trained technicians are not reasonably available. Purchaser must bear any transportation and delivery costs of the Product to the nearest authorized Service center or for the additional displacement rates of a certified trained technician.
THERE ARE NO EXPRESS WARRANTIES OTHER THAN THOSE LISTED AND DESCRIBED ABOVE, AND NO WARRANTIES WHETHER EXPRESS OR IMPLIED, INCLUDING, BUT NOT LIMITED TO, ANY IMPLIED WARRANTIES OF MERCHANTABILITY OR FITNESS FOR A PARTICULAR PURPOSE, SHALL APPLY AFTER THE EXPRESS WARRANTY PERIODS STATED ABOVE, AND NO OTHER EXPRESS WARRANTY OR GUARANTEE GIVEN BY ANY PERSON, FIRM OR CORPORATION WITH RESPECT TO THIS PRODUCT SHALL BE BINDING ON BERTAZZONI. BERTAZZONI SHALL NOT BE LIABLE FOR LOSS OF REVENUE OR PROFITS, FAILURE TO REALIZE SAVINGS OR OTHER BENEFITS, TIME AWAY FROM WORK, MEALS, LOSS OF FOOD OR BEVERAGES, TRAVELING OR HOTEL EXPENSES, EXPENSES TO RENT OR PURCHASE APPLIANCES, REMODELLING/CONSTRUCTION EXPENSES IN EXCESS OF DIRECT DAMAGES WHICH ARE DEFINITIVELY CAUSED EXCLUSIVELY BY BERTAZZONI, OR ANY OTHER SPECIAL, INCIDENTAL OR CONSEQUENTIAL DAMAGES CAUSED BY THE USE, MISUSE OR INABILITY TO USE THIS PRODUCT, REGARDLESS OF THE LEGAL THEORY ON WHICH THE CLAIM IS BASED, AND EVEN IF BERTAZZONI HAS BEEN ADVISED OF THE POSSIBILITY OF SUCH DAMAGES. NOR SHALL RECOVERY OF ANY KIND AGAINST BERTAZZONI BE GREATER IN AMOUNT THAN THE PURCHASE PRICE OF THE PRODUCT SOLD BY BERTAZZONI AND CAUSING THE ALLEGED DAMAGE. WITHOUT LIMITING THE FOREGOING, PURCHASER ASSUMES ALL RISK AND LIABILITY FOR LOSS, DAMAGE OR INJURY TO
PURCHASER AND PURCHASER'S PROPERTY AND TO OTHERS AND THEIR PROPERTY ARISING OUT OF THE USE, MISUSE OR INABILITY TO USE THIS PRODUCT SOLD BY BERTAZZONI NOT CAUSED DIRECTLY BY THE NEGLIGENCE OF BERTAZZONI. THIS LIMITED WARRANTY SHALL NOT EXTEND TO ANYONE OTHER THAN THE ORIGINAL PURCHASER OF THIS PRODUCT, IS NON-TRANSFERABLE AND STATES YOUR EXCLUSIVE REMEDY.
Bertazzoni does not assume any responsibility for incidental or consequential damages. Some states do not allow the exclusion or limitation of incidental or consequential damages, so the above limitation or exclusion may not apply to you. This warranty gives you specific legal rights and you may also have other rights which may vary from state to state or province to province.
Any questions about this Limited Warranty may be directed to Bertazzoni Customer Care
If located in the USA:
866 905 0010
https://us.bertazzoni.com/more/support
If located in CANADA:
800 561 7265
https://ca.bertazzoni.com/more/support
1 INFORMATIONS IMPORTANTES EN MATIÈRE DE SÉCURITÉ ET POUR L'ENVIRONNEMENT 49
natural_image
Diagram of a mechanical connector with a bulb and nut assembly (no text or symbols)natural_image
Illustration of hands connecting a plug to an electrical outlet (no text or symbols visible)
Important
https://us.bertazzoni.com/more/support
au Canada
https://ca.bertazzoni.com/more/support
3.3 Assistance technique
natural_image
Three abstract symbols: a circular logo with 'W' and a triangular pointer, a stylized black circle with 'W' and a small triangle, and a left-pointing arrow (no text or labels)CONSEILS D'UTILISATION DE L'ÉCRAN
3) Shopping FlexMode
3) Shopping FlexMode
natural_image
Line drawing of a hand opening a drawer with a handle, no text or symbols presentBac FlexMode
natural_image
Illustration of a hand holding a rectangular object with a circular inset showing a magnified view (no text or symbols)Bac à glaçons
natural_image
Architectural line drawing of a building interior with roof and window (no text or symbols)
Attention
natural_image
Illustration of a hand holding a tool interacting with a vertical panel (no text or symbols visible)natural_image
Illustration of a hand holding a tool interacting with a metal bracket (no text or symbols)Balconnets
natural_image
Technical line drawing of a mechanical component with directional arrows (no text or symbols)natural_image
Illustration of a person using a computer to interact with a device (no text or symbols visible)natural_image
Illustration of a refrigerator with three side panels and three upright cutouts (no text or symbols)natural_image
Pure electrical circuit lines without any symbols10.2 Nettoyage interne
natural_image
Diagram of a cabinet or storage unit with an open door and a slatted panel, showing directional arrows indicating flow or movement (no text or symbols present)natural_image
Illustration of a hand inserting a tube into a ventilation duct (no text or symbols)https://us.bertazzoni.com/more/support
Si situé au CANADA
800 561 7265
https://ca.bertazzoni.com/more/support
https://us.bertazzoni.com/more/support
https://ca.bertazzoni.com/more/support
natural_image
Technical illustration of a pipe fitting with a flanged connector (no text or symbols)natural_image
Hand inserting a plug into an electrical outlet (no text or symbols visible)
Importante
natural_image
Simple diagram with four symbols: a circular icon with 'BRAK' and a black square with a white circular symbol, two small circles with arrows pointing left, and a hand gesture (no text or labels)CONSEJOS PARA USAR LA PANTALLA
natural_image
Line drawing of a hand opening a drawer with a handle (no text or symbols)Cajón FlexMode
natural_image
Illustration of a hand opening a large window frame (no text or symbols visible)Bandeja del hielo
natural_image
Architectural line drawing of a building facade with structural elements (no text or symbols)
Advertencia
natural_image
Line drawing of a hand holding a tool interacting with a vertical rod (no text or symbols)natural_image
Illustration of a hand holding a metal bracket with arrows indicating force or movement (no text or symbols)Estantes en puerta
natural_image
Technical line drawing of a mechanical assembly with labeled components (no text or symbols)natural_image
Illustration of a person using a computer to interact with a small object (no text or symbols visible)natural_image
Illustration of a refrigerator with three side panels showing glass covers and ventilation slots (no text or symbols)natural_image
Pure electrical circuit lines without any symbols10.2 Limpieza del interior
natural_image
Diagram of a door frame with an open door and slatted panel, showing structural components without any text or symbols.natural_image
Illustration of a hand inserting a pipe into a ventilation duct (no text or symbols)https://us.bertazzoni.com/more/support
https://ca.bertazzoni.com/more/support
https://us.bertazzoni.com/more/support
https://ca.bertazzoni.com/more/support
- IMPORTANT SAFETY AND ENVIRONMENTAL INFORMATION 4
- INSTALLATION 10
- BEFORE STARTING 12
- SWITCHING THE APPLIANCE ON AND OFF 16
- CUSTOMIZING FUNCTIONS AND SETTINGS 20
- INTERNAL LAYOUT 32
- ACTIVATING AND USING THE ICE MAKER 33
- LIGHTING 35
- FOOD STORAGE 35
- CARE AND CLEANING 40
- TROUBLESHOOTING GUIDE 42
- LIMITED WARRANTY STATEMENT 45
- For your safety
- Caution
- Note
- Warning
- Important information when using the appliance
- Explosion hazard!
- Important
- Caring for the environment
- Power voltage
- Plastic packaging
- Danger of suffocation
- Cleaning, sanitising and maintaining the ice
- To save energy
- Information for regulatory authorities
- Warning and danger
- DANGER
- SAVE THESE INSTRUCTIONS!
- IMPORTANT SAFETY INSTRUCTIONS
- IMPORTANT SAFETY INSTRUCTIONS FOR PROPER DISPOSAL OF YOUR OLD REFRIGERATOR
- Important information to know about disposal of refrigerants:
- IMPORTANT SAFETY INSTRUCTIONS FOR MAINTENANCE AND CARE
- ! DANGER
- TIP OVER HAZARD
- Installation
- Connecting to the water system
- Connecting to the electrical power supply
- Refrigerant
- Caution:
- Know your refrigerator
- Manufacturer's liability
- Technical support
- Technical data
- Product plate
- Climate classes
- Overview of main components
- Electronic Control
- Main control panel
- Turning On/Off:
- Home
- Alarm
- Back
- Switching on and off
- First time starting the unit
- Switching off the unit
- Switching off the fridge only
- Turning the fridge back on
- Turning the compartment back on.
- Switching off for long periods
- How to adjust the temperature to meet different needs
- Modifying the compartment temperatures
- Padlock icon
- Warning notifications on the display
- TIPS FOR USINGTHE DISPLAY
- Functions
- 1) Shopping Mode Fridge
- 2) Vacation
- 3) Shopping FlexMode
- 4) Rapid Bottle Cooler
- 5) Turning on the Ice Maker
- 5a) Setting the ice cube size - SuperIce
- 6) Activating the Water Filter Reminder
- 6a) Water Filter Reminder Deactivation
- 6b) Resetting the Filter
- 7) Manually Cleaning the Water Filter
- Bypass filter
- Settings
- 1) Date
- 2) Time
- 3) SET °C/°F
- CUSTOMIZING FUNCTIONS AND SETTINGS
- 4) Language
- 5) FlexMode
- 6) Sabbath Mode
- 7) Reset
- 8) Demo Mode
- 9) Maintenance (prompted by an alert).
- 11) Info System
- 10) Service
- Internal Layout (positioning, adjusting and removing components)
- Refrigerator Drawer
- FlexMode Drawer
- Ice Tray
- Shelves
- Door Shelves
- Activating and using the Ice Maker
- The ice maker will continue to operate even if the ice bin is not in position.
- The production is 10 cubes per cycle, with approximately 10 cycles every 24 hours
- Do the ice cubes have an unusual odour?
- Operating noises
- Normal noises
- Water Filter
- Filter Replacement
- Lighting
- General instructions
- How to best preserve food quality
- When buying groceries
- When placing foods in the fridge
- Notes
- Tips for food storage and preservation
- Temperatures
- Refrigerator compartment door
- Refrigerator compartment
- Freezer compartment
- FROZEN FOODS STORAGE AREA TIME
- Care and Cleaning
- Cleaning the interior
- Cleaning of the ventilation grill, filter and condenser
- After the unit has been installed and turned on, you can set the condenser cleaning warning in the maintenance settings.
- The lower condenser
- To clean the condenser, follow these instructions:
- Troubleshooting Guide
- Display messages and sound alerts.
- The refrigerator or the freezer is not working.
- The refrigerator or freezer is warmer than usual.
- The appliance keeps running for a long time.
- If you hear unusual noises
- Condensation inside and outside of the refrigerator.
- Ice or frost build-up inside the refrigerator or freezer.
- Unpleasant odours inside the refrigerator.
- The doors are difficult to open.
- The appliance is cooling, but the lights and display are not working.
- The Ice Maker does not work.
- The Ice Maker does not produce sufficient amounts of ice.
- The ice cubes freeze into one block.
- The ice has an unusual flavour or colour.
- Limited two-year warranty
- Limited five year parts and labor warranty on sealed system
- Day Cosmetic warranty
- How to obtain service
- Warranty exclusions – what is not covered
- INFORMATIONS IMPORTANTES EN MATIÈRE DE SÉCURITÉ ET POUR L'ENVIRONNEMENT 49
- Assistance technique
- CONSEILS D'UTILISATION DE L'ÉCRAN
- Bac FlexMode
- Bac à glaçons
- Attention
- Balconnets
- Nettoyage interne
- Si situé au CANADA
- 561 7265
- Importante
- CONSEJOS PARA USAR LA PANTALLA
- Cajón FlexMode
- Bandeja del hielo
- Advertencia
- Estantes en puerta
- Limpieza del interior
Brand : BERTAZZONI
Model : REF30BMBIXRT
Category : Refrigerator