
PIXMA G4411 - Printer CANON - Free user manual and instructions
Find the device manual for free PIXMA G4411 CANON in PDF.

| Product Type | Multifunction inkjet printer |
| Brand | Canon |
| Model | PIXMA G4411 |
| Dimensions (W x D x H) | 445 x 330 x 163 mm |
| Weight | Approximately 6.4 kg (without ink) |
| Power supply | 100-240 V AC, 50/60 Hz |
| Power consumption | Approximately 11 W (printing), 0.8 W (standby) |
| Ink type | Pigment black ink and color ink (bottles) |
| Paper tray capacity | Up to 100 sheets of plain paper |
| Main functions | Print, scan, copy, wireless printing |
| Connectivity | Wi-Fi (wireless network), direct smartphone connection |
| Compatibility | Windows, macOS, iOS, Android |
| Maintenance and cleaning | Ink filling via bottles, print head cleaning via software |
| Safety | Do not tilt the printer during transport to avoid ink leaks |
| Spare parts and repairability | Replaceable ink cartridges, ink bottles included |
| Box contents | Printer, ink bottles, power cord, modular cable, installation CD-ROM (Windows), manuals |
| General information | Economical printer with refillable ink tanks |
Frequently Asked Questions - PIXMA G4411 CANON
User questions about PIXMA G4411 CANON
0 question about this device. Answer the ones you know or ask your own.
Ask a new question about this device
Download the instructions for your Printer in PDF format for free! Find your manual PIXMA G4411 - CANON and take your electronic device back in hand. On this page are published all the documents necessary for the use of your device. PIXMA G4411 by CANON.
USER MANUAL PIXMA G4411 CANON
Read Safety and Important Information (addendum) first.
natural_image
Red background with white icons of a laptop and smartphone, no text or symbols presentConnecting with Computer and Smartphone/Tablet ...... page 4
natural_image
Hand holding a play button icon on a laptop keyboard (no text or symbols visible)
flowchart
graph LR
    A["笔记本"] --> B["http://ij.start.canon"]
    B --> C["打开的书本"]
    C --> D["OK"]
    D --> E["视频播放器"]

1. Checking Included Items
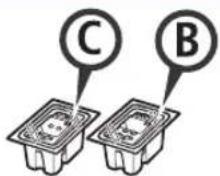
□ Cartridge □ Ink bottle
□ Power cord
□ Modular cable
□ Setup CD-ROM for Windows PC
□ Safety and Important Information
□ Getting Started (this manual)
2. Removing Packing Materials

1 Remove the packing materials (such as orange tape) from outside the printer.
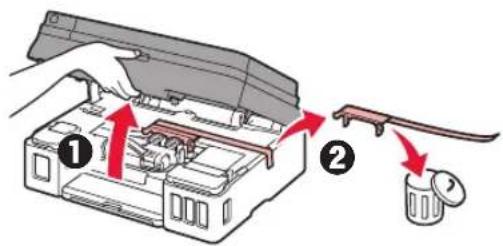
2 ① Open the scanning unit / cover.
② Remove the orange tape and the protective material and discard them.
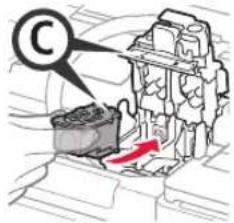
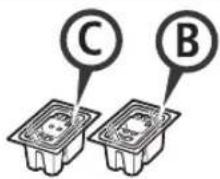
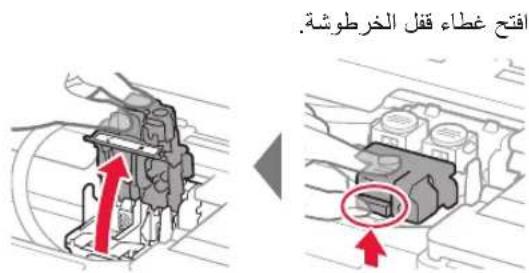
3. Installing the Cartridge

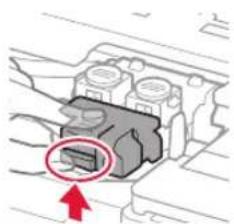
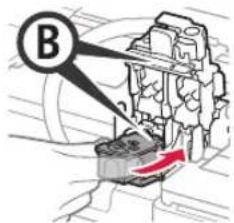
1 Open the cartridge locking cover.
natural_image
Mechanical component diagram showing a connector with a red arrow pointing to it (no text or symbols present)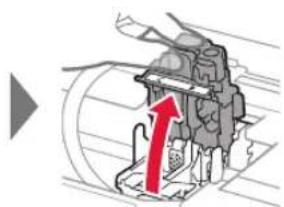
natural_image
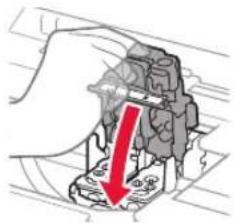
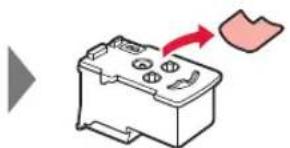
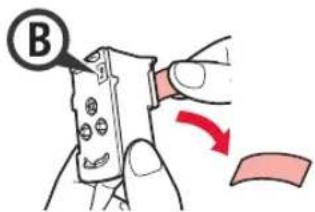
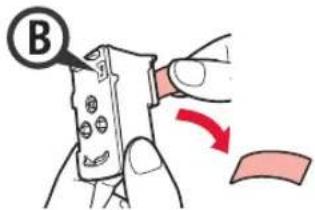
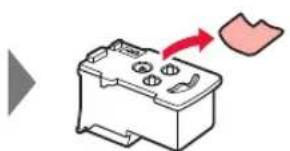
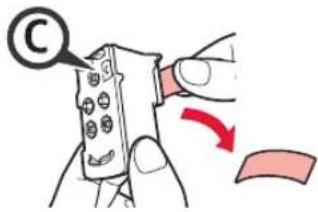
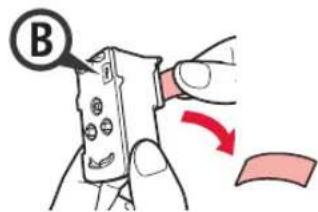
Mechanical component diagram showing a red upward arrow indicating motion or force direction (no text or symbols present)2 Take out each cartridge from the package and remove the label.


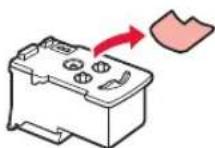
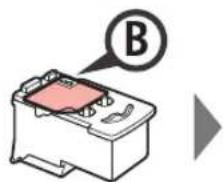
3 Remove the protective tape.
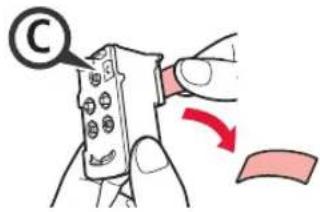

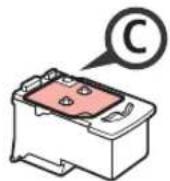
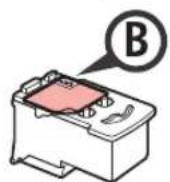
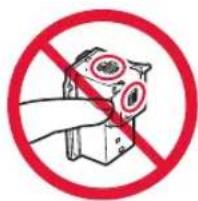
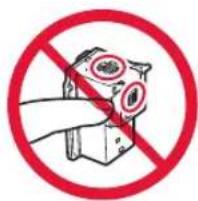
Do not touch.

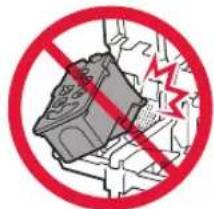
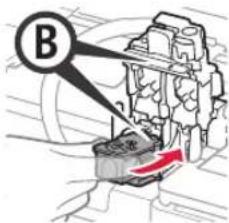
4 Insert the C (color) cartridge on the left and the B (black) cartridge on the right.


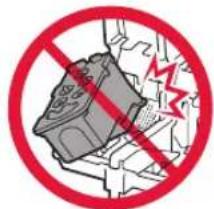
Do not bump it against the surrounding parts.
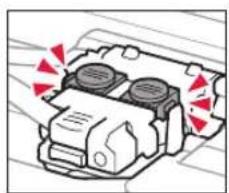
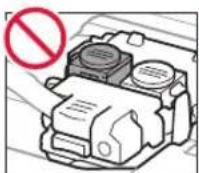
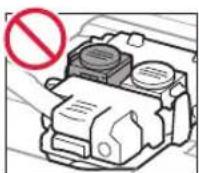
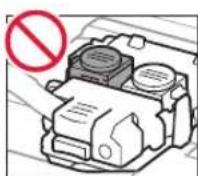
5 Close the cartridge locking cover and push it down.
natural_image
Illustration of a hand holding a textured object with a red downward arrow indicating a reduction or damage (no text or symbols present)
natural_image
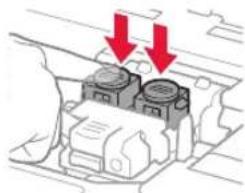
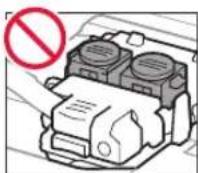
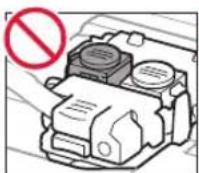
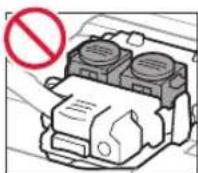
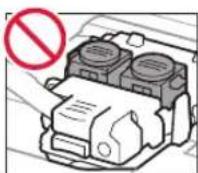
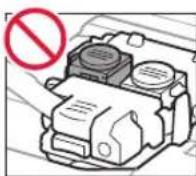
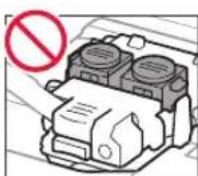
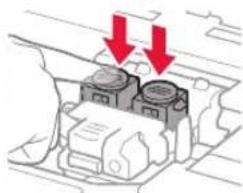
Diagram of a mechanical component with red arrows indicating force or movement (no text or symbols)6 Press down both joint buttons completely.
natural_image
Diagram of a mechanical component with two red arrows indicating downward motion (no text or symbols)
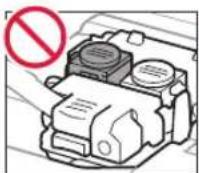
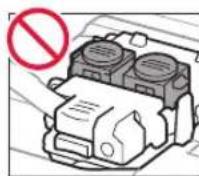
natural_image
Diagram of a vehicle engine compartment with red directional arrows indicating flow or movement (no text or symbols)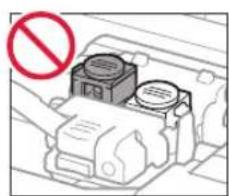
natural_image
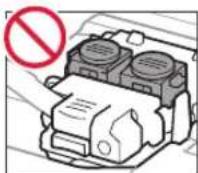
Diagram of a mechanical device with a prohibition symbol (no text or labels present)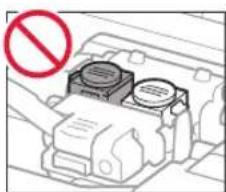
natural_image
Diagram of a mechanical device with a red prohibition symbol (no text or labels)4. Pouring Ink

This product requires careful handling of ink. Ink may splatter when the ink tanks are filled with ink. If ink gets on your clothes or belongings, it may not come off.
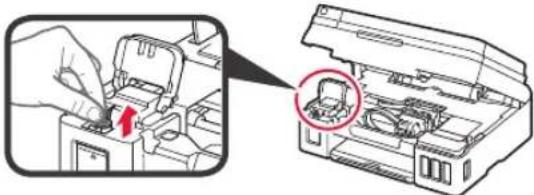
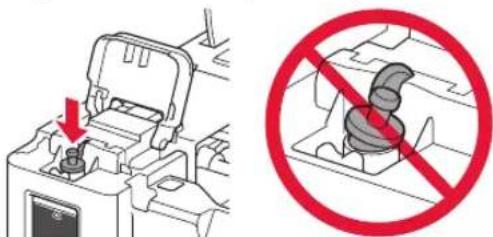
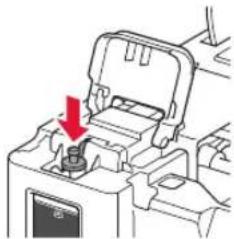
1 Open the ink tank cover.

2 Grab and remove the tank cap of the ink tank.
natural_image
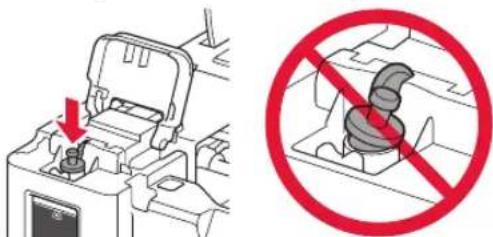
Illustration of a printer's internal structure with a magnified view showing a small object inside (no text or symbols present)3 Hold the ink bottle upright and remove the bottle cap.

natural_image
Illustration of hands performing a mechanical manipulation or tooling task with a red arrow indicating rotation (no text or symbols present)4 Insert the nozzle of the ink bottle into the inlet and stand the ink bottle upside down.
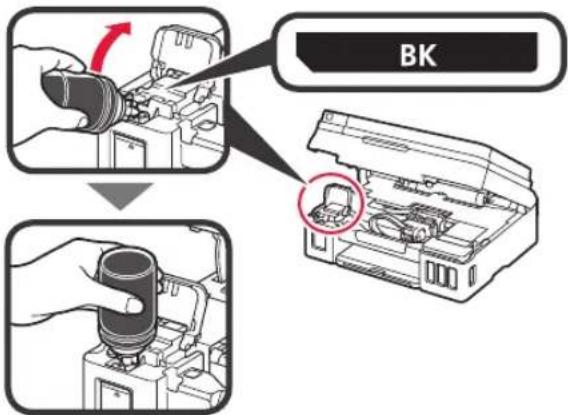
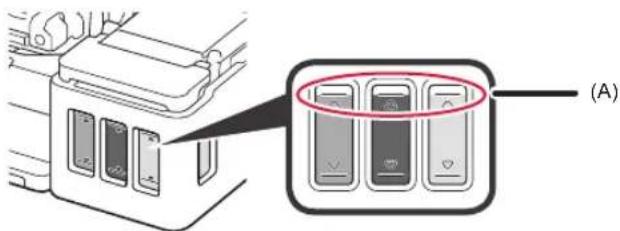
5 Pour all ink into the ink tank.
Confirm that the ink has been filled to the upper limit line (A).
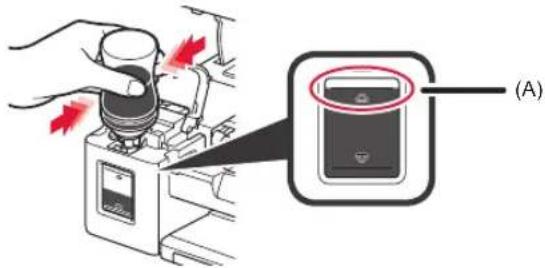
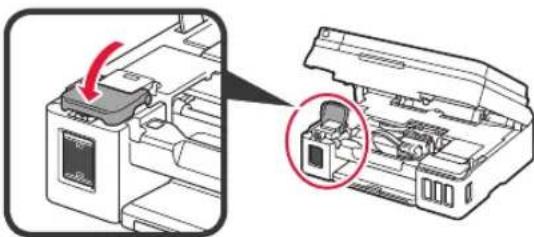
6 Replace the tank cap securely.
natural_image
Diagram showing a printer with a handle and a prohibition symbol (no text or labels present)7 Close the ink tank cover.
natural_image
Diagram showing a printer's internal structure with a red arrow indicating the component (no text or symbols present)8 Repeat steps 1 to 7 to pour all ink into the corresponding ink tanks on the right according to the label.
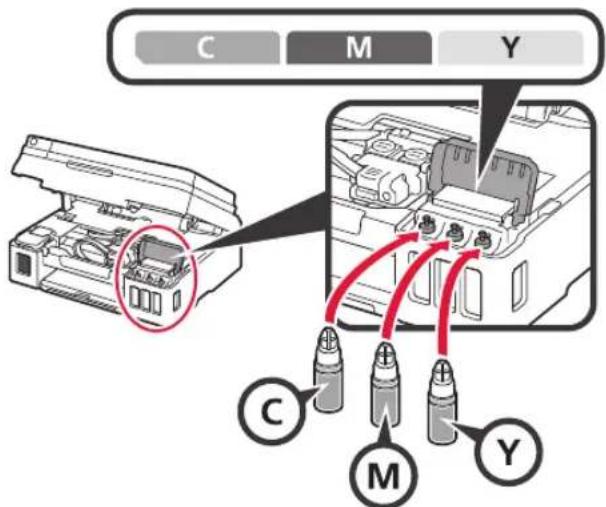
Confirm that the ink has been filled to the upper limit line (A).
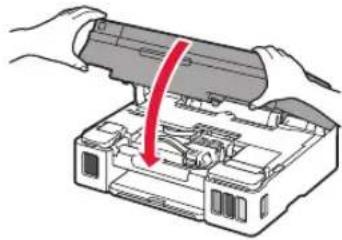
9 Close the scanning unit / cover.
natural_image
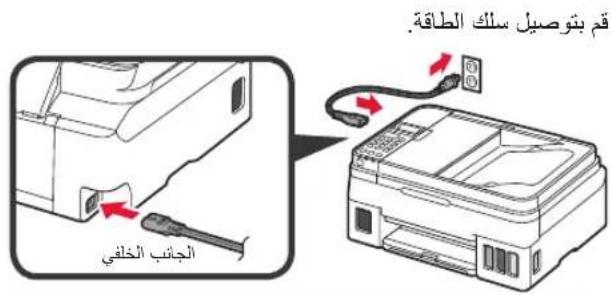
Illustration of hands installing or adjusting a device into a housing (no text or symbols visible)5. Turning on Printer

1 Connect the power cord.
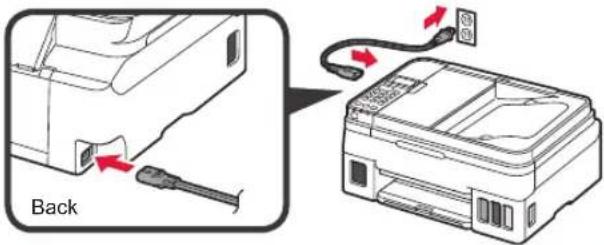
Do not connect any cables except the power cord yet.
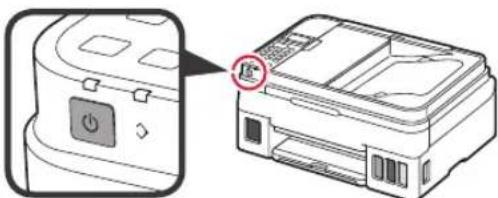
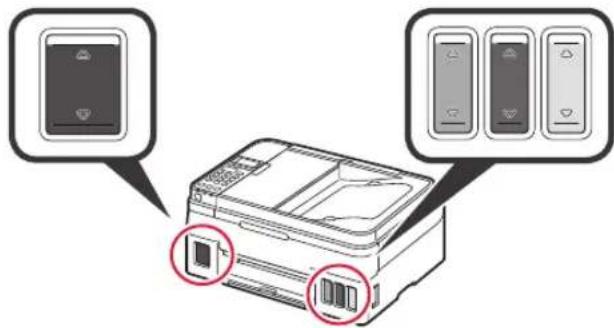
2 Press the ON button.
natural_image
Diagram showing a printer with a close-up view of its front panel and a close-up of its back panel (no text or symbols present)3 When the following screen appears, use the ◀ and ▶ buttons to select a language, and then press the OK button.
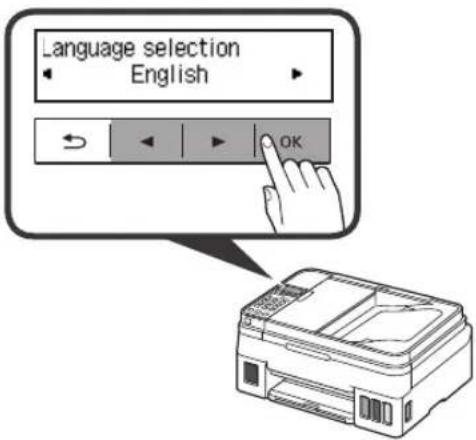
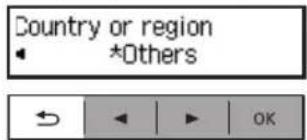
4 If the following screen appears, select your country or region, and then press the OK button.
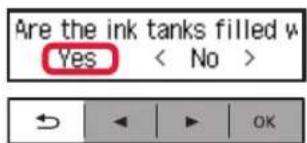
5 Confirm that all the ink tanks have ink in them.
6 Select Yes with the ◀ and ▶ buttons, and then press the OK button.
6. Preparing for Connection
1 Press the OK button.
Prepare for connection [OK]Next

Preparing the ink starts.
This takes about 5 to 6 minutes. Proceed to the next step.
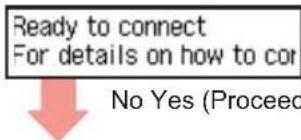
2 Check that the following screen appears.
Ready to connect For details on how to co
From here on, proceed to a step according to how you use the printer.
• To use the printer by connecting only to a computer or both to a computer and smartphone

"7-A. Connecting to Computer"
• To use the printer by connecting only to a smartphone

"7-B. Connecting to Smartphone" on page 6
To use the printer without connecting to a computer or smartphone
① Press the Stop button on the printer.
② In the connection method selection screen, use the ◀ and ▶ buttons to select Do not connect, and then press the OK button.
③ Use the ◀ and ▶ buttons to select Yes, and then press the OK button.
④ Wait until the following screen appears.
The setup is now complete.
7-A. Connecting to Computer

You need a connection setup for each computer. Proceed with the setup from step 1 for each computer.
1 Start the setup file for either method A or method . B

Downloading from the Internet
① Open a web browser (eetc.) on your computer.
② Input the following URL and access the Canon website.

③ Select Set Up.

④ Input the model name of your printer and click OK.

You can select a model name from the list.
⑤ Click Setup.

The procedures for Windows and macOS are shown below. If you are using a computer with an OS other than Windows or macOS, such as a Chrome OS, do the setup according to the on-screen instructions.
⑥ Click Download and download the setup file.

⑦ Execute the downloaded file.
Proceed to step 2 on the next page to continue.

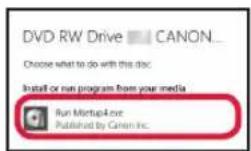
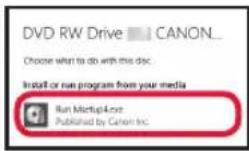
Using Setup CD-ROM (Windows Only)
① Load the Setup CD-ROM in your computer.

■ When using Windows 10 or Windows 8.1:
② When the following message appears on the right side of your computer screen, click it.

③ If the following screen appears, click Run Msetup4.exe.
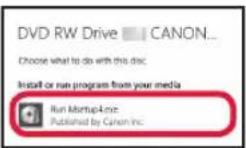
4 If the User Account Control dialog box appears, click Yes.
When This Message Does Not Appear (or Has Disappeared)
- Click File Explorer on the taskbar.

-
Click This PC on the left side of the opened window.
-
Double-click the CD-ROM icon on the right side of the window.
If the contents of the CD-ROM appear, double-click Msetup4.exe.
- Proceed to step ④.
■ When using Windows 7:
② When the AutoPlay screen appears, click Run Msetup4.exe.
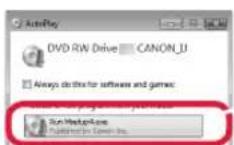
③ If the User Account Control dialog box appears, click Continue.
When AutoPlay Screen Does Not Appear
-
Click Computer from the start menu.
-
Double-click the CD-ROM icon on the right side of the opened window.
If the contents of the CD-ROM appear, double-click Msetup4.exe.
Proceed to step 2 to continue.
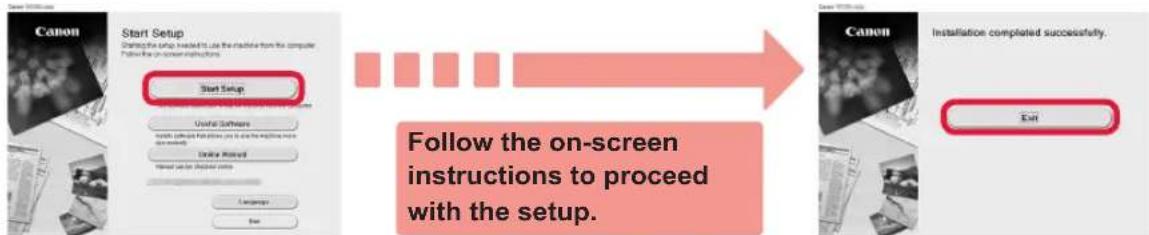
2 Click Start Setup.
If the following screen appears, click Exit.
flowchart
graph LR
    A["Start Setup"] --> B["Start Setup"]
    B --> C["Useful Software"]
    C --> D["Use Control"]
    D --> E["Cancel"]
    E --> F["Exit"]

    subgraph Setup
        G["Canon Setup"]
        H["Start Setup"]
        I["Cancel"]
    end

    note1["Follow the on-screen instructions to proceed with the setup."] --> G
    note2["Installation completed successfully."] --> H
The setup is complete when the following screen appears on the printer's screen. You can print from your computer.
7-B. Connecting to Smartphone

You need a connection setup for each smartphone. Proceed with the setup from step 1 for each smartphone.
Preparation
- Turn on Wi-Fi on your smartphone.
- If you have a wireless router, connect your smartphone to the wireless router you want to connect to the printer.
* For operations, refer to manuals of your smartphone and the wireless router or contact those manufacturers.
1 Install the application software Canon PRINT Inkjet/SELPHY in your smartphone.
iOS : Search "Canon PRINT" in App Store. Android : Search "Canon PRINT" in Google Play. Or access the Canon website by scanning the QR code.

* You may not connect your smartphone to the Internet wirelessly during connecting the printer to the smartphone directly. In that case, you may be charged depending on the contract with your service provider.
* Up to 5 devices can be connected to the printer via wireless LAN connection directly.
2 Check the display on the printer.
The screen turns off when no operation is made for about 10 minutes. Press one of the buttons on the operation panel (except for the ON button) to display the screen.
① Does the following screen appear?
B.)
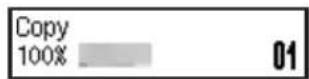
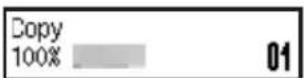
② Does Wi-Fi (the printer is connected to the network) appear on the screen displayed by pressing the Copy button?
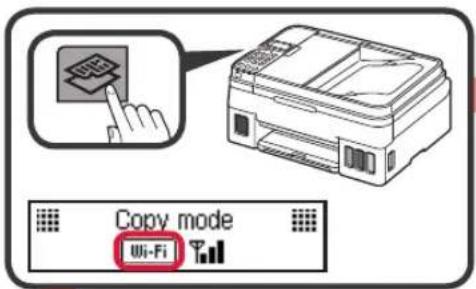
No (Proceed to B.)
If X appears, the printer cannot communicate by wireless LAN connection. For details, access "http://ij.start.canon" to see Frequently Asked Questions.

iOS
Android
① Tap the installed application software.
② Follow the on-screen instructions to register the printer.
③ Make sure that the right screen appears.
The connection with your smartphone is now complete. You can print from your smartphone.
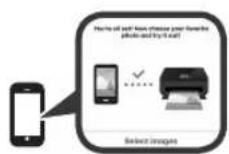
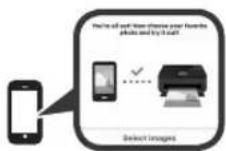
To print photos, load photo paper. Proceed to "Loading Paper" on page 8.

Procedures below vary depending on iOS or Android. Select your operating system and proceed to its procedure.
iOS
① Tap Settings on your smartphone's home screen, and tap Canon_ij_XXXX in the Wi-Fi settings.
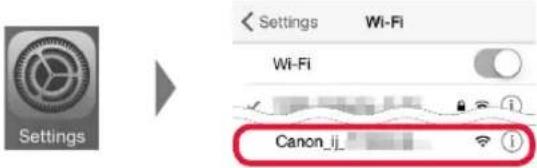
If Canon_ij_XXXX does not appear on the list, see "Troubleshooting" below to operate the printer, and then repeat step ①.
② Tap the installed application software.
③ Follow the on-screen instructions to register the printer.
Follow the on-screen instructions to proceed with the setup.
If you select Auto Select Conn. Method (recommended) on the connection method selecting screen, the appropriate connection method is selected automatically depending on your environment.
④ Make sure that the following screen appears.
Android
① Tap the installed application software.
② Follow the on-screen instructions to register the printer.
If a message saying "Printer is not registered. Perform printer setup?" does not appear, see "Troubleshooting" below to operate the printer, and then wait for a while until the message appears.
Follow the on-screen instructions to proceed with the setup.
- The appropriate connection method is selected depending on your environment.
- If two printer names appear on the Register Printer screen as shown below, select A. A) G4010 series (xxx.xxx.xxx.xxx) B) Direct-xxxx-G4010series
③ Make sure that the following screen appears.

The connection with your smartphone is now complete. You can print from your smartphone.
To print photos, load photo paper. Proceed to "Loading Paper" on page 8.

Troubleshooting
Printer is not found from your smartphone.
① Press the Setup button on the printer.
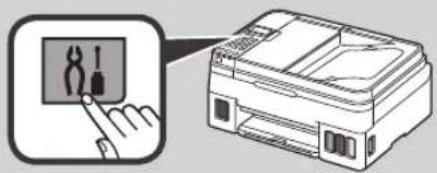
② Use the ◀ and ▶ buttons to select Wireless LAN setup > Easy WL connect, and then press the OK button.
③ Return to the operation of your smartphone.
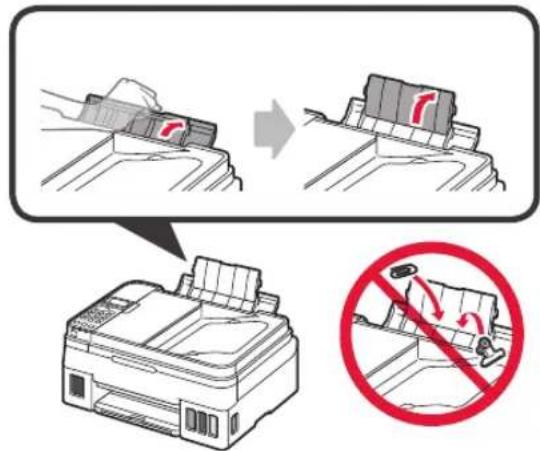
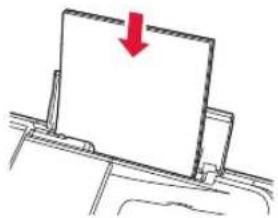
1 Open the paper support and the paper support extension.
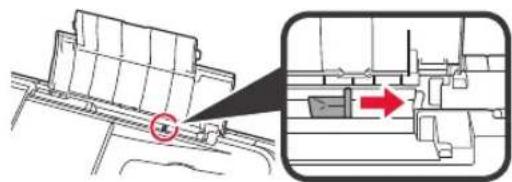
2 Slide the right paper guide to the end.
natural_image
Diagram showing a mechanical assembly with an inset highlighting a specific section (no text or symbols present)3 Load paper with the print side facing up.
natural_image
Simple line drawing of a mechanical component with a red downward arrow indicating compression or force (no text or symbols)
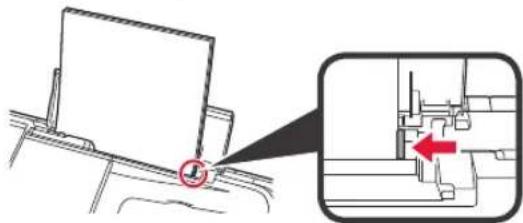
4 Slide the right paper guide to align it with the side of the paper stack.
natural_image
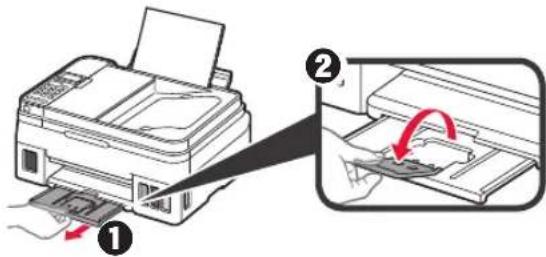
Diagram showing a device with a circular indicator and an inset view of a mechanical assembly (no text or symbols)5 ① Pull out the paper output tray.
② Open the output tray extension.
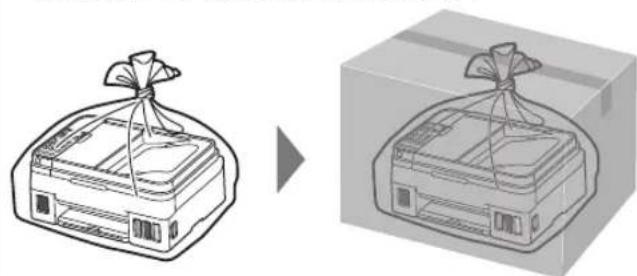
Transporting Your Printer
When relocating the printer, make sure of the following. Refer to the Online Manual for details.
Check that both joint buttons are pressed down completely to avoid ink leaks.
natural_image
Diagram of a vehicle engine compartment with red warning symbols indicating exhaust or ventilation (no text or labels)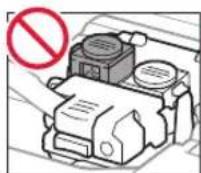
Pack the printer in a plastic bag in case ink leaks.
- Pack the printer in a sturdy box so that it is placed with its bottom facing down, using sufficient protective material to ensure safe transport.
- Do not tilt the printer. Ink may leak.
- Please handle with care and ensure the box remains flat and NOT turned upside down or on its side, as the printer may be damaged and ink in the printer may leak.
- When a shipping agent is handling transport of the printer, have its box marked "THIS SIDE UP" to keep the printer with its bottom facing down. Mark also with "FRAGILE" or "HANDLE WITH CARE".
natural_image
Illustration of a gift box being carried into a cardboard box, showing the same package and its wrapped body (no text or symbols)natural_image
Line drawing of four identical bottles with different internal shapes and color variations (no text or symbols)natural_image
Diagram of a mechanical component with a highlighted section and red arrow (no text or symbols)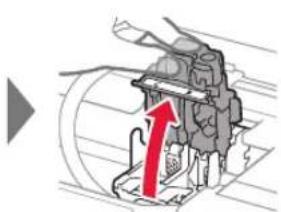
natural_image
Mechanical assembly diagram showing a piston and cylinder with a red upward arrow indicating motion (no text or symbols)natural_image
Illustration of a battery cell with an arrow indicating direction (no text or symbols)
natural_image
Illustration of a battery with an arrow indicating direction (no text or symbols)3 Retire la cinta protectora.

No tocar.
natural_image
Illustration of a hand pressing down on a mechanical component with a red downward arrow (no text or symbols)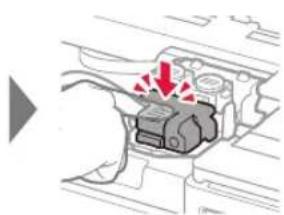
natural_image
Diagram of a mechanical component with red arrows indicating force or movement (no text or symbols)natural_image
Diagram of a mechanical component with two red arrows indicating downward motion (no text or symbols)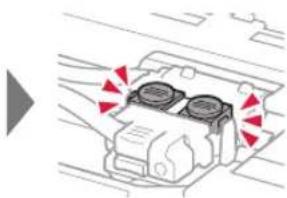
natural_image
Diagram of a vehicle engine compartment with red warning arrows indicating airflow or shock zones (no text or symbols)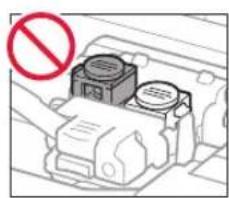
natural_image
Diagram of a mechanical device with a red prohibition symbol (no text or labels)
natural_image
Diagram of a mechanical device with a red prohibition symbol (no text or labels)4. Verter la tinta

natural_image
Illustration of a printer's internal structure with a magnified view showing a small object inside (no text or symbols present)natural_image
Illustration of hands using a tool to adjust a mechanical component with a red arrow indicating rotation (no text or symbols)natural_image
Diagram showing a printer's internal structure with a red arrow indicating a drop, and a red prohibition symbol (no text or labels present)natural_image
Diagram showing a printer's internal structure with a red arrow indicating the component (no text or symbols present)natural_image
Illustration of hands installing or adjusting a device into a housing (no text or symbols visible)5. Encender la impresora

natural_image
Diagram showing a printer with a close-up view of its front panel and a close-up of its back panel (no text or symbols present)
natural_image
Diagram showing a vehicle or road intersection with an inset highlighting a specific area (no text or symbols present)natural_image
Simple line drawing of a mechanical component with a red downward arrow indicating compression or force (no text or symbols)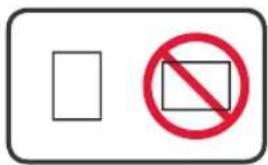
natural_image
Diagram showing a mechanical component with an inset close-up highlighting a specific section (no text or symbols present)natural_image
Diagram of a vehicle engine compartment with red directional arrows indicating flow or movement (no text or symbols)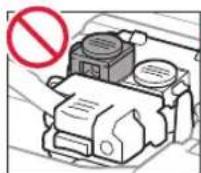
natural_image
Illustration of a money bag being placed on a cardboard box, showing the same shape and packaging (no text or symbols present)natural_image
Four identical line drawings of a cylindrical object with a pointed tip, shown in side-by-side packaging (no text or symbols)3. Instalando o cartucho

natural_image
Diagram of a mechanical component with a red arrow pointing to a specific part (no text or symbols present)
natural_image
Mechanical assembly diagram showing a piston and cylinder with a red upward arrow indicating motion (no text or symbols)2 Retire cada cartucho do pacote e remova a etiqueta.

natural_image
Illustration of a battery with a label 'C' and directional arrow (no text or symbols on the diagram itself)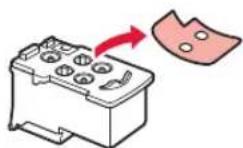
natural_image
Illustration of a battery pack with a labeled component 'B' and an arrow indicating direction (no text or symbols on the main diagram)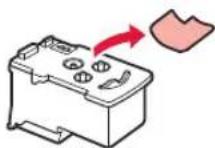
Não toque.

4 Insira o cartucho C (colorido) à esquerda e o cartucho B (preto) à direita.

natural_image
Illustration of a hand pressing down on a mechanical component with a red downward arrow (no text or symbols)
natural_image
Diagram of a mechanical component with red arrows indicating direction, no visible text or symbolsnatural_image
Diagram of a mechanical component with two red arrows indicating downward motion (no text or symbols)
natural_image
Diagram of a mechanical component with red directional arrows indicating motion or force (no text or symbols)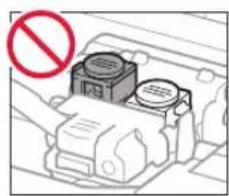
natural_image
Diagram of a mechanical component with a red prohibition symbol (no text or labels)
natural_image
Diagram of a mechanical device with a red prohibition symbol (no text or labels)4. Colocando tinta

natural_image
Illustration of a printer's internal structure with a magnified view showing a small object inside (no text or symbols present)natural_image
Illustration of hands performing a mechanical tool with a red arrow indicating rotation (no text or symbols)6 Recoloque firmemente a tampa do cartucho.
natural_image
Diagram showing a printer's internal structure with a red arrow indicating a drop, and a red prohibition symbol (no text or labels present)natural_image
Diagram showing a printer's internal structure with a red arrow indicating the component (no text or symbols present)8 Repita as etapas de 1 a 7 para colocar toda a tinta nos cartuchos de tinta correspondentes à direita, de acordo com a etiqueta.

natural_image
Illustration of hands installing or adjusting a device into a housing (no text or symbols visible)5. Ligando a impressora

natural_image
Diagram showing a printer with a close-up view of its front panel and a close-up of its back cover (no text or symbols present)Ready to connect For details on how to co
③ Se a tela a seguir for exibida, clique em Executar Msetup4.exe (Run Msetup4.exe).
flowchart
graph TD
    A["Laptop with red bookmark"] --> B["Printer icon"]
    C["Printer icon"] --> D["Printer icon"]
B.)
natural_image
Diagram showing a mechanical assembly with a highlighted component and an inset view highlighting a specific section (no text or symbols present)natural_image
Simple line drawing of a printer or printer with a red downward arrow indicating compression (no text or symbols)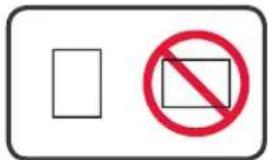
natural_image
Diagram showing a device with a circular indicator and an inset close-up of a mechanical component (no text or symbols)natural_image
Diagram of a mechanical device with two circular components and red triangular warning symbols (no text or labels)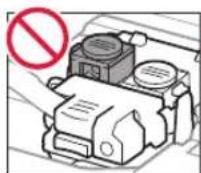
natural_image
Two 3D wireframe diagrams showing a money bag and a box, both without any text or symbols.natural_image
Four identical line drawings of a bottle with a bulb, shown in side-by-side packaging (no text or symbols)natural_image
Diagram of a mechanical component with a highlighted section and red arrow (no text or symbols)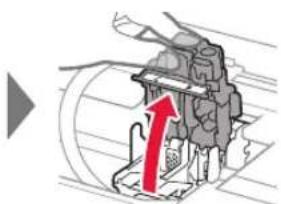
natural_image
Mechanical assembly diagram showing a piston and cylinder with a red upward arrow indicating motion (no text or symbols)
Ne pas toucher.

natural_image
Illustration of a hand holding a mechanical component with a red downward arrow indicating force or direction (no text or symbols present)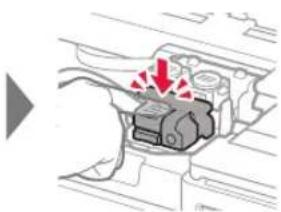
natural_image
Diagram of a mechanical component with red arrows indicating force or movement (no text or symbols)natural_image
Technical diagram of a mechanical component with two red arrows indicating downward motion (no text or symbols present)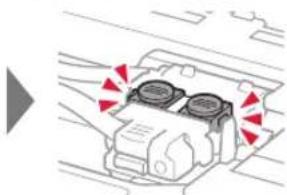
natural_image
Diagram of a mechanical component with red directional arrows indicating flow or movement (no text or symbols)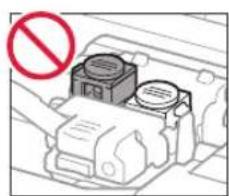
natural_image
Diagram of a mechanical device with a prohibition symbol (no text or labels present)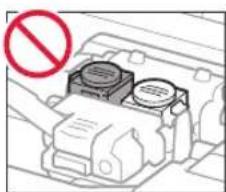
natural_image
Diagram of a mechanical device with a red prohibition symbol (no text or labels)natural_image
Diagram showing a hand inserting a component into a printer case, with a magnified inset highlighting the device's internal structure (no text or symbols present)natural_image
Illustration of a hand turning a small object with a red arrow indicating rotation (no text or symbols)natural_image
Technical diagram showing a mechanical device with a red arrow pointing to a component and a red prohibition sign (no text or symbols)natural_image
Diagram showing a printer's internal structure being removed, with a magnified inset highlighting the device (no text or symbols present)natural_image
Illustration of hands installing or adjusting a device into a housing (no text or symbols visible)natural_image
Diagram showing a device with a power button and a printer outline, no text or symbols present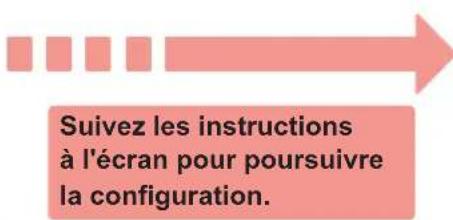
natural_image
Simple line drawing of a document holder with a red downward arrow indicating compression (no text or symbols)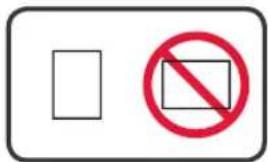
natural_image
Diagram showing a device with a magnified inset highlighting a mechanical component (no text or symbols present)natural_image
Diagram of a car engine with red warning symbols indicating airflow or heat release (no text or labels)
natural_image
Illustration of a money bag being placed on a box, showing transformation from a traditional box to a modern box (no text or symbols present)natural_image
Four identical line drawings of a bottle with a cap, shown in side-by-side packaging (no text or symbols)natural_image
Technical diagram of a mechanical component with a red circle highlighting a specific part (no text or symbols present)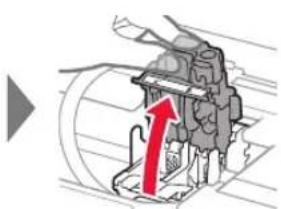
natural_image
Mechanical component diagram with red upward arrow indicating motion or force (no text or symbols)natural_image
Illustration of a battery with internal components and a red arrow pointing to its side (no text or symbols)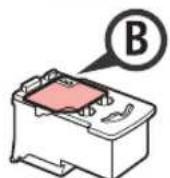
natural_image
Illustration of a battery with a red arrow indicating direction (no text or symbols)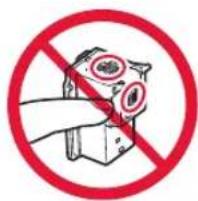
Не прикасайтесь.


natural_image
Illustration of a hand pressing down on a mechanical component with a red downward arrow (no text or symbols)
natural_image
Diagram of a mechanical component with red arrows indicating force or direction (no text or symbols)natural_image
Technical diagram of a mechanical component with two red arrows indicating downward motion (no text or symbols present)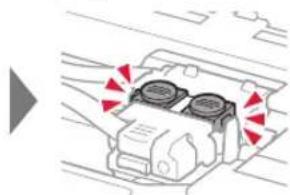
natural_image
Diagram of a vehicle engine compartment with red directional arrows indicating flow or movement (no text or symbols)
natural_image
Diagram of a mechanical device with a prohibition symbol (no text or labels present)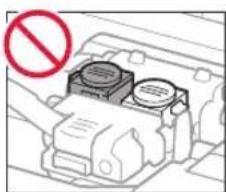
natural_image
Diagram of a mechanical device with a red prohibition symbol (no text or labels)4. Заливка чернил

natural_image
Diagram showing a hand inserting a component into a device, with a magnified inset highlighting a small component (no text or symbols present)natural_image
Illustration of hands performing a mechanical operation with a red arrow indicating direction (no text or symbols)natural_image
Technical diagram showing a printer with a handle and a prohibition symbol (no text or labels present)natural_image
Diagram showing a printer's internal structure with a red arrow indicating the component, and a magnified inset highlighting a device (no text or symbols present)natural_image
Illustration of hands operating a device with a red arrow indicating a component (no text or symbols present)natural_image
Diagram showing a printer with a close-up view of its front panel and a close-up of its back panel (no text or symbols present)natural_image
Diagram showing a mechanical assembly with an inset highlighting a specific section (no text or symbols present)natural_image
Simple line drawing of a document holder with a red downward arrow indicating compression (no text or symbols)
natural_image
Diagram showing a device with a magnified inset highlighting a mechanical component (no text or symbols present)natural_image
Diagram of a vehicle engine compartment with red warning arrows indicating airflow or hazard (no text or symbols)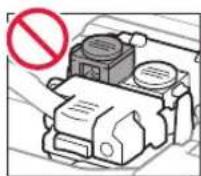
natural_image
Illustration of a money bag being placed on a cardboard box, showing structural change (no text or symbols)natural_image
Illustration of four identical plastic bottles with different internal shapes and packaging (no text or symbols)natural_image
Diagram of a connector or socket assembly with a red arrow pointing to a component (no text or symbols present)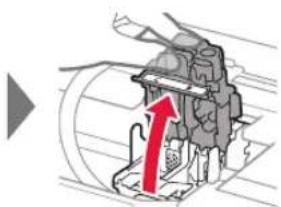
natural_image
Mechanical component diagram with red upward arrow indicating motion or force (no text or symbols)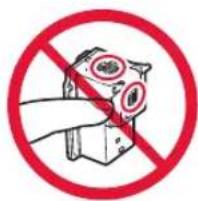
Не торкайтеся.

natural_image
Diagram showing mechanical assembly with red arrows indicating force or movement (no text or symbols present)natural_image
Diagram showing two mechanical components with red arrows indicating downward motion, no text or symbols present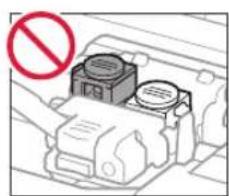
natural_image
Diagram of a mechanical component with a red prohibition symbol (no text or labels)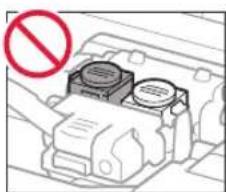
natural_image
Diagram of a mechanical device with a red prohibition symbol (no text or labels)natural_image
Diagram showing a hand inserting a component into a device, with a magnified inset highlighting a small object (no text or symbols present)natural_image
Illustration of hands using a tool to adjust a mechanical component with a red arrow indicating rotation (no text or symbols)natural_image
Diagram showing a printer's internal structure with a red arrow indicating the component (no text or symbols present)natural_image
Illustration of hands installing or adjusting a device into a housing (no text or symbols visible)natural_image
Diagram showing a printer with a close-up view of its front panel and a close-up of its back panel (no text or symbols present)Prepare for connection [OK]Next

Ready to connect For details on how to co

natural_image
Technical diagram showing a mechanical assembly with a highlighted section and an inset view of a component (no text or symbols present)natural_image
Simple line drawing of a document holder with a red downward arrow indicating compression (no text or symbols)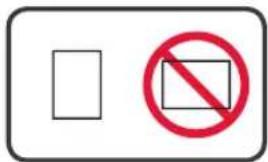
natural_image
Diagram showing a device with a magnified inset highlighting a mechanical component (no text or symbols present)natural_image
Diagram of a vehicle engine with red warning symbols indicating shock or damage (no text or labels)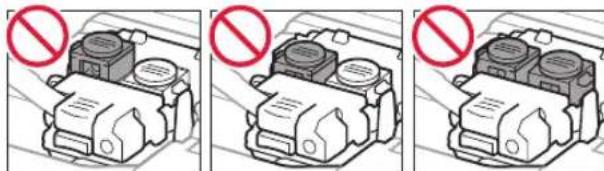
natural_image
Three identical diagrams showing a mechanical device with no visible text, numbers, or symbols.natural_image
Two 3D-rendered boxes with a bag wrapped in a ribbon, one open and one closed, both without any text or symbols.natural_image
Simple line drawing of a printer or printer with a red downward arrow indicating compression (no text or symbols)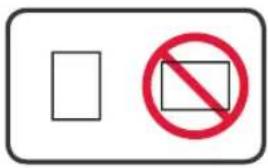
3
natural_image
Diagram showing a mechanical component with an inset close-up highlighting a specific section (no text or symbols present)2
natural_image
Technical diagram showing a mechanical assembly with an inset view of a component (no text or symbols present)natural_image
Illustration of a gift box being placed on a cardboard box, showing the same package with a ribbon and a gift bag (no text or symbols)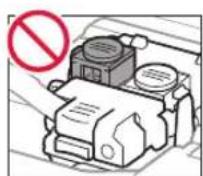
Ready to connect For details on how to cor
Y
.(Run Msetup4.exe) Msetup4.exe
.(Yes) , (User Account Control)
4
■

flowchart
graph LR
    A["Canon Installation completed successfully."] --> B["Canon User Interface"]
    B --> C["Start Setup: Select software and help to use the computer from the computer. Follow the computer instructions."]
    C --> D["User Interface: Select software and help to use the computer from the computer. Follow the computer instructions."]
    D --> E["User Interface: Select software and help to use the computer from the computer. Follow the computer instructions."]
    E --> F["User Interface: Select software and help to use the computer from the computer. Follow the computer instructions."]
    F --> G["User Interface: Select software and help to use the computer from the computer. Follow the computer instructions."]
    G --> H["User Interface: Select software and help to use the computer from the computer. Follow the computer instructions."]
    H --> I["User Interface: Select software and help to use the computer from the computer. Follow the computer instructions."]
    I --> J["User Interface: Select software and help to use the computer from the computer. Follow the computer instructions."]
    J --> K["User Interface: Select software and help to use the computer from the computer. Follow the computer instructions."]
    K --> L["User Interface: Select software and help to use the computer from the computer. Follow the computer instructions."]
    L --> M["User Interface: Select software and help to use the computer from the computer. Follow the computer instructions."]
    M --> N["User Interface: Select software and help to use the computer from the computer. Follow the computer instructions."]
    N --> O["User Interface: Select software and help to use the computer from the computer. Follow the computer instructions."]
    O --> P["User Interface: Select software and help to use the computer from the computer. Follow the computer instructions."]
    P --> Q["User Interface: Select software and help to use the computer from the computer. Follow the computer instructions."]
    Q --> R["User Interface: Select software and help to use the computer from the computer. Follow the computer instructions."]
    R --> S["User Interface: Select software and help to use the computer from the computer. Follow the computer instructions."]
    S --> T["User Interface: Select software and help to use the computer from the computer. Follow the computer instructions."]
    T --> U["User Interface: Select software and help to use the computer from the computer. Follow the computer instructions."]
    U --> V["User Interface: Select software and help to use the computer from the computer. Follow the computer instructions."]
    V --> W["User Interface: Select software and help to use the computer from the computer. Follow the computer instructions."]
    W --> X["User Interface: Select software and help to use the computer from the computer. Follow the computer instructions."]
    X --> Y["User Interface: Select software and help to use the computer from the computer. Follow the computer instructions."]
    Y --> Z["User Interface: Select software and help to use the computer from the computer. Follow the computer instructions."]
    Z --> AA["User Interface: Select software and help to use the computer from the computer. Follow the computer instructions."]
    AA --> AB["User Interface: Select software and help to use the computer from the computer. Follow the computer instructions."]
    AB --> AC["User Interface: Select software and help to use the computer from the computer. Follow the computer instructions."]
    AC --> AD["User Interface: Select software and help to use the computer from the computer. Follow the computer instructions."]
    AD --> AE["User Interface: Select software and help to use the computer from the computer. Follow the computer instructions."]
    AE --> AF["User Interface: Select software and help to use the computer from the computer. Follow the computer instructions."]
    AF --> AG["User Interface: Select software and help to use the computer from the computer. Follow the computer instructions."]
    AG --> AH["User Interface: Select software and help to use the computer from the computer. Follow the computer instructions."]
    AH --> AI["User Interface: Select software and help to use the computer from the computer. Follow the computer instructions."]
    AI --> AJ["User Interface: Select software and help to use the computer from the computer. Follow the computer instructions."]
    AJ --> AK["User Interface: Select software and help to use the computer from the computer. Follow the computer instructions."]
    AK --> AL["User Interface: Select software and help to use the computer from the computer. Follow the computer instructions."]
    AL --> AM["User Interface: Select software and help to use the computer from the computer. Follow the computer instructions."]
    AM --> AN["User Interface: Select software and help to use the computer from the computer. Follow the computer instructions."]
    AN --> AO["User Interface: Select software and help to use the computer from the computer. Follow the computer instructions."]
    AO --> AP["User Interface: Select software and help to use the computer from the computer. Follow the computer instructions."]
    AP --> AQ["User Interface: Select software and help to use the computer from the computer. Follow the computer instructions."]
    AQ --> AR["User Interface: Select software and help to use the computer from the computer. Follow the computer instructions."]
    AR --> AS["User Interface: Select software and help to use the computer from the computer. Follow the computer instructions."]
Prepare for connection [OK]Next
1

Ready to connect For details on how to co
2
natural_image
Illustration of hands installing or adjusting a device into a box with a red arrow indicating the process (no text or symbols present)
.5. تشغيل الطبعة
natural_image
Mechanical assembly diagram showing a component with a red arrow indicating a specific part (no text or symbols present)natural_image
Diagram showing a printer's internal structure with a red arrow indicating the component (no text or symbols present)5
6
7
8

- صب الحير
natural_image
Illustration showing a hand inserting a component into a printer case, with a magnified inset highlighting the device's internal structure (no text or symbols present)3
natural_image
Illustration of hands performing a mechanical press or stamping operation with a red arrow indicating rotation (no text or symbols present)4
لا تلمسه.
natural_image
Diagram of a mechanical component with red arrows indicating force or movement (no text or symbols)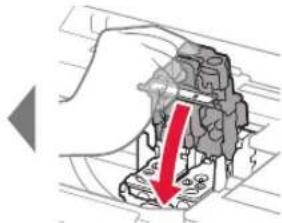
natural_image
Illustration of a hand holding a mechanical component with a red downward arrow indicating force or direction (no text or symbols present)natural_image
Diagram of a car air conditioner unit with red directional arrows indicating airflow or heat transfer (no text or labels)
natural_image
Diagram of a vehicle engine compartment with two red arrows indicating downward motion (no text or symbols present)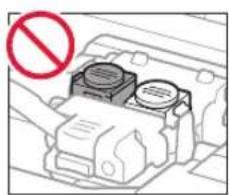
natural_image
Diagram of a mechanical device with a red prohibition symbol (no text or labels)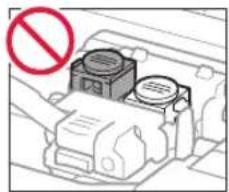
natural_image
Diagram of a mechanical device with a red prohibition symbol (no text or labels)3
natural_image
Illustration of three identical cylindrical objects with cross-shaped caps, arranged side by side (no text or symbols)زجاجة الحبر
5

3. تركيب الخرطوشة
1

natural_image
Red icon showing a globe with a question mark on a laptop, symbolizing global inquiry or search (no text present)Access Online Manual Acesse o Manual On-line Доступ к документу Онлайн-руководство
flowchart
graph LR
    A["Laptop"] --> B["Open Book"]
From desktop shortcut
flowchart
graph LR
    A["Smartphone Icon"] --> B["QR Code"]
    B --> C["Book Icon"]
- Checking Included Items
- Removing Packing Materials
- Installing the Cartridge
- Pouring Ink
- Turning on Printer
- Preparing for Connection
- To use the printer without connecting to a computer or smartphone
- 7-A. Connecting to Computer
- Downloading from the Internet
- Using Setup CD-ROM (Windows Only)
- Proceed to step 2 to continue.
- Click Start Setup.
- 7-B. Connecting to Smartphone
- Preparation
- iOS
- Android
- Follow the on-screen instructions to proceed with the setup.
- Troubleshooting
- Transporting Your Printer
- Verter la tinta
- Encender la impresora
- Instalando o cartucho
- Colocando tinta
- Ligando a impressora
- Заливка чернил
- 3
- 5
- تركيب الخرطوشة
- 1
Brand : CANON
Model : PIXMA G4411
Category : Printer