Predator Pro - Lamp ArmyTek - Free user manual and instructions
Find the device manual for free Predator Pro ArmyTek in PDF.

User questions about Predator Pro ArmyTek
0 question about this device. Answer the ones you know or ask your own.
Ask a new question about this device
Download the instructions for your Lamp in PDF format for free! Find your manual Predator Pro - ArmyTek and take your electronic device back in hand. On this page are published all the documents necessary for the use of your device. Predator Pro by ArmyTek.
USER MANUAL Predator Pro ArmyTek
natural_image
Technical line drawing of a cylindrical mechanical component with threaded ends and flanges (no text or symbols)2 ENG USER MANUAL
6
GER
BENUTZERANLEITUNG
10 FRA MANUEL D'UTILISATEUR
Thank you for choosing the products of Armytek.
Please read this manual carefully before using the flashlight.
Specifications
| Model Predator Pro (White) | ||
| LED/Optics Cree XHP35HI/Smooth reflector | ||
| Brightness stabilization type FULL (constant light) | ||
| Light output 1500 lm | ||
| Peak beam intensity 62800 cd | ||
| Hotspot : Spill 5°:40° | ||
| Beam distance 501 m | ||
| Modes, light output and runtimes (measured with 18650 Li-Ion 3500 mAh battery until the light output drops to 10% of the initial value) | Turbo 1500 lm/1 h 33 min (700 lm after 3 min) | |
| Main3 | 300 lm/5 h 13 min | |
| Main2 | 120 lm/12 h 20 min | |
| Main1 | 40 lm/32 h | |
| Strobe2 | 1500 lm/15 Hz/3 h (700 lm after 3 min) | |
| Strobe1 | 120 lm/15 Hz/23 h | |
| Power source | 1x18650 Li-Ion | |
| Length/Body diameter/Head diameter | 160 mm/25.4 mm/41 mm | |
| Weight without/with battery | 136 g/186 g | |
| Dust, water and impact resistance | IP68. Submersion at 25 m up to 5 h. Fallings from 25 m | |
Light output for flashlights with Warm light is about 7% less, beam distance is about 3% less. All the above specifications are test results based on ANSI/NEMA FL1-2009 Standard. The tests are performed using the battery included in the set. The data may vary due to environment, heat dissipation and other factors.
- Special precisely calculated reflector for High Intensity LED modification, which provides 1.5 times the light range compared to a usual LED, and tempered glass with anti-reflective coating for maximum throw create clear central spot with minimal side spill at 1500 lumens brightness. Spill diameter is 9 meters at 100 meters distance
- Powerful electronics provides constant brightness even at a temperature of -40^ and not fully charged battery
- Two types of operation: hunting and tactical. Tactical operation for quick access to maximum brightness mode and Strobe mode
- Withstands any recoil due to improved springs and installation of the driver inside a reinforced capsule filled with protective compound
- Standard 1 inch body is compatible with any accessories, including original magnetic remote switch and magnetic mount for quick one-motion attachment and removal
- Two-phase electronic button retained two levels of pressing similar to mechanical switch, but became noiseless and 20 times more durable
-
Non-flat button allows to easily switch the flashlight with a palm
-
Innovative technology allows using any standard 18650 Li-Ion batteries with 10A discharge current and provides full protection against short circuit even in case of contact between magnetic connector and metal objects
- Solid body made from aircraft-grade aluminium, special matt anti-abrasive finish without rough knurling
- Steel striking bezel with matt non-reflective black titanium coating, which prevents location disclosure, is used for additional protection of the optical system in the event of a fall and as a shock-crushing tool
• Active real-time temperature control to prevent overheating above +58 °C and warning indication of low battery level - Total protection from water, dirt and dust in accordance with IP68 standard — flashlight continues to work even at 25 meters depth up to 5 hours. Withstands fallings from the 10th floor
- Robust and water resistant magnetic connector
Set description
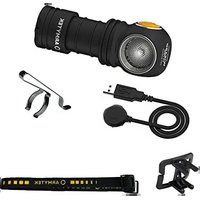
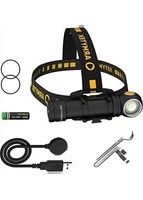
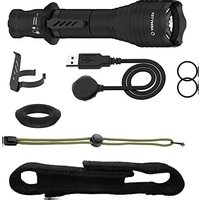
Flashlight, 18650 Li-Ion 3500 mAh battery, magnetic USB charger, clip, lanyard, holster, silicone grip, 2 spare O-rings, user manual.
The producer reserves the right to change the package at his own discretion without modifying this manual. Specifications are subject to change without notice.
Initial Service
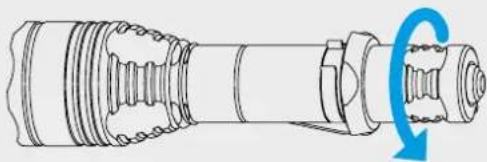
TO SET/REPLACE BATTERY
natural_image
Technical line drawing of a mechanical component with threaded ends and a blue circular arrow indicating rotation (no text or symbols)-
Unscrew the tailcap.
-
Place the battery with the positive contact (+) facing the head of the flashlight.
-
Adjust the tailcap and tighten it as far as it can go.
The flashlight is ready for operation.
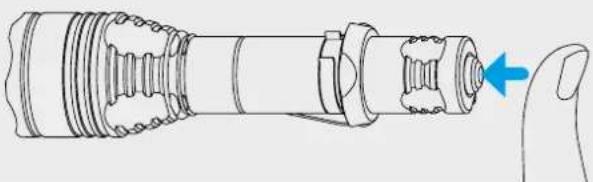
HOW TO CONNECT THE MAGNETIC CHARGER

natural_image
Technical line drawing of a mechanical component with directional arrows indicating motion (no text or symbols)Tighten the head of the flashlight as far as it can go and adjust the magnetic charger to the tailcap.
CHARGER COLOR INDICATION
Charger not plugged in:
- Green – device is in waiting mode.
Charger plugged in:
- Green blinking — evaluation of battery voltage.
- Red blinking – clean the external and internal contacts of the tailcap, as well as the contact areas of the charger.
- Orange blinking – USB power source voltage is too low for correct continuation of charging or bad contact between charger and battery. Clean the tailcap and the threads of the flashlight parts, use a different power source.
- Red — charging with rated charging current is going on.
- Orange – USB power source voltage is too low, charging current is reduced.
- Green – charging is finished.
Operation
Before use: Tighten the tailcap as far as it can go.
IN ANY MODE
natural_image
Technical line drawing of a mechanical component with a blue arrow pointing to a finger (no text or symbols present)Permanent on. First full click of the button turns the flashlight on. Second full click turns it off.
Momentary on. Switched on by half-pressing of the button (no click) and active till the button is released.
To switch between types of operation unscrew and tighten up the head of the flashlight at least 10 times (during rotation the modes will be changing). The pause between the moves must be less than 1 sec. The flashlight blinks once, confirming the action.
HUNTING TYPE (BY DEFAULT)
Turbo. Before switching on the flashlight in Turbo mode, tighten the head of the flashlight if it is unscrewed.
Additional modes. Before switching on the flashlight in Additional mode, unscrew the head to 1/8 if it is tightened. Full click switches on the last used Additional mode.
Cycling through Additional modes. To switch the mode turn the flashlight off and on (by full click or half-pressing). The flashlight must not be turned off for more than 2 sec. The modes switch cyclically: Main1 - Main2 - Main3 - Strobe2 (if enabled).
Add/Remove Strobe2 in Additional modes. Switch on the flashlight by half-pressing at least 20 times. The flashlight must not be turned on for more than 1 sec. Last switch must be full click. The flashlight blinks once, confirming the action.
Remote switch must be used in Turbo mode.
TACTICAL TYPE
Constant light. Before switching on the flashlight in Constant light mode, tighten the head if it is unscrewed.
Changing Constant light modes. The head is tightened: unscrew it to 1/8 and tighten again in 1 sec. Turbo and Main2 will switch cyclically.
Strobe. Before switching on the flashlight in Strobe mode, unscrew the head to 1/8 if it is tightened.
Changing Strobe modes. The head is unscrewed: tighten it and unscrew to 1/8 again. Strobe1 and Strobe2 will switch cyclically.
Remote switch can be used in ANY mode.
Automemorizing. After switching off the last used mode is memorized for quick access at next switching on.
Safe high brightness modes. Turbo mode gives maximum brightness until the temperature of the flashlight and discharge current of the battery don't exceed critical values.
Digital Light Stabilization & Safe Soft-Start System allows to increase runtime, get longer lifetime of rechargeable battery and protect it from overdischarge or overheating.
Active temperature control. When the temperature of the flashlight becomes close to +58 °C, brightness decreases to safe value, allowing the flashlight to avoid overheating for a long period of time. In conditions of good air-cooling the flashlight delivers light without stepping down.
Low battery level. If brightness of the mode is approximately <25% from nominal value, the LED will flash 2 times (after 30 sec from switching on). If you are not sure whether it flashed or not, switch the flashlight off and on: if the battery is low, the flashes will repeat.
Lock-out function. Unscrew the tailcap to 1/4 for protection from accidental switching on.
Warnings
For stable operation of the flashlight in Turbo and Strobe2 modes we recommend branded 18650 Li-Ion batteries without PCB (unprotected) or with PCB which guarantees 10A discharge current.
The flashlight can get hot in Turbo and Strobe2 modes quickly and discharge the battery with high current. Don't leave it without your attention as very bright light might heat objects and cause fire.
For storage or transportation of the flashlight in a pocket or a bag it is necessary to activate the lock-out function to ensure protection from accidental switching on.
It is forbidden to charge the battery inside the flashlight when the ambient temperature is below 0 °C.
- Always follow the instructions from this manual and recommendations on battery usage.
- Apply only the recommended power sources.
- Do not reverse battery polarity.
- Do not modify or recast the flashlight and its components as it will deprive you of the warranty.
- Do not allow water or any other liquid to leak into the flashlight.
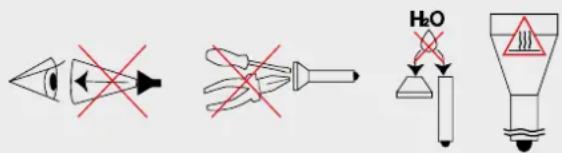
- Do not aim a switched-on flashlight at people's or animals' eyes — it can cause temporary blindness.
- Do not allow children to use the flashlight without your assistance.
The producer will not be liable for any harm done to the user if it was caused by improper use of the product.
Care and Storage
It is recommended to clean the threads and O-rings off dirt and old grease once or twice per year. Remember that reliable protection from water and dust cannot be provided by worn out sealing. The fouling as well as lack of lubricant cause fast wear-out of threads and sealing rings.
To clean the threads do the following:
- Unscrew the tailcap and remove the sealing ring carefully with a toothpick (do not use sharp metal things as they can damage the ring).
- Wipe the sealing ring thoroughly with a soft cloth (or tissue). Do not use solvents. If the sealing ring is worn out or damaged replace it by a new one.
- Clean the metal threads with a brush using ethanol. Be careful not to allow the applied liquid to get inside the flashlight or tailcap as it can cause fails in functionality of the flashlight.
After cleaning lubricate the thread and the sealing ring with polyalphaolefin-based silica grease, e.g. Nyogel 760G. The application of other types of grease is unacceptable. In case of active operation and exploitation in dusty environments, it is recommended to perform cleaning and lubricating of the parts as often as required.
WE DO NOT RECOMMEND leaving power sources inside the flashlight for a long storage period, as batteries can leak for various reasons and damage the inner parts of the flashlight. If you want to keep your flashlight in a stand-by state with batteries in, first install new and high-quality batteries. Store the flashlight in acceptable for batteries operational temperature and revise the batteries' state at least once a month. If you have noticed any signs of defects, withdraw the batteries from the flashlight and dispose of them.
Warranty and Service
Armytek provides free warranty repairs for 10 years (excluding batteries, chargers, switches and connectors, which have 2-year warranty) from the date of purchase if there is a document confirming the purchase. The warranty does not extend to damage during:
- Improper usage.
- Attempts to modify or repair the flashlight by nonqualified specialists.
- Application in chlorinated, contaminated liquids or sea water.
- Immersion into liquids in case of broken leakproofness.
- Exposure to high temperatures and chemicals, including the liquids from defected batteries.
- Usage of low-quality batteries.
Armytek
Germany, 10551 Berlin, Jonasstraße 6
+1 (206) 785-9574, service@armytek.com
www.armytek.com