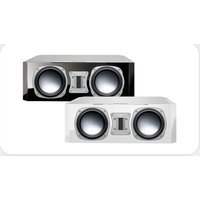
Quadral Aurum Base Titan - Loudspeaker QUAD - Free user manual and instructions
Find the device manual for free Quadral Aurum Base Titan QUAD in PDF.


| Product Type | Passive speaker |
| Brand | Quadral |
| Model | Aurum Base Titan |
| Category | Floorstanding speaker |
| Dimensions (approx.) | 1000 x 200 x 300 mm |
| Weight (approx.) | 20 kg |
| Power supply | Passive (powered by external amplifier) |
| Rated power | 100 W |
| Impedance | 4-8 Ω |
| Frequency response | 30 Hz - 40 kHz |
| Sensitivity | 88 dB |
| Main functions | Connection in conventional, bi-wiring or bi-amping mode; adjustment switches for treble, midrange and bass |
| Maintenance and cleaning | Dry soft cloth; no solvents; do not clean tweeters; vacuum cleaner for fabric covers |
| Safety | Do not connect to mains; avoid prolonged operation at very high volume; maintain a safe distance from TV; do not open the speaker |
| Spare parts and repairability | Decoupling spikes available; self-adhesive feet; spare parts from after-sales service |
| Warranty | Legal warranty 2 years, extendable up to 10 years upon registration |
| General information | Manual available in PDF; technical support by phone or email |
| Included accessories | Bi-wire cable, jumpers, self-adhesive feet (for compact models) |
| Connection type | Multi-way screw terminals (bi-wiring compatible) |
Frequently Asked Questions - Quadral Aurum Base Titan QUAD
User questions about Quadral Aurum Base Titan QUAD
0 question about this device. Answer the ones you know or ask your own.
Ask a new question about this device
Download the instructions for your Loudspeaker in PDF format for free! Find your manual Quadral Aurum Base Titan - QUAD and take your electronic device back in hand. On this page are published all the documents necessary for the use of your device. Quadral Aurum Base Titan by QUAD.
USER MANUAL Quadral Aurum Base Titan QUAD
Safety advice for passive loudspeakers 3-4
Setting up 5-6
Stands
6
Connecting to the amplifier 6-9
Tips for better acoustics 9
Adapting the sound output 10
Beware of clipping 11
Care of your loudspeakers 11
What to do if your speakers don't sound right? 12
Warranty registration 13
Inhalt
First of all, thank you for deciding on AURUM loudspeakers.
It is to satisfy the high expectations of music lovers and connoisseurs such as you that we build loudspeakers of a class that is well above average. Even though you may already be familiar with them, we list below a few ground rules that will enable you to make optimal use of your loudspeakers.
SAFETY ADVICE FOR PASSIVE LOUDSPEAKERS
Please take time to read through the manual carefully and follow all the steps describing how to set up and operate the loudspeakers. Keep the manual somewhere you can quickly access it should you have any questions later on.
- The stability of loudspeakers (especially large units) depends on the nature of the surface on which they stand. Carpets are often very poor for stability. Even an average bump can cause a loudspeaker to fall over and be a hazard for persons or pets in the vicinity. Stability can be significantly improved by using "spikes", but care should be taken during assembly as the sharp points can cause injury and the spikes can damage the floor. On smooth floors, the loudspeakers can be stabilised with Velcro or double-sided tape. Loudspeakers should never be used as a seat or as a substitute for a ladder!
- Use only wheeled furniture, stands or wall mounting systems and other devices for attaching and installing the products, which are available from the manufacturer and are sold for or with the product. To avoid damage or injury through tipping over, please be careful when moving table devices or stands on which the speakers are mounted. If wall-mounting the product, take special care that all components are securely screwed! Additional securing equipment (chains, etc.) should be fitted.
- The location for the loudspeakers should be dry and not too cold. Constant high humidity or strong sunlight (UV radiation) can cause your loudspeakers to age prematurely and consequently affect their functioning.
- Very high volume levels for long periods of time are not only annoying for your neighbours, but can also be harmful to the health of the user!
- When loudspeakers are overloaded with very high volume levels, there is a risk of individual components in crossover circuits or individual speakers burning out. In particularly bad cases, it is even possible for fire to break out inside a speaker. Speakers operated at these extremes should therefore not be left unattended.
- At high volumes, voltage levels of 30–50 V can be present at speaker terminals and components. Be very careful not to touch uninsulated terminal contacts of speakers when in operation. To avoid injury, never put hands or arms into sound outlets (bass reflex tubes). Children and pets, in particular, are at risk from this.
- For safety reasons, we generally forbid the opening of loudspeaker cabinets when in operation or connected since, as explained in the above paragraph, voltages of up to 50 volts can be present inside.
- Improper handling of mains voltage can cause fatal injury! Passive loudspeakers must on no account be connected to the electricity supply! Speaker terminals may only be connected to the appropriate output terminals of the amplifier. You should never connect these terminals to the electricity supply (230 V/115 V) in any way since that will otherwise
also immediately destroy the loudspeaker and all connected products. Avoid fitting plugs to ends of speaker cables that could even remotely be confused with mains supply plugs.
- Loudspeakers that are not magnetically shielded can affect the colour of the TV picture or cause distortion. A distance of 50 cm is generally sufficient to avoid problems of this kind. Avoid placing items such as credit cards, diskettes, audio or video cassettes or other magnetic media on the loudspeaker. This could destroy the information stored on them. Similarly,
SETTING UP
To obtain optimal sound results, it is generally necessary to try out different set-ups.
Since the room conditions have a major effect on sound reproduction, we suggest below a few useful approaches for positioning your AURUM loudspeakers.
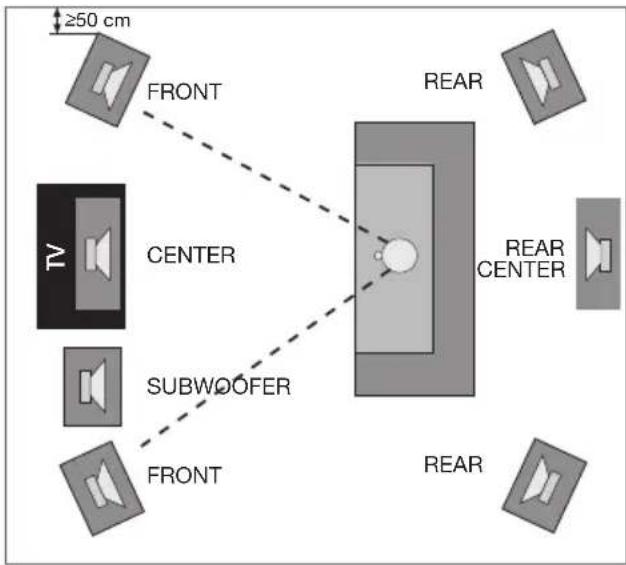
Main speakers (front)
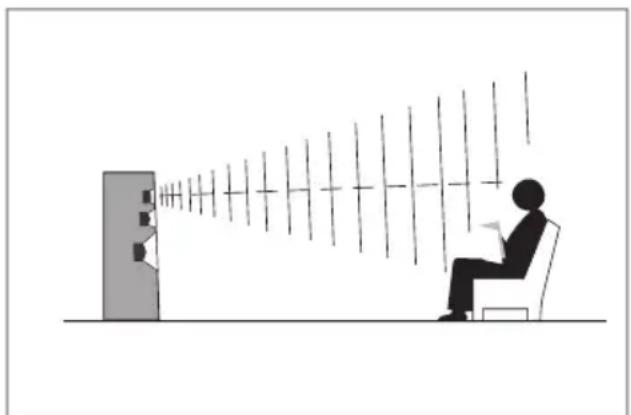
Where the speakers are positioned in the listening space has a decisive effect on their sound. Placing the speakers near the corners of the room will essentially give you loud bass reproduction but with little outline.
natural_image
Illustration of a person sitting in a chair observing a wall-mounted device with beams of light (no text or symbols)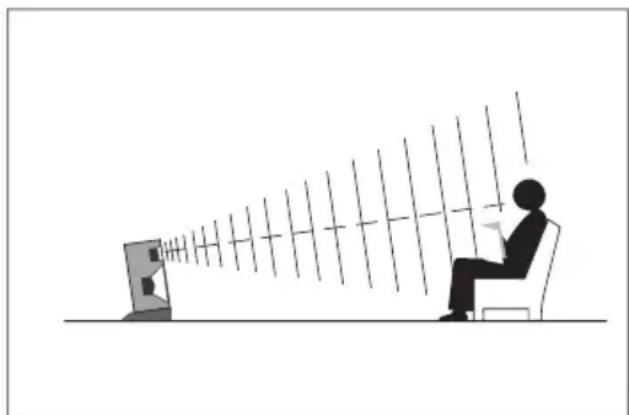
natural_image
Silhouette of a person sitting in a chair watching a screen with a diagonal light beam (no text or symbols)On the other hand, speakers positioned well away from the walls sound precise, but also very bright and thin. The best solution is to place the speakers with at least 30 cm between their backs and the nearest wall. To avoid loud wall reflections, the distance from the side walls of the room can even be 50 cm or more. With their slanted fronts, the floorstand speakers are specially adapted to acoustic demands. Bookshelf speaker units sound best on a speaker stand or shelf, with the tweeters arranged at ear height. The cases should be angled and slightly tilted to achieve this.
So far as possible, the speakers should be equidistant from the listening position, while the distance of the speakers from each other can be rather less than the distance from the listener.
Centre loudspeaker
These loudspeakers are no longer magnetically screened since the increase in use of plasma and LCD TVs. Since mounting on the television is no longer possible the centre loudspeaker can be placed lying horizontally under the television.
Further tips and tricks can also be found at:
www.youtube/quadral Technology World: loudspeaker mounting.
The distance to the television should be about 30 cm and at least 20 cm above the floor.
Apart from the above, we recommend angling the center speaker so that the tweeter is aimed at the listener in order to enjoy its full sound potential.
Rear center speaker
In contrast to 5.1 surround sets, 6.1 systems have an additional rear center speaker that should be placed behind and slightly above the typical listening position.
Rear speakers
Whether you direct the rear speakers toward the listening position is a matter of taste. Also, many listeners prefer the rear speakers to be positioned above ear height. This can be achieved by mounting the units on a sturdy wall bracket, a high speaker stand, a sideboard or shelf.
STANDS
For optimal front and rear speaker setup, quadral has suitable stands in its product range.
Should you have any questions, please contact us on tel.: +49 (0) 511 7904-0,
e-mail: ovs@quadral.com or info@aurumspeakers.com
CONNECTING TO THE AMPLIFIER
Before connecting up the speakers to your hifi or surround sound system, please ensure that the amplifier/receiver is switched off and its pilot light is not on. For connection, you will need a twin-core loudspeaker cable for each speaker cabinet. Make sure these cables are sufficiently long and cut them to a length that will subsequently enable you to lay them behind furniture or under the carpet where necessary. For cables more than 5 m in length we recommend a cross-section area of at least 2.5 mm 2 per core in order to avoid any unnecessary loss of output. To enable optimum contact, about 10 mm of the cores at each end of the cable must be isolated, and thus bare.
SCREW TERMINALS
For connection, the speakers are provided with colour-coded screw terminals on the back of the cabinet. Loosen the screw terminals and feed the stripped end of the core into the hole that is now free. The two cores of speaker cables have different colouring or shape for recognition. Connect the "+" core to the red, positive terminal – the remaining core to the black terminal. Tighten the screws hand-tight. To ensure correct polarity, check that the core connected to the red "+" terminal of the speaker is also the core that is connected to the
red "+" terminal of the amplifier and that the other core is connected to the black "-" terminals of both the speaker and amplifier.
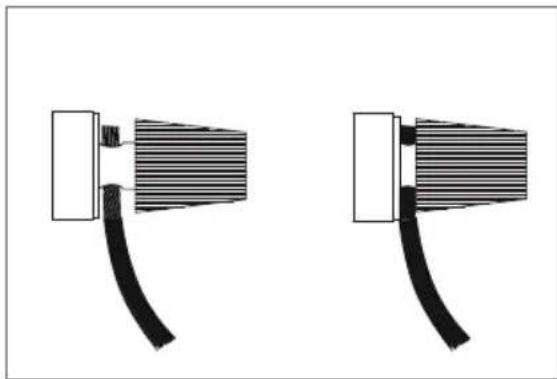
natural_image
Two identical diagrams of a connector with black and striped insulation, shown side by side (no text or symbols)With AURUM loudspeakers you can choose between three modes of operation:
a) Conventional mode
Do not remove the jumpers, connect the speaker cable as shown in the illustration.
b) Biwiring mode
Remove the jumpers after loosening the four screw terminals on the back of the speaker and connect the cable as shown in the illustration
c) Biamping mode
Remove the jumpers and connect the cables as shown in the illustration.
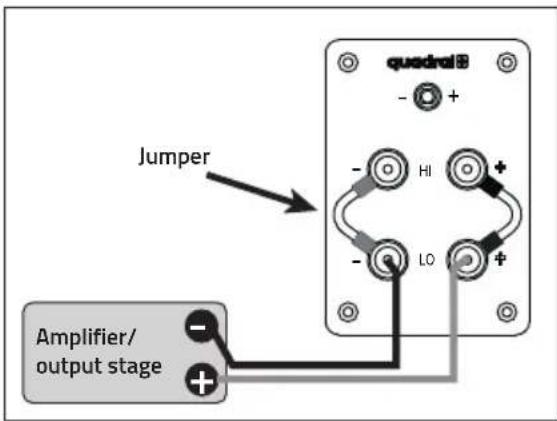
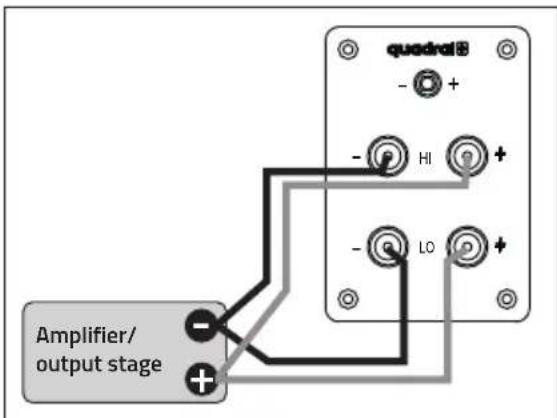
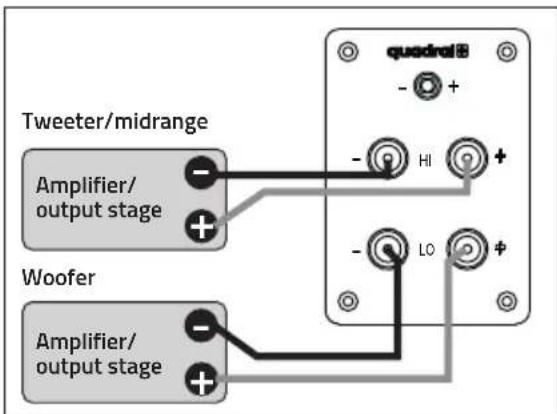
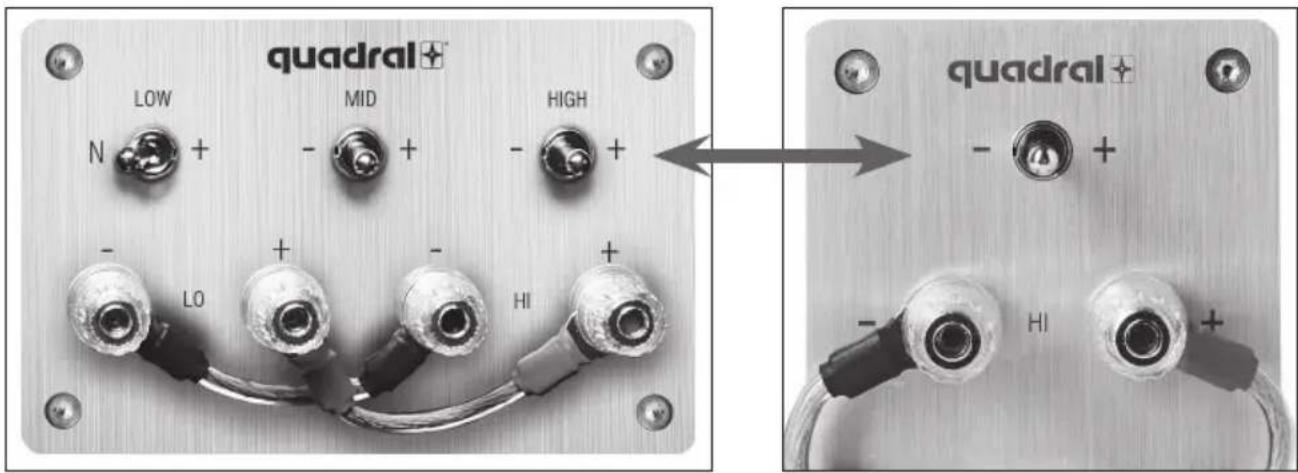
During Bi-wiring / Bi-amping operation of the AURUM loudspeaker, both screw terminals for the woofer (LO) are below and for the midrange speakers and tweeters (HI) are above on the connection plate.
Only the largest models of the AURUM 9 series are fitted with an extended connector panel by means of which these connections are arranged horizontally and the various operating modes apply analogously with the assignment of (HI) and (LO).
Make sure you use the correct polarities in these modes and that you remove the jumpers on the speaker terminal to avoid damaging your amplifier.
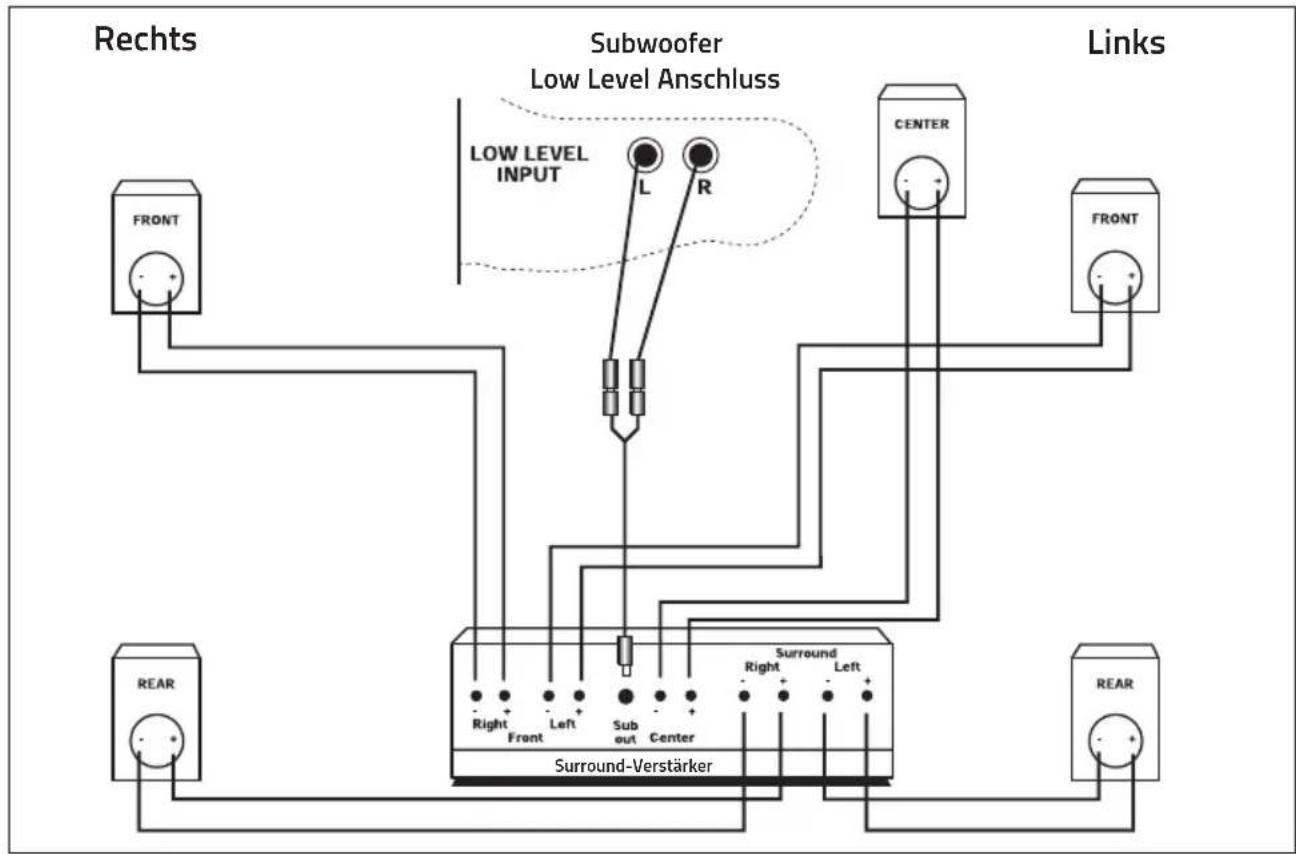
Once you have positioned and connected your speakers as shown in the illustration, you should perform the necessary settings in the bass management system of your surround amplifier.
Make sure you read the user manual supplied by your amplifier's manufacturer before doing this.
Since bass management primarily depends on the loudspeaker configuration, we give only typical settings below.
a) Small and very small satellite speakers must be operated in "small" mode. Perform the setting on your amplifier as follows:
Front:
small
Centre:
Rear: small Subwoofer: yes
b) There is no definitive formula for the settings for compact speakers. In this case, the suitable mode may be "large" or "small". This depends on the volume level you prefer or the sound effect you wish to obtain (refer to the section "Caution, clipping!"). The settings on your amplifier can optionally be configured as follows:
Front:
large/small
Centre:
large/small
Rear: large/small
Subwoofer: yes
c) Floorstanding speakers or large bookshelf speakers that are suitable for powerful bass reproduction should be operated in "large" mode.
Perform the setting on the amplifier as follows:
Front:
large
Centre:
large
Rear:
large
Subwoofer:
yes/no

flowchart
graph TD
    A["FRONT"] --> B["Left"]
    C["REAR"] --> D["Right"]
    E["SUBwoofer"] --> F["Low Level connection"]
    G["Surround-amplifier"] --> H["Left"]
    I["CENTER"] --> J["Left"]
    K["Left"] --> L["Right"]
    M["Left"] --> N["Right"]
    O["Left"] --> P["Left"]
    Q["Left"] --> R["Right"]
    S["Left"] --> T["Left"]
    U["Left"] --> V["Right"]
    W["L"] --> X["R"]
    Y["L"] --> Z["L"]
    style A fill:#f9f,stroke:#333
    style C fill:#f9f,stroke:#333
    style E fill:#f9f,stroke:#333
    style G fill:#f9f,stroke:#333
    style I fill:#f9f,stroke:#333
    style M fill:#f9f,stroke:#333
    style N fill:#f9f,stroke:#333
    style O fill:#f9f,stroke:#333
    style Q fill:#f9f,stroke:#333
    style R fill:#f9f,stroke:#333
Subwoofer
If your surround amplifier has a "line subwoofer" output, you can make use of this by using the Y cable supplied with the subwoofer (see illustration page 8). In this case, you connect the front speakers directly to the front speaker terminals of your amplifier. Refer to the connection diagram for wiring your surround system.
Refer to the user manual of the active subwoofer for the necessary settings on your subwoofer!
TIPS FOR BETTER ACOUSTICS
- The AURUM stand-mounted loudspeakers are fitted with a holder for spikes in order to achieve better acoustic decoupling of loudspeaker from the floor. Use of spikes can be advantageous dependent on the nature of the living room and the floor.
AURUM spikes can be obtained separately as an accessory from your dealer.
- In order to achieve better acoustic decoupling from the mounting surface for shelf or centre speakers, lay each of these loudspeakers on 4 self-adhesive felt washers.
ADAPTING THE SOUND OUTPUT
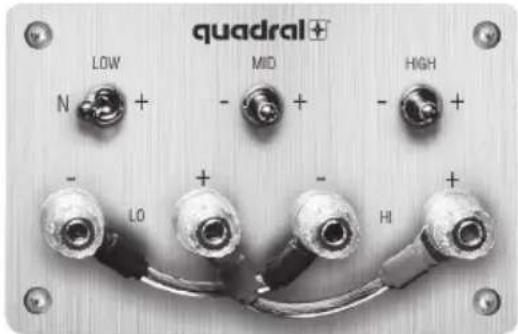
In order to adapt the new AURUM 9 series individually to your living room conditions without distorting the perfect sound character, all models are at least fitted with a high frequency switch (HIGH).
High range switch (HIGH)
HIGH +
In the high range, plus 2dB means an overall higher tonal level. This is worthwhile for very heavily insulated rooms and for everyone who wants to hear a bit more "analytically". It can be a special advantage when enjoying soft music, because the frequency-response curve is adjusted to hearing at a low level.
HIGH -
This switch setting makes sense in very hall-like rooms or at high listening volumes, because the frequency response in the high range is adjusted to the hearing curve at higher volumes.
The models AURUM TITAN 9. VULKAN 9 and TITAN BASE 9 are also fitted with a mid range tone and low tone filter switch.
Midrange switch (MID)
MID -
This lowers the volume in the listening area. In hall-like spaces, this can eliminate some midrange penetration. However, this switch setting can also simply be used as a matter of taste.
MID +
The midrange plus 2dB setting makes the fundamental tone range a bit warmer. For rooms with selectively heavy insulation, this can make the sound altogether more balanced and warmer.
Low tone filter switch (LOW)
LOW N
The neutral setting (N) set as standard in the delivery condition offers ideally structured bass reproduction for this loudspeaker.
LOW +
The LOW+ switch raises the middle bass range by between about 40 Hz and 100 Hz. In very large rooms this can lead to a desirable increase in full bass and pressure.
BEWARE OF CLIPPING!
Even if an amplifier's nominal output is significantly lower than the rated power-handling capacity of the speakers connected to it, there is still every possibility that the speakers might be damaged if not used correctly. The nominal output quoted merely indicates the number of watts the amplifier is capable of delivering to the speakers with low distortion. If an amplifier is overloaded it delivers far more power on the one hand while adding destructive direct current as well as high-frequency oscillation on the other. This process is known as clipping and negatively affects the sound through severe distortion in loud passages of music. When distortion becomes audible you should turn the volume down straight away to avoid damaging the speakers. Amp-clipping is a typical indication of overloading and always occurs when the volume and/or tone controls is/are turned up too high. Even when the tone controls are set in neutral (12 o'clock) position, conventional amps already reach their limits when subject to loud impulses as soon as the volume control is turned well beyond the 12 o'clock position.
Your AURUM loudspeakers are best cleaned with a soft, dry cloth. Do not use solvents.
You should only clean the loudspeaker systems (woofer, midrange units) when they have become very dirty (small amounts of dust have no effect on the acoustics). Use a soft, dry cloth or a soft brush with very gentle pressure, otherwise there is a risk of damaging the diaphragms.
We strongly advise against cleaning the ribbon tweeter, because this special transducer reacts with extreme sensitivity to compressed air and drafts and may be damaged. Therefore the ribbon tweeter must never be cleaned with a vacuum cleaner. The front opening must also not be blown off!
We accept no liability for improper cleaning of the speaker.
Slight soiling on the fabric front frame can be removed by tapping, with a vacuum cleaner, or by using an adhesive tape when the front frame has been removed.
Heavier soil can be removed with a dry foam cleaner (such as Centralin spray). Never use moisture to clean the front frame.
The technical details for your product can be found on the back of the speaker cabinet!
Should you have any questions, please contact us on tel.: +49 (0) 511 7904-0, e-mail: ovs@quadral.com or info@aurumspeakers.com
| FAULT | CAUSE | RECTIFICATION |
| Audible distortion even at low volume | a) Fault in the electronics | a) The fault lies in the electronics if the problem affects both speakers. Swap over the left and right speakers if only one speaker is affected. If the problem is still on the same channel, your electronics are faulty. The speaker is faulty if the problem is now on the other channel. |
| b) Fault in the speaker | b) Please contact your dealer or our service (tel. +49 (0) 511-7904-0). | |
| No sound | a) Cabling incorrect | a) Check the cabling. |
| b) Amplifier switched off | b) Switch on the system. | |
| Slender, bright sound. Sounds distant and unrealistic. | a) Incorrect polarity | a) Check to see if a terminal marked with + on the amplifier has been inadvertently connected to a terminal marked with - on the speaker or vice versa. |
| b) Unfavourable set-up | b) Set up the speaker closer to a wall, but maintain a minimum clearance of 5 cm between the back of the speaker and the wall. | |
| Bass notes too powerful | a) Unfavourable speaker set-up (e.g. in the corner of a room) | a) Move the speaker further away from the adjacent walls. |
| b) Bass control on amplifier set high | b) Set the bass control on your amplifier to a neutral position. | |
| Lack of treble | a) The tweeters are not properly aligned | a) Position the speakers so that the tweeters are facing directly towards your listening position. |
WARRANTY REGISTRATION
In addition to the legally prescribed warranty of 2 years you also have the option of extending the warranty for your AURUM loudspeaker to an overall period of 10 years. To do this you can go to our homepage www.quadral.com to enter the required personal and device-specific data. These details will be treated as confidential and not passed on to any third parties.
Please attach the purchase receipt as evidence of purchase. You can upload this as a file (scan, photograph) or send us a copy by post using the keyword "Warranty registration" to the above-mentioned address.
Once we have checked the documentation we will send you a digital certificate (pdf) which you should please keep in safe keeping and produce on request.
Please observe our warranty conditions.
natural_image
Illustration of a person sitting in a chair watching a wall-mounted screen with multiple screens (no text or symbols visible)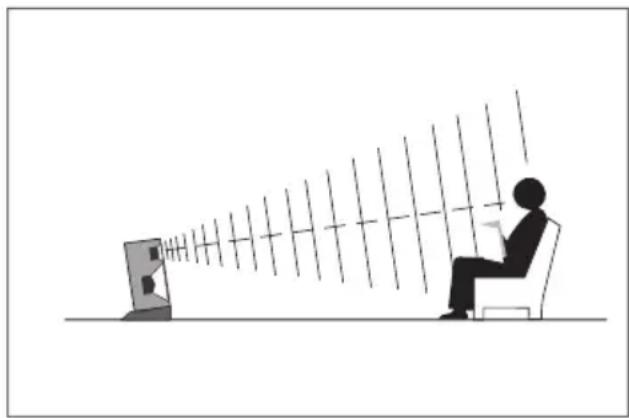
natural_image
Silhouette of a person sitting in a chair watching a screen with a diagonal light beam (no text or symbols)natural_image
Two identical cable connectors with black insulation, shown side by side (no text or symbols)Front: small Center: small Rear: small Subwoofer: yes
Front: large/small Center: large/small Rear: large/small Subwoofer: yes
Front: large Rear: large
Center: large Subwoofer: yes/no
flowchart
graph TD
    A["Rechts"] --> B["FRONT"]
    B --> C["Subwoofer Low Level Anschluss"]
    C --> D["L"]
    C --> E["R"]
    C --> F["Center"]
    C --> G["FRONT"]
    G --> H["REAR"]
    C --> I["Left"]
    C --> J["Right"]
    C --> K["Left"]
    C --> L["Right"]
    C --> M["Left"]
    C --> N["Right"]
    C --> O["Left"]
    C --> P["Right"]
    C --> Q["Left"]
    C --> R["Right"]
    C --> S["Left"]
    C --> T["Right"]
    C --> U["Left"]
    C --> V["Right"]
    C --> W["Left"]
    C --> X["Right"]
    C --> Y["Left"]
    C --> Z["Right"]
    style A fill:#f9f,stroke:#333
    style B fill:#ccf,stroke:#333
    style C fill:#cfc,stroke:#333
    style D fill:#fcc,stroke:#333
    style E fill:#cff,stroke:#333
    style F fill:#ffc,stroke:#333
    style G fill:#fcc,stroke:#333
    style H fill:#ccf,stroke:#333
    style I fill:#cfc,stroke:#333
    style J fill:#fcc,stroke:#333
    style K fill:#cff,stroke:#333
    style L fill:#ffc,stroke:#333
    style M fill:#fcc,stroke:#333
    style N fill:#cff,stroke:#333
    style O fill:#ffc,stroke:#333
    style P fill:#fcc,stroke:#333
    style Q fill:#cff,stroke:#333
    style R fill:#fcc,stroke:#333
    style S fill:#ffc,stroke:#333
Subwoofer
natural_image
Silhouette of a person sitting in a chair watching a wall-mounted screen with beams of light (no text or symbols visible)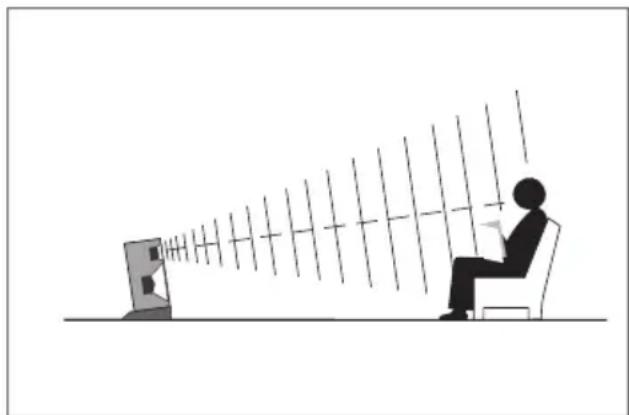
natural_image
Silhouette of a person sitting at a desk facing a wall-mounted screen, with no visible text or symbols.natural_image
Two identical cable connectors with black insulation and striped internal bands, shown side by side (no text or symbols)Frontal: small Central: small
Frontal: large/small Central: large/small
Frontal: large Central: large
Altavoz principal (frontal)
natural_image
Illustration of a person sitting in a chair observing through a mirror with visible reflection patterns (no text or symbols)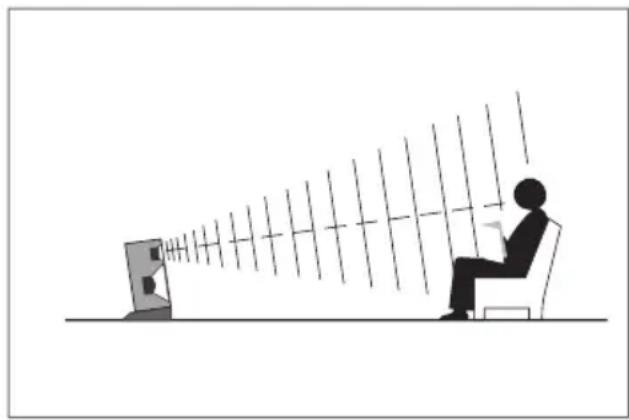
natural_image
Silhouette of a person sitting at a desk facing a screen with a diagonal light beam, no text or symbols presentnatural_image
Two identical diagrams of a connector with black and striped insulation, shown side by side (no text or symbols)Frontal: large/small Central: large/small Posterior: large/small Subwoofer: yes
Frontal: large Central: Posterior: large Subwoofer: yes/no

flowchart
graph TD
    subgraph Derecha
        A["FRONT"] --> B["Subwoofer"]
        C["REAR"] --> B
        B --> D["Surround-amplificador"]
        D --> E["Left"]
        D --> F["Right"]
        D --> G["Left"]
        D --> H["Right"]
        D --> I["Left"]
        D --> J["Right"]
        D --> K["Left"]
        D --> L["Right"]
        D --> M["Left"]
        D --> N["Right"]
        D --> O["Left"]
        D --> P["Right"]
        D --> Q["Left"]
        D --> R["Right"]
        D --> S["Left"]
        D --> T["Right"]
        D --> U["Left"]
        D --> V["Right"]
        D --> W["Left"]
        D --> X["Right"]
        D --> Y["Left"]
        D --> Z["Right"]
        D --> AA["Left"]
        D --> AB["Right"]
        D --> AC["Left"]
        D --> AD["Right"]
        D --> AE["Left"]
        D --> AF["Right"]
        D --> AG["Left"]
        D --> AH["Right"]
        D --> AI["Left"]
        D --> AJ["Right"]
        D --> AK["Left"]
        D --> AL["Right"]
        D --> AM["Left"]
        D --> AN["Right"]
        D --> AO["Left"]
        D --> AP["Right"]
        D --> AQ["Left"]
        D --> AR["Right"]
        D --> AS["Left"]
        D --> AT["Right"]
        D --> AU["Left"]
        D --> AV["Right"]
        D --> AW["Left"]
        D --> AX["Right"]
        D --> AY["Left"]
        D --> AZ["Right"]
        D --> BA["Left"]
        D --> BB["Right"]
        D --> BC["Left"]
        D --> BD["Right"]
        D --> BE["Left"]
        D --> BF["Right"]
        D --> BG["Left"]
        D --> BH["Right"]
        D --> BI["Left"]
        D --> BJ["Right"]
        D --> BK["Left"]
        D --> BL["Right"]
        D --> BM["Left"]
        D --> BN["Right"]
        D --> BO["Left"]
        D --> BP["Right"]
        D --> BQ["Left"]
        D --> BR["Right"]
        D --> BS["Left"]
        D --> BT["Right"]
        D --> BU["Left"]
        D --> BV["Right"]
        D --> BW["Left"]
        D --> BX["Right"]
        D --> BY["Left"]
        D --> BZ["Right"]
        D --> CA["Left"]
        D --> CB["Right"]
        D --> CC["Left"]
        D --> CD["Right"]
        D --> CE["Left"]
        D --> CF["Right"]
        D --> CG["Left"]
        D --> CH["Right"]
        D --> CI["Left"]
        D --> CJ["Right"]
        D --> CK["Left"]
        D --> CR["Right"]
        D --> CS["Left"]
        D --> CT["Right"]
        D --> CU["Left"]
        D --> CV["Right"]
        D --> CW["Left"]
        D --> CX["Right"]
        D --> CY["Left"]
        D --> CZ["Right"]
        D --> DA["Left"]
        D --> DB["Right"]
        D --> DC["Left"]
        D --> DD["Right"]
        D --> DE["Left"]
        D --> DF["Right"]
        D --> DG["Left"]
        D --> DH["Right"]
Subwoofer
- Inhalt
- SAFETY ADVICE FOR PASSIVE LOUDSPEAKERS
- SETTING UP
- Main speakers (front)
- Centre loudspeaker
- Further tips and tricks can also be found at:
- Rear center speaker
- Rear speakers
- STANDS
- CONNECTING TO THE AMPLIFIER
- SCREW TERMINALS
- a) Conventional mode
- b) Biwiring mode
- c) Biamping mode
- Subwoofer
- TIPS FOR BETTER ACOUSTICS
- ADAPTING THE SOUND OUTPUT
- High range switch (HIGH)
- HIGH +
- HIGH -
- Midrange switch (MID)
- MID -
- MID +
- Low tone filter switch (LOW)
- LOW N
- LOW +
- BEWARE OF CLIPPING!
- WARRANTY REGISTRATION
- Altavoz principal (frontal)
Brand : QUAD
Model : Quadral Aurum Base Titan
Category : Loudspeaker