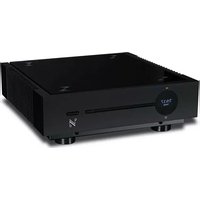
Artera Solus - Receiver QUAD - Free user manual and instructions
Find the device manual for free Artera Solus QUAD in PDF.


| Product Type | Stereo Receiver / Integrated Amplifier with DAC |
| Brand | QUAD |
| Model | Artera Solus |
| Power Output | 75W per channel into 8 ohms |
| Frequency Response | 20Hz - 20kHz ±0.5dB |
| Total Harmonic Distortion | <0.005% |
| Inputs | 4x RCA analog, 1x Phono MM, 2x Optical, 1x Coaxial, 1x USB Audio, Bluetooth aptX HD |
| Outputs | Speaker terminals (4-8 ohms), Pre-out, Headphone (6.35mm), Subwoofer out |
| DAC | ESS Sabre32 Reference DAC |
| Supported Audio Formats | PCM up to 32-bit/384kHz, DSD up to DSD256 |
| Dimensions (W x H x D) | 420 x 89 x 320 mm |
| Weight | 10.5 kg |
| Power Consumption | 350W max, <0.5W standby |
| Finish | Brushed aluminium (black or silver) |
| Remote Control | Included |
| Accessories | Power cable, remote control, user manual |
| Cleaning | Wipe with a soft, dry cloth; avoid solvents |
| Safety | Do not expose to moisture; ensure proper ventilation |
| Repairability | Authorized service centers only; no user-serviceable parts inside |
Frequently Asked Questions - Artera Solus QUAD
User questions about Artera Solus QUAD
0 question about this device. Answer the ones you know or ask your own.
Ask a new question about this device
Download the instructions for your Receiver in PDF format for free! Find your manual Artera Solus - QUAD and take your electronic device back in hand. On this page are published all the documents necessary for the use of your device. Artera Solus by QUAD.
USER MANUAL Artera Solus QUAD
natural_image
Pure technical line drawing of a mechanical device without any text, numbers, or symbolsOwner's Manual
IMPORTANT SAFETY INFORMATION

AVIS: RISQUE DE CHOC ELECTRIQUE-NE PAS OUVRIR WARNING: SHOCK HAZARD-DO NOT OPEN
This lightning flash with arrowhead symbol within an equilateral triangle is intended to alert the user to the presence of non-insulated "dangerous voltage" within the product's enclosure that may be of sufficient magnitude to constitute a risk of electric shock.
Warning: To reduce the risk of electric shock, do not remove the cover (or back) as there are no user-serviceable parts inside. Refer servicing to qualified personnel.
This exclamation point within an equilateral triangle is intended to alert the user to the presence of important operating and maintenance instructions in the literature accompanying the appliance.
Read these instructions.
Keep these instructions.
Heed all warnings.
Follow all instructions.
Do not use this apparatus near water.
Clean only with dry cloth.
Do not block any ventilation openings. Install in accordance with the manufacturer's instructions.
Do not install near any heat sources such as radiators, heat registers, stoves, or other apparatus (including amplifiers) that produce heat.
Do not defeat the safety purpose of the polarized or grounding plug. A grounding plug has two blades and a third grounding prong. The wide blade or the third prong is provided for your safety. If the provided plug does not fit into your outlet, consult an electrician for replacement of the obsolete outlet.
Protect the power cord from being walked on or pinched particularly at the plugs, convenience receptacles, and at the point where they exit from the apparatus.

Use only with the cart, stand, tripod, bracket, or table specified by the manufacturer, or sold with the apparatus. When a cart or rack is used, use caution when moving the cart/ apparatus combination to avoid injury from
tip-over.
Unplug this apparatus during lightning storms or when unused for long periods of time.
Refer all servicing to qualified service personnel. Servicing is required when the apparatus has been damaged in any way, such as power supply cord or plug is damaged, liquid has been spilled or objects have fallen into the apparatus, the apparatus has been exposed to rain or moisture, does not operate normally, or has been dropped.
Mains Supply: The mains operating voltage of all QUAD Artera series units is shown on the rear panel. If this voltage does not match the mains voltage in your area, consult your QUAD dealer about converting the unit.
The mains supply fuse on the rear panel is accessible when the IEC mains plug has been removed. In the rare event that it has broken, check for any obvious cause before replacing the fuse with one of the correct rating and type. The fuse values are:
Artera Solus:
220-240V (UK, China, etc.) T2.5AL 250V Slow Blow
100 - 120V (USA, Japan, etc.) T5AL 250V Slow Blow
WARNING: Only use attachments/accessories specified or provided by the manufacturer (such as the exclusive supply adapter, battery etc.).
WARNING: The mains plug/appliance coupler/direct plug-in adapter is used as disconnection device; the disconnection device shall remain readily operable.
CAUTION: These servicing instructions are for use by qualified service personnel only. To reduce the risk of electric shock, do not perform any servicing other than that contained in the operating instructions unless you are qualified to do so.
Do not install this equipment in a confined or built-in space such as a bookcase or similar unit, and keep well ventilated in open space. The ventilation should not be impeded by covering the ventilation openings with items such as newspaper, table-cloths, curtains etc.
WARNING: To reduce the risk of fire or electric shock, do not expose this apparatus to rain or moisture. The apparatus shall not be exposed to dripping or splashing and ensure that objects filled with liquids, such as vases, shall not be placed on the apparatus. No naked flame sources, such as lighted candles, should be placed on the apparatus.

This equipment is a Class II or double insulated electrical appliance. It has been designed in such a way that it does not require a safety connection to electrical earth.
QUAD
Artera Solus
USER GUIDE
CONTENTS
IMPORTANT SAFETY INFORMATION....Inside Front Cover
INTRODUCTION....2
UNPACKING THE EQUIPMENT....2
PLACEMENT....2
REMOTE HANDSET.... 3
CONTROLS AND CONNECTIONS.... 5
INSTALLATION....6
SYSTEM CONNECTION....9
OPERATIONS.... 10
BLUETOOTH 16
INSTALLATION OF QUAD FOR ASYNCHRONOUS MODE.... 17
INSTALL PLAYBACK SOFTWARE TO RUN PCM AND DSD AUDIO.... 23
MENU SETTING 29
SPECIFICATIONS.... 32
CARE AND CLEANING.... 33
SERVICE INFORMATION.... 33
INTERNATIONAL SERVICE CENTRE.... 33
INTRODUCTION
Quad gave its team of designers and engineers a specific brief for Artera: combine the qualities that have made Quad one of Britain's most revered hi-fi marques for many decades with fresh industrial design and the very latest high-performance audio technologies.
Artera's crisp, clean aesthetic both evokes Quad's past and looks forward to the future, with a textured aluminium front panel, thick glass top and CNC-routed heat sinks on either side. The housing provides a rugged structure that resists interference from external vibrations and the Artera Solus fascia incorporates an intuitive touch-sensitive control that contributes greatly to its sleek design.
Artera Solus are the newest additions to the Artera lineup. Artera Solus is a streamer / DAC / Preamp and CD Player, while the Artera Solus offers the same features with additional built-in amplification.
UNPACKING THE EQUIPMENT
The carton contains:
• The Artera Solus
• The Artera Solus Owner's Manual
• One Glass Top for Artera Solus
• One IEC mains cable with a plug suitable for your area
- Remote Handset and two AAA batteries
• CD-ROM - Quad Audio Driver
Consult the dealer from whom you purchased the equipment if any item is not present. Carefully unpack the unit and accessories. Take care not to damage the surface finish when undoing the protective polythene sleeve. Retain the packing materials for future use. Retain the user manual and information concerning the date and place of purchase of your equipment for future reference. If you transfer the unit to a third party please pass on this instruction manual along with the equipment.
PLACEMENT
The unit must be mounted on a solid, level and stable surface. If you are likely to play your system at high volume levels, the Artera Solus should be mounted on its own shelf with sufficient ventilation above and to the sides and rear.
Before you connect the QUAD Artera Solus to the mains, ensure your mains voltage corresponds to the rating on the rear panel of the product. If in doubt, consult your dealer. If you move to an area which has a different mains voltage, seek advice from a QUAD appointed dealer or a competent service technician.
REMOTE HANDSET

1 Standby Press to enable / disable standby
2 Mute Press to mute/unmute the sound
3 Number keys See "Handset Operation" below
4 Store Press to store a track in Program mode
5 Volume+ Increase Volume
6 ▶ Press to start/pause CD/USB playback
7 ▶▶| Move to the next track of CD/USB
8 Volume— Decrease Volume
9 Press and hold to Fast Reverse/ Fast Forward search
10 Digital Press to select Digital inputs
Press and hold to select DPLL bandwidth
11 CD Press to select CD playback
12 USB Press to select the USB input
13 Display Press to alter the display ON/OFF
14 Info Press to display more information
15 Prog Press to enter a program of tracks
Press and hold to select a MENU
16 |←← Press once to replay the current track of CD/USB
Press again to move to the previous track of CD/USB
17 ■ Press to stop CD
18 ▲ Press to eject/load the disc
19 Aux1/Aux2 Press to select Analogue inputs
20 Random Press to select/deselect random play
21 Repeat Press to select a repeat mode
Fitting Handset Batteries
Open the battery cover. Unwrap the two supplied AAA batteries and place them in the battery compartment with the polarity as shown. Replace the cover.
Always use AAA batteries and always replace them in sets. Never mix old and new batteries. Very weak batteries can leak and damage the handset. Replace them in good time.
There is a risk of fire and burns if a battery is handled improperly. Do not disassemble, crush, puncture, short external contacts, or dispose of in fire or water. Do not attempt to open or service a battery. Discard used batteries in full accordance with recycling regulations in force in your area.
1: Open the battery compartment cover

2: Insert 2 AAA batteries

3: Replace the cover
Handset Operation
Point the handset at the remote receiver and press the relevant key. The handset should be within 15 metres of the player and there must be a clear line of sight between the two units.
Selecting tracks with the number keypad:
If there are less than 10 tracks: pressing any number will begin playback from the track selected.
If there are 10 - 19 tracks: If you press any key other than "1" the player will jump to the track.
If "1" is pressed the player will pause briefly to allow you to enter another digit. If no key is pressed within the three seconds, track 1 will play.
If there are between 20 & 29 tracks: If you press any key other than "1" or "2" the player will jump directly to the track. If you press "1" or "2" the player will pause briefly to allow you to enter another digit before starting playback, and so on.
CONTROLS AND CONNECTORS
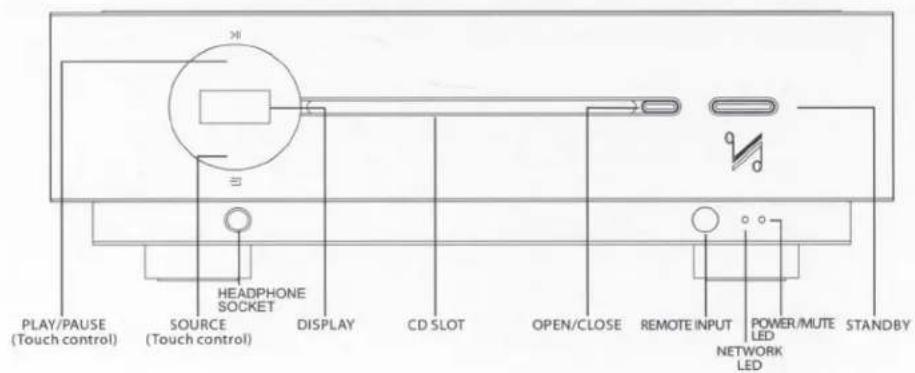

Artera Solus
INSTALLATION
Open the carton box, take out the glass top and the Artera Solus separately. Place the Artera Solus onto a sturdy shelf or table. Put the glass top on the lid of Artera Solus after making all connections.
Before making any connections to your high fidelity equipment make sure that all units in the system are switched off and unplugged at the mains.
Mains Connections
Before connecting your QUAD equipment to the AC mains supply, check and make sure the voltage marked on the back matches the voltage of your supply.
Power On/Off switch
The Power On/Off switch is on the rear panel of QUAD Artera Solus. When the TRIG OUT(+12V) of Artera Solus is connected to TRIG IN of QUAD Artera Stereo using a 3.5mm mono cable then the triggers are ready for the connection. This switch should be left switched on as the Artera Solus will remotely switch QUAD Artera Stereo on when it is brought in and out of standby. The On/Off switch may be switched off when Artera Stereo or Artera Solus is not in use.
Analogue Signal Input Connections
The Unbalanced Input
AUX1 and AUX2 are two sets of RCA unbalanced analogue inputs.
Connect an RCA phono interconnects between the unbalanced input on the Artera Solus rear panel with the matching output of the source unit. Interconnects should be of low-noise construction and fully screened to minimize hum and noise transmission.

Analogue Signal Output Connections
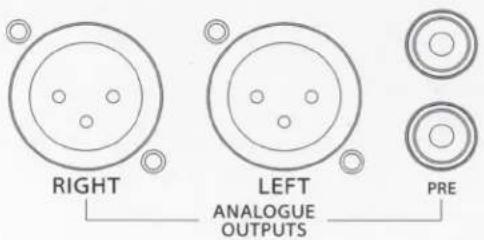
The XLR Balanced Output
If you are connecting a QUAD Artera Solus to a QUAD Artera Stereo or other amplification with balanced inputs we strongly advocate the use of the balanced XLR connections.
A major advantage of balanced interconnects is the suppression of ground loop problems. Balanced line inputs use 3 conductors, one for the ground and two for the voltage difference between the signal and the ground at the source unit. The signal is thus 'cleaner' and free from earth-induced currents and other LF artifacts and improved S/N ratio.
The Unbalanced Output
The QUAD Artera Solus has one set of unbalanced RCA analogue signal output (PRE) for connection to units which do not feature balanced inputs.
Digital Signal Input Connections
As the DACs in the Artera Solus will be superior to those of regular DVD players, DVB receivers, etc. We urge you to use these units with the Artera Solus for superior sound reproduction. The digital inputs are customizable to suit your source equipment.
Coaxial Inputs
DIG1 and DIG2 are coaxial SPDIF inputs. Connect an RCA digital interconnect between the digital coaxial output of the source unit to the required input on the Artera Solus.

Optical Inputs
OPT1 and OPT2 are optical SPDIF inputs. Connect an optical (TOSlink) interconnect between the digital optical output of the source unit to the required input on the Artera Solus.
USB Input
The USB input enables you to connect a Mac or PC to the Artera Solus for playing audio files stored on a computer. Connect a USB cable between a USB port on the computer to the USB input on the Artera Solus.

USB
Digital interconnects should be adequately specified and kept short to optimise performance.

UPDATE
Software Update
Put the file "Artera.bin" on the U disk, plug in the UPDATE USB interface, press STANDBY button on the front panel then POWER ON(on the rear panel), Artera will upgrade automatically.
Bluetooth SOCKET
For optimum signal clarity and performance, connect the supplied aerial to the SMA connector on the back panel. The optimum position of the aerial is upright.
Bluetooth
Digital Signal Output Connections
Two digital outputs are provided. These outputs are for those who wish to connect the Artera Solus to external standard audio DACs.
DIG & OPT Outputs
A coaxial and an optical output are available. These are the connections that will be normally used vto connect the Artera Solus to external standard audio DACs.
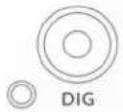

DIGITAL OUTPUT
Trigger Connections
If you have a Quad Artera system, we advise connecting the trigger. This will enable all Artera units to be brought in and out of standby along with trigger inputs and outputs.
To connect the triggers, you will need a cable with one end to match the trigger input of the slave unit and other terminating in a 3.5mm jack plug. For Artera series units, this will be a 3.5mm to 3.5mm interconnect.
The triggers on the Artera Solus are master (output) triggers. They are used exclusive to control other equipment.
Connect the TRIG OUT of Artera Solus to the TRIG IN of Artera Stereo or other Artera series unit, or any other slave unit having a 12V trigger in.

SYSTEM CONNECTION

Artera Solus
OPERATIONS

natural_image
Line drawing of a device with a circular component and a horizontal bar, mounted on a base (no text or symbols)Switching On
The power supply input is via an IEC mains connect and an appropriate mains lead is supplied. Connect the mains leads to all system components and then to the wall sockets ensuring that the mains switches on all units and wall sockets are switched off.
Check that all leads are correctly installed. Switch on the mains supply to the source units and the power amplifier/s. All connected unit/s will go to Standby and the Power LED/s on the front panel/s will indicate Red.
If the trigger system is connected: Press the Standby button on the Artera Solus or on the remote handset. The connected Artera Stereo will go from Standby to "Active". The Display of Artera Solus lights up.

Auto Standby Mode
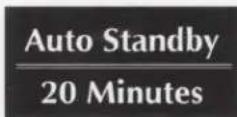
Artera Solus will not enter Auto Standby mode by default. Auto standby has a selectable 20 minute or 1 hour option. This has been added to offer low-power settings that save energy and this can be simply adjusted by using the Standby button. Press and hold the Standby button on the front panel while the unit is on for 3 seconds. "Auto Standby 20 Minutes" will appear briefly on screen and the Power LED will flash once.
In status Auto Standby, Artera Solus will automatically go into standby mode when there is no signal input and operation for 20 minutes, or if the CD has not played for 20 minutes (or 1 hour depending on the user preference / setting)
To exit Auto Standby mode:
- Press and hold the Standby button on the front panel during the operating state for 3 seconds, "Auto Standby Never" will appear briefly on screen and the Power LED will flash thrice, Solus will disable Auto Standby mode.
• Power Off and On again, Solus will be reset.
Power Up Sequence
Switch on display: The welcome screen displays "QUAD" for 5 seconds, indicating that the Player has powered on successfully.

flowchart
graph LR
    A["QUAD"] --> B["No Disc"]
Selecting an Input
Besides CD, available playback connections include Bluetooth, USB, two optical, two coaxial and two analogue inputs. Short touch the SOURCE button on the front panel repeatedly to cycle the inputs CD, BT, AUX1, AUX2, OPT1, OPT2, DIG1, DIG2, USB. Or simply press the required button on the handset to select the desired input.
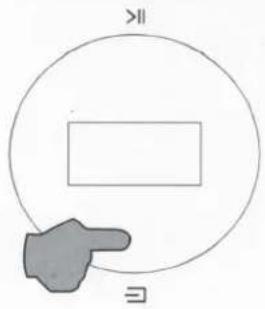
Loading a CD
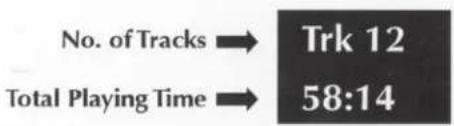
Insert a CD into the slot, the Solus will automatically start to load the disc and display the Table of Contents then stop.
Ejecting a CD
natural_image
Simple line drawing of a hand cursor clicking a button with musical notes nearby (no text or symbols)Press the Open/Close key on the front panel or the handset, remove the disc until "No Disc" is displayed.
If the disc is not removed within ten minutes the Solus will reload and read the disc.
Playing a CD
To play a CD from the start: Press the Play/Pause key on the handset or touch the Play/Pause button on the front panel.
To play a CD from a selected track:
1) Repeatedly press the |◀◀ / ▶▶| on the handset. When the track is reached stop pressing and the player will play from the selected track.
2) Enter the required track number from the handset. The disc will play from the selected track.
Pausing a CD during play
Press the Play/Pause key on the handset or touch the Play/Pause button on the front panel, pause icon appears briefly on screen, the CD will pause.
Press the Play/Pause key on the handset or touch the Play/Pause button on the front panel again, play icon appears briefly on screen, the CD will resume play.
Note: The CD will stop if CD paused for 3 minutes.

Selecting tracks during play
1) Repeatedly press the |◀/▶| on the handset or quick touch the Play/Pause button on the front panel twice to continually select NEXT TRACK. When the wanted track is reached stop pressing and the player will play from the selected track.
2) Enter the required track number from the handset. The disc will play from the selected track. For handset operation refer to Page 5.
Forward and Reverse Search during play:
Press and hold the ◀◀/▶ on the handset. The forward and reverse search will start. Play reverts to normal when the key is released.
Random Play
- Press the Random key on the handset to play all the tracks on the disc in random sequence. The Random On icon appears briefly on screen.
- Press the info key on the handset, the Random icon will be displayed.

flowchart
graph LR
    A["Input"] --> B["CD"]
    C["No. of Tracks"] --> D["Trk 2"]
    B --> E["Vol 12"]
    D --> F["00:18"]
    G["Random"] --> B
    H["Volume"] --> B
    I["Track Time Elapsed"] --> F
- Press the Random key again to return to the normal sequence. The Random Off icon appears briefly on screen.
Repeat Play
- Press the Repeat key once to repeat one track continuously. The Repeat 1 icon appears briefly on screen. You can also select a new track and this will be continuously repeated. Press the info key on the handset, the Repeat 1 icon will be displayed.
Repeat 1

- Press the Repeat key twice to repeat all the tracks on the disc continuously. The Repeat All icon appears briefly on screen.
- Press the info key on the handset, the Repeat All icon will be displayed.
Repeat All

- Press the Repeat key again to cancel repeat mode, the Repeat Off icon appears briefly on screen.
Stopping a disc
1) Press the Stop key on the handset. If Random or Repeat play is selected, pressing Stop key does not cancel these options. They must be cancelled as described above.
2) Eject and load the disc, play stops and the disc reloads. All options are reset.
Program Play
You can programme a sequence of tracks to play in any order of your choosing. Program mode must be accessed from the handset when the disc is stopped.
Example: enter a programme of three tracks (The displays shown below are the cases when press the info key on the handset).
1) Stop the CD playback.
2) Press the Prog button on the handset, Program On appears briefly on screen then the Program screen deploys. NO Track will be displayed.
3) Enter a track with the number keys. The track number flashes.
4) Press Store to program the track.
5) Enter another track (or the same track) with the number keys.
6) Press Store to program the track.
7) Repeat the procedure to enter all three tracks.
8) When all the tracks are entered:
To play the program: press ▶||
To cancel a program during programming: press the Stop key, program Off appears briefly on screen.
During Programme Play:
1) Pause, Stop, Previous track, Next track, Fast Forward, Fast Reverse are available.
2) Direct track selection with the number keys is disabled.
3) Repeat play (Repeat 1, Repeat All) is enabled but Random play is disabled.
Stopping Programme Play:
1) Press Stop once to stop play, Playback stops but the programme is retained in memory. To replay the programme, press ▶II.
2) When the programme is in stop mode, further tracks can be added following the procedure above.
3) Press Stop twice to stop programme play and erase the programme. Program Off appears briefly on screen.
4) Eject and load the disc will also erase the programme.

flowchart
graph LR
    A["Program"] --> B["CD PRG Vol 12 No Track"]
    B --> C["Prg2 ---;---"]
    C --> D["CD PRG Trk 3 Vol 12 16:02"]
    D --> E["A programme of 3 tracks"]
Volume Adjustment
To alter the volume level from the handset:
Press the Volume+/- keys to alter the level as required.
To alter the volume level from the front panel:
1) Touch and hold the SOURCE button to enter the volume adjustment mode.
2) Increase the volume level by touching the PLAY/PAUSE button.
3) Decrease the volume level by touching the SOURCE button.
If there is a delay of more than 2 seconds between pressing the SOURCE button and altering the volume, the procedure will self cancel.
The volume level is variable between 0 and 100.
Notes:
When first switched on: The system sets the default volume level to 50 - a safe low level.
When next switched on: If the unit was switched off with the volume level set above 50, the default level of 50 will be restored. If the unit was switched off with the volume level set below 50, the lower level will be displayed when the unit is next switched on.
Mute
Press the MUTE key on the handset to mute the sound output. The word "Mute" appears briefly on screen and then the play screen restores.
Pressing the info key on the handset the "Mute" will be displayed, indicating that the player is in mute.

When the output is muted:
- Pressing the Mute key on the handset cancels mute.
- Changing the Volume level cancels mute.
- Bringing the unit into and out of Standby will cancel mute.
Playing a USB input
Install the Quad Audio Driver from the CD-ROM provided as accessory, or download the driver via www.quad-hifi.co.uk. The USB and DSD Setup Guide is burnt on the CD-ROM, please refer to the file when installing the software. Connect your computer to the Solus via USB cable (type A to Type B), change the Solus mode to USB input using the handset or the button on the front panel.
"NoPC" will be displayed if there is no input signal via USB. The Solus with digital inputs will lock onto the input data when there is an input signal for USB. The display screen will then indicate the presence of a digital signal and show the output sampling frequency of the music file in your computer.
If input sampling frequency is 384kHz, display show is PCM384 kHz.
If the format of music file is DSD64, display show is DSD2.8MHz.
If the format of music file is DSD128, display show is DSD5.6MHz.
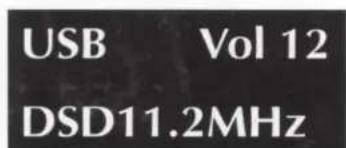
If the format of music file is DSD256, display show is DSD11.2MHz.
Press the info key on the handset, display shown as following: (e.g. On your computer, input sampling frequency is 384kHz or the format of music file is DSD 256)

HID function is available when playing PC USB. Play, Pause, Previous track, Next track can be controlled by the handset.
Playing an External SPDIF input
There are two optical and two coaxial SPDIF inputs for QUAD Artera Solus: OPT1-OPT2-DIG1-DIG2, press the required button on the handset or short touch the SOURCE button on the front panel to select the desired input.
"Unlocked" will be displayed if no input signal for SPDIF input. The display screen will then display the sampling frequency when there is an input signal for SPDIF input. The displays shown below are the cases when press the info key on the handset. (e.g. input sampling frequency is 192KHZ for DIG1)

When playing an external SPDIF input, volume, mute, info and display functions only are available. All other control functions are carried out from the source unit.
BLUETOOTH
Please follow the below instructions to connect your mobile device
- Select BT on the Artera by pressing the USB key twice on your remote control. The USB button on the remote switches between USB and BT. Select Artera BT on your mobile device. (Some devices will see Artera BT in their Bluetooth menu without selecting BT on the Artera).
- Once paired the Artera will show BT Connected on the display.
• Volume will be controlled by your mobile device so you might need to increase the volume on the Artera unit depending on the maximum volume required. - If you switch to another input on the Artera, your mobile device will be disconnected from the Bluetooth connection after 60 seconds. To reconnect, select BT on the Artera and it will connect to the last paired device, or select Artera BT on your mobile device in the Bluetooth menu and it will reconnect.

natural_image
Line drawing of a CD or DVD player with a circular button and scroll (no text or symbols)INSTALLATION OF QUAD FOR ASYNCHRONOUS MODE
(Quad USB Driver - IAG Platform)
Setup of Operating System
1 Mac OS X
2 Windows 10 / Windows 8 / Windows 7 / Vista / XP
3 Recommendations
4 Install and Configure Foobar2000 to Play DSD
All Operating Systems
Please note that your screen display may vary depending on the operating system.
System Requirements:
Intel Core 2 @ 1.6GHz or similar AMD processor
1GB RAM
USB 2.0 Interface
Microsoft Windows Vista 32/64 Bit incl. SP2 | Windows 7 32/64Bit | Windows XP SP3 (not recommended)
Apple MAC OS from 10.6.4
Windows 10 / Windows 8 / Windows 7 / Vista / XP
Installation
You have to install the driver before using the USB device for the first time!
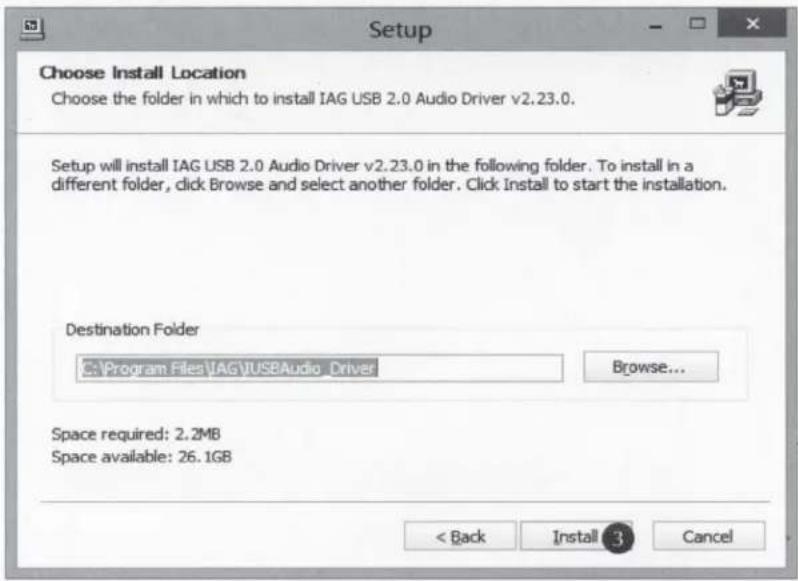
Put the installation CD into the CD/DVD drive of your computer.
Setup will start automatically. If not, please follow these steps:
Click on Start -> Computer. Right-click the icon of the CD/DVD drive and then click on Install program.
Follow the instructions of the setup program to install the driver. Complete the installation by clicking Finish.
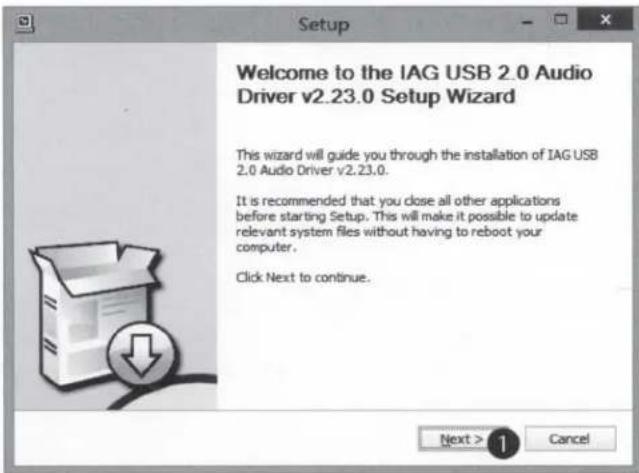
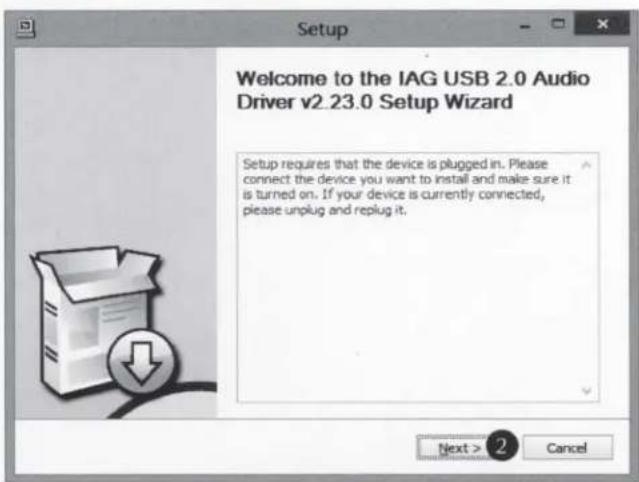
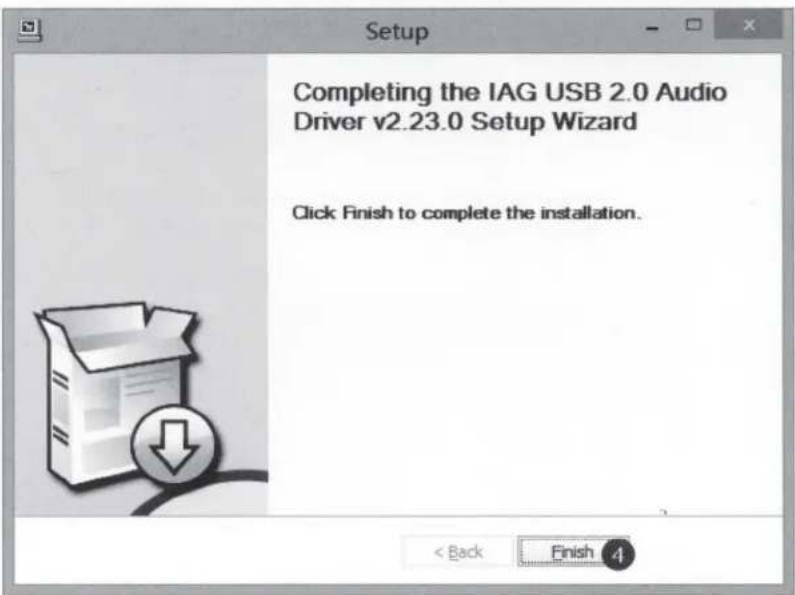

To confirm connection of the Quad product to the PC, double click
on the 📋 tab.

If this window appears then the connection has been established between the Quad product and the PC, the device is now ready to use.

If this window appears then the connection has not been established, please reconnect the Quad product.
Windows 10 / Windows 8 / Windows 7 / Vista / XP
System Setup
After successful installation of the driver please connect the USB audio device to a free USB port. Do not use a USB-hub! Close all other USB applications if you want to listen to music with your computer. The Quad USB Audio Driver replaces the internal soundcard of your computer.
Adjusting the sample rate
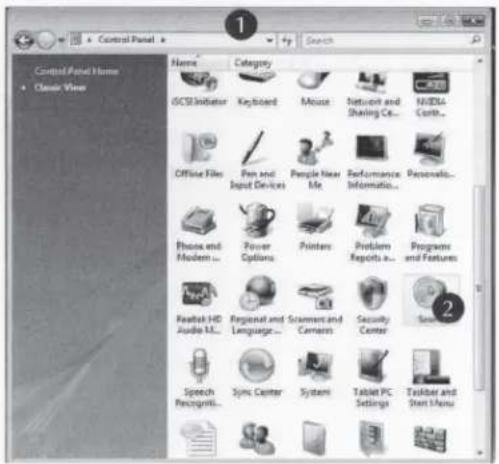
1 Open the control panel of your computer.
2 Open Sound.
3 If the Quad USB Audio is not set do to default, please set it to default as shown.
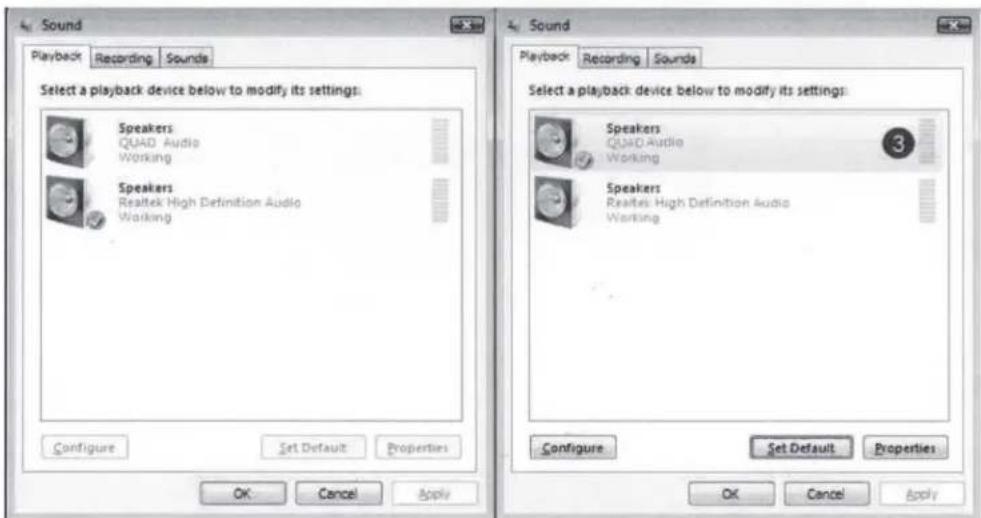
4 Under properties select Advanced and adjust the output format as required 5.
Note:
Windows Vista does not support the sample rate of 176.4kHz/24 bit. If you want to playback this sample rate, a music player supporting this feature is required. You can use J. River media Center or Foobar for example.
Windows XP does not support sample rates of more than 48 kHz. You need a special music player to play back other sample rates, for example J. River media Center or Foobar.

Recommendations
Music players supplied with Windows or Mac OS do not support native playback of music files. If you adjust the output sample rate to 96 kHz for example, but your file is 44.1 kHz, the computer will convert the sample rate to 96 kHz. This will affect sound quality and should be avoided! In order to get native playback you must install a music player which supports this feature. We achieved very good results with these players:
MAC
Pure Music Player + iTunes
- better sound quality compared to iTunes
- automatic sample rate switching
- Memory buffered playback
- 64 bit precise up-sampling
- exclusive access
- Plug-ins
Windows
Foobar2000
- sound quality
- automatic sample rate switching
- Plug-ins
INSTALL PLAYBACK SOFTWARE TO RUN PCM AND DSD AUDIO
Install and setup Foobar2000 in windows OS
- Download Foobar2000 from official website, install Foobar2000 on windows.
- Download the SACD plugin from official webstie.
a. Unzip SACD plugin,
b. Click the .exe file to install,
c. Foobar will pop-up a windows, please click "Apply" to restart Foobar.
- Download the ASIO plugin from official webstie.
d. Unzip ASIO plugin,
e. Click the .exe file to install,
f. Foobar will pop-up a windows, please click "Apply" to restart Foobar.
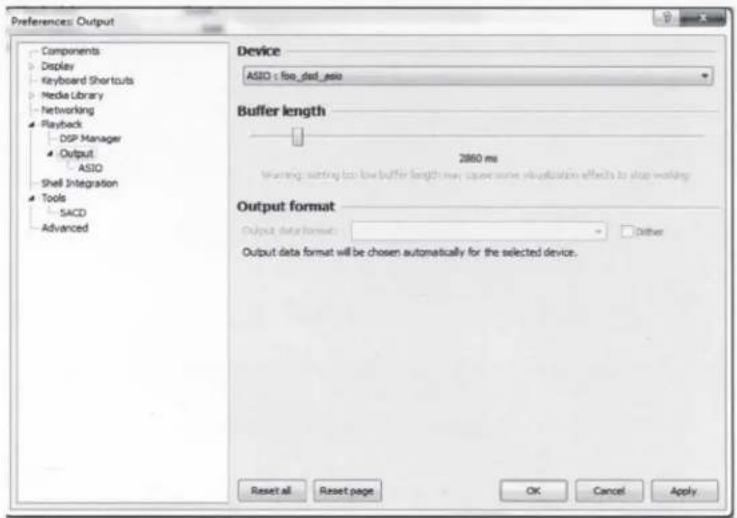
- Configure the Output Device
a. Go to Playback->Output
b. Select the Device:ASIO foo_dsd_asio
- Configure the ASIO output
a. Goto Playback->Output->ASIO, double-click on foo_dsd_asio
b. Select the TUSBAudio ASIO Driver
c. Select Dop Marker 0x05/0xFA (If play DSD256 file, please select ASIO Native)
d. Select PCM to DSD Method: None
e. Select Fx:DSD64

- Configure the SACD plugin to play DSD (and not convert from DSD to PCM)
a. Goto Tools->SACD
b.Set ASIO Driver Mode to DSD
c.Set PCM Sample Rate to 176400
- Load some some PCM or DSD audio into Foobar2000 and play.

Install and Setup Itunes in Mac OS X to play PCM audio
- Click the "Sound" icon In "System Preferences".

- Click the "Output" tab in "Sound", select the "IAG USB Audio 2.0 Output" as the device for sound output.

- Click "Audio MIDI Setup" in the Utilities Screen to open "Audio Devices".
(1) Click "IAG USB Audio 2.0 Output" in the main menu.
(2) In the pop up menu, select "Use this device for sound output".
Music form iTunes will be directed to the QUAD products, but the alert sounds will be sent to your secondary speakers.
(3) Set the format to "44100.0Hz-24bit", the default sampling rate should be selected as 44100.0Hz-24bit, if you are playing music at other sampling frequencies, you should set the sampling rate to match that rate.
(4) Load some PCM audio into iTunes and play.

Install and Setup Audirvana Plus in Mac OS X to play PCM or DSD audio
- Open Audirvana Plus, Click "Preferences" from "Audirvana Plus" drop-down menu.

- Open "Audirvana Preferences" dialog box, click "Change" in "Audirvana Preferences" dialog box.

- Select "IAG USB Audio 2.0 Output" icon as the device for sound output.

- Load PCM or DSD audio into Audirvana Plus and play.

Attention Before Service
If the above operations fail to work, please try the following illustrations.
- Please connect the power cable before plugging USB cable to your PC.
- Please unplug and reconnect the power cable or USB cable when the PC does not recognize the device / when it works abnormally.
- Please disconnect the power cable and USB cable when unused for a long time.
* Should the above symptoms persist with all instructions observed, your product may require servicing.
Altering the Display Brightness
Short press the Display key on the handset, the word "Display Off" appears briefly on screen and the display will revert to off.
Short press the Display key on the handset again, the word "Display On" appears briefly on screen and the display will revert to on.
There are 8 levels of brightness available. Press and hold the Display key on the handset, the word "Brightness Level 8" appears briefly on screen, short press the Display key on the handset to repeatedly alter the level from 1-8.
The Brightness level will be retained on Artera Solus even it enters Standby but not Power Off.
Brightness
Level 8
MENU SETTING
Digital Filter (digital inputs only)
The Artera Solus offers a choice of filters to optimise playback on different devices, resolutions and to tailor the sound to fit your personal taste
There are 4 filters choices: Fast, Smooth, Wide and Narrow. The default digital filter for the Artera Solus is "Smooth". Press and hold the Prog key on the handset to enter the Menu options then toggle through using the ◄◀/▶▶ the menu to select 'Digital Filter'
Toggle through the different settings and use the ▶|| button to select your filter of choice.

flowchart
graph LR
    A["Digital Filter\nSmooth"] --> B["Digital Filter\nWide"]
    B --> C["Digital Filter\nNarrow"]
    C --> D["Digital Filter\nFast"]
The Digital Filter state will be retained on Artera Solus even it enters Standby or Power Off.
Filter Characteristics:
Smooth: The 'Smooth' filter is a digital filter which implements sampling theory and is designed for near perfect technical response in the frequency domain. It's quite useful for simpler acoustic recordings as it sounds more natural. The filter has a slightly lower bandwidth but superior rejection of out of spectrum noise and thus ha a very clear, smooth open sound.
Wide: The 'Wide' filter has a gentle rate of attenuation, minimum 'time-domain ringing', minimal out of spectrum noise and thus is quite useful for high sample rate (96kHz and above) files. It has a very 'clean' sound, even if it doesn't have the transient impact of 'Fast'.
Narrow: The 'Narrow' filter typifies industrial standard characteristics (-6dB at 12 Fs with significant time-domain ringing) and is included here for comparison purposes). This filter has a high jitter tolerance.
Fast: The 'Fast' filter exhibits no ringing – the transient nature of the music is preserved. This type of filter has a purity and 'naturalness' to the sound quality.
DSD Bandwidth
The DSD Bandwidth can be widened to suit high performance hi-fi equipment and particular DSD audio files.

Volume Limit
For protection of equipment and other uses, a volume limit can be applied from 0-100.

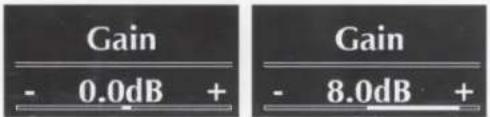
Output Gain
The output can be adjusted, with up to a 8.0dB+ boost. This will not work on the COAX / OPT outputs as they are fixed volume.
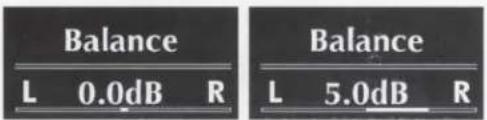
Balance
Balance of left and right channels can be adjusted
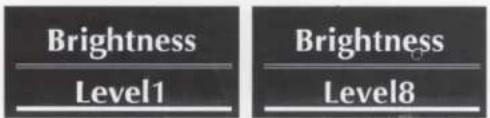
Brightness
The Artera Series brightness can be adjusted from a low level to a bright level, adjustable in 8 increments.
CD Track Time
Users can select the track time display in four formats. 'Track Time Forward' shows the individual track playback time. 'Track Time Remain' displays individual track time remaining. 'Disc Time Forward' displays the playback time of the whole CD. 'Disc Time Remain' displays the remaining time left on the whole CD.




Auto Standby
Artera Solus has three standby modes, editable via the Menu
Auto Standby Never: Artera Solus will only enter standby through user control
Auto Standby 20 Minutes: If the CD is stopped for 20 minutes, or if there is no input signal for 20 minutes, the Artera Solus will enter standby.
Auto Standby 1 Hour: If the CD is stopped for 1 hour, or if there is no input signal for 1 hour, the Artera Solus will enter standby.


Default Channel
Any channel on the Artera Solus can be set as the default channel. Additionally this can be set, using the 'Recall Last Input' feature.


Factory Reset
The Artera Solus can be restored to factory default settings. To do so, toggle through the menu options using the ◀◀/▶▶ keys. Once the Factory Reset ▶


Firmware
The final menu option displays the current firmware installed on the Artera Solus

SPECIFICATIONS
(All measurement made with 230V supply)
| Model | Artera Solus |
| General Description | CD Player, DAC, Pre-Amp with Integrated amplifier |
| Key Technology & Features | DSD (up to DSD256 Compatible)Bluetooth (aptX) |
| Audio File Formats | ALAC, WAV, FLAC, AIFF, WMA, MP3, AAC, AAC-HE, AAC+, DSD64, DSD128, DSD256 |
| D/A Converter | ESS ES9018 32bit DAC |
| USB Input | USB B (PC / MAC) |
| Digital Audio Inputs | 2 x Optical TOSlink, 2 x RCA(DIG1, DIG2) |
| Digital Audio Outputs | 1 x Optical TOSlink, 1 x RCA (DIG) |
| Analogue Inputs | 2 x RCA (AUX1, AUX2) |
| Analogue Outputs | 2 x RCA, 2 x Balanced XLR, 6.3mm Headphone Jack |
| Speaker Outputs | 2 x Speaker Binding Post Terminals |
| Sample Rate (USB B) | 44.1kHz, 48kHz, 88.2kHz, 96kHz, 176.4kHz, 192kHz, 384kHz |
| Sample Rate (Digital Inputs / Outputs) | 44.1 - 192kHz |
| Standby Power Consumption | <0.5W |
| Pre-Amplifier Section | |
| Output Level (1kHz) Variable Output | 0 - 4 Vrms (Pre Outputs)0 - 8 Vrms (Balanced Outputs) |
| Frequency Response | 20Hz-20kHz, 1kHz (± 0.2dB) |
| Total Harmonic Distortion | <0.002% (20Hz-20kHz) |
| Signal to Noise Ration(S/N) | >103dB (1kHz)>110dB (A Weighted, 1kHz) |
| Channel Separation | >100dB (1kHz) |
| Power Amplifier Section | |
| Rated Power Output | 2 x 75W (8Ω) |
| Frequency Response | ± 0.5dB (20Hz-20kHz, 1kHz) |
| Total Harmonic Distortion | <0.009% (10W 20Hz-20kHz) |
| Signal to Noise Ration(S/N) | >100dB (A Weighted,ref.75W) |
| Channel Separation | >82dB (A Weighted,ref.1W) |
| Dynamic Range A-wtd | >98dB |
| Power Requirement | 230V~50-60Hz |
| 115V~50-60Hz | |
| 100V~50-60Hz | |
| Dimensions & Weight | |
| Dimensions (Unpacked) | 320 x 320 x 105mm |
| Dimensions (Packed) | 465 x 465 x 220mm |
| Net Weight | 11.84kg |
| Gross Weight | 13.84kg |
CARE AND CLEANING
The surface of the equipment may be cleaned with a damp cloth provided that the power has been switched off first. Solvent based cleaning materials should not be used as they may damage the finish.
SERVICE INFORMATION
Product service enquiries should, in the first instance, be referred to the supplying dealer. If you need to return your equipment for servicing we recommend that it is shipped in its original packing.
In case of difficulty or for other product enquiries please contact the appointed QUAD distributor for your country. Principal Service Center addresses and contact numbers can be found below.
For information on authorized service centres worldwide contact QUAD Electroacoustics Ltd. A worldwide distributor list is available on the QUAD website: www.quad-hifi.co.uk
INTERNATIONAL SERVICE CENTRE
IAG House, 13/14 Glebe Rode, Huntingdon, Cambridgeshire, PE 29 7DL, UK
Tel: 01480 452561 Fax: 01480 413403

Correct Disposal of this product. This marking indicates that this product should not be disposed with other household wastes throughout the EU. To prevent possible harm to the environment or human health from uncontrolled waste disposal, recycle it responsibly to promote the sustainable reuse of material resources. To return your used device, please use the return and collection systems or contact the retailer where the product was purchased. They can take this product for environmental safe recycling.


- IMPORTANT SAFETY INFORMATION
- AVIS: RISQUE DE CHOC ELECTRIQUE-NE PAS OUVRIR WARNING: SHOCK HAZARD-DO NOT OPEN
- QUAD
- Artera Solus
- USER GUIDE
- CONTENTS
- INTRODUCTION
- UNPACKING THE EQUIPMENT
- PLACEMENT
- Fitting Handset Batteries
- Handset Operation
- CONTROLS AND CONNECTORS
- INSTALLATION
- Mains Connections
- Power On/Off switch
- Analogue Signal Input Connections
- Analogue Signal Output Connections
- Digital Signal Input Connections
- Bluetooth SOCKET
- Digital Signal Output Connections
- DIG & OPT Outputs
- Trigger Connections
- SYSTEM CONNECTION
- OPERATIONS
- Switching On
- Auto Standby Mode
- Power Up Sequence
- Selecting an Input
- Loading a CD
- Ejecting a CD
- Playing a CD
- Repeat Play
- Repeat 1
- Repeat All
- Stopping a disc
- Program Play
- During Programme Play:
- Stopping Programme Play:
- Volume Adjustment
- Notes:
- Mute
- Playing a USB input
- Playing an External SPDIF input
- BLUETOOTH
- Please follow the below instructions to connect your mobile device
- INSTALLATION OF QUAD FOR ASYNCHRONOUS MODE
- (Quad USB Driver - IAG Platform)
- Setup of Operating System
- All Operating Systems
- Windows 10 / Windows 8 / Windows 7 / Vista / XP
- System Setup
- Adjusting the sample rate
- Note:
- Recommendations
- MAC
- Windows
- INSTALL PLAYBACK SOFTWARE TO RUN PCM AND DSD AUDIO
- Install and setup Foobar2000 in windows OS
- Install and Setup Itunes in Mac OS X to play PCM audio
- Install and Setup Audirvana Plus in Mac OS X to play PCM or DSD audio
- Attention Before Service
- Altering the Display Brightness
- MENU SETTING
- Digital Filter (digital inputs only)
- Filter Characteristics:
- DSD Bandwidth
- Volume Limit
- Output Gain
- Balance
- Brightness
- CD Track Time
- Auto Standby
- Default Channel
- Factory Reset
- Firmware
- SPECIFICATIONS
- CARE AND CLEANING
- SERVICE INFORMATION
- INTERNATIONAL SERVICE CENTRE
Brand : QUAD
Model : Artera Solus
Category : Receiver