
Vena II - Receiver QUAD - Free user manual and instructions
Find the device manual for free Vena II QUAD in PDF.


| Product Type | Integrated Amplifier / Receiver |
| Brand | Quad |
| Model | Vena II |
| Category | Receiver |
| Dimensions (W x H x D) | 313 mm x 102 mm x 314 mm |
| Weight | 7.5 kg |
| Power Supply | 100-240 V AC, 50/60 Hz |
| Power Output | 2 x 45 W into 8 ohms |
| Frequency Response | 20 Hz - 20 kHz ±0.5 dB |
| Total Harmonic Distortion | < 0.03% |
| Inputs (Digital) | 2x Optical, 1x Coaxial, 1x USB (Type B) |
| Inputs (Analog) | 2x RCA Line, 1x Phono (MM) |
| Outputs | Speaker outputs, Pre-out (RCA), Headphone (6.3mm) |
| Bluetooth Version | 4.2 with aptX HD |
| DAC Chip | ESS Sabre ES9018K2M |
| Remote Control | Included |
| Standby Power Consumption | < 0.5 W |
| Maintenance & Cleaning | Disconnect power and clean with dry, soft cloth. Do not use solvents. |
| Safety | Do not expose to moisture or extreme heat. Ensure proper ventilation. |
| Spare Parts & Repairability | Contact Quad authorized service center for genuine spare parts and repairs. |
| General Information | Released in 2019; supports up to 24-bit/192kHz via USB. |
Frequently Asked Questions - Vena II QUAD
User questions about Vena II QUAD
0 question about this device. Answer the ones you know or ask your own.
Ask a new question about this device
Download the instructions for your Receiver in PDF format for free! Find your manual Vena II - QUAD and take your electronic device back in hand. On this page are published all the documents necessary for the use of your device. Vena II by QUAD.
USER MANUAL Vena II QUAD
Integrated Amplifier
Owner's Manual
IMPORTANT SAFETY INFORMATION

CAUTION!
RISK OF ELECTRIC SHOCK DO NOT OPEN

TO REDUCE THE RISK OF ELECTRIC SHOCK DO NOT REMOVE COVER (OR BACK) NO USER-REMOVEABLE PARTS INSIDE REFER SERVICING TO QUALIFIED PERSONNEL
ADVERTISSEMENT: RISQUE DE CHOC ELECTRIQUE-NE PAS OUVRIR

This symbol indicates that there are important operating and maintenance instructions in the literature accompanying this unit.

This symbol indicates that dangerous voltage constituting a risk of electric shock is present within this unit.
Read these instructions.
Keep these instructions.
Heed all warnings.
Follow all instructions.
Do not use this apparatus near water.
Clean only with dry cloth.
Do not block any ventilation openings.
Install in accordance with the manufacturer's instructions.
Do not install near any heat sources such as radiators, heat registers, stoves, or other apparatus (including amplifiers) that produce heat.
Do not defeat the safety purpose of the polarised or grounding type plug.
A polarised plug has two blades with one wider than the other. A grounding type plug has two blades and a third grounding prong. The wider blade or the third prong is provided for your safety. If the provided plug does not fit into your outlet, consult an electrician for replacement of the obsolete outlet.
Protect the power cord from being walked on or pinched particularly at the plugs, convenience receptacles, and the point where they exit from the apparatus.

Use only with the cart, stand, tripod, bracket, or table specified by the manufacturer, or sold with the apparatus. When a cart or rack is used, use caution when moving the cart/apparatus combination to avoid injury from tip-over.
Unplug the apparatus during lightning storms or when unused for long periods of time.
Refer all servicing to qualified service personnel. Servicing is required when the apparatus has been damaged in any way, such as power supply cord or plug is damaged, liquid has been spilled or objects have fallen into the apparatus, the apparatus has been exposed to rain or moisture, does not operate normally, or has been dropped.
CAUTION: These servicing instructions are for use by qualified service personnel only. To reduce the risk of electric shock, do not perform any servicing other than that contained in the operating instructions unless you are qualified to do so.
Do not install this equipment in confined or built-in space such as a bookcase or similar unit, and keep well ventilated in open space. The ventilation should not be impeded by covering the ventilation openings with items such as newspaper, table-cloths, curtains etc.
WARNING: Only use attachments/accessories specified or provided by the manufacturer (such as the exclusive supply adapter, battery etc.).
WARNING: To reduce the risk of fire or electric shock, do not expose this apparatus to rain or moisture. The apparatus shall not be exposed to dripping or splashing and ensure that objects filled with liquids, such as vases, shall not be placed on apparatus. No naked flame sources, such as lighted candles, should be placed on the apparatus.
WARNING: Terminals marked with symbol of "4" may hold voltage of sufficient magnitude to constitute a risk of electric shock. The external wiring connected to the terminals requires installation by qualified personnel or the use of ready-made leads or cords
WARNING: Danger of explosion if battery is incorrectly replaced. Replace only with the same or equivalent type.
WARNING: The battery (battery or batteries or battery pack) shall not be exposed to excessive heat such as sunshine, fire or the like.
WARNING: Excessive sound pressure from earphones and headphones can cause hearing loss.
WARNING: Listening to music at high volume levels and for extended duration can damage one's hearing. In order to reduce the risk of damage to hearing, one should lower the volume to a safe, comfortable level, and reduce the amount of time listening at high levels. Headsets should comply with EN 50332-2 requirements (for GS certification).
WARNING: The mains plug is used as disconnection device; the disconnection device shall remain readily operable. The mains switch and circuit breakers are not provided with the apparatus; the installation shall be carried out in accordance with all applicable installation rules.
IMPORTANT NOTICE TO UK USERS
The appliance cord is terminated with a UK approved mains plug fitted with a 5A fuse. If the fuse needs to be replaced, an ASTA or BSI approved BS1362 fuse rated at 5A must be used. If you need to change the mains plug, remove the fuse and dispose of this plug safely immediately after cutting it from the cord.
Connecting a Mains Plug
The wires in the mains lead are coloured in accordance with the code: Blue: NEUTRAL; Brown: LIVE; Green and Yellow: Earth. As these colours may not correspond to the coloured markings identifying the terminals in your plug, proceed as follows:
The BLUE wire must be connected to the terminal marked with the letter N or coloured BLUE or BLACK. The BROWN wire must be connected to the terminal marked with the letter L or coloured BROWN or RED.

CONTENTS
IMPORTANT SAFETY INFORMATION ....Inside Front Cover
INTRODUCTION ....1
UNPACKING THE EQUIPMENT ....1
PLACEMENT ....1
CONTROLS AND CONNECTIONS 2
INSTALLATION 3
REMOTE HANDSET 7
OPERATION 8
SPECIFICATIONS 10
CARE AND CLEANING 11

Bluetooth®
The Bluetooth ^® word mark and logos are registered trademarks, owned by Bluetooth SIG, Inc. and any use of such marks by IAG Group Ltd is under license. Other trademarks and trade names are those of their respective owners.

aptX® software is copyright CSR plc. or its group companies. All rights reserved.
The aptX ^® mark and the aptX logo are trademarks of CSR plc. or one of its group companies and may be registered in one or more jurisdictions.
INTRODUCTION
Thank you for your investment in QUAD Vena II. We are sure that Vena II will continue to delight you for years to come.
QUAD Vena II is designed to be the perfect match to a wide variety of sources and provides the necessary amplification to realise the highest quality of your stored music replayed through your loudspeakers and headphones.
You can link Vena II to both analogue and digital sources thanks to its diversity of inputs. You can also stream music to Vena II from any Bluetooth® device such as portable music players and smartphones. QUAD Vena II is designed with the innovative aptX. codec built in so that you can hear CD quality audio over the Bluetooth wireless connection.
Please read this manual carefully to discover all the ways you can connect your equipment to QUAD Vena II and how to get the best performance from your stored music.
UNPACKING THE EQUIPMENT
The QUAD Vena II carton contains:
• The QUAD Vena II integrated amplifier
• One IEC mains cable with a plug suitable for your area
• One remote handset
• One battery for remote handset
• One antenna (metal enclosure only)
• This owner's manual
- CD-ROM - Quad Audio Driver
Consult the dealer from whom you purchased the equipment if any item is not present. Carefully unpack the unit and accessories, so as not to damage the surface finish. Retain the packing materials for future use. Retain the user manual and information concerning the date and place of purchase of your equipment for future reference. If you transfer any unit to a third party please pass on this instruction manual along with the equipment.
PLACEMENT
Place the unit on a sturdy shelf or table. The unit is designed to run warm during normal operation. Do not place anything on top of the unit. If you are using an equipment rack ensure the unit has sufficient space to allow adequate ventilation and is on its own shelf.
Before you connect the QUAD Vena II to the mains, ensure your mains voltage corresponds to the rating on the rear panel of the product. If in doubt, consult your dealer. If you move to an area which has a different mains voltage seek advice from a QUAD appointed dealer or a competent service technician.
CONTROLS AND CONNECTIONS
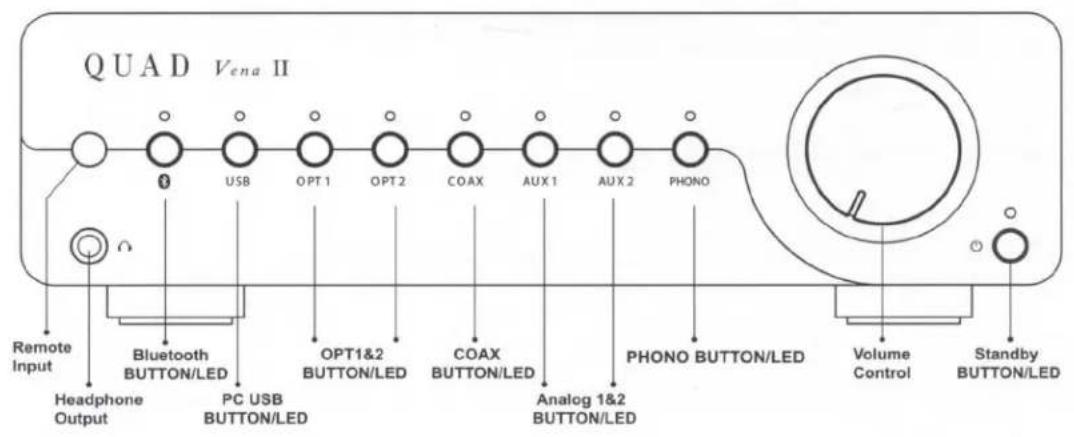

INSTALLATION
Before making any connections to your high fidelity equipment make sure that all units in the system are switched off and unplugged at the mains.
Mains Connections
The Mains On/Off switch is on the rear panel. Before connecting your QUAD equipment to the AC mains supply check and make sure the voltage marked on the back matches your supply voltage.
Digital Signal Output Connections
Coaxial Output
Venall has one coaxial SPDIF output. Connect an RCA digital interconnect between the digital coaxial out of Venall unit and the required input of your equipment.
Optical Outputs
Vena II has one optical SPDIF output. Connect an optical (TOSLink) interconnect between the digital optical output of Vena II and the required input of your equipment.
Analog Signal Output Connections
Preamplifier Output
Vena II has one pair of unbalanced RCA outputs which can make Vena II operate as a preamplifier.
Connect an RCA cable between the unbalanced pre output of Venal and the unbalanced input of a power amplifier or associated equipment. Interconnection should be low-noise construction and fully screened to minimize hum and noise transmission.
Loudspeaker Outputs
Venall has two sets of loudspeaker outputs. They are independent for right and left stereo amplifier outputs.
Connect the Positive (+) RED terminals of the amplifier to the Positive (+) RED terminals of the loudspeakers. Connect the Negative (-) BLACK terminals similarly. When connecting loudspeakers tighten the terminals securely by hand. Make sure there are no loose strands of wires which could cause short circuits.
Headphone Output
Venall has a stereo 6.3mm(1/4") jack on the front panel for connecting headphones. Connecting headphones mutes the audio signal to the loudspeakers. Vena II headphone output can be set up to 4.5V, users can select suitable output levels to suit their headphones.
WARNING: Listening to music at high volume levels and for extended durations can damage one's hearing. In order to reduce the risk of damage to hearing, one should lower the volume to a safe, comfortable level, and reduce the amount of time listening at high levels. Headsets should comply with EN 50332-2 requirements (for GS certification).
Output Connections
Artera Play

Analog Signal Input Connections
Vena II has two sets of unbalanced RCA inputs for connection to units which do not feature balanced outputs. Both sets are identical.
Connect an RCA cable between the unbalanced input of Vena II and the unbalanced output of a source unit like a CD player or DAC. Interconnections should be low-noise construction and fully screened to minimize hum and noise transmission.
PHONO Signal Input Connections
Vena II has a PHONO signal input, the PHONO input should only be connected to turntables fitted with MM cartridges
Digital Signal Input Connections
Venall has a variety of digital inputs, which can be connected to most popular digital sources, like the digital output of a CD or DVD player, DAC, PC.
Coaxial Inputs
Venall has a coaxial SPDIF input. Connect an RCA digital interconnect between the digital coaxial out of the source unit to the COAX input of Vena II.
Optical Inputs
Vena II has two optical SPDIF inputs. Connect an optical (TOSlink) interconnect between the digital optical output of the source unit to the OPT1 or OPT2 input on Vena II.
Bluetooth Input
Venall has a built-in Bluetooth signal processor module which can play audio files transmitted from the source unit via Bluetooth wireless transmission. Please refer to page 9 to enable this function.
USB Input
VenatI has one B-type USB input which lets you connect a Mac or PC to Vena to play audio files stored on a computer.

B-type USB
Input Connections

REMOTE HANDSET


Press to bring product in/out of standby mode

Press to Mute/Unmute the sound. In Mute, the selected source indicator on front panel will flash on and off

Press to select previous source

Press to select next source

Press to increase volume

Press to decrease volume
The selected source indicator will flash when Vena responds to remote commands.
Preparing the Handset
- Unpack the handset
- Invert the handset
- Remove the battery cover
- Insert a new battery
- Close the battery cover

Battery Caution
• There is a risk of fire and burns if the battery is handled improperly.
- Do not disassemble, crush, puncture, short external contacts or dispose in fire or water.
- Do not attempt to open or service the battery. Replace only with a CR2025 battery.
- Discard used batteries in accordance with recycling regulations in force in your area.

Warning: DO NOT INGEST BATTERY, CHEMICAL BURN HAZARD.
This product contains a coin/button cell battery. If the coin/button cell battery is swallowed, it can cause sever internal burns in just 2 hours and can lead to death.
Keep new and used batteries away from children. If the battery compartment does not close securely, stop using the product and keep it away from children.
If you think batteries might have been swallowed or placed inside any part of the body, seek immediate medical attention.
OPERATION
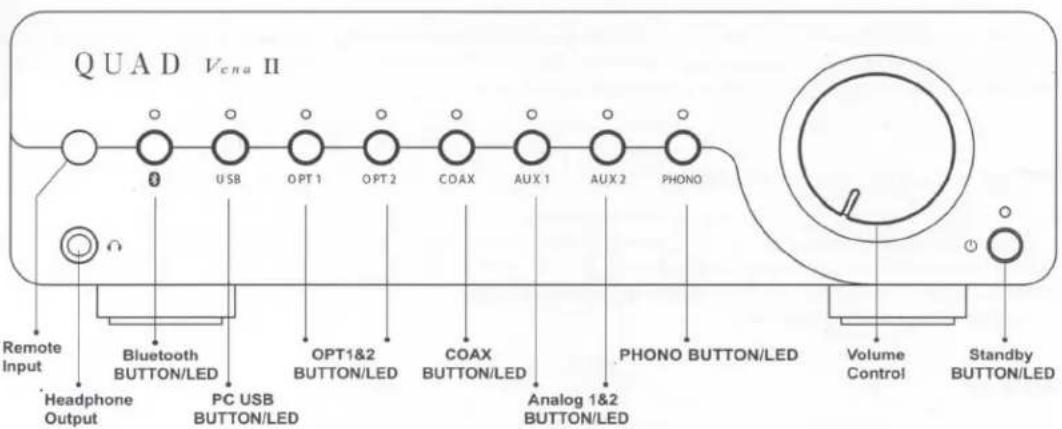
Standby Mode
Venall will be in standby mode when powered on. The ⏻ indicator on front panel is lit. Press ⏻ button to bring Venall out of standby. You can activate the 'auto standby' function by holding the ⏻ button down for 3 seconds. Using this 'auto standby' function, Vena II will automatically go into standby mode when there is no signal input or operation for 30 minutes. Venall will be switched to the Bluetooth source input when unit is activated for the first time, and switched to the last input source used after that.
Protection Mode
Vena II is protected by a thermal switch which interrupts the AC Power supply if the amplifier is grossly overloaded for a period of time. To restore operation, simply press the ⏻ button on the front panel. It is thus fully protected against gross overload, short-circuited output etc, but not necessarily against seriously inadequate ventilation.
Mute Mode
Venall will go into Mute mode with no sound output for 3 seconds when the unit is switched on and all indicators will flash 3 times. After 3 seconds the indicators will stop flashing and Venall will exit from Mute mode.
Users can also press 📋 to bring Venall in or out of Mute mode when playing music.
Volume knob
Venat has a volume control knob on the front panel. Users can decrease or increase the music level with this volume knob. Please always turn up the volume gradually.
Playing Music via Analog Inputs
Connect the analog signal of a source unit to Vena's AUX1 or AUX2 input. Press AUX1 or AUX2 button on the front panel. AUX1 or AUX2 indicator will be lit and music will start playing.
Playing Music via Digital Inputs
Connect coaxial SPDIF signal of source units to the digital in COAX jack on Vena's rear panel. Press COAX button on the front panel, COAX indicator will be lit and music will start playing.
Connect optical (TOSLink) signal of source units to Vena's OPT1 or OPT2 jack on Vena's rear panel. Press OPT1 or OPT2 button on the front panel. OPT1 or OPT2 indicator will be lit and music will start playing.
Playing Music via USB input
Connect a Mac or PC via the B-type USB interface on Vena's rear panel. Press USB button on the front panel. USB indicator will be lit, and then click Play on your music player software to play audio files stored on your computer.
Playing Music via Bluetooth
You can wirelessly connect Venal to a music source via Bluetooth wireless technology. Volume up/down, standby and mute in/out can be controlled from either your Bluetooth source or from Venal. Other functions – play, pause, previous track, next track, fast forward and reverse are all controlled from your Bluetooth source only.
Establishing a Bluetooth Connection
- Place Vena II and a Bluetooth music source within a few meters of each other.
- Power on Vena II and select Bluetooth as the source. The Bluetooth source indicator will flash twice when in pairing mode.
- Activate the Bluetooth function on your music source.
- Select "Quad VenaII" when Vena is found to start the pairing process.
- If prompted for a password, enter "0000".
To play music
Select Venall as a music output device on your Bluetooth source to start playing music.
Disconnecting Bluetooth Connection
To disconnect the Bluetooth music source either:
- Move the Bluetooth source beyond the communication area.
- Turn off the connected device or turn off its Bluetooth function.
Note:
If you have difficulty connecting Vena II to a Bluetooth device, please try selecting "Forget this Device" on your source unit and then go through the connection procedure again.
SPECIFICATIONS
( All measurement made with 230V supply )
| D/A Converter | ESS Sabre32 Reference ES9018K2M |
| Input Sampling Rates | Optical,Coaxial:44.1kHz ---192kHz;USB:44.1kHz---384kHz(PCM)/DSD64,DSD128,DSD256 |
| Rated Output Power | 2x45W (8ohm) / 2x65W (4ohm) |
| Total Harmonic Distortion | < 0.005% (30W , 8ohm) |
| Frequency Response | 20Hz-20KHz (+/- 0.5dB) |
| Input Sensitivity | 450mV(RCA AUX IN):4.1mV(PHONO MM) |
| Input Impedance | 10Kohm (AUX) ; 47Kohm // 100pF (Phono) |
| Signal to Noise Ratio (S/N) | ≥108dB ( A Weighted, ref. 45W ) |
| Pre Output Level | 2.3V ( Max ) |
| Pre Output Total Harmonic Distortion (THD) | < 0.002% |
| Pre Output Signal to Noise(S/N) | >110dB (A-Weighted) |
| Bluetooth Version | 4.0 |
| Profile | A2DP |
| Codec | aptX ( priority ), SBC |
| USB Input | 1 x USB ( B-type ) |
| USB Input Sampling Rates | 44.1kHz---384kHz(PCM)/DSD64,DSD128,DSD256 |
| Digital Audio Inputs | 2 x Optical TOSlink1 x RCA Coax |
| Digital Audio Outputs | 1 x Optical TOSlink1 x RCA Coax |
| Analog Inputs | 2xRCA (AUX1 AUX2):1XRCA(PHONO MM) |
| Power Requirement | 220-230V---50/60Hz110-120V 50/60Hz100V 50/60Hz |
| Dimensions (WxHxD) | 313 x 93.5 x 302 (mm) |
| Metal Enclosure | 6.1kg |
| Wood Cabinet | 7.5kg |
CARE AND CLEANING
While cleaning is in progress the AC power cord must be unplugged from the AC power supply socket.
The surface of the equipment should be cleaned with a damp soft cloth. Solvent based cleaning materials should not be used as they may damage the finish.
If you have any queries regarding the use of QUAD equipment, consult your dealer.
WARRANTY
QUAD equipment is guaranteed against any defect in material and workmanship for a period of one year from the date of purchase. Proof of purchase is required for warranty claims.
Please complete and return the enclosed Warranty Registration Form. Within the warranty period QUAD will undertake replacement of defective parts free of charge provided that the failure was not caused by misuse, accident or negligence. Your statutory rights within the territory in which you purchased the equipment is not affected by this warranty.
QUAD carries out regular reviews and reserves the right to adjust the specifications and performance from time to time.
SERVICING
Product service enquiries should, in the first instance, be referred to the supplying dealer. If you need to return your equipment for servicing we recommend that it is shipped in its original packing.
In cases of difficulty or for other product enquiries please contact the appointed QUAD distributor for your country. Principal Service Centre addresses and contact numbers can be found below.
For information of worldwide authorized service centres, please read worldwide distributor list on the QUAD website:www.quad-hifi.co.uk.
INTERNATIONAL SERVICE CENTRE ADDRESS
IAG House
13/14 Glebe Road
Huntingdon
Cambridgeshire
PE29 7DL
UK
Tel: 01480 452561
Fax: 01480 413403

IAG-QUAD
Correct Disposal of this product. This marking indicates that this product should not be disposed with other household wastes throughout the EU. To prevent possible harm to the environment or human health from uncontrolled waste disposal, recycle it responsibly to promote the sustainable reuse of material resources. To return your used device, please use the return and collection systems or contact the retailer where the product was purchased. They can take this product for environmental safe recycling.

natural_image
Dark, nearly blank or completely dark image with no discernible text, symbols, or structured content.QUAD
IAG House, 13/14 Glebe Road, Huntington, Cambridgeshire, PE29 7DL, UK
Tel: +44(0)1480 452561 Fax: +44(0)1480 413403 http://www.quad-hifi.co.uk
IAG reserves the right to alter the design and specifications without notice. All rights reserved © IAG Group Ltd.
Quad is a member of the International Audio Group. Code: QH13-MNL001a

- IMPORTANT SAFETY INFORMATION
- CAUTION!
- IMPORTANT NOTICE TO UK USERS
- CONTENTS
- Bluetooth®
- INTRODUCTION
- UNPACKING THE EQUIPMENT
- PLACEMENT
- CONTROLS AND CONNECTIONS
- INSTALLATION
- Mains Connections
- Digital Signal Output Connections
- Analog Signal Output Connections
- Output Connections
- Analog Signal Input Connections
- PHONO Signal Input Connections
- Digital Signal Input Connections
- Coaxial Inputs
- Optical Inputs
- Bluetooth Input
- USB Input
- REMOTE HANDSET
- Preparing the Handset
- Battery Caution
- OPERATION
- Standby Mode
- Protection Mode
- Mute Mode
- Volume knob
- Playing Music via Analog Inputs
- Playing Music via Digital Inputs
- Playing Music via USB input
- Playing Music via Bluetooth
- Establishing a Bluetooth Connection
- To play music
- Disconnecting Bluetooth Connection
- CARE AND CLEANING
- WARRANTY
- SERVICING
- INTERNATIONAL SERVICE CENTRE ADDRESS
Brand : QUAD
Model : Vena II
Category : Receiver