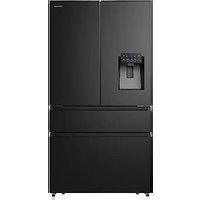
RF728N4SBFE - Fridge HISENSE - Free user manual and instructions
Find the device manual for free RF728N4SBFE HISENSE in PDF.


User questions about RF728N4SBFE HISENSE
0 question about this device. Answer the ones you know or ask your own.
Ask a new question about this device
Download the instructions for your Fridge in PDF format for free! Find your manual RF728N4SBFE - HISENSE and take your electronic device back in hand. On this page are published all the documents necessary for the use of your device. RF728N4SBFE by HISENSE.
USER MANUAL RF728N4SBFE HISENSE
INSTALLATIONSANFORDERUNG....12
text_image
914mm A m5871 B C 725mmtext_image
Technical diagram showing labeled components (E, F, G) of a mechanical assembly or assembly with arrows indicating direction or force.text_image
H I J Inbusschlüsselnatural_image
Line drawing of a hand pressing down on a cabinet with an arrow indicating motion (no text or symbols)natural_image
Line drawing of a kitchen appliance with a cup pouring liquid into a tray (no text or symbols)natural_image
Line drawing of a hand inserting a device into a cabinet (no text or symbols)text_image
10mm to 15mm A Adjustable foot B Roller C Roller A B Ctext_image
908mm 1080.6mm 125° 125° 1471.4mmnatural_image
Pure technical line drawing of a mechanical bracket or bracket (no text or symbols)natural_image
Pure technical line drawing of a mechanical component with intersecting diagonal lines (no text or symbols)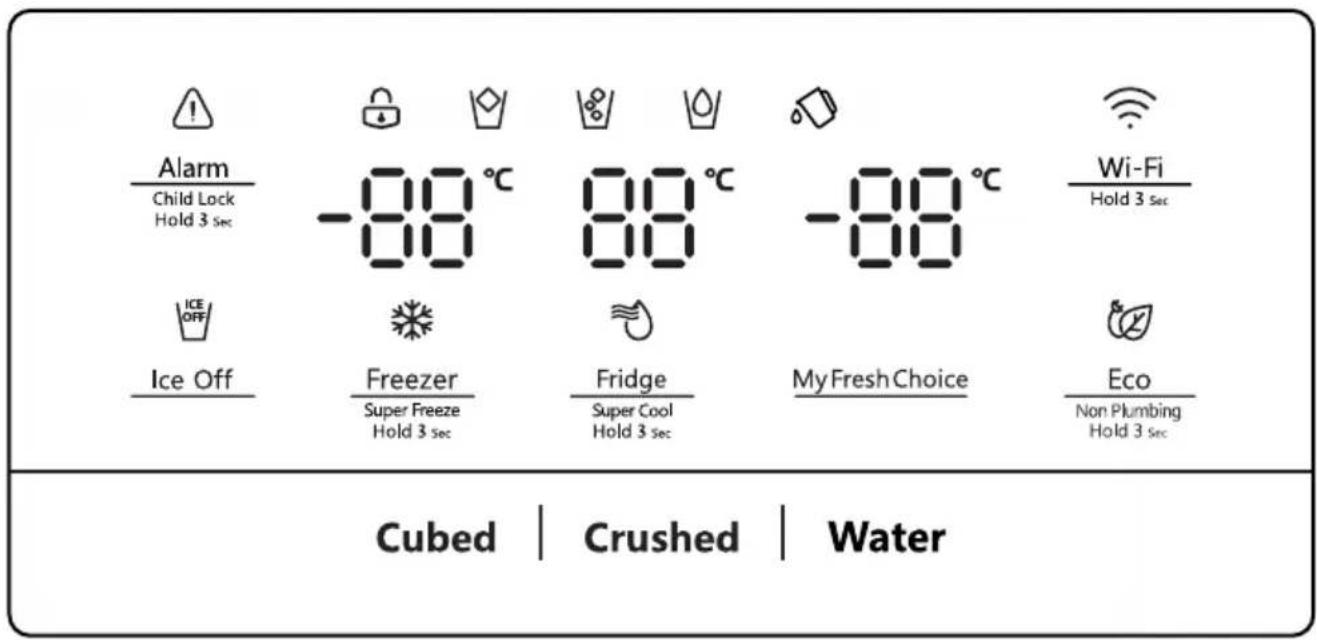
text_image
Alarm Child Lock Hold 3 sec ICE OFF Ice Off Freezer Super Freeze Hold 3 sec 80°C 80°C Fridge Super Cool Hold 3 sec 80°C 80°C My Fresh Choice Wi-Fi Hold 3 sec Eco Non Plumbing Hold 3 sec Cubed | Crushed | Waterchemical
Temperature range diagram for a substance with labeled degrees Celsiuschemical
Temperature gradient notation for carbon chain with corresponding temperature valueschemical
Temperature range diagram showing 5°C to -17°C with corresponding degrees Celsius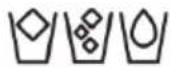
Spender Einstellung
natural_image
Simple line drawing of a geometric structure with a triangular base and a small object on top (no text or symbols)(2)
natural_image
Line drawing of a mechanical tool or tool with no visible text, numbers, or symbolsnatural_image
Illustration of two hands holding a transparent cylindrical object with upward arrows indicating motion or force (no text or symbols)natural_image
Technical line drawing of a refrigerator with internal compartments and mounting brackets (no text or symbols)text_image
Alarm Crushed Lock Hold 3 lm -88 °C 88 °C -88 °C Wi-Fi Hold 3 lm Ice Off Freezer Sugar Freeze Hold 3 lm Fridge Sugar Cool Hold 3 lm My Fresh Choice Eco Non-Holding Hold 3 lm Cubed | Crushed | Water ICE OFF Ice off No ice Cubed Crushed Water 21Kaltes Wasser holen
natural_image
Technical line drawing of a mechanical assembly with an 125° angle标注 (no text or symbols beyond the angle indicator)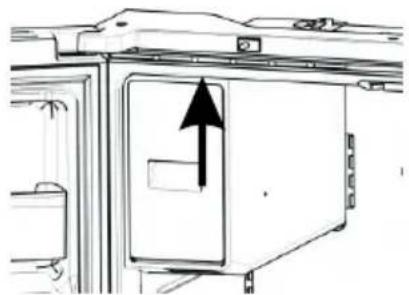
natural_image
Diagram of a microwave oven with an upward arrow indicating airflow or movement (no text or symbols present)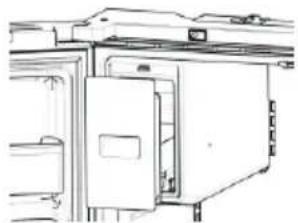
natural_image
Line drawing of a kitchen appliance with a door and cabinet (no text or symbols)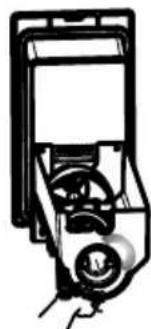
natural_image
Pure mechanical diagram showing a lever mechanism without any text, numbers, or symbolsHINWEIS:
text_image
Technical schematic diagram of a mechanical or electrical enclosure with labeled components and measurement indicatorsnatural_image
Architectural floor plan diagram showing room layouts and structural elements (no text or labels)Warnung:
natural_image
Simple line drawing of a rectangular metal plate with mounting holes (no text or symbols)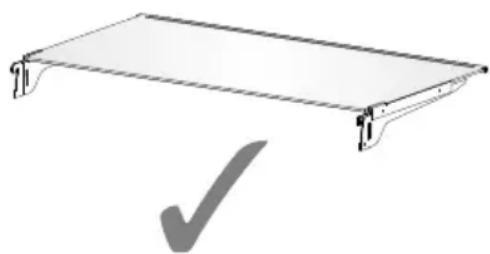
natural_image
Simple line drawing of a rectangular metal frame with supports and a checkmark below (no text or symbols)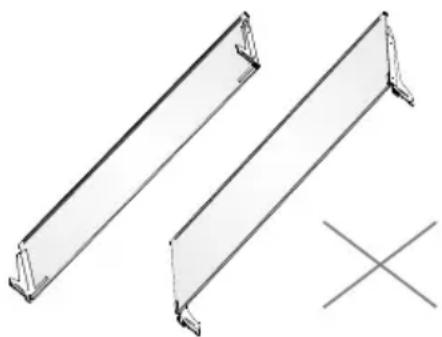
natural_image
Technical line drawing of two metal structural beams with a cross symbol below (no text or labels)
WARNUNG
Stromschlaggefahr
Before operating this unit, please read this manual thoroughly, and retain for future reference.
Thank you for choosing Hisense. We are sure you will find your new refrigerator a pleasure to use. However, before you use the appliance, we recommend that you carefully read the instructions, which provide details about installing and using the product. Please keep this manual for future reference.
Table of Contents
REFRIGERATOR SAFETY.... 3
PARTS AND FEATURES.... 11
INSTALLATION REQUIREMENTS....12
Location Requirements....12
Electrical Requirements.... 12
INSTALLATION INSTRUCTIONS....13
Unpack the Refrigerator.... 13
Installation Positioning....13
Door Removal....13
Use of water storage box.... 14
Complete the Installation.... 15
Level Refrigerator....15
Align Doors....15
REFRIGERATOR USE....16
Opening and Closing Doors.... 16
Using the Controls....17
Features....21
General Use Information.... 23
REFRIGERATOR CARE.... 25
Cleaning....25
Lights....25
Vacation and Moving Care.... 26
Reinstalling / Using Refrigerator Again 26
TROUBLESHOOTING....27
DISPOSAL OF THE APPLIANCE....29
Refrigerator Safety
Your safety and the safety of others are very important.
We have provided many important safety messages in this manual and on your appliance. Always read and obey all safety messages.
This is the safety alert symbol.
This symbol alerts you to potential hazards that can kill or hurt you and others. All safety messages will follow the safety alert symbol and either the word "DANGER," "WARNING" or "CAUTION."
These words mean:

An imminently hazardous situation. You could be killed or seriously injured if you don't immediately follow instructions.

A potentially hazardous situation which, if not avoided, could result in death or serious bodily injury.

A potentially hazardous situation which, if not avoided, may result in moderate or minor injury.
All safety messages will tell you what the potential hazard is, tell you how to reduce the chance of injury, and tell you what can happen if the instructions are not followed.

Safety and warning information
For your safety and correct usage, before installing and first using the appliance, read this user manual carefully, including its hints and warnings. To avoid unnecessary mistakes and accidents, it is important to make sure that all people using the appliance are thoroughly familiar with its operation and safety features. Save these instructions and be sure that they remain with the appliance if it is moved or sold, so that anyone using it throughout its life, will be properly informed on its usage and safety notices.
For the safety of life and property, keep the precautions of these user's instructions as the manufacturer is not responsible for damages caused by omission.
Safety for children and others who are vulnerable people
▶ According to EN standard
This appliance can be used by children aged from 8 years and above and persons with reduced physical, sensory or mental capabilities or lack of experience and knowledge if they have been given supervision or instruction concerning use of the appliance in a safe way and understand the hazards involved. Children shall not play with the appliance. Cleaning and user maintenance shall not be made by children without supervision. Children aged from 3 to 8 years are allowed to load and unload refrigerating appliances.
▶ According to IEC standard
This appliance is not intended for use by persons (including children) with reduced physical sensory or mental capabilities, or lack of experience and knowledge, unless they have been given supervision or instruction concerning use of the appliance by a person responsible for their safety.
Children should be supervised to ensure that they do not play with the appliance.
Keep all packaging away from children as there is risk of suffocation.
If you are discarding the appliance, pull the plug out of the socket, cut the connection cable (as close to the appliance as you can) and remove the door to prevent children playing from suffering an electric shock or from closing themselves inside it.
If this appliance, featuring a magnetic door seals, is to replace an older appliance having a spring lock (latch) on the door or lid, be sure to make the spring lock unusable before you discard the old appliance. This will prevent it from becoming a death trap for a child.

General safety
This appliance is intended to be used in household and similar applications such as :
-staff kitchen areas in shops, offices and other working environments;
-farm houses and by clients in hotels, motels and other residential type environments;
-bed and breakfast type environments;
-catering and similar non-retail applications.
Do not store explosive substances such as aerosol cans with a flammable propellant in this appliance.
If the supply cord is damaged, it must be replaced by the manufacturer, its service agent or similarly qualified persons in order to avoid a hazard.
- WARNING — Keep ventilation openings, in the appliance enclosure or in the built-in structure, clear of obstruction.
- WARNING — Do not use mechanical devices or other means to accelerate the defrosting process, other than those recommended by the manufacturer.
▶ WARNING — Do not damage the refrigerant circuit.
WARNING — Do not use electrical appliances inside the food storage compartments of the appliance, unless they are of the type recommended by the manufacturer.
The refrigerant and insulation blowing gas are flammable. When disposing of the appliance, do so only at an authorized waste disposal centre. Do not expose to flame.
WARNING —When positioning the appliance, ensure the supply cord is not trapped or damaged.
- WARNING—Fill with potable water only for the water container.
- WARNING —Do not locate multiple portable socketoutlets or portable power supplies at the rear of the appliance.
Replacing the LED
WARNING—The LED light must not be replaced by the user! If the LED light is damaged, contact the customer helpline for assistance.
Refrigerant
The refrigerant isobutene (R600a) is contained within the refrigerant circuit of the appliance, a natural gas with a high level of environmental compatibility, which is nevertheless flammable. During transportation and installation of the appliance, ensure that none of the components of the refrigerant circuit becomes damaged.
The refrigerant (R600a) is flammable.
WARNING — Refrigerators contain refrigerant and gases in the insulation. Refrigerant and gases must be disposed of professionally as they may cause eye injuries or ignition. Ensure that tubing of the refrigerant circuit is not damage prior to proper disposal.
Warning: Risk of fire/flammable materials
If the refrigerant circuit should be damaged:
- Avoid opening flames and sources of ignition. Thoroughly ventilate the room in which the appliance is situated.
It is dangerous to alter the specifications or modify this product in any way.
Any damage to the cord may cause a short circuit, fire, and/or electric shock.
Electrical safety
The power cord must not be lengthened.
Make sure that the power plug is not crushed or damaged. A crushed or damaged power plug may overheat and cause a fire.
Make sure that you can access the main plug of the appliance.
Do not pull the main cable.
If the power plug socket is loose, do not insert the power plug. There is a risk of electric shock or fire.
You must not operate the appliance without the interior lighting lamp cover.
The fridge is only applied with power supply of single phase alternating current of 220\~240V/50Hz. If fluctuation of voltage in the district of user is so large that the voltage exceeds the above scope, for safety sake, be sure to apply A.C. Automatic voltage regulator of more than 350W to the fridge. The fridge must employ a special power socket instead of common one with other electric appliances. Its plug must match the socket with ground wire.
Daily use
Do not store flammable gass or liquids in the appliance, There is a risk of an explosion.
Do not operate any electrical appliances in the appliance (e.g.electric ice cream makers,mixers etc.).
When unplugging always pull the plug from the mains socket, do not pull on the cable.
Do not place hot items near the plastic components of this appliance.
Do not place food products directly against the air outlet on the rear wall.
Store pre-packed frozen food in accordance with the frozen food manufacture's instructions.
The appliances manufactures storage recommendations should be strictly adhered to. Refer to relevant instructions for storage.
Do not place carbonated or fizzy drinks in the freeze compartment as it creates pressure on the container, which may cause it to explode, resulting in damage to the appliance.
➢ Frozen food can cause frost burns if consumed straight from the freezer compartment.
Do not place the appliance in direct sunlight.
Keep buring candles, lamps and other items with naked flames away from the appliance so that do not set the appliance on fire.
The appliance is intended for keeping food stuff and/or beverages in normal household as explained in this instruction booklet The appliance is heavy. Care should be taken when moving it.
Do not remove nor touch items from the freezer compartment if your hands are damp/wet, as this could cause skin abrasions or frost/freezer burns.
▶ Never use the base, drawers, doors etc. to stand on or as supports.
➢ Frozen food must not be refrozen once it has been thawed out.
Do not consume ice popsicles or ice cubes straight from the freezer as this can cause freezer burn to the mouth and lips.
To avoid items falling and causing injury or damage to the appliance, do not overload the door racks or put too much food in the crisper drawers.
- WARNING - Food needs to be packed into bags before it is put into the refrigerator. Liquids need to be stored in bottles or capped containers in order to avoid a spill, as the design structure of the product is not easy to clean.
This refrigerating appliance is not intended to be used as a built-in appliance.

Caution!
Care and cleaning
Before maintenance, switch off the appliance and disconnect the mains plug from the mains socket.
Do not clean the appliance with metal objects, steam cleaner, ethereal oils, organic solvents or abrasive cleansers.
Do not use sharp objects to remove frost from the appliance. Use a plastic scraper.
Installation Important
For electrical connection carefully, follow the instructions given in this manual.
▶ Unpack the appliance and check if there are damages on it. Do not connect the appliance if it is damaged. Report possible damages immediately to the place you bought it. In this case retain packing.
It is advisable to wait at least four hours before connecting the appliance to allow the oil to flow back in the compressor.
Adequate air circulation should be around the appliance, lacking this leads to overheating. To
achieve sufficient ventilation, follow the instructions relevant to installation. Wherever possible the back of the product should not be too close to a wall to avoid catching warm parts (compressor, condenser) to prevent the risk of a fire, follow the instructions relevant to installation. touching or catching warm parts (compressor, condenser) to prevent the risk of a fire, follow the instructions relevant to installation.
The appliance must not be locate close to radiators or cookers.
Make sure that the mains plug is accessible after the installation of the appliance
Service
▶ Any electrical work required to do the servicing of the appliance should be carried out by qualified electrician or competent person.
This product must be serviced by an authorized Service Center, and only genuine spare parts must be used.
- If the appliance is Frost Free.
- If the appliance contains freezer compartment.
Proper Disposal of Your Old Refrigerator

WARNING
Suffocation Hazard
Remove doors from your old refrigerator.
Failure to do so can result in death or brain damage.
IMPORTANT: Child entrapment and suffocation are not problems of the past. Junked or abandoned refrigerators are still dangerous—even if they will sit for “just a few days.” If you are getting rid of your old refrigerator, please follow these instructions to help prevent accidents.
Before You Throw Away Your Old Refrigerator or Freezer:
• Take off the doors.
- Leave the shelves in place so that children may not easily climb inside.
Important information to know about disposal of refrigerants:
Dispose of refrigerator in accordance with Federal and Local regulations. Refrigerants must be evacuated by a licensed, EPA certified refrigerant technician in accordance with established procedures.
Parts and Features
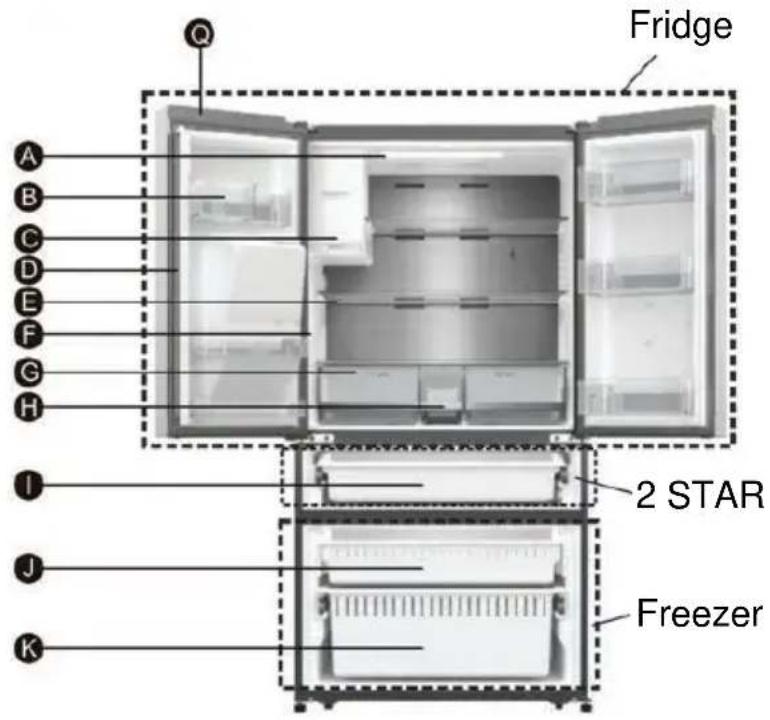
text_image
Fridge A B C D E F G H I J K 2 STAR Freezer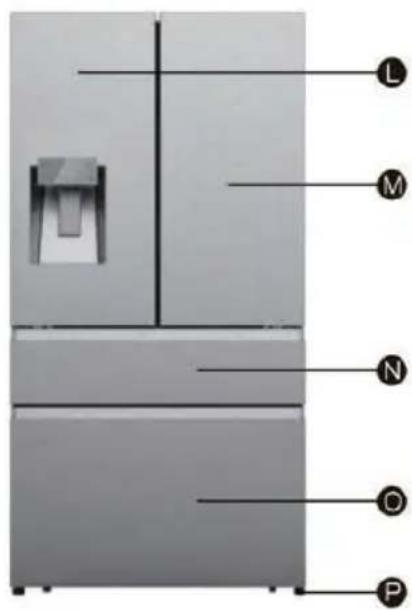
text_image
L M N C PA Refrigerator LED Light
B Refrigerator Door Bin
© Ice-Maker
D Rotary Separator
E Glass Shelf
F Refrigerator Side Light
G Storage Drawer
H Water Storage Box
My Fresh Choice Drawer
J Freezer Drawer
K Down Freezer Drawer
L Fridge Door Left
M Fridge Door Right
N My Fresh Choice Door
Freezer Door
P Leveling Leg
Wi-Fi Module
NOTE: Your model may look different from this and other images in this manual, depending on your model's features.
NOTE: To get the best energy efficiency of this product, please place all shelves, drawers on their original position as the illustration above.
Location Requirements

WARNING
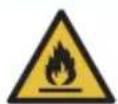
Risk of fire/ flammable materials
Keep flammable materials and vapors, such as gasoline, away from appliance. Failure to do so can result in death, explosion or fire.
IMPORTANT: This refrigerator is designed for indoor, household use only.
Temperature
This refrigerator is intended for use in a location where the temperature ranges from a minimum of 16^ C to a maximum of 43^ C. The preferred room temperature range for optimum performance, which reduces electricity usage and provides superior cooling, is between 16^ C and 32^ C. It is recommended that you do not install the refrigerator near a heat source, such as an oven or radiator.
Exterior and Dimensions
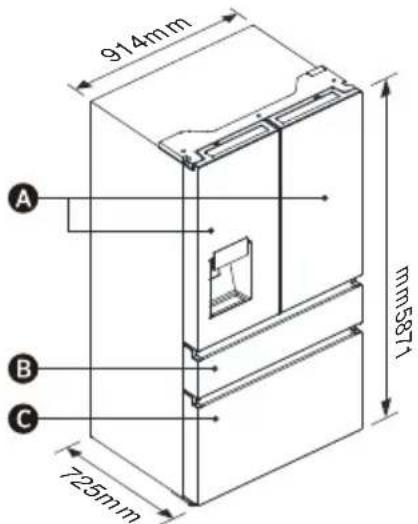
text_image
914mm mm5871 A B C 725mmA Refrigerator doors
B My fresh choice door
© Freezer door
Ventilation
Adequate air circulation around the refrigerator is required for efficient operation.
To ensure proper ventilation, maintain the recommended clearances.
Recommender Clearances
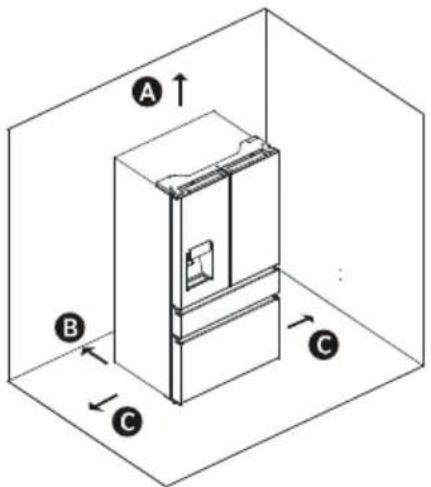
text_image
A B CA 100mm Above
B 50mm Behind
C 50mm Each Side
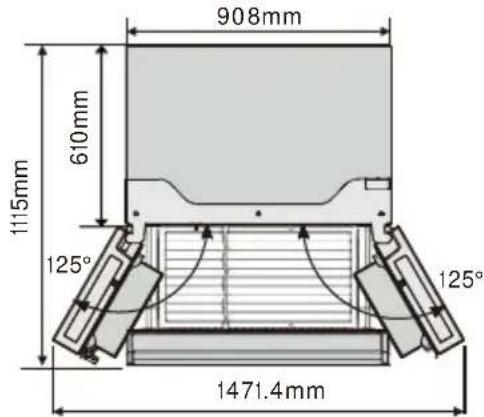
NOTE: If you place the refrigerator next to a fixed wall, leave 1471.4mm minimum space to allow the door to swing open.
Electrical Requirements

WARNING
Electrical Shock Hazard
Plug into a grounder 3 prong outlet.
Do not remove the ground prong from the power cord plug.
Do not use an adapter.
Do not use an extension cord.
Failure to do so can result in death, fire or electrical shock.
Before you move your refrigerator into its final location, it is important to make sure you have the proper electrical connection.
Recommender Grounding Method
AC 220-240 volt, 50 Hz, AC only 15- or 20-amp fused, grounded electrical supply is required. It is recommended that a separate circuit serving only your refrigerator is provided. Use an outlet that cannot be turned off by a switch. Do not use an extension cord.
NOTE: Before performing any type of installation or cleaning, disconnect the refrigerator from the electrical source. When you have finished, reconnect the refrigerator to the electrical source and reset the temperature controls to the desired setting.
Unpack the Refrigerator
WARNING
Fire or Explosion Hazard
Do not puncture refrigerant tubing.
Follow handling instructions carefully.
Flammable refrigerant used.
Failure to do so can result in death, explosion or fire.
IMPORTANT: Handle with care when moving refrigerator to avoid either damaging the refrigerant tubing or increasing the risk of a leak.
WARNING
Excessive Weight Hazard
Use two or more people to move and install refrigerator.
Failure to do so can result in back or other injury.
Remove the Packaging
- Remove tape and glue residue from surfaces before turning on the refrigerator. Rub a small amount of liquid dish soap over the adhesive with your fingers. Wipe with warm water and dry.
NOTE: Do not use sharp instruments, rubbing alcohol, flammable fluids, or abrasive cleaners to remove tape or glue. These products can damage the surface of your refrigerator. For more information, see "Refrigerator Safety."
- Dispose of/recycle all packaging materials.
- If the refrigerator has been placed in a horizontal or tilted position for any period of time, wait 4 hours before plugging it in to allow the oil to settle into the compressor.
When Moving Your Refrigerator:
Your refrigerator is heavy. When moving the refrigerator for cleaning or service, be sure to cover the floor with cardboard or hardboard to avoid floor damage. Always pull the refrigerator straight out when moving it.
Do not wiggle or "walk" the refrigerator when trying to move it, as floor damage could occur.
Clean Before Using
After you remove all of the packaging materials, clean the inside of the refrigerator before using it. See the cleaning instructions in "Refrigerator Care."
Important information to know about glass shelves and covers:
Do not clean glass shelves or covers with warm water when they are cold. Shelves and covers may break if exposed to sudden temperature changes or impact, such as bumping. Tempered glass is designed to shatter into many small, pebble-size pieces. This is normal. Glass shelves and covers are heavy. Use both hands when removing them to avoid dropping.
Installation Positioning
- This application perform well from SN to ST. The Appliance may not work properly if it is left for a longer period at a temperature above or below the indicated range.
| Climate class | Ambient temperature |
| SN | +10°C to +32°C |
| N | +16°C to +32°C |
| ST | +16°C to +38°C |
| T | +16°C to +43°C |
Door Removal (only if needed)
Measure the refrigerator to make sure it will fit through the doorway. If the refrigerator cannot pass easily through the doorway, follow the instructions to remove the two refrigerator compartment doors and the front panel of the freezer drawer.
WARNING
Electrical Shock Hazard
Disconnect power before removing doors. Reconnect ground wire before operating. Failure to do so could result in death or electric shock.
Tools you will need (Not provided)
| Allen Wrench (4mm) | Wrench (8mm) |
| Philips Screwdriver | |
Remove the Doors
IMPORTANT: Keep the refrigerator doors closed until you are ready to lift them from the cabinet.
- Unplug refrigerator or disconnect power.
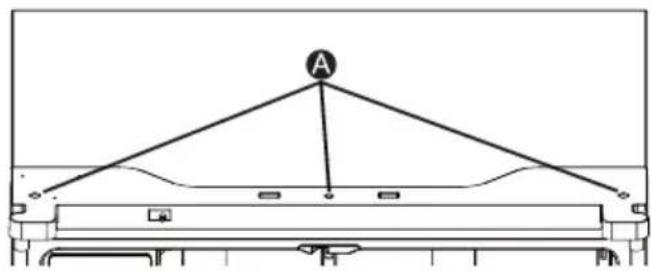
- Using a Phillips screwdriver, remove the three screws attaching the hinge cover, and then remove the hinge cover with the entire harnesses attached.
text_image
AA Screws
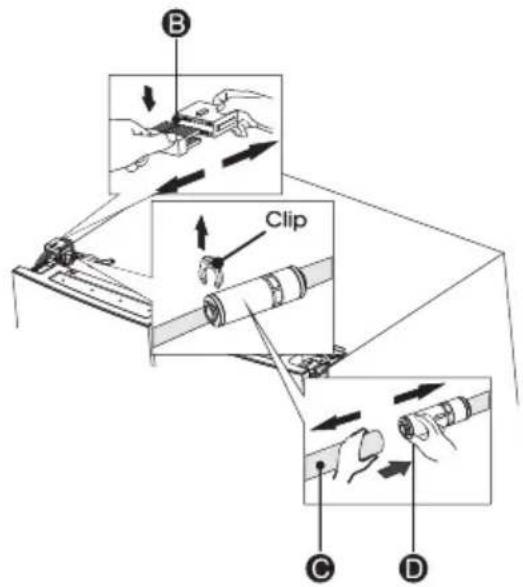
- Separate the two connectors on the left side door. To remove the wire connector, press the top of the connector (B) and separate it from the other one. To remove the water coupler from the hinge, twist and pull the clips from the coupler.
Remove the water line (C) while pressing the movable part (D) of the water line coupler.
text_image
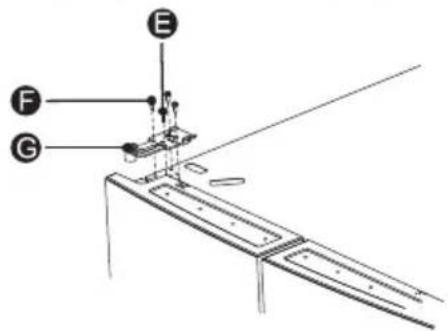
B Clip C D- Remove the 3 screws (E) fixed on the hinges, with a Wrench (8mm) and 1 ground screws (F) attached to the hinge with Philips (+) screwdriver. Remove the upper left door hinge (G).
text_image
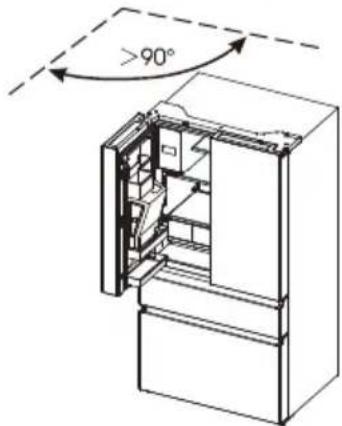
Technical diagram showing labeled components E, F, and G for a mechanical assembly or assembly process.- Use your both hands to open the door more than 90°. Lift it up and take it off.
text_image
>90°- If necessary, remove the 2 hex head bolts hinges (I) with an Allen wrench (5 mm). Remove the lower left door hinge (H).
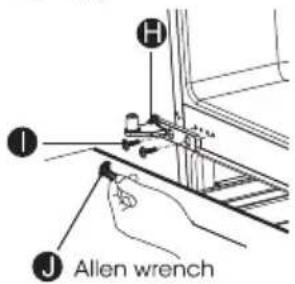
text_image
H I J Allen wrenchReplace the Doors
- If removed, reinstall the bottom hinge.
- Using two or more people, set the refrigerator door onto the bottom hinge.
- Insert the top hinge into the top of the door.
- Using the three screws removed earlier, fasten the top hinge to the top of the cabinet.
NOTE: Left-hand door only, replace the ground screw into the top hinge, reattach the wire harness, reconnect the water line, make sure the clips are properly connected to the coupler. - Repeat steps 1 through 4 to replace the opposite door.
- Using the three screws removed earlier, reinstall the top hinge cover and control panel to the top of the cabinet.
Use of water storage box
- The user pulls out the ice box in the direction of the arrow.
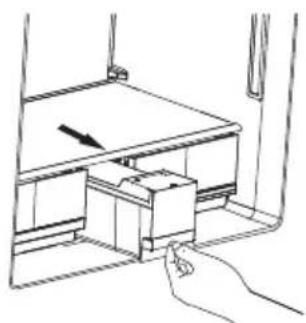
natural_image
Line drawing of a hand inserting a component into a cabinet (no text or symbols)- Open the lid of the ice box and add water to it.
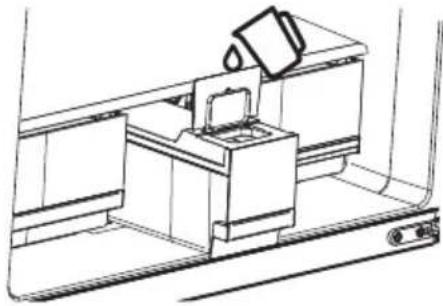
natural_image
Line drawing of a desk setup with a coffee cup pouring liquid from a tray (no text or symbols)- Close the lid and push back into the ice box in the direction of the arrow.
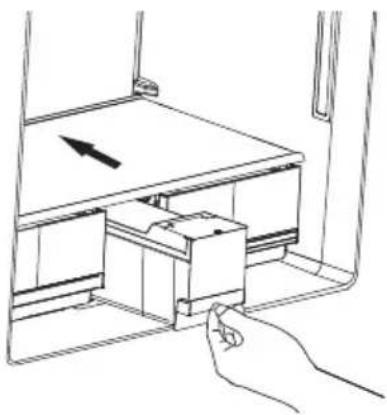
natural_image
Line drawing of a hand inserting a device into a cabinet (no text or symbols)NOTE: 1. The ice box can hold up to 4.2L of water.
-
If the water storage box is not in place, the icon "☐" on the control panel flashes.
-
If the user has more than 7 days of travel planned, it is recommended to clean the ice.
-
When the tank is repositioned, the pump will reverse the water from the ice maker. After about a minute, a few drops of water will fall out of the ice outlet, which is normal.
Complete the Installation

WARNING
Electrical Shock Hazard
Plug into a grounded 3 prong outlet.
Do not remove the ground prong from the power cord plug.
Do not use an adapter.
Do not use an extension cord.
Failure to do so can result in death, fire or electrical shock.
- Plug into a grounded 3 prong outlet.
NOTE: This refrigerator begins operating as soon as it is connected to the power supply.
- Move the refrigerator into its final location, making sure to maintain the recommended clearance.
Level Refrigerator (if needed)
The refrigerator must be level to maintain optimal performance and appearance.
-
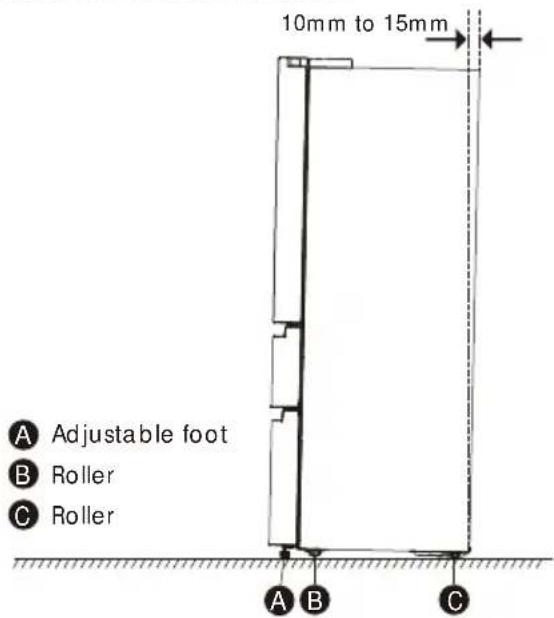
Turn the leveling feet on the bottom, front of the cabinet to raise or lower that side of the refrigerator until the refrigerator is level side to-side.
-
Turn both feet by the same amount, to slightly raise the front of the refrigerator. This will make it easier for the doors to close.
text_image
10mm to 15mm A Adjustable foot B Roller C Roller A B CNOTE: Having someone push against the top of the refrigerator takes some weight off the leveling feet. This makes it easier to turn the feet. Rotate the adjustable feet clockwise to raise or counter-clockwise to lower your refrigerator. To make sure that the doors close automatically, tilt the top of your refrigerator backward about 10mm to 15mm. If necessary, use a spanner wrench to adjust the feet.
Align Doors (if needed)
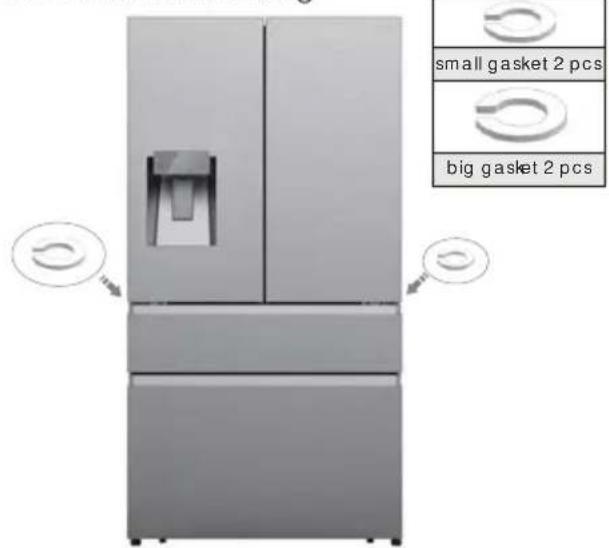
The gaskets are used to align doors, you can find them in the manual bag.
text_image
small gasket 2 pcs big gasket 2 pcsRefrigerator Use
Opening and Closing Doors
Providing room for doors to open
Make sure that you have enough room in front of your refrigerator to swing the doors open.
text_image
908mm 610mm 1115mm 125° 1471.4mm 125°The four doors can be opened and closed either separately or together.
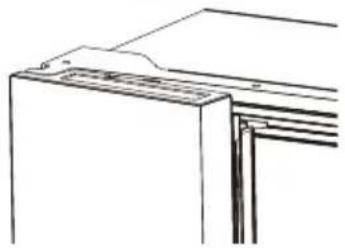
- There is a mullion on the left-hand side refrigerator compartment door.
- When closing the left-hand door, the mullion folds behind the right-hand door joining the two doors.
• The temperature of the door frame is controlled
to help prevent moisture from developing on the mullion. The temperature of the surface may be warm, which is normal, and will not affect the performance of the refrigerator.
natural_image
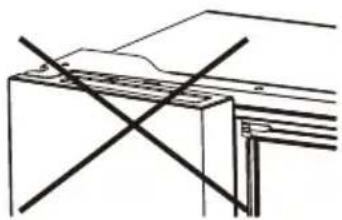
Pure technical line drawing of a mechanical or architectural component without any text, numbers, or symbolsNOTE: Before closing the left-hand door, make sure the mullion is folded inward. If the mullion is pulled outward it may become damaged when you try to close the door.
natural_image
Pure technical line drawing of a mechanical assembly with intersecting diagonal lines (no text or symbols)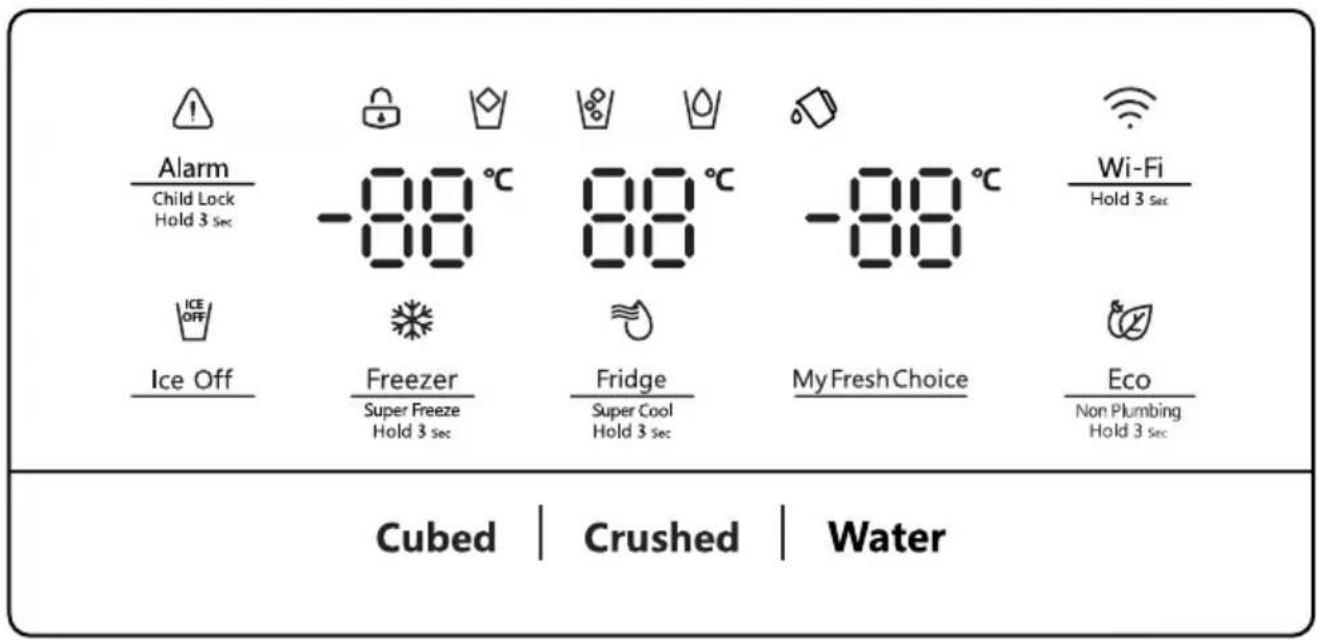
text_image
Alarm Child Lock Hold 3 sec ICE OFF Ice Off Freezer Super Freeze Hold 3 sec 80°C 80°C Fridge Super Cool Hold 3 sec 80°C 80°C My Fresh Choice Wi-Fi Hold 3 sec Eco Non Plumbing Hold 3 sec Cubed | Crushed | WaterWhen the appliance is powered on for the first time, the backlighting of the icons on the display panel starts working. If no buttons have been touched and the doors are closed, the backlighting will turn off after 60 seconds.
Caution!
When you set a temperature, you set an average temperature for the whole Refrigerate cabinet. Temperatures inside each compartment may vary from the temperatures displayed on the panel, depending on how much food you store and where you place it. High or low room temperature may also affect the actual temperature inside the appliance.

Alarm Child Lock and Door
This button serves two purposes:
- Child Lock
Press and hold Alarm key for 3 seconds to lock the all the Control Panel including dispenser function. If Control panel is locked, the icon " 🔊" will be on, and none of the key on the Control panel work. To unlock the Control panel, please press and hold Alarm key for 3 seconds again.
- Door Alarm
In case of alarm, "⚠️" icon will flicker and a buzzing sound will be heard. Touch Alarm key to clear alarm, then the "
⚠ " icon will stop flickering and keep on, the buzzing will stop at the same time. When the door of fridge, variation
or freezer is open over 2 minutes, the door alarm will come on. The "⚠️" icon will flicker, the control panel will display "dr", and you will hear a buzzer sound. The buzzer will sound 3 times per minute and will stop after 8 minutes. Also it can be stopped by closing all the doors. When Child Lock is off, and the doors are open, you can turn alarm off by touching Alarm key.
Note: To save energy, please avoid keeping doors open for a long time when using Refrigerate.
Ice Off
This key controls the ice maker. You can touch Ice Off key to control the ice maker. When the Child Lock is off, and
the ice function is on, you can touch the Ice Off key to lock the ice maker, and the icon "ICE OFF" will be illuminated. If you want to unlock the ice maker, please touch the Ice Off key again, and the icon "ICE OFF" will be off.
Note: When the "ICE OFF" is on, it only lock the ice maker not the dispenser.

Fridge temperature control
You can touch the Fridge key to activate the mode to control the fridge temperature. When you touch the key continuously, the temperature will be set in the following sequence.

chemical
Temperature range diagram for a substance with labeled degrees CelsiusIf you want to decrease the time needed to cool products in the Fridge, please touch and hold this key for 3 seconds, the super cool icon " &=" will be illuminated, the fridge temperature setting displays 2°C.
Super cool automatically switches off after 3 hours, and the Refrigerate temperature setting will revert back to the previous setting.
When super cool function is on, you can touch the Fridge key to switch it off. The fridge will not retain the Super Cool function when power off.
Note: On the Super Cool function, when you touch the Eco key, Eco function will be activated, and Super Cool mode will be off.
Freezer temperature control
Super Freeze 3. You can touch the Freezer key to activate the mode to control the freezer temperature. When you press the key continuously, the temperature will be set in the following sequence.

Press and hold the Freezer key for 3 seconds, the icon " ✪" will be illuminated the freezer temperature setting displays -24°C.
Super Freeze can quickly lower the temperature and freeze your food faster than usual. This can retain more of the vitamins and nutrition in fresh food and keep your food longer.
Super freeze automatically switches off after 52 hours, and the freezer temperature setting will revert back to the previous setting.
When the super freeze function is on, you can touch Freezer key to switch off the Super Freeze function. And it will not retain the Super Freeze function when power off.
To freeze fresh food activate the SuperFreeze function at least 24 hours before placing the food to complete pre-freezing.
Note:
- On the Super Freezer Function, when you touch the Eco Key, Eco function will be activated, and Super Freezer mode will be off.
- When selecting the Super Freeze function. ensure there are no bottles in the freezer compartment. Bottles and cans may explode.
My Fresh Choice
My Fresh Choice
Temperature Control
You can touch the My Fresh Choice key to activate the mode to control the convertible compartment temperature.
When you press the button continuously, the temperature will be set in the
following sequence.

chemical
Temperature range diagram showing 5°C to -17°C with directional arrows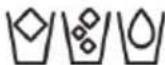
Dispenser control
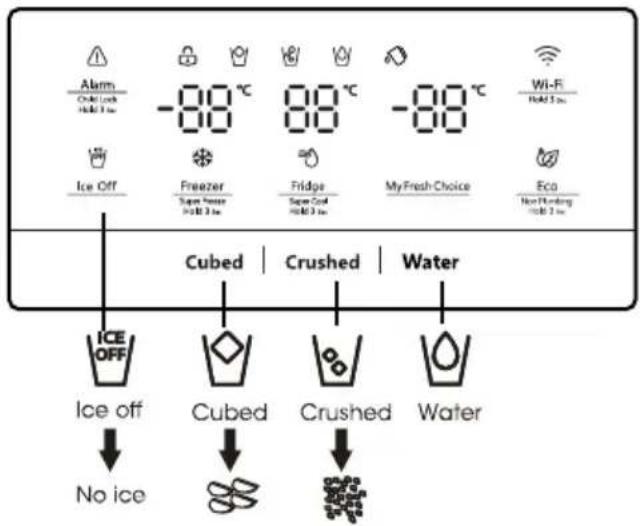
When the Child Lock is on, the dispenser will not work. When the Child Lock is off, You can press the "Cubed" or "Crushed" option to choose the type of Ice to be dispensed, and press the "Water" button will activate the water mode. If you choose the function of cubed, the "icon will be illuminated; If you choose the function of Crushed, the "icon will be illuminated, and the "icon will be illuminated when Water function be chose. If you don't need ice, turn the function off to save on water and energy consumption. (See Ice Off above.)

Eco
Non Plumbing 3 sec You can touch this key to turn Eco mode on and off. When you turn Eco on, the Eco icon
" 🔒 " lights. The temperature of the fridge is automatically switched to 6°C and the freezer to -17°C. If Eco mode is off, the icon " 🔒" will go off and the temperature setting will revert back to the previous setting.
Tank reset icon
If the water tank is not installed in place, the icon will flicker. If the water tank is installed in place, the icon " 🔍 " will be extinguished. when the icon " 🔍 " flicker , long press the Eco key 3 seconds to cancel tank alarm and the
icon will be extinguished.
Note: If you need to make ice, you still need to put the tank in place.
Demo mode
Demo mode is for store display, and it prevents the Refrigerate from generating cool air. In this Cooling off Mode, the Refrigerate may seem like it is working but it not make cool air. The indicators on the control panel will show "OF". To cancel this mode, press and hold
" Alarm " and " WI-FI " keys at the same time for 3 seconds and buzzing a long sound.
Wi-Fi function
This appliance may be controlled remotely with a smart phone or a tablet computer. If the appliance is not connected to the home network, it will function like a regular appliance.
What do you need to connect the appliance?
- Signal from the local wireless network (Wi-Fi) should be sufficiently strong in the spot where the appliance is installed.
• Home network router has to be connected to the internet, and the Wi-Fi function on the appliance should be activated. - The smart phone/tablet computer has to be connected to the internet. Operating system on your smart phone/tablet computer should be compatible with the ConnectLife app.
ConnectLife App
The ConnectLife App is available to download free of charge from the Apple App Store or from the Google Play Store.
Installing the ConnectLife app
-
Go to the App Store (on Apple devices), AppGallery (on Huawei devices) or Google Play Store (on Android devices) on your phone/tablet computer.
-
Search for " ConnectLife".
- Choose the ConnectLife app and install it on your smart phone/tablet computer.
INFORMATION!
We recommend downloading and installing the mobile app and creating a ConnectLife account before attempting to set up the connection with your appliance.
CONNECT APPLIANCE TO Wi-Fi
After activating the Wi-Fi function, connect your device to your home router in order to connect your appliance with the ConnectLife mobile app.
Step 1: Set the appliance to normal operation. Touch the Wi-Fi key for approximately 3 seconds. You entered network connection menu when '--' appears in the display.
Step 2: Touch the Fridge key to select '0' within 60 seconds.
Step 3: Touch the Wi-Fi key to confirm the selection mode. The Wi-Fi symbol starts blinking and the network of this appliance is now open to connect to, for 5 minutes.
Step 4: When the Wi-Fi symbol is on, it means that the Wi-Fi connection is successful. The display will return to normal.
PAIR APPLIANCE
The appliance can be paired with your mobile device. Simply pair another user to your appliance. This requires, that your appliance was already set up before and is connected to your home network. If not, go back and select.
CONNECTION SETUP.
Step 1: Set the appliance to normal operation. Touch the Wi-Fi key for approximately 3 seconds. You entered network connection menu when '--'.
Step 2: Touch the Fridge key to select 'P' within 60 seconds.
Step 3: Touch the Wi-Fi key to confirm the selection mode. The PAIR network of this appliance is now open to connect to, for 5 minutes.
Step 4: When the display returns to normal, it means the PAIR connection is successful.
UNBIND ALL PAIR APPLIANCE
By activating this function, the appliance will be removed from all paired app user accounts.
Step 1: Set the appliance to normal operation. Touch the Wi-Fi key for approximately 3 seconds. You entered network connection menu when '--' appears in the display.
Step 2: Touch the Fridge key to select '88' within 60 seconds.
Step 3: Touch the Wi-Fi key to confirm the selection mode to realize unbinding.
Step 4: After the device is unbound, it will automatically enter the distribution network state, the Wi-Fi icon flashes, and the distribution network time is up to 5 minutes.
Features
Important information to know about glass shelves and covers:
Do not clean glass shelves or covers with warm water when they are cold. Shelves and covers may break if exposed to sudden temperature changes or impact, such as bumping. Tempered glass is designed to shatter into many small, pebble-size pieces. This is normal. Glass shelves and covers are heavy. Use both hands when removing them to avoid dropping.
1. Refrigerator
IMPORTANT: To avoid damage to the doors, make sure all shelves and drawers are pushed fully into the cabinet before closing a door.
Adjustable Shelves
The height of the shelves can be adjusted to fit your storage needs.
- To remove a shelf, gently lift upward and then pull the shelf forward until the end of the shelf passes the rail support.
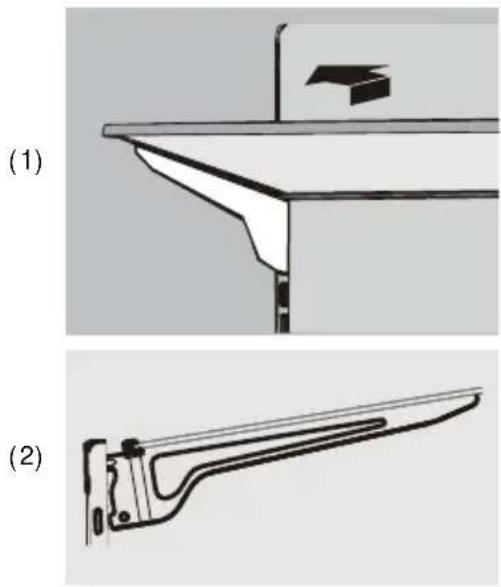
- To reinstall a shelf, gently slide the shelf back into the refrigerator compartment, and lower the shelf onto the rail support.
2. Removable door bins
The bins located in the middle of the door are adjustable.
To Remove and Replace a Door Bin:
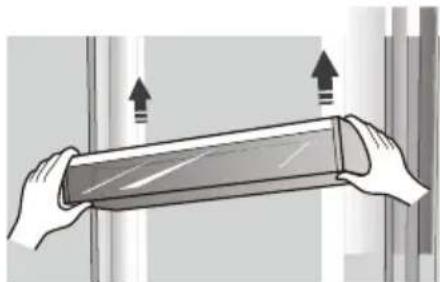
- Place hands on both sides of the bin and lift upward.
- Pull the door bin out.
- Replace the door bin by inserting it above the support and pressing down to snap into place.
natural_image
Illustration of two hands holding a transparent cylindrical object with upward arrows indicating motion or force (no text or symbols)NOTE: The quality of your ice will be only as good as the quality of the water supplied to your ice maker. Avoid connecting the ice maker to a softened water supply. Water softener chemicals (such as salt) can damage parts of the ice maker and lead to poor quality ice. If a softened water supply cannot be avoided, make sure the water softener is operating properly and is well-maintained.
3. Removing/Replacing freezer drawer
natural_image
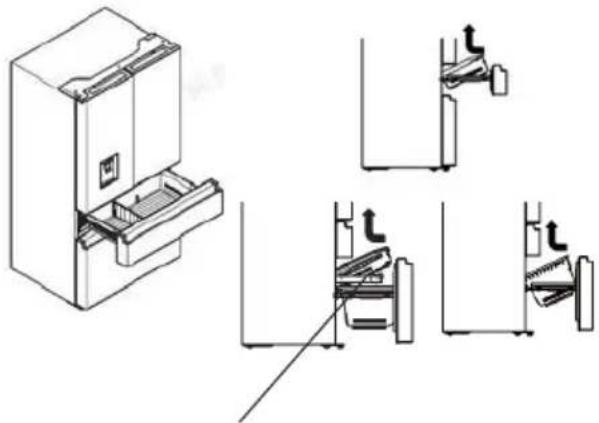
Technical line drawing of a refrigerator with three views showing internal components (no text or symbols)NOTE: Unscrew the drawer before taking it out.
- Pull out d rawer to maximum extension.
- Lift up to remove the drawer.
- Reverse steps 1 and 2 to replace the drawer.
4. Getting cold water and ice
Push the appropriate ice or water type button to select what you want to dispense.
text_image
Alarm On/Ock hold 1 in -80 °C Wi-Fi hold 1 in Ice Off Freezer Sugar Power hold 2 in Fridge Sugar Coat hold 3 in My Fresh Choice Eco Non-Holding hold 2 in Cubed | Crushed | Water ICE OFF Ice off No ice Cubed Crushed WaterGetting cold water
The water dispenser is located in the fridge door. To get water, push the water button. Then move your glass down to the dispenser lever (A) in the suggested position and press it.
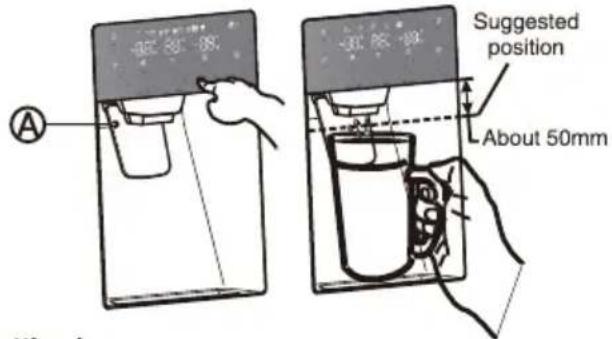
text_image
A Suggested position About 50mmGetting ice
To get ice, push the cubed or crushed ice button as required. Then move your glass down to the dispenser lever in the suggested position and press it.
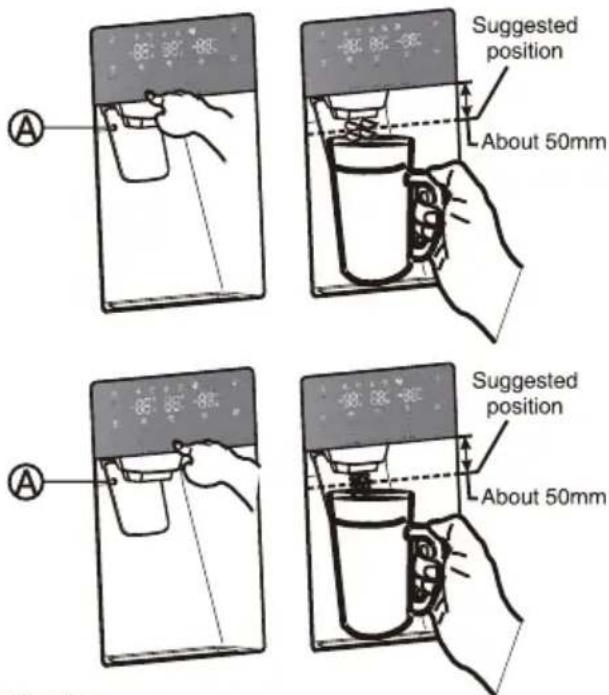
Making ice
• To fill the ice bucket to maximum capacity after installation, follow these steps:
- Allow your refrigerator to operate and cool down for 24 hours (or 1 full day). Waiting 24 hours will allow your ice maker to cool properly.
- Dispense 4 to 6 ice cubes into the glass.
- After 8, and then 16 hours, dispense a full glass of ice.
Warning:
Do not put food in the ice bucket. If you store food in the ice bucket, the food can strike the ice maker when you open or close the door, causing damage to the ice maker.
Note that the ice cubes in the ice bucket may spill out over the drawer. If this occurs, be sure to clear the ice cubes that spilled out of the drawer.
- If a power failure occurs, ice cubes may melt, and
then freeze together when the power comes back on, causing the dispenser to stop working.
• To prevent this problem, after a power failure, pull out the ice bucket and residual ice or water.
Note:
- Don't push the water dispenser lever forward without a cup below since it may cause water spilling.
• To avoid cold air leaking out from cabinet, keep the water dispenser still installed even if the dispenser is not in use.
Using the ice off function
When you select the ice off mode, remove all ice cubes from the bucket.
If you leave the ice cubes in the bucket, the ice cubes may clump together, making it difficult to remove them.
First, open the door at the maximum Angle.
Then, lift up on the ice bucket, and pull it straight out in the direction of the arrow.
To put the ice bucket in, push it firmly straight back. If the bucket does not fit, turn the helix 90 degree (see the last illustration on the right, below) and try again.
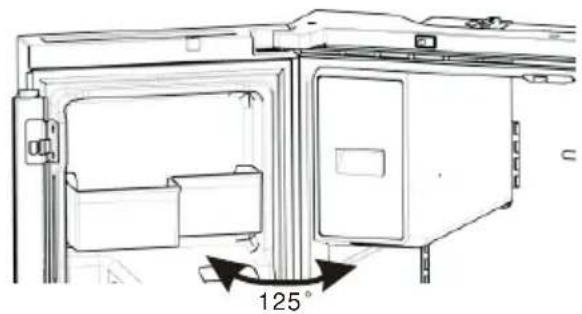
natural_image
Technical line drawing of a mechanical assembly with a 125° angle标注 (no text or symbols beyond the angle marker)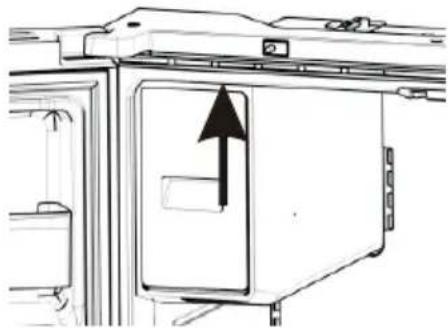
natural_image
Diagram of a refrigerator interior with an upward arrow indicating direction (no text or symbols present)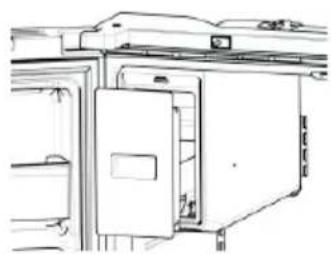
natural_image
Line drawing of a refrigerator with doors and refrigerators (no text or symbols)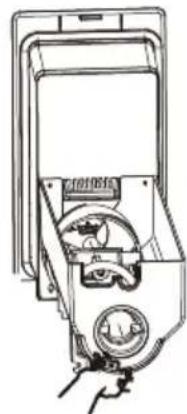
natural_image
Line drawing of a hand holding a device with a dial and control panel (no text or symbols)NOTE:
- The inside of the ice bucket is very cold when the refrigerator is operating. Don't reach deep inside the ice bucket.
- Use only the ice maker provided with the refrigerator. The water supply to this refrigerator must only be installed by a qualified person.
• To operate the ice maker properly, water pressure of 30\~125 psi is required.
Going on vacation
If you have a long vacation or business trip and won't use the water or ice dispensers for a long time:
- Close the water valve. Otherwise, water leakage may occur.
- Remove all food.
- Unplug the refrigerator.
- Wipe excess moisture from inside and leave the doors open. Otherwise, odor and mold may develop.
Warning:
- Do not put your fingers, hands or any other unsuitable objects in the chute or ice-maker bucket. It may result in personal injury or material damage.
- Never put your fingers or any other objects in the dispenser opening. It may cause injury.
- Do not try to disassemble the ice maker.
- Do not wash or spray the ice bucket with water while it is in the refrigerator. Remove it to clean.
Water clouding phenomenon
All water provided to the refrigerator flows through the filter which is an alkaline water filter. In the filtering process, the pressure of the water that has flowed out of the filter is increased, and the water becomes saturated with oxygen and nitrogen. When this water flows out into the air, the pressure plummets and the oxygen and nitrogen get supersaturated, which results in gas bubbles. The water may temporarily look misty or cloudy due to these oxygen bubbles. After a few seconds, the water will look clear.
Cleaning
After using for a period, water accumulated in receiving tank might overflow, thus you should clean it with dry towel regularly to avoid water spilling out onto the floor.
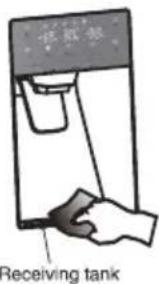
text_image
红灯瓶 Receiving tankNOTE:
In case of stained by dust or other pollutant, dispensing water with unpleasant smell, etc., water dispenser parts should be cleaned thoroughly.
6. Using your fridge compartment
The refrigerator compartment is suitable for storage of vegetables and fruit. Food inside should be packed to store in order to avoid losing moisture or flavor permeating into other foods.
Caution
Never close the refrigerator door while the shelves, crisper and/or telescopic slides are extended. It may damage both them and the refrigerator.
Door baskets
The refrigerator compartment is provided with several different door baskets, which are suitable for the storage of canned liquid, bottled drinks and packed food.
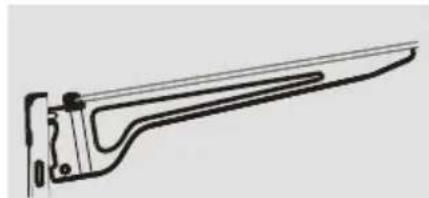
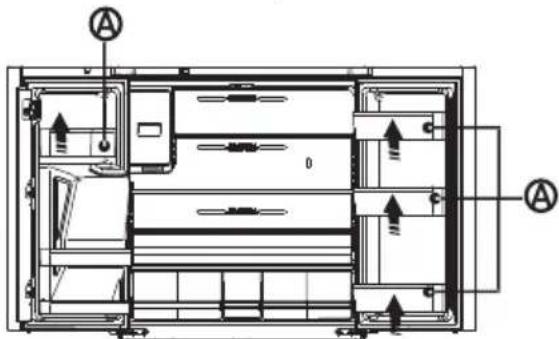
To remove the door baskets (A), simply lift the racks up and pull straight out.
To relocate the door baskets (A), slide them in above the desired location and push down until them stop.
text_image
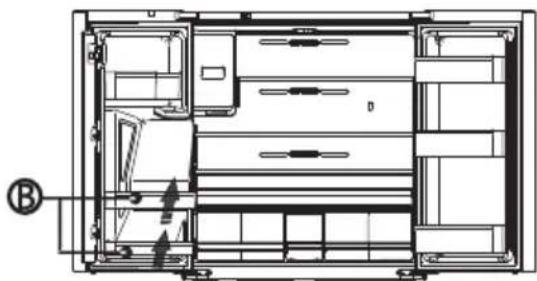
Technical diagram of a multi-chamber refrigerator with labeled components and directional arrows indicating airflow or movement.To remove the door baskets (B), take the right side of the baskets out by lifting it at an angle along the guide, and then take the left side out by pulling it from the door.
To relocate the door baskets (B), slide them into the original location and push down until them sticks.
natural_image
Architectural floor plan of a multi-level building with internal compartments and structural elements (no text or labels)Warning:
Do not place too many heavy things in the baskets. Before you lift up the door shelf vertically, please take the food out.
Glass shelves
To remove the glass shelves, tilt up the front of the shelf shown in Page19 (1) and lift it up vertically shown in Page19 (2). Then pull the shelf out.
General Use Information
- When first turning on refrigerator after a period of non-use, allow the refrigerator to cool at least 2 hours before adding food.
- Do not block air circulation vents with stored
items.
- Store items so that the air can circulate freely around them.
- Cover or wrap stored food well to avoid transfer of odors.
- Once defrosted, food quality will deteriorate rapidly. Defrosted food should not be refrozen.
- Neither bottled nor canned drinks should be stored in the freezer compartment. Bottles and cans may explode.
To avoid contamination of food, please respect the following instructions: - Opening the door for long periods can cause
a significant increase of the temperature in the compartments of the appliance.
- Clean regularly the surfaces that can come in contact with food and accessible drainage systems.
- Store raw meat and fish in suitable containers in the refrigerator, so that it is not in contact with or drip onto other food.
- Two-star frozen-food compartments are suitable for storing pre-frozen food, storing or making ice-cream and making ice cubes.
- Two-star compartments are not suitable for the freezing of fresh food.
| Order | Compartments Type | Target storage temp.[°C] | Appropriate food |
| 1 | Fridge | +2~+8 | Eggs, cooked food, packaged food, fruits and vegetables, dairy products, cakes, drinks and other foods which are not suitable for freezing. |
| 2 | (***)*-Freezer | ≤-18 | Seafood (fish, shrimp, shellfish), freshwater aquatic products and meat products (recommended for 3 months ,the longer the storage time, the worse the taste and nutrition),suitable for frozen fresh food. |
| 3 | ***-Freezer | ≤-18 | Seafood (fish, shrimp, shellfish),freshwater aquatic products and meat products (recommended for 3 months, the longer the storage time, the worse the taste and nutrition),are not suitable for frozen fresh food. |
| 4 | **-Freezer | ≤-12 | Seafood (fish, shrimp, shellfish), freshwater aquatic products and meat products (recommended for 2 months, the longer the storage time, the worse the taste and nutrition), are not suitable for frozen fresh. food. |
| 5 | *-Freezer | ≤-6 | Seafood (fish, shrimp, shellfish), freshwater aquatic products and meat products (recommended for 1 month, the longer the storage time, the worse the taste and nutrition) are not suitable for frozen fresh food. |
| 6 | 0-star | -6~0 | Fresh pork, beef, fish, chicken, some packaged processed foods, etc. (Recommended to eat within the same day, preferably no later than 3 days).Partially encapsulated processed foods (non-freezable foods) |
| 7 | Chill | -2~+3 | Fresh/frozen pork, beef, chicken, freshwater aquatic products, etc.(7 days below 0°C and above 0°C is recommended for consumption within that day, preferably no more than 2 days).Seafood (less than 0°C for 15 days, it is not recommended to store above 0°C) |
| 8 | Fresh Food | 0~+4 | Fresh pork, beef, fish, chicken, cooked food, etc. (Recommended to eat within the same day, preferably no more than 3 days) |
| 9 | Wine | +5~+20 | Red wine, white wine, sparkling wine etc. |
NOTE: please store different foods according to the compartments or target storage temperature of your purchased products.
If the refrigerating appliance is left empty for long periods, switch off, defrost, clean, dry, and leave the
door open to prevent mould developing within the appliance.
Make sure the compliance is checked by regular inspections.
Refrigerator Care
Cleaning
Both the refrigerator and freezer sections defrost automatically. However, clean both sections about once a month to avoid buildup of odors. Wipe up spills immediately. To avoid odor transfer and drying out of food, wrap or cover foods tightly.

WARNING
Explosion Hazard
Use nonflammable cleaner.
Failure to do so can result in death, explosion or fire.
IMPORTANT:
- Do not use harsh chemicals, ammonia, chlorine bleach, concentrated detergent, solvents, abrasives or metal scouring pads to clean your refrigerator inside or out. They can damage and/or discolor the refrigerator finish.
- Do not use warm water to clean glass shelves while they are still cold. Glass may break when exposed to sudden temperature changes.
Shelf parts clean
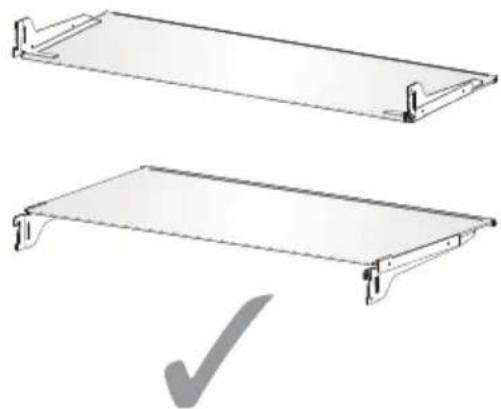
- When cleaning the shelf parts, remove the lower shelf parts and place them horizontally. Either front or back, to prevent the shelf support from falling off.
- If the shelf parts are placed at an angle, their sides will touch the ground. When the force applied for cleaning is not proper, the shelf bracket will easily fall off.
natural_image
Two views of a metal shelf panel with a checkmark indicating selection (no text or symbols present)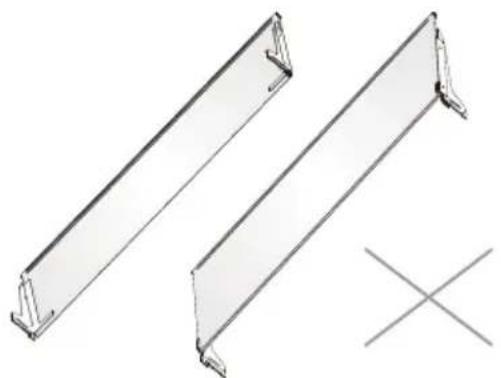
natural_image
Two metal structural panels with mounting brackets, one marked with a cross symbol (no text or labels present)
WARNING
Electrical Shock Hazard
Unplug your appliance or disconnect power before cleaning.
Failure to do so can result in death, electric shock or personal injury.
- Unplug refrigerator or disconnect power.
- Clean the interior.
Hand wash, rinse, and dry removable parts and interior surfaces thoroughly. Use a clean sponge or soft cloth and a mild detergent in warm water.
- Clean the door seals (gaskets). A dirty or sticky door seal may adhere to the cabinet and tear when you open the door.
Using a soft cloth and a solution of mild detergent and warm water, hand wash the door seals. Rinse with clear water and dry thoroughly.
- Clean the exterior surfaces.
Wash exterior surfaces with a clean, soft cloth or sponge and a mild detergent in warm water. Rinse surfaces with clean, warm water and dry immediately to avoid water spots.
- Plug in refrigerator or reconnect power.
Lights
This product contains a light source of energy efficiency classG on the top and side of the refrigerating chamber.
IMPORTANT: Your refrigerator is equipped with LED lighting. These lights are designed to last for the life of your refrigerator. However, if the lights stop operating, please contact a qualified technician for replacement.
Vacation and Moving Care
Vacation
If You Choose to Leave the Refrigerator On While You're Away:
- Use up any perishables and freeze other items.
If You Choose to Turn Off the Refrigerator Before You Leave:
- Remove all food from the refrigerator and freezer.
- Unplug refrigerator or disconnect power.
- Clean refrigerator, wipe it, and dry well.
- Tape rubber or wooden blocks to the tops of the two doors, and let them open a sufficient distance to let air in. This stops odor and mold from building up.
Moving
WARNING
Fire or Explosion Hazard
Do not puncture refrigerant tubing.
Follow handling instructions carefully.
Flammable refrigerant used.
Failure to do so can result in death, explosion or fire.
IMPORTANT: Handle with care when moving refrigerator to avoid either damaging the refrigerant tubing or increasing the risk of a leak.
WARNING
Excessive Weight Hazard
Use two or more people to move and install refrigerator.
Failure to do so can result in back or other injury
When you are moving your refrigerator to a new home, follow these steps to prepare it for the move.
- Remove all food from the refrigerator and pack all frozen food in dry ice.
- Unplug refrigerator.
- Clean, wipe, and dry thoroughly.
-
Take out all removable parts, wrap them well, and tape them together so they don't shift and rattle during the move.
-
Raise the leveling legs so they don't scrape the floor. See "Level Refrigerator."
- Seal the doors with tape and tape the power cord to the back of the refrigerator. When you get to your new home, put everything back and refer to the "Installation Instructions" section for preparation instructions.
Reinstalling/Using Refrigerator Again
If the refrigerator has been placed in a horizontal or tilted position for any period of time, wait 4 hours before plugging it in to allow the oil to settle into the compressor.
- Clean refrigerator. See "Cleaning."
- Place refrigerator in desired location and level. See "Installation Instructions."
WARNING
Electrical Shock Hazard
Plug into a grounded 3 prong outlet.
Do not remove the ground prong from the power cord plug.
Do not use an adapter.
Do not use an extension cord.
Failure to do so can result in death, fire or electrical shock.
- Plug into grounded 3 prong outlet.
Troubleshooting
Try the solutions suggested here first in order to avoid the cost of an unnecessary service call.
Refrigerator operation
| PROBLEM | POSSIBLE CAUSE(S) | SOLUTION |
| Refrigerator does not run | Refrigerator is unplugged. | Plug refrigerator into a grounded 3 prong outlet. |
| Breaker is tripped or turned off, or fuse is blown. | Reset/Turn on breaker or replace fuse. | |
| Refrigerator is in defrost mode. | Wait for defrost cycle to end and cooling system to restart. | |
| Refrigerator compressor runs frequently or for long periods of timeNote: This refrigerator is designed to run for longer periods of time at a lower energy usage. | Refrigerator is first plugged in. | This is normal. Allow 24 hours for the refrigerator to cool down. |
| Warm or large amounts of food added. | This is normal. | |
| Door is left open, or refrigerator is not level. | Check that an item is not preventing door from closing. Level the refrigerator. See "Level Refrigerator." | |
| Hot weather or frequent openings. | This is normal. | |
| Temperature control set to coldest setting. | Adjust temperature to a warmer setting. | |
| Refrigerator has an odor | Food is not sealed or packaged properly. | Reseal packaging. Place an opened box of baking soda in the refrigerator, replace every 3 months. |
| Interior needs to be cleaned. | Clean the interior. See "Cleaning." | |
| Food stored too long. | Dispose of spoiled food. | |
| Light does not come on | Refrigerator is unplugged. | Plug refrigerator into a grounded 3 prong outlet. |
| LED light is burned out. | Contact a qualified technician to replace the burned out LED. | |
| Doors do not close properly | Refrigerator is not level. | See "Level Refrigerator." |
| Something is obstructing door closure. | Check for and remove obstructions. | |
| Vibration or rattling | Refrigerator is not resting firmly on floor. | See "Level Refrigerator." |
| Normal Sounds | It sounds like water is flowing from the refrigerator. | Refrigerant flowing in the lines will make this sound when the compressor starts and stops. |
| The refrigerator has an automatic defrostling system. The defrosted water will make this sound. | ||
| Humming or buzzing sounds | The compressor and fans used for cold air circulation can make this sound. If the refrigerator is not level, the sound will be louder. | |
| Cracking or clicking sounds | The interior parts will make this sound as they contract and expand in response to temperature changes. | |
| Popping noise | May occur during automatic defrosting. |
Temperature and Moisture
| PROBLEM | POSSIBLE CAUSE(S) | SOLUTION |
| Refrigerator or freezer is too warm | Temperature control is not set cold enough. | Adjust the compartment to a colder setting; allow 24 hours for the temperature to adjust. |
| Doors opened frequently or left open. | Limit door openings to maintain the internal temperature. Check that an item is not preventing door from closing. | |
| Warm food added recently. | Allow time for food and refrigerator to cool. | |
| The space between the back of the refrigerator and the wall is too close. | Allow 5 cm space between the back of the refrigerator and the wall. | |
| Items against back of compartments are blocking proper airflow. | Store items only inside the trim of the glass shelves; don't place items against sides of the compartments or directly in front of any vents. | |
| Refrigerator or freezer is too cold | Temperature control is set too cold. | Adjust temperature in the compartment to the next warmer setting; allow 24 hours for temperature to adjust. |
| Moisture on exterior/ interior of refrigerator | High humidity | This is normal during times of high humidity. Dry surface and adjust temperature to a slightly colder setting. |
| Doors opened frequently or left open. | Keep door closed. Check that an item is not preventing the door from closing. Level the refrigerator. See "Level Refrigerator." | |
| Open container of water in refrigerator. | Cover or seal container | |
| Frost or ice crystals on frozen food | Freezer door left open or opened frequently. | Limit door openings to maintain the internal temperature. Check that an item is not preventing door from closing. |
| Refrigerator is not level. | Level the refrigerator. See "Level Refrigerator." | |
| Items blocking freezer air vents and preventing proper air flow. | Move items away from rear wall. | |
| Food freezing in refrigerator | Food placed too close to the air vent. | Move items away from back and top of the refrigerator. |
| Temperature control set too cold. | Adjust the temperature to a less cold setting. |
Disposal of the appliance
It is prohibited to dispose of this appliance as household waste.
Packaging materials
Packaging materials with the recycle symbol are recyclable. Dispose of the packaging into a suitable waste collection container to recycle it.
Before disposal of the appliance
- Pull out the mains plug from the mains socket.
- Cut off the power cord and discard with the mains plug.

WARNING
Refrigerators contain refrigerant and gases in the insulation. Refrigerant and gases must be disposed of professionally as they may cause eye injuries or ignition. Ensure that tubing of the refrigerant circuit is not damage prior to proper disposal.
| Correct Disposal of this product | |
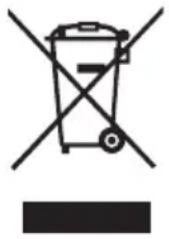 | This symbol on the product or in its packing indicates that this product may not be treated as household waste. Instead, it should be taken to the appropriate waste collection point for the recycling of electrical and electronic equipment. By ensuring this product is disposed of correctly, you will help prevent potential negative consequences for the environment and human health, which could otherwise be caused by the inappropriate waste handling of this product. For more detailed information about the recycling of this product, please contact your local council your household waste disposal service, or the shop where you purchased the product. |
Hisense
life reimagined
text_image
914mm A mm581 B C 725mmtext_image
H I J Llave Allennatural_image
Line drawing of a hand inserting a device into a cabinet (no text or symbols)natural_image
Technical line drawing of a mechanical assembly with a bucket and mounting bracket (no text or symbols)natural_image
Line drawing of a hand inserting a device into a cabinet (no text or symbols)text_image
908mm 610mm 1115mm 125° 1471,4mm 125°natural_image
Pure technical line drawing of a mechanical or architectural component without any text, numbers, or symbolsnatural_image
Pure technical line drawing of a structural component with intersecting diagonal lines (no text or symbols)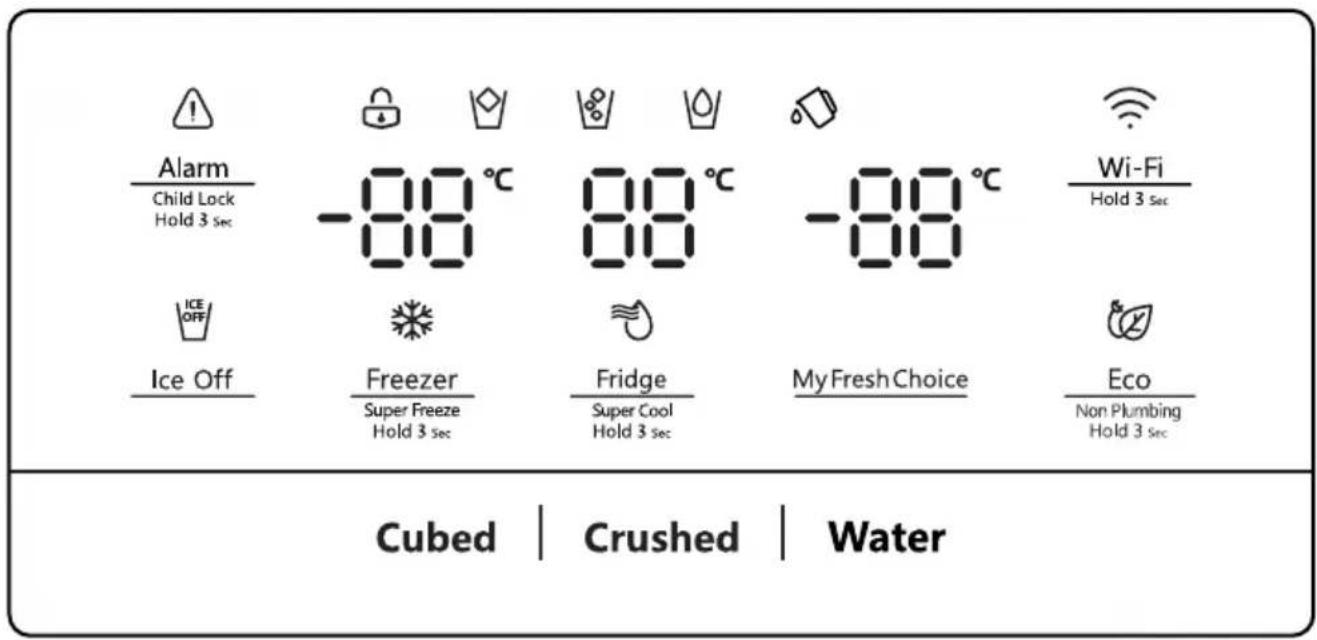
text_image
Alarm Child Lock Hold 3 sec ICE OFF Ice Off Freezer Super Freeze Hold 3 sec 80°C 80°C Fridge Super Cool Hold 3 sec 80°C 80°C My Fresh Choice Wi-Fi Hold 3 sec Eco Non Plumbing Hold 3 sec Cubed | Crushed | Waterchemical
Temperature range diagram for a substance with labeled degrees Celsiuschemical
Temperature range labels for a substance with specific degrees Celsiuschemical
Temperature range diagram showing 5°C to -17°C with corresponding degrees Celsius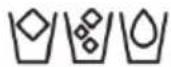
Control del dispensador
natural_image
Technical diagrams showing two views of a mechanical component, labeled (1) and (2), with no visible text or symbols.natural_image
Illustration of two hands holding a rectangular object with upward arrows indicating motion or force (no text or symbols)natural_image
Technical line drawing of a refrigerator with four sequential views showing internal components (no text or symbols)text_image
Alarm Cold Cool Hill 3 Ice -80 °C Wi-Fi Hill 3 Ice Ice Off Freezer Super Freeze Hill 3 Ice Fridge Super Cool Hill 3 Ice -80 °C MyFresh Choice Eco NonFlushing Hill 3 Ice Cubed | Crushed | Water ICE OFF Ice off No ice Cubed Crushed Waternatural_image
Technical line drawing of a mechanical assembly with a 125° angle标注 (no text or symbols beyond the angle marker)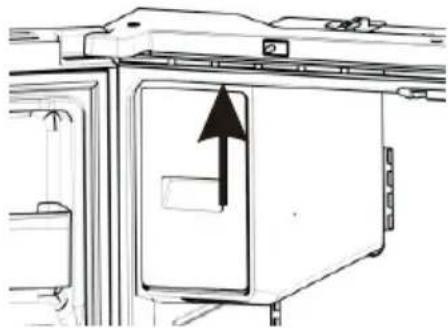
natural_image
Diagram of a refrigerator interior with an upward arrow indicating direction (no text or symbols present)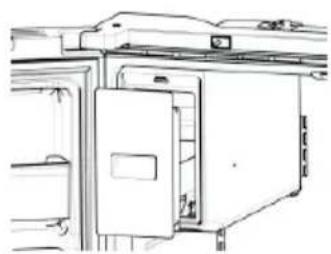
natural_image
Line drawing of a refrigerator with doors and shelves (no text or symbols)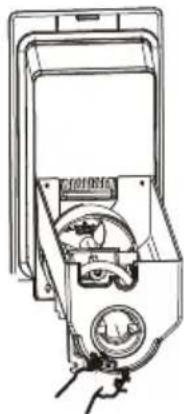
natural_image
Line drawing of a hand holding a device with a circular dial and control panel (no text or symbols)NOTA:
text_image
Technical schematic diagram of a multi-chamber refrigerator with labeled components and directional arrows indicating flow or movement.natural_image
Architectural floor plan of a multi-level building with internal compartments and structural elements (no text or labels)Advertencia:
natural_image
Two views of a metal shelf panel with a checkmark indicating selection (no text or symbols present)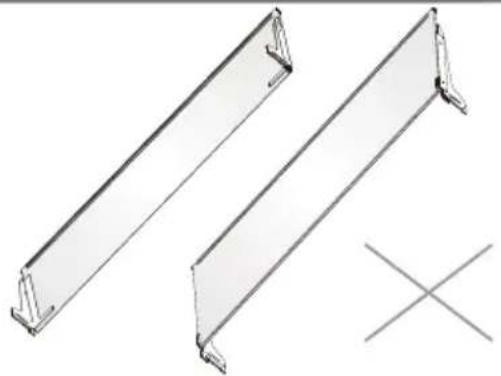
natural_image
Two metal-framed structural beams with support brackets, one marked with a cross symbol (no text or labels)
ADVERTENCIA
text_image
914mm A mm581 B C 725mmtext_image
Technical diagram showing labeled components E, F, and G for a mechanical assembly or assembly setuptext_image
H I J Clé Allennatural_image
Line drawing of a cabinet interior with an arrow indicating direction (no text or symbols)natural_image
Technical line drawing of a mechanical assembly with a bucket pouring liquid into a housing (no text or symbols)natural_image
Line drawing of a hand inserting a device into a cabinet (no text or symbols)text_image
petit joint 2 pcs Gros joint 2 pcstext_image
908mm 610mm 1115mm 125° 125° 1471,4mmnatural_image
Pure technical line drawing of a mechanical component or bracket (no text or symbols)natural_image
Pure technical line drawing of a mechanical assembly with intersecting diagonal lines (no text or symbols)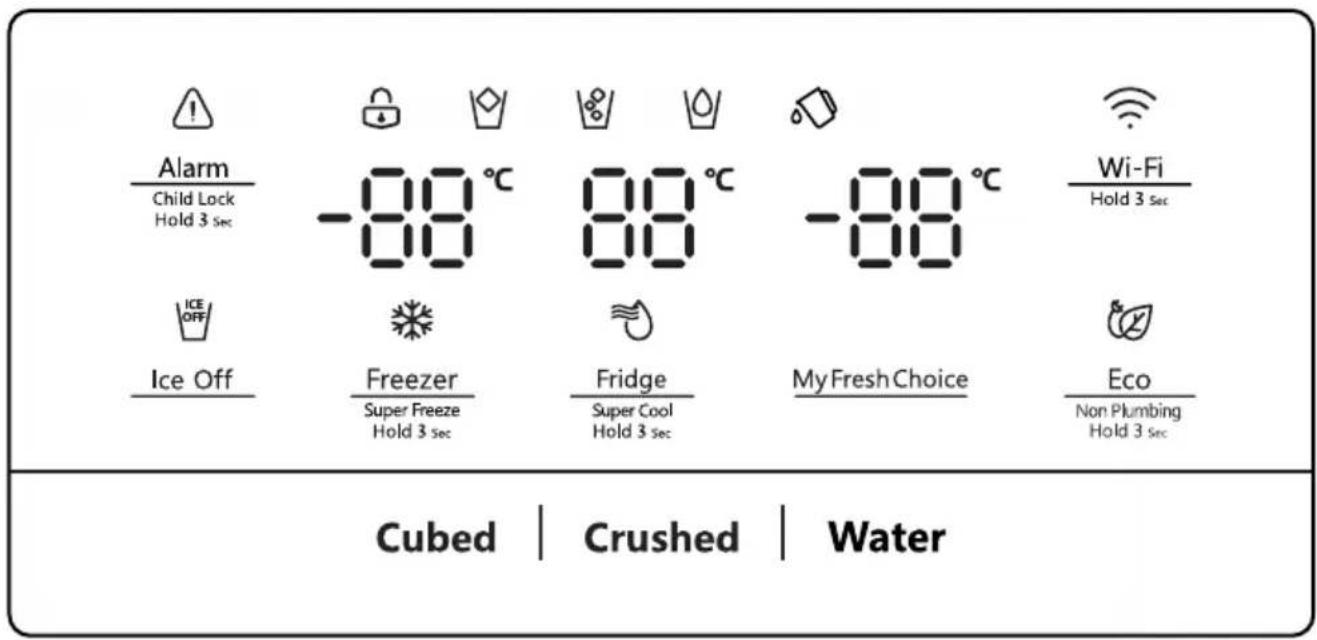
text_image
Alarm Child Lock Hold 3 sec ICE OFF Ice Off Freezer Super Freeze Hold 3 sec 80°C 80°C Fridge Super Cool Hold 3 sec 80°C 80°C My Fresh Choice Wi-Fi Hold 3 sec Eco Non Plumbing Hold 3 sec Cubed | Crushed | Waterchemical
Temperature range diagram for a substance with labeled degrees Celsiuschemical
Temperature gradient notation for a substance with labeled degrees Celsiuschemical
Temperature range diagram showing 5°C to -17°C with corresponding degrees Celsius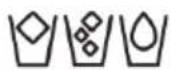
natural_image
Technical diagrams showing two views of a mechanical component, labeled (1) and (2), with no visible text or symbols.natural_image
Illustration of two hands holding a rectangular object with upward arrows indicating motion or force (no text or symbols)natural_image
Technical line drawing of a refrigerator with three sequential mechanical assembly steps (no text or labels)text_image
Alarm Cold Lock Hold 3 in -80 °C 80 °C -80 °C Wi-Fi Hold 3 in Ice Off Freezer Super Freeze Hold 3 in Fridge Super Cool Hold 3 in My Fresh Choice Eco Non-Hunting Hold 3 in Cubed | Crushed | Water ICE OFF Ice off No ice Cubed Crushed Waternatural_image
Technical line drawing of a mechanical assembly with a 125-degree rotation indicator (no text or symbols present)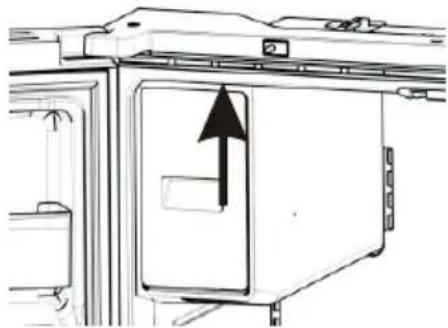
natural_image
Diagram of a refrigerator interior with an upward arrow indicating direction (no text or symbols present)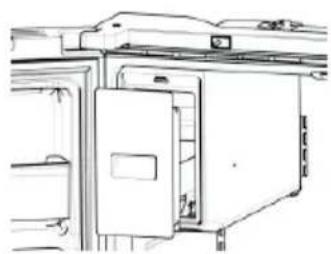
natural_image
Line drawing of a refrigerator with doors and shelves (no text or symbols)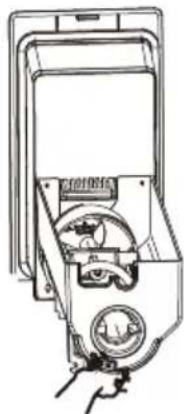
natural_image
Line drawing of a hand holding a device with a circular dial and control panel (no text or symbols)REMARQUE :
text_image
Technical schematic diagram of a multi-chamber refrigerator with labeled components and directional arrows indicating flow or movement.natural_image
Architectural floor plan of a multi-level building with internal compartments and structural elements (no text or labels)Attention:
natural_image
Two views of a metal shelf panel with a checkmark indicating selection (no text or symbols present)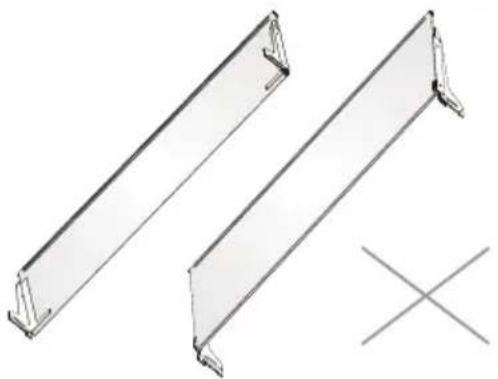
natural_image
Technical line drawing of two metal structural beams with a cross symbol below (no text or labels)
ATTENTION
text_image
914mm A B C 725mm mm5871text_image
Technical diagram showing a triangular structure with labeled point A and reference lines, likely illustrating a mechanical or structural assembly.
Viti
text_image
Technical diagram showing labeled components E, F, and G for a mechanical assembly or assembly setupnatural_image
Line drawing of a cabinet interior with an arrow indicating direction, no text or symbols presentnatural_image
Line drawing of a kitchen appliance with a cup pouring liquid into a tray (no text or symbols)natural_image
Line drawing of a hand inserting a device into a cabinet (no text or symbols)text_image
908mm 610mm 1115mm 125° 1471.4mm 125°natural_image
Pure technical line drawing of a mechanical or architectural component without any text, numbers, or symbolsnatural_image
Pure technical line drawing of a mechanical assembly with intersecting diagonal lines (no text or symbols)
text_image
Alarm Child Lock Hold 3 sec ICE OFF Ice Off Freezer Super Freeze Hold 3 sec 80°C 80°C Fridge Super Cool Hold 3 sec 80°C 80°C My Fresh Choice Wi-Fi Hold 3 sec Eco Non Plumbing Hold 3 sec Cubed | Crushed | Waterchemical
Temperature range diagram for a substance with labeled degrees Celsiuschemical
Temperature gradient notation for a substance with labeled degrees Celsiuschemical
Temperature range diagram showing 5°C to -17°C with corresponding degrees Celsius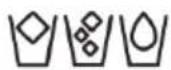
Controllo dispenser
natural_image
Technical diagrams showing two views of a mechanical component, labeled (1) and (2), with no visible text or symbols.natural_image
Illustration of two hands holding a rectangular object with upward arrows indicating motion or force (no text or symbols)natural_image
Technical line drawing of a refrigerator with three views showing internal components (no text or symbols)text_image
Alarm Cold lock Hold 3 lm -80 °C 80 °C -80 °C Wi-Fi HAD 5 lm Ice Off Freezer Sugar Powder Hold 3 lm Fridge Sugar Coal Hold 3 lm My Fresh Choice Eco Non Plumbing Hold 3 lm Cubed | Crushed | Water ICE OFF Ice off No ice Cubed Crushed Waternatural_image
Technical line drawing of a mechanical assembly with a 125° rotation indicator (no text or symbols present)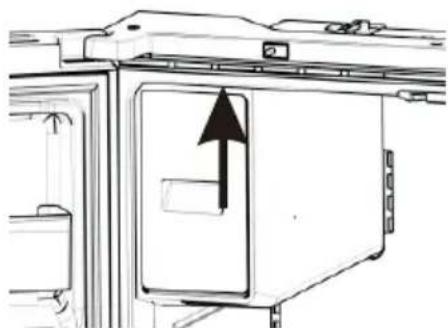
natural_image
Diagram of a microwave oven with an arrow indicating direction (no text or symbols present)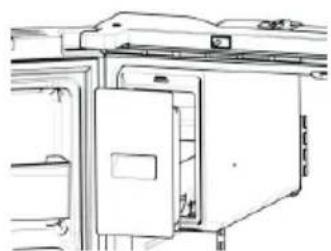
natural_image
Line drawing of a refrigerator with doors and shelves (no text or symbols)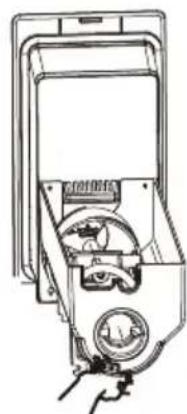
natural_image
Line drawing of a hand holding a device with a dial and control panel (no text or symbols)NOTA:
text_image
Technical diagram of a multi-chamber refrigerator with labeled components and directional arrows indicating airflow or movement.natural_image
Architectural floor plan of a multi-level building with visible door, windows, and structural elements (no text or labels)Avvertenza:
natural_image
Two views of a metal shelf panel with a checkmark indicating selection (no text or symbols present)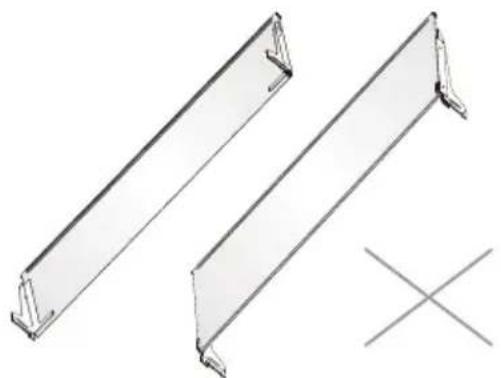
natural_image
Technical line drawing of two metal bracket components with a cross symbol below (no text or labels)
AVVERTENZA
PROBLEEMOPLOSSING.... 27
AFDANKEN VAN HET APPARAAT....29
text_image
Q A B C D E F G H I J K Koelkast 2 STERREN Vriezer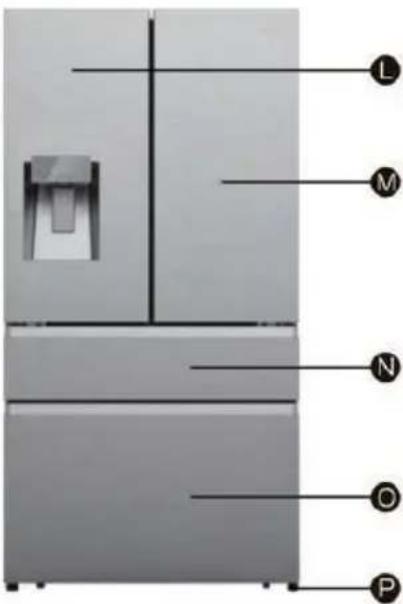
text_image
L M N O Ptext_image
914mm A 1785mm B C 725mmA Koelkastdeuren
text_image
Technical diagram showing labeled components (E, F, G) on a mechanical assembly with alignment lines and components.natural_image
Line drawing of a cabinet interior with an arrow indicating direction, no text or symbols presentnatural_image
Line drawing of a kitchen appliance with a cup pouring liquid into a tray (no text or symbols)natural_image
Line drawing of a hand inserting a device into a cabinet (no text or symbols)text_image
908mm 610mm 1115mm 125° 1471.4mm 125°natural_image
Pure technical line drawing of a mechanical or architectural component without any text, numbers, or symbolsnatural_image
Pure technical line drawing of a mechanical assembly with intersecting diagonal lines (no text or symbols)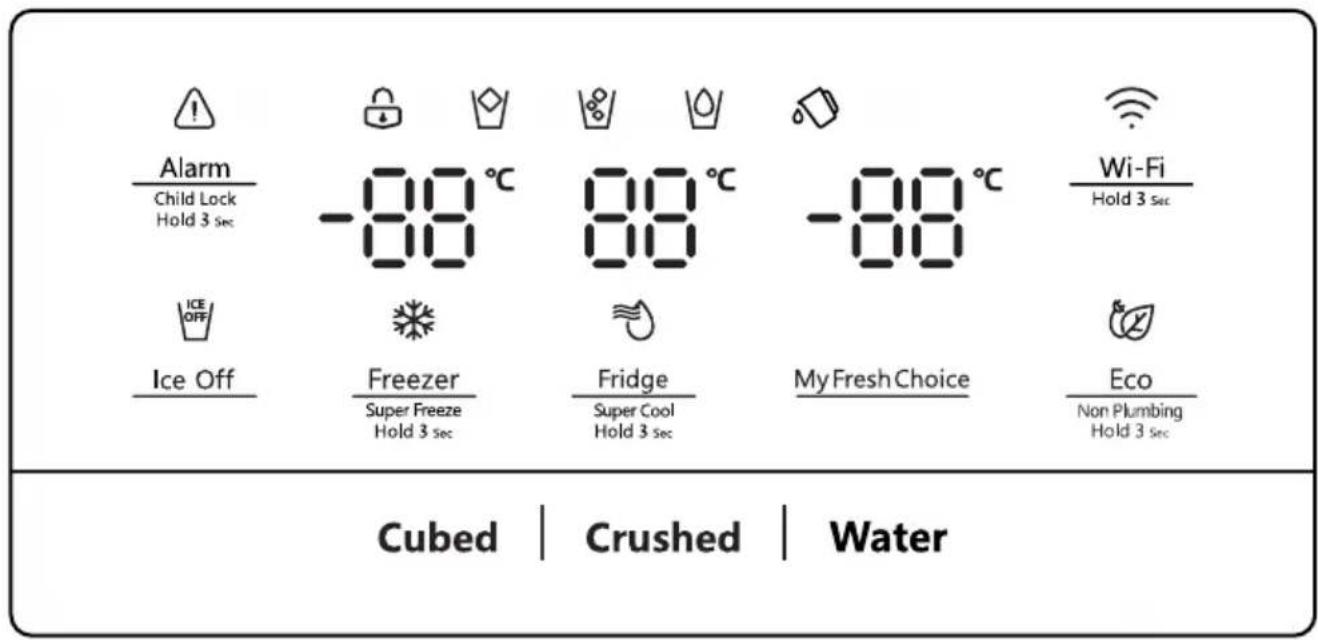
text_image
Alarm Child Lock Hold 3 sec ICE OFF Ice Off Freezer Super Freeze Hold 3 sec 80°C 80°C Fridge Super Cool Hold 3 sec 80°C 80°C My Fresh Choice Wi-Fi Hold 3 sec Eco Non Plumbing Hold 3 sec Cubed | Crushed | Waterchemical
Temperature range diagram for a substance with labeled degrees Celsiuschemical
Temperature gradient notation for a substance with labeled degrees Celsiuschemical
Temperature range diagram showing 5°C to -17°C with corresponding degrees Celsius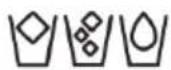
Dispenser controle
De ConnectLife App is gratis te downloaden in de Apple App Store of in de Google Play Store.
Installeren van de ConnectLife app
VERBIND APPARAAT MET Wi-Fi
natural_image
Technical line drawings of two mechanical components, one showing a bracket and the other a tool or bracket (no text or symbols present)natural_image
Illustration of two hands holding a rectangular object with upward arrows indicating motion or force (no text or symbols)natural_image
Technical line drawing of a refrigerator with four sequential views showing internal components (no text or symbols)text_image
Alarm Cold Lock Hold 3 lm -80 °C Wi-Fi HAD 5 lm Ice Off Freezer Sugar Powder Hold 3 lm Fridge Sugar Coal Hold 3 lm My Fresh Choice Eco Non Flushing Hold 3 lm Cubed | Crushed | Water ICE OFF Ice off No ice Cubed Crushed Waternatural_image
Technical line drawing of a mechanical assembly with a 125° angle标注 (no text or symbols beyond the angle indicator)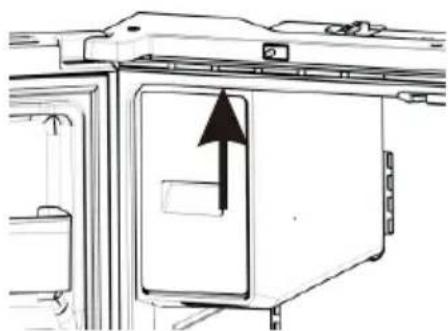
natural_image
Diagram of a door with an arrow indicating direction, no text or symbols present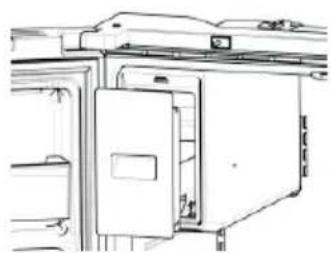
natural_image
Technical line drawing of a refrigerator with doors and shelves (no text or symbols)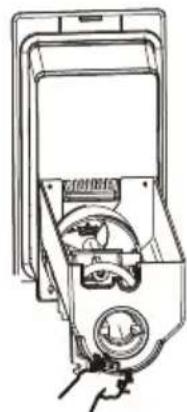
natural_image
Line drawing of a hand holding a device with a dial and control panel (no text or symbols)OPMERKING:
text_image
Technical diagram of a multi-chamber refrigerator with labeled components and directional arrows indicating airflow or movement.natural_image
Architectural floor plan of a multi-level building with internal compartments and structural elements (no text or labels)Waarschuwing:
natural_image
Two views of a metal shelf panel with a checkmark indicating selection (no text or symbols present)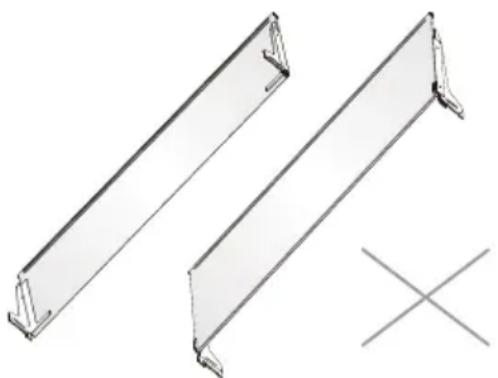
natural_image
Two metal bracket panels with mounting flanges and a cross symbol below (no text or labels)
WAARSCHUWING

Alinhe as portas.... 15
USO DA GELADEIRA....16
text_image
914mm A B C 725mm mm5871text_image
Technical diagram showing labeled components (E, F, G) of a mechanical assembly or assembly with no readable text or symbols.text_image
H I J Chave AllenSubstitua as portas
natural_image
Line drawing of a hand inserting a component into a cabinet (no text or symbols)natural_image
Line drawing of a kitchen appliance with a cup pouring liquid into a tray (no text or symbols)natural_image
Line drawing of a hand inserting a device into a cabinet (no text or symbols)text_image
908mm 610mm 1115mm 125° 1471.4mm 125°natural_image
Pure technical line drawing of a mechanical component or bracket (no text or symbols)natural_image
Pure technical line drawing of a mechanical assembly with intersecting diagonal lines (no text or symbols)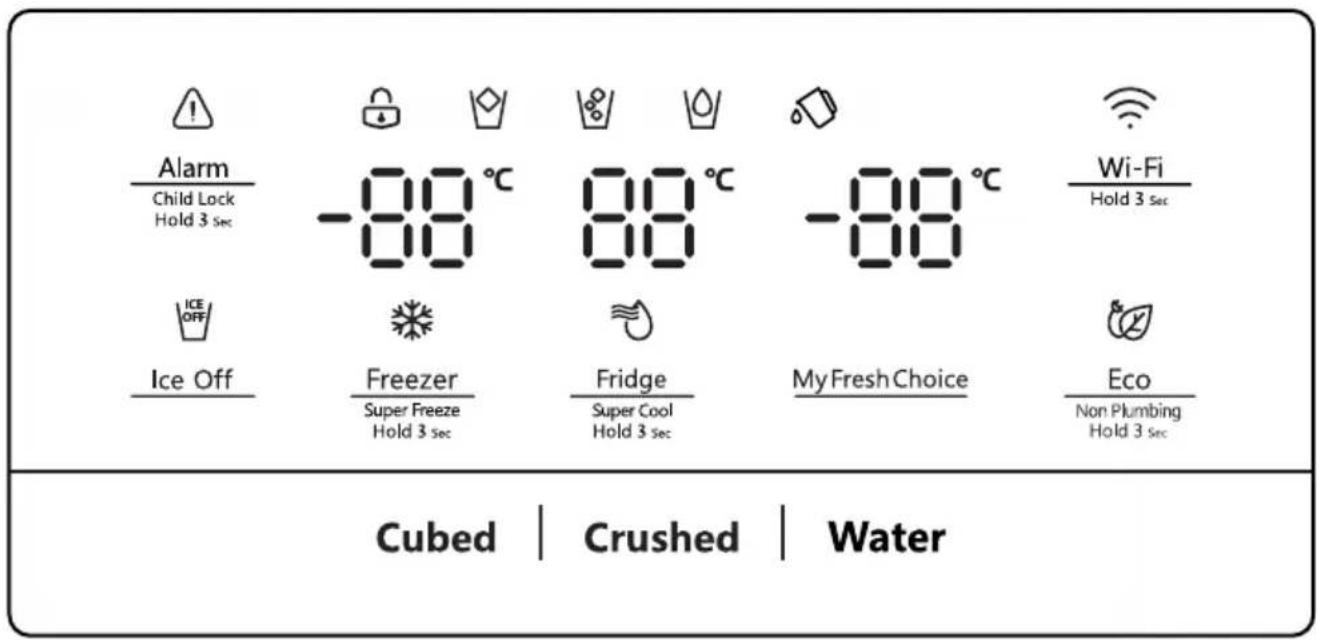
text_image
Alarm Child Lock Hold 3 sec ICE OFF Ice Off Freezer Super Freeze Hold 3 sec 80°C 80°C Fridge Super Cool Hold 3 sec 80°C 80°C My Fresh Choice Wi-Fi Hold 3 sec Eco Non Plumbing Hold 3 sec Cubed | Crushed | Waterchemical
Temperature range diagram for a substance with labeled degrees Celsiuschemical
Temperature gradient notation for a substance with labeled degrees Celsiuschemical
Temperature range diagram showing 5°C to -17°C with corresponding degrees Celsius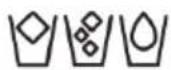
Instalar a app ConnectLife
natural_image
Technical line drawings of two mechanical components, (1) a bracket and (2) a tool or bracket assembly (no text or symbols)natural_image
Illustration of two hands holding a rectangular object with upward arrows indicating motion or force (no text or symbols)natural_image
Technical line drawing of a refrigerator with internal compartments and three sequential views showing internal structure (no text or symbols)text_image
Alarm On/Lock HOLD 2 sec -80 °C Wi-Fi HOLD 3 sec Ice Off Freezer Sugar Powder HOLD 2 sec Fridge Sugar Powder HOLD 3 sec My Fresh Choice Eco Non-Holding HOLD 2 sec Cubed | Crushed | Water ICE OFF Ice off No ice Cubed Crushed WaterObter água gelada
natural_image
Technical line drawing of a mechanical assembly with a 125° angle标注 (no text or symbols beyond the angle marker)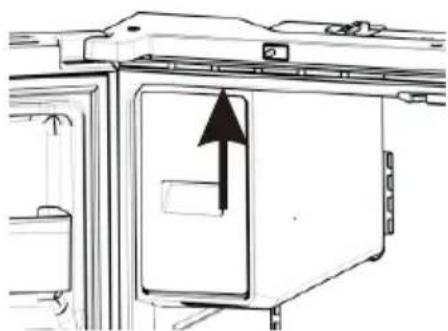
natural_image
Diagram of a door opening with an arrow indicating direction (no text or symbols present)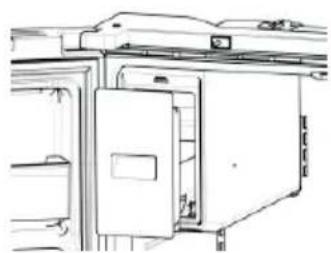
natural_image
Line drawing of a refrigerator with doors and shelves (no text or symbols)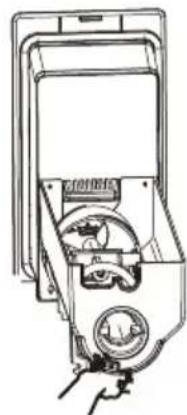
natural_image
Line drawing of a hand holding a device with a circular dial and control panel (no text or symbols)NOTA:
text_image
Technical schematic diagram of a multi-chamber refrigerator with labeled components and directional arrows indicating flow or movement.natural_image
Technical line drawing of a multi-chamber refrigerator or oven unit with no visible text or symbolsAviso:
natural_image
Two views of a metal shelf panel with a checkmark indicating selection (no text or symbols present)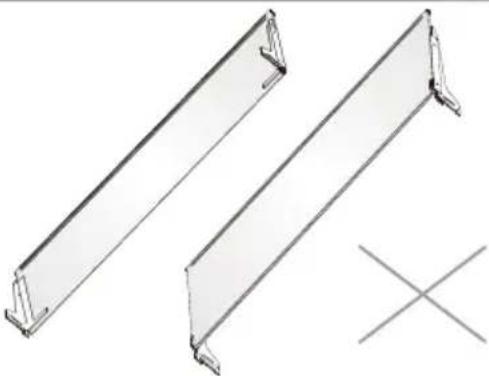
natural_image
Technical line drawing of two metal-framed structural components with a cross symbol below (no text or labels)