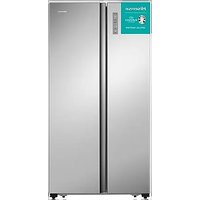
RS677N4ACC - Fridge HISENSE - Free user manual and instructions
Find the device manual for free RS677N4ACC HISENSE in PDF.


User questions about RS677N4ACC HISENSE
0 question about this device. Answer the ones you know or ask your own.
Ask a new question about this device
Download the instructions for your Fridge in PDF format for free! Find your manual RS677N4ACC - HISENSE and take your electronic device back in hand. On this page are published all the documents necessary for the use of your device. RS677N4ACC by HISENSE.
USER MANUAL RS677N4ACC HISENSE
natural_image
Pure technical line drawing of a vertical panel or enclosure with a base, no text or symbols presentnatural_image
Technical line drawing of a vertical structural component with a 0.5° angle标注 (no text or symbols beyond the angle marker)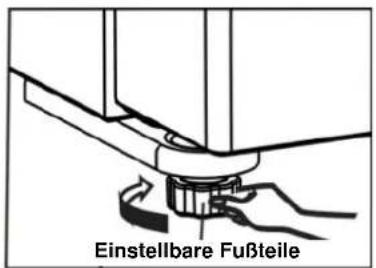
text_image
Diagram of a refrigerator interior with numbered compartments for identificationtext_image
Labeled diagram of a refrigerator interior showing 18 numbered compartments and doorstext_image
Around Cooling Pridge Freesor ZONE -88 TEMP. MODE/UNLOCK Half 24mmnatural_image
Simple line drawing of a refrigerator with an upward arrow and base blocks (no text or symbols)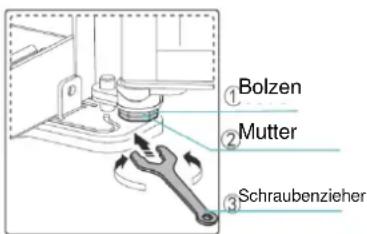
natural_image
Illustration showing a hand holding a cylindrical object with upward arrows, and a close-up of hands reaching out from a shelf (no text or symbols)natural_image
Illustration of two hands holding a battery with arrows indicating motion (no text or symbols)②
natural_image
Technical line drawing of a mechanical component with no visible text or symbols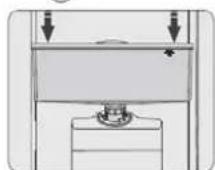
Warnung!
natural_image
Simple line drawing of a refrigerator with a hand holding the door (no text or symbols)Vorsicht!
natural_image
Top-down schematic of a multi-level storage or refrigerator unit with no visible text, labels, or symbols.natural_image
Line drawing of a refrigerator interior with doors and drawers, showing a hand cleaning the door (no text or symbols)Before operating this unit, please read this manual thoroughly, and retain for future reference
Contents
Safety and warning information......2
Installing your new appliance.... 7
Description of the appliance....9
Display controls....12
Using your appliance.... 18
Cleaning and care....21
Helpful hints and tips....22
Troubleshooting....23
Disposal of the appliance....26

Safety and warning information
For your safety and correct usage, before installing and first using the appliance, read this user manual carefully, including its hints and warnings. To avoid unnecessary mistakes and accidents, it is important to make sure that all people using the appliance are thoroughly familiar with its operation and safety features. Save these instructions and be sure that they remain with the appliance if it is moved or sold, so that anyone using it throughout its life, will be properly informed on its usage and safety notices.
For the safety of life and property, keep the precautions of these user's instructions as the manufacturer is not responsible for damages caused by omission.
Safety for children and others who are vulnerable people
- According to EN standard
This appliance can be used by children aged from 8 years and above and persons with reduced physical, sensory or mental capabilities or lack of experience and knowledge if they have been given supervision or instruction concerning use of the appliance in a safe way and understand the hazards involved. Children shall not play with the appliance. Cleaning and user maintenance shall not be made by children without supervision.
Children aged from 3 to 8 years are allowed to load and unload refrigeration appliances.
According to IEC standard
This appliance is not intended for use by persons (including children) with reduced physical, sensory or mental capabilities, or lack of experience and knowledge, unless they have been given supervision or instruction concerning use of the appliance by a person being responsible for their safety.
Children should be supervised to ensure that they do not play with the appliance.
- Keep all packaging away from children as there is a risk of suffocation.
- If you are discarding the appliance, pull the plug out of the socket, cut the connection cable (as close to the appliance as you can) and remove the door to prevent children playing from suffering an electric shock or from closing themselves inside it.
- If this appliance, featuring a magnetic door seals, is to replace an older appliance having a spring lock (latch) on the door or lid, be sure to make
the spring lock unusable before you discard the old appliance. This will prevent it from becoming a death trap for a child.
General safety

● WARNING —This appliance is intended to be used in household and similar applications such as
-staff kitchen areas in shops, offices and other working environments;
-farm houses and hotels, motels and other residential type environments;
-bed and breakfast type environments;
-catering and similar non-retail applications.
- WARNING — Do not store explosive substances such as aerosol cans with a flammable propellant in this appliance.
- WARNING — If the supply cord is damaged, it must be replaced by the manufacturer, its service agent or similarly qualified persons in order to avoid a hazard.
- WARNING — Keep ventilation openings, in the appliance enclosure or in the built-in structure, clear of obstruction.
- WARNING — Do not use mechanical devices or other means to accelerate the defrosting process, other than those recommended by the manufacturer.
● WARNING — Do not damage the refrigerant circuit. - WARNING — Do not use electrical appliances inside the food storage compartments of the appliance, unless they are of the type recommended by the manufacturer.
● WARNING — The refrigerant and insulation blowing gas are flammable. When disposing of the appliance, do so only at an authorized waste disposal centre. Do not expose to flame. - WARNING —When positioning the appliance, ensure the supply cord is not trapped or damaged.
- WARNING —Do not locate multiple portable socket-outlets or portable power supplies at the rear of the appliance.
Replacing the illuminating lamps
- WARNING—The illuminating lamps must not be replaced by the user! If the illuminating lamps is damaged, contact the customer helpline for assistance.
This warning is only for refrigerators that contain illuminating lamps.
Refrigerant
The refrigerant isobutene (R600a) is contained within the refrigerant circuit of the appliance, a natural gas with a high level of environmental compatibility, which is nevertheless flammable. During transportation and installation of the appliance, ensure that none of the components of the refrigerant circuit
becomes damaged.
The refrigerant (R600a) is flammable.
- WARNING — Refrigerators contain refrigerant and gases in the insulation. Refrigerant and gases must be disposed of professionally as they may cause eye injuries or ignition. Ensure that tubing of the refrigerant circuit is not damage prior to proper disposal.

- The symbol is a warning and indicates the refrigerant and insulation blowing gas are flammable.
● Warning: Risk of fire/flammable materials
If the refrigerant circuit should be damaged:
-Avoid opening flames and sources of ignition.
-Thoroughly ventilate the room in which the appliance is situated.
It is dangerous to alter the specifications or modify this product in any way.
Any damage to the cord may cause a short circuit, fire, and/or electric shock.

Electrical safety
- The power cord must not be lengthened.
- Make sure that the power plug is not crushed or damaged. A crushed or damaged power plug may overheat and cause a fire.
- Make sure that you can access the main plug of the appliance.
- Do not pull the main cable.
- If the power plug socket is loose, do not insert the power plug. There is a risk of electric shock or fire.
- You must not operate the appliance without the interior lighting lamp cover.
- The fridge is only applied with power supply of single phase alternating current of 220\~240V/50Hz. If fluctuation of voltage in the district of user is so large that the voltage exceeds the above scope, for safety sake, be sure to apply A.C. Automatic voltage regulator of more than 350W to the fridge. The fridge must employ a special power socket instead of common one with other electric appliances. Its plug must match the socket with ground wire.
Daily use
- Do not store flammable gas or liquids in the appliance, There is a risk of an explosion.
- Do not operate any electrical appliances in the appliance (e.g. electric ice cream makers, mixers etc.).
- When unplugging always pull the plug from the mains socket, do not pull on the cable.
- Do not place hot items near the plastic components of this appliance.
- Do not place food products directly against the air outlet on the rear wall.
● Store pre-packed frozen food in accordance with the frozen food
manufacture's instructions.
- The appliances manufactures storage recommendations should be strictly adhered to. Refer to relevant instructions for storage.
- Do not place carbonated or fizzy drinks in the freezer compartment as it creates pressure on the container, which may cause it to explode, resulting in damage to the appliance.
- Frozen food can cause frost burns if consumed straight from the freezer compartment.
- Do not place the appliance in direct sunlight.
- Keep burning candles, lamps and other items with naked flames away from the appliance so that do not set the appliance on fire.
- The appliance is intended for keeping food stuff and/or beverages in normal household as explained in this instruction booklet. You should take care when move it as the appliance is heavy.
- Do not remove nor touch items from the freezer compartment if your hands are damp/wet, as this could cause skin abrasions or frost/freezer burns.
- Never use the base, drawers, doors etc. to stand on or as supports.
- Frozen food must not be refrozen once it has been thawed out.
- Do not consume ice popsicles or ice cubes straight from the freezer as this can cause freezer burn to the mouth and lips.
- To avoid items falling and causing injury or damage to the appliance, do not overload the door racks or put too much food in the crisper drawers.
- This refrigerating appliance is not intended to be used as a built-in appliance.
caution!
Care and cleaning
- Before maintenance, switch off the appliance and disconnect the mains plug from the mains socket.
- Do not clean the appliance with metal objects, steam cleaner, ethereal oils, organic solvents or abrasive cleansers.
- Do use sharp objects to remove frost from the appliance. Use a plastic scraper.
Installation Important!
- For electrical connection carefully, follow the instructions given in this manual. Unpack the appliance and check if there are damages on it.
- Do not connect the appliance if it is damaged. Report possible damages immediately to the place you bought it. In this case retain packing.
- It is advisable to wait at least four hours before connecting the appliance to allow the oil to flow back in the compressor.
-
Adequate air circulation should be around the appliance, lacking this leads to overheating. To achieve sufficient ventilation, follow the instructions relevant to installation.
-
Wherever possible the back of the product should not be too close to a wall to avoid touching or catching warm parts (compressor, condenser) to prevent the risk of a fire, follow the instructions relevant to installation.
● The appliance must not be locate close to radiators or cookers. - Make sure that the mains plug is accessible after the installation of the appliance.
Service
- Any electrical work required to do the servicing of the appliance should be carried out by qualified electrician or competent person.
- This product must be serviced by an authorized Service Center, and only genuine spare parts must be used.
1) If the appliance is Frost Free.
2) If the appliance contains freezer compartment.
Installing your new appliance
Before using the appliance for the first time, you should be informed of the following tips.

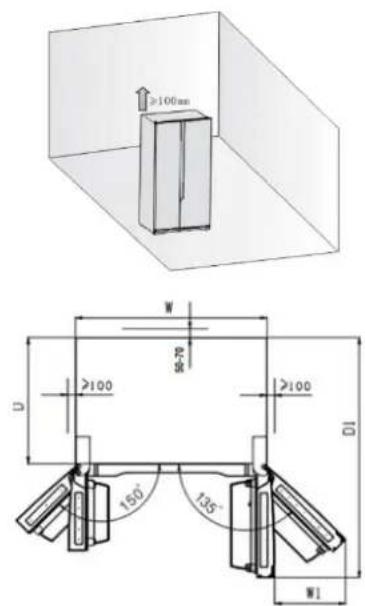
In order to improve efficiency of the cooling system and save energy, it is necessary to maintain good ventilation around the appliance for the dissipation of heat. For this reason, sufficient clear space should be available around the refrigerator.
Suggest: It is advisable for there to be 50-70mm of space from the back to the wall, at least 100mm from its top, at least 100mm from its side to the wall and a clear space upfront to allow the doors to open 135/150°.
Please see the following diagrams.
text_image
≥100mm W W2 ≥100 D 150° 135° ≥100 D1 W1Space required(mm)
| W W1 | D D1 | ||
| 908 | 441.5 | 550 | 1096.5 |
Note:
●This appliance performs well in the climate class from SN to T showed in the
table below. It may not work properly if being left at a temperature above or below the indicated range for a long period.
| Climate class | Ambient temperature |
| SN | +10°C to +32°C |
| N | +16°C to +32°C |
| ST | +16°C to +38°C |
| T | +16°C to +43°C |
- Stand your appliance in a dry place to avoid high moisture.
- Keep the appliance out of direct sunlight, rain or frost. Stand the appliance away from heat sources such as stoves, fires or heaters.
Leveling of appliance
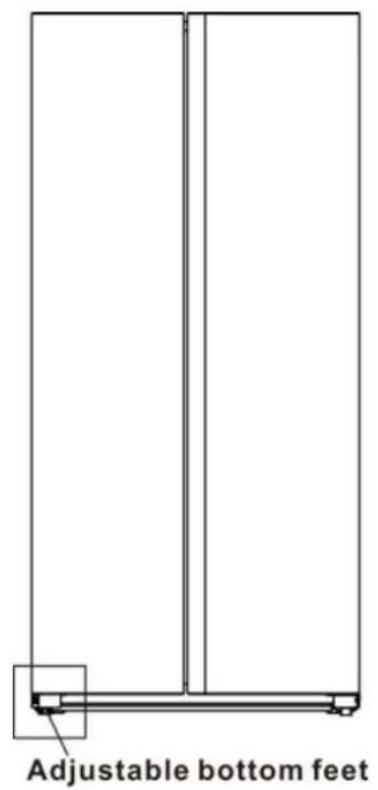
- For sufficient leveling and air circulating in the lower rear section of the appliance, the bottom feet may need to be adjusted. You can adjust them manually by hand or by using a suitable spanner.
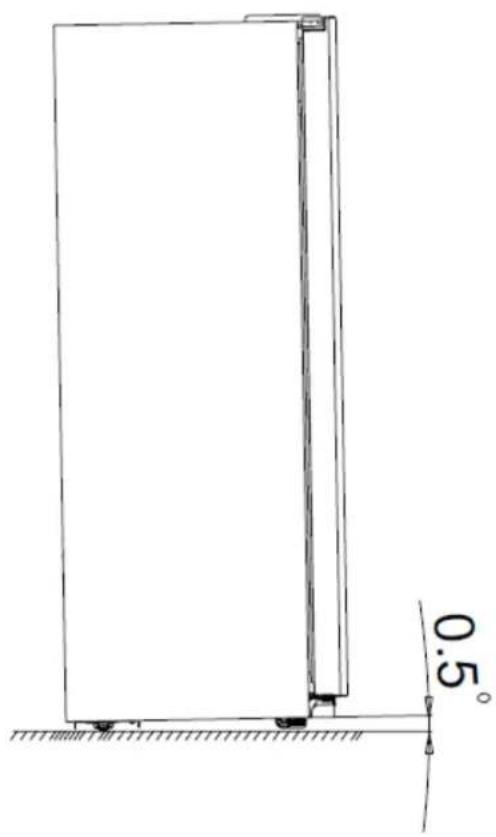
•After the product is put in place, please adjust the two front support feet at the bottom of the refrigerator. The bottom of the support feet is required to be close to the ground, so as to prevent the product from toppling after the door is loaded. - To allow the doors to self-close, tilt back the top backwards for about 10mm or 0.5^ by turning the adjustable feet.
- Whenever you want to move the appliance, remember to turn the feet back up so that the appliance can roll freely. Reinstall the appliance when relocating.
Caution! The rollers, which are not castors, should be only used for forward or backward movement. Moving the refrigerator side ways may damage your floor and the rollers.
text_image
Adjustable bottom feet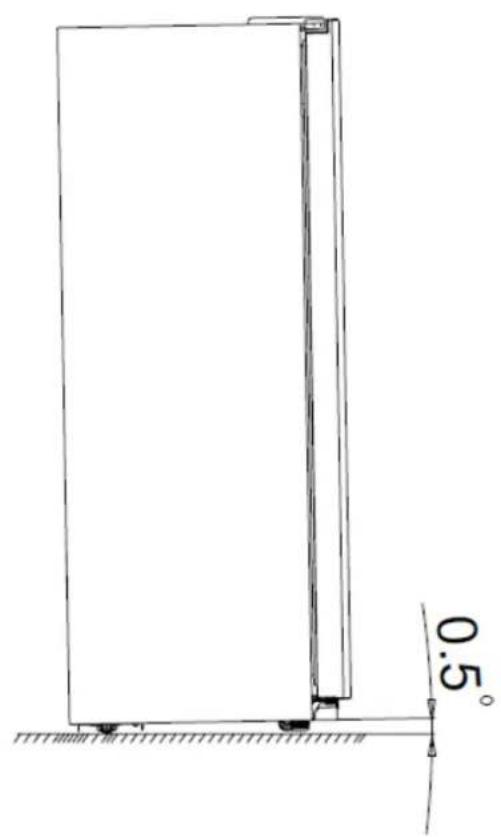
natural_image
Technical line drawing of a vertical structural component with a 0.5° angle标注 (no text or symbols beyond the angle marker)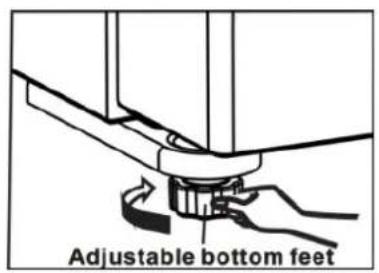
text_image
Adjustable bottom feetDescription of the appliance
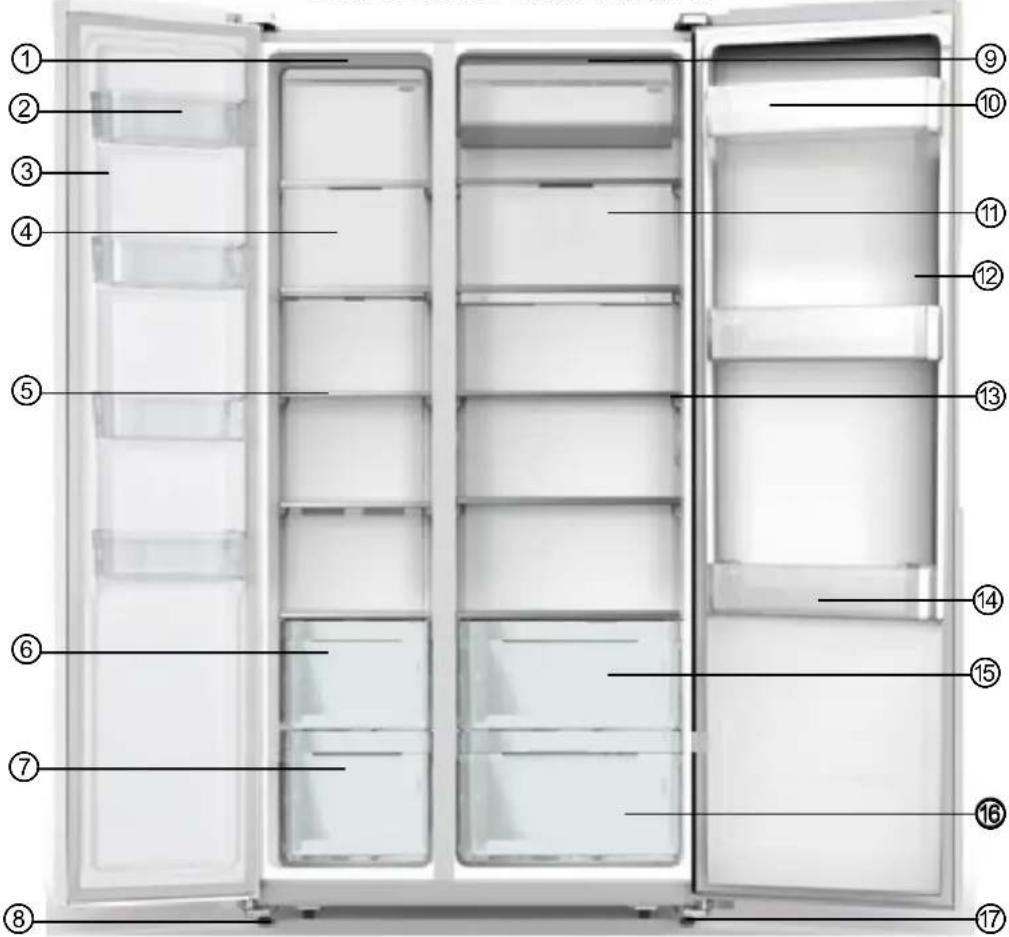
View of the appliance ( RS677N4BIE RS677N4AWF MS91519FF RS677N4AIF RS677N4BFD RS677N4BID RS677N4ACC RS677N4AFC
text_image
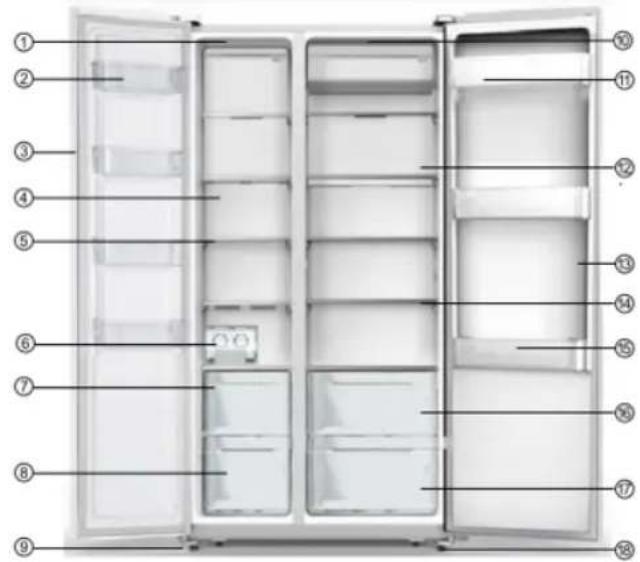
Labeled diagram of a refrigerator interior showing numbered compartments for identification1.Freezer LED light
2.Freezer rack
3.Freezer door
4.Freezer wind channel part
5.Freezer glass shelf
6.Freezer drawer
7.Freezer drawer
8. Left adjustable bottom feet
9.Fridge LED light
10.Fridge rack
11.Fridge wind channel part
12.Fridge door
13.Fridge glass shelf
14.Egg tray(inside)
15.Fruit and vegetable crisper
16.Fruit and vegetable crisper
17.Right adjustable bottomfeet
Note!
- Due to unceasing modification of our products, your refrigerator may be slightly different from this instruction manual, but its functions and using methods remain the same.
- To get the best energy efficiency of this product, please place all shelves, drawers and baskets on their original position as the illustration above.
View of the appliance
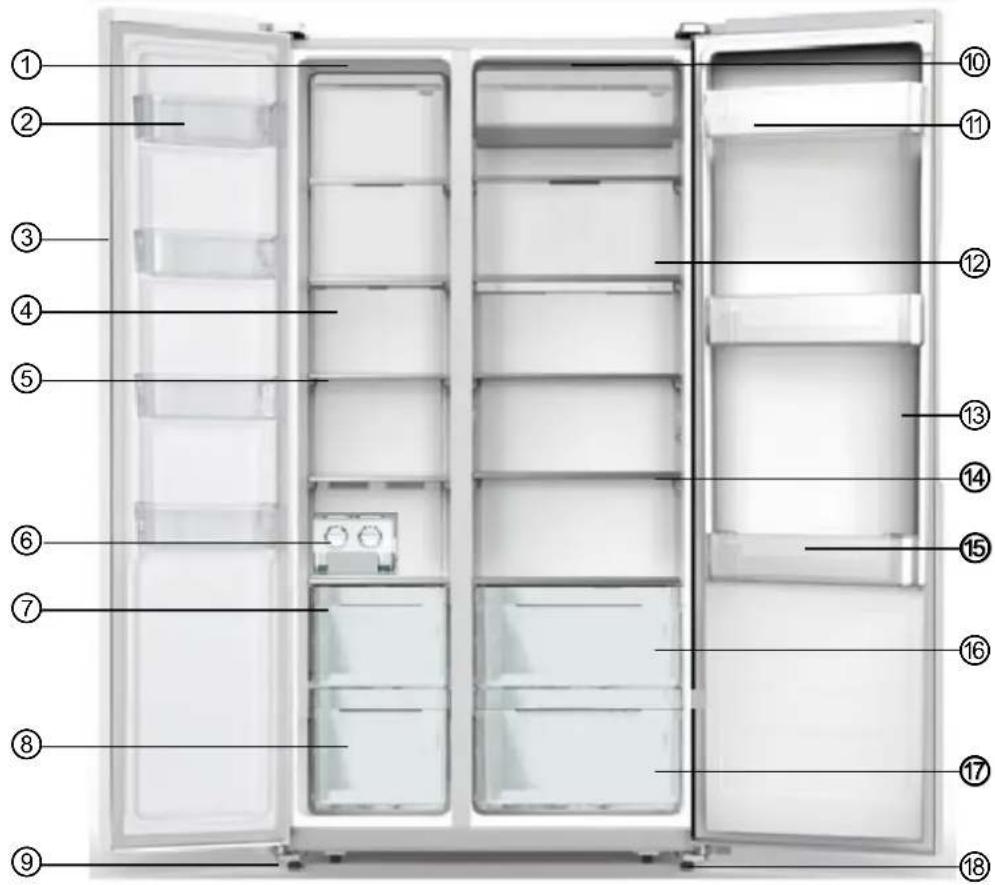
text_image
Labeled diagram of a refrigerator interior showing 18 numbered compartments and doors1.Freezer LED light
2.Freezer rack
3.Freezer door
4.Freezer wind channel part
5.Freezer glass shelf
- Ice box part
7.Freezer drawer
8.Freezer drawer
9.Left adjustable bottom feet
10.Fridge LED light
11.Fridge rack
12.Fridge wind channel part
13.Fridge door
14.Fridge glass shelf
15.Egg tray(inside)
16.Fruit and vegetable crisper
17.Fruit and vegetable crisper
18.Right adjustable bottomfeet
Note!
- Due to unceasing modification of our products, your refrigerator may be slightly different from this instruction manual, but its functions and using methods remain the same.
- To get the best energy efficiency of this product, please place all shelves, drawers and baskets on their original position as the illustration above.
View of the appliance ( FSN519WFI )
HSN519WIF
RS677N4WCD
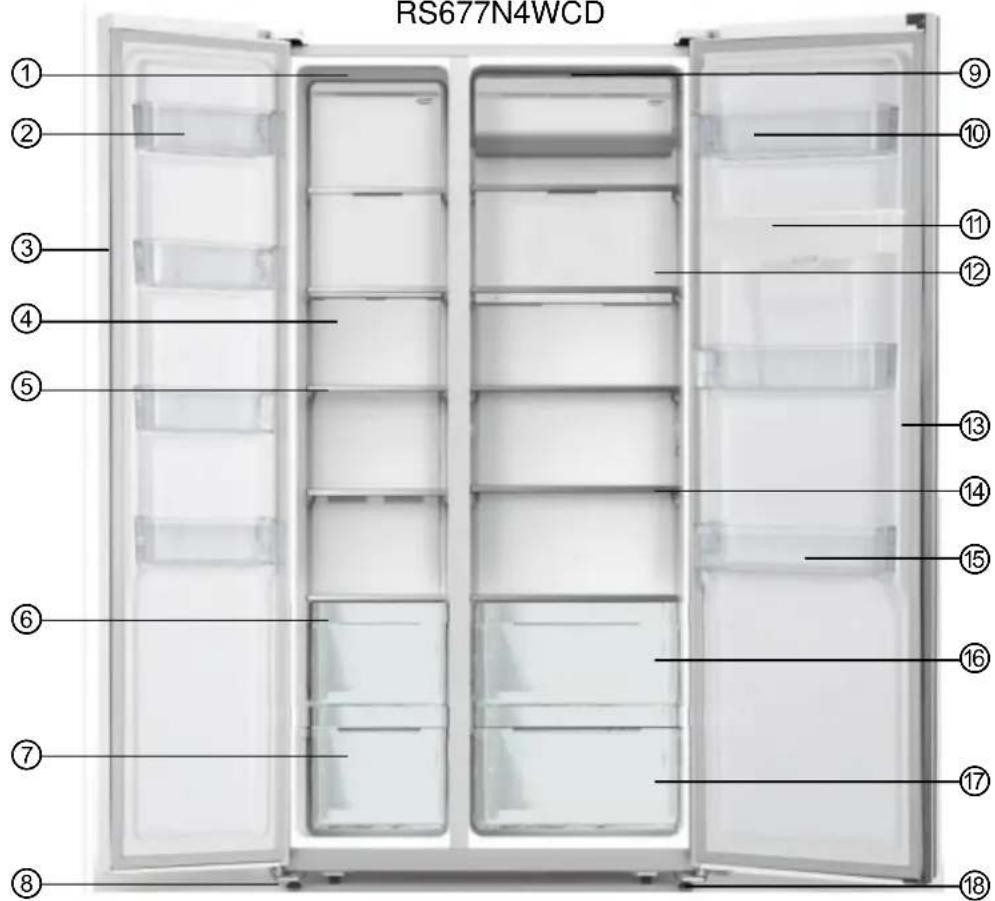
text_image
RS677N4WCD ① ② ③ ④ ⑤ ⑥ ⑦ ⑧ ⑨ ⑩ ⑪ ⑫ ⑬ ⑰1.Freezer LED light
2.Freezer rack
3.Freezer door
4.Freezer wind channel part
5.Freezer glass shelf
6.Freezer drawer
7.Freezer drawer
8.Left adjustable bottom feet
9.Fridge LED light
10.Fridge rack
- Water tank
12.Fridge wind channel part
13.Fridge door
14.Fridge glass shelf
15.Egg tray(inside)
16.Fruit and vegetable crisper
17.Fruit and vegetable crisper
18.Right adjustable bottomfeet
Note!
- Due to unceasing modification of our products, your refrigerator may be slightly different from this instruction manual, but its functions and using methods remain the same.
- To get the best energy efficiency of this product, please place all shelves, drawers and baskets on their original position as the illustration above.
Display Controls(Only for some products)
Use your appliance according to the following control regulations, your appliance has the corresponding functions as the display panels showed in the pictures below.
Controlling the temperature
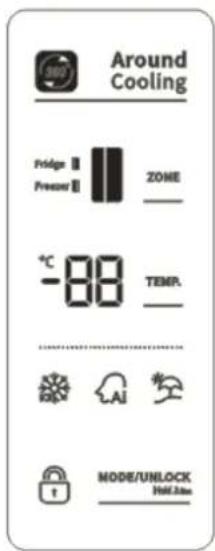
text_image
Around Cooling Fridge Freezer ZONE -88 TEMP. NODE/UNLOCK Half/JmFor optimum food preservation, we recommend that when you start your refrigerator for the first time, the temperature for the refrigerator is set to 5°C and the freezer to -18°C. If you want to change the temperature, follow the instructions below.
Note: High
temperature setting will accelerate food waste.
Caution! When you set a temperature, you set an average temperature for the whole refrigerator cabinet. Temperatures inside each compartment may vary from the temperature values displayed on the panel, depending on how much food you store and where you place them. Ambient temperature may also affect the actual temperature inside the appliance.
Unlock
When the appliance is powered on for the first time, the backlighting of the icons on display panel starts working. If no buttons have been pressed and the doors are closed, the backlighting will turn off after 60 seconds.
All the buttons are locked if the icon " 🔍 "
is illuminated, press the “MODE/UNLOCK Hold 3 sec” button for 3 seconds to unlock them. And it will be locked itself after 20 seconds no pressing any button.
Mode Selection
You can select "ICE" "AI" "three
modes by pressing the “____” button in the unlock sate. And it will be selected after 10 seconds no pressing any button.
1. Super Freeze(

Super Freeze will quickly lower the temperature within the freezer so food will freeze faster. This can lock in the vitamins and nutrients of fresh food and keep food fresh longer.
- When the function is activated, the temperature of the freezer is automatically switched to -24^ .
• In case of the maximum amount of food to be frozen, please wait about 24 h. - Super freeze automatically switches off after 52 hours and after 52 hours, the freezer temperature setting will revert back to the previous setting.
2. Artificial Intelligence(LAI)
- When the function is selected, the temperature of the appliance is automatically adjusted.
- When the Artificial Intelligence function is activated, the temperature of the fridge is automatically switched to 5^ and the freezer to -18^ .
3.Holiday(
If you are going to be away for a long period of time, you can activate this
function. When the function is activated, the temperature of the fridge is automatically switched to 15^ C and the freezer to -18^ C.
Important! Do not store any food in the fridge during this time.
Temperature setting
- You should choose to control Fridge( ) temperature or Freezer( ) temperature
by pressing the “” button in unlock sate. The corresponding icon of the selected compartment will flash, and the other one will stay on.
- You can press the “TEMP” button to control the Fridge temperature when the corresponding icon( ) flashes. When you press the button continuously, the temperature will be set as the following
sequence.

- You can press the “TEMP” button to control the Freezer temperature when the corresponding icon(Ⅱ) flashes. When you press the button continuously, the temperature will be set as the following sequence.

Door Alarm
- If the door of fridge or freezer is open for over 2 minutes, the door alarm will sound. The buzzer will automatically stop alarming 10 minutes later.
- To save energy, please avoid keeping the door open for a long time when using the appliance. The door alarm can be cleared by closing the door.
Display Controls(Only for some products)
Use your appliance according to the following control regulations, your appliance has the corresponding functions as the display panels showed in the pictures below.
Controlling the temperature
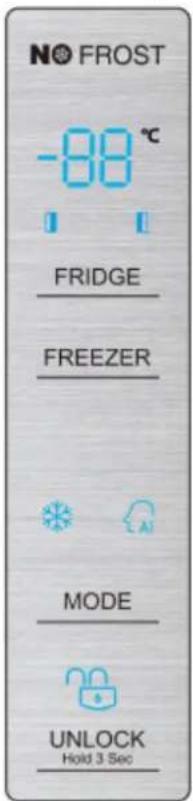
text_image
NO FROST -88 °C FRIDGE FREEZER MODE UNLOCK Hold 3 SecFor optimum food preservation, we recommend that when you start your refrigerator for the first time, the temperature for the refrigerator is set to 5°C and the freezer to -18°C. If you want to change the temperature, follow the instructions below.
Note: High temperature setting will accelerate food waste.
Caution! When you set a temperature, you set an average temperature for the whole refrigerator cabinet. Temperatures inside each compartment
may vary from the temperature values displayed on the panel, depending on how much food you store and where you place them. Ambient temperature may also affect the actual temperature inside the appliance.
Unlock
When the appliance is powered on for the first time, the backlighting of the icons on display panel starts working. If no buttons have been pressed and the doors are closed, the backlighting will turn off after 60 seconds.
All the buttons are locked if the icon “💡”
is illuminated, press the “ 3 Sec ” button
for 3 seconds to unlock them. And it will be locked itself after 20 seconds no pressing
any button.
Mode Selection
You can select “*” “A” two modes by pressing the “MODE” button in the unlock sate. And it will be selected after 10 seconds no pressing any button.
1. Super Freeze( )
Super Freeze will quickly lower the temperature within the freezer so food will freeze faster. This can lock in the vitamins and nutrients of fresh food and keep food fresh longer.
- When the function is activated, the temperature of the freezer is automatically switched to -24^ .
• In case of the maximum amount of food to be frozen, please wait about 24 hours. - Super freeze automatically switches off after 52 hours and after 52 hours, the freezer temperature setting will revert back to the previous setting.
2. Artificial Intelligence( { AI })
- When the function is selected, the temperature of the appliance is automatically adjusted.
- When the Artificial Intelligence function is activated, the temperature of the fridge is automatically switched to 5^ and the freezer to -18^ .
Temperature setting
- You can press the “FRIDGE” button to control the Fridge temperature when the
corresponding icon( )flashes. When you
press the button continuously, the temperature will be set as the following
sequence.

- You can press the “FREEZER” button to control the Freezer temperature when the corresponding icon( ) flashes. When you press the button continuously, the temperature will be set as the following sequence.

Door Alarm
- If the door of fridge or freezer is open for over 2 minute, the door alarm will sound. The buzzer will automatically stop alarming 10 minutes later.
- To save energy, please avoid keeping the door open for a long time when using the appliance. The door alarm can be cleared by closing the door.
Display Controls(Only for some products)
Use your appliance according to the following control regulations, your appliance has the corresponding functions and modes as the control panels showed in the pictures below. When the appliance is powered on for the first time, the backlighting of the icons on display panel will be illuminated for 3 seconds, then the display panel starts working. If no buttons have been pressed and the fridge door has no open/close motion, the backlighting will turn off after 1 minutes.
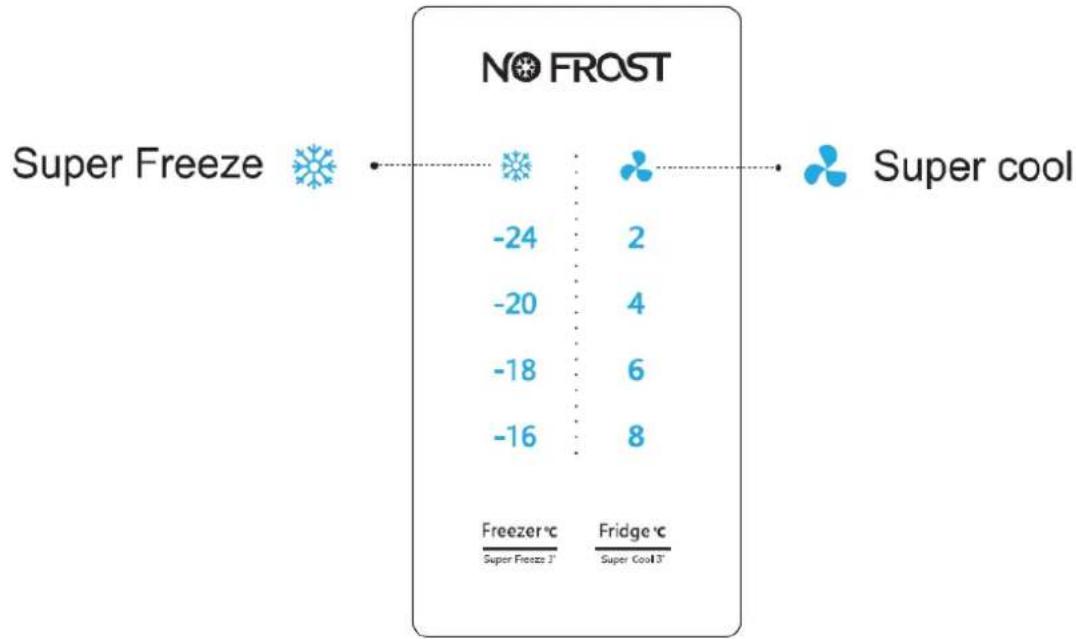
other
| Product | Temperature (°C) | | :--- | :--- | | Super Freeze | -24 | | Super Freeze | -20 | | Super Freeze | -18 | | Super Freeze | -16 | | Super FROST | 2 | | Super FROST | 4 | | Super FROST | 6 | | Super FROST | 8 | | Super cool | | | Fridge °C | Super Cool 3° |Controlling the temperature
We recommend that when you star your refrigerator for the first time, the temperature for the refrigerator is set to 4^ C, and the freezer to -18^ C. If you want to change the temperature, follow the instructions below.
Caution! When you set a temperature, you set an average temperature for the whole refrigerator cabinet. Temperatures inside each compartment may vary from the temperature values displayed on the panel, depending on how much food you store and where you place them. Ambient temperature may also affect the actual temperature inside the appliance.
1. Freezer
Press the middle part of ^cSuper Freezer^d button to set the freezer temperature between -16°C and -24°C to suit your desired temperature, and the freezer temperature indicator will display corresponding value according to the following sequence.
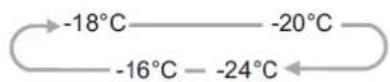
2. Fridge
Press the middle part of ^ CoolT button to set your desired fridge temperature between 8^ and 2^ , and the fridge temperature indicator will display corresponding value according to the following sequence.
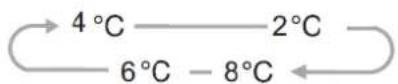
3. Super Freeze

Super Freeze can rapidly lower frozen temperature and freeze you
food substantially faster than usual.
- This feature also helps to keep vitamins and nutrition of fresh food for longer period.
- Press the middle part of a Freezer button for 3 seconds to activate the super freeze function. The light will be illuminated and the freezer temperature indicator will display -24°C.
- Super freeze automatically switches off after 52 hours.
- When super freeze function is on you can switch off super freeze function by pressing the middle part of ^ Freeze^ button and the freezer temperature setting will revert back to the previous setting.
Note: When selecting the Super Freeze function, ensure there are no bottled or
canned drinks (especially carbonated drinks) in the freezer compartment. Bottles and cans may expode.
4. Super Cool
Super Cool can refrigerate the food quicker and, keep food fresh for a longer period
Press the middle part of ^ CondT button for 3 seconds to activate this function. The light ✿ will be illuminated and the fridge temperature indiactor will display 2^ .
Super cool automatically switches off after 3 hours.
When super cool function is on you can switch it off by pressing the middle part of ^cSuper Cool^2 button and the refrigerator temperature setting will revert back to the previous setting.
Using your appliance
This section tells you how to use most of the useful features. We recommend that you read through them carefully before using the appliance. it may be different depending on the model
1. Adjust the door
When you find the doors are not at the same level, you can use the screwd river to adjust the door.
When the freezer door is upper than the refrigerator door. First, you can use the screwdriver to turn the bolt anticlockwise on the lower hinge that can make the door go up. Then use the screwdriver to lock the nut in place.
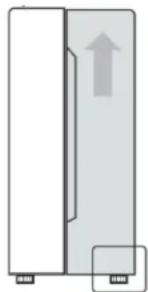
natural_image
Diagram of a refrigerator with an upward arrow indicating motion, shown in two views (no text or symbols)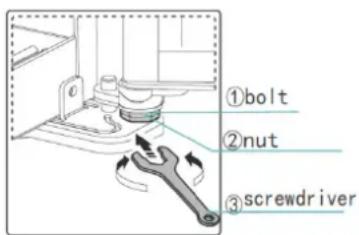
text_image
①bolt ②nut ③screwdriver2. Using your refrigerator compartment
The refrigerator compartment is suitable for storage of vegetables and fruit. Food inside should be packed to store in order to avoid losing moisture or flavor permeating into other foods.
Caution! Never close the refrigerator door while the shelves, crisper and/or telescopic slides are extended. It may damage both them and the refrigerator.
Glass shelves and Door racks
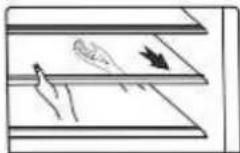
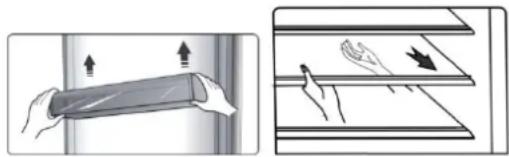
The glass shelves and door racks are suitable for the storage of eggs, canned liquid, bottled drinks and packed food. They can be placed a different heights according to your need. But do not place too many heavy things in racks. Before you lift up the door shelf vertically, please take the food out.
natural_image
Illustration showing a cylindrical object being held by two hands, with arrows indicating motion direction (no text or symbols)When you remove the shelves, gently pull them forward until the shelf comes clear of the shelf guides.
When you return the shelves, make sure there is no obstacle behind and gently push the shelf back into the position.
Note: All the door racks and shelves can be taken out to be cleaned.
Drawers
These are suitable for storage of fruits and vegetables. And it can be taken out to be cleaned.
To take them out, open the door to the final location first. Then pull out the drawer and tilt up the front of the drawer after moving slightly in the direction.
3. Using the freezer compartment
The freezer compartment is suitable for storage of food which needs to be frozen, including meat, fish, ice cream, etc..
Caution! Never close the door while the shelves and/or drawers are extended. It may damage both them and the refrigerator.
4. Using your ice box (only for the model with ice box)
The ice box is as an independent part that can be taken out of the freezing chamber.
Using the ice box
- Take out the ice box placed on a platform, then pour water level shall not exceed the maximum line.
- Place the filled ice box back to the
freezing room.
- When ice cubes form, twist the knobs dockwise and the the ice will drop into the ice box below.
- Ice cubes can be stored in the ice box, if you need them, you can pull out the ice box and take them out.
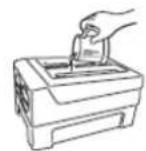
water injection
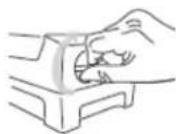
take off ice
Note: If the ice box is used for the first time or has not been used for a long time please clean it before using.
5. Water Dispenser (only for the model with Water Dispenser)
The water dispenser, located in the fridge door, is for storing drinking water.
With this appliance you can obtain chilled water easily without opening the refrigerator. You should be informed of following tips.
- Before using
Before using this appliance for the first time, you should use it as follows.
-
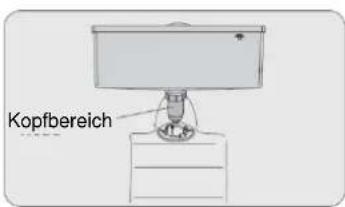
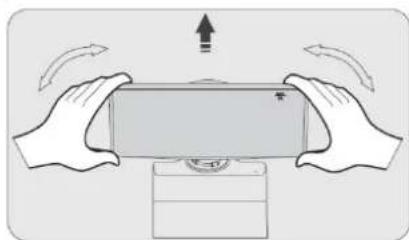
Hold the two sides of the water tank tightly, then pull up the water tank by shaking up and down.
-
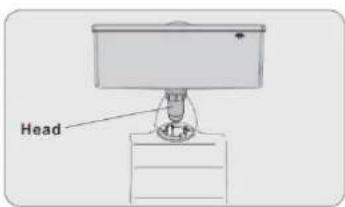
Unscrew the head, then clean it and the inside of water tank.
①
natural_image
Illustration of hands holding a battery with arrows indicating motion (no text or symbols)②
text_image
Head- Assembling
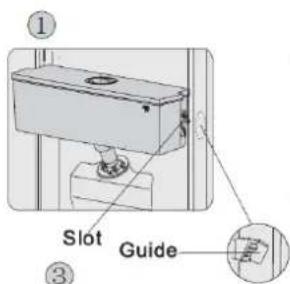
Before assembling, please drain the water inside the tank, and check whether the washer is reversed or not.
- Insert the head into the hole.
- Fit the tank along the guides on the door.
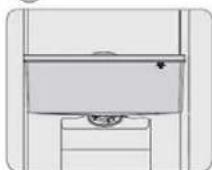
- Press down on the two side of the tank.
- When you hear a click sound, that means the installation is completed.
text_image
① Slot Guide ③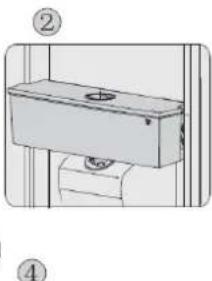
natural_image
Technical line drawing of a mechanical housing or enclosure with labeled components (no text or symbols present)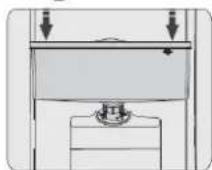
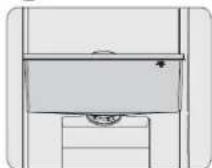
Warning!
- Be careful not to press on the head;
- When fitting the water tank, ensure the head inserted into the hole first;
- Filling water
Before you fill the drinking water into the water tank, ensure that the water tank is steady and in a correct position.
Caution!
Fill with water up to 3L (which is suggested), and not above the level.
Otherwise, it may overflow when the lid is close.
We recommend that you fill the water by the following ways.
- Remove the small lid and fill water from the inlet of the large lid.
- Remove the cover of the tank, and then fill water inside directly.
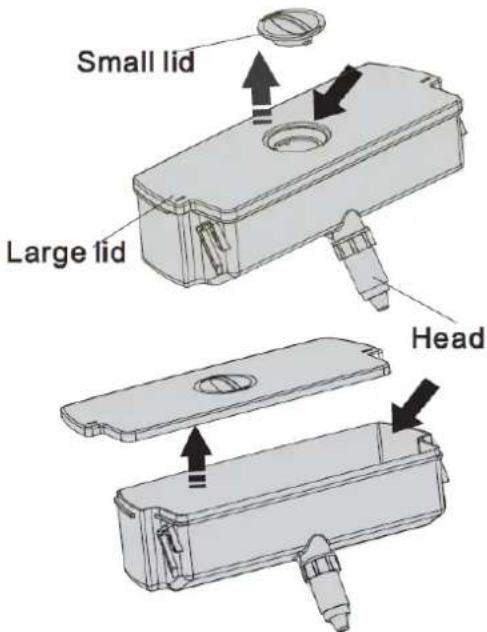
text_image
Small lid Large lid HeadWarning!
Don't touch other parts of the appliance when filling water, it may cause the water leakage.
- Dispensing water
- Make sure the cover of the water tank is fitted on.
- Close the fridge door and check the dispenser.
- Receiving Water
You should use the correct cups to receive water underneath the water dispenser.
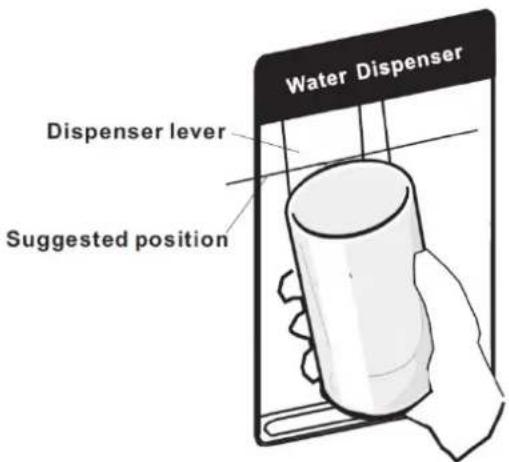
text_image
Water Dispenser Dispenser lever Suggested positionWarning!
Don't push the dispenser lever forward without cup, it may cause the water leak from the dispenser.
- Cleaning
- Put the water tank out of the door carefully, and then wash the tank, lid, and head lightly in water.
- After you have successfully cleaned the appliance, you should dry it by natural drying or using the dryer.
- If you have used the water dispenser for many times, the water in the receiving tank may drop on the floor, which may make your floor wet, and you should clean the tank with dry towel regularly before overflow.
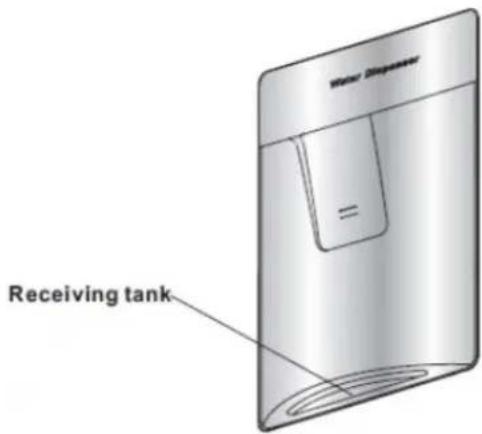
text_image
Water Separator = Receiving tankCleaning and care
For hygienic reasons the appliance (including exterior and interior accessories) should be cleaned regularly at least every two months.
Caution!
The appliance must not be connected to the mains during cleaning. Danger of electrical shock! Before cleaning switch the appliance off and remove the plug from the mains socket.
Exterior cleaning
To maintain good appearance of your appliance, you should clean it regularly.
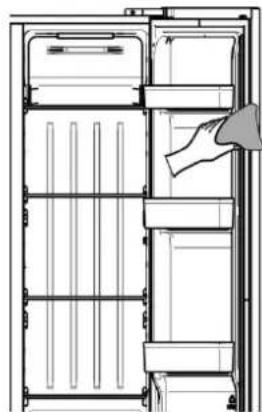
- Spray water onto the cleaning cloth instead of spraying directly on the surface of the appliance. This helps ensure an even distribution of moisture to the surface.
- Clean the doors, handles and cabinet surfaces with a mild detergent and then wiped dry with a soft cloth.
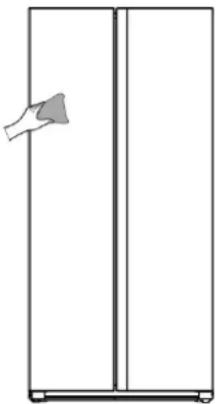
natural_image
Simple line drawing of a door with a handle, no text or symbols presentCaution!
- Don't use sharp objects as they are likely to scratch the surface.
- Don't use Thinner, Car detergent, Clorox, ethereal oil, abrasive cleansers or organic solvent such as Benzene for cleaning. They may damage the surface of the appliance and may cause fire.
Interior cleaning
You should clean the appliance interior regularly. It will be easier to clean when food stocks are low. Wipe the inside of the fridge freezer with a weak solution of bicarbonate of soda, and then rinse with warm water using a wrung-out sponge or cloth. Wipe completely dry before replacing the shelves and baskets. Thoroughly dry all surfaces and removable parts before putting them back into place.
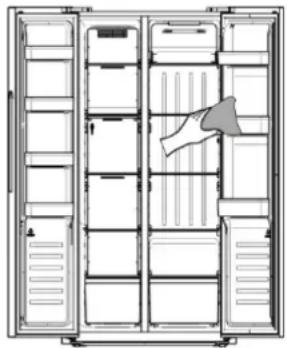
natural_image
Top-down schematic of a multi-level refrigerator with doors, drawers, and a hand pointing to the interior (no text or labels)Although this appliance automatically defrosts, a layer of frost may occur on the freezer compartment's interior walls if the freezer door is opened frequently or kept open too long. If the frost is too thick, choose a time when the freezer is nearly empty and proceed as follow:
- Remove existing food and accessories baskets, unplug the appliance from the mains power and leave the doors open. Ventilate the room thoroughly to accelerate the process.
- When defrosting is completed, clean your freezer as described above.
- The gaps beside the freezer wind channel part are difficult to clean by wipe. You can use a pressure sprayer to help you clean. Spray weak solution of bicarbonate of soda firstly, and then rinse with warm water. Wipe completely dry after clean.
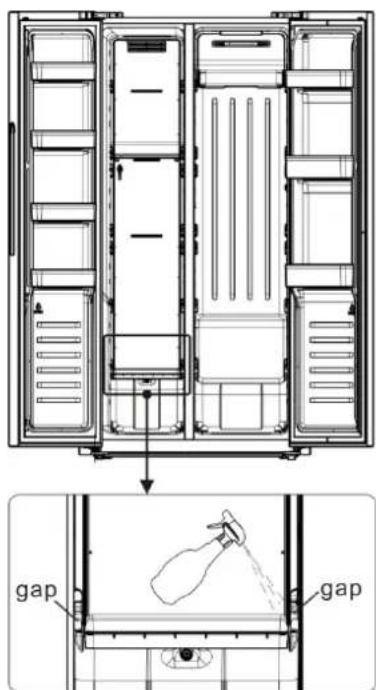
text_image
Technical diagram of a refrigerator interior with labeled gap areas and a close-up showing the gap between two compartments.Warning!
Do not use sharp objects to remove frost from the freezer compartment. Only after the interior is completely dry should the appliance be switched back on and plugged back into the mains socket.
Door seals cleaning
Take care to keep door seals clean. Sticky food and drinks can cause seals to stick to the cabinet and tear when you open the door. Wash seal with a mild detergent and warm water. Rinse and dry it thoroughly after cleaning.
natural_image
Line drawing of a refrigerator interior showing door, front panel, and side panels (no text or symbols)Caution! Only after the door seals are completely dry should the appliance be powered on
Replacing the LED light:
Warning: The LED light must not be replaced by the user! If the LED light is damaged, contact the customer helpline for assistance. To replace the LED light, the below steps can be followed:
- Unplug your appliance.
- Remove light cover by pushing up and out.
- Hold the LED cover with one hand and pull it with the other hand while pressing the connector latch.
- Replace LED light and snap it correctly in place.
Helpful hints and tips
Energy saving tips
We recommend that you follow the tips below to save energy.
- Try to avoid keeping the door open for long periods in order to conserve energy.
Ensure the appliance is away from any sources of heat (Direct sunlight, electric oven or cooker etc) - Don't set the temperature colder than necessary.
- Don't store warm food or evaporating liquid in the appliance.
- Place the appliance in a well ventilated, humidity free, room. Please refer to Installing your new appliance chapter.
- If the diagram shows the correct combination for the drawers, crisper and shelves, do not adjust the combination as this is designed to be the most energy efficient configuration.
Hints for fresh food refrigeration
- Do not place hot food directly into the fridge or freezer, the internal temperature will increase resulting in the compressor having to work harder and will consume more energy.
- Do cover or wrap the food, particularly if it has a strong flavor.
- Place food properly so that air can circulate freely around it.
Hints for refrigeration
- Meat (All Types) Wrap in polythene food: wrap and place on the glass shelf above the vegetable drawer. Always follow food storage times and use by dates suggested by manufacturers.
• Cooked food, cold dishes, etc.:
They should be covered and may be placed on any shelf.
- Fruit and vegetables:
They should be stored in the special drawer provided.
- Butter and cheese:
Should be wrapped in airtight foil or plastic film wrap.
- Milk bottles:
Should have a lid and be stored in the door racks.
Hints for freezing
- When first starting-up or after a period out of use, let the appliance run at least 2 hours on the higher settings before putting food in the compartment.
•Prepare food in small portions to enable it to be rapidly and completely frozen and
to make it possible to subsequently thaw only the quantity required.
- Wrap up the food in aluminum foil or polyethylene food wraps which are airtight,
- Do not allow fresh, unfrozen food to touch the food which is already frozen to avoid temperature rise of the latter.
- Iced products, if consumed immediately after removal from the freezer compartment, will probably cause frost burns to the skin.
- It is recommended to label and date each frozen package in order to keep track of the storage time.
Hints for the storage of frozen food
- Ensure that frozen food has been stored correctly by the food retailer
- Once defrosted, food will deteriorate rapidly and should not be re-frozen. Do not exceed the storage period indicated by the food manufacturer.
Switching off your appliance
If the appliance needs to be switched off for an extended period, the following steps should be taken prevent mould on the appliance.
- Remove all food.
- Remove the power plug from the mains socket.
- Clean and dry the interior thoroughly.
- Ensure that all the doors are wedged open slightly to allow air to circulate.
Troubleshooting
If you experience a problem with your appliance or are concerned that the appliance is not functioning correctly, you can carry out some easy checks before calling for service, please see below.
Warning! Don't try to repair the appliance yourself. If the problem persists after you have made the checks mentioned below, contact a qualified electrician, authorized service
engineer or the shop where you purchased the product.
Warning! A child entrapment warning statement is included in either the operating instructions or in a use and care manual provided with each refrigerator.
DANGER: Risk of child entrapment. Before you throw away your old refrigerator or freezer:
- Take off the doors.
- Leave the shelves in place so that children may not easily climb inside.
| Problem Possible cause & Solution | |
| Appliance is not working correctly | Check whether the power cord is plugged into the power outlet properly. |
| Check the fuse or circuit of your power supply, replace if necessary. | |
| The ambient temperature is too low. Try setting the chamber temperature to a colder level to solve this problem. | |
| It is normal that the freezer is not operating during the defrost cycle, or for a short time after the appliance is switched on to protect the compressor. | |
| Odours from the compartments | The interior may need to be cleaned |
| Some food, containers or wrapping cause odours. | |
| Noise from the appliance | The sounds below are quite normal:Compressor running noises.Air movement noise from the small fan motor in the freezer compartment or other compartments.Gurgling sound similar to water boiling.Popping noise during automatic defrosting.Clicking noise before the compressor starts.Clicking noise when you get the water.The motor running noises when you get the ice. |
| Other unusual noises are due to the reasons below and may need you to check and take action:The cabinet is not level.The back of appliance touches the wall.Bottles or containers fallen or rolling. | |
| The motor runs continuously | It is normal to frequently hear the sound of the motor, it need to run more when in following circumstances:Temperature setting is set colder than necessaryLarge quantity of warm food has recently been stored within the appliance.The temperature outside the appliance is too high.Doors are kept open too long or too often.After your installing the appliance or it has been switched off for a long time. |
| A layer of frost occurs in the compartment | Check that the air outlets are not blocked by food and ensure food is placed within the appliance to allow sufficient ventilation. Ensure that door is fully closed. To remove the frost, please refer to the “Cleaning and care” chapter. |
| Temperature inside is too warm | You may have left the doors open too long or too frequently; or the doors are kept open by some obstacle; or the appliance is located with insufficient clearance at the sides, back and top |
| Temperature inside is too cold | Increase the temperature by following the “Display controls” chapter. |
| Doors can’t be closed easily | Check whether the top of the refrigerator is tilted back by 10-15mm to allow the doors to self close, or if something inside is preventing the doors from closing. |
| Water drips on the floor | The water pan (located at the rear bottom of the cabinet) may not be properly leveled, or the draining spout (located underneath the top of the compressor depot) may not be properly positioned to direct water into this pan, or the water spout is blocked. You may need to pull the refrigerator away from the wall to check the pan and spout. |
| The light is not working | ●The LED light may be damaged. Refer to replace LED lights in cleaning and care chapter.●The control systems has disabled the lights due to the door being kept open too long, close and reopen the door to reactivate the lights. |
| Hear water bubbling in the refrigerator | This is normal. The bubbling comes from the refrigerant coolant liquid circulating through the refrigerator. |
Disposal of the appliance
It is prohibited to dispose of this appliance as household waste.
Packaging materials
Packaging materials with the recycle symbol are recyclable. Dispose of the packaging into a suitable waste collection container to recycle it.
Before disposal of the appliance
- Pull out the mains plug from the mains socket.
- Cut off the power cord and discard with the mains plug
Warning! Refrigerators contain refrigerant and gases in the insulation. Refrigerant and gases must be disposed of professionally as they may cause eye injuries or ignition. Ensure that tubing of the refrigerant circuit is not damage prior to proper disposal.
| Correct Disposal of this product | |
 | This marking indicates that this product should not be disposed with other household wastes throughout the EU. To prevent possible harm to the environment or human health from uncontrolled waste disposal, recycle responsibly to promote the sustainable reuse of material resources. To return your used device, please use the return and collection systems or contact the retailer where the product was purchased. They can take this product for environmental safe recycling. |
To avoid contamination of food, please respect the following instructions
- Opening the door for long periods can cause a significant in crease of the temperature in the compartments of the appliance.
- Clean regularly surfaces that can come in contact with food and accessible drainage systems.
- Store raw meat and fish in suitable containers in the refrigerator, so that it is not in contact with or drip onto other food.
- Two-star frozen-food compartments are suitable for storing pre-frozen food, storing or making icecream and making ice cubes.
- One-, two- and three- star compartments are not suitable for the freezing of fresh food.
| Order | Compartments TYPE | Target storage temp.[°C] | Appropriate food |
| 1 Fridge +2~+8 | Eggs, cooked food, packaged food, fruits and vegetables, dairy products, cakes, Drinks and other foods which are not suitable for freezing. | ||
| 2 (***)*-Freezer | ≤-18 | Seafood(fish, shrimp, shellfish), freshwater aquatic products and meat products(recommended time is 3 months – nutrition values and taste decrease with time), suitable for frozen fresh food. | |
| 3 ***-Freezer | ≤-18 | Seafood(fish, shrimp, shellfish), freshwater aquatic products and meat products(recommended time is 3 months – nutrition values and taste decrease with time). Not suitable for freezing fresh food. | |
| 4 **-Freezer | ≤-12 | Seafood(fish, shrimp, shellfish), freshwater aquatic products and meat products(recommended time is 2 months – nutrition values and taste decrease with time). Not suitable for freezing fresh food. | |
| 5 *-Freezer | ≤-6 | Seafood(fish, shrimp, shellfish), freshwater aquatic products and meat products(recommended time is 1 month – nutrition values and taste decrease with time). Not suitable for freezing fresh food. | |
| 6 0-star | -6~0 | Fresh pork, beef, fish, chicken, some packaged processed foods, etc.(Recommended to eat within the same day, preferably not later than 3 days). | |
| 7 Chill | -2~+3 | Fresh/frozen pork, beef, fish, chicken, freshwater aquatic products, etc.(7 days below 0°C and above 0°C is recommendedfor consumption within that day, preferably no more than 2 days). Seafood(less than 0 for 15 days, it is not recommended to store above 0°C). | |
| 8 Fresh Food 0~+4 | Fresh pork, beef, fish, chicken, cooked food, etc.(Recommended to eat within the same day, preferably no more than 3 days). | ||
| 9 Wine +5~+20 red wine, white wine, sparkling wine etc. | |||
Note: please store different foods according to the compartments or target storage temperature of your purchased products.
- If the refrigerating appliance is left empty for long preiods, switch off, defrost, clean, dry, and leave the door open to prevent mould developing within the appliance.
Water dispenser cleaning(special for water dispenser products):
- Clean water tanks if they have not been used for 48h; flush the water system connected to a water supply if water has not been drawn for 5 days.
WARNING! Food needs to be packed in bags before putting into the refrigerator, and liquids need to be packed in bottles or capped containers to avoid the problem that the product design structure is not easy to clean.
Hisense
life reimagined
natural_image
Pure technical line drawing of a vertical panel or enclosure with a base and mounting bracket (no text or symbols)Patas inferiores ajustables

natural_image
Technical line drawing of a vertical structural component with a 0.5° angle标注 (no text or symbols beyond the angle marker)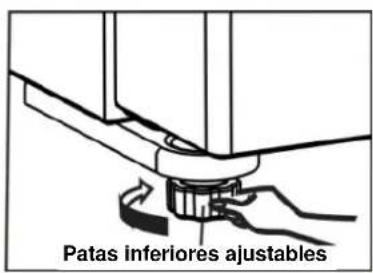
text_image
Patas inferiores ajustablestext_image
Diagram of a refrigerator interior with numbered compartments for identificationtext_image
Labeled diagram of a refrigerator interior showing 18 compartments with numbered annotationsnatural_image
Simple line drawing of a refrigerator with an upward arrow indicating motion (no text or symbols)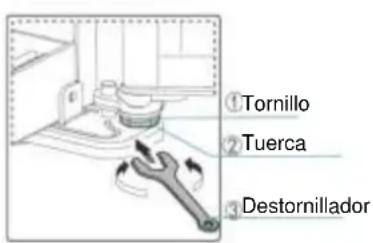
text_image
①Tornillo ②Tuerca ③Destornilladornatural_image
Illustration showing a hand holding a rectangular object with arrows indicating motion, alongside a close-up of the hand interacting with a shelf (no text or symbols)text_image
Diagram illustrating two steps of a device operation: (1) press or press with upward motion, and (2) Cabezal testing setup.- Montaje
text_image
Tanque receptorLimpieza y cuidado
natural_image
Simple line drawing of a door with a handle, no text or symbols present¡Precaución!
natural_image
Top-down schematic of a multi-level storage or refrigerator unit with internal compartments and a hand pointing to one panel (no text or labels)natural_image
Line drawing of a refrigerator interior with a hand pointing to the door (no text or symbols)natural_image
Pure technical line drawing of a vertical panel or enclosure with a base, no text or symbols presentPieds ajustable arrière res
natural_image
Technical line drawing of a vertical panel or enclosure with a 0.5° angle标注 (no text or symbols beyond the angle marker)
text_image
Pieds ajustable arriè restext_image
Diagram of a refrigerator interior with numbered compartments for identificationnatural_image
Simple line drawing of a refrigerator with an upward arrow and base (no text or symbols)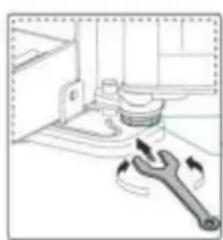
natural_image
Diagram showing a wrench working on a kitchen sink with a mounted fixture (no text or symbols visible)①Boulon
Écrou
Tournevis
natural_image
Two line drawings showing hands using a device to press or install a package (no text or symbols present)natural_image
Illustration of hands holding a smartphone with motion arrows indicating movement (no text or symbols)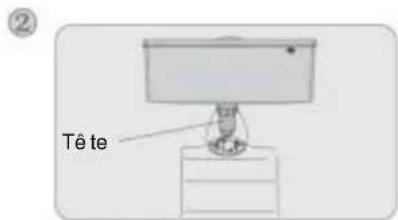
text_image
② Tête- Assemblage
natural_image
Simple line drawing of a refrigerator with a handle, no text or symbols presentMise en garde!
natural_image
Interior view of a multi-level refrigerator with doors, drawers, and a hanging arm (no text or symbols visible)natural_image
Line drawing of a refrigerator interior with handle and door (no text or symbols)natural_image
Pure technical line drawing of a vertical panel or enclosure with a base and mounting bracket (no text or symbols)natural_image
Technical line drawing of a vertical structural component with a 0.5° angle标注 (no text or symbols beyond the angle marker)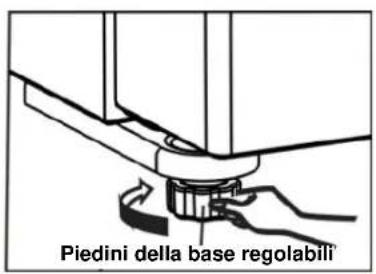
text_image
Diagram of a refrigerator interior with numbered compartments for identificationtext_image
Labeled diagram of a refrigerator interior showing 18 numbered compartments and doorsbar
| Condition | Value | |---|---| | Super Congelatore | -24 | | Super Congelatore | -20 | | Super Congelatore | -18 | | Super Congelatore | -16 | | Super FROST | 2 | | Super FROST | 4 | | Super FROST | 6 | | Super FROST | 8 | The chart displays a single bar representing the temperature range (in °C) for the 'No Frost' appliance. Below it is a legend indicating 'Freezer °C' and 'Fridge °C'. The label 'Super Congelatore' appears twice, while 'Super Cool' appears twice, suggesting different conditions or categories. The label 'Super Cool' appears twice, likely indicating a different condition or type. The chart is in English.natural_image
Simple line drawing of a refrigerator with an upward arrow and base blocks (no text or symbols)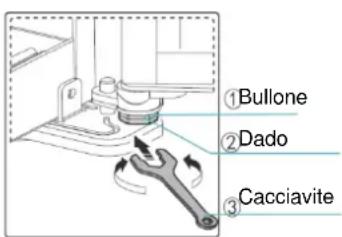
text_image
①Bullone ②Dado ③Cacciavitenatural_image
Illustration of hands holding a cylindrical object with upward arrows indicating motion or force (no text or symbols)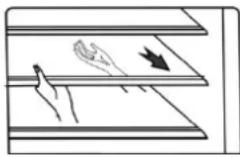
natural_image
Illustration of hands holding a smartphone with arrows indicating motion (no text or symbols)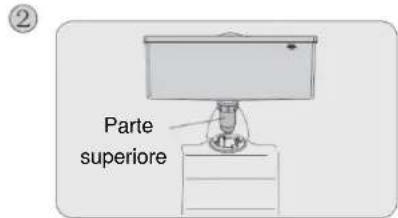
text_image
② Parte superiore- Montaggio
text_image
① ② Fessura Guida ③ ④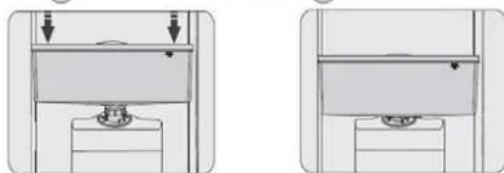
natural_image
Two technical diagrams showing mechanical components with arrows indicating motion or force direction (no text or symbols)Avvertenza!
natural_image
3D diagram of a device with a labeled component and curved surfaces, no text or symbols presentnatural_image
Simple line drawing of a door with a handle, no text or symbols presentAttenzione!
natural_image
Top-down schematic of a multi-level storage or refrigerator unit with internal compartments and a hand pointing to one panel (no text or symbols)text_image
Technical diagram of a multi-level storage unit with spazio and spazio components, showing internal compartments and structural details.Avvertenza!
natural_image
Line drawing of a refrigerator interior showing door, front panel, and side compartments (no text or symbols)natural_image
Pure technical line drawing of a vertical panel or enclosure with a base, no text or symbols presentnatural_image
Architectural line drawing of a vertical structure with a 0.5° angle标注 (no text or symbols beyond the angle marker)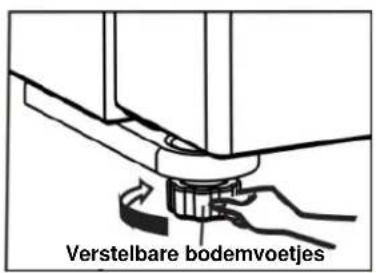
text_image
Diagram of a refrigerator interior with numbered compartments for identificationtext_image
Labeled diagram of a refrigerator interior showing 18 compartments with numbered annotations for identification.text_image
Labeled diagram of a refrigerator interior showing 18 numbered compartments and doorstext_image
Around Cooling Fridge Freezer ZONE -88 TEMP. MODE/UNLOCK Hot./Armnatural_image
Simple line drawing of a refrigerator with an upward arrow and base blocks (no text or symbols)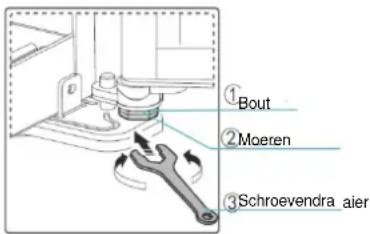
text_image
①Bout ②Moeren ③Schroevendra aier2. Gebruik van uw
koelkastcompartiment
natural_image
Illustration of hands holding a cylindrical object with upward arrows indicating motion or force (no text or symbols)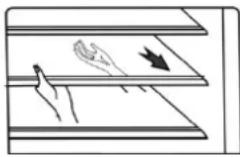
natural_image
Simple line drawing of a door with a handle, no text or symbols presentLet op!
natural_image
Top-down schematic of a multi-level storage or ventilation system with no visible text, labels, or symbols.natural_image
Line drawing of a refrigerator interior with a hand pointing to the door (no text or symbols)text_image
2×100mm W 50-70 D ≥100 ≥100 D1 150° 135° W1text_image
Diagram of a refrigerator interior with numbered compartments for identificationVista do aparelho
text_image
Labeled diagram of a refrigerator interior showing 17 numbered compartments and doors opennatural_image
Simple line drawing of a refrigerator with an upward arrow and base (no text or symbols)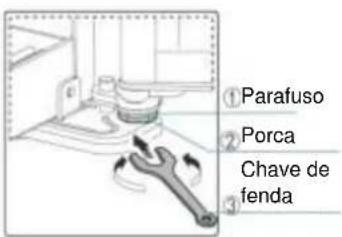
text_image
① Parafuso ② Porca ③ Chave de fendanatural_image
Illustration of a hand holding a rectangular object with upward arrows indicating motion or force (no text or symbols)