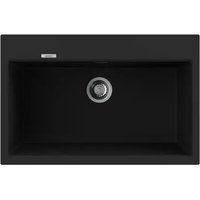
NorGranite 78.50 1B BK - Sink NODOR - Free user manual and instructions
Find the device manual for free NorGranite 78.50 1B BK NODOR in PDF.


| Brand | NODOR |
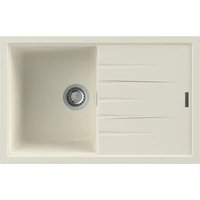
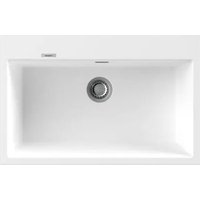
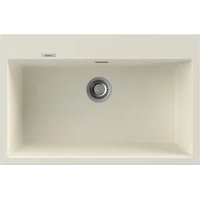
| Model | NorGranite 78.50 1B BK |
| Product type | Undermount sink |
| Material | Composite granite |
| Color | Black (BK) |
| Number of basins | 1 basin |
| Approx. dimensions | 78.5 cm (length) x variable width |
| Faucet hole drilling | Pre-marked, to be drilled with a 35 mm hole saw |
| Fixing type | Swivel fixing clips |
| Compatible worktop thickness | 30 to 40 mm (with the provided clips) |
| Recommended sealant | Silicone sealant (not supplied) |
| Daily cleaning | Warm water, soft cloth, non-abrasive detergent |
| Stain cleaning | Liquid abrasive product in small quantity, rub gently |
| Descaling | White vinegar, non-abrasive nylon pad, rinse after 20 min |
| Prohibited | Abrasive cream/powder products, ammonia, caustic soda, formic acid |
| Usage precautions | Do not use as a cutting board; do not lean on the sink |
| Installation | Cut the worktop 10 mm inside the outline |
| Required tools | Ruler, pencil, drill, jigsaw, silicone, screwdriver, hammer |
| Warranty | Refer to the supplied manual |
Frequently Asked Questions - NorGranite 78.50 1B BK NODOR
User questions about NorGranite 78.50 1B BK NODOR
0 question about this device. Answer the ones you know or ask your own.
Ask a new question about this device
Download the instructions for your Sink in PDF format for free! Find your manual NorGranite 78.50 1B BK - NODOR and take your electronic device back in hand. On this page are published all the documents necessary for the use of your device. NorGranite 78.50 1B BK by NODOR.
USER MANUAL NorGranite 78.50 1B BK NODOR

NODOR
always innovating
ES MAMUALADPENSISTUBOCIONES
EN INSTERBOODIORSGRUSSE
FR MAMNELED D'UTILISATION
PT MANUALADENISIFUCÕES
DE GEBBAUCBISANWEISIGNIG
ES
Fig. 1.1
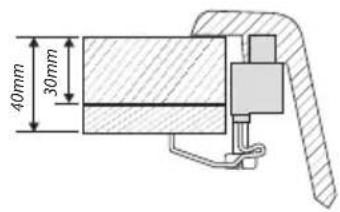
Fig. 1.2
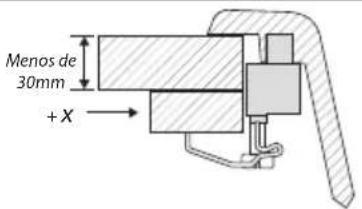
Fig. 1.3
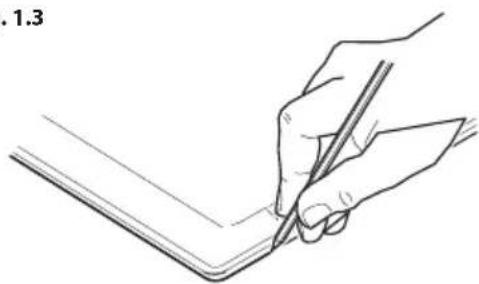
Fig. 1.4
Encimera
Instalador
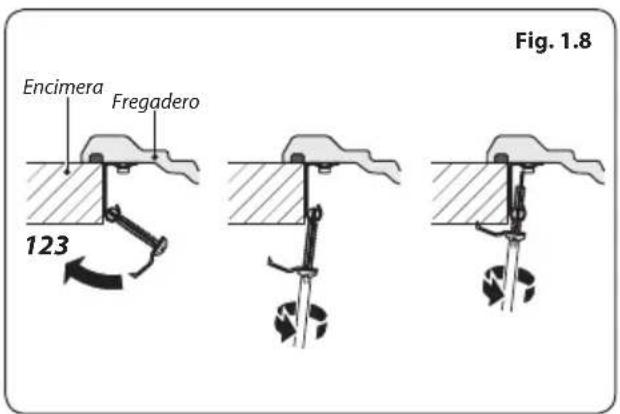
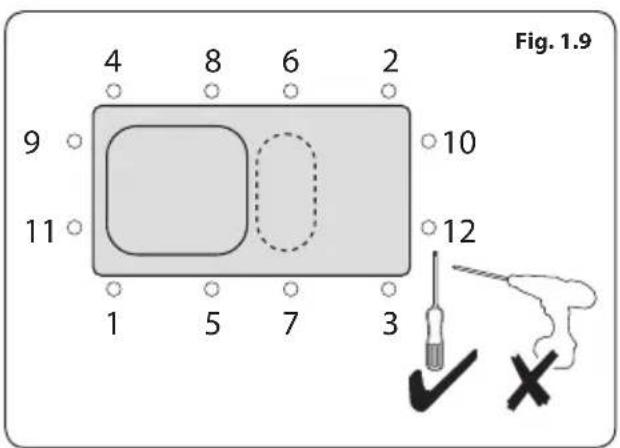
Fig. 1.2
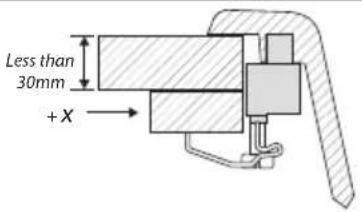
Fig. 1.3
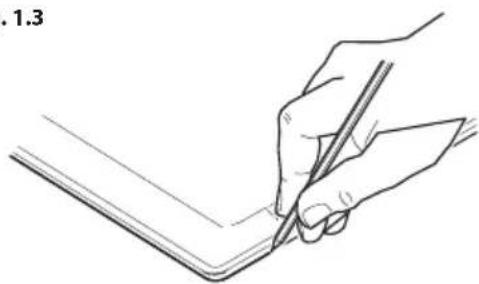
Fig. 1.4
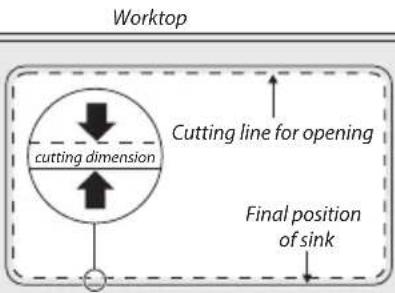
Fig. 1.5
Installer
Please leave this leafet with the user, as it contains valuable after care advice.
Tools Required
| Ruler/Tape Measure Pencil | |
| Masking Tape Safety Glasses | |
| Kitchen Silicone Sealant Screwdriver | |
| Hammer 35mm Hole Saw | (for cutting tap hole) |
| Drill Jigsaw & Suitable Blade | (if work top cutout is required) |
Notes
- During installation, take care to protect the sink from scuffs and scratches.
- Do not stand on the sink.
- During installation, do not stand the sink on its edges or corners. This may cause damage.
- Avoid straining and over tightening of all plumbing fixtures connected to the sink.
- Carefully check that the moulding and edges of the sink are dead level so that water will flow off the drainer.
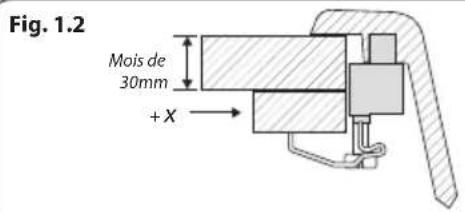
- The clamping brackets are suitable for worktops of between 30–40 mm thickness (Fig. 1.1). If your worktop is a different size then it may require packing under the clamps or rebating (Fig. 1.2).
Preparing the Worktop
Marking Out the Opening
We recommend that you fit the sink to the worktop before permanently fixing the worktop to the cabinet.
-
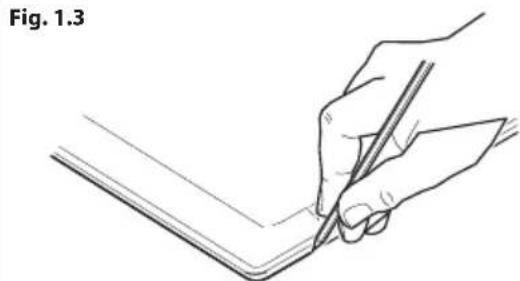
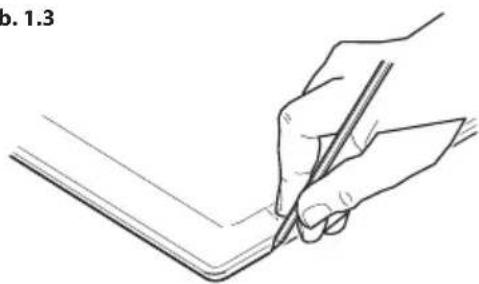
Place the sink upside down on the worktop. Position the sink on the worktop as required. Make sure the cabinet framework will clear all parts of the sink. Using a soft, sharp pencil draw around the sink as accurately as possible (Fig. 1.3). Remove the sink.
-
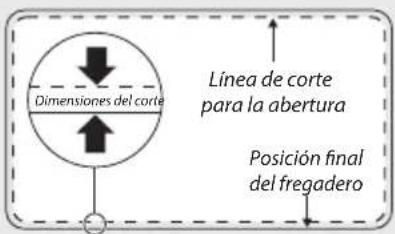
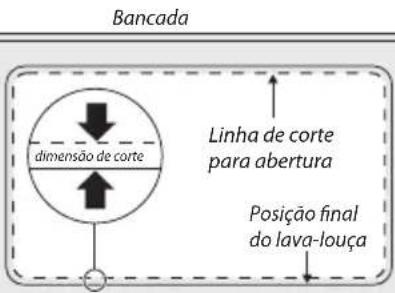
Draw another line 10 mm inside the sink top outline – this is the cutting line for the opening (Fig. 1.4).
- Drill as large a hole as possible inside the cutting line. Using a pad saw, jigsaw or similar, cut out the opening up to the cutting line.

Sealing the Edges of the Opening.
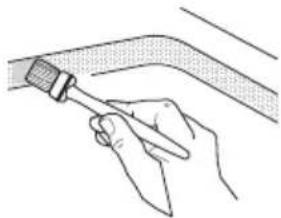
We recommend that porous edges around the cut-out are sealed using a waterproof sealant such as varnish, paint or wood glue. This will prevent swelling of the worktop should any small leaks occur (Fig. 1.5)
Preparing the Sink
Tap Hole Preparation
Drilling a pre-marked hole for taps
- Before drilling please read safety instructions supplied with hole saw.
- The front face must be fully supported to prevent cracking when drilling or cutting.
- WARNING!
Any machining operation will produce fine particles of dust. Drilling or cutting MUST be carried out in a well-ventilated area.
- Identify which pre marked tap hole(s) you will require.
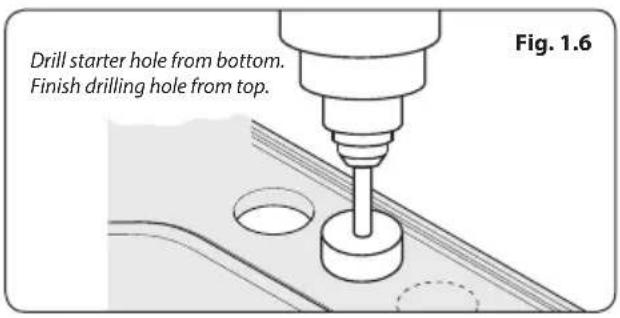
- Using a hole saw, drill out the tap hole part way from the underside of the sink Fig. 1.6. Finish drilling the hole from the upper surface of the sink to ensure a clean hole.
- It may be necessary to cool the tip of the drill with water to prevent burning. For this reason we recommend the use of a rechargeable drill. Take special care if using a mains electric drill around water.
- Attach the tap, waste and overflow (where required) to the sink according to the manufacturer's Instructions.
Applying the Silicon Sealant
• DO NOT use Epoxi sealant or Epoxi adhesive.
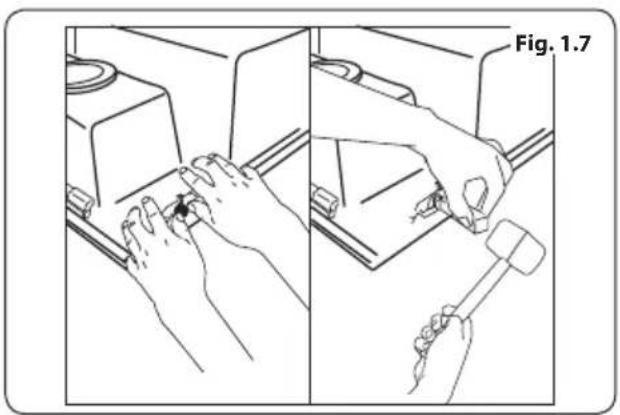
Apply a bead of "Silicone sealant" (not included) to the underside of the sink flange. For final fit, make sure each sink clip is pulled back as shown in Fig. 1.7. Position the sink into the work top opening.
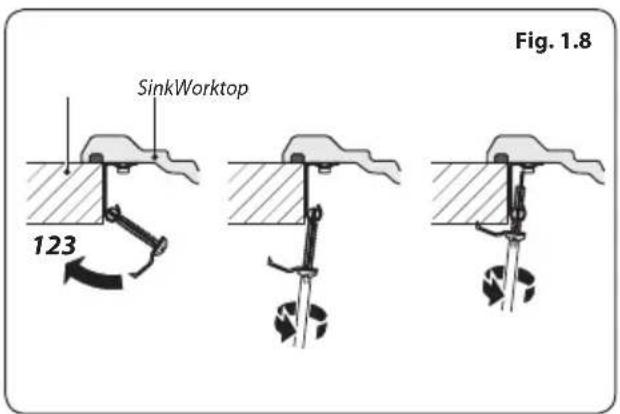
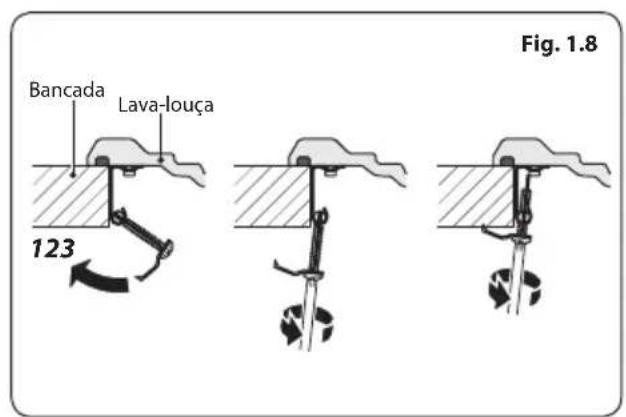
Secure the sink by pivoting the sink clips into the position Fig. 1.8 and tighten screws in the front, then tighten rear and side screws.
Waste Fittings
Fit the waste fittings to the sink using the instructions supplied with them. Apply a uniform bead of silicone onto the underside of the rim of the sink, 1/4 inch from the outeredges of the rim.
Fitting the Sink
- Turn the sink upside down and lay the
worktop over the sink. Swing each clip into place – this is the most effective method, although if the worktop has been fitted to the cabinet the sink can be placed in the opening and fixed in position from underneath.
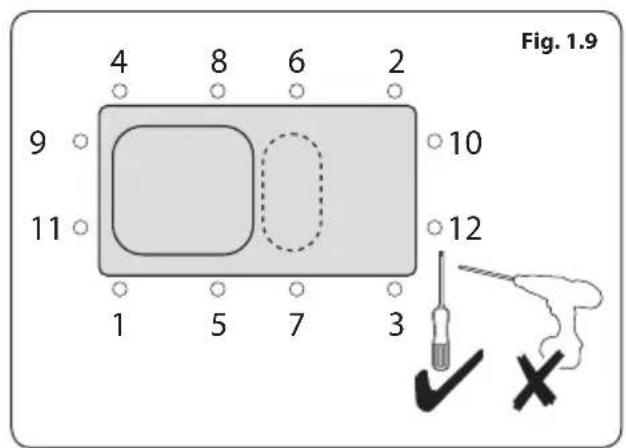
- Centre the sink. Tighten the fixing screws in the sequence shown in Fig. 1.9.
• DO NOT TIGHTEN FULLY AT FIRST ATTEMPT.
- Remove any surplus sealing material or wipe away any excess sealant.
Check for Leaks:
• Supply user tubes to faucet
• Supply riser tubes to shut off valves or lower connections
- Fill sink with water and check for leak around drain
- Release water from sink and check for possible leaks
- Tighten a s needed
After Care
Day-to-day care
Although your sink is made from extremely durable materials and will withstand a great deal of hard use, it can be scratched by hard or sharp objects. If the surfaces are to be kept in a blemish free condition reasonable care should be taken when handling such items.
- DO NOT USE THE DRAINER AS A CHOPPING BOARD.
Cleaning
Wash your sink using warm water, a soft cloth or non-abrasive woven nylon pad and a non-abrasive liquid cleaner or detergent. This can be done as often as the sink is used.
Metallic Abrasions or Heavy Stains:
Wipe the sink using a soft cloth or non-abrasive woven nylon pad and a liquid scouring product. Apply the liquid scouring product sparingly and rub lightly. Repeat as necessary until sink is clean.
Hard Water, Calcium and Lime Deposits:
Wipe with a non-Abrasive woven nylon pad and white vinegar. Rinse after 20 minutes.
- Do not use abrasive cleaning creams or powders, scrub pads or alkali cleaners such as ammonia, concentrated caustic soda, formic acid or anything highly corrosive.
PT
Fig. 1.1
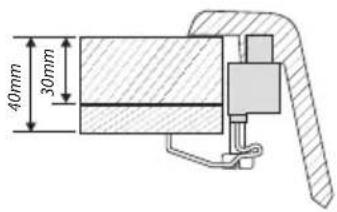
Fig. 1.2
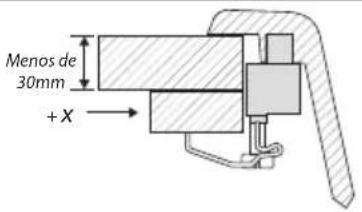
Fig. 1.3
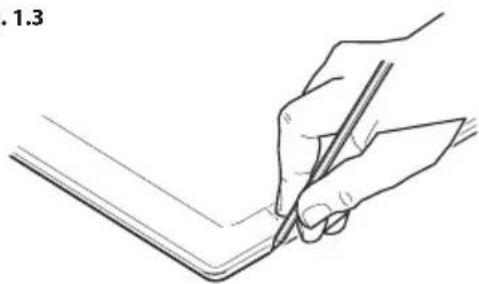
Fig. 1.4
Instalador
Installateur
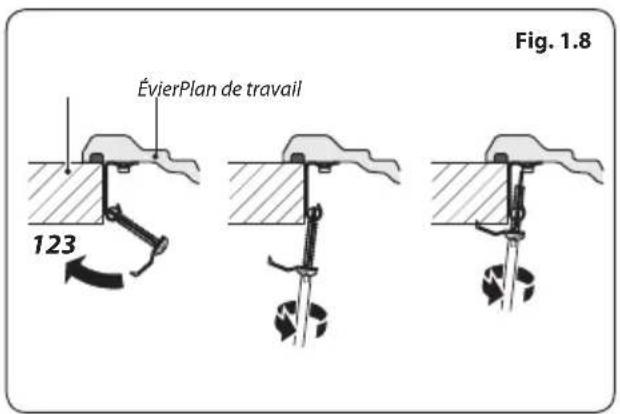
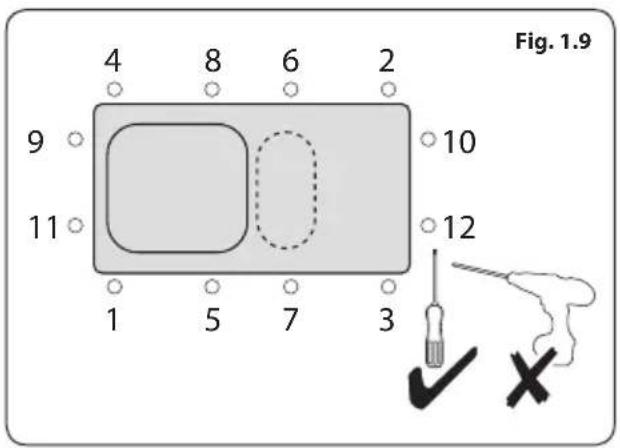
Abb. 1.2
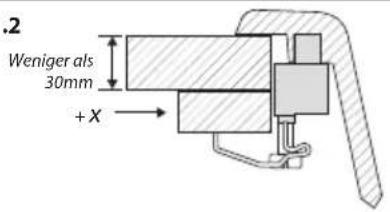
Abb. 1.3
Installateur
- NODOR
- ES
- INSTALADOR
- INSTALLER
- NOTES
- PREPARING THE WORKTOP
- MARKING OUT THE OPENING
- SEALING THE EDGES OF THE OPENING
- PREPARING THE SINK
- TAP HOLE PREPARATION
- DRILLING A PRE-MARKED HOLE FOR TAPS
- APPLYING THE SILICON SEALANT
- WASTE FITTINGS
- FITTING THE SINK
- CHECK FOR LEAKS
- AFTER CARE
- DAY-TO-DAY CARE
- CLEANING
- METALLIC ABRASIONS OR HEAVY STAINS
- HARD WATER, CALCIUM AND LIME DEPOSITS
- PT
- INSTALLATEUR
Brand : NODOR
Model : NorGranite 78.50 1B BK
Category : Sink