NorChef SO 4800 DB - Oven NODOR - Free user manual and instructions
Find the device manual for free NorChef SO 4800 DB NODOR in PDF.

User questions about NorChef SO 4800 DB NODOR
0 question about this device. Answer the ones you know or ask your own.
Ask a new question about this device
Download the instructions for your Oven in PDF format for free! Find your manual NorChef SO 4800 DB - NODOR and take your electronic device back in hand. On this page are published all the documents necessary for the use of your device. NorChef SO 4800 DB by NODOR.
USER MANUAL NorChef SO 4800 DB NODOR
PT MAMMALADDENSISTURÇÕES
natural_image
Technical line drawing of a kitchen grater with internal structure and ventilation duct (no text or symbols)text_image
Diagram of a refrigerator interior with numbered labels pointing to different compartments or fixtures.text_image
24mm 546mm 455mm 595mm 540mm 450mmtext_image
Hand interacting with a touchscreen interface, showing control buttons and navigation iconstext_image
User interface control panel with buttons and a hand interacting with the buttontext_image
Hand holding a digital interface with control buttons and a finger pointing to a button labeled '3'text_image
User interface control panel with numeric input fields and a hand pointing to the buttonCómo utilizar
text_image
End of cooking time 0 Alarm Clock CookingtimePlease read these instructions carefully before attempting to install or use this appliance.
It is advisable to keep these instructions in a safe place for future reference.
Introduction
Thank you for choosing this appliance.
It has been designed to give years of trouble-free use provided it is installed and maintained correctly.
Please read these instructions carefully before installing or using your appliance. It is advisable to keep your purchase and installation receipts with these instructions in a safe place for future reference. I nd uded is some important safety information in addition to guidelines and recommendations that will enable you to take full advantage of all the functions available.
This quality appliance has been tested and certified to meet all applicable electrical and safety standards.
T his appliance must be installed and connected in accordance with current regulations. After unpacking the appliance ensure that there is no visible damage. If the appliance has been damaged during transit, do not install or use it, contact your retailer immediately.
Content
- Content....1
- General warnings 2-3
- Replacing oven lamp....4
- Placing of accessories in the cavity ....5
- Environmental effect report ....6
- Safety cauti ons ....6
- A ccessori es....7
- Product overview ....8
- Product Dimension 8
- Product specification 9
- Installation precaution....10
- Installation....10
- Production caution ....11
- Control panel....12
- Quick start....13
- How to use .... 14
- Selection of food container ..... 14
- Suggested steaming time....15
- Maintenance and repair....16
- Troubleshooting....17
General warnings
-
This appliance shall not be used by children aged from 8 years and above and persons with reduced physical, sensory or mental capabilities, or lack of experience and knowledge, unless they have been given supervision or instruction on how to use the appliance in a safe way and understand the hazards involved. Children shall not play with the appliance. Cleaning and user maintenance shall not be made by children without supervision.
-
If the power supply cord is damaged, it must be replaced by the manufacturer, it's service agent or similarly qualified persons in order to avoid a hazard.
-
Please make sure that the power is well connected after installation.
-
The product will become hot when its in use, do not put any flammable products inside the oven.
-
Caution: the accessories or parts of the oven will become very hot when it is in use. Please keep away from children.
-
Do not use other abrasive cleaners and/or wire wool or metal tools with sharp edge to clean the oven door glass, as this may scratch the surface which may lead to damage of the oven door
-
Do not use steam clearer to clean the oven.
-
Please make sure that the power is disconnected before replacing the oven lamp to avoid electric shock.
-
Disposal must be carried out in accordance with local environmental regulations for waste disposal.
-
For more detailed information about treatment, recovery and recycling of this product, please contact your local authority, your household waste disposal service or the retailer where you purchased the product.

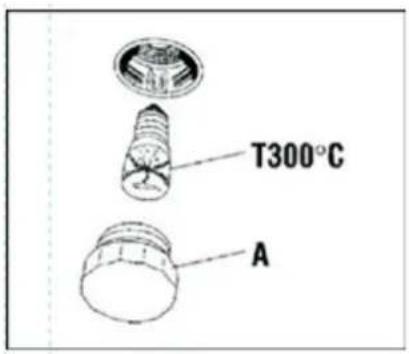
R eplacing of oven lamp
• Di sconnect with power supply
• Unscrew the glass cover attached to the lamp holder
- Unscrew the lamp and replace it with another high-temperature lamp (300°C) with the following characteristics:
text_image
T300°C A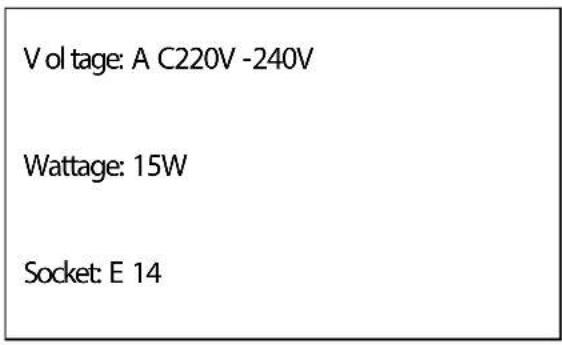
text_image
Vol tage: A C220V -240V Wattage: 15W Socket: E 14- R emount the glass cover and reconnect the appli ance to the power supply
WARNING: Ensure that the appliance is unplugged before replacing the lamp to avoid the possibility of electric shock.
Warning: Do not operate appliance with damaged cord or plug or after the appliance malf unctions, or has been damaged in any manner, return appliance to the nearest Authorized Service Center for examination, repair, or adjustment.
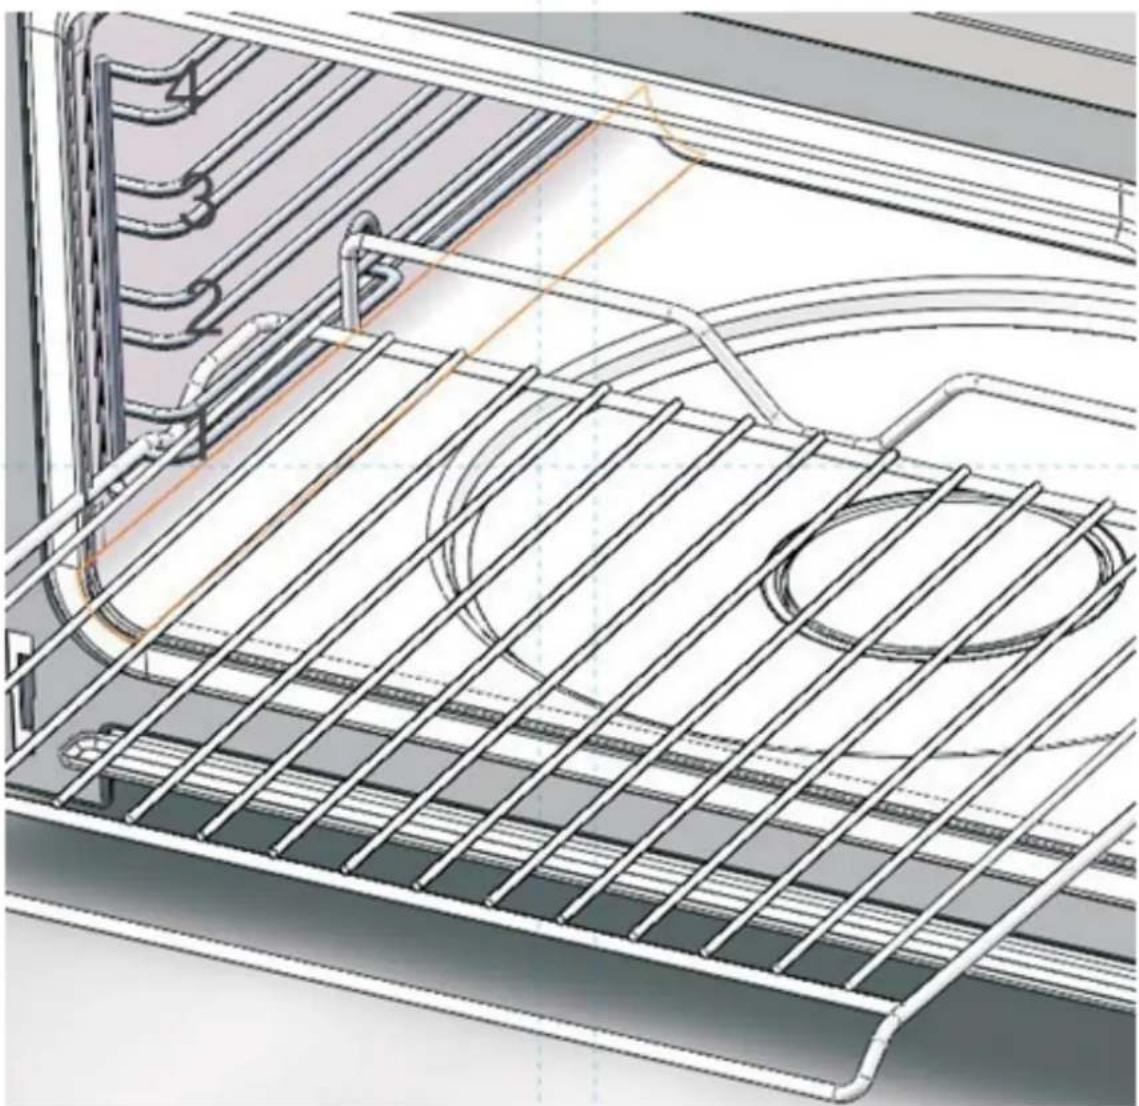
Fitting Oven Shelves
The deep pan and wired shelf have a side edge, there edges can match with the sliding rack on the sides of the cavity.
It can prevent the rack or tray from slipping out from the oven.
Deep pan and wired shelf in the position 1-4 marked
natural_image
Technical line drawing of an oven structure with internal grating and ventilation duct (no text or symbols)E nvi ronmental effect report
Please protect the environment, avoid pollution.
Please dispose the product as below:
Packing box, plastic material and other recyclable material should be disposed to recycle center. Battery or other dangerous material may lead to pollution and need to be disposed in environmental friendly and healthy way.
Safety precautions
- Please use power cable with 10A or above, and please ensure that it is earthed. Do not use any cable with loose connection to avoi d electri c shock or even fire hazard. Do not share the power supply with other appliance to avoi d overheating.
- When disconnecting the power, please make sure that it is fully unplugged. Do not leave the power cable on the socket. Or it may cause electric shock or short circuit.
- Do not place the product in water or make it wet, or it may cause electric shock or short circuit.
- Do not use power with voltage of AC 187-242V, or it may cause electric shock or short circuit.
- Please keep your children away from this product and do not let them play with the product, or it may cause electric shock or short circuit.
- The product can only be repaired by technician from designated service agent. Do not try to open or repair the unit on your own.
- If the product will not be used for a period of time, please disconnect with power supply.
- If the power socket is damaged, please contact qualified technician to repair or replace.
Accessories
Main Unit 1 unit
Steam tray 1 piece
Grill rack 1 piece
Water absorbing accessory 1 piece
C leaning foam 1 piece
Detergents 2 packs
Instruction on manual 1 piece
Product overview

text_image
Diagram of a refrigerator interior with numbered labels pointing to different compartments or fixtures.- Control panel
- Sliding rack
- Grill rack
- Steam tray
- Oil collecting plate
- Door hinge
- Water collection tray
- Oven door
- Water tank
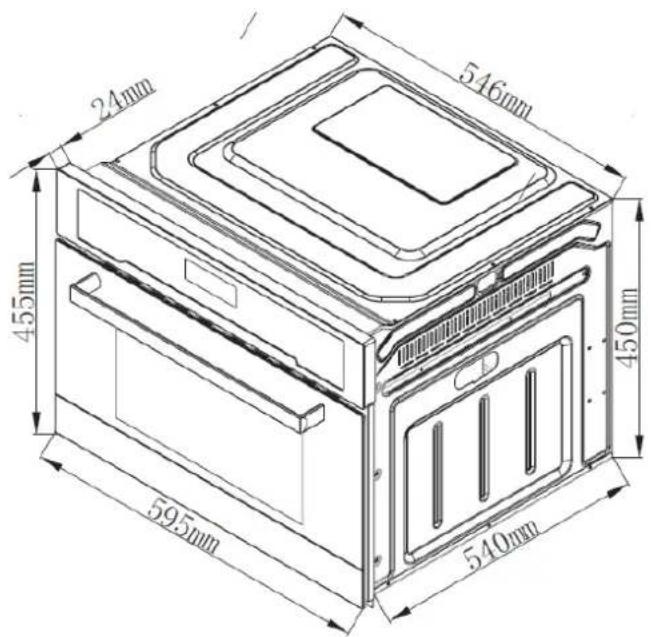
Product Dimensi on
text_image
24mm 546mm 455mm 595mm 540mm 450mmProduct Specification
| Model | SO 4800 |
| Voltage | 220V 240V 50HZ |
| Rated power | 3020W |
| Product dimension ☒ W X H X D☐ | 595 X 455 X 540 mm |
| Aperture dimension ☒ W X H X D☐ | 560 X 450 X 550 mm |
| Packing dimension ☒ W X H X D☐ | 660 X 512 X 650 mm |
I nstallation precaution
-
The steam oven should be installed in a position which is convenience for operation, maintenance, and suitable for repair.
-
Do not install the steam oven or power cord in a humid place or place with water.
-
Please make sure that the power cable is well earthed.
-
Please do not hold the handle if you need to lift up the unit.
-
Please reserve enough space around the oven.
-
When the steam oven is in use, do not touch the steam from the oven to avoid scald.
-
If you fit the steam oven in the cabinet, please make sure that sufficient space is reserved for ventilation, or it may affect the normal operation of the unit. The rear panel of the cabinet must be removed so that air can circulate freely.
Fitting the appliance
- For the most efficient air circulation, the oven should be fitted according to the dimension as below:
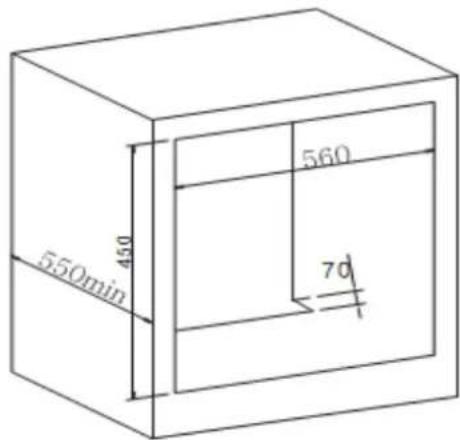
text_image
550min 450 560 70| Aperture dimension (W X H X D) | 560 X 450 X 550 mm |
- A fter fitting the steam oven in the cabinet, it must be fixed with screw.
I important notes
- If you want to take out the food from the oven immediately after cooking finish, please use cooking gloves or other tools to avoid scald.
- There will be water drop from the unit when it is in use, please clean them.
- Do not open the oven door i immediately after cooking end to avoi d scald by the steam.
- Do not use water to clean the oven, and do not let any petrol oil or other oil material to be in contact with the body of the oven.
- A lways clean or descale the cavity and food tray or racks.
- If the power socket is damaged, to avoid hazard, please contact qualified technician to replace.
- A ll the sockets must be earthed.
- If the product will not be used for a long period of time, please clean up the water in the oven, and disconnect with power supply.
- Do not put excess food in the oven, to avoid uneven steam circulation in the cavity.
- It is recommended to use distilled water or bottled water to steaming.
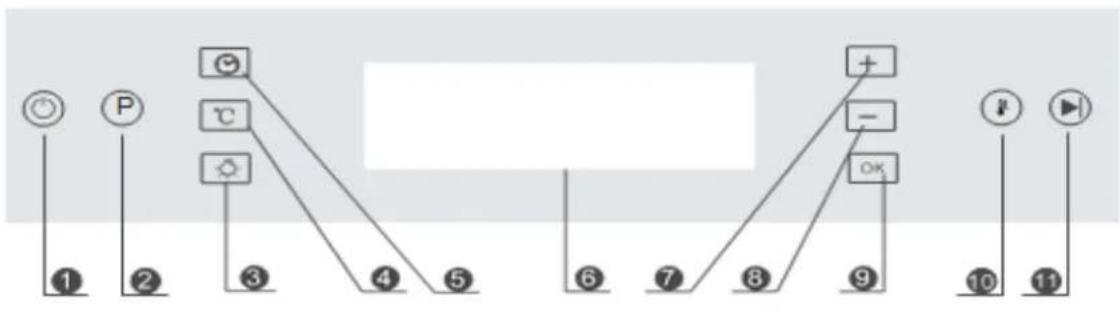
Control panel
flowchart
graph TD
    A["○"] --> B["1"]
    C["P"] --> D["2"]
    E["G"] --> F["3"]
    G["C"] --> H["4"]
    I["◇"] --> J["5"]
    K["+"] --> L["6"]
    M["-"] --> N["7"]
    O["OK"] --> P["8"]
    Q["↓"] --> R["9"]
    S["▶"] --> T["10"]
    U["11"] --> V["11"]
1 ON/OFF
2 Program
3 Oven lamp
4 Temperature
5 Timer
6 Display
7 " +" increase
8" -"
decrease
9 OK
10 Quick start
11 Start/stop
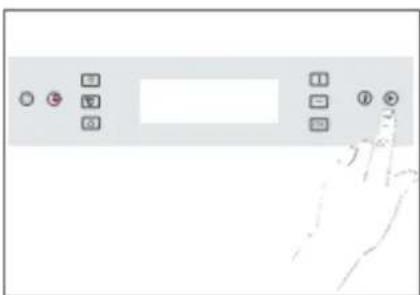
Quick start
- A ctivate the steam function
Step 1: Press "ON/OFF" button, the control panel will lights up, the oven is in standby mode
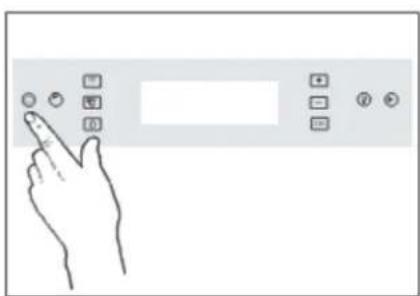
natural_image
Hand interacting with a touchscreen control panel (no text or symbols visible)Step 2: Press the Timer key twice to enter the cooking time, cooking time will blink at the left bottom of the panel.
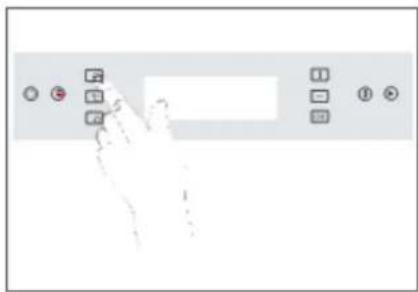
text_image
User interface control panel with input fields and buttons, showing a hand pointing to a blank input field.Step 3: Press “+” and “-” to adjust the cooking time.
Press "OK" to confirm
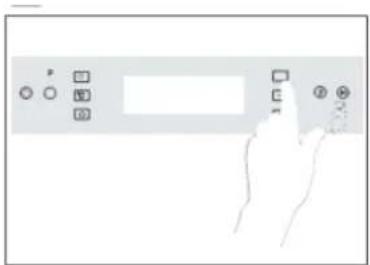
text_image
Hand holding a control panel with labeled buttons and icons, likely from an older software interfaceStep 4: Lastly, press "Start/stop" to start cooking
text_image
User interface control panel with numeric input fields and a hand pointing to the buttonHow to use
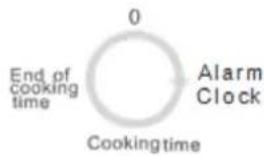
- Date/Cooking time/finish time setting. The sequence of cooking tie modes will be displayed in the screen as below:
text_image
End of cooking time 0 Cooking time Alarm Clock1.1 Clock: Press "Timer" for 2 seconds, then press "+" or "-" key to adjust the time, press OK to confirm
1.2 Alarm clock: Press "Timer", then press "+" or "-" key to adjust the time, press OK to confirm
1.3 Cooking time: Press "Timer" twice, then press "+" or "-" key to adjust the time, press OK to confirm
1.4 Finish time: If you want to set up the finish cooking time, press "Timer" three times to set it. The oven will end cooking when the time is reached.
2. Cooking Functions
2.1 Press "Program" to start operating, continue to press this key to select the function that you desire.
2.2 Temperature can be adjusted by pressing "Temperature" key, press, " +" or " -" key to adjust the temperature, press OK to confirm. Once the function is selected, press "Start/stop" key to start cooking. Press it again to stop and start cooking.
3. Descaling Function
Take out the water tank, pour in the descaling pack add water until it is half full. Put the water tank in place again.
Close the door and press "P" to select " ", to start working. " ", will appear on the display. Descale until the " ," sign appear with beep sound.
When “ ” sign appear, take out the water tank again, pour in water until it is half full, put it back. Close the door and press “ ” again to start the second part of cleaning. Do the same as the above for third time cleaning. When it fi ni sh, the descal ing is completed.
4. Rapid heating
When the setting temperature exceeds 100 degree and the pre-heat function is not finished, user can press the key to start rapid heating model. The display will show the symbol.
5. Child Lock Function
Press the "OK" key for 2 seconds, the oven will be locked. Press it again for two seconds, it will be unlocked.
- Temperature Setting. In standby mode, press ℃, then press “+” or “-” to set desired temperature, press OK to confirm.
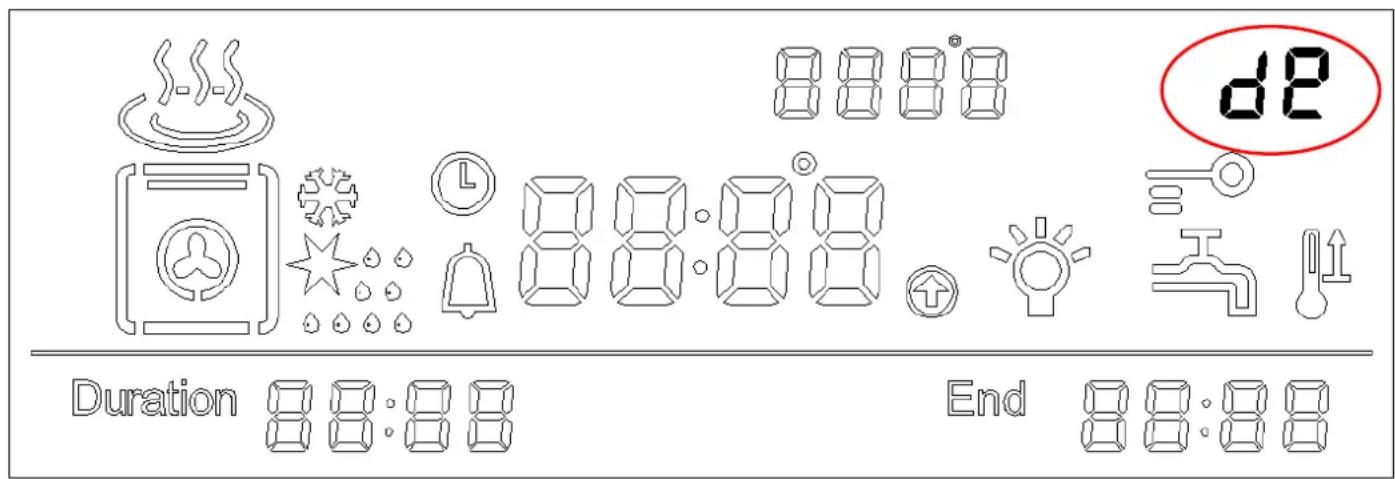
Demo Mode:
In the standby mode, press and hold the start/pause button for 5 seconds. The buzzer will give a short "beep" for 3 times the system will enter the demo mode. The display shows "de" on top right corner of the display and other icons are shown as normal
text_image
8:8:8 d8 Duration 8:8:88 End 8:8:88In demo mode, the normal operation of the cooling fan, circulation fan, and lighting work normally and other output(like grill, steam) are supspended.
To turn off the display, this setting can be saved. The demo mode still works after turn on the display again.
In the off state, the demo mode will be turn off too.
In demo mode, turn off the display to standby mode, press and hold the start/pause key for 5 seconds. The buzzer will give a short "beep" for 3 times and the system will exit the demo mod
I ntrroduction of functions and settings
| Function | ||||||||||
| Working parts | Fan thaw | Convection | Full grill | Full grill and lower heating element | Full grill and lower heating element with fan | Pure steam | Full heating with convection and steam | Convection and steam | Full grill and heating with steam | Descaling |
| Default temperature | 200°C | 200 | 200°C | 200°C | 100°C | 120°C | 120°C | 120°C | ||
| Adjustable temperature range | 20-60°C | 50-225°C | 50-225°C | 50-225°C | 50-225°C | 40-100°C | 120—220°C | 120—220°C | 120—220°C | |
| Power | 1680W | 1450W | 2500W | 2520W | 1740W | 1980W | 2180W | 3020W |
Select the right food container:
Please select the correct container for different kinds of food. All the tray and rack included in the oven are heat resistant. Below you can find our suggestion:
- For food such as sweet potatoes, corn, tomato and egg, please place on the steam tray, do not put it directly on the metal rack.
- Food such as seafood, chicken wings, chicken steak or pumpkin, which can be cooked with sauces, you can use steam tray.
- For food such as fish, ribs, whole chicken or beef, which you do not want to keep the juice or oil, then you can use grill rack.
| Species | Weight | Time |
| Fish | 650g | 15 minutes |
| Crab | 500g | 25minutes |
| Shri mp | 500g | 12minutes |
| C hicken leg | 5pcs around 650g | 30minutes |
| Chi cken | 1100g | 35minutes |
| Beef | 350g | 40minutes |
| Pork | 400g | 20minutes |
| Soup | 450g | 15minutes |
| E gg | 10pcs around 650g | 15minutes |
| Pumpkin | 850g | 20minutes |
| Tomato | 550g | 30minutes |
| Com | 550g | 30minutes |
| B read | 10 | 18minutes |
| R ice | 400g | 30minutes |
Dail y mai ntenance
Note: It has been designed to give years of trouble-free use provided it is installed and maintained correctly. Please disconnect with power supply before maintenance.
- Do not pull the cable to disconnect power.
- When cleaning the cavity, please remove everything in the cavity include the shelves and use clean cloth to clean it.
- Do not use water to spray on the unit directly. Do not use abrasi ve material.
- Cavity must be clean every time after use, wait until the cavity is fully cool down, use dry cloth to clean the cavity, or keep the oven door oven to let the cavity dry out.
- It is recommended to descale the steam oven once every three months. For details you can refer to the descaling function on section.
- Please clear the water tank regularly. When you clean the water tank. Please remove the cover and use dry cloth to wipe it.
Troubleshooting
If you found the unit operating abnormally, please stop using it. U nplug the power and follow the following instruction. Please contact our service center for checking.
| Status | Possible reasons | Solution |
| L ack of water “ “ sign | No water i n water tankBad pumps | Fill water into the tankRepl acement of pump, please contact servi ce agent |
| C ontrol panel is not working | C hild Lock i s onDefective control panel | Unlock the uni tPlease contact servi ce agent |
| Food are not cooked after steaming | T he food is sealing with coverNo steam is generated | R emove the coverC ontact servi ce agent |
| E 2 appear on di spl ay | I nterior sensor error | Contact servi ce agent |
| E 3 appear on di spl ay | I nterior sensor overheat | Contact servi ce agent |
| E 4 appear on di spl ay | Steam heating plate sensor error | Contact servi ce agent |
| E 5 appear on di spl ay | Steam heating plate overheat | Contact servi ce agent |
| E 1 appear on di spl ay | No water tank or water tank not i n place | Contact servi ce agent |
natural_image
Technical line drawing of an oven rack with internal components and ventilation ducts (no text or symbols)text_image
Diagram of a refrigerator interior with numbered labels pointing to the exterior paneltext_image
24mm 546mm 455mm 450mm 595mm 510mmnatural_image
Hand interacting with a touchscreen device (no text or symbols visible)natural_image
Hand interacting with a control panel (no visible text or symbols)natural_image
Hand holding a touchscreen device with control buttons and a blank screen (no text or symbols visible)text_image
Diagram of a control panel with labeled buttons and a hand pointing to it, showing icons for status, function, and navigation.Mode d'emploi
flowchart
graph TD
    A["End of cooking time"] --> B["Cooking time"]
    B --> C["Alarm Clock"]
    C --> D["0"]
text_image
8:8:88 d2 Duration 8:8:88 End 8:8:88natural_image
Technical line drawing of a kitchen appliance with metal grating and ventilation ducts (no text or symbols)text_image
Diagram of a refrigerator interior with numbered labels pointing to the exterior paneltext_image
24mm 546mm 455mm 595mm 540mm 450mmnatural_image
Hand interacting with a touchscreen control panel (no text or symbols visible)text_image
User interface control panel with navigation buttons and a hand interacting with the buttontext_image
Hand holding a digital interface with control buttons and a square button labeled '3'text_image
User interface control panel with numeric input fields and a hand pointing to the buttonComo usar
text_image
End of cooking time 0 Alarm Clock Cookingtimenatural_image
Technical line drawing of an oven rack with internal components and ventilation ducts (no text or symbols)text_image
Diagram of a refrigerator interior with numbered labels pointing to the exterior paneltext_image
24mm 546mm 455mm 450mm 595mm 510mmAngaben zum Gerät
text_image
Hand interacting with a touchscreen device, showing control buttons and display areatext_image
User interface control panel with buttons and a hand interacting with the buttonnatural_image
Hand holding a computer monitor with control buttons (no visible text or symbols)natural_image
Pure electrical circuit lines without any symbolsBedienung
flowchart
graph TD
    A["0"] --> B["End of cooking time"]
    B --> C["Alarm Clock"]
    C --> D["Cooking time"]