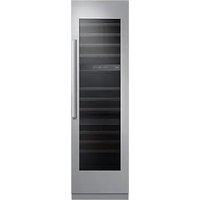
RAW24AMLHSR - Wine cellar Dacor - Free user manual and instructions
Find the device manual for free RAW24AMLHSR Dacor in PDF.



| Product Type | Built-in Wine Cellar |
| Brand | Dacor |
| Model | RAW24AMLHSR |
| Bottle Capacity | Up to 100 bottles (depending on configuration) |
| Number of Temperature Zones | 3 zones (upper, middle, lower) |
| Temperature Range | 4 °C to 18 °C (40 °F to 65 °F) |
| Power Supply | 115-120 V AC, 10 A minimum |
| Refrigerant | R-600a (isobutane) |
| Connectivity | SmartThings (Wi-Fi 2.4 GHz, IEEE 802.11 b/g/n) |
| Lighting | LED (crate and display lighting, adjustable to 4 levels) |
| Door Opening System | Automatic Door Opening |
| Deodorizing Filter | 18-month lifespan, replaceable |
| Special Functions | Sabbath Mode, No Cooling Mode (demo), Door Alarm, Lock |
| Display and Controls | Touch control panel with digital display |
| Shelf Material | Wood (bottle rack) and metal |
| Cleaning | Soft lint-free cloth, lightly soapy water; avoid abrasive products |
Frequently Asked Questions - RAW24AMLHSR Dacor
User questions about RAW24AMLHSR Dacor
0 question about this device. Answer the ones you know or ask your own.
Ask a new question about this device
Download the instructions for your Wine cellar in PDF format for free! Find your manual RAW24AMLHSR - Dacor and take your electronic device back in hand. On this page are published all the documents necessary for the use of your device. RAW24AMLHSR by Dacor.
USER MANUAL RAW24AMLHSR Dacor
Built-In Wine Cellar
DRW24980RAP/LAP
Contents
Important Information 5
Before You Begin 5
Safety Information 6
Important Safety Symbols and Precautions: 7
State of California Proposition 65 Warning (US only) 7
Severe Warning Signs for Transportation and Site 7
Critical Installation Warnings 8
Installation Cautions 10
Critical Usage Warnings 11
Usage Cautions 14
Cleaning Cautions 15
Critical Disposal Warnings 16
Intended Use 16
What's Included 17
Inside Parts, Storage, and Shelving 17
Operations 19
Control Panel 19
SmartThings 24
Special Features 27
Wine Rack Assemble & Disassemble 32
Replacement 36
Care and Maintenance 38
Cleaning 38
Troubleshooting 39
General 39
Abnormal Sounds 40
Auto Door Open (ADO) 42
SmartThings 43
Warranty and Service 44
Customer Service 44
Warranty 44
Regulatory Notice 48
FCC Notice 48
IC Notice 49
Open Source Announcement 50

To Our Valued Customer:
Congratulations on your purchase of the very latest in Dacor® products! Our unique combination of features, style and performance make us a great addition to your home.
In order to familiarize yourself with the controls, functions and full potential of your new Dacor appliance, read this use and care manual thoroughly, beginning with the Important Safety Instructions section.
All Dacor appliances are designed and manufactured with quality and pride, while working within the framework of our company value. Should you ever experience a problem with your product, please first check the Troubleshooting section of this manual for guidance. It provides useful suggestions and remedies prior to calling for service.
Valuable customer input helps us to continuously improve our products and services, so please feel free to contact our Customer Assurance Team for assistance with any of your product support needs.
Dacor Customer Assurance Team
14425 Clark Avenue
City of Industry, CA 91745
Telephone: 833-35-ELITE (833-353-5483) USA, Canada
Fax: (626) 403-3130
Hours of Operation: Monday through Friday 5:00 A.M. to 5:00 P.M. Pacific Time
Website: www.dacor.com/customer-care/contact-us
Thank you for choosing Dacor for your home. We are a company built by families for families, and we are dedicated to serving yours. We are confident that your new Dacor product will deliver a high level of performance and enjoyment for many years to come.
Sincerely,
The Dacor Customer Assurance Team
Important Information
Before You Begin
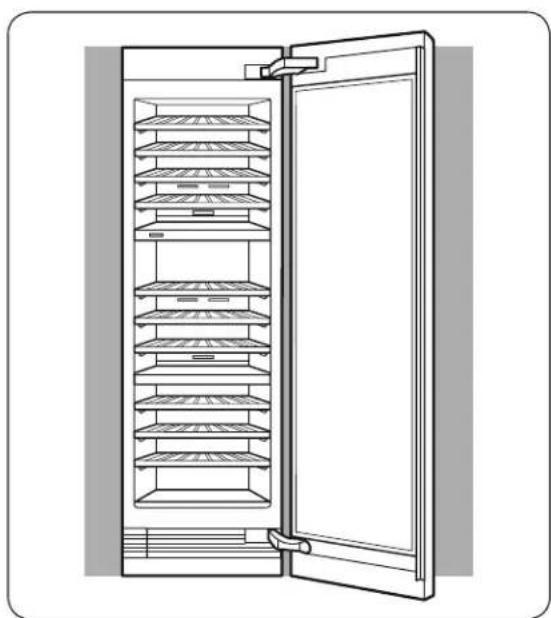
natural_image
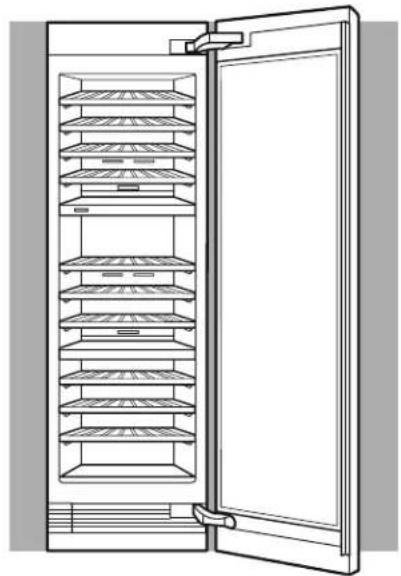
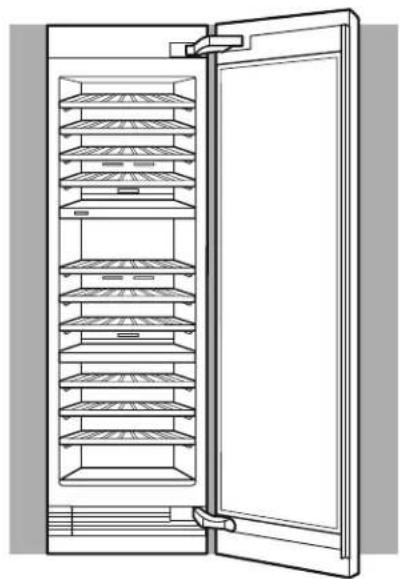
Line drawing of a refrigerator with open door and shelves (no text or symbols)• The overall design and/or accessories may differ with the model.
Installer
- Leave these Use and Care instructions with the appliance.
Consumer
- Please read this Use and Care Manual completely before using your wine cellar. Save it for future reference.
Retain your sales receipt or canceled check. Proof of original purchase date is required for warranty service.
Have the complete model and serial number identification of your appliance ready.
These numbers are found on the label located inside of the wine cellar wall. Record these numbers below for easy access.
| Model Number | |
| Serial Number | |
| Date of Purchase |
Since we continually improve the quality and performance of our products, we may make changes to the appliance without updating this manual. Visit www.dacor.com to download the latest version of this manual.
Dacor Assurance Team
Phone: 833-35-ELITE (833-353-5483) USA, Canada
Monday through Friday 5:00 A.M. to 5:00 P.M. Pacific Time
Website: www.dacor.com/customer-care/contact-us
Safety Information
- Before using your new Dacor wine cellar, please read this manual thoroughly to ensure that you know how to operate the features and functions that your new appliance offers safely and efficiently.
- This appliance is not intended for use by persons (including children) with reduced physical, sensory or mental capabilities, or lack of experience and knowledge, unless they have been given supervision or instruction concerning use of the appliance by a person responsible for their safety. Children should be supervised to ensure that they do not play with the appliance.
- Because the following instructions cover various models, the characteristics of your wine cellar may differ slightly from the wine cellar described in this manual.
- It is hazardous for anyone other than an Authorized Service Person to service this appliance.
- Refrigerant squirting out of the pipes could ignite or cause an eye injury. When refrigerant leaks from the pipe, avoid any naked flames and move anything flammable away from the product and ventilate the room immediately.
- Failing to do so may result in fire or explosion.

WARNING
- R-600a is used as a refrigerant. This product contains flammable gas (Refrigerant R-600a), contact your local authority in regard to safe disposal of this product.
- In order to avoid the creation of a flammable gas-air mixture if a leak in the refrigerating circuit occurs, the size of the room in which the appliance may be sited depends on the amount of refrigerant used. The room must be 35.3ft^3 in size for every 8g of R-600a refrigerant inside the appliance.
- The installation location should not be exposed to direct sunlight and not placed near any electric appliance or heat source, e.g. stove, oven, cooktop, radiator, etc.
- If you use two products side by side, for safety reason, be sure to use certified products in explosive gas atmospheres.
- Never start up an appliance showing any signs of damage. If in doubt, consult your dealer.
Warning; Risk of fire / flammable materials
Important Safety Symbols and Precautions:
Please follow all safety instructions in this manual. This manual uses the following safety symbols.
WARNING
Hazards or unsafe practices that may result in severe personal injury, property damage, and/or death.
CAUTION
Hazards or unsafe practices that may result in severe personal injury and/or property damage.
NOTE
Useful information that helps users understand or benefit from the wine cellar.
These warning signs are here to prevent injury to you and others.
Please follow them carefully.
After reading this section, keep it in a safe place for future reference.
State of California Proposition 65 Warning (US only)
WARNING: Cancer and Reproductive Harm - www.P65Warnings.ca.gov.
Severe Warning Signs for Transportation and Site
WARNING
- When transporting and installing the appliance, care should be taken to ensure that no parts of the refrigerating circuit are damaged.
- Refrigerant leaking from the pipe work could ignite or cause an eye injury. If a leak is detected, avoid any naked flames or potential sources of ignition and air the room in which the appliance is standing for several minutes.
- This appliance contains a small amount of isobutane refrigerant (R-600a), a natural gas with high environmental compatibility but also flammable.
Critical Installation Warnings

WARNING
- Do not install the wine cellar in a damp location or place where it may come in contact with water.
- Deteriorated insulation on electrical parts may cause an electric shock or fire.
- Do not place this wine cellar in direct sunlight or expose it to heat from stoves, room heaters, or other appliances.
- Do not plug several appliances into the same power strip. The wine cellar should always be plugged into its own individual electrical outlet which has a voltage rating that matches the voltage listed on the wine cellar's rating plate.
- This provides the best performance and also prevents overloading of house wiring circuits, which could overheat the wires and cause a fire hazard.
- If the wall socket is loose, do not insert the power plug.
- There is a risk of electric shock or fire.
- Do not use a power cord that has cracks or abrasion damage along its length or at either end.
- Do not bend the power cord excessively or place heavy objects on it.
- Do not pull or excessively bend the power cord.
- Do not twist or tie the power cord.
- Do not hook the power cord over a metal object, insert the power cord between objects, or push the power cord into the space behind the appliance.
- Never unplug your wine cellar by pulling on the power cord. Always grip the plug firmly and pull straight out from the outlet.
- Damage to the cord may cause a short-circuit, fire, and/or electric shock.
- Do not store explosive substances such as aerosol cans with a flammable propellant in this appliance.
- Do not install this appliance near flammable material.
- Do not install this appliance in a location where gas may leak.
- This may result in an electric shock or fire.
- This wine cellar must be properly located and installed in accordance with the instructions in this manual before you use it.
- Connect the power plug in the proper position with the cord hanging down.
- If you connect the power plug upside down, the wire can get cut off and cause a fire or electric shock.
- Make sure that the power plug is not crushed or damaged by the back of the wine cellar.
- Keep the packing materials out of reach of children.
- There is a risk of death from suffocation if a child puts the packing materials on his or her head.
- The appliance must be positioned so that the plug is accessible after installation.
- Failing to do so may result in an electric shock or fire due to electric leakage.
- Do not install this appliance in a humid, oily or dusty location, or in a location exposed to direct sunlight or to water (rain drops).
- If large amounts of dust or water enter the wine cellar, turn off the power switch and contact your Dacor service center.
- Otherwise there is a risk of fire.
- You need to remove all the protective plastic film before you initially plug the product in.
- Children should be supervised to ensure that they do not play with the snap rings used for door adjustment.
- There is risk of death by suffocation if a child swallows a snap ring. Keep the snap rings out of children's reach.
- The wine cellar must be safely grounded.
- Always make sure that you have grounded the wine cellar before attempting to investigate or repair any part of the appliance. Power leakages can cause severe electric shock.
- Never use gas pipes, telephone lines, or other potential lightning attractors as an electrical ground.
- You must ground the wine cellar to prevent any power leakages or electric shocks caused by current leakage from the wine cellar.
- This may result in an electric shock, fire, explosion, or problems with the product.
- Improper use of the grounding plug can result in a risk of electric shock. If it is necessary to use an extension cord, use only a 3-wire extension cord that has a 3-blade grounding plug and a 3-slot receptacle that will accept the plug on the appliance. The marked rating of the extension cord should be AC 115-120 V, 10 A, or more. If a grounding adapter is used, make sure the receptacle box is fully grounded.
- Plug the power plug into the wall socket firmly. Do not use a damaged power plug, damaged power cord, or loose wall socket.
- This may result in an electric shock or fire.
- If the power cord is damaged, have it replaced immediately by the manufacturer or one of its service agents.
Safety Information
- Only a qualified technician or service company should be allowed to change the fuse in the wine cellar.
- Failing to do so may result in an electric shock or personal injury.
- The wall socket must be easily accessible so that the appliance can be quickly disconnected from the wall socket in an emergency.
- It must be outside the area of the rear of the appliance.
- When positioning the appliance, ensure the power cord is not trapped or damaged.
- Do not locate multiple socket-outlets or power supplies at the rear of the appliance.
- Keep ventilation openings, in the appliance enclosure or in the built-in structure, clear of obstruction.
Installation Cautions
CAUTION
- Allow sufficient space around the wine cellar and install it on a flat surface.
- Keep the ventilation space in the appliance enclosure or mounting structure clear of obstructions.
- After you have installed the wine cellar and turned it on, allow the appliance to stand for 2 hours before loading it with wine.
- It is strongly recommended you have a qualified technician or service company install the wine cellar.
- Failing to do so may result in an electric shock, fire, explosion, problems with the product, or injury.
Critical Usage Warnings
WARNING
- Do not insert the power plug into a wall socket with wet hands.
- This may result in an electric shock.
- Do not store articles on the top of the appliance.
- When you open or close the door, the articles may fall and cause personal injury and/or material damage.
- Do not insert hands, feet or metal objects (such as utensils, etc.) into the bottom or the back of the wine cellar.
- This may result in an electric shock or injury.
- Any sharp edges may cause a personal injury.
- Do not put a container filled with water on the wine cellar.
- If spilled, there is a risk of fire or electric shock.
- Do not keep volatile, flammable objects or substances (benzene, thinner, propane gas, alcohol, ether, LP gas, and other such products) in the wine cellar.
- This wine cellar is for storing wine only.
- This may result in fire or explosion.
- Children should be supervised to ensure that they do not play with the appliance.
- Keep fingers out of “pinch point” areas. Clearances between the doors and cabinet are necessarily small. Be careful when you open the doors if children are in the area.
- Do not let children hang on the door. A serious injury may occur.
- Do not let children go inside the wine cellar. They could become trapped.
- Do not insert your hands into the area under the appliance.
- Any sharp edges may cause personal injury.
- Do not store pharmaceutical products, scientific materials, or temperature sensitive products in the wine cellar.
- Products that require strict temperature controls must not be stored in the wine cellar.
- Do not place or use electrical appliances inside the wine cellar, unless they are of a type recommended by the manufacturer.
- If you smell smoke, turn off the power switch immediately, and then contact your Dacor service center.
- If large amounts of dust or water enter the wine cellar, disconnect the power plug and contact your Dacor service center.
- Otherwise there is a risk of fire.
- Do not leave the door of the wine cellar open while the wine cellar is unattended and do not let children enter the wine cellar.
- It can cause death from suffocation by entrapment or personal injury.
- Do not overfill the wine cellar with wine.
- When you open the door, an item may fall out and cause personal injury or material damage.
- Do not spray volatile material such as insecticide onto the surface of the appliance.
- As well as being harmful to humans, it may also result in an electric shock, fire, or problems with the product.
- Do not use or place any substances sensitive to temperature such as flammable sprays, flammable objects, dry ice, medicine, or chemicals near or inside the wine cellar.
- Do not use a hair dryer to dry the inside of the wine cellar. Do not place a lighted candle in the wine cellar to remove bad odors.
- This may result in an electric shock or fire.
- Do not use mechanical devices or any other means to accelerate the defrosting process, other than those recommended by the manufacturer.
- Do not damage the refrigerant circuit.
- If a gas leak is detected, avoid any naked flames or potential sources of ignition, and air the room in which the appliance is standing for several minutes.
- Do not touch the appliance or power cord.
- Do not use a ventilating fan.
- A spark may result in an explosion or fire.
- Use only the LED lamps provided by the manufacturer or its service agents.
- Do not attempt to repair, disassemble, or modify the wine cellar yourself.
- Unauthorized modifications can cause safety problems. To reverse an unauthorized modification, we will charge the full cost of parts and labor.
- Do not use any fuse (such as cooper, steel wire, etc.) other than a standard fuse.
- If your wine cellar needs to be repaired or reinstalled, contact your nearest service center.
- Failing to do so may result in an electric shock, fire, problems with the product, or injury.
- If the interior or exterior LED lamp has gone out, contact your nearest Dacor service center.
- If the wine cellar emits a burning smell or smoke, unplug the wine cellar immediately and contact a Dacor service center.
- Failing to do so may result in an electric or fire hazards.
- Pull the power plug out of the socket before changing the interior lamps of the wine cellar.
- Otherwise, there is a risk of electric shock.
-
If you experience difficulty changing a non-LED light, contact a Dacor service center.
-
If the product is equipped with LED lamps, do not disassemble the lamp covers and LED lamps yourself.
- Contact a Dacor service center.
- Plug the power plug into the wall socket firmly.
- Do not use a damaged power plug, damaged power cord, or loose wall socket.
- This may result in an electric shock or fire.
- Do not expose the interior accessories, such as wine racks, bottle presenters, and shelf to direct sunlight for long.
Usage Cautions

CAUTION
• To get the best performance from the product:
- Do not place wine too close to the vents at the rear of the wine cellar as this can obstruct free air circulation in the wine cellar compartment.
• Service warranty and modification.
- Any changes or modifications performed by a 3rd party on this finished appliance are not covered under Dacor warranty service, nor is Dacor responsible for safety issues that result from 3rd party modifications.
- Do not block the air vents inside the wine cellar.
- If the air vents are blocked, especially with a plastic bag, the wine cellar can be over cooled.
- If the wine cellar is disconnected from the power supply, you should wait for at least five minutes before plugging it back in.
- If large amounts of water enter the wine cellar, turn off the power switch and contact a Dacor service center.
- Do not strike or apply excessive force to any glass surface.
- Broken glass may result in a personal injury and/or property damage.
- If the wine cellar is flooded, shut off the power to the wine cellar and contact your nearest Dacor service center.
- There is a risk of electric shock or fire.
Cleaning Cautions

CAUTION
- Do not spray water directly on the inside or outside the wine cellar.
- There is a risk of fire or electric shock.
- Do not use a hair dryer to dry the inside of the wine cellar.
- Do not place a lighted candle in the wine cellar to remove bad odors.
- This may result in an electric shock or fire.
- Do not spray cleaning products directly on the display.
- Printed letters on the display may come off.
- If any foreign substance such as water has entered the appliance, unplug the power and contact your nearest service center.
- Failing to do so may result in an electric shock or fire.
- Use a clean, dry cloth to remove any foreign matter or dust from the power plug blades. Do not use a wet or damp cloth when cleaning the plug.
- Otherwise, there is a risk of fire or electric shock.
- Do not clean the appliance by spraying water directly onto it.
- Do not use benzene, thinner, or Clorox (bleach) to clean the wine cellar.
- They may damage the surface of the appliance and may cause a fire.
- Before cleaning or performing maintenance, unplug the appliance from the wall socket.
- Failing to do so may result in an electric shock or fire.
Critical Disposal Warnings

WARNING
• DANGER : Risk of child entrapment. Before you throw away your old wine cellar:
- Take off the doors and door latch.
- Leave the shelves in place so that children may not easily climb inside.
- Children trapped inside a wine cellar can hurt themselves or suffocate to death.
- Please dispose of the packaging material from this product in an environmentally friendly manner.
- Ensure that none of the pipes on the back of the wine cellar are damaged prior to disposal.
- R-600a is used as a refrigerant. This product contains flammable gas (Refrigerant R-600a), contact your local authority in regard to safe disposal of this product.
- Cyclopentane is used in the insulation. The gases in the insulation material require a special disposal procedure. Please contact your local authorities in regard to the environmentally safe disposal of this product.
- Keep all packaging materials well out of the reach of children, as packaging materials can be dangerous to children.
- If a child places a bag over his or her head, the child could suffocate.
Intended Use
- staff kitchen areas in shops, offices and other working environments;
- farm houses and by clients in hotels, motels and other residential type environments;
• bed and breakfast type environments;
• catering and similar non-retail applications. - This appliance is intended for use at an elevation of no more than 2000 meters above sea level.
Inside Parts, Storage, and Shelving
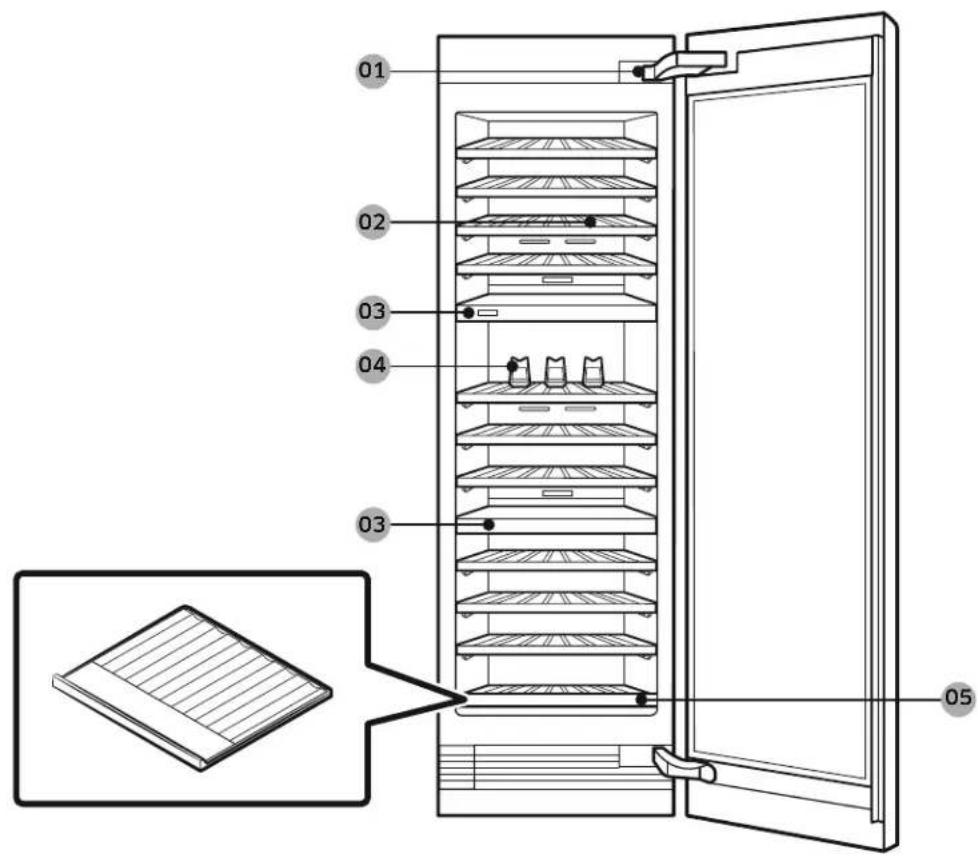
01 Power switch, Auto Door Open switch 02 Wine Racks
03 Control Panel & Compartment Wall 04 Bottle Presenter
05 Bottom Wine Shelf
What's Included
Switch box
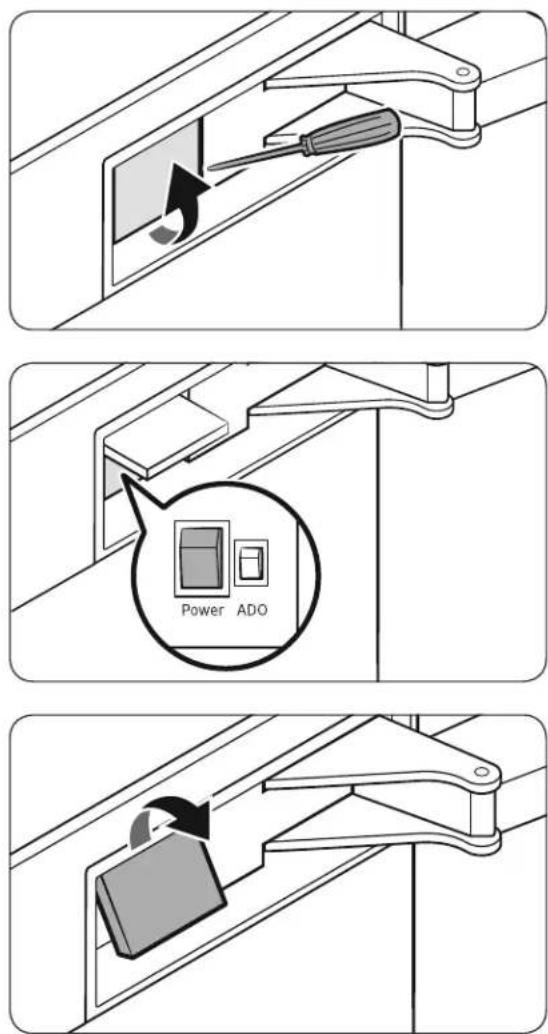
- Use a flat head screwdriver to open the switch box cover.
- The black one is the Power switch while the Auto Door Open switch is red next to it.
- Close the switch box cover.
Control Panel
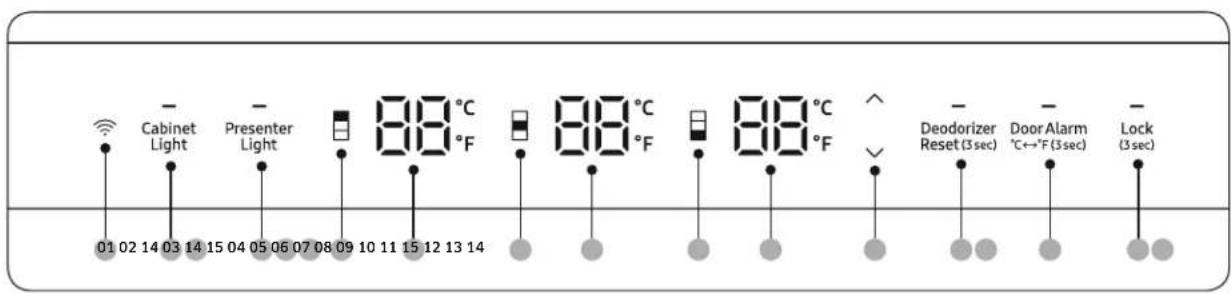
01 Network Connection 02 Cabinet Light
03 Presenter Light 04 Upper Zone Select
05 Upper Zone Temp. 06 Middle Zone Select
07 Middle Zone Temp.
08 Lower Zone Select
09 Lower Zone Temp.
10 Temp. Control
11 Deodorizer Reset (3 sec)
12 Door Alarm / °C↔°F (3 sec)
13 Lock (3 sec)
14 Cooling Off
15 Sabbath Mode
NOTE
- When you change the temperature on the panel, the panel displays the current temperature and the temperature on the display will gradually change according to the internal temperature until it reaches the desired temperature. Note that it will take time for the wine cellar to reach the new temperature. This is normal. You do not need to set the desired temperature just because the display does not show your desired temperature.
- If no button is input for 10 seconds after Lock is deactivated, the display will turn off except for the Lock button, all the zone select buttons, and all the zone temp. displays.
- If the control panel has moisture or liquid on its surface, it may fail. Wipe the moisture or liquid using a dry cloth, and then try again.
- When the door is closed, all the zone select buttons and zone temp. displays turns off, and then the entire display will turn off after 10 minutes.
01 Network Connection
You can control and monitor your wine cellar through the SmartThings app. For more information, see the SmartThings section.
NOTE
- Recommended encryption systems include WPA/TKIP and WPA2/AES. Any newer or unstandardized Wi-Fi authentication protocols are not supported.
- Wireless networks may be affected by the surrounding wireless communication environment.
- If your Internet service provider has registered the MAC address of your PC or modem for identification, your Dacor wine cellar may fail to connect to the Internet. If this happens, contact your Internet service provider for technical assistance.
- The firewall settings of your network system may prevent your Dacor wine cellar from accessing the Internet. Contact your Internet service provider for technical assistance. If this symptom continues, contact a local Dacor service center or retailer.
- To configure the wireless access point (AP) settings, see the user manual of the AP.
- Dacor wine cellars support both Wi-Fi 2.4 GHz with IEEE 802.11 b/g/n and Soft-AP protocols (IEEE 802.11 n is recommended).
- Unauthorized Wi-Fi wireless routers may fail to connect to applicable Dacor wine cellars.
- Recommended to have Wi-Fi Router or Access Point with in 50 feet of appliance.
02 Cabinet Light
Press to adjust the cabinet light. You can choose from 4 different levels (Off, 1-3).
NOTE
The cabinet light is set to level 3 (brightest) as factory default.
03 Presenter Light
| Presenter Light | Press to adjust the presenter light. You can choose from 4 different levels (Off, 1-3).NOTEThe presenter light is set to off as factory default. |
04 Upper Zone Select
| Upper Zone Select | Press this button, and then use the Temp. Control buttons to adjust the upper zone temperature between 40 °F ~ 65 °F (4 °C ~ 18 °C). |
05 Upper Zone Temp.
| Upper Zone Temp. | Displays the temperature of the upper zone.The set temperature will be displayed when you adjust the upper zone temperature. |
06 Middle Zone Select
| Middle Zone Select | Press this button, and then use the Temp. Control buttons to adjust the middle zone temperature between 40 °F ~ 65 °F (4 °C ~ 18 °C). |
07 Middle Zone Temp.
| Middle Zone Temp. | Displays the temperature of the middle zone.The set temperature will be displayed when you adjust the middle zone temperature. |
08 Lower Zone Select
| Lower Zone Select | Press this button, and then use the Temp. Control buttons to adjust the lower zone temperature between 40 °F ~ 65 °F (4 °C ~ 18 °C). |
09 Lower Zone Temp.
| Lower Zone Temp. | Displays the temperature of the lower zone.The set temperature will be displayed when you adjust the lower zone temperature. |
10 Temp. Control
| Temp. Control | Press ∧ or √to increase or decrease the set temperature of the selected zone.You can adjust the temperature between 0 °F ~ 65 °F (4 °C ~ 18 °C) in 1 °F (1 °C) unit.If you press and hold the button for more than 2 seconds, the temperature will increase or decrease until you release the button.NOTEIf you press these buttons without selecting the zone (upper, middle, or lower), temperature does not change and all the zone select buttons will blink. |
11 Deodorizer Reset (3 sec)
| Deodorizer Reset | After about 18 months of using the original deodorizer filter, the Filter indicator blinks red to remind you that the filter needs to be replaced. If this happens, replace the filter, and press and hold Deodorizer Reset for 3 seconds. The filter lifecycle will be reset and the Filter indicator turns off. |
12 Door Alarm / °(3-sec)
| Door Alarm | You can enable or disable the door alarm by pressing Door Alarm. When Door Alarm is enabled and a door is left open for more than 2 minutes, the alarm will sound and the alarm indicator will blink. The Door Alarm function is enabled by factory default. |
| °C↔°F | You can use the Door Alarm button to switch the temperature scale between Celsius and Fahrenheit.To switch the temperature scale, press and hold Door Alarm for 3 seconds. |
NOTE
If the door is left open for more than 10 minutes, the LED lamps will turn off.
13 Lock (3 sec)
| Lock | To prevent accidental setting changes, press and hold Lock for 3 seconds. Main panel will be disabled and the Lock indicator (—) will turn on.If you press any button while Lock is on, the indicator will blink.If you press and hold the button again for more than 3 seconds, Lock will be deactivated. However, Lock will be reactivated if no button is input for the next 1 minute. |
14 Cooling Off
Cooling Off mode (also called Demo mode) is designed for use by retailers when they are displaying wine cellar on a retail floor.
In Cooling Off mode, the fan motor and lights operate normally, but the compressors do not run so the wine cellar does not get cold.
- To enter Cooling Off mode, press and hold Cabinet Light, Presenter Light, and Lock simultaneously for 5 seconds. The fridge chime sounds and the temperature display shows "oF".
- To exit Cooling Off mode, press and hold Cabinet Light, Presenter Light, and Lock simultaneously for 5 seconds again. The fridge chime sounds and the temperature display shows the current temperature.
NOTE
If the Lock indicator turns on, you must first deactivate Lock.
15 Sabbath mode
The Sabbath mode stays active for 85 hours once it is activated. After that, it will be deactivated automatically.
- To activate, press and hold Presenter Light and Deodorizer Reset simultaneously for 5 seconds. Then the wine cellar operates in Sabbath mode where the buttons, the display, and the room lamps are all under control.
- To deactivate, press and hold the buttons again for 5 seconds.
NOTE
- If the Lock indicator turns on, you must first deactivate Lock.
- Even after the wine cellar powers off and restarts, the Sabbath mode remains active. To exit, you must deactivate the Sabbath mode.
SmartThings
Installation
Visit the Google Play Store, Galaxy Apps, or Apple App Store and search for "SmartThings". Download and install the SmartThings app provided by Samsung Electronics to your smart device.

NOTE
- The SmartThings app is designed for Android 6.0 (Marshmallow) or later, iOS 10.0 or later, iPhone 6 or later, and is optimized for Samsung smartphones (Galaxy S and Galaxy Note series).
- For improved performance, the SmartThings app is subject to change without notice or discontinued support according to the manufacturer's policy.
- Recommended encryption systems include WPA/TKIP and WPA2/AES. Any newer or non-standard Wi-Fi authentication protocols are not supported.
- Wireless networks may be affected by the surrounding wireless communication environment.
- If your Internet service provider has registered the MAC address of your PC or modem for identification, your Samsung Smart Wine Cellar may fail to connect to the Internet. If this happens, contact your Internet service provider for technical assistance.
- The firewall settings of your network system may prevent your Samsung Smart Wine Cellar from accessing the Internet. Contact your Internet service provider for technical assistance. If this symptom continues, contact a local Samsung service center or retailer.
- To configure the wireless access point (AP) settings, see the user manual of the AP (router).
- Samsung Smart Wine Cellar support both Wi-Fi 2.4 GHz with IEEE 802.11 b/g/n and Soft-AP protocols. (IEEE 802.11 n is recommended.)
- Unauthorized Wi-Fi wireless routers may fail to connect to applicable Samsung Smart Wine Cellar.
Samsung account
You are required to register with a Samsung account to use the app. If you don't have a Samsung account, follow the app's onscreen instructions to create a free Samsung account.
Getting started
- Turn on the device you want to connect, open the SmartThings app on your phone, and then follow the instructions below.
- If a pop-up appears saying that a new device has been found, tap ADD NOW.
- If a pop-up doesn't appear, tap the + button, and then select the device you want to connect from the list of available devices.
- If your device isn't in the list of available devices, tap Supported Devices, select the device type (wine cellar), and then select the specific device model.
- Follow the instructions in the app to set up your device. Once setup is complete, your wine cellar will appear as a "card" on your Devices screen.
Wine cellar app
Integrated control
You can monitor and control your Wine Cellar at home and on the go.
- Tap the Wine Cellar icon on the SmartThings Dashboard or tap the Devices icon at the bottom of the Dashboard, and then tap the Wine Cellar “card” to open the Wine Cellar page.
- Check the operation status or notifications related to your Wine Cellar, and then change options or settings if necessary.

NOTE
Some options or settings of the wine cellar may not be available for remote control.
| Category Item | Description | |
| Monitoring | Temperature | Displays the current temperature setting of the wine cellar. |
| Self Check Detects abnormal operations of the wine cellar. | ||
| Energy monitoring | Checks the accumulated power consumption of the wine cellar for the last 180 days. | |
| Functions Temperature | You can change temperature settings and check the current settings. | |
| Alarms | Abnormally high temperature | This alarm is triggered when the temperature of the wine cellar abnormal. |
| Door opening | This alarm is triggered if the fridge is left open for a specific time. | |
| Deodorizer filter replacement | This alarm reminds you that the deodorizer filter must be replaced. | |
| Wine inventory | You can add, edit, and sort your wine information. | |
| HomeCare Wizard | Provides history of “door opening” for the last 7 days, “filter replacement time guide”, and the diagnosis information of the product. | |
To check the MAC address
- In this mode, the MAC address appears on the temperature panel sequentially for 1 minute.
Press and hold both Cabinet Light and Door Alarm for 6 seconds. The temperature display blinks. Then, press Door Alarm to display the MAC address. The wine cellar beeps.
- For example, if the MAC address is "11-22-33-44-55-66", the temperature panel displays the address for 1 minute in this sequence: "--" → "11" → "22" → "33" → "44" → "55" → "66" → "--".
After the 1 minute, the MAC address disappears and the temperature panel returns to the normal state.
NOTE
The temperature panel displays “-- / --” for an unknown MAC address or if a Wi-Fi connection is not established or is lost.
Special Features
Load capacity
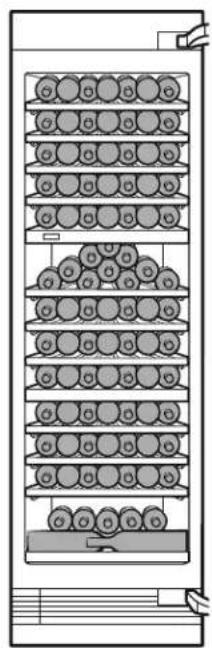
natural_image
Diagram of a vertical rack with circular components and a base, no text or symbols presentType A Type B
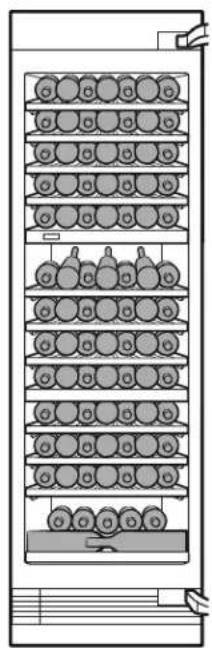
natural_image
Diagram of a vertical storage rack with circular components and a base, no text or symbols present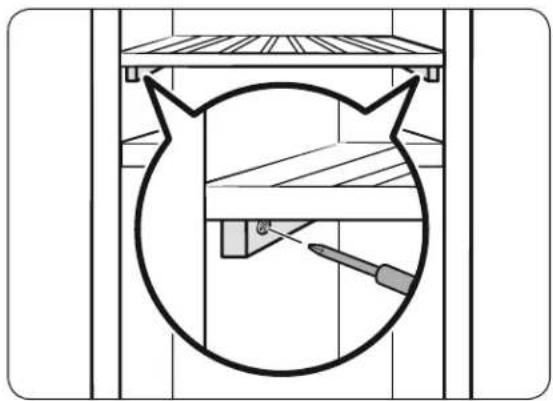
natural_image
Simple line drawing of a cat-shaped object inside a container with a screwdriver inserted (no text or symbols)| Load capacity Type A Type B | |||
| Upper zone | 1 | 7 | 7 |
| 2 | 7 | 7 | |
| 3 | 7 | 7 | |
| 4 | 7 | 7 | |
| 5 | 7 | 7 | |
| Middle zone | 1 | 1 | 0 |
| 2 | 7 | 7 | |
| 3 | 7 | 7 | |
| 4 | 7 | 7 | |
| Lower zone | 1 | 7 | 7 |
| 2 | 7 | 7 | |
| 3 | 7 | 7 | |
| 4 | 1 | 3 | |
| Total 100 97 | |||
CAUTION
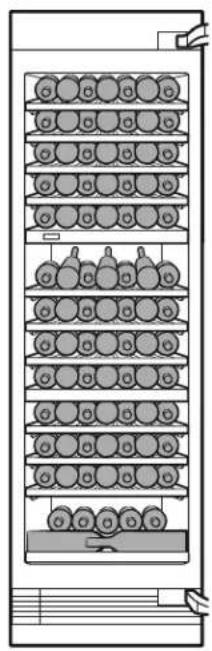
If you are using the bottle presenters on the top rack of the middle zone (as shown in Type B of the figure), make sure to fix the rack with a screw driver.
Operations
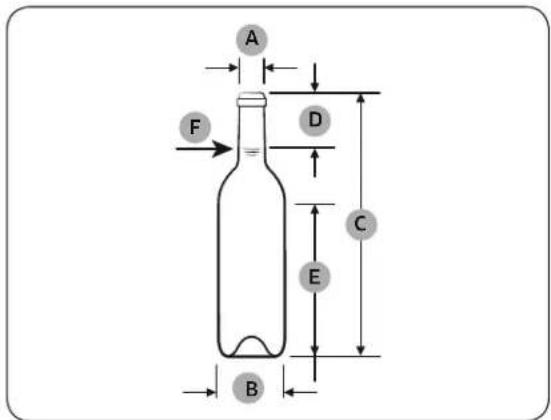
Standard bottle size
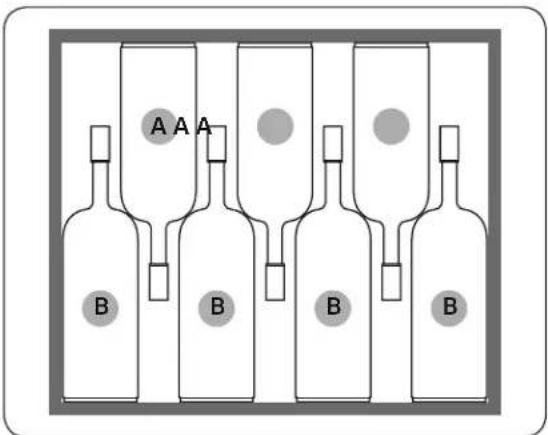
A: Standard bottle / B: Long bottle
| A | 1^3/_32'' ( 27.5) |
| B 3'' ( 76.1) | |
| C 21 | ^27/_32'' (300.5) |
| D 6 | ^1/_4'' (63) |
| E 12 | ^15/_32'' (158.5) |
| F 25.4 fl | oz (75.0 cl) |

NOTE
If you want to store standard bottles and long bottles on the same rack, place 4 long bottles and 3 standard bottles as shown in the figure.
natural_image
Diagram of two storage racks with circular components and a prohibition symbol, no text or labels present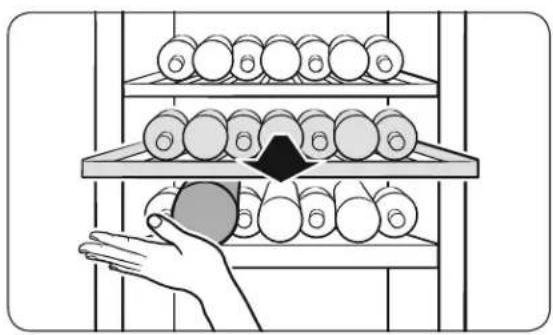
natural_image
Illustration of a hand reaching for a ball on a rack with balls in the background (no text or symbols)CAUTION
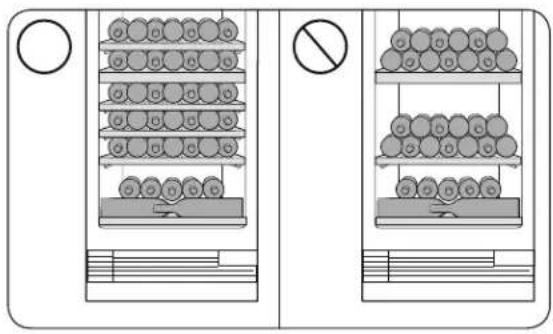
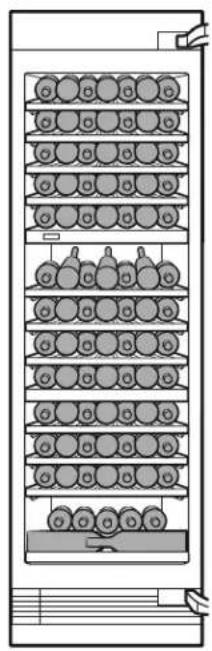
Stack wine bottles only on the bottom rack of the bottom zone (maximum two rows) and the top rack of the middle zone. (To stack bottles on the top rack of the middle zone, see TYPE A of the figure on the page 27.)
Do not pull out the bottom shelf when bottles are loaded.
CAUTION
If you stored bottles that are bigger than the standard size on the wine racks or bottom wine shelf (bottom part of each zone), protect the bottles when you pull out the rack directly above it to prevent them from falling.
Bottle presenters
natural_image
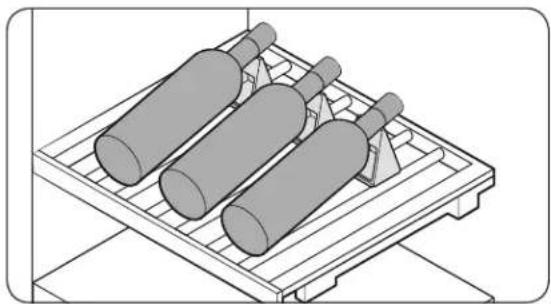
Isometric line drawing of three cylindrical objects on a metal rack (no text or symbols)You can display up to 3 wine bottles using the provided bottle presenters (as shown in the figure).
Auto Door Open system
natural_image
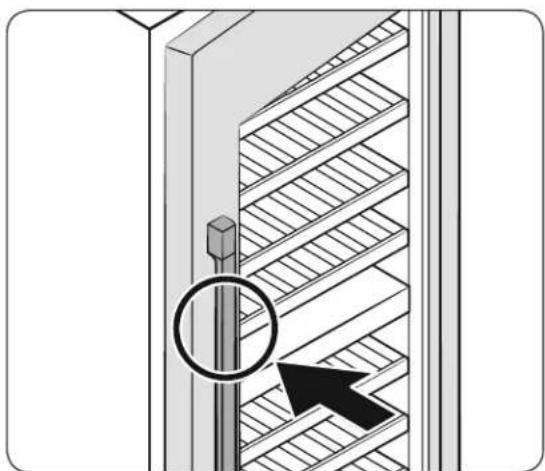
Diagram of a building facade with ladder-like structure and a circular arrow pointing to a vertical pole (no text or symbols)The auto door open system allows for effortless opening of the door with the help of a mechanical device.
To open the door with mechanical assistance, simply push the door handle.
Touching or snapping does not trigger the auto door open system.
Closing the door early during the auto door open system could cause kit damage.
You can adjust the pressure sensitivity. To maximize the sensitivity, press and hold
Cabinet Light and Deodorizer Reset simultaneously for 3 seconds. The display shows "01" for 3 seconds.
To set the pressure sensitivity back to default, press and hold the buttons again for 3 seconds. The display will show "00".
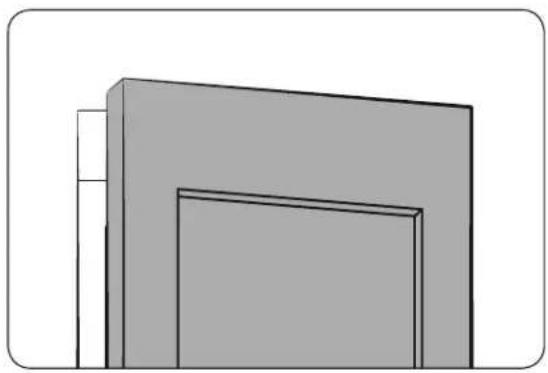
natural_image
Simple 3D diagram of a rectangular block with a smaller side panel, no text or symbols present
NOTE
- By default, the system is turned on.
• The system is not triggered immediately after the door is closed. Allow 2 seconds and try again. This is not a system failure.
- When the door opens by the system, it remains open for 2 seconds and closes automatically.

CAUTION
Do not force the door back in while it is opening. It may cause a mechanical failure of the system.
- The effort to push the door differs depending on operating conditions. It increases right after the door is closed or if the refrigeration cycle is turned on causing a negative pressure inside.
- When wine cellars are installed in a pair, it is possible that the system can be triggered by closing the door of the adjacent wine cellar. It may happen when the door is closed hard or when the wine cellars are not fixed tight into the cabinet.
Operations
Wine Rack Assemble & Disassemble
Assembling the wine rack
natural_image
Illustration of a hand holding a metal rod with two arrows indicating rotational movement (no text or symbols)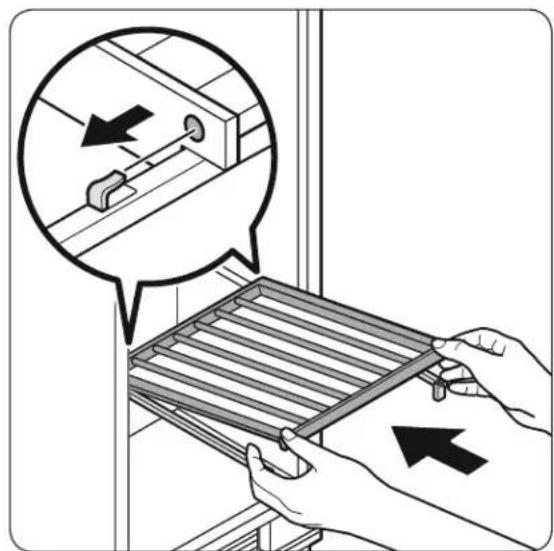
natural_image
Illustration of hands using a tool to adjust a metal rack with a magnified inset showing mechanical components (no text or symbols)-
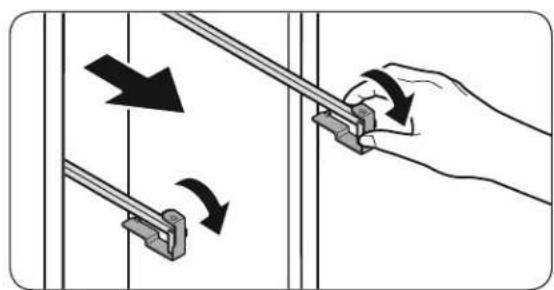
Remove the rail holders
-
Hold the front part of the wine rack and the rail, and then push the wine rack so that the hook on the back of the rail is inserted into the hole on the back of the wine rack as shown in the figure.
NOTE
Make sure the hooks on the both rails are properly inserted into the rack.
natural_image
Diagram showing a mechanical assembly with arrows indicating force or movement, no text or symbols present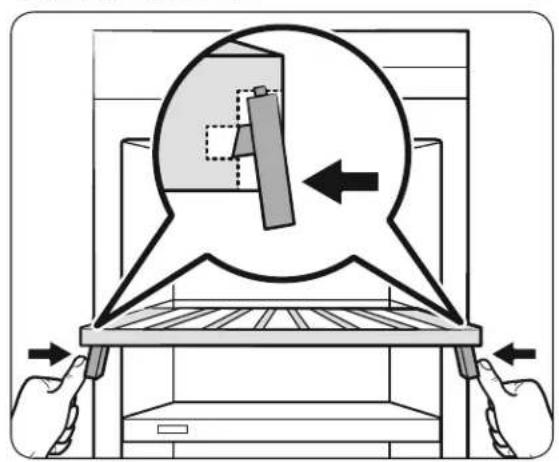
natural_image
Diagram of a mechanical device with hands operating a base, showing a circular component being inserted into a tray (no text or symbols present)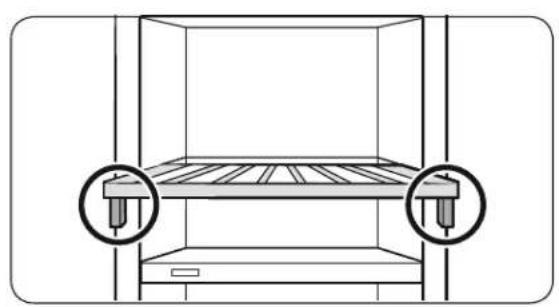
natural_image
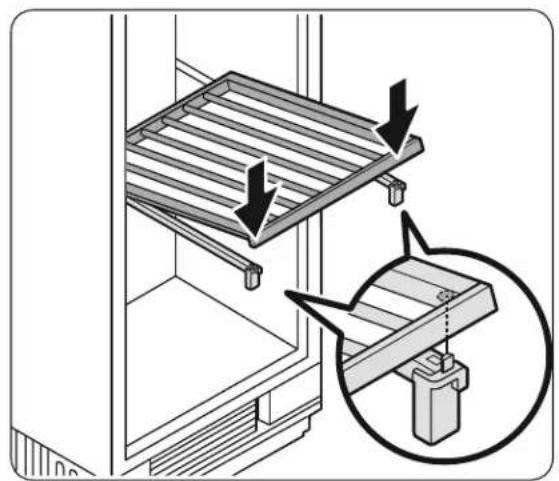
Diagram of a mechanical assembly with two circular insets showing internal components (no text or symbols)- Fix the front part of the wine rack by placing the rack on the front of the rail so that two pins on the top and side of the rack is inserted into the holes on the front part of the rack as shown in the figure.

NOTE
Make sure the pins on the both rails are properly inserted into the holes on the rack.
Operations
-
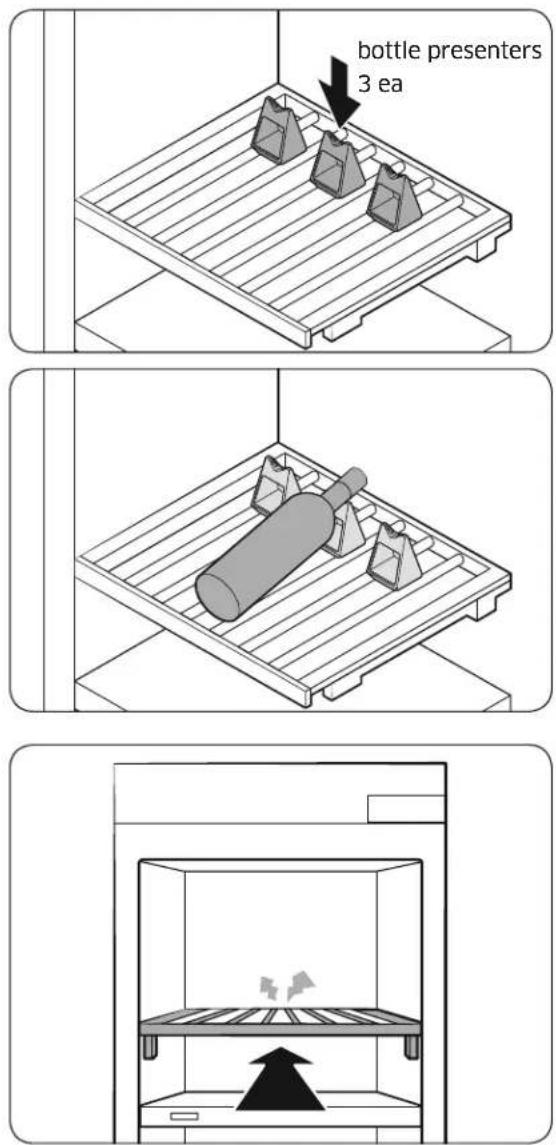
Place 3 bottle presenters on the wine rack of the Presentation Zone.
-
Slide in the wine rack until you hear a clicking sound.

WARNING
- Make sure the appliance is level. If the appliance is not level, the wine rack may slide in or out.
• Make sure the wine rack is firmly fixed.
Disassembling the wine rack
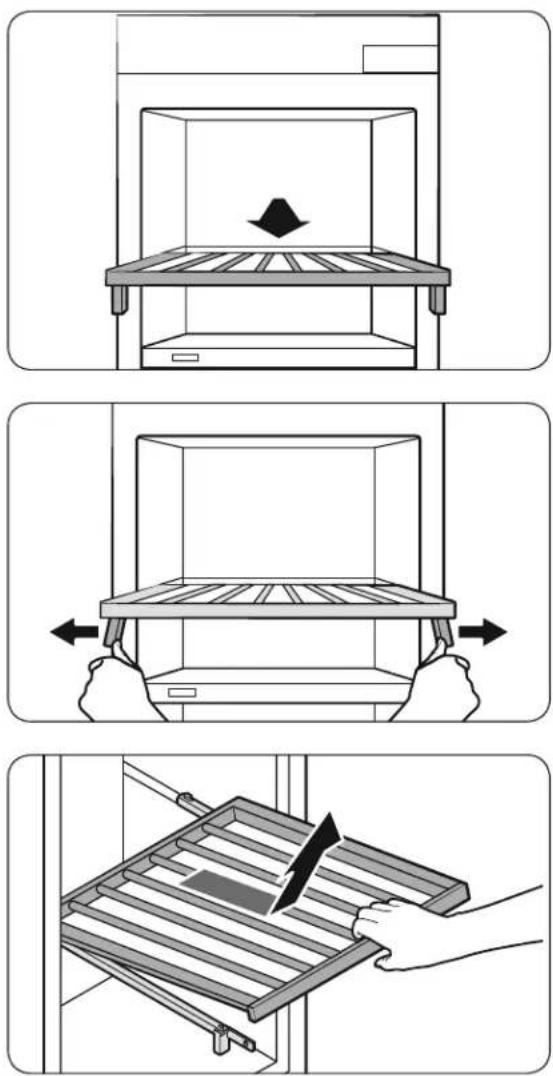
- Pull the wine rack.
- Gently spread the racks and lift the front part to release from the pins.
- Pull the wine rack to remove.
Replacement
Deodorizer filter
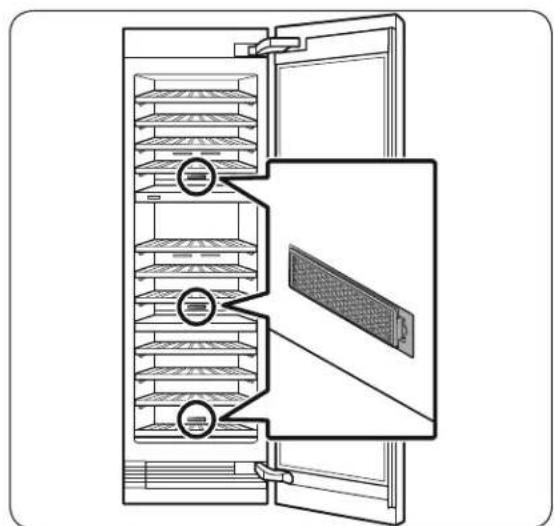
natural_image
Diagram of a refrigerator interior showing the doors and shelves with no text or symbols• The overall design and/or accessories may differ with the model.
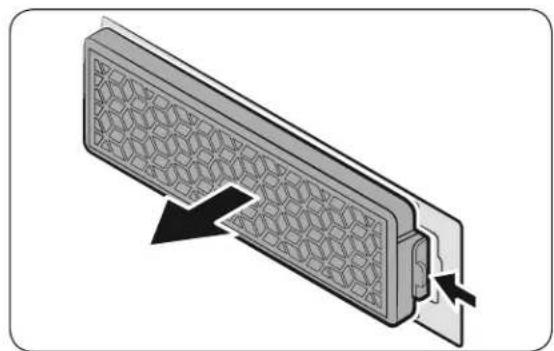
natural_image
Diagram of a mechanical component with a hexagonal lattice pattern and directional arrows indicating movement (no text or symbols)To remove, take out the wine rack first to reveal the filter on the rear wall. Hold down the tabs of the filter to unlock and remove.
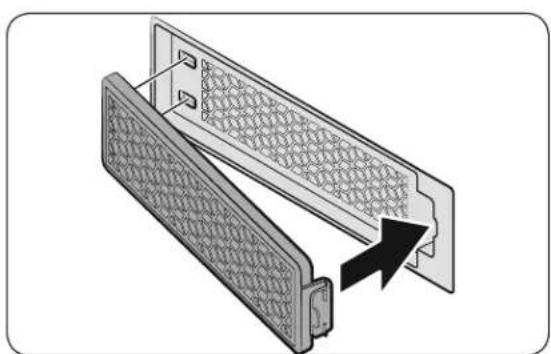
natural_image
Diagram of a mechanical component with a meshed panel and directional arrow (no text or symbols)To insert, insert the rear of the filter first, and then push the front to lock into position.
NOTE
The lifecycle of the deodorizer filter is 18 months, which differs depending on the use conditions. You can purchase a new filter at a local Dacor service center.
LED Lights
To replace the LED lights on the wine cellar, contact a local service agent. Contact Dacor Customer Service at (800) 793-0093.
WARNING
The LED lights are not user-serviceable. Do not attempt to replace an LED light yourself. This can cause electric shock.
Care and Maintenance
Cleaning
WARNING
- Do not use benzene, thinner, or home/car detergent such as Clorox™ for cleaning. They may damage the surface of the wine cellar and cause a fire.
- Do not spray water onto the wine cellar. This may cause electric shock.
Regularly use a dry cloth to remove all foreign substances such as dust or water from the power plug terminals and contact points.
- Power off the wine cellar.
- When done, use a dry cloth or paper towel to dry well.
-
Power on the wine cellar.
-
Use a moistened, soft, lint-free cloth or paper towel to clean the wine cellar's interior and exterior.
Troubleshooting
Before calling for service, review the checkpoints below. Any service calls regarding normal situations (No Defect Cases) will be charged to users.
General
Temperature
| Symptom Possible causes Solution | ||
| Wine cellar does not operate.Wine cellar temperature is warm. | Power cord is not plugged in properly. | Properly plug in the power cord. |
| Temperature control is not set correctly. | Set the temperature lower. | |
| Wine cellar is located near a heat source or direct sunlight. | Keep the wine cellar away from direct sunlight or a heat source. | |
| The wine cellar is overloaded. Wine is blocking the wine cellar vents. | Do not overload the wine cellar. Do not allow wine to block ventilation. | |
| Wine cellar is over-cooling. | Temperature control is not set correctly. | Set the temperature higher. |
Odors
| Symptom Possible causes Solution | ||
| Wine cellar has odors. | It might be the natural oak smell from the wooden wine rack. | Clean the wine cellar and open the door for a while.The lifecycle of the deodorizer filter is 18 months, which differs depending on the use of conditions. |
Condensation
| Symptom Possible causes Solution | ||
| Condensation forms on the interior walls. | • If door is left open, moisture enters the wine cellar. | • Remove the moisture and do not leave the door for a long time. |
Troubleshooting
Abnormal Sounds
Before calling for service, review the checkpoints below. Any service calls related to normal sounds will be charged to the user.
These sounds are normal.
- When starting or ending an operation, the wine cellar may make sounds similar to a car engine starting. As the operation stabilizes, the sounds will decrease.
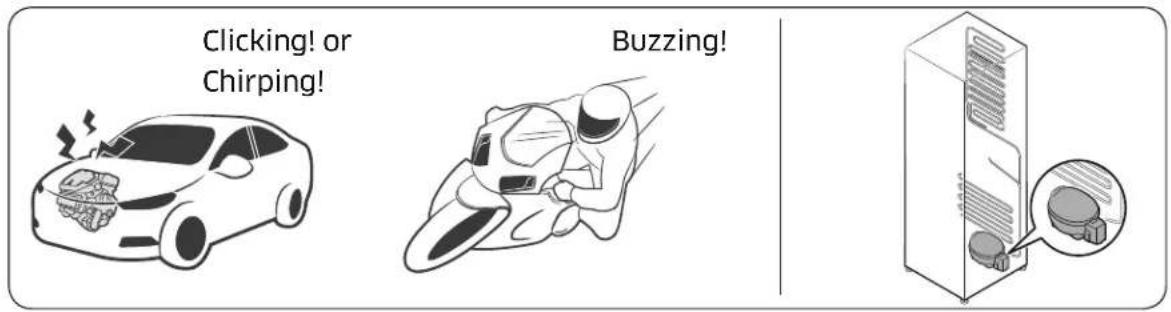
- While the fan is operating, these sounds may occur. When the wine cellar reaches the set temperature, no fan sound should occur.
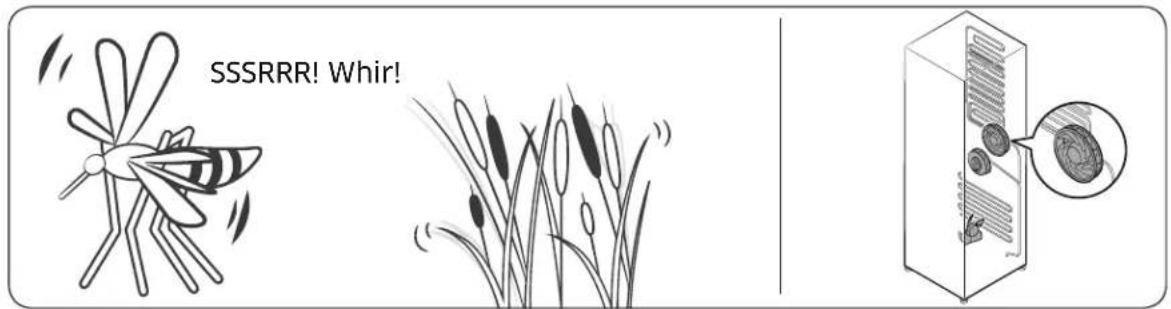
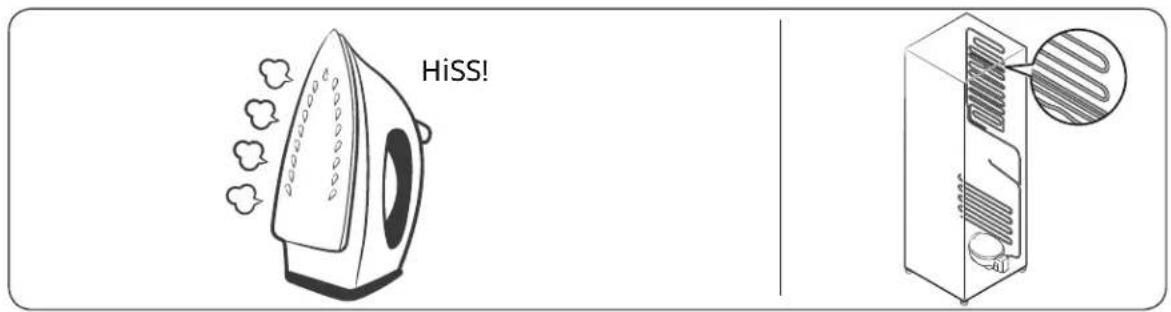
- During a defrost cycle, water may drip on the defrost heater, causing sizzling sounds.
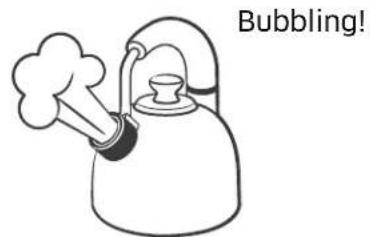
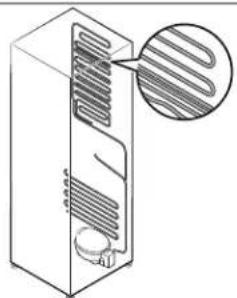
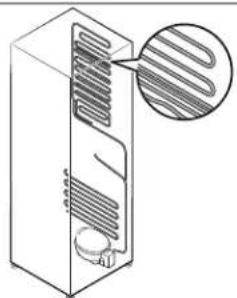
- As the wine cellar cools refrigerant gas moves through sealed pipes, causing bubbling sounds.
natural_image
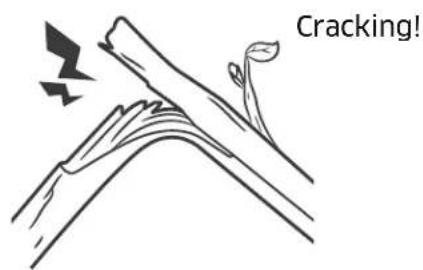
Diagram of a refrigerant unit with internal cooling pipes and a magnified inset showing a coiled heat element (no text or labels)- As the wine cellar temperature increases or decreases, plastic parts contract and expand, creating cracking noises. These noises occur during the defrosting cycle or when electronic parts are working.
natural_image
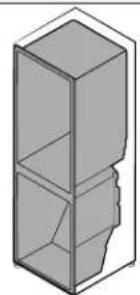
3D diagram of a vertical cabinet or storage unit with internal compartments (no text or symbols)- Due to pressure equalizing when opening and closing the wine cellar door, whooshing sounds may occur.
Troubleshooting
Auto Door Open (ADO)
| Symptom Action | |
| Auto Door Open(ADO) is not working. | Turn on Auto Door Open switch. (factory setting is turn off)Auto Door Open system will not work if it was opened less than 1 minute ago. Allow one minute, before attempting to open again. |
| When closing the door, the other door opens (Pair installation). | When closing the door of one wine cellar, the door of the other wine cellar (installed in a pair) may be opened. This occurs if the door sensor of the other wine cellar is triggered, and is not a system failure. The opened door will be closed in a moment by the Auto Close system. |
SmartThings
| Symptom Action | |
| Could not find “SmartThings” in the app market. | ·The SmartThings app is designed for Android 6.0 (Marshmallow) or later, iOS 10.0 or later, iPhone 6 or later, and is optimized for Samsung smartphones (Galaxy S and Galaxy Note series). |
| The SmartThings app fails to operate. | ·The SmartThings app is available for applicable models only. |
| The SmartThings app is installed but is not connected to my wine cellar. | ·You must log into your Samsung account to use the app.·Make sure that your router is operating normally.·Make sure that the Smart Home Adapter is inserted properly.·If the Wi-Fi icon on the Wine Cellar's display is off, this indicates that no network connection has been established yet. In this case, use the SmartThings app to connect and register your Wine Cellar to the access point (AP/Router) in your home. |
| Could not log into the app. | ·You must log into your Samsung account to use the app.·If you don't have a Samsung account, follow the app's onscreen instructions to create one. |
| An information message appears when I try to register my wine cellar. | ·Network connection may fail due to the distance from your access point (AP) or electrical interference from the surrounding environment. Wait a moment and try again. |
| The SmartThings app is successfully connected to my wine cellarbut does not run. | ·Exit and restart the SmartThings app or disconnect and reconnect the router.·Remove the Smart Home Adapter, and reconnect it properly. Then, try again. |
Customer Service
Before you request help or schedule service:
- Try the solutions offered in the Problem–Solution table in the "Troubleshooting" section.
- Become familiar with the warranty terms and conditions of your product.
- If none of these tips or suggestions resolves your problem, call our Customer Assurance team at the number below.
Dacor's Customer Assurance Team is available 5:00 A.M. to 5:00 P.M. Pacific Time.
For warranty repairs or questions in the US and Canada
Phone: 833-35-ELITE (833-353-5483) USA, Canada
For non-warranty repairs or questions in the US and Canada
Phone: (800) 793-0093, extension 2813
Contact us through our website at:
www.dacor.com/customer-care/contact-us
Product Information: knowledgebase.dacor.com
Warranty
What is Covered
CERTIFICATE OF WARRANTY ON
DACOR WINE CELLAR
WITHIN THE FIFTY STATES OF THE U.S.A., THE DISTRICT OF COLUMBIA AND CANADA:
FULL TWO-YEAR WARRANTY
The warranty applies to only the Dacor appliance that was sold to the first-use purchaser.
Warranty is also valid on products purchased brand new from a Dacor Authorized Dealer or other seller authorized by Dacor.
Starting from the date of original retail purchase receipt or closing date for new construction, whichever period is longer.
- 60-day Cosmetic
• 2-Year Full Warranty
• 6-Year Sealed System Warranty: Parts/Labor
• 12-Year Sealed System Warranty: Parts only
• 15-Year Compressor Warranty: Parts only
Except as noted above, consumable parts such as filters and light bulbs are not covered and are the responsibility of the purchaser.
LIMITED WARRANTY
In three to six years after the date of purchase, when this wine cellar is used and maintained according to the instructions or care guide that came with the product, Dacor will pay for factory specified parts and repair labor costs to correct defects in materials or workmanship in the sealed refrigeration system. These parts are: the compressor, evaporator, condenser, dryer and connecting tubing.
In seven to twelve years after the date of purchase, when this wine cellar is used and maintained according to the instructions or care guide that came with the product, Dacor will pay for factory specified parts for the following components to correct defects in materials or workmanship in the sealed refrigeration system that existed when this major appliance was purchased: the compressor, evaporator, condenser, dryer and connecting tubing.
In thirteen to fifteen years after the date of purchase, when this wine cellar is used and maintained according to the instructions or care guide that came with the product, Dacor will pay for factory specified parts for the compressor to correct defects in materials or workmanship that existed when this major appliance was purchased.
LIMITATIONS OF COVERAGE
Service will be provided by a Dacor designated service company during regular business hours. Please note service providers are independent entities and are not agents of Dacor.
Dealer displays and model home displays with a production date longer than 5 years, products sold “As-Is,” and products installed for non-residential use, which include but not limited to religious organizations, fire stations, bed and breakfast, and spas, carry a one-year parts warranty only. All delivery, installation, labor costs, and other service fees are the responsibility of the purchaser.
The owner must provide proof-of-purchase or a closing statement for new construction upon request. All Dacor products must be accessible for service. All cosmetic damage (such as scratches on stainless steel, paint/ porcelain blemishes, etc.) to the product or included accessories must be reported to Dacor within 60 days of the original purchase date to qualify for warranty coverage.
Warranty will be null and void on product that has altered, defaced, or missing serial numbers and tags.
Warranty is null and void if non-CSA approved product is transported from the U.S.A.
OUTSIDE THE FIFTY STATES OF THE U.S.A., THE DISTRICT OF COLUMBIA, AND CANADA: LIMITED FIRST YEAR WARRANTY
If your Dacor product fails to function within one year of the original date of purchase due to a defect in material or workmanship, Dacor will furnish a new part, F.O.B. factory to replace the defective part.
All delivery, installation, labor costs, and other service fees are the responsibility of the purchaser.
What is Not Covered
- Slight color variations may be noticed because of differences in painted parts, kitchen lighting, product placement, and other factors; this warranty does not apply to color variation.
- Service calls to educate the customer on proper use and care of the product.
- Service fees for travel to islands and remote areas, which include but are not limited to, ferries, toll roads, or other travel expenses.
- Consequential or incidental damage, including but not limited to: food or medicine loss, time away from work, or restaurant meals.
- Failure of the product when used for commercial, business, rental, or any application other than for residential consumer use.
- Failure of the product caused by improper product installation.
- Replacement of house fuses, fuse boxes, or resetting of circuit breakers.
- Damage to the product caused by accident, fire, flood, power interruption, power surges, or acts of God.
- Liability or responsibility for damage to surrounding property including cabinetry, floors, ceilings and other structures or objects around the product.
- Breakage, discoloration or damage to glass, metal surfaces, plastic components, trim, paint, or other cosmetic finish caused by improper usage, care, abuse, or neglect.
Out-of-Warranty
Should you experience a service issue beyond the standard warranty period, please contact us.
Dacor reviews each issue and customer concern to provide the best possible solution based on the circumstances.
THE REMEDIES PROVIDED IN THE ABOVE EXPRESS WARRANTIES ARE THE SOLE AND EXCLUSIVE REMEDIES. THEREFORE, NO OTHER EXPRESS WARRANTIES ARE MADE, AND OUTSIDE THE FIFTY STATES OF THE UNITED STATES, THE DISTRICT OF COLUMBIA AND CANADA, ALL IMPLIED WARRANTIES, INCLUDING BUT NOT LIMITED TO, ANY IMPLIED WARRANTY OF MERCHANTABILITY OR FITNESS FOR A PARTICULAR USE OR PURPOSE, ARE LIMITED IN DURATION TO ONE YEAR FROM THE DATE OF ORIGINAL PURCHASE. IN NO EVENT SHALL DACOR BE LIABLE FOR INCIDENTAL EXPENSE OR CONSEQUENTIAL DAMAGES. IN THE EVENT DACOR PREVAILS IN ANY LAWSUIT, DACOR SHALL BE ENTITLED TO REIMBURSEMENT OF ALL COSTS AND EXPENSES, INCLUDING ATTORNEY'S FEES, FROM THE DACOR CUSTOMER. NO WARRANTIES, EXPRESS OR IMPLIED, ARE MADE TO ANY BUYER FOR RESALE.
Some states do not allow limitations on how long an implied warranty lasts, or do not allow the exclusion or limitation of inconsequential damages, therefore the above limitations or exclusions may not apply to you. This warranty gives you specific legal rights, and you may also have other rights that vary from state-to-state.
FCC Notice

FCC CAUTION:
Any changes or modifications not expressly approved by the party responsible for compliance could void the user's authority to operate the equipment.
Contains Transmitter Module FCC ID: A3LCWAM210S
This device complies with Part 15 of FCC Rules. Operation is Subject to the following two conditions:
(1) This device may not cause harmful interference, and
(2) This device must accept any interference received including interference that cause undesired operation.
For products available in the US and Canadian markets, only channels 1\~11 are available. You cannot select other channels.
FCC STATEMENT:
This equipment has been tested and found to comply within the limits for a Class B digital device, pursuant to part 15 of the FCC Rules. These limits are designed to provide reasonable protection against harmful interference in a residential installation.
This equipment generates, uses, and can radiate radio frequency energy and, if not installed and used in accordance with the instructions, may cause harmful interference to radio communications. However, there is no guarantee that interference will not occur in a particular installation. If this equipment does cause harmful interference to radio or television reception, which can be determined by turning the equipment off and on, the user is encouraged to try to correct the interference by one or more of the following measures:
- Reorient or relocate the receiving antenna
- Increase the separation between the equipment and receiver
- Connect the equipment to an outlet that is on a different circuit than the receiver.
- Consult the dealer or an experienced radio/TV technician for help.
FCC RADIATION EXPOSURE STATEMENT:
This equipment complies with FCC radiation exposure limits set forth for an uncontrolled environment.
This equipment should be installed and operated so there is at least 8 inches (20 cm) between the radiator and your body. This device and it's antennas must not be co-located or operated in conjunction with any other antenna or transmitter except in accordance with FCC multi-transmitter product procedures.
IC Notice
Contains Transmitter Module IC: 649E-CWAM210S
The term “IC” before the radio certification number only signifies that Industry Canada technical specifications were met. Operation is subject to the following two conditions: (1) this device may not cause interference, and (2) this device must accept any interference, including interference that may cause undesired operation of the device.
This Class B digital apparatus complies with Canadian ICES-003.
For products available in the US and Canadian markets, only channels 1\~11 are available. You cannot select other channels.
IC RADIATION EXPOSURE STATEMENT:
This equipment complies with IC RSS-102 radiation exposure limits set forth for an uncontrolled environment. This equipment should be installed and operated so there is at least 8 inches (20 cm) between the radiator and your body. This device and it's antennas must not be co-located or operated in conjunction with any other antenna or transmitter except in accordance with FCC multi-transmitter product procedures.
SAVE THESE INSTRUCTION
Open Source Announcement
The software included in this product contains open source software. You may obtain the complete corresponding source code for a period of three years after the last shipment of this product by sending an email to mailto:oss.request@samsung.com.
It is also possible to obtain the complete corresponding source code in a physical medium such as a CD-ROM; a minimal charge will be required.
The following URL http://opensource.samsung.com/opensource/SMART_AT_051/seq/0 leads to the download page of the source code made available and open source license information as related to this product. This offer is valid to anyone in receipt of this information.

Memo
dacor®
Guide d'utilisation
City of Industry, CA 91745
The Dacor Customer Assurance Team
Avant de commencer
natural_image
Line drawing of an open refrigerator with multiple shelves and a door (no text or symbols)Service client Dacor
natural_image
Diagram of a vertical rack with circular components and a central pile (no text or symbols)Type A Type B
natural_image
Diagram of a vertical rack with circular components, no text or symbols present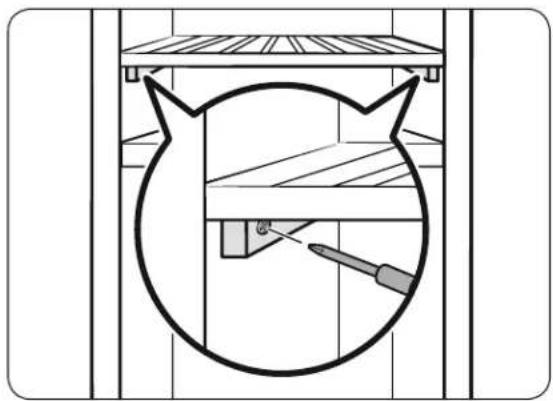
natural_image
Simple line drawing of a cat-shaped object inside a container with a screwdriver inserted (no text or symbols)natural_image
Diagram of two storage racks with circular components and a prohibition symbol, no text or labels present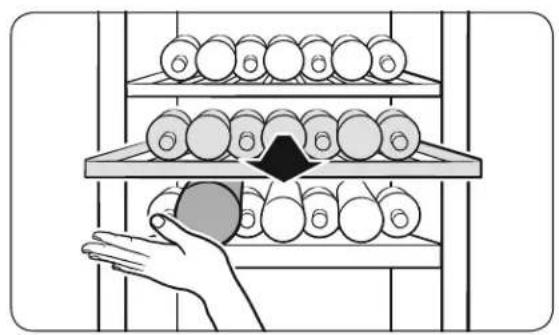
natural_image
Illustration of a hand reaching toward a ball on an abacus with stacked balls (no text or symbols)ATTENTION
natural_image
3D illustration of three cylindrical objects on a rack, no text or symbols presentnatural_image
Diagram of a staircase with a circular arrow pointing to the base wall (no text or symbols present)natural_image
Simple 3D diagram of a rectangular block with a smaller side panel, no text or symbols presentREMARQUE
natural_image
Illustration of a hand holding a metal rod with two arrows indicating rotational movement (no text or symbols)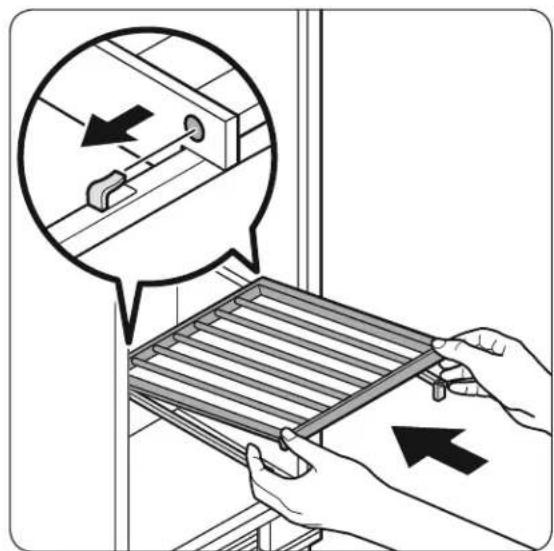
natural_image
Illustration of hands using a tool to adjust a metal rack with a magnified inset showing mechanical components (no text or symbols)natural_image
Diagram showing a mechanical assembly with arrows indicating force or movement, no text or symbols present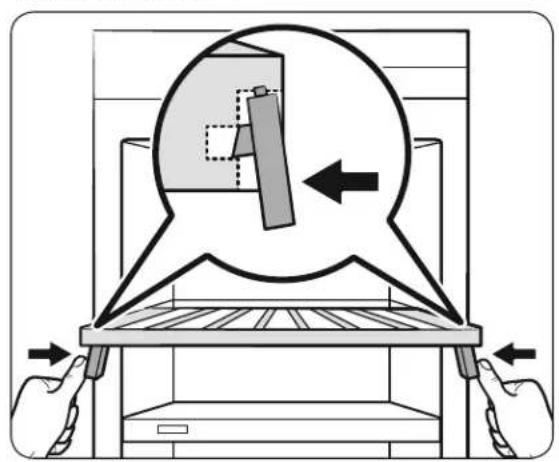
natural_image
Diagram of a mechanical device with hands operating a base, showing a circular component being inserted into a tray (no text or symbols present)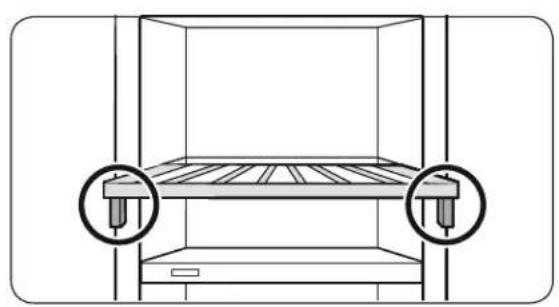
natural_image
Diagram of a mechanical assembly with two circular insets showing internal components (no text or symbols)natural_image
Diagram of a refrigerator interior showing the door, shelves, and storage compartments (no text or labels)natural_image
Diagram of a mechanical component with a meshed panel and directional arrows indicating movement (no text or symbols)natural_image
Diagram of a mechanical component with a meshed panel and directional arrow (no text or symbols)natural_image
Simple line drawing of a kettle emitting smoke (no text or symbols)Bouillonnement
natural_image
Diagram of a refrigerant unit with internal cooling pipes and a magnified inset showing a coiled heat element (no text or symbols)natural_image
3D diagram of a vertical cabinet or storage unit with internal compartments (no text or symbols)Mémo
dacor®
Manual del usuario
Cava incorporada
DRW24*
Contenido
Dacor Customer Assurance Team
14425 Clark Avenue
City of Industry, CA 91745
The Dacor Customer Assurance Team
Antes de comenzar
natural_image
Line drawing of an open refrigerator with multiple shelves and a door (no text or symbols)natural_image
Diagram of a vertical storage rack with multiple circular compartments (no text or labels)Tipo A Tipo B
natural_image
Diagram of a vertical rack with circular components, no text or symbols present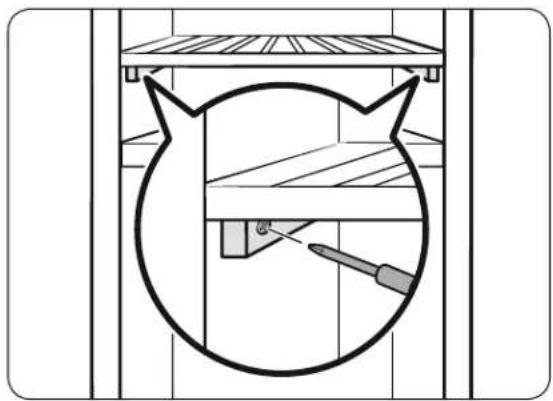
natural_image
Simple line drawing of a cat-shaped object inside a container with a screwdriver inserted (no text or symbols)| Capacidad de carga Tipo A Tipo B | |||
| Zona superior | 1 | 7 | 7 |
| 2 | 7 | 7 | |
| 3 | 7 | 7 | |
| 4 | 7 | 7 | |
| 5 | 7 | 7 | |
| Zona media | 1 | 1 | 0 |
| 2 | 7 | 7 | |
| 3 | 7 | 7 | |
| 4 | 7 | 7 | |
| Zona inferior | 1 | 7 | 7 |
| 2 | 7 | 7 | |
| 3 | 7 | 7 | |
| 4 | 1 | 3 | |
| Total 100 97 | |||
PRECAUCIÓN
natural_image
Diagram of two storage racks with circular components and a prohibition symbol, no text or labels present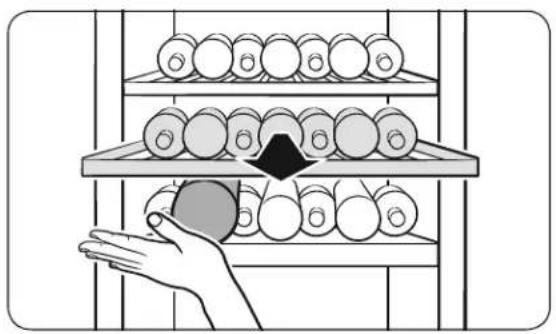
natural_image
Illustration of a hand reaching for a ball on a rack with balls in the background (no text or symbols)PRECAUCIÓN
natural_image
Illustration of three cylindrical objects mounted on a rack, no text or symbols presentnatural_image
Diagram of a staircase with a circular arrow pointing to a vertical post (no text or symbols)natural_image
Simple 3D diagram of a rectangular block with a smaller side panel, no text or symbols present
NOTA
natural_image
Illustration of a hand holding a metal rod with two arrows indicating rotational movement (no text or symbols)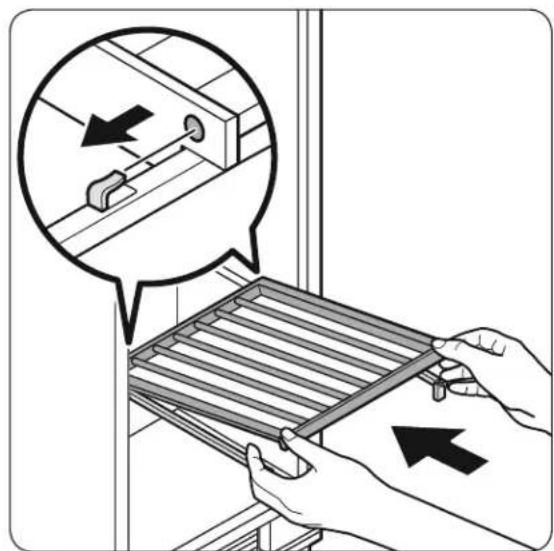
natural_image
Illustration of hands installing or adjusting a metal grate with arrows indicating direction (no text or symbols present)natural_image
Diagram showing a mechanical assembly with arrows indicating force or movement, no text or symbols present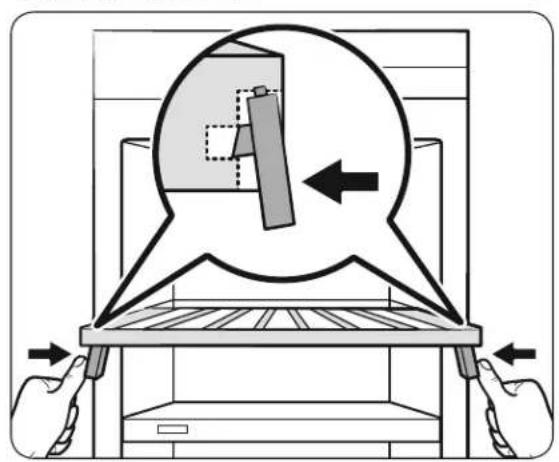
natural_image
Diagram of a mechanical device with hands operating a base, showing a circular component being inserted into a tray (no text or symbols present)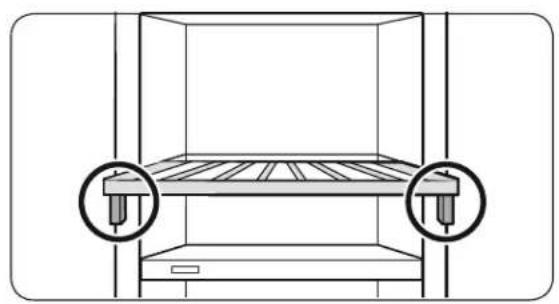
natural_image
Diagram of a horizontal storage unit with two circular insets showing internal components (no text or symbols)natural_image
Diagram of a refrigerator interior showing the doors and shelves with no text or symbolsnatural_image
Diagram of a mechanical component with a hexagonal lattice pattern and directional arrows indicating movement (no text or symbols)natural_image
Diagram of a mechanical component with a meshed panel and directional arrow (no text or symbols)natural_image
Simple line drawing of a kettle with smoke rising, labeled 'Burbujeo' (no other text or symbols)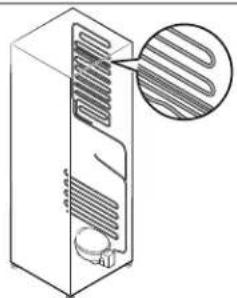
natural_image
Diagram of a refrigerant unit with internal cooling pipes and a magnified inset showing a coiled heat element (no text or labels)natural_image
3D diagram of a vertical cabinet or storage unit with internal compartments (no text or symbols)Notas


- Built-In Wine Cellar
- Contents
- Important Information 5
- Safety Information 6
- What's Included 17
- Operations 19
- Care and Maintenance 38
- Troubleshooting 39
- Warranty and Service 44
- Regulatory Notice 48
- Open Source Announcement 50
- Important Information
- Before You Begin
- Installer
- Consumer
- Safety Information
- WARNING
- Important Safety Symbols and Precautions:
- CAUTION
- NOTE
- State of California Proposition 65 Warning (US only)
- Severe Warning Signs for Transportation and Site
- Critical Installation Warnings
- Installation Cautions
- Critical Usage Warnings
- Usage Cautions
- Cleaning Cautions
- Critical Disposal Warnings
- Intended Use
- What's Included
- Switch box
- Control Panel
- Network Connection
- Cabinet Light
- Presenter Light
- Upper Zone Select
- Upper Zone Temp.
- Middle Zone Select
- Middle Zone Temp.
- Lower Zone Select
- Lower Zone Temp.
- Temp. Control
- Deodorizer Reset (3 sec)
- Door Alarm / °(3-sec)
- Lock (3 sec)
- Cooling Off
- Sabbath mode
- SmartThings
- Installation
- Samsung account
- Getting started
- Wine cellar app
- Integrated control
- To check the MAC address
- Special Features
- Operations
- Bottle presenters
- Auto Door Open system
- Wine Rack Assemble & Disassemble
- Assembling the wine rack
- Disassembling the wine rack
- Replacement
- Deodorizer filter
- LED Lights
- Care and Maintenance
- Cleaning
- Troubleshooting
- General
- Abnormal Sounds
- These sounds are normal.
- Customer Service
- Warranty
- What is Covered
- LIMITED WARRANTY
- LIMITATIONS OF COVERAGE
- OUTSIDE THE FIFTY STATES OF THE U.S.A., THE DISTRICT OF COLUMBIA, AND CANADA: LIMITED FIRST YEAR WARRANTY
- What is Not Covered
- Out-of-Warranty
- FCC Notice
- FCC CAUTION:
- FCC STATEMENT:
- FCC RADIATION EXPOSURE STATEMENT:
- IC Notice
- IC RADIATION EXPOSURE STATEMENT:
- Open Source Announcement
- Memo
- Avant de commencer
- Service client Dacor
- ATTENTION
- REMARQUE
- Mémo
- Cava incorporada
- Contenido
- Antes de comenzar
- PRECAUCIÓN
- NOTA
- Notas
Brand : Dacor
Model : RAW24AMLHSR
Category : Wine cellar