
KHBC112 - Blender KITCHENAID - Free user manual and instructions
Find the device manual for free KHBC112 KITCHENAID in PDF.

| Product Type | Commercial Immersion Blender |
| Brand | KitchenAid |
| Model | KHBC112 |
| Power Supply | 120 V AC, 60 Hz |
| Power | 750 W (1 HP) |
| Net Weight | 4.3 kg (9.5 lb) |
| Variable Speed | Yes, rotary speed control |
| On/Pulse Button | Yes, with safety lock |
| Included Accessories | S-shaped multi-purpose blade, whisk, stainless steel blending shaft |
| Blending Shaft Length | 420 mm |
| Continuous Run Function | Yes, with bowl attachment |
| Bowl Attachment | Yes, for hands-free use |
| Second Handle | Yes, removable for added stability |
| Power Cord | Long, grooveless for easy cleaning |
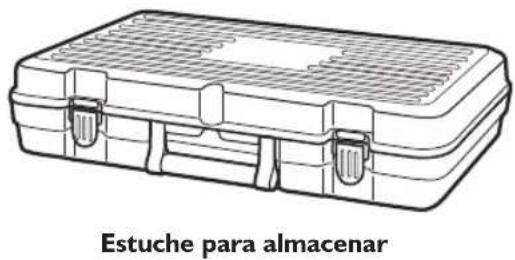
| Carrying Case | Included |
| Replaceable Motor Brushes | Yes, to extend lifespan |
| Thermal Protection | Automatic thermal shutoff |
| Safety | Safety lock, sharp blades, mandatory grounded outlet |
| Motor Housing Maintenance | Wipe with a damp cloth; do not immerse |
| Accessory Cleaning | Dishwasher safe or hand washable |
| Intended Use | Restaurants, commercial kitchens |
| Warranty | 2 years (full warranty) |
Frequently Asked Questions - KHBC112 KITCHENAID
User questions about KHBC112 KITCHENAID
0 question about this device. Answer the ones you know or ask your own.
Ask a new question about this device
Download the instructions for your Blender in PDF format for free! Find your manual KHBC112 - KITCHENAID and take your electronic device back in hand. On this page are published all the documents necessary for the use of your device. KHBC112 by KITCHENAID.
USER MANUAL KHBC112 KITCHENAID
natural_image
Exterior view of a KitchenAid kitchen brush (no text or symbols visible on the device body)KitchenAid®
COMMERCIAL
WELCOME TO THE WORLD OF KITCHENAID COMMERCIAL
We're committed to helping you create a lifetime of delicious dishes for your customers. To help ensure the longevity and performance of your appliance, keep this guide handy. It will empower you with the best way to use and care for your product. Your satisfaction is our #1 goal. Remember to register your product online at www.kitchenaidcommercial.com or by mail using the enclosed Product Registration Card.
COMMERCIAL IMMERSION BLENDER INSTRUCTIONS
TABLE OF CONTENTS
COMMERCIAL IMMERSION BLENDER SAFETY
Important Safeguards....4
Electrical Requirements....5
Electrical Data for Immersion Blender & Attachments 6
PARTS AND FEATURES GUIDE
Commercial Immersion Blender parts....7
Optional accessories....8
Commercial Immersion Blender features 8
Before first use....9
Intended use....9
Using the Commercial Immersion Blender
with Blade Attachments 9
Using the Commercial Immersion Blender
with the Whisk Attachment....II
Using the Bowl Clamp and the Continuous Run Feature....13
TIPS FOR GREAT RESULTS ...... 13
CARE AND CLEANING
Washing the Motor Body....14
Washing the Attachments....14
TROUBLESHOOTING....15
TECHNICAL SPECIFICATIONS....16
WARRANTY AND SERVICE....17
PROOF OF PURCHASE & PRODUCT REGISTRATION
Always keep a copy of the sales receipt showing the date of purchase of your Commercial Immersion Blender. Proof of purchase will assure you of in-warranty service. Before you use your Commercial Immersion Blender, please fill out and mail your product registration card packed with the unit. This card will enable us to contact you in the unlikely event of a product safety notification and assist us in complying with the provisions of the Consumer Product Safety Act. This card does not verify your warranty. Please complete the following for your personal records:
Model Number
Serial Number
Date Purchased ____
Store Name ____
COMMERCIAL IMMERSION BLENDER SAFETY
Your safety and the safety of others are very important.
We have provided many important safety messages in this manual and on your appliance. Always read and obey all safety messages.

This is the safety alert symbol.
This symbol alerts you to potential hazards that can kill or hurt you and others.
All safety messages will follow the safety alert symbol and either the word "DANGER" or "WARNING." These words mean:
! DANGER
You can be killed or seriously injured if you don't immediately follow instructions.
WARNING
You can be killed or seriously injured if you don't follow instructions.
All safety messages will tell you what the potential hazard is, tell you how to reduce the chance of injury, and tell you what can happen if the instructions are not followed.
State of California Proposition 65 Warnings:
WARNING: This product contains one or more chemicals known to the State of California to cause cancer.
WARNING: This product contains one or more chemicals known to the State of California to cause birth defects or other reproductive harm.
IMPORTANT SAFEGUARDS
When using electrical appliances, basic safety precautions should always be followed, including the following:
I. Read all instructions.
2. To protect against risk of electrical shock do not put motor body, cord, or electrical plug of this Commercial Immersion Blender in water or other liquid.
-
This appliance should not be used by children and care should be taken when used near children.
-
Unplug from outlet when not in use, before putting on or taking off parts, and before cleaning or replacing carbon brushes.
-
Avoid contact with moving parts.
-
Do not operate any appliance with a damaged cord or plug or after the appliance malfunctions, or is dropped or damaged in any manner. Return appliance to the nearest Authorized Service Facility for examination, repair or electrical or mechanical adjustment.
-
The use of attachments not recommended or sold by the manufacturer may cause fire, electric shock, or injury.
-
Do not use outdoors.
-
Do not let cord hang over edge of table or counter.
COMMERCIAL IMMERSION BLENDER SAFETY
- Do not let cord contact hot surfaces, including the stove.
II. When mixing liquids, especially hot liquids, use a tall container or make small quantities at a time to reduce spillage and possibility of injury. - Keep hands and utensils out of the container while blending to prevent the possibility of severe injury to persons or damage to the unit. A scraper may be used, but must be used only when the unit is not running.
- Blades are sharp. Handle carefully.
SAVE THESE INSTRUCTIONS
Electrical Requirements
WARNING

Electrical Shock Hazard
Plug into a grounded 3 prong outlet.
Do not remove ground prong.
Do not use an adapter.
Do not use an extension cord.
Failure to follow these instructions can result in death, fire, or electrical shock.

natural_image
Illustration of a hand inserting into an electrical outlet with two socket outlets (no text or symbols)Voltage: 120 V.A.C.
Frequency: 60 Hz
Wattage: 750 W
To reduce the risk of electrical shock, this plug will fit in an outlet only one way. If it does not fit, contact a qualified electrician. Do not modify the plug in any way.
If a long extension cord is used:
- The marked electrical rating of the extension cord should be at least as great as the electrical rating of the appliance.
- The cord should be arranged so it will not drape over the countertop or tabletop where it can be pulled or tripped over unintentionally.
COMMERCIAL IMMERSION BLENDER SAFETY
Electrical Data for Immersion Blender and Attachments
| Immersion Blender | Whisk Blending Arm | ||
| Models KHBC412 | KHBC414KHBC418KHBC416KHBC420 | KHBC110 | KHBC112KHBC114KHBC116KHBC118KHBC120 |
| Volts/Hertz 120 V.A.C. / 60 Hz | |||
| Speed-lowest 9,000 rpm 550 rpm 9,000 rpm | |||
| Speed-highest 18,000 rpm 900 rpm 18,000 rpm | |||
Motor horsepower for our Immersion Blender motors was measured using a dynamometer, a machine laboratories routinely use to measure the mechanical power of motors. Our 1.0 horsepower (HP) motor reference reflects the horsepower rating of the motor itself and not the Immersion Blender's horsepower output to the blending vessel. The output horsepower to the blending vessel will be slightly less than 1.0 HP.
PARTS AND FEATURES GUIDE
Commercial Immersion Blender parts
![Lock Button Power/Pulse Trigger Speed Control Dial 12-ft. Power Cord Continuous Run Button Serviceable Motor Brushes Mount for Bowl Clamp and Secondary Handle Stainless Steel Blending Arm (KHBC120 shown) Motor Body Whisk Attachment Bowl Clamp Secondary Handle MODEL COMPARISON KHBC412 (12" [305 mm]) KHBC414 (14" [356 mm]) KHBC416 (16" [406 mm]) KHBC418 (18" [457 mm]) KHBC420 (20" [508 mm]) Storage Case](/content/2026/04/667515/images/e49c42e0d4b7357d88df827f66b3ff45b2c562b8fb0ed3dd691ede6a538f58aa.jpg)
English
PARTS AND FEATURES GUIDE
Optional accessories
| Accessory Model # Style Length | |||
| Whisk Attachment | KHBC110WSS 10" 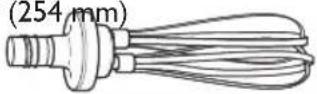 | ||
| Multi-Purpose S-Blade | KHBC112SS 12" (305 mm) 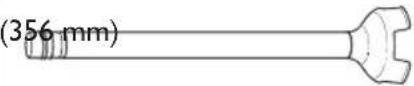 (KHB112SS shown) (KHB112SS shown) | ||
| KHBC114SS 14" | |||
| KHBC116SS KHBC118SS KHBC120SS | 16" (406 mm) 18" (457 mm) 20" (508 mm) | ||
| Recommended Bowl Size | KHBC412OB KHBC414OB KHBC416OB KHBC418OB KHBC420OB | 6 gallon bowl (maximum) 14 gallon bowl (maximum) 23 gallon bowl (maximum) 32 gallon bowl (maximum) 40 gallon bowl (maximum) | |
Commercial Immersion Blender features
Speed Control
Provides easy adjustment of speed with a turn of the dial, located at the base of the motor body.
Powerful IHP Motor
Provides powerful blending action designed for long-life operation.
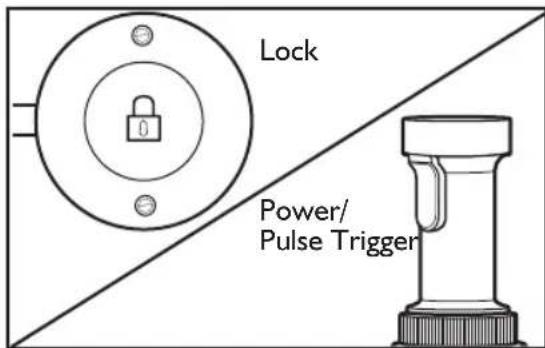
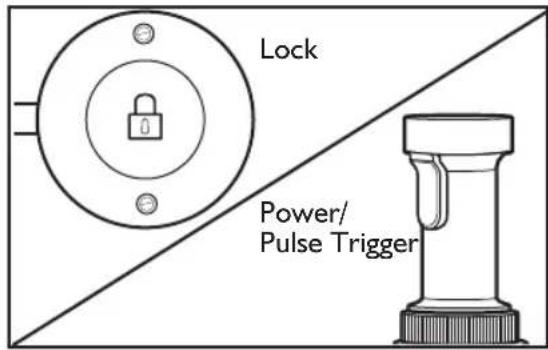
Power/Pulse Trigger
Located on the handle and activated by pressing and holding during blending. To stop blending, simply release the Power/Pulse Trigger.
Lock Switch
Press to unlock in order for Power/Pulse Trigger to function; press to lock when Commercial Immersion Blender is not in use.
Serviceable Motor Brushes
Feature allows easy access to motor brushes, allowing for maintenance when worn, and a longer product life for the Commercial Immersion Blender.
Bowl Clamp
Mounts conveniently to the motor housing, allowing for hands-free operation.
Continuous Run
When used with the bowl clamp, this feature allows for continuous operation.
Twist Lock Stainless Steel Blending Arm
Simply seats onto the motor body and is rotated to lock together.
Secondary handle
Mounts conveniently to the motor housing, allowing for better control while blending.
12-ft. Power Cord
Long enough to take the Commercial Immersion Blender to the cooktop or work area and rounded with no grooves for easy clean-up.
Carrying Case
Durable case for optimal storage of the Commercial Immersion Blender.
Ordering Replacement Parts
To order replacement parts for your Commercial Immersion Blender, call toll-free 1-855-845-9684, 8 a.m. to 8 p.m., Monday through Friday, Eastern Time or visit kitchenaidcommercial.com.
Before using the KitchenAid Commercial Immersion Blender for the first time, wipe the motor body with a clean, damp cloth to remove any dirt or dust.
IMPORTANT: Do not immerse the motor body in water.
Wash all the attachments and accessories by hand or in the dishwasher. Mild dish soap may be used, but do not use abrasive cleansers. Dry thoroughly with a soft cloth.
IMPORTANT: Always be sure to unplug the power cord from the wall socket before attaching or removing attachments.
Intended use
This KitchenAid Commercial Immersion Blender is intended for use in restaurants, professional kitchens, and other food service locations. The Commercial Immersion Blender can be used directly in a pot or bowl to mix a variety of ingredients.
| Accessory Uses | |
| Whisk Attachment | Pancake batter, Mayonnaise, Egg whites, Pudding, Whipped cream |
| Multi-Purpose S-Blade | Soups, Vegetable purées, Mousses, Compotes, Sauces, Bisques, Cooked meats, Beef gravy, Liquefy fruits, Minces |
Using the Commercial Immersion Blender with Blade Attachments
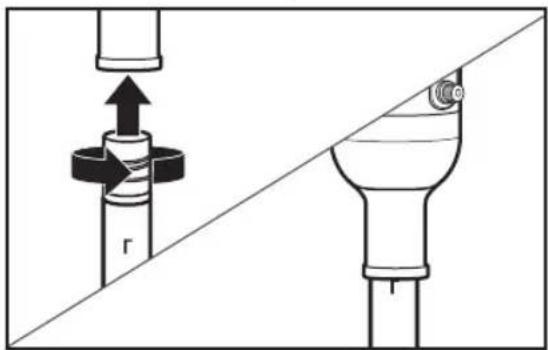
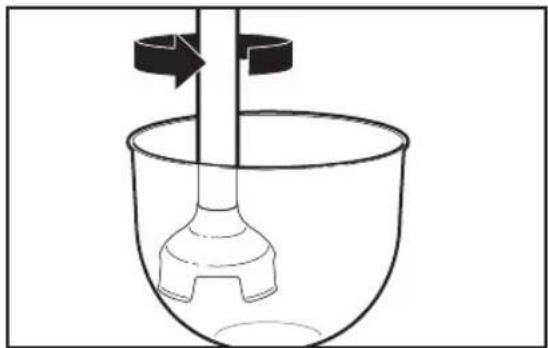
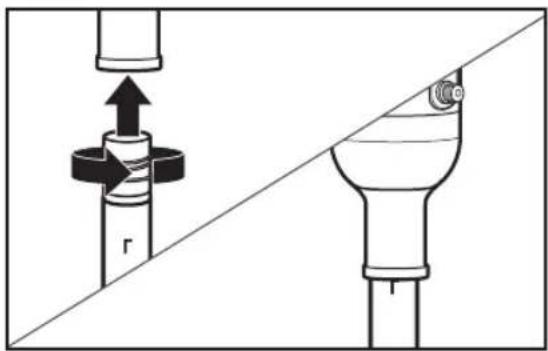
I. Insert Blending Arm attachment into the motor body, twist to lock. The attachment mark on the blending arm should line up with the bottom of the motor bell when fully attached.
natural_image
Diagram showing two mechanical components with directional arrows, one mounted on a cylindrical shaft and the other in a flanged housing (no text or symbols)WARNING

Electrical Shock Hazard
Plug into a grounded 3 prong outlet.
Do not remove ground prong.
Do not use an adapter.
Do not use an extension cord.
Failure to follow these instructions can result in death, fire, or electrical shock.
- Plug the electrical cord into a grounded 3 prong outlet.
- Set Commercial Immersion Blender to your desired speed on the Speed Dial.
natural_image
Diagram of a mechanical device with a lever and circular component, no text or symbols present- Insert the Commercial Immersion Blender into the mixture.
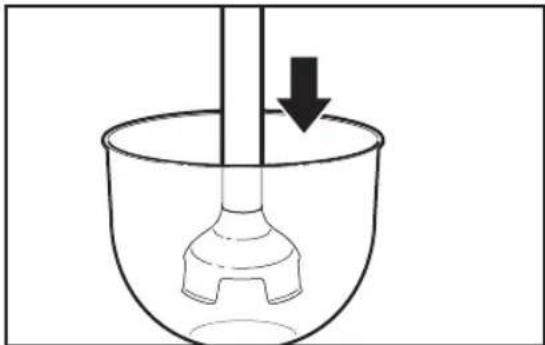
natural_image
Simple line drawing of a laboratory bowl with a stirring rod and a downward arrow indicating liquid level (no text or symbols)NOTE: The Commercial Immersion Blender should only be immersed in liquids to the max fill line shown on blending arm. To avoid damage to the blender, do not submerge beyond the seam of the blending attachment. Do not immerse the motor body into liquids or other mixtures. To avoid damaging blades or mixing container, do not touch the blade to the bottom of the mixing container or use in a mixing container that has protruding parts that can go under the metal guard.
- Press the LOCK switch to unlock the Commercial Immersion Blender, then PRESS AND HOLD the Power/Pulse Trigger to activate.
For best results, insert Commercial Immersion Blender with Blending Arm attached into the pot or bowl containing ingredients at an angle. Use the removable Secondary Handle for better stability. Stop the Commercial Immersion Blender before removing it from the pot or bowl to avoid splashing.
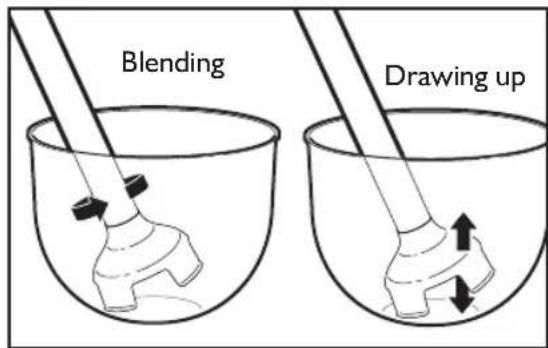
Rest the Commercial Immersion Blender on the bottom of the pot or bowl momentarily, then hold at an angle and slowly draw it upwards against the side of the pot or bowl. As the Commercial Immersion Blender is drawn up you will notice the ingredients from the bottom of the pot or bowl being drawn up. When the ingredients are no longer being drawn up from the bottom, return the Commercial Immersion Blender to the bottom, and repeat the process until the ingredients are the desired consistency.
Using a light circular motion from your wrist, draw the Commercial Immersion Blender up slightly and let it fall again into the ingredients. Allow your wrist motion and the weight of the Commercial Immersion Blender to do the work. Use the removable Secondary Handle, if needed, for extra stability while mixing.
natural_image
Simple line drawing of a laboratory setup with a funnel and rotating arrow (no text or symbols)- When blending is complete, release the Power/Pulse Trigger before removing the Commercial Immersion Blender from the mixture.
- Unplug immediately after use, before removing or changing attachments.
IMPORTANT: If a piece of food becomes lodged in the guard surrounding the blade, follow these instructions:
I. Release the Power/Pulse Trigger and unplug the Commercial Immersion Blender.
2. Use a spatula to remove the food lodged in the plastic guard. Do not use your fingers to remove lodged food.
3. Plug the Commercial Immersion Blender back into the electrical outlet and resume operation.
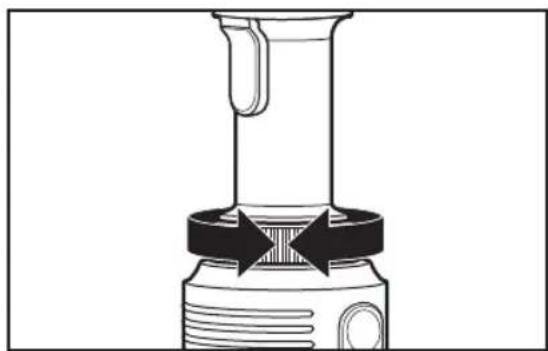
Using the Commercial Immersion Blender with the Whisk Attachment
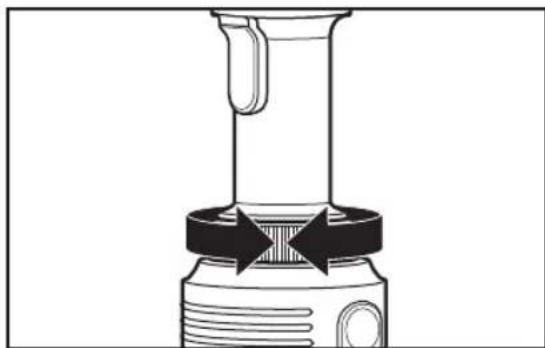
I. Insert the Whisk attachment into the motor body, twist to lock. The attachment mark on the whisk should line up with the bottom of the motor bell when fully attached.
natural_image
Diagram showing a mechanical assembly with a cylindrical component and a flanged cylindrical component, no text or symbols present.WARNING

Electrical Shock Hazard
Plug into a grounded 3 prong outlet.
Do not remove ground prong.
Do not use an adapter.
Do not use an extension cord.
Failure to follow these instructions can result in death, fire, or electrical shock.
- Plug the electrical cord into a grounded 3 prong outlet.
- Set Commercial Immersion Blender to your desired speed on the Speed Dial.
natural_image
Diagram of a mechanical device with a central component and directional arrows indicating motion (no text or symbols)- Insert the Whisk into the mixture.
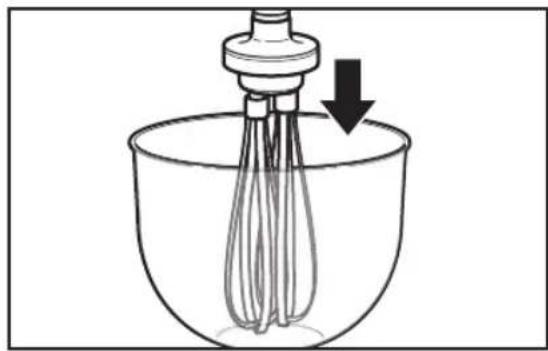
natural_image
Line drawing of a mixing bowl with a whisk and a top handle, showing liquid level (no text or symbols)NOTE: The Commercial Immersion Blender should only be immersed in liquids the length of the attachment. To avoid damage to the blender, do not submerge beyond the seam of the blending attachment. Do not immerse the motor body into liquids or other mixtures.
- Press the LOCK switch to unlock the Commercial Immersion Blender, then PRESS AND HOLD the Power/Pulse Trigger to activate.
For best results, insert the Commercial Immersion Blender with the Whisk attached into the pot or bowl containing ingredients at an angle. Use your free hand to hold the pot or bowl or hold the Commercial Immersion Blender near the base of the motor unit for better stability. Remember to stop the Commercial Immersion Blender before removing it from the pot or bowl to avoid splashing.

Using a light circular motion from your wrist, draw the Whisk up slightly and let it fall again into the ingredients. Allow your wrist motion and the weight of the Whisk to do the work. Use the removable Secondary Handle, if needed, for extra stability while mixing.
- When blending is complete, release the Power/Pulse Trigger before removing the Commercial Immersion Blender from the mixture.
- Unplug immediately after use, before removing or changing attachments.
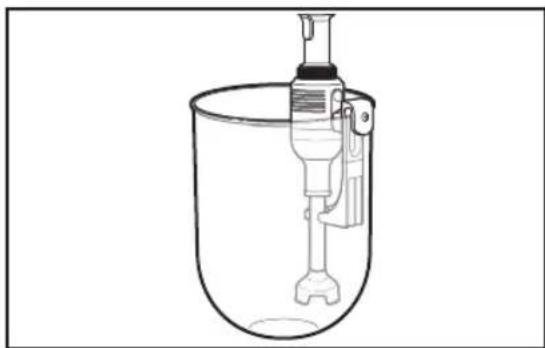
Using the Bowl Clamp and the Continuous Run feature
natural_image
Line drawing of a mechanical device inside a container, no text or symbols presentIMPORTANT: Continuous Run feature maximum recommended mixing times:
30 minutes - Low Speed
10 minutes - High Speed
- Slide the notched latch into the Bowl Clamp at the slot in the top of the clamp; then, use the adjustment wheel to tighten into place at the correct spot for the bowl you are using to mix.
- Slide the Bowl Clamp over the edge of the bowl you are using for mixing, allowing the white notch on the clamp to snap onto the bowl; then, turn the knob to tighten in place.
- Snap the Commercial Immersion Blender into the slot at the bottom of the Bowl Clamp support arm, so that the Commercial Immersion Blender is inserted in the mixture you are blending.
- Press the Lock switch to unlock the Commercial Immersion Blender, then Press the Power/Pulse Trigger and the Continuous Run button simultaneously, and then release the Power/Pulse Trigger to activate the continuous run feature. The Commercial Immersion Blender will run hands-free at this setting.


TIPS FOR GREAT RESULTS
- Cut solid foods into small pieces for easier blending or chopping.
- The Commercial Immersion Blender is equipped with thermal protection from high operating temperatures. Should the Commercial Immersion Blender suddenly stop during use, unplug it and allow 10 minutes to automatically reset.
- To avoid splashing, insert the Commercial Immersion Blender into the mixture before pressing the Power/Pulse Trigger, and release the Power/Pulse Trigger before pulling the Commercial Immersion Blender out of the mixture.
-
When blending in a stockpot on a cooktop, remove the stockpot from the heating element to protect the Commercial Immersion Blender from overheating.
-
For best blending, hold the Commercial Immersion Blender at an angle and gently move up and down within the container. Do not pound down on the mixture with the Commercial Immersion Blender.
• To prevent overflow, allow room in the container for the mixture to rise when using the Commercial Immersion Blender. - Be sure the extra long cord of the Commercial Immersion Blender is not extending over a hot heating element.
- Do not let the Commercial Immersion Blender sit in a hot pan on the cooktop while not in use.
- Remove hard items, such as fruit pits or bones, from the mixture before blending or chopping to help prevent damage to the blades.
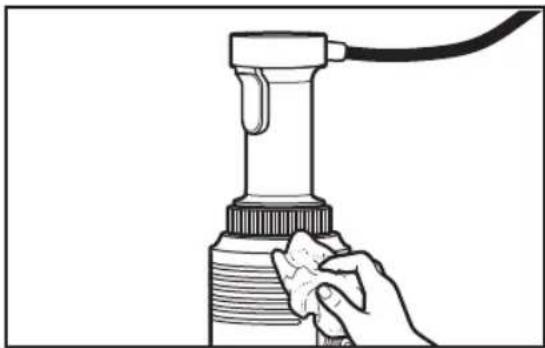
CARE AND CLEANING
Washing the Motor Body
natural_image
Line drawing of a hand holding a handheld device with a cable, no text or symbols presentNOTE: To avoid damage to the blender, do not immerse the motor body in washing solution, rinse water, or sanitizing solution.
Always clean the Commercial Immersion Blender prior to initial use, after each use, and before storing.
I. Unplug Commercial Immersion Blender before cleaning.
2. Remove the attachments by twisting (see "Operating the Commercial Immersion Blender" section).
3. Wipe the motor body and power cord with a warm sudsy cloth; wipe clean with a damp cloth. Dry with a soft cloth. Mild dish soap may be used, but do not use abrasive cleansers.
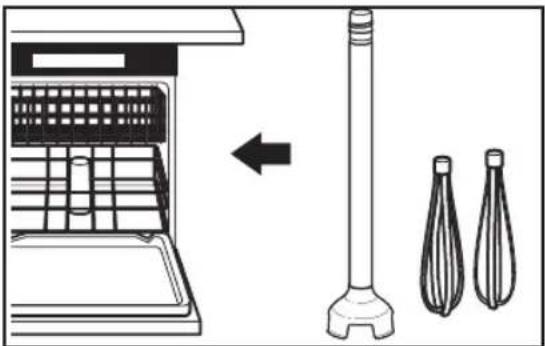
Washing the Attachments
natural_image
Diagram showing a kitchen appliance with a vertical post and two conical objects beside it (no text or symbols)For food service applications: wash, rinse, and sanitize the stainless steel attachments for the Immersion Blender prior to initial use, after each use, or whenever they will not be used again within a period of 1 hour.
The following washing, rinsing, and sanitizing solutions (or their equivalents) may be used.
| Solution Product Dilution in Water Temperature | |||
| Washing Noble Pan Pro 1 l oz. / 3 gallons(30 milliliters / 11.4 liters) | Hot 46°C (115°F) | ||
| Rinsing Plain Water Warm 35°C (95°F) | |||
| Sanitizing Clorox® Institutional Bleach | 1 Tbsp / gallon(14.8 cc / 3.8 liters) | Cold 10-21°C(50-70°F) | |
| In applications requiring repetitive use, frequent cleaning will prolong life. | |||
I. Remove attachment from motor body. Rinse any food residue under running water.
2. Scrub the attachment using a soft sponge. Rinse both interior and exterior sections of the attachment, removing as much stuck-on soil as possible.
3. Using a soft sponge dampened in wash solution, wipe down attachments, getting into all areas of the attachment. Assemble attachment to motor body; place in a container with wash solution, immersing 34 of the attachment. Run unit on high for 2 minutes.
4. Repeat step 3 using clean rinse water in place of wash solution.
5. Repeat step 3 using sanitizing solution in place of wash solution.
6. Do not rinse after sanitizing. Allow to air dry before using.
TROUBLESHOOTING
If the Commercial Immersion Blender has stopped working, check for the following:
Unit has been unplugged
- Release the Power/Pulse Trigger.
- Check the power supply.
- Restart the Commercial Immersion Blender as instructed in “Operating the Commercial Immersion Blender”.
Machine has overheated
- Release the Power/Pulse Trigger.
- Unplug the unit.
- Wait a few minutes for the motor to cool down and the thermal safety mechanism to reset.
- Restart the Commercial Immersion Blender as instructed in "Operating the Commercial Immersion Blender".
Unknown cause
- Release the Power/Pulse Trigger.
-
Unplug the unit.
-
Check the following:
- electrical plug for damage.
- power cord for cuts or other damage.
- drive shaft for freedom of rotation. (check by removing the attachment arm and rotating the shaft manually).
- blades for freedom of movement. (food may be lodged between blades and plastic guard.)
IMPORTANT: If a piece of food becomes lodged in the guard surrounding the blade, follow these instructions:
I. Release the Power/Pulse Trigger and unplug the Commercial Immersion Blender.
2. Use a spatula to remove the food lodged in the plastic guard. Do not use your fingers to remove lodged food.
3. Plug the Commercial Immersion Blender back into the electrical outlet and resume operation.
TECHNICAL SPECIFICATIONS
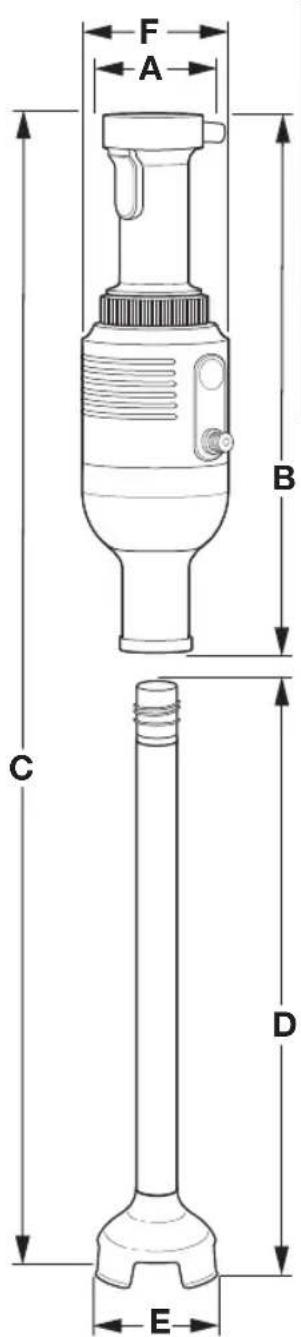
| A(mm) | B(mm) | C(mm) | D(mm) | E(mm) | F(mm) | G(lbs/kgs) | |
| KHBC112 7 | 3.4 420 | 926.6 3 | 83.9 10 | 1.5 115 | 9.5/4.3 | ||
| KHBC114 7 | 3.4 420 | 875.8 4 | 34.7 10 | 1.5 115 | 9.7/4.4 | ||
| KHBC116 7 | 3.4 420 | 825 48 | 5.5 101.5 | 115 9.9/4.5 | |||
| KHBC118 7 | 3.4 420 | 774.2 4 | 34.7 10 | 1.5 115 | 10.1/4.6 | ||
| KHBC120 7 | 3.4 420 | 723.4 3 | 83.9 10 | 1.5 115 | 10.3/4.7 |
WARRANTY AND SERVICE
KitchenAid® Commercial Immersion Blender Warranty for the 50 United States, the District of Columbia, and Canada
This warranty extends to the purchaser and any succeeding owner for Commercial Immersion Blenders operated in the 50 United States, the District of Columbia, and Canada.
Length of Warranty: Two Year Full Warranty from date of purchase.
KitchenAid Will Pay Hassle-Free Replacement of your Commercial Immersion for Your Choice of: Blender. See the next page for details on how to arrange for service, or call the Customer eXperience Center toll-free at 1-855-845-9684.

OR
The replacement parts and repair labor costs to correct defects in materials and workmanship. Service must be provided by an Authorized KitchenAid Service Center. See
the KitchenAid® Commercia for Puerto Rico for details on how to arrange for service.
® Commercial Immersion Blender Warranty
KitchenAid Will A. Damage resulting from accident, alteration, misuse Not Pay for: or abuse.
B. Replacement parts or repair labor costs for Immersion Blender operated outside the 50 United States and District of Columbia.
DISCLAIMER OF IMPLIED WARRANTIES; LIMITATION OF REMEDIES
IMPLIED WARRANTIES, INCLUDING TO THE EXTENT APPLICABLE WARRANTIES OF MERCHANTABILITY OR FITNESS FOR A PARTICULAR PURPOSE, ARE EXCLUDED TO THE EXTENT LEGALLY PERMISSIBLE. ANY IMPLIED WARRANTIES THAT MAY BE IMPOSED BY LAW ARE LIMITED TO ONE YEAR, OR THE SHORTEST PERIOD ALLOWED BY LAW. SOME STATES AND PROVINCES DO NOT ALLOW LIMITATIONS OR EXCLUSIONS ON HOW LONG AN IMPLIED WARRANTY OF MERCHANTABILITY OR FITNESS LASTS, SO THE ABOVE LIMITATIONS OR EXCLUSIONS MAY NOT APPLY TO YOU.
IF THIS PRODUCT FAILS TO WORK AS WARRANTED, CUSTOMER'S SOLE AND EXCLUSIVE REMEDY SHALL BE REPAIR OR REPLACEMENT ACCORDING TO THE TERMS OF THIS LIMITED WARRANTY. KITCHENAID AND KITCHENAID CANADA DO NOT ASSUME ANY RESPONSIBILITY FOR INCIDENTAL OR CONSEQUENTIAL DAMAGES. This warranty gives you specific legal rights and you may also have other rights which vary from state to state or province to province.
WARRANTY AND SERVICE
KitchenAid® Commercial Immersion Blender Warranty for Puerto Rico
A limited two year warranty extends to the purchaser and any succeeding owner for Commercial Immersion Blenders operated in Puerto Rico. During the warranty period, all service must be handled by an Authorized KitchenAid Service Center.
Please bring the Commercial Immersion Blender, or ship it prepaid and insured, to the nearest Authorized Service Center. Call toll-free at 1-855-845-9684 to learn the location of a Service Center near you. Your repaired Commercial Immersion Blender will be returned to you prepaid and insured.
Hassle-Free Replacement Warranty – 50 United States and District of Columbia
We're so confident the quality of our products meets the exacting standards of KitchenAid that, if your Commercial Immersion Blender should fail within the first two years of ownership, KitchenAid will arrange to deliver an identical or comparable replacement to your door free of charge and arrange to have your original Commercial Immersion Blender returned to us. Your replacement unit will also be covered by our two year limited warranty. Please follow these instructions to receive this quality service.
If your Commercial Immersion Blender should fail within the first two years of ownership, simply call our Customer eXperience Center toll-free at 1-855-845-9684 Monday through Friday, 8 a.m. to 8 p.m. (Eastern Time). Give the consultant your complete shipping address. (No P.O. Box numbers, please.)
When you receive your replacement Commercial Immersion Blender, use the carton and packing materials to pack up your original Commercial Immersion Blender.
WARRANTY AND SERVICE
Hassle-Free Replacement Warranty – Canada
We're so confident the quality of our products meets the exacting standards of the KitchenAid brand that, if your Commercial Immersion Blender should fail within the first two years of ownership, KitchenAid Canada will replace your Commercial Immersion Blender with an identical or comparable replacement. Your replacement unit will also be covered by our two year limited warranty. Please follow these instructions to receive this quality service.
If your Commercial Immersion Blender should fail within the first two years of ownership, take the Commercial Immersion Blender or ship collect to an
Authorized KitchenAid Service Centre. In the carton include your name and complete shipping address along with a copy of the proof of purchase (register receipt, credit card slip, etc.). Your replacement Commercial Immersion Blender will be returned prepaid and insured. If you are unable to obtain satisfactory service in this manner call our toll-free Customer eXperience Centre at 1-800-807-6777.
Or write to us at:
Customer eXperience Centre
KitchenAid Canada
200 - 6750 Century Ave.
Mississauga, ON L5N 0B7
Arranging for Service after the Warranty Expires, or Ordering Accessories and Replacement Parts
In the United States and Puerto Rico:
For service information, or to order accessories or replacement parts, call toll-free at 1-855-845-9684 or write to:
Customer eXperience Center KitchenAid Small Appliances, P.O. Box 218, St. Joseph, MI 49085-0218
Outside the United States and Puerto Rico:
Consult your local KitchenAid dealer or the store where you purchased the Commercial Immersion Blender for information on how to obtain service.
For service information in Canada:
Call toll-free I-800-807-6777.
Or write to:
Customer eXperience Centre
KitchenAid Canada
200 - 6750 Century Ave.
Mississauga, ON L5N 0B7
BIENVENUE DANS LE MONDE DE KITCHENAID COMMERCIAL
Electrical Data for Immersion Blender & Attachments 24
GUIDE DES PIÈCES ET CARACTÉRISTIQUES
Optional accessories....26
natural_image
Line drawing of a hand inserting into an electrical outlet with two socket outlets (no text or symbols)Optional accessories
| Accessoire N° | de modèle Style | Longueur | |
| Fouet KHBC110WSS 10" (254 mm) | 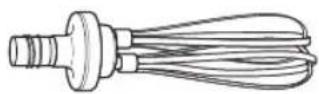 | ||
| Lame polyvalente en S | KHBC112SS 12" (305 mm) | 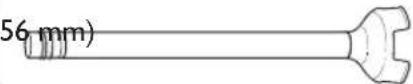 (KHB112SS shown) (KHB112SS shown) | |
| KHBC114SS 14" (3 | |||
| KHBC116SSKHBC118SSKHBC120SS | 16" (406 mm)18" (457 mm)20" (508 mm) | ||
| Taille du bol recommandée | KHBC412OBKHBC414OBKHBC416OBKHBC418OBKHBC420OB | Bol de 6 gallons (maximum)Bol de 14 gallons (maximum)Bol de 23 gallons (maximum)Bol de 32 gallons (maximum)Bol de 40 gallons (maximum) | |
natural_image
Diagram showing two mechanical components with directional arrows, one mounted on a cylindrical shaft and the other in a flanged container (no text or symbols)natural_image
Diagram of a mechanical device with a lever and rotating arrow, no text or symbols presentnatural_image
Simple line drawing of a laboratory bowl with a stirring rod and arrow indicating downward motion (no text or symbols)natural_image
Simple line drawing of a laboratory setup with a funnel and rotating arrow (no text or symbols)natural_image
Diagram showing a mechanical assembly with a cylindrical component and a flanged component, no text or symbols present.AVERTISSEMENT

natural_image
Diagram of a mechanical device with a central shaft and circular base, showing directional arrows indicating movement or force (no text or symbols)UTILISATION DU MÉLANGEUR À IMMERSION COMMERCIAL
natural_image
Line drawing of a mixing bowl with a whisk and a headstock, showing a downward arrow indicating motion (no text or symbols)natural_image
Line drawing of a laboratory mixing bowl with a pressure vessel (no text or symbols)natural_image
Line drawing of a hand holding a handheld device with a cable, no text or symbols presentnatural_image
Diagram showing a kitchen appliance with a vertical post and two conical-shaped objects beside it (no text or symbols)La machine a surchauffé
Customer eXperience Center, KitchenAid Small Appliances, P.O. Box 218, St. Joseph, MI 49085-0218
Commercial Immersion Blender features 45
natural_image
Illustration of a hand inserting a plug into an electrical outlet (no text or symbols)Voltios: I20 V.A.C.
Hertzios: 60 Hz
![KHBC414 (14" [356 mm])](/content/2026/04/667515/images/5c3888b2ddb060cfd31740840a081bffba3074d4af608cf568e02f50f15374ac.jpg)
![KHBC416 (16" [406 mm])](/content/2026/04/667515/images/b9dab591cc96e9a9f1705bdbe148691f00ed6b16580e5f28cac1aea794f71794.jpg)
![KHBC418 (18" [457 mm])](/content/2026/04/667515/images/ddd0f6e97ad45685e43abb050acd877a4700e15d38d4e08120d944b2bdf23d4b.jpg)
![KHBC420 (20" [508 mm])](/content/2026/04/667515/images/1e498573d2f2d76faf1ac04a0e6ffcbaa75f86b12e1be6965ef8f939ba5705f1.jpg)
natural_image
Diagram showing a mechanical assembly with a valve and a funnel, no text or symbols presentnatural_image
Diagram of a mechanical device with a central component and directional arrows indicating motion (no text or symbols)natural_image
Simple line drawing of a laboratory glassware setup with a funnel and downward arrow (no text or symbols)natural_image
Simple line drawing of a laboratory setup with a funnel and beaker (no text or symbols)natural_image
Diagram showing a mechanical assembly with a cylindrical component and a flanged cylindrical component, both without any text or symbols.ADVERTENCIA

natural_image
Diagram of a mechanical device with a central component and directional arrows indicating motion (no text or symbols)natural_image
Line drawing of a mixing bowl with a whisk and a stand mixer, showing a downward arrow indicating motion (no text or symbols)natural_image
Line drawing of a mechanical device inside a container, no text or symbols presentnatural_image
Line drawing of a hand holding a handheld device with a cable, no text or symbols presentnatural_image
Diagram showing a kitchen appliance with a vertical post and two conical objects beside it (no text or symbols)Customer eXperience Center,
KitchenAid Small Appliances,
P.O. Box 218, St. Joseph, MI 49085-0218
Customer eXperience Centre
KitchenAid Canada
200 - 6750 Century Ave.

natural_image
Two horizontal bar segments with grayscale shades and a central crosshair symbol (no text or labels)


natural_image
Two horizontal bar segments with grayscale shades and a central crosshair symbol (no text or labels)

KitchenAid®
COMMERCIAL
© 2015. All rights reserved.

- WELCOME TO THE WORLD OF KITCHENAID COMMERCIAL
- COMMERCIAL IMMERSION BLENDER INSTRUCTIONS
- TABLE OF CONTENTS
- COMMERCIAL IMMERSION BLENDER SAFETY
- PARTS AND FEATURES GUIDE
- TIPS FOR GREAT RESULTS ...... 13
- CARE AND CLEANING
- TROUBLESHOOTING....15
- PROOF OF PURCHASE & PRODUCT REGISTRATION
- Model Number
- Your safety and the safety of others are very important.
- ! DANGER
- WARNING
- IMPORTANT SAFEGUARDS
- SAVE THESE INSTRUCTIONS
- Electrical Requirements
- Commercial Immersion Blender features
- Speed Control
- Powerful IHP Motor
- Power/Pulse Trigger
- Lock Switch
- Serviceable Motor Brushes
- Bowl Clamp
- Continuous Run
- Twist Lock Stainless Steel Blending Arm
- Secondary handle
- 12-ft. Power Cord
- Carrying Case
- Ordering Replacement Parts
- Intended use
- Using the Commercial Immersion Blender with Blade Attachments
- Using the Commercial Immersion Blender with the Whisk Attachment
- Using the Bowl Clamp and the Continuous Run feature
- TIPS FOR GREAT RESULTS
- Washing the Motor Body
- Washing the Attachments
- TROUBLESHOOTING
- Unit has been unplugged
- Machine has overheated
- Unknown cause
- TECHNICAL SPECIFICATIONS
- WARRANTY AND SERVICE
- KitchenAid® Commercial Immersion Blender Warranty for the 50 United States, the District of Columbia, and Canada
- DISCLAIMER OF IMPLIED WARRANTIES; LIMITATION OF REMEDIES
- KitchenAid® Commercial Immersion Blender Warranty for Puerto Rico
- Hassle-Free Replacement Warranty – 50 United States and District of Columbia
- Hassle-Free Replacement Warranty – Canada
- Arranging for Service after the Warranty Expires, or Ordering Accessories and Replacement Parts
- In the United States and Puerto Rico:
- Outside the United States and Puerto Rico:
- For service information in Canada:
- BIENVENUE DANS LE MONDE DE KITCHENAID COMMERCIAL
- GUIDE DES PIÈCES ET CARACTÉRISTIQUES
- AVERTISSEMENT
- UTILISATION DU MÉLANGEUR À IMMERSION COMMERCIAL
- La machine a surchauffé
- ADVERTENCIA
- KitchenAid®
- COMMERCIAL
Brand : KITCHENAID
Model : KHBC112
Category : Blender