CCH1T518DW - Fridge CANDY - Free user manual and instructions
Find the device manual for free CCH1T518DW CANDY in PDF.


User questions about CCH1T518DW CANDY
0 question about this device. Answer the ones you know or ask your own.
Ask a new question about this device
Download the instructions for your Fridge in PDF format for free! Find your manual CCH1T518DW - CANDY and take your electronic device back in hand. On this page are published all the documents necessary for the use of your device. CCH1T518DW by CANDY.
USER MANUAL CCH1T518DW CANDY
No-Frost Refrigerator Freezer
| Content | |
| 1. Safety Information Page 1~9 | |
| 2. Overview | Page 10~11 |
| 3. Installation Page 12~17 | |
| 4. User interface Page 18~19 | |
| 5. Daily Use Page 20~24 | |
Safety information
In the interest of your safety and to ensure correct operation, prior to installation and initial use please read this user manual carefully, including its tips and warnings. To avoid unnecessary mistakes and accidents, it is important to ensure that all people using the appliance are thoroughly familiar with its operation and safety features. Save these instructions and if moved or sold make sure that they remain with the appliance, so that everyone using it through its life will be properly informed on the appliance's use and safety.
To safeguard life and property keep the precautions listed in the user instructions handy as the manufacturer is not responsible for damages caused by omission.
Children and vulnerable people safety
- This appliance can be used by children ages 8 years and above and persons with reduced physical, sensory, or mental capabilities, or lack of experience and knowledge if they are supervised or have received instructions on the safe use of the appliance and understand the hazards involved.
- Children ages 3 to 8 are allowed to load and unload this appliance.
- Children should be supervised to ensure that they do not play with the appliance.
- Cleaning and user maintenance is not to be performed by children unless they are aged 8 years and above and supervised.
- Keep all packaging well away from children. There is risk of suffocation.

Safety information
CE
- If you are discarding the appliance, pull the plug out of the socket, cut the connection cable (as close to the appliance as possible) and remove the door to prevent children from possible electric shock or locking themselves inside it.
- If this appliance, which features magnetic door seals, is to replace an older appliance with a spring lock (latch) on the door or lid, be sure to disassemble the spring lock before you discard the old appliance. This will prevent it from becoming a death hazard for children.
General safety
WARNING! Keep ventilation openings in the appliance enclosure or in the built-in structure clear of obstruction.
WARNING! Do not use mechanical devices or other means to accelerate the defrosting process, other than those recommended by the manufacturer.
⚠ WARNING! Do not damage the refrigerant circuit.
WARNING! Do not use other electrical appliances (such as ice cream makers) inside the refrigerating appliance unless approved by the manufacturer.
⚠ WARNING! Do not touch the light bulb if it has been on for a long period of time because it could be very hot. ^1)


WARNING! When positioning the appliance, ensure the supply cord is not trapped or damaged.

WARNING! Do not place multiple portable socket-outlets or portable power suppliers at the rear of the appliance.
- Do not store explosive substances such as aerosol cans with a flammable propellant in this appliance.
- The refrigerant isobutane (R-600a) is contained inside the refrigerant circuit of the appliance. It is a natural gas with a high level of environmental compatibility, which is nevertheless flammable.
- During transportation and installation of the appliance, ensure that none of the components of the refrigerant circuit are damaged.
- avoid open flames and sources of ignition - thoroughly ventilate the room in which the appliance is situated
- It is dangerous to alter the specifications or modify this product in any way. Any damage to the cord may cause a short circuit, fire and/or electric shock.
- This appliance is intended to be used in households or similar applications such as
- staff kitchen areas in shops, offices and other working environments; - farm houses and by clients in hotels, motels and other residential type environments;
- bed and breakfast type environments; - catering and similar non-retail applications.
Safety information
WARNING! Any electrical components (plug, power cord, compressor etc.) must be replaced by a certified service agent or qualified service personnel.
WARNING! The light bulb supplied with this appliance is a “special use light bulb” to be used only with the appliance supplied. This “special use light bulb” is not suitable for domestic lighting. ^1)
- The power cord must not be lengthened.
- Make sure that the power plug is loose and that it is not damaged by the rear of the appliance. A trapped or damaged power plug may overheat and cause a fire.
- Make sure that you can access the mains plug of the appliance.
- Do not pull the mains cable.
- If the power plug socket is loose, do not insert the power plug. There is a risk of electric shock or fire.
- You must not operate the appliance without the light bulb.
- This appliance is heavy. Care should be taken when moving it.
- Do not remove or touch items from the freezer compartment if your hands are damp/wet, as this could cause skin abrasions or frost/freezer burns.
- Avoid prolonged exposure of the appliance to direct sunlight.
Daily use
- Do not heat the plastic parts of the appliance.
- Do not place food products directly against the rear wall.

Safety information
- Frozen food must not be re-frozen once it has been thawed. ^1)
- Store pre-packed frozen food items in accordance with the frozen food manufacturer's instructions. ^1)
- Appliance manufacture and storage recommendations should be strictly adhered to. Refer to relevant instructions.
- Do not place carbonated of fizzy drinks in the freezer compartment as this creates pressure inside the container, which may cause it to explode, resulting in damage to the appliance. ^1)
- Ice lollies can cause frost burns if consumed straight from the appliance. ^1)
- To avoid contamination of food, please respect the following instructions.
- Opening the door for long periods can cause a significant increase in temperature in the compartments of the appliance.
- Regularly clean surfaces that may come in contact with food items and accessible drainage systems.
- Clean water tanks if they have not been used for 48h; flush the water system connected to a water supply if water has not been drawn for 5 days.
- Store raw meat and fish in suitable containers in the refrigerator, so that they do not come in contact with, or drip onto other food items.
- Two-star frozen-food compartments (if they are sold with the appliance) are suitable for storing pre-frozen food items, storing, or making ice-cream and making ice cubes.
1) If there is a freezer compartment. 2) If there is a fresh-food storage compartment.

Safety information
- One-, two- and three-star compartments (if they are sold with the appliance) are not suitable for freezing fresh food items.
- If the appliance is left empty for long periods, switch off, defrost, clean, dry and leave the door open to prevent mould from developing inside the appliance.
Care and cleaning
- Before maintenance, switch off the appliance and disconnect the mains plug from the mains socket.
- Do not clean the appliance with metal objects.
- Do not use sharp objects to remove frost from the appliance. Use a plastic scraper instead. ^1)
- Regularly examine the drain in the refrigerator for defrosted water. If necessary, clean the drain. If the drain is blocked, water will collect at the bottom of the appliance. ^2)
Installation
Important! For electrical connections carefully follow the instructions given in specific paragraphs.
- Unpack the appliance and check for any damages. Do not connect the appliance if it is damaged. Report possible damages immediately to the point of purchase. In this case do not discard the packaging.
- It is advisable to wait at least four hours before connecting the appliance to allow the oil to flow back to the compressor.

Safety information
- The appliance’s surroundings will need to have suitable air circulation, otherwise overheating may occur. For sufficient ventilation, follow the installation instructions.
- Wherever possible the spacers of the product should be positioned against a wall to prevent touching or grabbing warm parts (compressor, condenser) and possible burns.
- The appliance must not be located close to radiators or cookers.
- Make sure that the mains plug is accessible after the installation of the appliance.
Service
- Any electrical work required to service the appliance should be carried out by a qualified electrician or competent person.
- This product must be serviced by an authorised Service Centre, and only genuine spare parts must be used.
Energy saving
- Don’t put hot food in the appliance.
- Don’t place packed food items together as this prevents air from circulating.
- Make sure food items don’t touch the back of the compartment(s).
- If the electricity switches off, don’t open the door(s).
- Don’t open the door(s) frequently.
- Don’t keep the door(s) open for a long time.
- Don’t set the thermostat on excessively cold temperatures.
- All accessories, such as drawers, shelves and balconies, should be kept in place for lower energy consumption.
Environmental Protection
This appliance does not contain gasses in its refrigerant circuit or insulation materials which could damage the ozone layer. The appliance must not be discarded together with household refuse or rubbish. The insulation foam contains flammable gases, and the appliance must be disposed of according to the appliance's regulations and collected from your local authority. Avoid damaging the cooling unit, especially the heat exchanger.
Materials on this appliance marked by the symbol care recyclable.
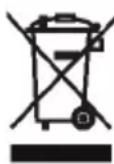
This symbol on the product or its packaging indicates that the product must not be treated as household waste. Instead, it should be taken to the appropriate collection point for recycling electrical or electronic equipment.
By ensuring this product is disposed of correctly, you will help prevent potential negative consequences to the environment and human health, which could otherwise be caused by the inappropriate waste handling of this product. For more detailed information on how to recycle this product, please contact your local council, household waste disposal service or point of purchase.
Packaging materials
Materials with the symbol are recyclable.
Dispose the packaging in a suitable recycling collection bin.

Safety information
Disposal of the appliance
- Disconnect the mains plug from the mains socket.
- Cut off the mains cable and discard it.
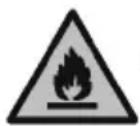
WARNING! During use, servicing or disposal of the appliance, please pay attention to similar yellow or orange colour symbols, displayed at the rear of the appliance (rear panel or compressor).
This is a risk of fire warning symbol. There are flammable materials in refrigerant pipes and compressors.
Please keep away from fire sources during use, servicing or disposal.

text_image
Thermostat and Light Fridge Shelves Water Tank Crisper Cover Fridge Balconies Crisper Freezer Shelves Freezer Drawers Leveling FeetNote: The above picture is for reference purposes only. The actual appliance may be different.
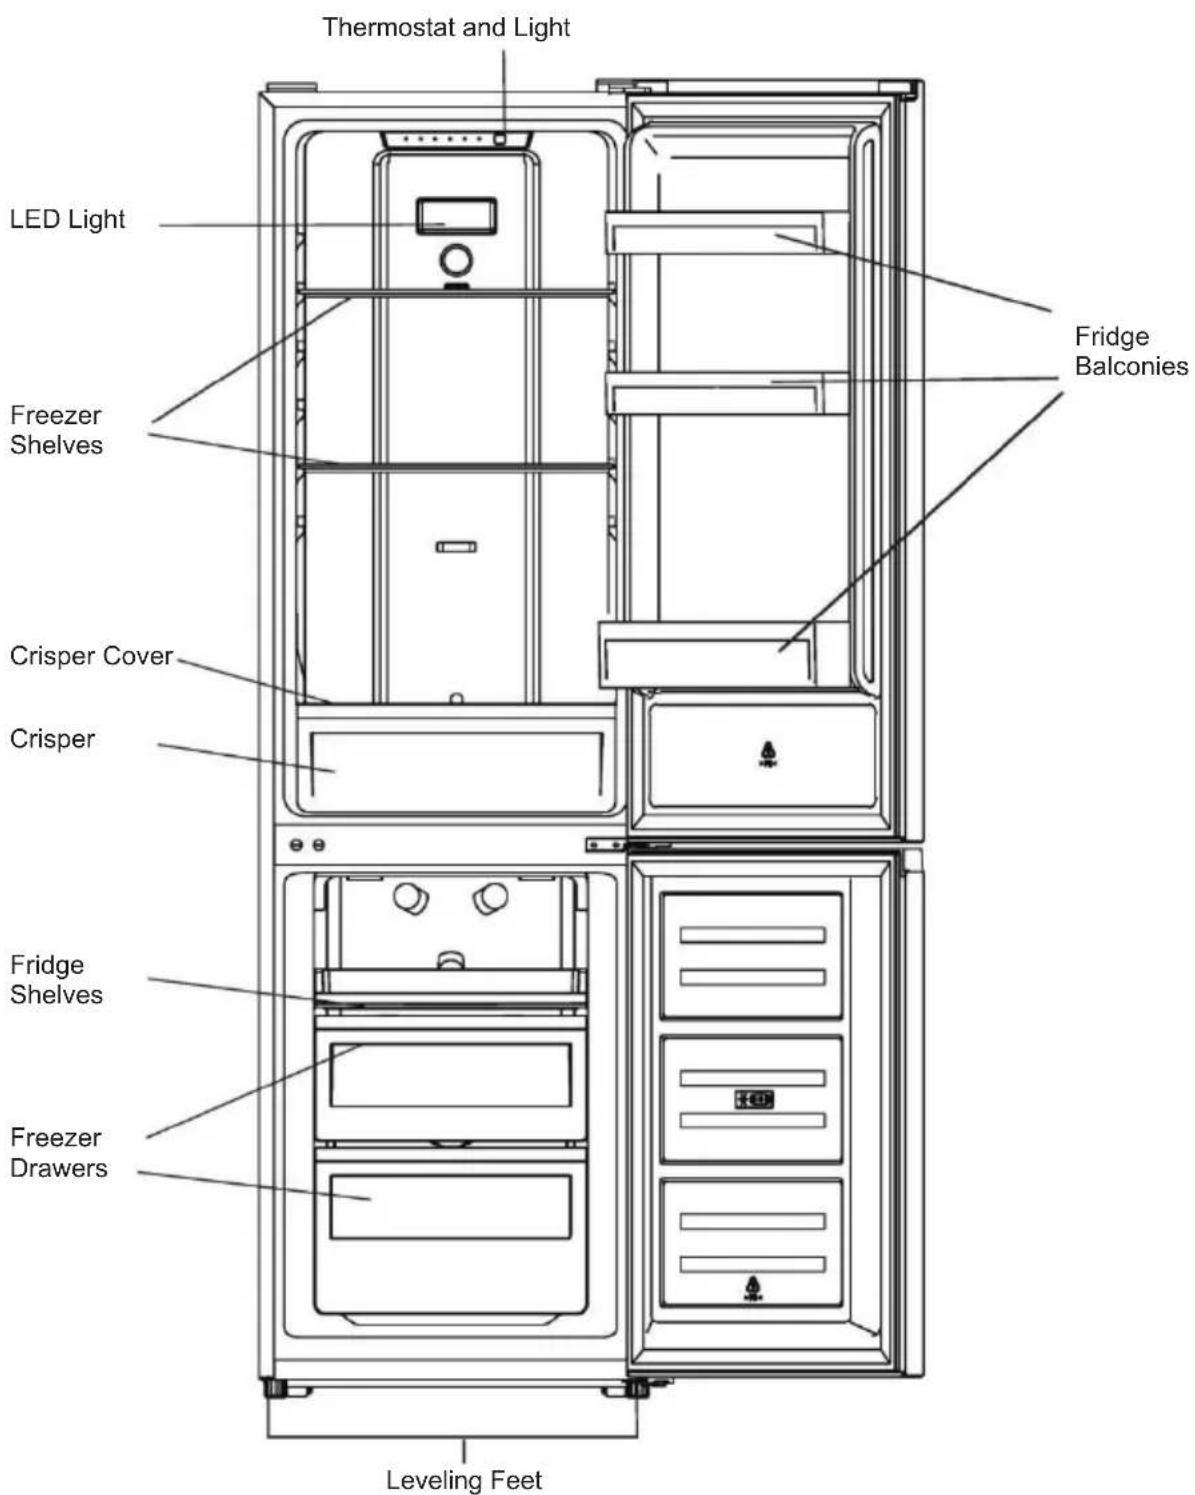
The most energy-saving configuration requires drawers, food boxes and shelves to be positioned inside the product. Please see the picture above.
text_image
Thermostat and Light LED Light Freezer Shelves Fridge Balconies Crisper Cover Crisper Fridge Shelves Freezer Drawers Leveling FeetNote: The above picture is for reference purposes only. The actual appliance may be different.
The most energy-saving configuration requires drawers, food boxes and shelves to be positioned inside the product. Please see the picture above.
Space Requirement
- Select a location without direct exposure to sunlight.
- Select a location with enough space for the refrigerator doors to open easily.
- Select a location with level (or nearly level) flooring.
- Allow sufficient space to install the refrigerator on a flat surface.
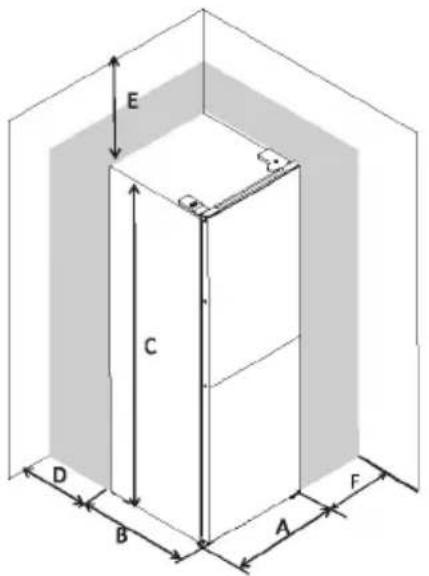
- Allow a clearance to the right, left, back and top when installing. This will help reduce power consumption and reduce your energy bills.
- Keep a 50mm clearance by the two sides and rear.
Positioning
Install this appliance in a location where the ambient temperature corresponds to the climate class indicated on the rating plate of the appliance. For refrigerating appliances with climate class:
- extended temperate: this refrigerating appliance is intended to be used at ambient temperatures ranging from 10 °C to 32 °C; (SN)
- temperate: this refrigerating appliance is intended to be used at ambient temperatures ranging from 16 °C to 32 °C; (N)
- subtropical: this refrigerating appliance is intended to be used at ambient temperatures ranging from 16 °C to 38 °C;(ST)
- tropical: this refrigerating appliance is intended to be used at ambient temperatures ranging from 16 °C to 43 °C;(T)
Location
The appliance should be installed well away from sources of heat such as radiators, boilers, direct sunlight etc. Ensure that air can circulate freely around the back of the cabinet. To ensure best performance, if the appliance is positioned below an overhanging wall unit, the minimum distance between the top of the cabinet and the wall unit must be at least 50 mm. Ideally, however, the appliance should not be positioned below overhanging wall units. Accurate leveling is ensured by one or more adjustable feet at the base of the cabinet.
This refrigerating appliance is not intended to be used as a built-in appliance.

Warning! It must be possible to disconnect the appliance from the mains power supply; the plug must therefore be easily accessible after installation.
Electrical connection
Before plugging in, ensure that the voltage and frequency shown on the rating plate correspond to your domestic power supply. The appliance must be earthed. The power supply cable plug is provided with a contact for this purpose. If the domestic power supply socket is not earthed, connect the appliance to a separate earth in compliance with current regulations, and consult a qualified electrician. The manufacturer declines all responsibility if the above safety precautions are not observed. This appliance complies with EEC Directives.
Door Reversibility
Before reversing the door, please have available the following tools and materials: straight screwdriver, cross screwdriver, spanner and the components included in the poly bag:
Left Door Hinge Cover x 1
Left Aid-Closer on Upper Door x 1
Left Aid-Closer on Lower Door x 1
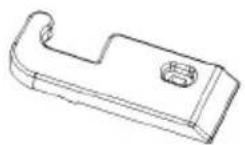
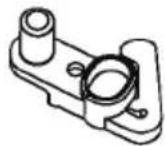
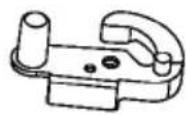
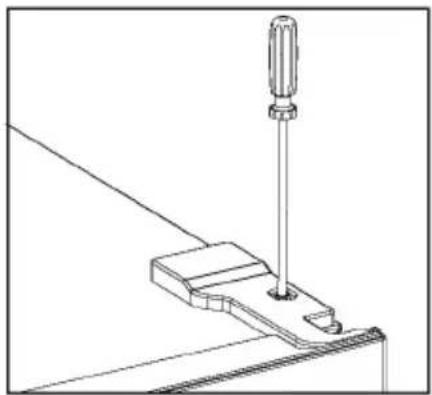
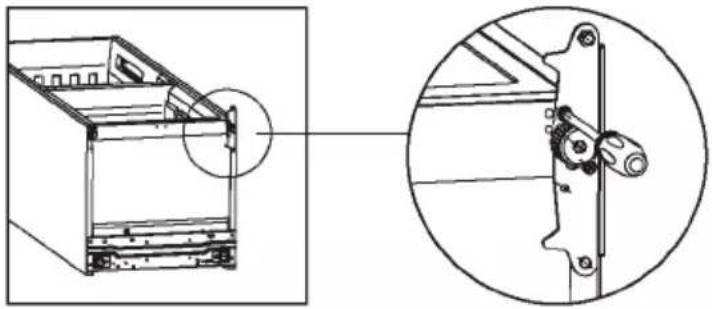
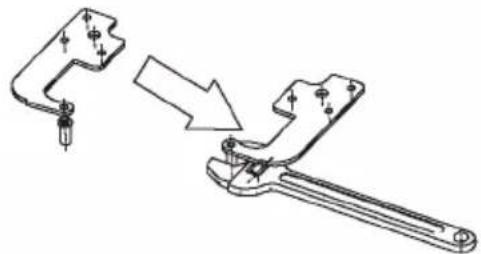
- Unscrew the top hinge cover and then unscrew the top hinge.
Then lift the upper door and place it on a soft pad to avoid scratches and damages.
natural_image
Technical line drawing of a screwdriver inserted into a mechanical clamp (no text or symbols)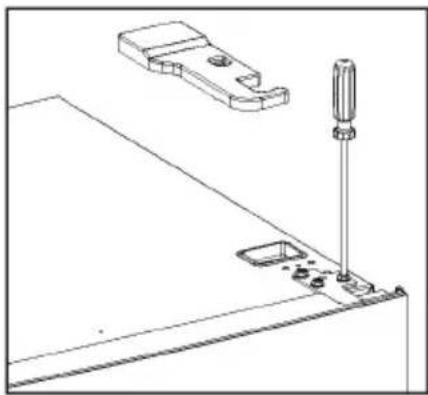
natural_image
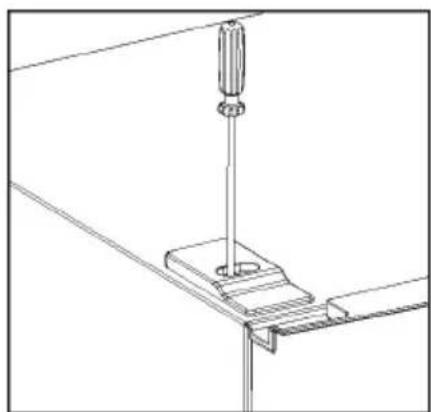
Technical line drawing of a mechanical assembly with a screwdriver and two components (no text or symbols)- Remove the top left screw cover.
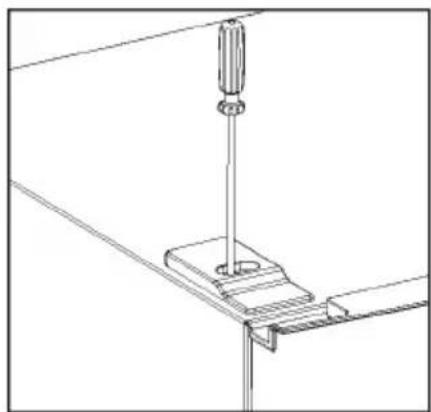
natural_image
Technical line drawing of a mechanical assembly with a vertical rod and base plate (no text or symbols)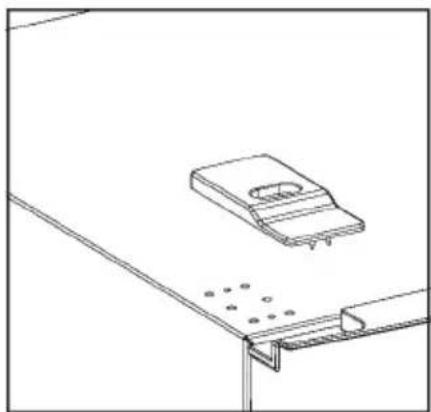
natural_image
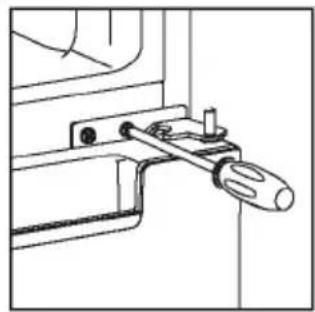
Technical line drawing of a mechanical bracket assembly with mounting holes and a slot (no text or symbols)- Remove the upper door, use a cross screwdriver to remove the screw, then remove the lower door.
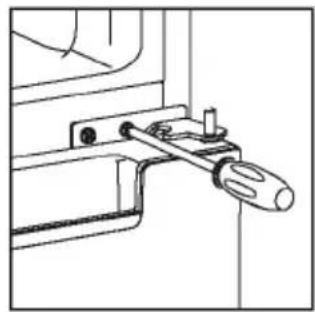
natural_image
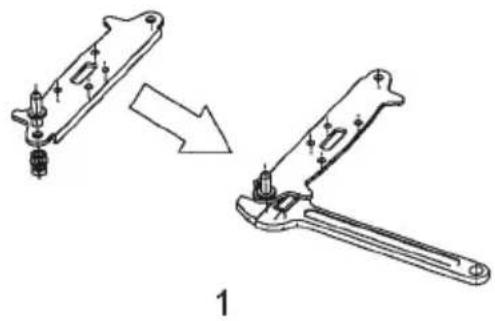
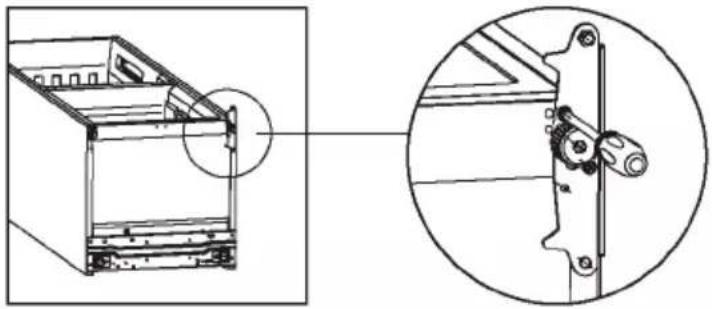
Technical line drawing of a mechanical clamp or bracket assembly (no text or symbols)- Laying the refrigerator flat on the ground, remove the adjusting feet as shown in the picture below, then with a cross screwdriver to remove the lower hinge.
natural_image
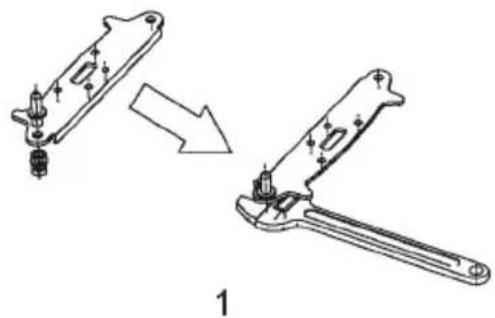
Technical line drawing of a mechanical assembly with an inset close-up showing a detail view (no text or symbols)- Fit the hinge core position of the lower hinge and upper hinge, opposite sides together.
natural_image
Technical illustration of a mechanical clamp or bracket being adjusted, showing disassembly from a component to a handle (no text or symbols present)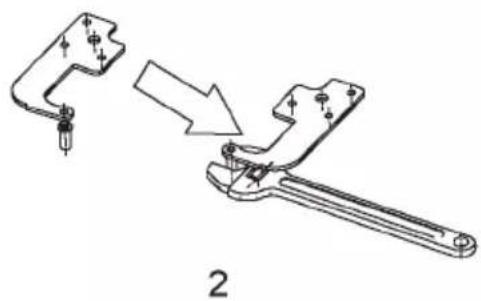
natural_image
Technical line drawing of a mechanical clamp or bracket assembly, showing a disassembly process (no text or symbols present)- Install the lower hinge under the refrigerator, screw in the adjusting feet, and ensure a horizontal position.
natural_image
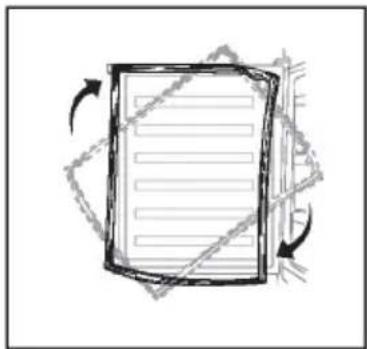
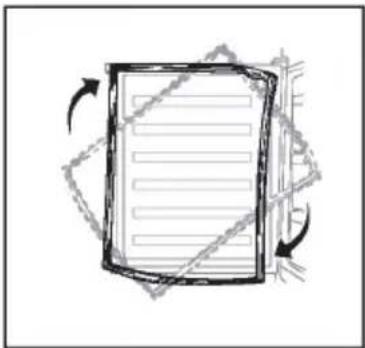
Technical line drawing of a mechanical assembly with cross-sectional and top views (no text or symbols)- Detach the Fridge and Freezer door gaskets and then attach them after rotating.
flowchart
graph TD
    A["Document"] --> B{Processing Step}
    B -->|Yes| C["Output"]
    B -->|No| D["Feedback Loop"]
    D --> E["End"]
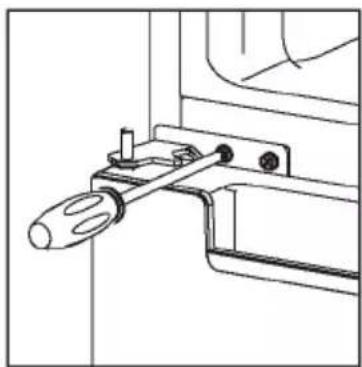
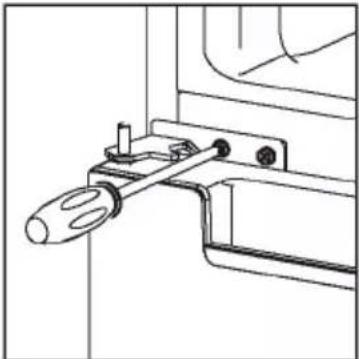
- Install the lower door, adjust and fasten the middle hinge onto the cabinet.
natural_image
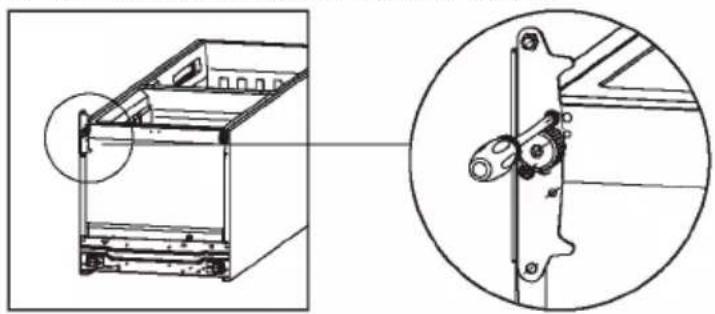
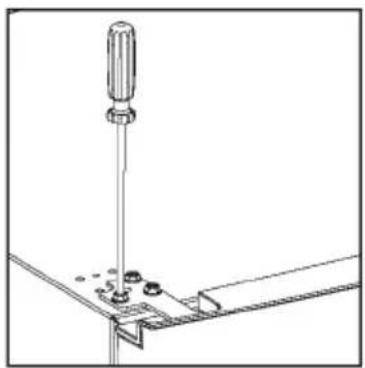
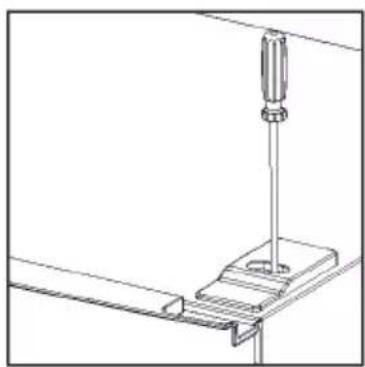
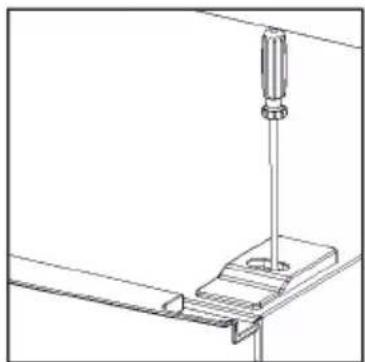
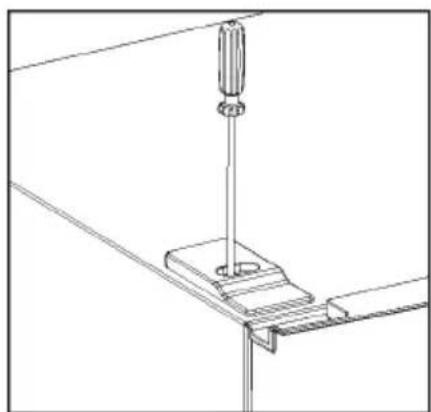
Technical line drawing of a mechanical clamp or bracket assembly (no text or symbols)- Put back the door. Ensure the door is aligned horizontally and vertically so that the seal is closed on all sides before finally tightening the top hinge. Then insert the top hinge, screw it to the top of the unit and fasten the hinge cover (in accessory bag) with a screw.
natural_image
Technical line drawing of a screwdriver inserted into a bracket with mounting holes (no text or symbols)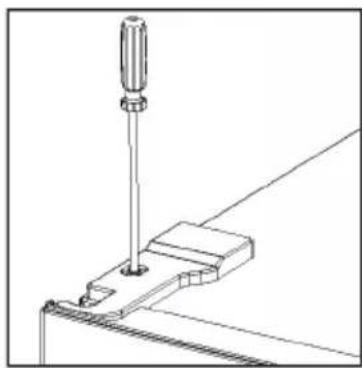
natural_image
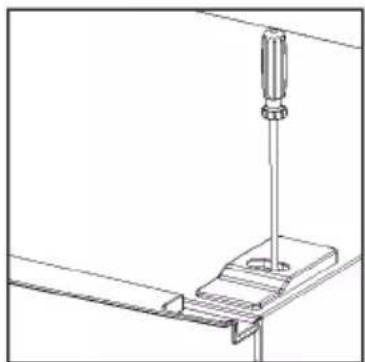
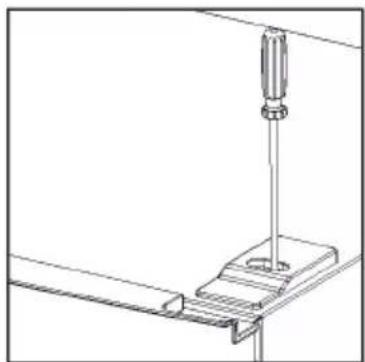
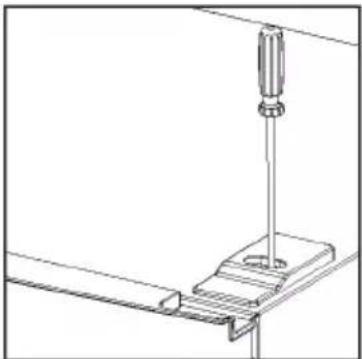
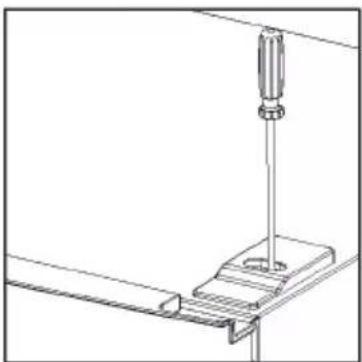
Technical line drawing of a screwdriver inserted into a bracket (no text or symbols)- Fasten the screw cover.
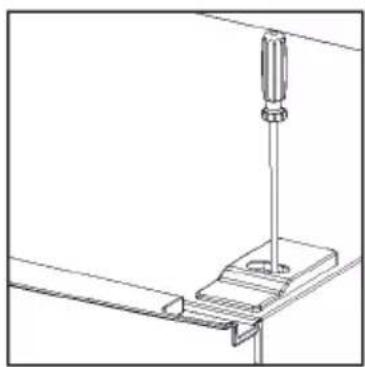
natural_image
Technical line drawing of a screwdriver inserted into a bracket (no text or symbols)Water Dispenser (If water dispenser is sold with the appliance)
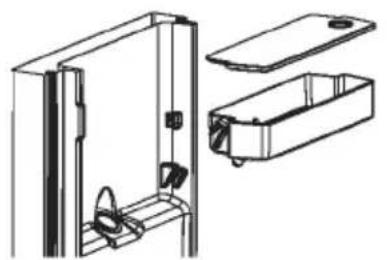
Before using the water dispenser for the first time, remove and clean the water tank located inside the refrigeration compartment.
- Lift and remove the tank balcony.
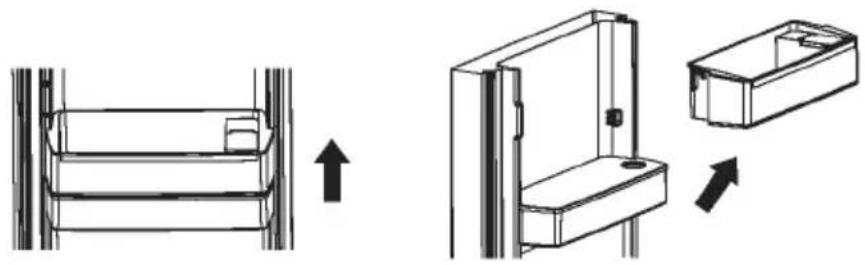
natural_image
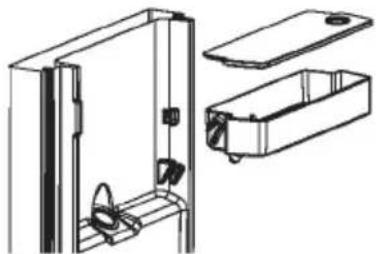
Technical line drawing showing two views of a mechanical component with an arrow indicating direction (no text or symbols present)- Remove the water tank. Detach the top cover and wash and wipe dry both the tank and the cover.
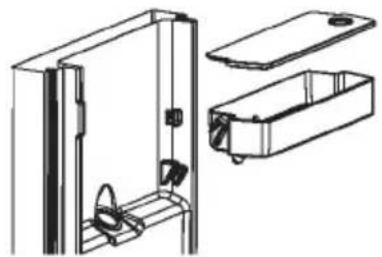
natural_image
Technical line drawing of a mechanical housing assembly with internal components (no text or symbols)- After cleaning, put back the water tank, cover and tank balcony as shown below.

natural_image
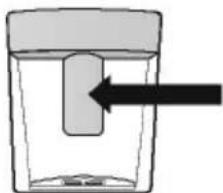
Four-step diagram showing mechanical assembly steps: bracket opening, clamping, mounting, and final assembly (no text or symbols)- Clean the dispenser lever located outside the refrigerator door.
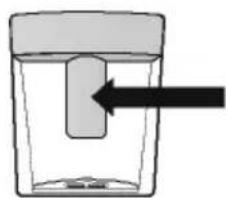
natural_image
Simple line drawing of a container with an arrow pointing to the side (no text or symbols)Filling the water tank
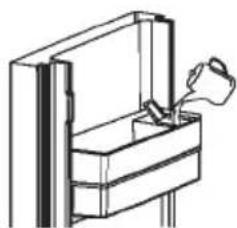
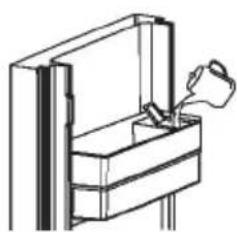
- Open the small lid over the tank balcony.
- Fill the water tank with drinkable water up to the 2.5L line.
- Close the lid. Ensure it is firmly shut.
Dispensing water
Push the dispenser lever gently with a glass or container. To stop the flow, pull the glass away from the lever.
natural_image
Simple line drawing of a mechanical assembly with a tool inserted (no text or symbols)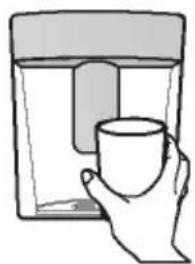
natural_image
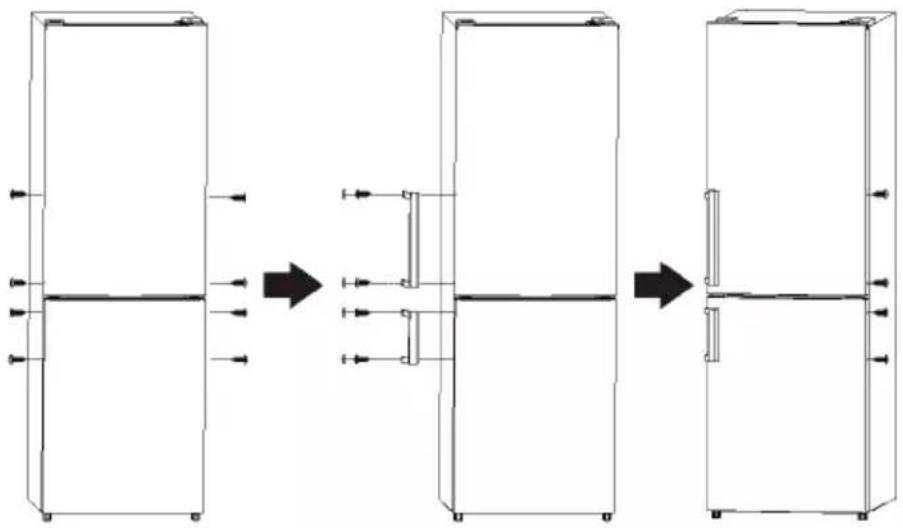
Simple line drawing of a hand holding a mug, no text or symbols presentInstall door external handle (if external handle is sold with the appliance)
flowchart
graph LR
    A["Stage 1: Left side"] --> B["Stage 2: Middle"]
    B --> C["Stage 3: Right side"]
    style A fill:#f9f,stroke:#333
    style B fill:#bbf,stroke:#333
    style C fill:#bfb,stroke:#333
Space Requirement
- Keep enough space to be able to open the door.
- Keep at least a 50mm clearance by the two sides and rear.
text_image
E C D B A F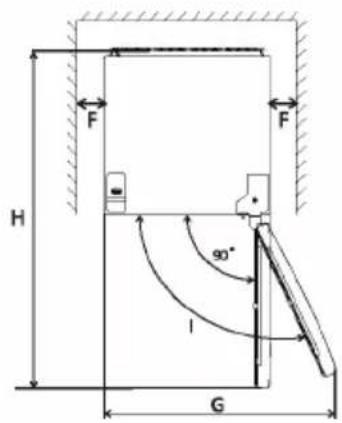
text_image
F H G 90° l| A | 550 |
| B | 585 |
| C | 1800 |
| D | min=50 |
| E | min=50 |
| F | min=50 |
| G | 1100 |
| H | 1135 |
| I | 135° |
Leveling the unit
To do this adjust the two leveling feet to the front of the unit.
If the unit is not level, the doors and magnetic seal alignments will not be properly protected.
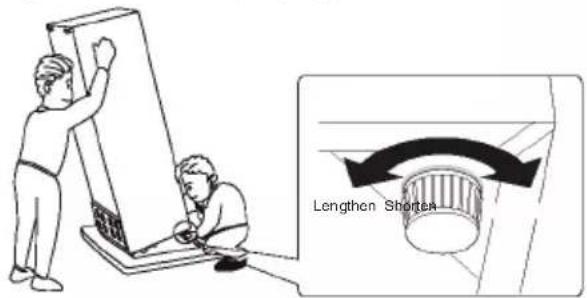
text_image
Lengthen Shorten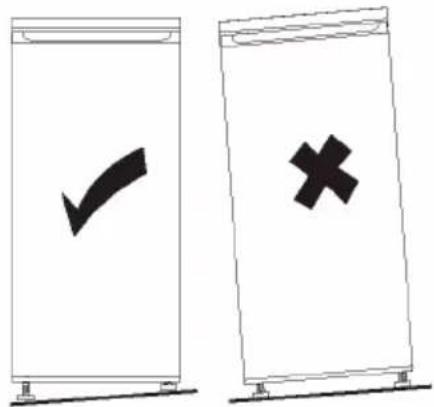
text_image
Diagram showing two labeled vertical panels with checkmark and cross symbols, likely indicating approval or rejection status.1. Temperature setting of the Fridge Compartment
Fridge temperature setting Panel
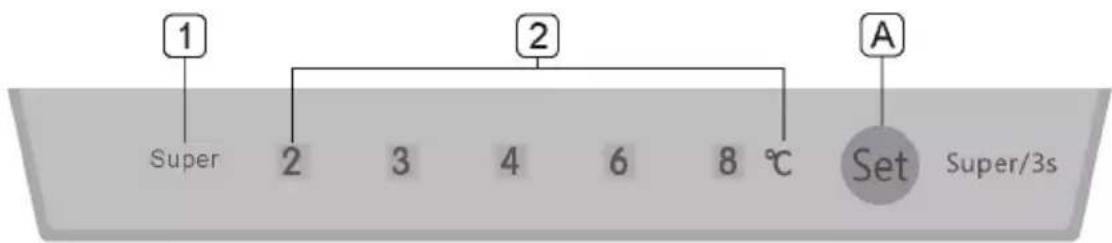
text_image
1 Super 2 3 4 6 8 °C 2 A Set Super/3s1.1 Operation button

Set button
Press this button once to select the running temperature.
Keep pressing this button for 3s to select the Super mode.
1.2 Indicators
1) Super mode indicator: the light is on when Super mode is selected.
2) Setting the temperature indicators of the fridge compartment. The lit indicator means the desired temperature is selected.
1.3 Super mode
Activate super mode:
Keep pressing the Set button for 3s, the super mode will be activated, and indicator Super will switched on.
When super mode is activated, the fridge temperature will remain on its previous setting and cannot be changed by pressing the button.
Exit from Super mode
- Press Set button (A) for over 3 seconds
- Or the appliance will automatically return to its original setting when Super mode has been running for more than 50 hours.
2. Temperature setting of the Freezer Compartment
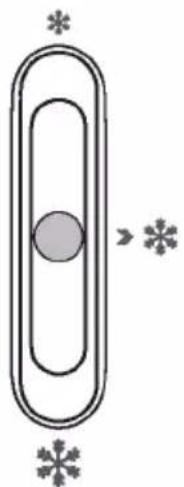
The freezer temperature setting slider
FREEZER CONTROL
natural_image
Simple diagram of a paperclip with a central circle and surrounding snowflake symbols (no text or labels)- This slider in the fridge compartment is used to adjust the temperature of the freezer compartment.
- When the slider is set to * , the temperature in the freezer compartment will be higher. On the contrary, the
temperature in the freezer compartment will be lower if the slider is set to

- The middle position ✱ is recommended for standard use.
- To obtain the lowest temperature in the freezer compartment, you can adjust the setting knob to coldest and set
the slider to

- Temperature setting recommendation
| Temperature setting recommendation | |||
| Environment Temperature | Fridge Compartment Freezer | Compartment | |
| Warm |  ↑ ↑ ↑ ↑ | 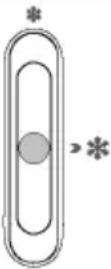 * * | Set to* |
| Normal |  ↑ ↑ ↑ ↑ | 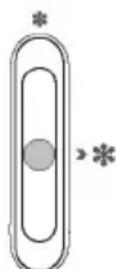 * * | Set to* |
| Cold |  ↑ ↑ | 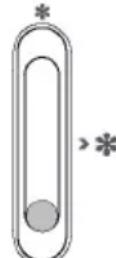 * * | Set to* |
- The information above gives users recommendations for temperature settings.
- In winter or when temperatures reach 16^ , users should avoid setting to * and cold.
- For energy saving, the ✿ and coldest setting apply only for special conditions (such as quick-freezing or ice making), and after use return to original setting.
Initial use
Cleaning the interior
Before using the appliance for the first time, wash the interior and all internal accessories with lukewarm water and some neutral soap so as to remove the smell of a brand-new product, then dry thoroughly.
Important! Do not use detergents or abrasive powders, as these will damage the finish.
Daily use
Place different food items in different compartments according to the table below
| Refrigerator compartments Type of food | |
| Door or balconies of fridge compartment | ·Foods with natural preservatives, such as jams, juices, drinks, condiments.·Do not store perishable foods. |
| Crisper drawer (salad drawer) | ·Fruits, herbs and vegetables should be placed separately in the crisper drawer.·Do not store bananas, onions, potatoes, garlic in the refrigerator. |
| Fridge shelf - middle | ·Dairy products, eggs |
| Fridge shelf - top | ·Foods that do not need cooking, such as ready-to-eat foods, deli meats, leftovers. |
| Freezer drawer(s)/shelf | ·Foods for long-term storage.·Bottom drawer/shelf for raw meat, poultry, fish.·Middle drawer/shelf for frozen vegetables, potatoes.·Top drawer/shelf for ice cream, frozen fruit, frozen goods. |
Freezing fresh food
- The freezer compartment is suitable for freezing fresh food items and storing frozen and deep-frozen food items for a long time.
- Place the fresh food to be frozen in the bottom compartment.
- The maximum amount of food that can be frozen in 24 hours is specified on the rating plate.
- The freezing process lasts 24 hours. During this period do not add other food items.
Storing frozen food
When first starting-up or after a period of out of use. Before putting any products in the compartment let the appliance run for at least 2 hours on the higher settings.
Important! In the event of accidental defrosting, for example the power has been off for longer than the time frame recommended in the technical characteristics chart under “rising time”, the defrosted food must be consumed quickly or cooked immediately and then re-frozen (after cooked).
Thawing
Deep-frozen or frozen food, prior to be used, can be thawed in the freezer compartment or at room temperature, depending on the time available for this operation.
Small pieces may even be cooked while still frozen directly from the freezer. In this case, cooking will take longer.
Accessories Movable shelves
The walls of the refrigerator are equipped with a series of runners so that the shelves can be positioned as desired.
Positioning the door balconies
Door balconies can be disassembled for cleaning. To remove, gradually pull the balcony in the direction of the arrows until it comes free, and after cleaning, slot it back again.
Disassemble the bottom drawer
- Pull out the bottom drawer up to the stopper position.
- Lift the front of the drawer upwards.
- Pull out the bottom drawer.
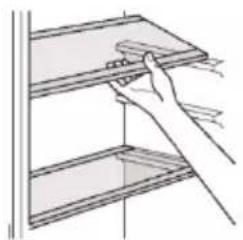
natural_image
Line drawing of a hand holding a shelf with a tool, no text or symbols present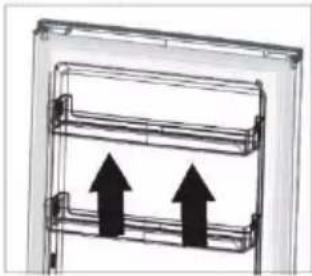
natural_image
Diagram of a vertical shelf with two upward arrows indicating movement or flow (no text or symbols present)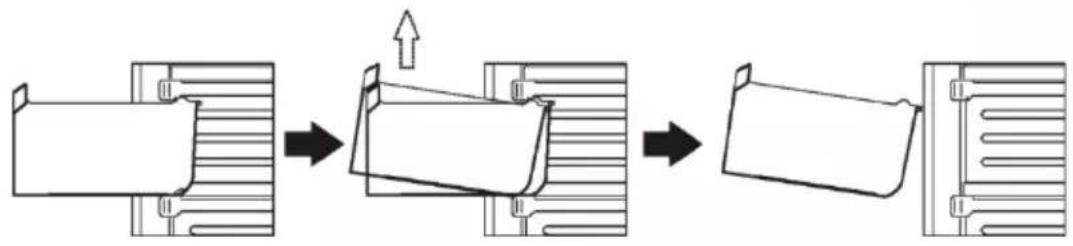
flowchart
graph LR
    A["Raw Material"] --> B["Step 1"]
    B --> C["Step 2"]
    C --> D["Step 3"]
    D --> E["Final Product"]
Helpful tips
Tips for freezing
To help you make the most of the freezing process, here are some useful tips:
• The maximum quantity of food which can be frozen in 24 hrs is shown on the rating plate.
• The freezing process takes 24 hours. No further food items should be added during this period.
- Only freeze top quality, fresh and thoroughly cleaned foodstuffs.
- Prepare food in small portions to enable a rapid and thorough freezing process and subsequently thaw only the quantity required.
- Wrap up the food in aluminium foil or polythene and make sure that the packages are airtight.
- Do not allow fresh, unfrozen food to touch food items frozen to prevent the temperature of the frozen food from rising.
- Lean foods store better and longer than fatty ones; salt reduces the storage life of food.
- Water ice cubes, if consumed immediately after removal from the freezer compartment, may cause the skin to freeze burn.
- It is advisable to display the freezing in date on each individual pack to ensure safe removal from the freezer compartment, otherwise skin may freeze burn.
- It is advisable to show the freezing in date on each individual pack to enable you to keep tab of the storage time.
Tips for storing frozen food
To obtain optimal performance from this appliance, you should:
Make sure that the commercially frozen foodstuffs were adequately stored by the retailer.
Be sure that frozen foodstuffs are transferred from the food store to the freezer in the shortest time possible.
Do not open the door frequently or leave it open longer than necessary.
Once defrosted, food deteriorates rapidly and cannot be refrozen.
Do not exceed the storage period indicated by the food manufacturer.
Tips for fresh food refrigeration
To obtain best performance:
- Do not store warm food or evaporating liquids in the refrigerator.
- Do cover or wrap food, particularly if it has a strong odour.
Tips for refrigeration
Useful tips:
- Meat (all types): wrap in polythene bags and place on the glass shelves above the vegetable drawer.
- For safety, store for one or two days at the most.
- Cooked foods, cold dishes, etc., should be covered and placed on any shelf.
- Fruit and vegetables should be thoroughly cleaned and placed in the special drawer(s) provided.
- Butter and cheese should be placed in special airtight containers or wrapped in aluminium foil or polythene bags to exclude as much air as possible.
- Milk bottles should be closed with a lid and stored in the door balconies.
- Bananas, potatoes, onions, and garlic must not be kept in the fridge, if not packed.
- For energy efficiency, all drawers, baskets, and shelves, must be slotted in the right place.
Cleaning
For hygiene reasons the appliance interior, including interior accessories, should be cleaned regularly.

Caution! The appliance must not be connected to the mains during cleaning, as this creates a risk of electric shock! Before cleaning, switch off the appliance and remove the plug from the mains, or switch off or disconnect the circuit breaker or fuse. Never clean the appliance with a steam cleaner. Moisture could accumulate in the electrical components and cause a risk of electric shock! Hot vapours may damage plastic parts. The appliance must be dry before it is switched on again.
Important! Ethereal oils and organic solvents may damage plastic parts, e.g., lemon juice or the juice form orange peel, butyric acid, cleanser that contain acetic acid.
- Do not allow such substances to come in contact with the appliance's parts.
- Do not use any abrasive cleaners.
- Remove the food from the freezer. Store in a cool place and cover well.
- Switch off the appliance and remove the plug from the mains or switch off or disconnect the circuit breaker of fuse.
- Clean the appliance and the interior accessories with a cloth and lukewarm water. After cleaning wipe with fresh water and rub dry.
• After all components are completely dry put the appliance back into operation.
Replacing the light bulb
The inside light is of LED type. To replace the light bulb, please contact a qualified technician.
Replaceable (LED only) light source to be fitted by a professional only. This product contains a light source of energy efficiency class G.
NOTE: After closing the door, the internal light will turn off after 60 seconds. This is normal.
Troubleshooting

Caution! Before troubleshooting, disconnect the power supply. Only a qualified electrician or competent person must perform any troubleshooting not described in this manual.
Important! There are certain sounds that are emitted during normal use (compressor, refrigerant circulation).
| Problem Possible cause Solution | ||
| Appliance does not work | Temperature regulation knob is set to coldest. | Set the knob to another setting and switch on the appliance. |
| Mains plug is not plugged in or is loose. | Insert mains plug. | |
| Fuse has blown or is defective. Check fuse, replace if necessary. | ||
| Socket is defective. | Mains malfunctions are to be corrected by an electrician. | |
| Appliance freezes or cools too much | Temperature is set to too cold, or the appliance is running on the coldest setting. | Turn the temperature regulator to a warmer setting temporarily. |
| The food is not frozen enough. | Temperature is not properly adjusted. | Please consult the initial Temperature Setting section. |
| Door was open for an extended period. | Only keep the door open for as long as necessary. | |
| A large quantity of warm food was placed in the appliance within the last 24 hours. | Turn the temperature regulator to a colder setting temporarily. | |
| The appliance is near a heat source. | Please consult the section on installation location. | |
| Heavy buildup of frost on the door seal. | Door seal is not airtight. | Carefully dry the leaking sections of the door seal with a hair dryer (set to a cool setting). At the same time, shape the warmed door seal by hand to make sure it sits correctly. |
| Unusual noises | Appliance is not level. Re-adjust the feet. | |
| The appliance is touching the wall or other objects. | Move the appliance slightly. | |
| A component, e.g., a pipe, at the rear of the appliance is touching another part of the appliance or the wall. | If necessary, carefully bend the component out of the way. | |
| Water on the floor | Water drain hole is blocked. | See the Cleaning and Care section. |
| Side panels are hot. | It's normal. Heat exchange parts are located at the sides. | Wear gloves before touching the sides, if needed. |
If the malfunction persists, contact the Service Centre.
This data is necessary to help you act quickly and correctly. Write down the necessary values here, be sure to refer to the rating plate.
GUARANTEE
Minimum guarantee: 2 years for EU Countries, 3 years for Turkey, 1 year for the UK, 1 year for Russia, 3 years for Sweden, 2 years for Serbia, 5 years for Norway, 1 year for Morocco, 6 months for Algeria, Tunisia no legal warranty required.
AVAILABILITY OF SPARE PARTS
"Thermostats, temperature sensors, printed circuit boards and light sources are available for a minimum period of seven years after the last unit of the model has been placed on the market. Door handles, door hinges, trays and baskets for a minimum period of seven years and door gaskets for a minimum period of 10 year, after the last unit of the model has been placed on the market".
For further information about the product, please consult https://
eprel.ec.europa.eu/ or scan the QR on the energy label supplied with the appliance
To contact the technical assistance, visit our website: https://corporate.haier-europe.com/en/
Under the section “website”, choose the brand of your product and your country.
You will be redirected to the specific website where you can find the telephone number and form to contact technical assistance.
Chladnička s mrazničkou No-Frost
natural_image
Technical line drawing of a screwdriver inserted into a mechanical clamp or bracket (no text or symbols)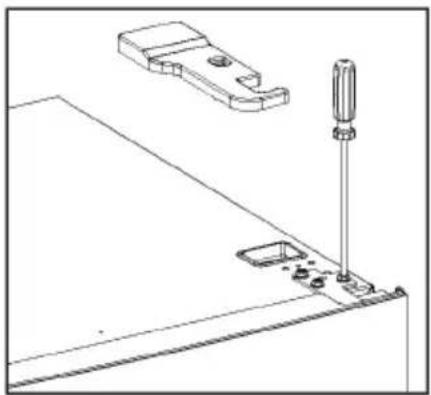
natural_image
Technical line drawing of a mechanical assembly with a screwdriver inserted and a bracket (no text or symbols)natural_image
Technical line drawing of a mechanical assembly with a vertical rod and base plate (no text or symbols)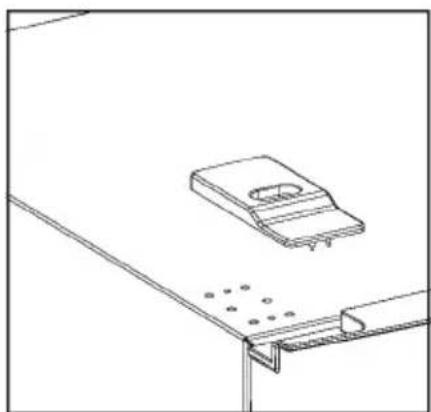
natural_image
Technical line drawing of a mechanical bracket assembly with mounting holes and a slot (no text or symbols)natural_image
Technical line drawing of a mechanical clamp or bracket assembly (no text or symbols)natural_image
Technical line drawing of a mechanical assembly with an inset close-up showing a detail view (no text or symbols)natural_image
Technical illustration of a mechanical clamp or bracket being adjusted, showing disassembly from a component to a handle (no text or symbols present)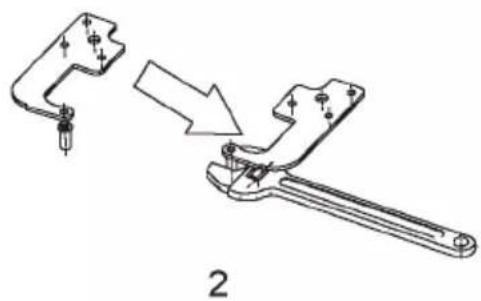
natural_image
Technical line drawing of a mechanical clamp or bracket assembly, showing a disassembly process (no text or symbols present)natural_image
Technical line drawing of a mechanical assembly with cross-sectional and top views (no text or symbols)natural_image
Technical line drawing of a mechanical clamp or bracket assembly (no text or symbols)natural_image
Technical line drawing of a screwdriver inserted into a bracket with mounting base (no text or symbols)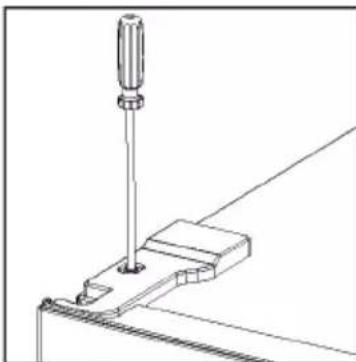
natural_image
Technical line drawing of a screwdriver inserted into a bracket (no text or symbols)natural_image
Technical line drawing of a screwdriver inserted into a bracket (no text or symbols)natural_image
Technical line drawing showing two views of a mechanical component with an upward arrow indicating transformation (no text or symbols present)natural_image
Technical line drawing of a mechanical device with two views: top view shows internal components, bottom view shows external housing (no text or symbols)natural_image
Diagram showing four sequential steps of a mechanical assembly or mounting process, with arrows indicating direction (no text or symbols present)natural_image
Simple line drawing of a container with a handle and arrow indicating direction (no text or symbols)natural_image
Simple line drawing of a mechanical assembly with a tool inserted (no text or symbols)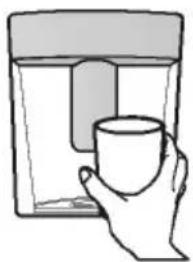
natural_image
Simple line drawing of a hand holding a mug, no text or symbols presenttext_image
Diagram showing two labeled vertical panels with checkmark and cross symbols, likely indicating approval or rejection status.natural_image
Simple diagram of a paperclip with a central circle and surrounding stars (no text or symbols)natural_image
Line drawing of a hand holding a shelf with a tool, no text or symbols present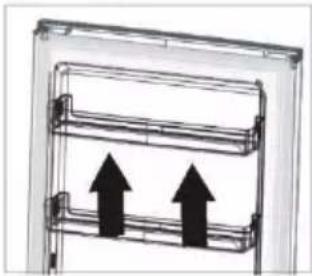
natural_image
Diagram of a vertical shelf with two upward arrows indicating movement or flow (no text or symbols present)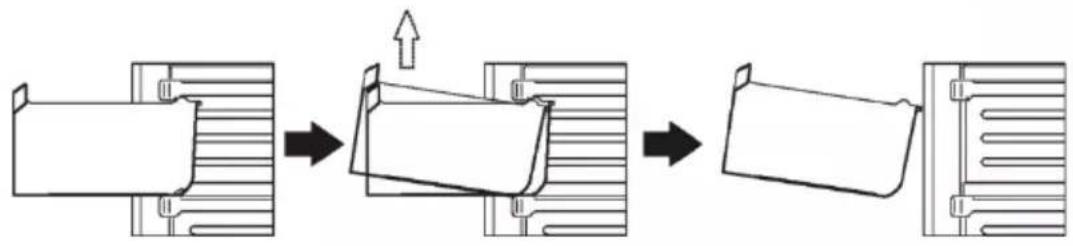
flowchart
graph LR
    A["Initial Component"] --> B["Step 1: ↑ Up"]
    B --> C["Step 2: Down"]
    C --> D["Step 3: Down"]
    D --> E["Final Product"]
Užitečné rady
Tipy na zmrazení
natural_image
Technical line drawing of a screwdriver inserted into a mechanical clamp or bracket (no text or symbols)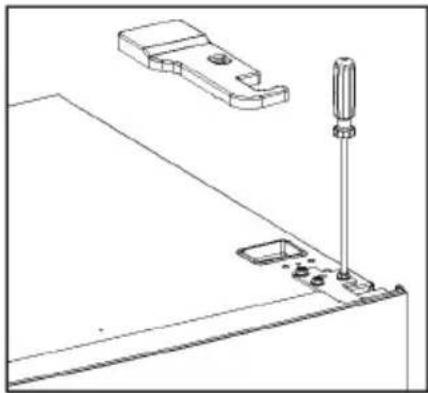
natural_image
Technical line drawing of a mechanical assembly with a screwdriver and two components (no text or symbols)natural_image
Technical line drawing of a mechanical assembly with a vertical rod and base plate (no text or symbols)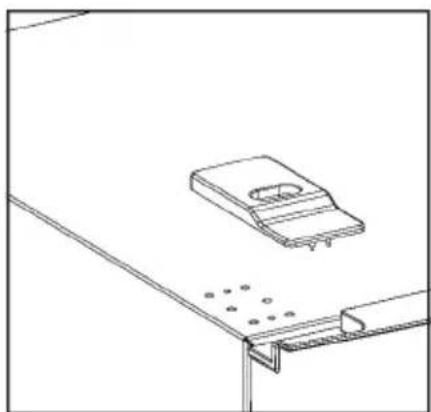
natural_image
Technical line drawing of a mechanical bracket assembly with mounting holes and a slot (no text or symbols)natural_image
Technical line drawing of a mechanical clamp or bracket assembly (no text or symbols)natural_image
Technical line drawing of a mechanical assembly with an inset close-up showing a detail view (no text or symbols)natural_image
Technical illustration of a mechanical clamp or bracket being adjusted, showing disassembly from a component to a handle (no text or symbols present)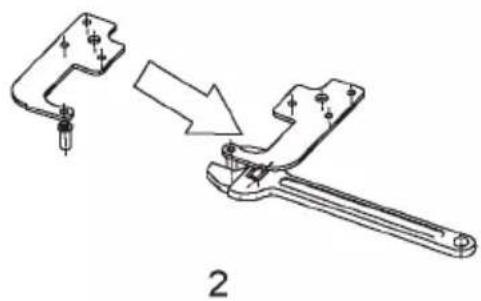
natural_image
Technical line drawing of a mechanical clamp or bracket assembly, showing a disassembly process (no text or symbols present)natural_image
Technical line drawing of a mechanical assembly with cross-sectional and top views (no text or symbols)natural_image
Technical line drawing of a mechanical clamp or bracket assembly (no text or symbols)natural_image
Technical line drawing of a screwdriver inserted into a bracket with mounting base (no text or symbols)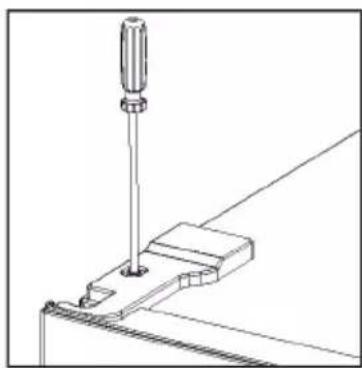
natural_image
Technical line drawing of a screwdriver inserted into a bracket (no text or symbols)- Fastgør skruelåget.
natural_image
Technical line drawing of a screwdriver inserted into a bracket (no text or symbols)natural_image
Technical line drawing showing a mechanical assembly with an arrow indicating direction (no text or symbols present)natural_image
Technical line drawing of a mechanical assembly with two views: one showing internal components and the other showing a housing (no text or symbols present)natural_image
Four-step diagram showing mechanical assembly steps: bracket opening, clamping, mounting, and final assembled (no text or symbols)natural_image
Simple line drawing of a container with a handle and arrow indicating direction (no text or symbols)natural_image
Simple line drawing of a door handle with a small object inserted, no text or symbols present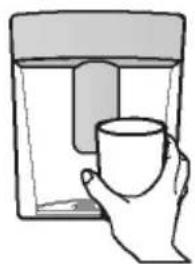
natural_image
Simple line drawing of a hand holding a mug inside a container (no text or symbols)text_image
Diagram showing two labeled vertical panels with checkmark and cross symbols, likely indicating approval or rejection status.natural_image
Simple diagram of a paperclip with a central circle and surrounding stars (no text or symbols)natural_image
Line drawing of a hand holding a shelf with a tool, no text or symbols present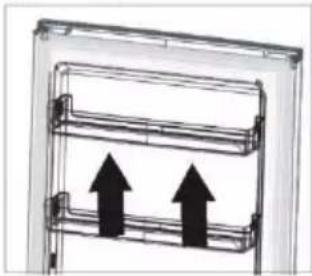
natural_image
Diagram of a vertical shelf with two upward arrows indicating movement or flow (no text or symbols present)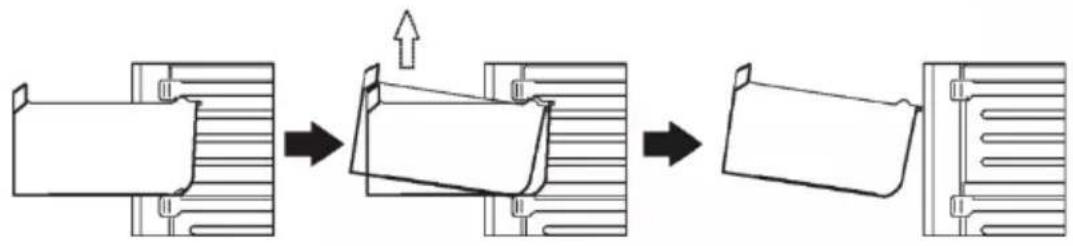
flowchart
graph LR
    A["Initial Component"] --> B["Step 1: ↑ Up"]
    B --> C["Step 2: Down"]
    C --> D["Step 3: Down"]
    D --> E["Final Product"]
Nyttige tips
Tips til frysning
natural_image
Technical line drawing of a screwdriver inserted into a clamp bracket (no text or symbols)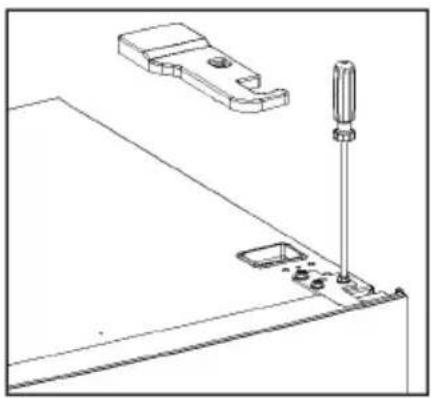
natural_image
Technical line drawing of a mechanical assembly with a screwdriver inserted into a base (no text or symbols)natural_image
Technical line drawing of a mechanical assembly with a vertical rod and base plate (no text or symbols)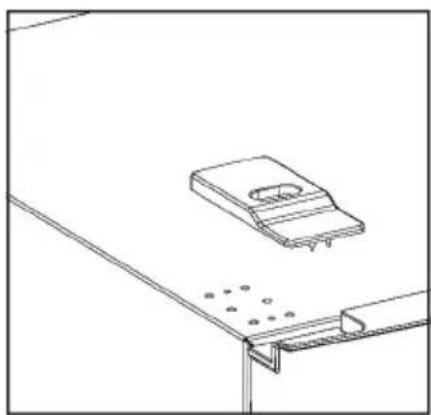
natural_image
Technical line drawing of a mechanical assembly with mounting bracket and mounting holes (no text or symbols)natural_image
Technical line drawing of a mechanical clamp or bracket (no text or symbols)natural_image
Technical line drawing of a mechanical assembly with an inset close-up showing a detail (no text or symbols)natural_image
Technical line drawing of a mechanical component before and after assembly (no text or symbols)1
natural_image
Technical line drawing of a mechanical clamp or bracket being adjusted, showing disassembly and assembly (no text or symbols)2
natural_image
Technical line drawing of a mechanical assembly with cross-sectional and top views (no text or symbols)natural_image
Technical line drawing of a mechanical clamp or bracket assembly (no text or symbols)natural_image
Technical line drawing of a screwdriver inserted into a bracket with mounting base (no text or symbols)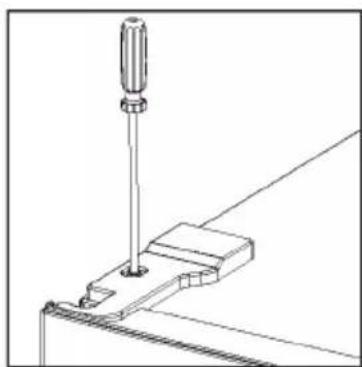
natural_image
Technical line drawing of a screwdriver inserted into a bracket (no text or symbols)natural_image
Technical line drawing of a screwdriver inserted into a bracket (no text or symbols)natural_image
Technical line drawing showing two views of a mechanical component with an upward arrow indicating transformation (no text or symbols present)natural_image
Technical line drawing of a mechanical assembly with two views: one showing internal components and the other showing a housing (no text or symbols present)natural_image
Four-step diagram showing mechanical assembly steps: opening, clamping, mounting, and closing (no text or symbols)natural_image
Simple line drawing of a container with a handle and arrow indicating direction (no text or symbols)natural_image
Simple line drawing of a mechanical assembly with a tool inserted (no text or symbols)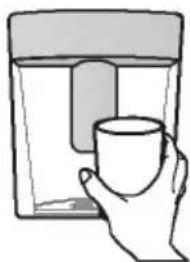
natural_image
Simple line drawing of a hand holding a mug inside a container (no text or symbols)flowchart
graph LR
    A["Stage 1: Left side with horizontal lines and arrows"] --> B["Stage 2: Middle line with vertical connectors and arrows"]
    B --> C["Stage 3: Right side with horizontal lines and arrows"]
Platzbedarf
text_image
Diagram showing two labeled containers with checkmark and cross symbols, likely indicating approval or rejection status.natural_image
Simple diagram of a vertical oval shape with a central circle and surrounding stars (no text or symbols)natural_image
Line drawing of a hand holding a shelf with a tool, no text or symbols present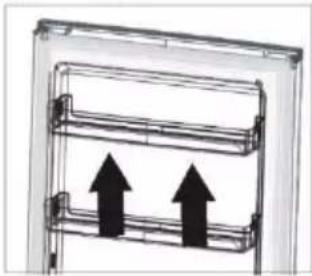
natural_image
Diagram of a vertical shelf with two upward arrows indicating movement or flow (no text or symbols present)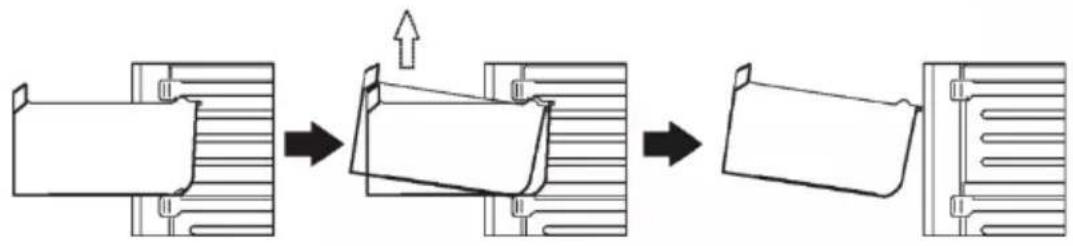
flowchart
graph LR
    A["Raw Material"] --> B["Step 1"]
    B --> C["Step 2"]
    C --> D["Step 3"]
    D --> E["Final Product"]
Hilfreiche Tipps
Website: https://corporate.haier-europe.com/en/
natural_image
Technical line drawing of a screwdriver inserted into a mechanical clamp or bracket (no text or symbols)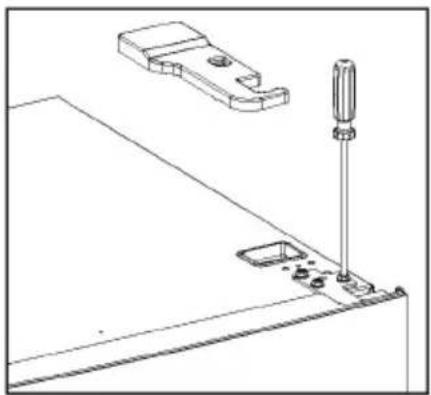
natural_image
Technical line drawing of a mechanical assembly with a screwdriver inserted into a base (no text or symbols)natural_image
Technical line drawing of a mechanical assembly with a vertical rod and base plate (no text or symbols)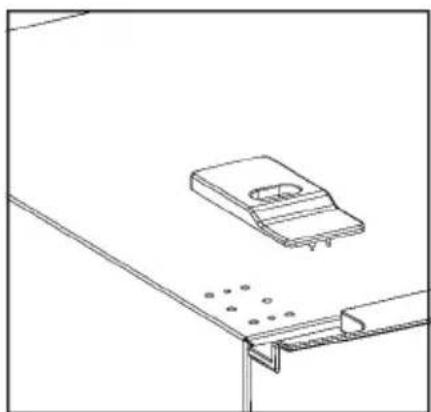
natural_image
Technical line drawing of a mechanical bracket assembly with mounting holes and a slot (no text or symbols)natural_image
Technical line drawing of a mechanical clamp or bracket assembly (no text or symbols)natural_image
Technical line drawing of a mechanical assembly with an inset close-up showing a bracket detail (no text or symbols)natural_image
Technical illustration of a mechanical clamp or bracket being adjusted, showing disassembly from a component to a handle (no text or symbols present)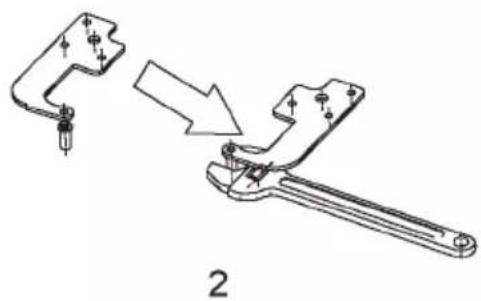
natural_image
Technical line drawing of a mechanical clamp or bracket assembly, showing a disassembly process (no text or symbols present)natural_image
Technical line drawing of a mechanical assembly with cross-sectional and top views (no text or symbols)natural_image
Technical line drawing of a mechanical clamp or bracket assembly (no text or symbols)natural_image
Technical line drawing of a screwdriver inserted into a bracket with mounting base (no text or symbols)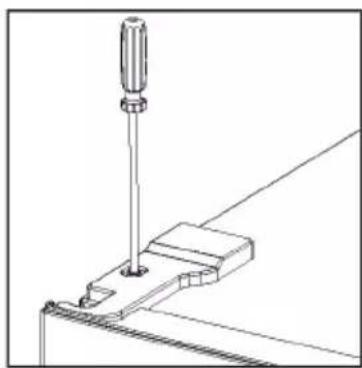
natural_image
Technical line drawing of a screwdriver inserted into a bracket (no text or symbols)natural_image
Technical line drawing of a screwdriver inserted into a bracket (no text or symbols)natural_image
Technical line drawing showing two views of a mechanical component with an upward arrow indicating transformation (no text or symbols present)natural_image
Technical line drawing of a mechanical assembly with two views: one showing internal components and the other showing a housing (no text or symbols present)natural_image
Four-step diagram showing mechanical assembly steps: opening, clamping, mounting, and closing (no text or symbols)natural_image
Simple line drawing of a container with a handle and arrow indicating direction (no text or symbols)natural_image
Simple line drawing of a mechanical assembly with a tool inserted (no text or symbols)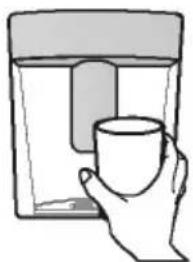
natural_image
Simple line drawing of a hand holding a mug, no text or symbols presentflowchart
graph LR
    A["Stage 1: Left side with horizontal lines and arrows"] --> B["Stage 2: Middle line with vertical connectors and arrows"]
    B --> C["Stage 3: Right side with horizontal lines and arrows"]
| A | 550 |
| B | 585 |
| C | 1800 |
| D | = 50 |
| E | = 50 |
| F | = 50 |
| G | 1100 |
| H | 1135 |
| I | 135^ |
text_image
Diagram showing two vertical panels with checkmark and cross symbols, likely indicating approval or rejection status.natural_image
Simple diagram of a paperclip with a central circle and surrounding stars (no text or symbols)natural_image
Line drawing of a hand holding a shelf with a tool, no text or symbols present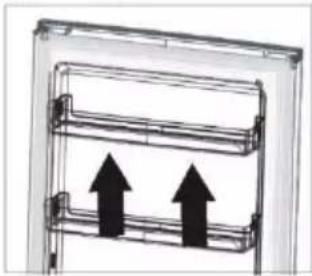
natural_image
Diagram of a vertical shelf with two upward arrows indicating movement or flow (no text or symbols present)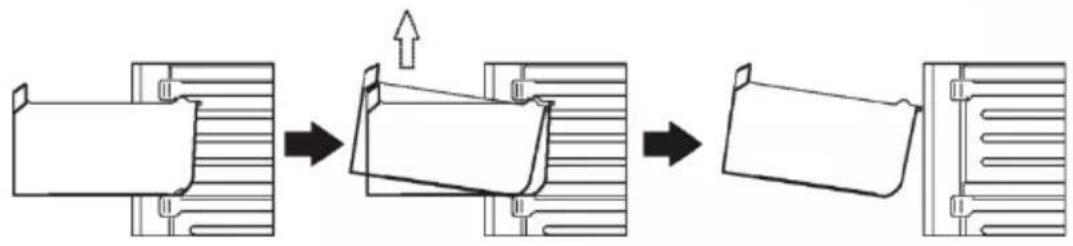
flowchart
graph LR
    A["Raw Material"] --> B["Step 1"]
    B --> C["Step 2"]
    C --> D["Step 3"]
    D --> E["Final Product"]
Consejos útiles
natural_image
Technical line drawing of a screwdriver inserted into a mechanical clamp or bracket (no text or symbols)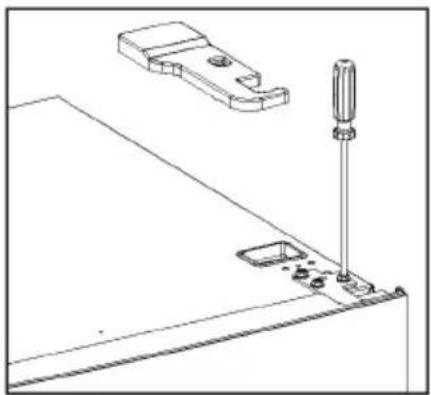
natural_image
Technical line drawing of a mechanical assembly with a screwdriver inserted and a bracket (no text or symbols)natural_image
Technical line drawing of a mechanical assembly with a vertical rod and base plate (no text or symbols)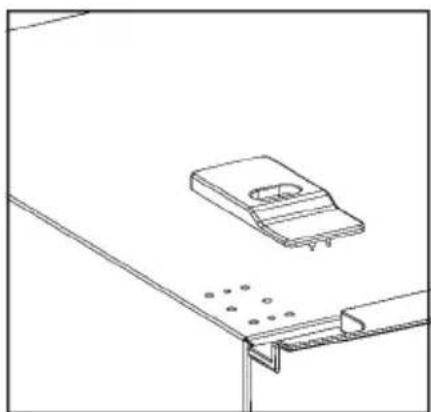
natural_image
Technical line drawing of a mechanical bracket assembly with mounting holes and a slot (no text or symbols)Asennus
natural_image
Technical line drawing of a mechanical clamp or bracket assembly (no text or symbols)natural_image
Technical line drawing of a mechanical assembly with an inset close-up showing a bracket detail (no text or symbols)natural_image
Technical line drawing of a mechanical component before and after assembly, showing disassembly (no text or symbols)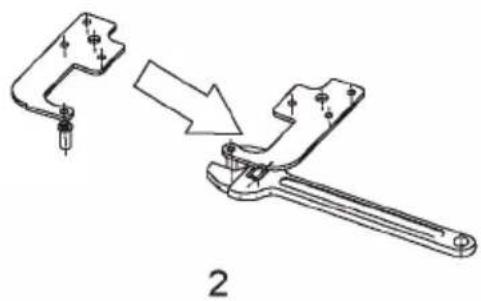
natural_image
Technical line drawing of a mechanical clamp or bracket assembly, showing a disassembly process (no text or symbols present)natural_image
Technical line drawing of a mechanical assembly with an inset close-up showing a component detail (no text or symbols)Asennus
natural_image
Technical line drawing of a mechanical clamp or bracket assembly (no text or symbols)natural_image
Technical line drawing of a screwdriver inserted into a bracket with mounting base (no text or symbols)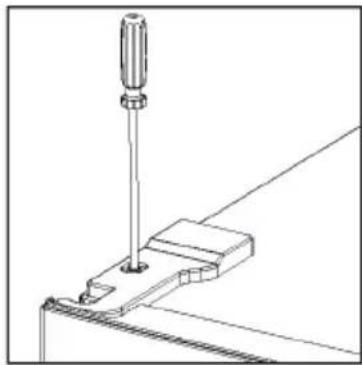
natural_image
Technical line drawing of a screwdriver inserted into a clamping bracket (no text or symbols)natural_image
Technical line drawing of a screwdriver inserted into a bracket (no text or symbols)natural_image
Technical line drawing showing two views of a mechanical component with an arrow indicating direction (no text or symbols present)natural_image
Technical line drawing of a mechanical assembly with two views (top and side), no text or symbols present.natural_image
Four-step diagram showing mechanical assembly steps: bracket opening, clamping, mounting, and final assembly (no text or labels)natural_image
Simple line drawing of a container with an arrow pointing to the interior (no text or symbols)natural_image
Simple line drawing of a mechanical assembly with a tool inserted (no text or symbols)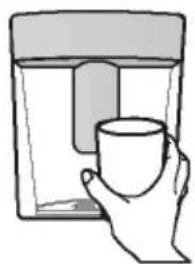
natural_image
Simple line drawing of a hand holding a mug inside a container (no text or symbols)flowchart
graph LR
    A["Stage 1: Left side with horizontal lines and arrows"] --> B["Stage 2: Middle line with vertical connectors and arrows"]
    B --> C["Stage 3: Right side with vertical connectors and arrows"]
Tilantarve
text_image
Diagram showing two labeled vertical panels with checkmark and cross symbols, likely indicating approval or rejection status.natural_image
Simple diagram of a paperclip with a central circle and surrounding snowflake symbols (no text or labels)natural_image
Line drawing of a hand holding a shelf with a tool, no text or symbols present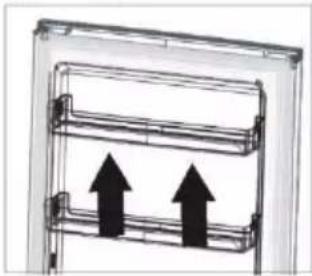
natural_image
Diagram of a double door with two upward arrows indicating flow or movement (no text or symbols)
flowchart
graph LR
    A["Initial Component"] --> B["Assembly Step"]
    B --> C["Final Assembly"]
natural_image
Technical line drawing of a screwdriver inserted into a mechanical clamp or bracket (no text or symbols)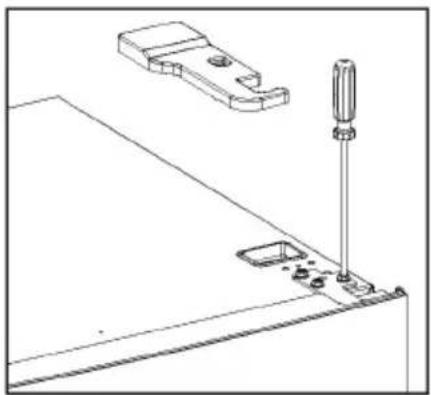
natural_image
Technical line drawing of a mechanical assembly with a screwdriver inserted and a bracket (no text or symbols)natural_image
Technical line drawing of a mechanical assembly with a vertical rod and base plate (no text or symbols)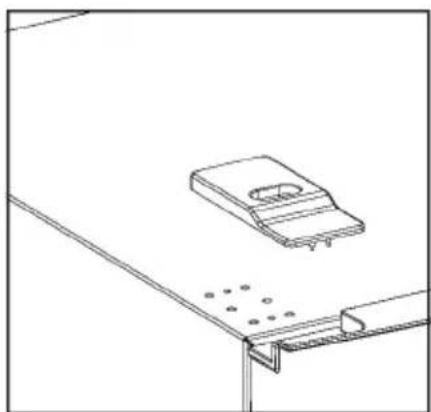
natural_image
Technical line drawing of a mechanical bracket assembly with mounting holes and a slot (no text or symbols)natural_image
Technical line drawing of a mechanical clamp or bracket assembly (no text or symbols)natural_image
Technical line drawing of a mechanical assembly with an inset close-up showing a bracket detail (no text or symbols)natural_image
Technical illustration of a mechanical clamp or bracket assembly before and after disassembly (no text or symbols present)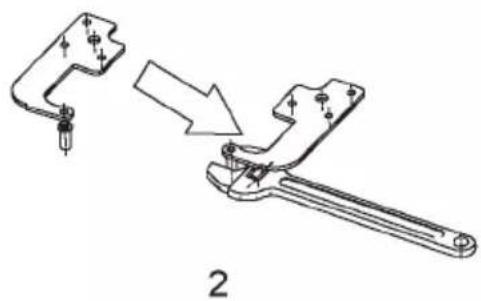
natural_image
Technical line drawing of a mechanical clamp or bracket assembly, showing a disassembly process (no text or symbols present)natural_image
Technical line drawing of a mechanical assembly with cross-sectional and top views (no text or symbols)natural_image
Technical line drawing of a mechanical clamp or bracket assembly (no text or symbols)natural_image
Technical line drawing of a screwdriver inserted into a bracket with mounting holes (no text or symbols)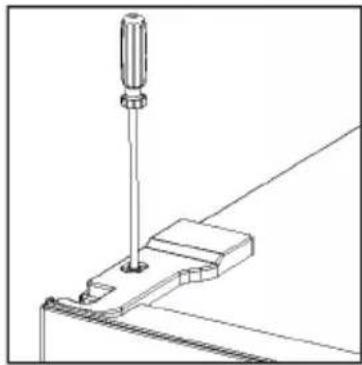
natural_image
Technical line drawing of a screwdriver inserted into a bracket (no text or symbols)- Fixez le cache-vis.
natural_image
Technical line drawing of a screwdriver inserted into a bracket (no text or symbols)natural_image
Technical line drawing showing a mechanical assembly with an arrow indicating direction (no text or symbols present)natural_image
Technical line drawing of a mechanical assembly with two views (top and side), no text or symbols present.natural_image
Diagram showing four sequential steps of a mechanical assembly or mounting process, with no visible text or symbols.natural_image
Simple line drawing of a container with a handle and arrow indicating direction (no text or symbols)natural_image
Simple line drawing of a window with a handle and frame (no text or symbols)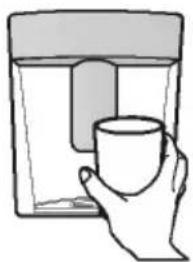
natural_image
Hand holding a mug inside a container (no text or symbols visible)text_image
Diagram showing two labeled vertical panels with checkmark and cross symbols, likely indicating approval or rejection status.natural_image
Simple diagram of a paperclip with a central circle and surrounding stars (no text or symbols)Accessoires Clayettes mobiles
natural_image
Line drawing of a hand holding a shelf with a tool, no text or symbols present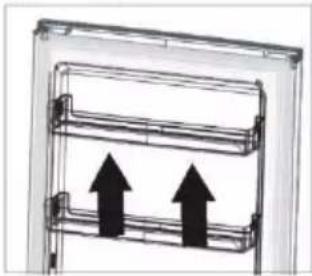
natural_image
Diagram of a vertical shelf with two upward arrows indicating movement or flow (no text or symbols present)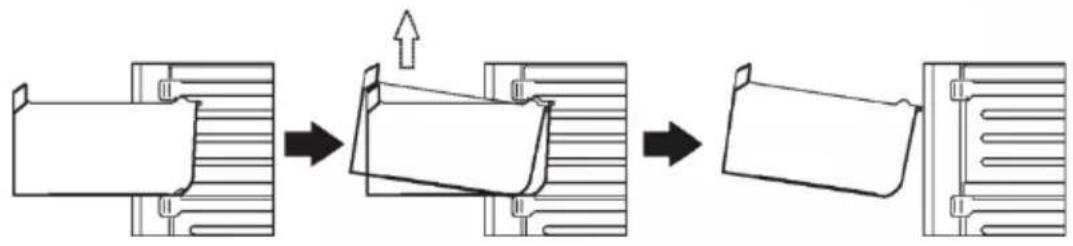
flowchart
graph LR
    A["Initial Component"] --> B["Step 1"]
    B --> C["Step 2"]
    C --> D["Step 3"]
    D --> E["Final Product"]
Conseils utiles
text_image
7HUPRVWDW L VYMHWOR /DPSLFD LED Police ]DPU]LYDpD 3RNORSDF ODGLFH ]D YRüH L SRYUüH Ladica ]D YRüH i SRYUüH Police KODGQMDND Ladice ]DPU]LYDpD Police vrata KODGQMDND1RåLFH ]D SRUDYQDYDQMH
1DSRPHQD *RUH SULND|DQD VOLND VOXål VDPR X LQIRUPDWLYQH VYUKH GWYDUQL XUHYDM PRåH VH UD|OLNRYDWL
=D NRQILJXUDFLMX V QDMYHüRP XâWHGRP HQHUJLMH ODGLFH NXWLMH ]D KUDQX L SROLF 3RJOHGDMWH JRUH SULND]DQX VOLNX
Prostorni zahtjevi
natural_image
Technical line drawing of a screwdriver inserted into a mechanical clamp or bracket (no text or symbols)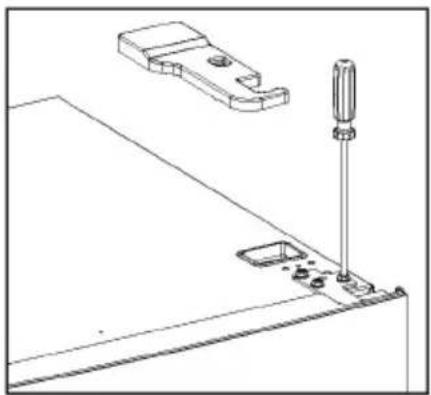
natural_image
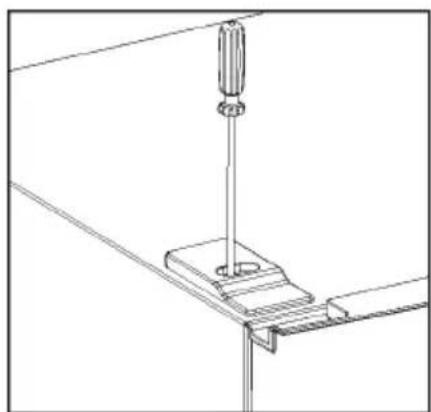
Technical line drawing of a mechanical assembly with a screwdriver inserted and a bracket (no text or symbols)- Uklonite gornji lijevi poklopac vijaka.
natural_image
Technical line drawing of a mechanical assembly with a vertical rod and base plate (no text or symbols)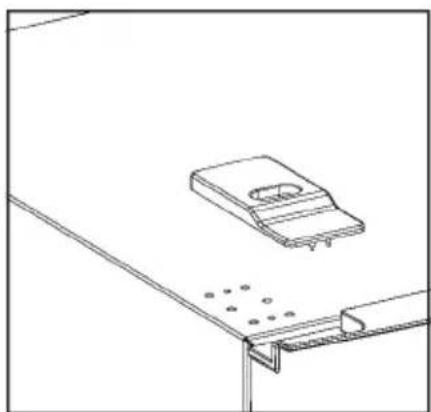
natural_image
Technical line drawing of a mechanical bracket assembly with mounting holes and a slot (no text or symbols)- Uklonite gornja vrata; upotrijebite križni odvijač da biste uklonili vijak, a zatim uklonite donja vrata.
natural_image
Technical line drawing of a mechanical clamp or bracket assembly (no text or symbols)- Položite hladnjak ravno na tlo, uklonite nožice za podešavanje kao što je prikazano na slici u nastavku, a zatim križnim odvijačem uklonite donju šarku.
natural_image
Technical line drawing of a mechanical assembly with an inset close-up showing a bracket detail (no text or symbols)- Postavite položaj jezgre donje i gornje šarke na suprotnu stranu.
natural_image
Technical illustration of a mechanical clamp or wrench being assembled, showing part assembly before and after (no text or symbols present)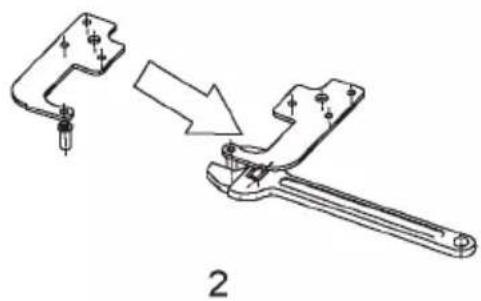
natural_image
Technical line drawing of a mechanical clamp or bracket assembly, showing a disassembly process (no text or symbols present)- Postavite donju šarku ispod hladnjaka, pritegnite nožice za podešavanje i pazite na vodoravan položaj.
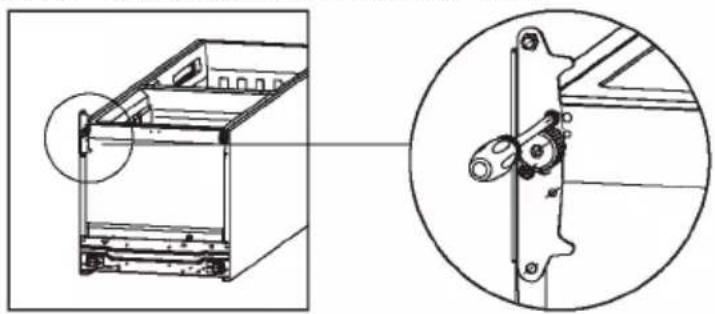
natural_image
Technical line drawing of a mechanical assembly with cross-sectional and top views (no text or symbols)Ugradnja
natural_image
Technical line drawing of a mechanical clamp or bracket assembly (no text or symbols)- Vratite vrata. Provjerite jesu li vrata poravnata vodoravno i okomito tako da se brtva zatvara sa svih strana prije nego što zategnete gornju šarku. Zatim umetnite gornju šarku, pritegnite je na gornju stranu jedinice i pričvrstite poklopac šarke (u vrećici s dodatnom opremom) vijkom.
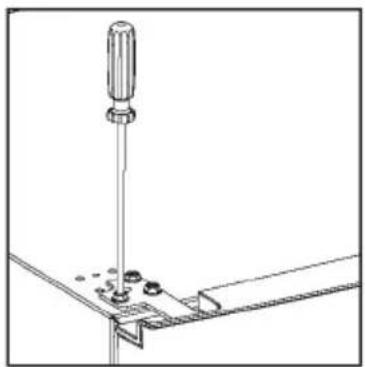
natural_image
Technical line drawing of a screwdriver inserted into a bracket with mounting base (no text or symbols)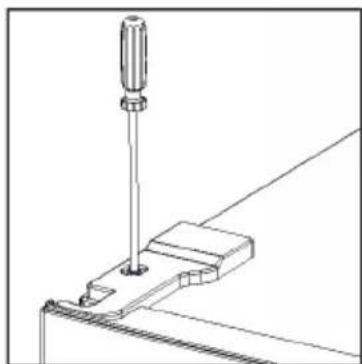
natural_image
Technical line drawing of a screwdriver inserted into a bracket (no text or symbols)- Pričvrstite poklopac vijka.
natural_image
Technical line drawing of a screwdriver inserted into a bracket (no text or symbols)natural_image
Technical line drawing showing a mechanical assembly with an arrow indicating direction (no text or symbols present)- Izvadite spremnik za vodu. Odvojite gornji poklopac te operite i obrišite spremnik i poklopac.
natural_image
Technical line drawing of a mechanical device with two views: one showing internal components and the other showing a housing (no text or symbols present)natural_image
Diagram showing four sequential steps of a mechanical assembly or mounting process, with no visible text or symbols.natural_image
Simple line drawing of a container with a handle and arrow indicating direction (no text or symbols)natural_image
Simple line drawing of a mechanical assembly with a tool inserted (no text or symbols)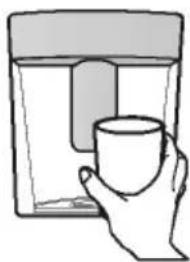
natural_image
Simple line drawing of a hand holding a mug inside a container (no text or symbols)text_image
Diagram showing two labeled panels with checkmark and cross symbols, likely indicating approval or cancellation actions.natural_image
Simple diagram of a paperclip with a central circle and surrounding snowflake symbols (no text or labels)- Ovaj klizač u odjeljku hladnjaka služi za podešavanje temperature odjeljka zamrzivača.
- Kad je klizač postavljen na *, temperatura u odjeljku zamrzivača bit će viša. Suprotno tome, temperatura u
odjeljku zamrzivača bit će niža ako je klizač postavljen na - Za standardnu upotrebu preporučuje se srednji položaj.
- Da biste postigli najnižu temperature u odjeljku zamrzivača, možete podesiti gumb za postavljanje na najnižu
temperaturu i klizač na


- Preporuka za postavku temperature
| Preporuka za postavku temperature | |||
| Temperatura okoline | Odjeljak hladnjaka | Odjeljak zamrzivača | |
| Toplo |  ↑↑ ↑↑ | Postavite na* | |
| Normalno |  ↑↑ ↑↑ | Postavite na* | |
| Hladno |  ↑ ↑ | Postavite na* | |
Početak upotrebe
Čišćenje unutrašnjosti
Prije prve upotrebe uređaja operite unutrašnjost i sve unutarnje dodatke mlakom vodom i neutralnim sapunom da biste uklonili miris potpuno novog proizvoda, a zatim temeljito osušite.
Važno! Ne upotrebljavajte deterdžente ili abrazivne praške jer se njima oštećuje završni premaz.
Svakodnevna upotreba
natural_image
Line drawing of a hand holding a shelf with a tool, no text or symbols present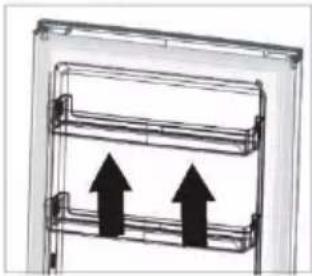
natural_image
Diagram of a vertical shelf with two upward arrows indicating movement or flow (no text or symbols present)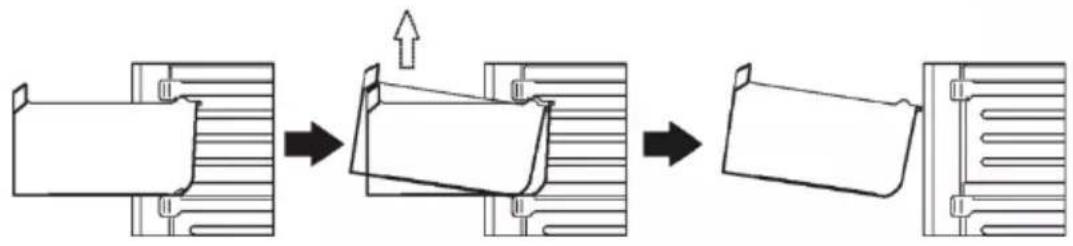
flowchart
graph LR
    A["Raw Material"] --> B["Step 1"]
    B --> C["Step 2"]
    C --> D["Step 3"]
    D --> E["Final Product"]
Korisni savjeti
natural_image
Technical line drawing of a screwdriver inserted into a mechanical clamp or bracket (no text or symbols)
natural_image
Technical line drawing of a mechanical assembly with a screwdriver inserted into a base (no text or symbols)natural_image
Technical line drawing of a mechanical assembly with a vertical rod and base plate (no text or symbols)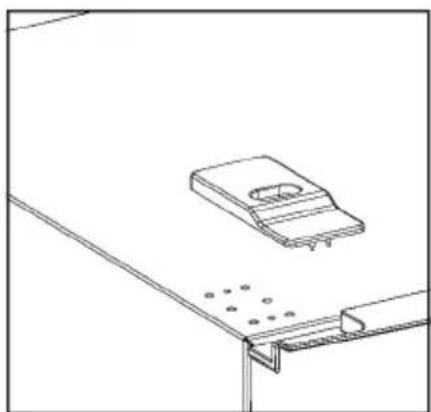
natural_image
Technical line drawing of a mechanical bracket assembly with mounting holes and a slot (no text or symbols)natural_image
Technical line drawing of a mechanical clamp or bracket (no text or symbols)natural_image
Technical line drawing of a mechanical assembly with an inset close-up showing a detail (no text or symbols)natural_image
Mechanical assembly diagram showing a disassembled component being rotated, with no visible text or symbols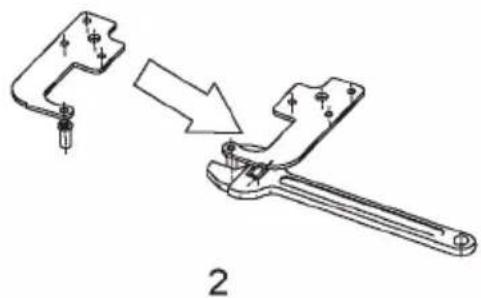
natural_image
Technical line drawing of a mechanical clamp or lever mechanism with a downward arrow indicating motion (no text or symbols present)natural_image
Technical line drawing of a mechanical assembly with an inset close-up showing a component detail (no text or symbols)Installazione
natural_image
Technical line drawing of a mechanical clamp or bracket assembly (no text or symbols)natural_image
Technical line drawing of a screwdriver inserted into a bracket with mounting base (no text or symbols)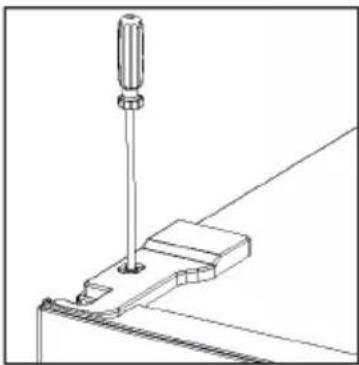
natural_image
Technical line drawing of a screwdriver inserted into a bracket (no text or symbols)natural_image
Technical line drawing of a screwdriver inserted into a bracket (no text or symbols)natural_image
Technical line drawing showing a mechanical assembly with two views of a cabinet or enclosure (no text or symbols present)natural_image
Technical line drawing of a door frame and its internal compartments (no text or symbols)natural_image
Four-step diagram showing mechanical assembly steps: clamping, folding, packing, and final assembly (no text or symbols)natural_image
Simple line drawing of a container with a handle and arrow indicating direction (no text or symbols)Riempimento del serbatoio dellacqua
natural_image
Simple line drawing of a mechanical assembly with a tool inserted (no text or symbols)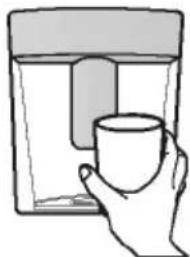
natural_image
Simple line drawing of a hand holding a cup, no text or symbols presentflowchart
graph LR
    A["Left panel"] --> B["Right panel"]
    B --> C["Left panel with horizontal line and vertical connectors"]
    C --> D["Right panel with vertical connectors and horizontal line"]
Spazio necessario
text_image
Diagram showing two labeled rectangular objects with checkmark and cross symbols, likely indicating approval or cancellation.natural_image
Simple diagram of a paperclip with a central circle and surrounding stars (no text or symbols)natural_image
Line drawing of a hand holding a shelf with a tool, no text or symbols present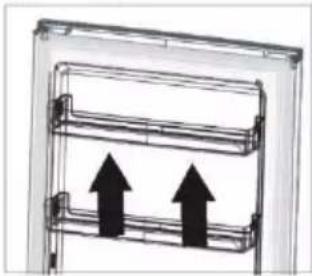
natural_image
Diagram of a vertical shelf with two upward arrows indicating movement or flow (no text or symbols present)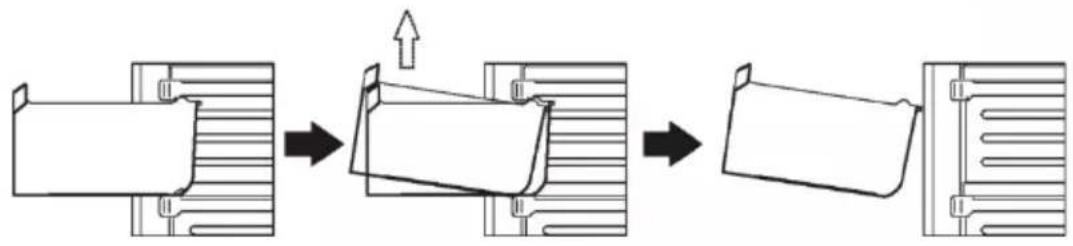
flowchart
graph LR
    A["Initial Component"] --> B["Assembly Step"]
    B --> C["Final Assembly"]
Consigli utili
No-Frost Refrigerator Freezer
natural_image
Technical line drawing of a screwdriver inserted into a mechanical clamp or bracket (no text or symbols)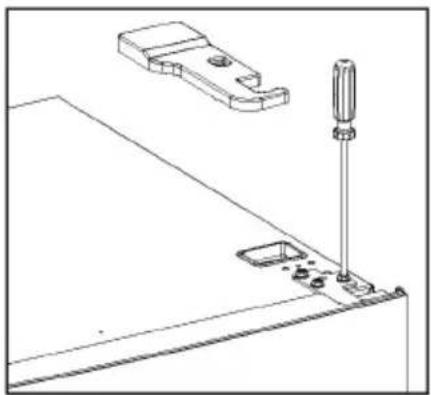
natural_image
Technical line drawing of a mechanical assembly with a screwdriver inserted into a base (no text or symbols)natural_image
Technical line drawing of a mechanical assembly with a vertical rod and base plate (no text or symbols)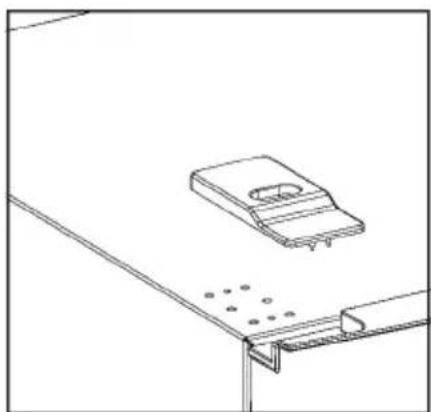
natural_image
Technical line drawing of a mechanical bracket assembly with mounting holes and a slot (no text or symbols)natural_image
Technical line drawing of a mechanical clamp or bracket assembly (no text or symbols)natural_image
Technical line drawing of a mechanical assembly with an inset close-up showing a bracket detail (no text or symbols)natural_image
Technical illustration of a mechanical clamp or bracket being adjusted, showing disassembly from a component to a handle (no text or symbols present)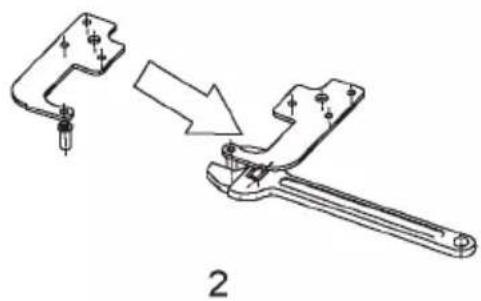
natural_image
Technical line drawing of a mechanical clamp or bracket assembly, showing a disassembly process (no text or symbols present)natural_image
Technical line drawing of a mechanical assembly with cross-sectional and top views (no text or symbols)natural_image
Technical line drawing of a mechanical clamp or bracket assembly (no text or symbols)natural_image
Technical line drawing of a screwdriver inserted into a bracket (no text or symbols)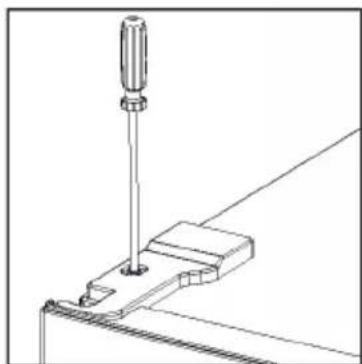
natural_image
Technical line drawing of a screwdriver inserted into a clamping bracket (no text or symbols)- Fest skrudekselet.
natural_image
Technical line drawing of a screwdriver inserted into a bracket (no text or symbols)natural_image
Technical line drawing showing two views of a mechanical component with an arrow indicating direction (no text or symbols present)natural_image
Technical line drawing of a mechanical device with internal components and housing (no text or symbols)natural_image
Four-step diagram showing mechanical assembly steps: bracket, panel, housing, and final assembly (no text or symbols)natural_image
Simple line drawing of a container with a handle and arrow indicating direction (no text or symbols)Fylle vanntanken
- Åpne det lille lokket over tankbalkongen.
- Fyll vanntanken med drikkevann opp til 2,5L-linjen.
- Lukk lokket. Påse at det er stengt.
Dispenseringsvann
natural_image
Simple line drawing of a mechanical assembly with a handle and base plate (no text or symbols)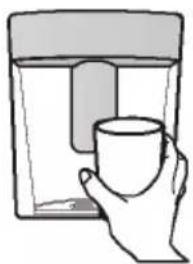
natural_image
Simple line drawing of a hand holding a cup, no text or symbols presentflowchart
graph LR
    A["Stage 1: Left side with horizontal lines and arrows"] --> B["Stage 2: Middle line with vertical connectors and arrows"]
    B --> C["Stage 3: Right side with vertical connectors and arrows"]
Plassbehov
text_image
Forleng F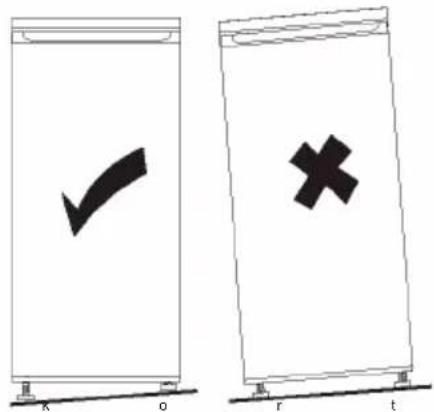
text_image
Diagram showing two containers with checkmark and cross symbols, labeled k, o, r, tnatural_image
Simple diagram of a paperclip with a central circle and surrounding snowflake symbols (no text or labels)natural_image
Line drawing of a hand holding a shelf with a tool, no text or symbols present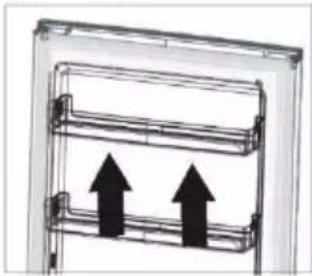
natural_image
Diagram of a double door with two upward arrows indicating flow or movement (no text or symbols)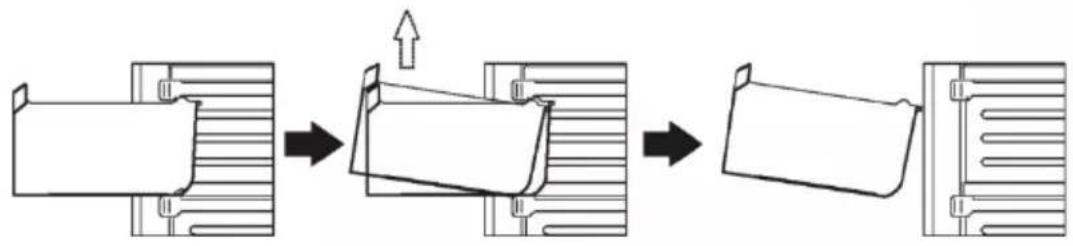
flowchart
graph LR
    A["Initial Component"] --> B["Step 1: ↑ Up"]
    B --> C["Step 2: Down"]
    C --> D["Step 3: Down"]
    D --> E["Final Product"]
Hjelpsomme tips
Tips for frying
natural_image
Technical line drawing of a screwdriver inserted into a mechanical clamp or bracket (no text or symbols)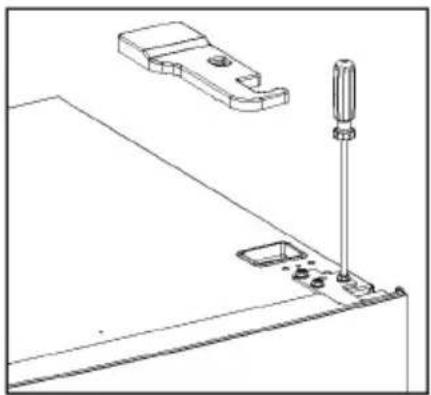
natural_image
Technical line drawing of a mechanical assembly with a screwdriver inserted and a bracket (no text or symbols)- Retire a tampa superior dos parafusos
natural_image
Technical line drawing of a mechanical assembly with a vertical rod and base plate (no text or symbols)
natural_image
Technical line drawing of a mechanical bracket assembly with mounting holes and a slot (no text or symbols)Instalação
natural_image
Technical line drawing of a mechanical clamp or bracket (no text or symbols)natural_image
Technical line drawing of a mechanical assembly with an inset close-up showing a detail view (no text or symbols)natural_image
Technical illustration of a mechanical clamp or bracket assembly, showing a disassembly process (no text or symbols present)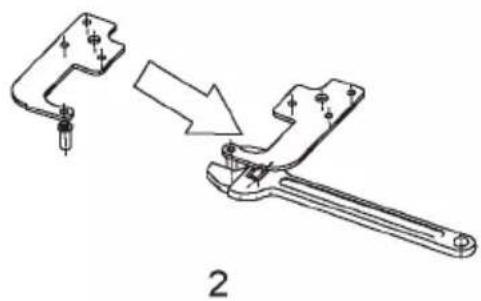
natural_image
Technical line drawing of a mechanical clamp or bracket assembly with a downward arrow indicating compression (no text or symbols present)natural_image
Technical line drawing of a mechanical assembly with cross-sectional and top views (no text or symbols)natural_image
Abstract diagram of a document with arrows indicating rotation or movement (no text or symbols)natural_image
Technical line drawing of a mechanical clamp or bracket assembly (no text or symbols)natural_image
Technical line drawing of a screwdriver inserted into a bracket with mounting base (no text or symbols)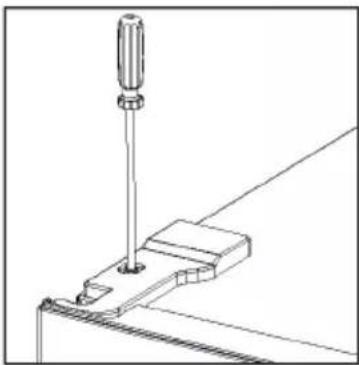
natural_image
Technical line drawing of a screwdriver inserted into a bracket (no text or symbols)- Aperte a tampa de rosca.
natural_image
Technical line drawing of a screwdriver inserted into a bracket (no text or symbols)natural_image
Technical line drawing showing a mechanical assembly with an arrow indicating direction (no text or symbols present)natural_image
Technical line drawing of a door frame and its internal compartments (no text or symbols)natural_image
Diagram showing four sequential steps of a mechanical assembly or mounting process, with arrows indicating direction (no text or symbols present)- Limpe a alavanca do dispensador situada fora da porta do frigorífico.
natural_image
Simple line drawing of a container with a handle and arrow indicating direction (no text or symbols)natural_image
Simple line drawing of a mechanical assembly with a tool inserted (no text or symbols)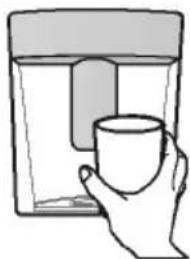
natural_image
Line drawing of a hand holding a cup inside a container (no text or symbols)flowchart
graph LR
    A["Stage 1: Left side with horizontal lines and arrows"] --> B["Stage 2: Middle line with vertical connectors and arrows"]
    B --> C["Stage 3: Right side with horizontal lines and arrows"]
text_image
F H G 90° I F| A | 550 |
| B | 585 |
| C | 1800 |
| D | min=50 |
| E | min=50 |
| F | min=50 |
| G | 1100 |
| H | 1135 |
| I | 135° |
Nivelar a unidade
text_image
Diagram showing two labeled vertical panels with checkmark and cross symbols, likely indicating approval or rejection status.natural_image
Simple diagram of a paperclip with a central circle and surrounding snowflake symbols (no text or labels)natural_image
Line drawing of a hand holding a shelf with a tool, no text or symbols present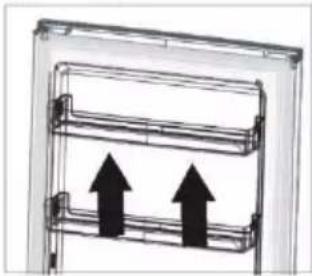
natural_image
Diagram of a double door with two upward arrows indicating flow or movement (no text or symbols)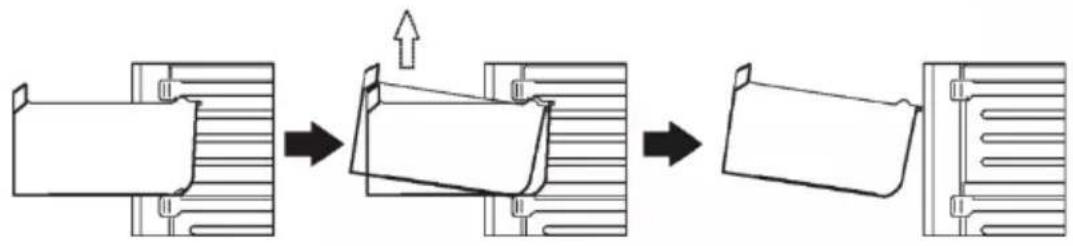
flowchart
graph LR
    A["Initial Component"] --> B["Step 1: ↑ Up"]
    B --> C["Step 2: Down"]
    C --> D["Step 3: Down"]
    D --> E["Final Product"]
Dicas úteis
Dicas para congelar
natural_image
Technical line drawing of a screwdriver inserted into a clamp bracket (no text or symbols)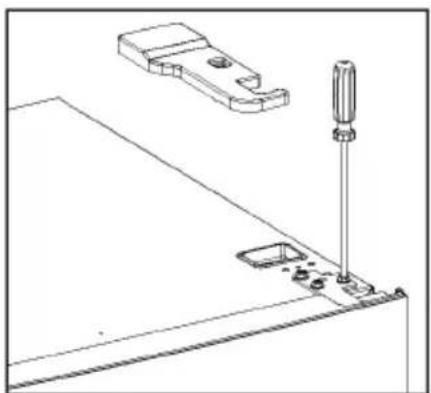
natural_image
Technical line drawing of a mechanical assembly with a screwdriver inserted and a bracket (no text or symbols)natural_image
Technical line drawing of a mechanical assembly with a vertical rod and base plate (no text or symbols)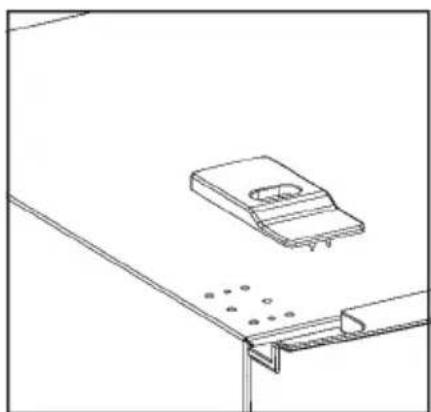
natural_image
Technical line drawing of a mechanical bracket assembly with mounting holes and a slot (no text or symbols)natural_image
Technical line drawing of a mechanical clamp or bracket assembly (no text or symbols)natural_image
Technical line drawing of a mechanical assembly with an inset close-up showing a bracket detail (no text or symbols)natural_image
Technical illustration of a mechanical clamp or bracket being adjusted, showing disassembly from a component to a handle (no text or symbols present)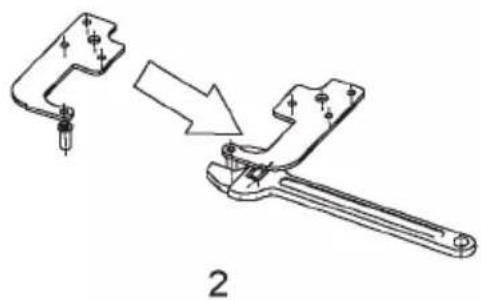
natural_image
Technical line drawing of a mechanical clamp or bracket assembly, showing a disassembly process (no text or symbols present)natural_image
Technical line drawing of a mechanical assembly with cross-sectional and top views (no text or symbols)Instalare
natural_image
Abstract diagram of a document with arrows indicating rotation or movement (no text or symbols)natural_image
Technical line drawing of a mechanical clamp or bracket assembly (no text or symbols)natural_image
Technical line drawing of a screwdriver inserted into a bracket with mounting base (no text or symbols)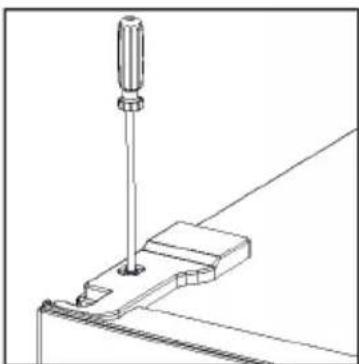
natural_image
Technical line drawing of a screwdriver inserted into a bracket (no text or symbols)natural_image
Technical line drawing of a screwdriver inserted into a bracket (no text or symbols)natural_image
Technical line drawing showing a door frame assembly and its internal components (no text or symbols)natural_image
Technical line drawing of a mechanical assembly with two views: one showing internal components and the other showing a housing (no text or symbols)natural_image
Four-step diagram showing mechanical assembly steps: wire connection, clamping, mounting, and final assembly (no text or symbols)natural_image
Simple line drawing of a container with a handle and arrow indicating direction (no text or symbols)natural_image
Simple line drawing of a mechanical assembly with a tool inserted (no text or symbols)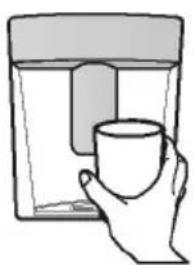
natural_image
Line drawing of a hand holding a cup, no text or symbols presentflowchart
graph LR
    A["Stage 1: Left side with horizontal lines and arrows"] --> B["Stage 2: Middle line with vertical connectors and arrows"]
    B --> C["Stage 3: Right side with vertical connectors and arrows"]
text_image
Diagram showing two vertical panels with checkmark and cross symbols, likely indicating approval or rejection status.natural_image
Simple diagram of a paperclip with a central circle and surrounding snowflake symbols (no text or labels)natural_image
Line drawing of a hand holding a shelf with a tool, no text or symbols present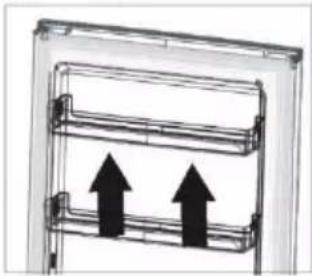
natural_image
Diagram of a double door with two upward arrows indicating flow or movement (no text or symbols)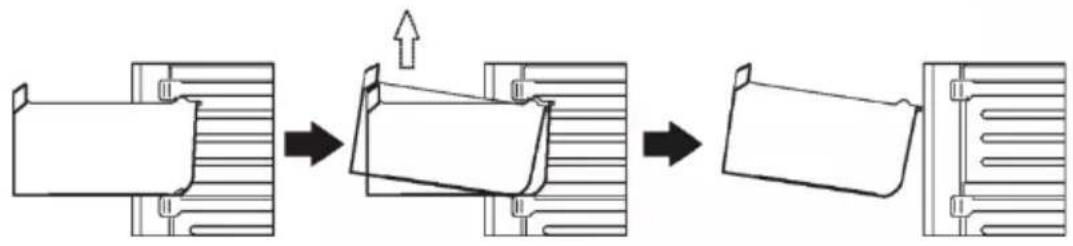
flowchart
graph LR
    A["Initial Component"] --> B["Assembly Step"]
    B --> C["Final Assembly"]
Sfaturi de ajutor
natural_image
Technical line drawing of a screwdriver inserted into a mechanical clamp or bracket (no text or symbols)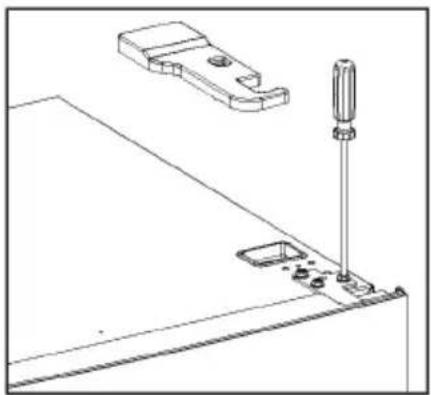
natural_image
Technical line drawing of a mechanical assembly with a screwdriver inserted and a bracket (no text or symbols)- Odstranite zgornji pokrovček vijaka.
natural_image
Technical line drawing of a mechanical assembly with a vertical rod and base plate (no text or symbols)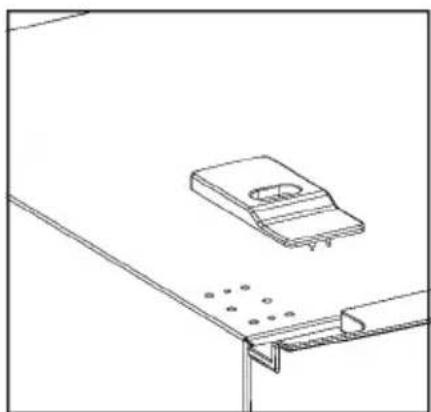
natural_image
Technical line drawing of a mechanical bracket assembly with mounting holes and a slot (no text or symbols)natural_image
Technical line drawing of a mechanical clamp or bracket assembly (no text or symbols)natural_image
Technical line drawing of a mechanical assembly with an inset close-up showing a bracket detail (no text or symbols)natural_image
Technical illustration of a mechanical clamp or bracket being adjusted, showing disassembly from a component to a handle (no text or symbols present)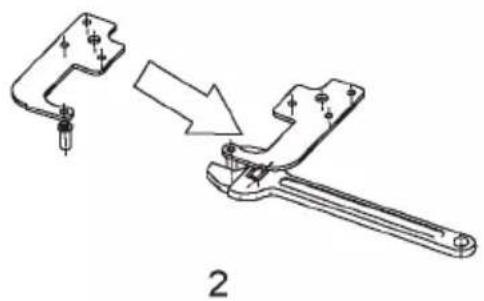
natural_image
Technical line drawing of a mechanical clamp or clamp tool being adjusted, showing disassembly and assembly (no text or symbols)natural_image
Technical line drawing of a mechanical assembly with cross-sectional and top views (no text or symbols)- Odstranite tesnila z vrat hladilnika in zamrzovalnika in jih ponovno namestite, ko vrata obrnete.
natural_image
Abstract diagram of a document with arrows indicating rotation or movement (no text or symbols)- Namestite spodnja vrata, nastavite in pritrdite srednji tečaj na omaro.
natural_image
Technical line drawing of a mechanical clamp or bracket assembly (no text or symbols)natural_image
Technical line drawing of a screwdriver inserted into a bracket with mounting base (no text or symbols)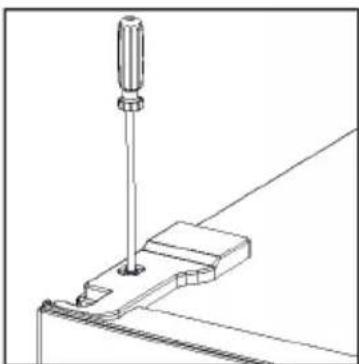
natural_image
Technical line drawing of a screwdriver inserted into a bracket (no text or symbols)- Zategnite pokrovček vijaka.
natural_image
Technical line drawing of a screwdriver inserted into a bracket (no text or symbols)natural_image
Technical line drawing showing a door frame assembly with an arrow indicating direction (no text or symbols)- Odstranite rezervoar za vodo. Odstranite zgornji pokrov ter operite in do suhega obrišite tako rezervoar kot pokrov.
natural_image
Technical line drawing of a mechanical device with two views: top view showing internal components and bottom view (no text or symbols)natural_image
Four-step diagram showing mechanical assembly steps: housing, panel, box, and final assembly (no text or symbols)natural_image
Simple line drawing of a container with a handle and arrow indicating direction (no text or symbols)Polnjenje rezervoarja za vodo
- Odprite majhen pokrov nad polico rezervoarja.
- Rezervoar za vodo napolnite s pitno vodo do črtice 2,5 l.
- Zaprite pokrovček. Prepričajte se, da je dobro zaprt.
Doziranje vode
Nežno potisnite ročico dozirnika s kozarcem ali posodo. Če želite ustaviti tok vode, kozarec povlecite stran od ročice.
natural_image
Simple line drawing of a mechanical assembly with a tool inserted (no text or symbols)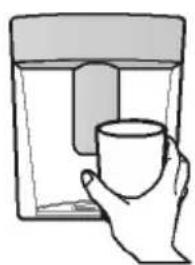
natural_image
Line drawing of a hand holding a cup, no text or symbols presenttext_image
H F F 90° I G| A | 550 |
| B | 585 |
| C | 1800 |
| D | min=50 |
| E | min=50 |
| F | min=50 |
| G | 1100 |
| H | 1135 |
| I | 135° |
Postavitev naprave v vodoravni položaj
To storite z regulacijskima nogicama na sprednji strani enote.
text_image
Diagram showing two labeled containers with checkmark and cross symbols, likely indicating approval or rejection status.natural_image
Simple diagram of a paperclip with a central circle and surrounding snowflake symbols (no text or labels)natural_image
Line drawing of a hand holding a shelf with a tool, no text or symbols present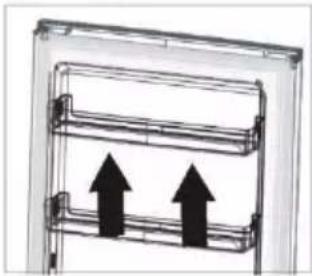
natural_image
Diagram of a vertical shelf with two upward arrows indicating movement or flow (no text or symbols present)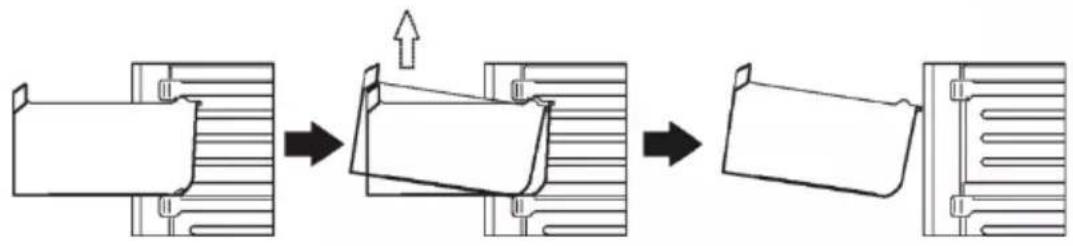
flowchart
graph LR
    A["Initial Component"] --> B["Step 1: ↑ Up"]
    B --> C["Step 2: Down"]
    C --> D["Step 3: Down"]
    D --> E["Final Product"]
Koristni nasveti
No-Frost Refrigerator Freezer
natural_image
Technical line drawing of a screwdriver inserted into a mechanical clamp or bracket (no text or symbols)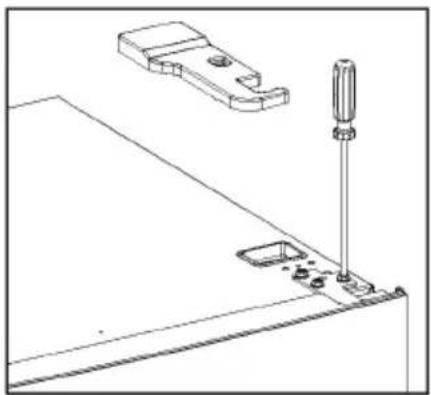
natural_image
Technical line drawing of a mechanical assembly with a screwdriver inserted and a bracket (no text or symbols)natural_image
Technical line drawing of a mechanical assembly with a vertical rod and base plate (no text or symbols)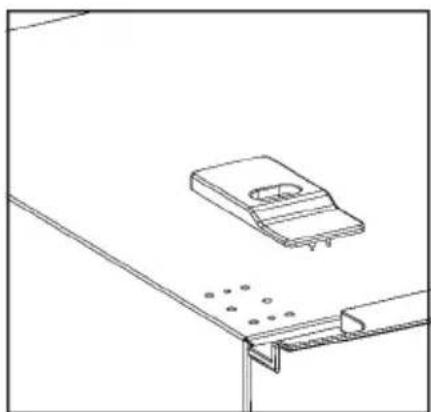
natural_image
Technical line drawing of a mechanical bracket assembly with mounting holes and a slot (no text or symbols)natural_image
Technical line drawing of a mechanical clamp or bracket assembly (no text or symbols)natural_image
Technical line drawing of a mechanical assembly with an inset close-up showing a bracket detail (no text or symbols)natural_image
Mechanical assembly diagram showing a disassembled component being rotated into a wrench (no text or symbols present)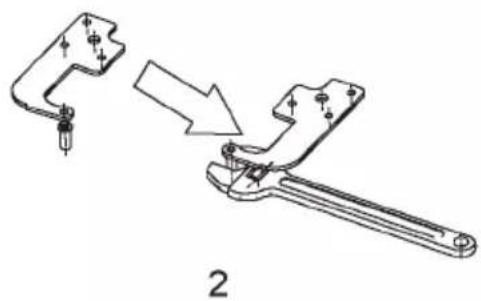
natural_image
Technical line drawing of a mechanical clamp or bracket assembly, showing a disassembly process (no text or symbols present)natural_image
Technical line drawing of a mechanical assembly with cross-sectional and top views (no text or symbols)natural_image
Technical line drawing of a mechanical clamp or bracket assembly (no text or symbols)natural_image
Technical line drawing of a screwdriver inserted into a bracket with mounting base (no text or symbols)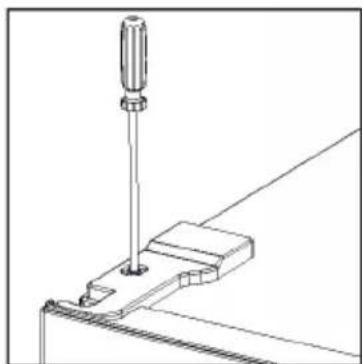
natural_image
Technical line drawing of a screwdriver inserted into a bracket (no text or symbols)- Fäst skruvskyddet.
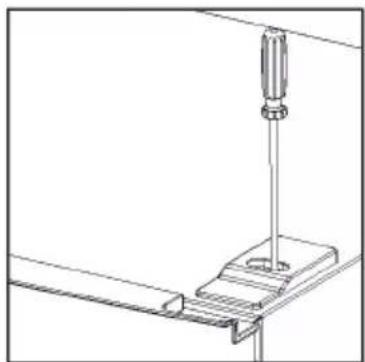
natural_image
Technical line drawing of a screwdriver inserted into a bracket (no text or symbols)Vattendispenser (om sådan finns)
natural_image
Technical line drawing showing two views of a mechanical component with an arrow indicating direction (no text or symbols present)natural_image
Technical line drawing of a mechanical assembly with two views: one showing internal components and the other showing a housing (no text or symbols present)natural_image
Diagram showing four sequential steps of a mechanical assembly or mounting process, with arrows indicating direction (no text or symbols present)natural_image
Simple line drawing of a container with a handle and arrow indicating direction (no text or symbols)natural_image
Simple line drawing of a mechanical assembly with a tool inserted (no text or symbols)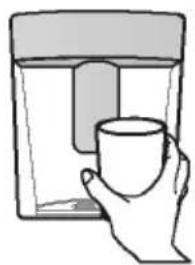
natural_image
Hand holding a mug inside a container (no text or symbols visible)text_image
Diagram showing two containers with checkmark and cross symbols, labeled k, o, r, tnatural_image
Simple diagram of a paperclip with a central circle and surrounding stars (no text or symbols)natural_image
Line drawing of a hand holding a shelf with a tool, no text or symbols present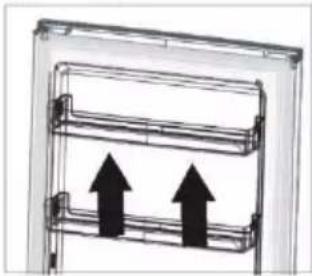
natural_image
Diagram of a double door with two upward arrows indicating flow or movement (no text or symbols)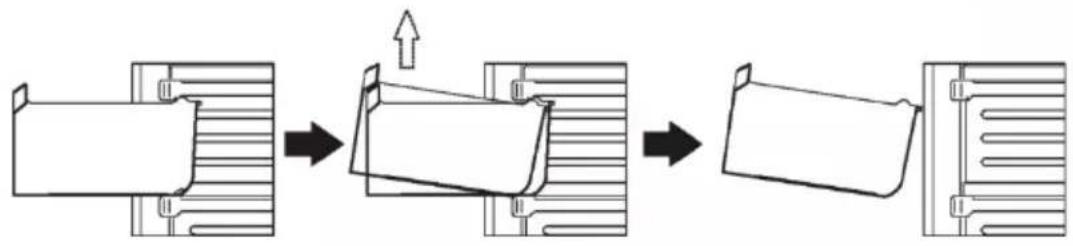
flowchart
graph LR
    A["Initial Component"] --> B["Step 1: ↑ Up"]
    B --> C["Step 2: Down"]
    C --> D["Step 3: Down"]
    D --> E["Final Product"]
Hjälpfulla tips
Tips för frysning
No-Frost chladnička s mrazničkou
natural_image
Technical line drawing of a screwdriver inserted into a mechanical clamp (no text or symbols)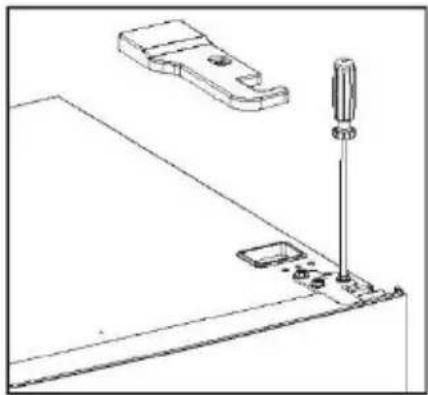
natural_image
Technical line drawing of a mechanical assembly with a screwdriver inserted, no text or symbols presentnatural_image
Technical line drawing of a mechanical assembly with a screw and bracket (no text or symbols)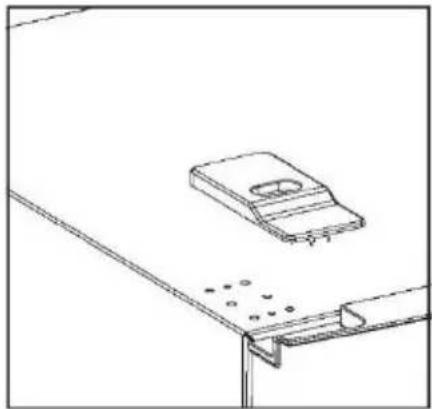
natural_image
Technical line drawing of a mechanical component with mounting bracket and mounting holes (no text or symbols)natural_image
Technical line drawing of a mechanical clamp or bracket assembly (no text or symbols)natural_image
Technical line drawing of a mechanical assembly with an inset close-up showing a bracket detail (no text or symbols)natural_image
Mechanical assembly diagram showing a disassembly of a mechanical component into a larger part, with no visible text or symbols.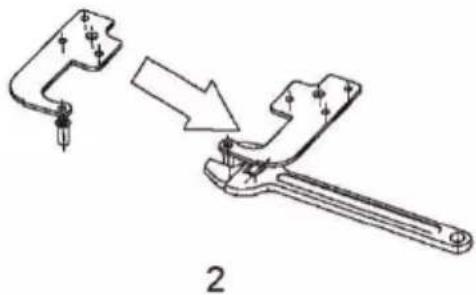
natural_image
Technical line drawing of a mechanical clamp or wrench tool, showing a disassembly process (no text or symbols present)- Nainštalujte spodný záves pod chladničku, naskrutkujte nastavovacie nožičky a zaistite horizontálnu polohu.
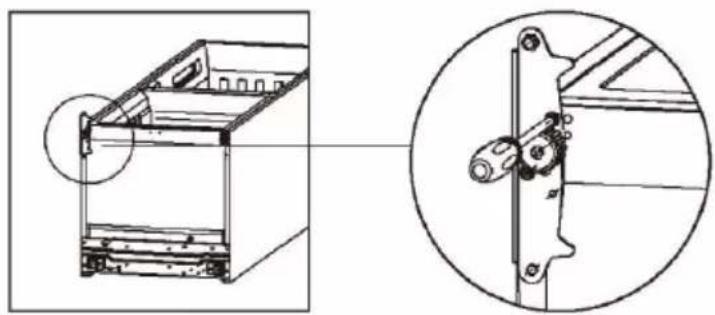
natural_image
Technical line drawing of a mechanical assembly with cross-sectional and top views (no text or symbols)natural_image
Abstract diagram of a document with arrows indicating rotation or movement (no text or symbols)natural_image
Technical line drawing of a mechanical clamp or bracket (no text or symbols)natural_image
Technical line drawing of a screwdriver inserted into a bracket with mounting base (no text or symbols)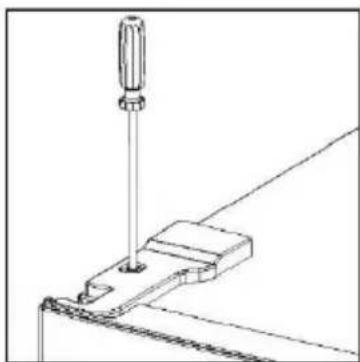
natural_image
Technical line drawing of a screwdriver inserted into a bracket (no text or symbols)- Pripevnite kryt skrutky.
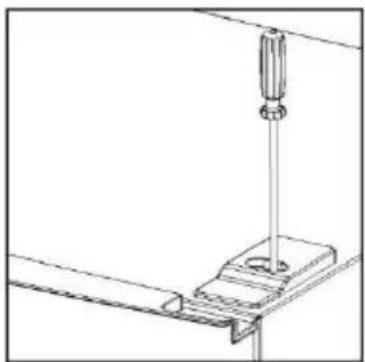
natural_image
Technical line drawing of a screwdriver inserted into a bracket (no text or symbols)Dávkovač vody (ak sa dávkovač vody predáva spolu so spotrebičom)
natural_image
Technical line drawing showing a mechanical assembly with an arrow indicating direction (no text or symbols present)natural_image
Technical line drawing of a mechanical device with two views: top view shows internal components, bottom view shows external housing (no text or symbols)natural_image
Four-step diagram showing mechanical assembly or assembly process with arrows indicating direction (no text or symbols)- Vyčistite páčku dávkovača umiestnenú z vonkajšej strany dvierok chladničky.
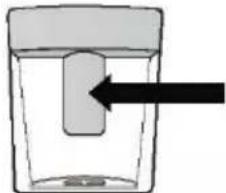
natural_image
Simple line drawing of a container with a handle and arrow pointing to the bottom (no text or symbols)natural_image
Simple line drawing of a mechanical assembly with no text or symbols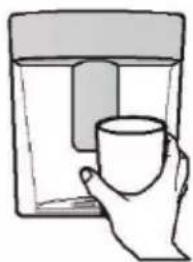
natural_image
Simple line drawing of a hand holding a cup inside a container (no text or symbols)text_image
Two vertical signs with checkmarks and an 'X' symbol, likely indicating approval or rejection status.1. Nastavenie teploty chladničky
Panel nastavenia teploty chladničky
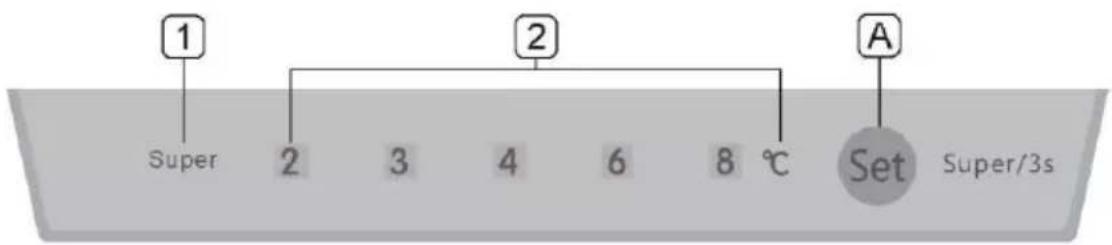
text_image
1 Super 2 3 4 6 8 °C 2 A Set Super/3s1.1 Tlačidlo obsluhy

Tlačidlo Set
natural_image
Simple diagram of a paperclip with a central circle and surrounding stars (no text or symbols)natural_image
Hand holding a shelf with a ruler, no text or symbols visible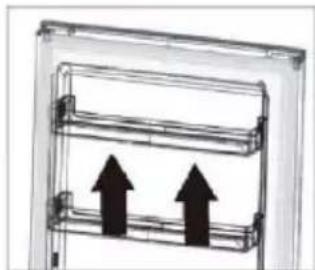
natural_image
Diagram of a mechanical or electrical component with two upward-pointing arrows, no text or symbols present.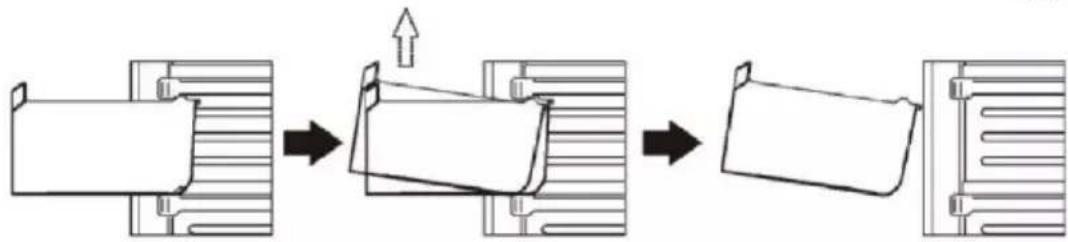
flowchart
graph LR
    A["Component"] --> B["Step 1"]
    B --> C["Step 2"]
    C --> D["Step 3"]
    D --> E["Final Assembly"]