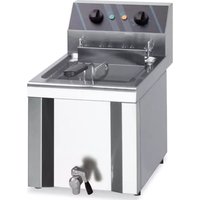
EF12B - Refrigerator MBM - Free user manual and instructions
Find the device manual for free EF12B MBM in PDF.


| Product type | Professional fryer |
| Brand | MBM |
| Model | EF12B |
| Dimensions (W x D x H) | 375 x 655 x 315 mm (overall max. 450 mm) |
| Tank capacity | 12 liters |
| Basket dimensions | 235 x 275 x 105 mm |
| Total power consumption | 9 kW |
| Net weight | 18 kg |
| Electrical supply | 230V 1N~50/60Hz or 400V 3N~50/60Hz |
| Temperature range | 55 °C to 180 °C |
| Controls | On/off switch, adjustable thermostat |
| Indicator lights | Power and heating |
| Material | Stainless steel |
| Protection | Safety thermostat, grounding |
| Cleaning | Daily cleaning of the tank and coils with hot water and mild detergent |
| Oil drainage | Drain valve with lever |
| Included accessories | Basket, lid, drain valve |
| Electrical connection | Requires a cable of appropriate section (see manual) |
| Intended use | Cooking by immersion in oil or liquid fat |
Frequently Asked Questions - EF12B MBM
User questions about EF12B MBM
0 question about this device. Answer the ones you know or ask your own.
Ask a new question about this device
Download the instructions for your Refrigerator in PDF format for free! Find your manual EF12B - MBM and take your electronic device back in hand. On this page are published all the documents necessary for the use of your device. EF12B by MBM.
USER MANUAL EF12B MBM
natural_image
Simple line drawing of a spray bottle dispensing liquid into a container (no text or symbols)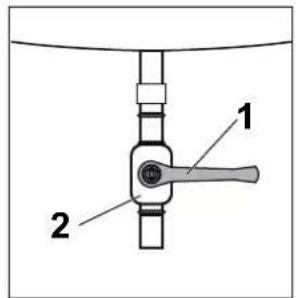
Congratulations on the purchase of this high-quality
You have chosen an appliance that fulfils high technical requirements at the same time as it provides a comfortable usage. We hope the appliance will please you.
1 Explanation about the symbols and schedules
1.1 Warning notices
Gradation of the warning notices
The warning notices differ from one another concerning the type of danger through the following signs:
→ Caution warns against damage to property.
→ Warning warns against bodily harm.
→ Danger warns against danger to life.
Composition of the warning notices

Signal words
Type and source of the danger!
Measure to avoid the danger.
1.2 Other symbols
Operating instructions
Composition of the operation instructions:
→ Guidance to an operation.
Indication of an outcome, if necessary.
Schedules
Composition of the non numbered schedules:
→ Schedule level 1
→ Schedule level 2
Composition of the numbered schedules:
- Schedule level 1
- Schedule level 1
2.1 Schedule level 2
2.2 Schedule level 2
Deep fryer
2 Safety instructions
→ Mind the use directions.
Always keep the use directions with the appliance.
Install the appliance exactly as indicated.
Install the appliance in closed spaces.
- Protect the appliance from the sun.
Protect the appliance from frost.
Make sure that the line cord is not damaged.
- Protect the appliance from humidity.
Do not clean the appliance using direct water jets.
- Ask exclusively qualified personnel to carry out repair works.
Keep children away from the appliance when it is active.
Make sure that only people who have been instructed use the appliance.
- Disconnect the appliance from the mains by pulling the plug, never the cord.
- Use the appliance exclusively in the original conditions.
The appliance should be used only for the purpose for which it was designed.
- Use exclusively original spare parts.
Make sure that there is enough fresh air supply when the appliance is operating.
3 Package contents
Package contents:
→ The appliance
→ Lid
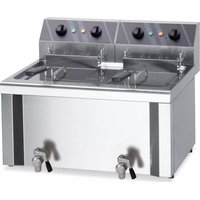
→ Tap
→ Wire basket
4 Correct ways of employment
Use the appliance exclusively to deep-fry food in oil or liquid fat.
5 Function
The appliances heats oil. The food is fried in hot oil. The temperature of the oil can be adjusted.
Deep fryer
6 Handling/Operation
6.1 Set-up/Assembly
- Assemble the appliance exclusively under an extraction hood.
Remove protection film from the appliance.
6.2 First use
First cleaning
- Clean the appliance before the first use (see Cleaning).
Connect the appliance

Life danger due to mains voltage!
Make sure that voltage and frequency of mains correspond to values specified on rating plate.
Make sure that line cord is not damaged.
Make sure that line cord does not get hotter than 50 °C.
- Ask qualified personnel to install the appliance.
Connect an all-pole circuit breaker with a contact clearance of > 3 mm ahead of the appliance.
Make sure that the appliance is earthed.
Necessary information for qualified personnel:
| MODEL | EF6BMEF8BM | EF6+6BM | EF8B | EF8+8B | EF12BEF12SEF25SEF20BPEF60BP | EF12+12BEF12+12SEF25+25S | ||||||
| TYPE OF TENSION | MaxA/f | N. Cables mm^2 | MaxA/f | N. Cables mm^2 | MaxA/f | N. Cables mm^2 | MaxA/f | N. Cables mm^2 | MaxA/f | N. Cables mm^2 | MaxA/f | N. Cables mm^2 |
| 1 N AC 230 V 50/60 Hz | - | 3 x 2,5 | 3+3 | 3 x 2,5 | 6 | 3 x 4 | 6+6 | 3 x 4 | 12 | 3 x 4 | 12+12 | 3 x 4 |
| 3 AC 230 V 50/60 Hz | - | - | - | - | 6 | 4 x 2,5 | 6+6 | 4 x 2,5 | 12 | 4 x 4 | 12+12 | 4 x 4 |
| 3 N AC 400 V 50/60 Hz | - | - | - | - | 6 | 5 x 2,5 | 6+6 | 5 x 2,5 | 12 | 5 x 2,5 | 12+12 | 5 x 2,5 |
Deep fryer
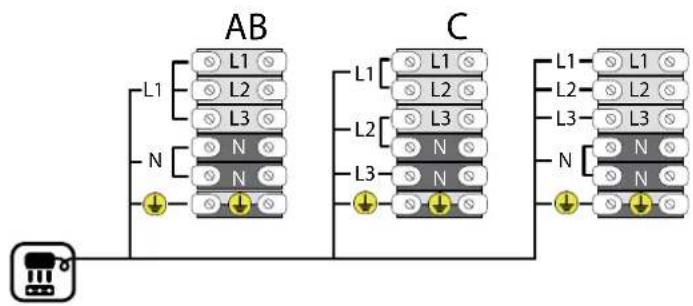
- Connect the appliance as follows; connect the appliance as follows:
flowchart
graph TD
    A["Power Source"] --> B["AB"]
    B --> C["L1"]
    B --> D["L2"]
    B --> E["L3"]
    B --> F["N"]
    B --> G["N"]
    B --> H["N"]
    B --> I["↓"]
    J["C"] --> K["L1"]
    J --> L["L2"]
    J --> M["L3"]
    J --> N["N"]
    J --> O["N"]
    J --> P["N"]
    J --> Q["↓"]
    R["L1"] --> S["L1"]
    R --> T["L2"]
    R --> U["L3"]
    R --> V["N"]
    R --> W["N"]
    R --> X["N"]
A: PHASES: 220/240 V \~ 1N 50-60 Hz
B: PHASES: 220/240 V \~ 3 50-60 Hz /
C: PHASES: 380/415 V \~ 3N 50-60 Hz
6.3 How to use
Control elements and indicators
→ The operating elements control the functions.
| Switch/Button | Function |
| 1/0 | To switch the appliance on and off |
| Thermostat switch | Adjusting of temperature |
→ Pilot lights show operating state.
When pilot light next to switch 1/0 is on:
→ The appliance is on.
When pilot light next to thermostat switch is on:
→ The appliance heats oil until it reaches the set temperature.
To fill up
Fill container up to the mark with
→ oil
→ molten fat
Deep fryer
Switching on
→ Check filling level.
Refill if necessary.
Rotate switch 1/0 (1).
Pilot light next to switch 1/0 is on.
- Set thermostat switch to desired temperature.
The appliance is on.
Pilot light next to thermostat switch is on.
The appliance heats up the oil.
Note The time required to heat up depends on the type of oil and the ambient conditions.
When the appliance reaches set temperature:
→ Pilot light next to thermostat switch switches off.
Deep-frying
→ Put dry food into wire basket.
→ Put in wire basket with food.
If food is frozen:
Fill wire basket half-full.
Put in wire basket slowly.
Switching off
Set thermostat switch to 0.
Rotate switch 1/0 (0).
Both pilot lights switch off.
The appliance is off.
Remove residue from oil.
Separate the appliance from the mains.
Note The minimum temperature is approximately 55^ C and the maximum temperature it can reach is approximately 180^ C.
Deep fryer
Discharge
Risk of injury due to incorrect discharge!
- Have the appliance emptied exclusively by qualified personnel or empty it under supervision of qualified personnel.
Let the appliance and the oil cool down completely before emptying it. - Wear appropriate protective clothing according to CE requirements when emptying the appliance.
natural_image
Diagram of a mechanical device pouring liquid into a container (no text or symbols)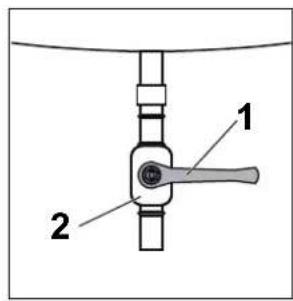
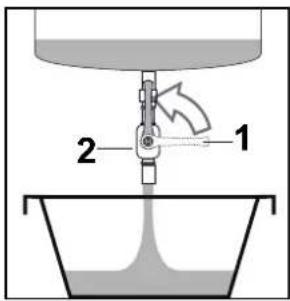
Switch off the appliance.
Let the appliance cool down.
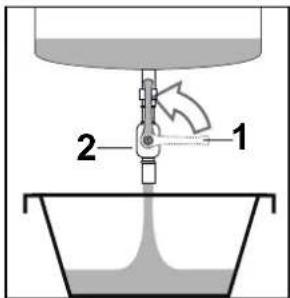
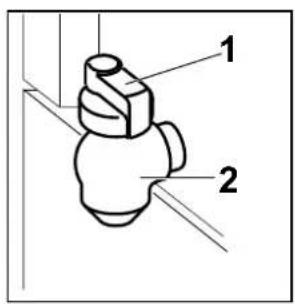
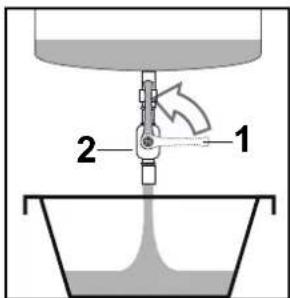
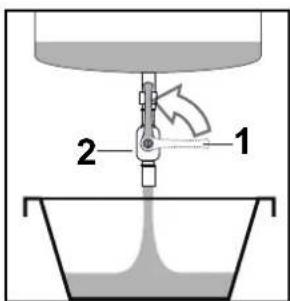
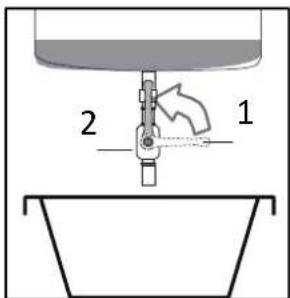
- Make sure that there is enough room for a container of sufficient size under the tap 2.
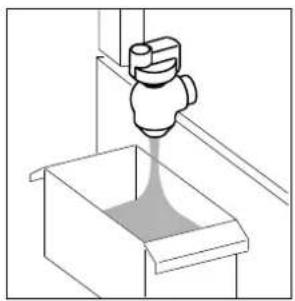
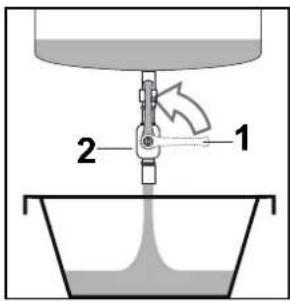
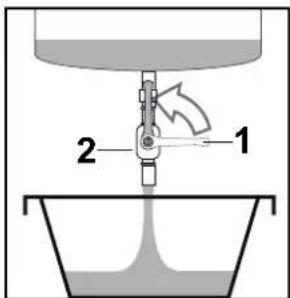
Put a container of sufficient size to hold all the oil under the tap 2.
→ Push down lever 1 on tap.
Rotate lever 1 on tap by 90° in counterclockwise direction.
Let all the oil run into container.
Note Oil disposal: see Disposal.
When the appliance is empty:
Rotate lever 1 on tap by 90^ in clockwise direction.
6.4 Faults/Fault repair
| Fault Remedy | |
| The appliance is not working. Check w | whether power supply is correct. |
| Check whether control box is sitting on contact pins of housing. | |
| Check whether safety thermostat has been triggered. | |
| Safety thermostat has been triggered. | Call a specialist and report the fault. |
Deep fryer
6.5 Placing out of operation
When the appliance is not being used:
Set thermostat switch to 0.
Rotate switch 1/0 (0).
Both pilot lights switch off.
Separate the appliance from the mains.
→ Clean the appliance (see Cleaning).
7 Maintenance/Cleaning
Danger of life due to electrocution!
Prior to every maintenance work or cleaning, switch off power switch connected ahead.
7.1 Maintenance
Ask exclusively qualified personnel to do the maintenance of the appliance.
7.2 Cleaning
- Clean the appliance daily.
Switch off the appliance before cleaning.
→ Let the appliance cool down.
Empty container.
→ Filter cold oil.
Do not use corrosive cleaning agents. - Clean container with hot water and cleaning agent.
- Clean heating coils with hot water and cleaning agent.
Dry the appliance with a soft and clean cloth.
Deep fryer
8 Technical data
| MODEL | DIMENSIONS mm. | Tank Capacity Lt. | TANK N° | TOTAL POWER SUPPLY kW | NET WEIGHT kg. | |
| External L x P x A/A max. | Basket | |||||
| mm. | ||||||
| EF6BM | 290 x 505 x 300 / 440 | 190 x 200 x 105 | 5/6 | 1 | 3 | 11 |
| EF6+6BM | 580 x 505 x 300 / 440 | 190 x 200 x 105 | 5/6+5/6 | 2 | 3+3 | 19 |
| EF8BM | 290 x 505 x 300 / 440 | 190 x 245 x 105 | 8/9 | 1 | 3 | 12 |
| EF8B | 290 x 505 x 300 / 440 | 190 x 245 x 105 | 8/9 | 1 | 6 | 13 |
| EF8+8B | 580 x 505 x 300 / 440 | 190 x 245 x 105 | 8/9+8/9+10 | 2 | 6+6 | 20 |
| EF12B | 375 x 655 x 315 / 450 | 235 x 275 x 105 | 12+10 | 1 | 9 | 18 |
| EF12+12B | 750 x 655 x 315 / 450 | 235 x 275 x 105 | 12+10/12 | 2 | 9+9 | 32 |
| EF12S | 375 x 655 x 845 / 985 | 235 x 275 x 105 | 12/14 | 1 | 9 | 29 |
| EF12+12S | 750 x 655 x 845 / 985 | 235 x 275 x 105 | 12/14+12/14 | 2 | 9+9 | 55 |
| EF25S | 375 x 755 x 845 / 985 | 235 x 385 x 105 | 18/20 | 1 | 12 | 32 |
| EF25+25S | 750 x 755 x 845 / 985 | 235 x 385 x 105 | 18/20+18/20 | 2 | 12+12 | 60 |
| EF20BP | 750 x 675 x 315 / 440 | 560 x 275 x 105 | 18/20 | 1 | 9 | 24 |
| EF60BP | 750 x 675 x 315 / 440 | 600 x 400 x 105 | 34/37 | 1 | 9 | 29 |
Deep fryer
9 Standards and rules
The appliance complies with the following standards:
→ EN 60335-1
→ EN 60335-2-36
→ EN 60335-2-37
→ EN 60335-2-38
→ EN 60335-2-39
→ EN 60335-2-42/46
→ EN 60335-2-47
→ EN 60335-2-50
→ EN 55014
10 Disposal
Oil disposal
Observe local laws and regulations on oil disposal.
When you dispose of the oil, do not put it into the household waste.
Disposal of the appliance:
To dispose of the appliance:
When you dispose of your appliance do not put it into the household waste.
- Send the appliance to the recycling of electrical appliances.
The materials of the appliance are reusable. By reusing, material recycling or other forms of use of old appliances you give an important contribution to the protection of our environment.
To ask for the appropriate disposal point: www.servicevega.com
User information
Pursuant to the 2011/65/EU (ROHS II) and 2012/19/EU (WEEE) Directives concerning the reduction in the utilisation of dangerous substances in electric and electronic equipment, as well as waste disposal.
The symbol of the crossed rubbish skip on the equipment or on the package indicates that the product must be separated from other waste at the end of its useful life. The differentiated collection of this equipment is organised and managed by the producer. The user who intends to get rid of this equipment shall contact the producer and follow the system that the latter has used in order to collect the equipment separately at the end of its life. The proper differentiated collection in order to start the following recycling, treatment and disposal of the disused equipment incompliance with the environment helps to avoid possible negative effects on the environment and on health, and favours the reutilisation and/or recycling of the materials forming the equipment.
The unauthorised disposal of the product by the holder implies applying administrative penalties provided by the regulations in force.
Deep fryer
11 Guarantee
The appliance is guaranteed for ten years from the date of purchase in the following terms:
The guarantee covers assembly, manufacture, and material faults of any kind as well as the repair and / or replacement of parts that our technicians recognise to be faulty. The spare parts and the hours of work needed for the repair are not charged.
→ The certificate of guarantee is of your responsibility, please preserve it and in case you need to use the guarantee send it together!
→ The guarantee expires when the appliance is:
→ used inappropriately.
→ manipulated.
→ not suitably maintained.
→ not used according to the instructions.
→ technically modified.
Friteuse Chef
6.1 Installation/Montage
C: PHASES: 380/415 V \~ 3N 50-60 Hz
6.3 Manipulation
natural_image
Diagram of a hand pouring liquid into a container (no text or symbols)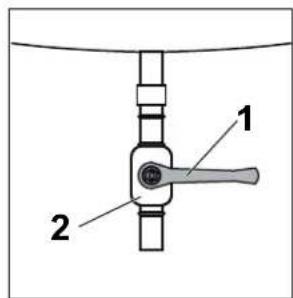
C: PHASES: 380/415 V \~ 3N 50-60 Hz
6.3 Manejo
natural_image
Simple line drawing of a spray nozzle dispensing liquid into a container (no text or symbols)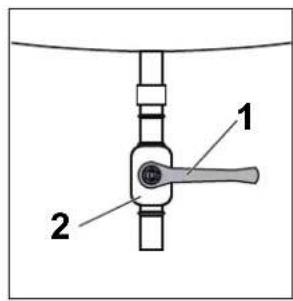
C: PHASES: 380/415 V \~ 3N 50-60 Hz
6.3 Utilização
natural_image
Diagram of a mechanical device pouring liquid into a container (no text or symbols)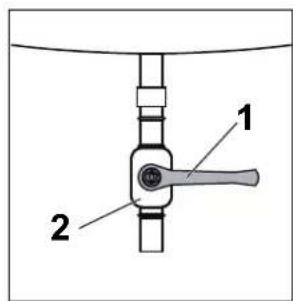
natural_image
Diagram of a hand pouring liquid into a container (no text or symbols)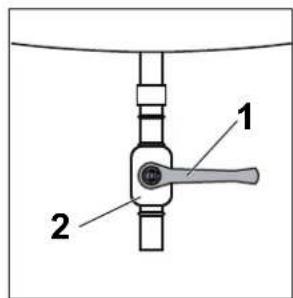
natural_image
Simple line drawing of a pipe valve mounted on a box (no text or symbols)
EC declaration of conformity
The manufacturer / marketing authorisation holder Name / Address
declares that the current model of the machine/system mentioned below
- Explanation about the symbols and schedules
- Warning notices
- Gradation of the warning notices
- Composition of the warning notices
- Other symbols
- Operating instructions
- Schedules
- Deep fryer
- Safety instructions
- Package contents
- Correct ways of employment
- Function
- Handling/Operation
- Set-up/Assembly
- First use
- First cleaning
- Connect the appliance
- Life danger due to mains voltage!
- How to use
- Control elements and indicators
- To fill up
- Switching on
- Deep-frying
- Switching off
- Discharge
- Risk of injury due to incorrect discharge!
- Faults/Fault repair
- Placing out of operation
- Maintenance/Cleaning
- Danger of life due to electrocution!
- Maintenance
- Cleaning
- Standards and rules
- Disposal
- User information
- Guarantee
- Friteuse Chef
- Installation/Montage
- Manipulation
- Manejo
- Utilização
Brand : MBM
Model : EF12B
Category : Refrigerator