KA 190 - Basket DELONGHI - Free user manual and instructions
Find the device manual for free KA 190 DELONGHI in PDF.

User questions about KA 190 DELONGHI
0 question about this device. Answer the ones you know or ask your own.
Ask a new question about this device
Download the instructions for your Basket in PDF format for free! Find your manual KA 190 - DELONGHI and take your electronic device back in hand. On this page are published all the documents necessary for the use of your device. KA 190 by DELONGHI.
USER MANUAL KA 190 DELONGHI
natural_image
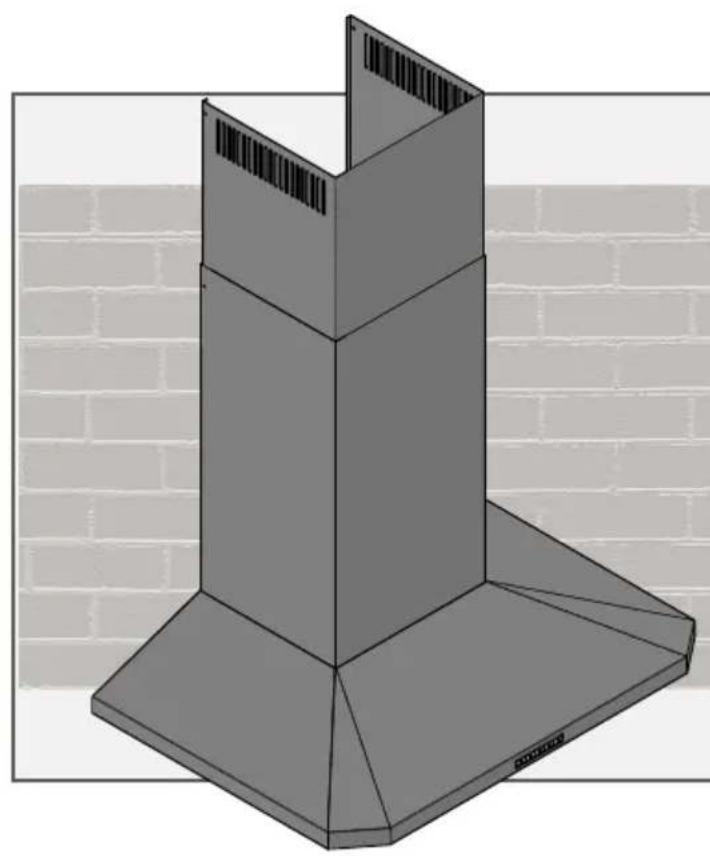
3D architectural rendering of a chimney structure with grating and base platform (no text or symbols)Cooker Hood
EN IT ES FR DE


| English | |||||
| Warnings! |  | Installation In |  | ctions |  |
| italiano | |||||
| Avvertenze! |  | Montaggio I |  | ioni |  |
| Español | |||||
| Advertencias! |  | Instalación |  | Instrucciones |  |
| Français | |||||
| Avertissements! |  | Montage Ins |  | tions |  |
| Deutsch | |||||
| Warnungen! |  | Montage An |  | ng |  |

natural_image
Warning symbol with exclamation mark inside a triangle (no text or numbers)Safety
The appliance is not to be used by persons (including children) with reduced physical, sensory or mental capabilities, or lack of experience and knowledge, unless they have been given supervision or instruction. This equipment can be used by children aged 8 or more, people with physical, mental and sensory disabilities or inexperienced users it if they were instructed under proper supervision or trained on the safe use of the equipment and if they are fully aware of the related risks. Children shall not play with the equipment. The cleaning and maintenance are at user's expense and shall not be performed by unsupervised children.
- As soon as the equipment is delivered, remove the package immediately. Verify its overall aspect and, should any type of anomaly be found, notify it immediately to the sales point or the installer.
- Its equipment is intended for domestic use. It shall not be employed for industrial or professional purposes nor for any other purpose than that for which it has been designed.
- The supplier will not provide any warranty for the consequences and damages caused by an improper installation or a misuse of the equipment.
- Do not attempt to modify the characteristics of this equipment, that would represent a hazard. Repairs shall be exclusively made by a specialized and authorized technician. To avoid risks, the manipulation of the equipment is strictly forbidden so is the replacement of the power cable.
- When the range hood is located above a gas appliance, this distance shall be at least 65 cm. If the instructions for installation for the gas hob specify a greater distance, this has to be taken into account.
-
Once the equipment has been installed, the disconnection of the equipment from the power supply shall be allowed. Disconnection can be done by keeping the jack accessible or adding a switch to the electric system in accordance with the installation rules.
-
If the power cord is damaged, it shall be replaced either by the producer, its customer service or qualified personnel in order to avoid risks.
- It is of vital importance to place particular attention as to where the wall or ceiling will be perforated so as to verify the presence of hidden electrical cables, pipes or iron beams, etc. This may cause serious breakdowns, electrical derivations or the transmission of noises and vibrations.
- IMPORTANT: During the installation phase, before electrically connecting the equipment, always disconnect the power panel that will supply it (differential or thermal-magnetic of the general house switchboard).
- WARNINGS: Always disconnect the exhaust hood from the electrical outlet before proceeding to cleaning and maintenance operations by plugging off the electrical outlet, differential or thermal-magnetic of the general home switchboard. To clean the exhaust hood, never use steam or high-pressure devices (rules regarding electric safety).
- It is forbidden to cook directly on the flame or operate the gas stoves with no container to cook on the same flame (aspirated flames may damage the equipment and the warranty will be cancelled accordingly). The use of the equipment on a fuel stove is not authorized (wood, coal,...).
- Frying under the equipment shall be constantly monitored since oils and fats being subjected to high temperatures may ignite. Do not flame under the exhaust hood.
- CAUTION: accessible parts may become hot when used with cooking appliances.
- Follow the cleaning frequency and filter substitution. The accrual of fat deposits may provoke fires. Never use the exhaust hood without the anti-fat filter.
- The equipment shall abide by the existing rules on the ventilation of closed spaces. Technically, the air expelled shall not pass through the duct used for the discharge of smokes from appliances using gas or any other fuel (central heating systems, etc...).
- Ventilate the environment appropriately in case of a simultaneous operation of the exhaust hood and any other equipment supplied by an
energy source other than electricity so that the exhaust hood will not draw gas compounds.
- Attention! There shall be adequate ventilation of the room when the range hood is used at the same time as appliances burning gas or other fuels (not applicable to appliances that only discharge the air back into the room.
- It is necessary to maintain a depressurized environment of maximum 4 Pa (0.04 mbar). Such conditions allow an excellent working of the exhaust hood. In order to achieve such environment a permanent air intake is necessary in order to avoid air stagnation (it is advised to use a ventilation grid for this purpose). Windows or doors shall not be used.
- The electrical supply of the power network shall be stable and cope with the indicated electrical standards, see rating label. Should it be not stable and receive voltage variations in the supply, intensity or frequency such as armonici, transistor, voltage dips, overloads, electrical storms, etc..., the hood may show malfunctions or even breakdowns, and the repair would not be covered by the warranty. In that case, the exhaust hood shall be disconnected and the company must contact an electrician or electrical company in order to solve the supply problem.
- The hood is a household appliance act to extract smoke, it can not be used as support element of objects or utensils.
- In the constant effort to improve our products, we reserve the right to make changes following their enhancement to their technical, functional and aesthetic characteristics.
Declaraon of Conformity CE
This appliance is in compliance with the following European Directives:
Directive EMC 2014/30/EU
Directive LVD 2014/35/EU
Directive ROHS 2011/65/EU
Delegated Regulation ( UE ) nr. 65/2014
Electrical Connecon
- Before connecting the appliance to the electricity supply, check that the voltage corresponds to that on the data plate and that the power supply cable is suitable for the appliance load also stated on the data place.
- If the appliance is connected directly to the mains, fit an all-pole disconnect switch with minimum contact gap of 3 mm, adequate for the appliance load and complying to regulations.
- The plug used must support the power of work of the appliance.
- Do not use reducers, adapters or switches for connection to the mains, since these could overheat and cause burns
- Earth connection is required by law
If the power cable must be replaced, use a cable having identical characteristics to the original supplied by the manufacturer, suitable for the load and temperature. This is available from After-sales service.
Important!
The entire installation process is exclusively reserved for qualified workers, installers or authorized technical service.
Before proceeding with the installation, make sure that all components are in perfect conditions. Otherwise, contact the vendor and do not proceed with the installation.
Once installed, the likely imperfections of the equipment such as scratches, impacts, etc..., will not be covered by under warranty.
Maintenance
• Use only a damp doth with neutral liquid detergent.
- Do not use wet sponges or cloths, water jets, thinners, solvents, hydrochloric acid, bleach, alcohol or abrasive substances.
- Unplug the appliance or switch off the circuit breaker before carrying out maintenance operations.
Scrapping
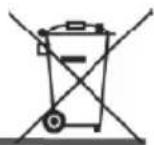
The symbol on the product or on the accompanying paperwork indicates that the appliance should not be treated as domestic waste, but should be delivered to a suitable electric and electronic appliance recycling collection point.
Follow local guidelines when disposing of waste. For more information on the treatment, re-use and recycling of this product, please contact your local authority, domestic waste collection service or the shop where the appliance was purchased.
PLEASE NOTE
DO NOT REMOVE THE PROTECTIVE PLASTIC SHEET FROM THE HOOD UNTIL THE INSTALLATION IS NOT COMPLETELY FINALIZED
Sicurezza
Directive ROHS 2011/65/EU
natural_image
Gray icon of a crossed wrench and screwdriver (no text or symbols)Procedure for xing
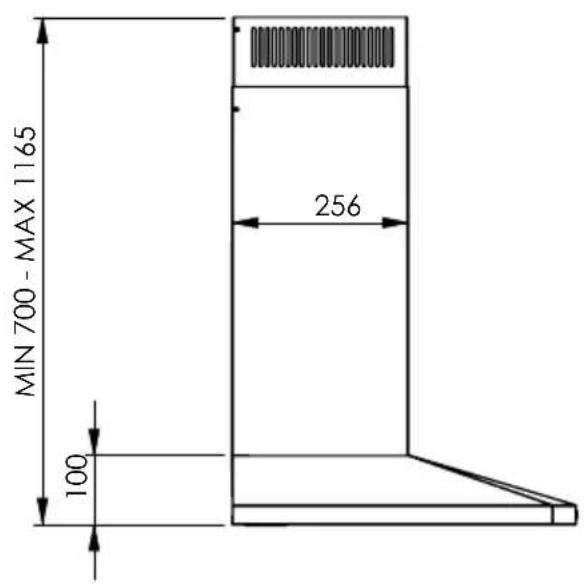
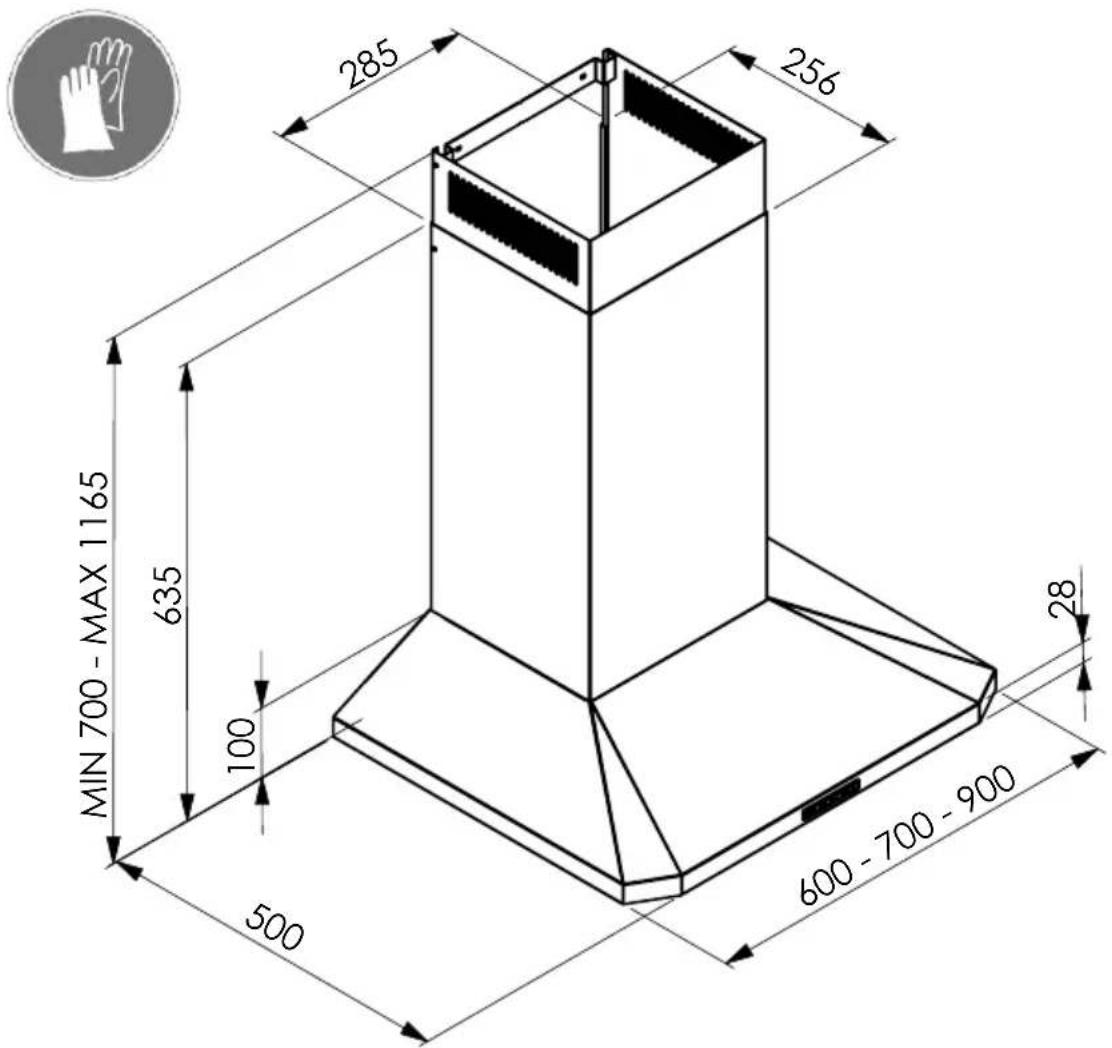
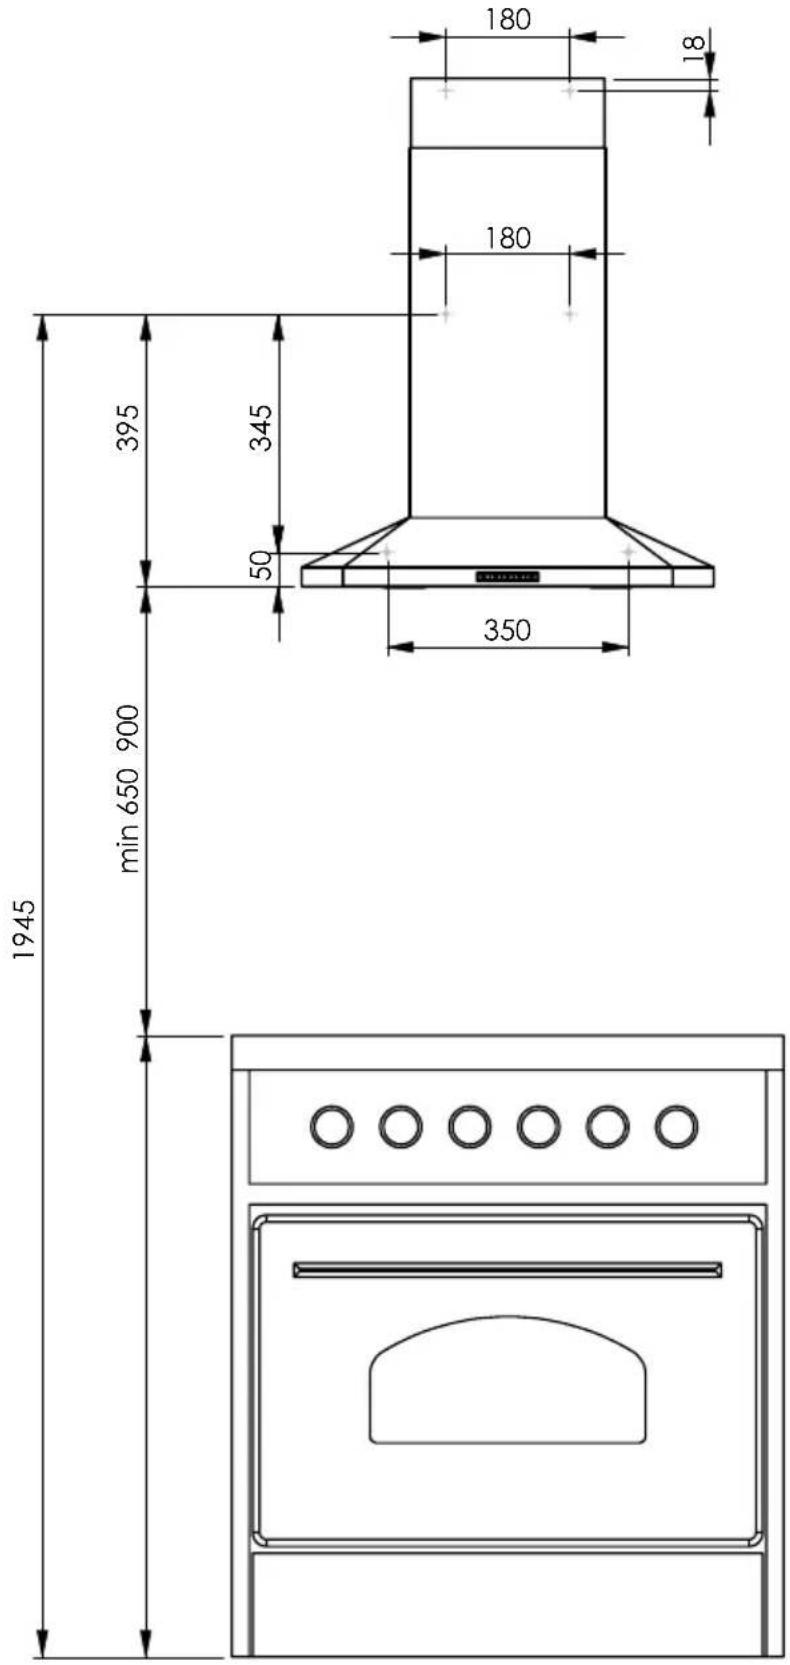
• Dimensional Drawings

- Follow the direcons of the template for drilling

Connecng and ng
Before connecng the appliance, check the household installaon.
Appliance with preed power cable: The power cable must only be replaced by a trained aer-sales engineer.
Installing: Do not trap the power cable and do not route it over sharp edges. If the oven is a built-under type, route the cable on the rear corners of the oven to the socket.
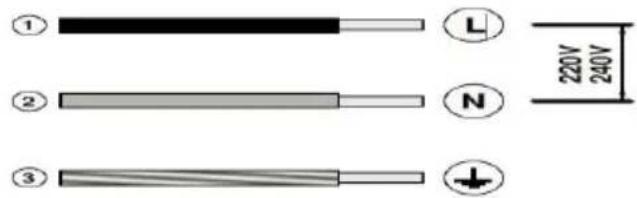
Electrical Connecon
Connect the device to the mains and check the operaon:
• voltage, see the rang plate
natural_image
Gray circular icon with a stylized lowercase 'i' in the center, representing information (no text or symbols beyond the icon itself)MRBCommands

 | Short pression: Motor ON at first speed. Long pression: Motor OFF. |
| [0KBY] | Short pression: Motor at second speed. |
 | Short pression: Motor at third speed. Long pression: intensive speed for 7' (at the end of this time, the system will return to the speed set previously). |
 | Push this buon to set up the mer of 5 minutes. Aer 5 minutes the cooker hood will be switched o automacally (motor and lighng). When the mer is acvated the LED ashes. The timer can not be activated for intensive speed. |
 | Push This buon to switch on/o the light. |
LED Replacement

- Disconnect the connector and replace the part
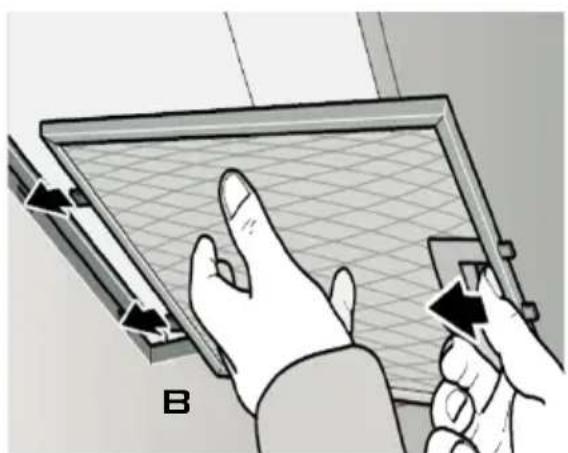
Filters Replacement

• A. ACTIVATED CARBON FILTERS (Only Itering types):
- The Iter assembly can not be regenerated and must be replaced at least every two months.
B. METALLIC ANTI-GREASE FILTERS:
- The Iters must be washed at least one a month with hot water and detergent.
- It can also be washed in the dishwasher.
- Open by means of the handle.
Tips for Energy Saving
- Always use the cover corresponding to each pot. When cooking without a lid, the energy consumpon is somewhat greater.
• Use a glass lid to see inside without having to li it. - Use containers atbed. If the base is not at, the energy consumption is greater.
- For small amounts, use small pans. A large bowl and led just needs a lot of energy.
- For cooking, use a lile water. Thus, it saves energy and preserves all the vitamins and minerals in vegetables.
Maintenance functions
- CLEAN AIR: o preserve air quality --> push Timer button for 3" with hood off. The hood turns on at first speed for 10' per hour. Push any button to disable the function.
- FILTER SATURATION ALARM: light button LED flashes every 30h of hood operation: the anti-grease filter shall be cleaned. To reset the hood when it is off push light button for 3".
On/off button LED flashes every 120h of hood operation: the anti-odor filter shall be replaced (filter version). To reset the hood when it is off push light button for 3".
Maintenance
• Use only a damp doth with neutral liquid detergent.
- Do not use wet sponges or cloths, water jets, thinners, solvents, hydrochloric acid, bleach, alcohol or abrasive substances.
- Unplug the appliance or switch off the circuit breaker before carrying out maintenance operations.
QuadroComandiMRB

natural_image
Simple line drawing of a stylized object resembling a ring or tool, enclosed in a diamond frame (no text or symbols)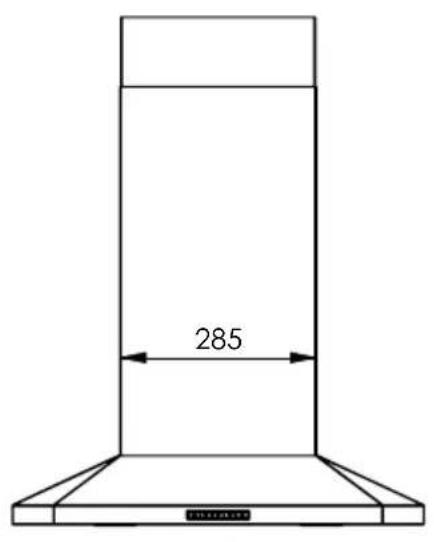

220-240V 1N\~

natural_image
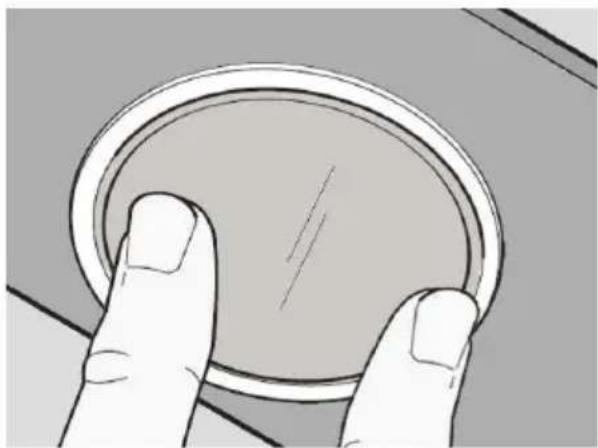
Illustration of a finger pressing a circular button on a surface (no text or symbols)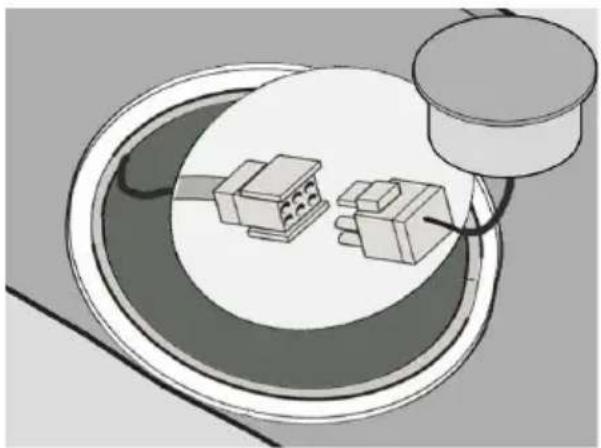
natural_image
Illustration of a mechanical assembly with two connected components and a cylindrical component (no text or symbols)

natural_image
Illustration of a hand interacting with a grid-patterned panel, no text or symbols present