USER MANUAL 16330108 Melissa
16330108/16330109/16330110/16330112/16330132
UK Microwave oven....25
DE Mikrowellenherd 33
NL Combimagnetron 42
FR Four micro-ondes ....50
ES Horno microondas....58
PL Mikrofalówka....66
IT Forno a microonde 75
DK/NO
INTRODUKTION
OVERSIGT OVER APPARATETS DELE
- Låge
- Glasdrejetallerken
- Kabinet
- Låsetapper
- Ovnrum
- Drejehjul
- Aksel
- Display
- Micro Power (mikrobølgeeffekt)
- Preset/Clock/Defrost (ur/optøning)
- Express (eksprestilberedning)
- Pause/Cancel (pause/annuller)
- Drejeknap
KLARG∅RING AF APPARATET
BESKRIVNING AV APPARATENS DELAR
PÄÄOSAT
To get the best out of your new microwave oven, please read through these instructions carefully before using it for the first time.
Take particular note of the safety precautions. We also recommend that you keep the instructions for future reference, so that you can remind yourself of the functions of your appliance.
GENERAL SAFETY INSTRUCTIONS
- The appliance may only be used by children over the age of 8 and persons with reduced sensitivity, physical or mental disabilities if they are supervised or instructed how to use the appliance in a safe way, and they understand the associated risks. Children must not play with the appliance. Cleaning and maintenance must not be carried out by children unless they are supervised.
- Keep the appliance under constant supervision while in use. Keep an eye on any children in the vicinity of the appliance when it is in use. The appliance is not a toy.
- Incorrect use of this appliance may cause personal injury and damage the appliance.
- Use for its intended purpose only. The manufacturer is not responsible for any injury or damage resulting from incorrect use or handling (see also Warranty Terms).
- For domestic use only. Not for outdoor or commercial use.

UK
- Remove all packaging and transport materials from the inside and outside of the appliance. Check that the appliance has no visible damage and that no parts are missing.
- Do not use with any cords other than that supplied.
- Check that it is not possible to pull or trip over the cord or any extension cord.
- Turn off the appliance and remove the plug from the socket before cleaning, or when the appliance is not in use.
- Avoid pulling the cord when removing the plug from the socket. Instead, hold the plug.
- Keep the cord and appliance away from heat sources, hot objects and naked flames.
- Ensure that the cord is fully extended. The cord must not be twisted or wound around the appliance. Check regularly that neither the cord nor plug is damaged and do not use if there is any damage, or if it has been dropped on the floor, dropped in water or damaged in any other way.
- If the appliance, cord or plug has been damaged, have the appliance inspected and if necessary repaired by an authorised repairer. Connect to 230 V, 50 Hz only.
UK
- The guarantee is not valid if the appliance is connected to incorrect voltage.
- Never try to repair the appliance yourself. Please contact the store where you bought the appliance for repairs under warranty.
- Unauthorised repairs or modifications will invalidate the guarantee.
- Always follow the instructions in the “Tips for food preparation” and “Using utensils when preparing food” sections.
- Do not switch on when empty. To be able to absorb microwaves, there must be something in the appliance (food) to avoid damage.
- If you would like to practise using the various functions, place a cup of water inside the oven.
- Do not use the appliance if the turntable ring and glass tray are not installed.
- Never cook food directly on the glass turntable; always use a suitable container.
-
On the right-hand side of the oven compartment there is a mica plate (resembles cardboard); this must not be removed.
-
Do not use if the safety locking system is not functioning, which means that the appliance could be switched on even if the door is not closed. If the door is open, you risk being exposed to microwave radiation.
- Never prop the door open.
- Do not use the appliance if there are cleaning agent residues inside it.
- Keep the appliance and its cord out of reach of children less than 8 years.
- The appliance shall not be operated by means of an external timer, or a separate remote control system.
- Caution! Some parts of this product can become very hot and cause burns. Particular attention has to be given where children and vulnerable people are present.
Positioning the appliance
- Avoid blocking the ventilation slots on the top, sides and back.
- Do not remove the feet.
- This appliance is designed to be freestanding. Always ensure the vent holes on top of the cabinet are not covered. If they are covered while the appliance is in use, there is a risk of overheating. Do not use the appliance until it has cooled down.
UK
- The appliance must stand on a flat surface capable of bearing its weight. There must be a clearance of at least 10 cm at the rear, 5 cm at the sides and 20 cm above to ensure sufficient ventilation.
Important safety measures when preparing food!
- If using the appliance to heat baby food or liquids in a feeding bottle, you must always stir the food/ liquid and check the temperature thoroughly before serving. This ensures that the heat is evenly distributed and avoids scalding injuries. The lid and/or teat must not be fitted on feeding bottles when placed in the appliance.
- If some foods are heated too long, they may char and give off smoke. If this happens, you should leave the oven door closed and switch off the appliance completely.
- Some foods with low water content, e.g. chocolate in squares and pastries with a sweet filling, should be heated carefully, if not, they or the container may be ruined.
Fire hazard!
- To reduce the risk of fire occurring in the oven compartment, please note the following points:
- Do not cook food for too long or at too high a temperature and do not leave unattended if paper, plastic or other flammable materials have been used with a view to reducing cooking times.
- Metal clips and lids/film containing metallic threads can cause sparks and must therefore be removed.
- Never heat oil or fat in the appliance.
- If materials in the appliance catch fire, leave the door closed. Switch off immediately, and remove the plug from the wall socket.
UK
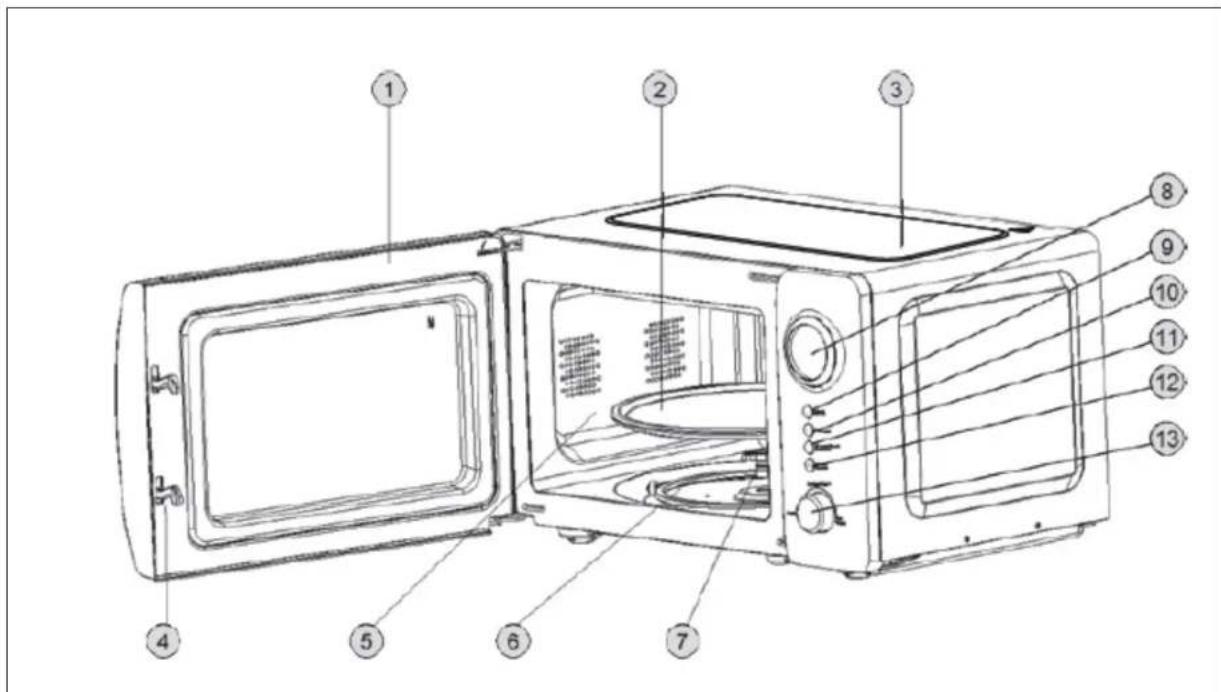
MAIN COMPONENTS
- Door
- Glass turntable
- Cabinet
- Lock dowels
- Oven cavity
- Turntable rings
- Spindle
- Display
- Micro Power
- Instant/Start
- Pause/Cancel
-
Dial
-
Preset/Clock/Defrost
PREPARING THE APPLIANCE
Each individual appliance is checked at the factory but, for safety's sake, after unpacking, check carefully that your appliance has not been damaged during transport.
Check whether there is any visible damage (e.g. in the form of dents or similar), if the door closes properly, if it is intact and if the hinges are in order.
If the appliance appears to have been damaged, contact the shop where you bought it, and do not use it until it has been checked by an authorised specialist.
Before use, check that you have removed all packaging inside and out.
Connection
The appliance must be connected to a 230 volt AC current, 50 Hz. The guarantee is not valid if the appliance is connected to incorrect voltage.
Once the power is connected to the appliance, all the segments in the display will flash 3 times and then flash “:” only.
Inserting the glass turntable
Before use, ensure the glass turntable (2) is correctly seated on the turntable rings (6) and spindle (7). Mount it on the three wheels, with each wheel aligned to the groove on the bottom of the turntable.
Setting the clock
- Hold the Preset/Clock/Defrost button (10) pressed for 3 seconds. The hours digits start flashing.
- Turn the dial (13) clockwise or anticlockwise to increase or reduce the hours digits.
- Press the Preset/Clock/Defrost button. The minutes digits start flashing.
- Turn the dial (13) clockwise or anticlockwise to increase or reduce the minutes digits.
- Press the Preset/Clock/Defrost button. The clock has now been set.
- If no button is pressed or turned within a few seconds, adjustment will conclude automatically.
OPERATING THE APPLIANCE
Basic operation
Place the food to be cooked in the appliance and close the door.
Select cooking function as described below and start the appliance. Once the cooking time set has elapsed, the oven will switch off automatically. The display will show "End" and 3 beeps will sound. The beeps repeat every third minute if you do not open the oven door or press one of the buttons to end cooking.
If you do not start the appliance within approx. 2 minutes of setting program and time, it will beep once and return to clock display.
Cooking time can be set from 10 seconds to 60 minutes.
Cooking can be temporarily interrupted at any time by pressing the Pause/Cancel button once (12). If you press the button twice, the cooking time and the program selected will be cancelled.
Cooking can also be temporarily interrupted by opening the door (practical if the food needs turning). When cooking is temporarily interrupted, the clock will show the remaining cooking time.
To restart cooking, close the microwave door (if it has been opened) and press the Instant/Start button.
Express cooking
Express cooking takes place at full microwave power for the time you set.
- Press the Instant/Start button once to start express cooking for one minute. Turn the dial to adjust the cooking time.
- The appliance starts cooking on full power when the Instant/Start button is first pressed.
- The display will show the remaining.
Manual cooking - selecting microwave power level
- Press the Micro Power button (9) repeatedly to select the required microwave power level (see the various power levels (see the various power levels in the table below).
| No. of times to press button | Indication in the display | Microwave power |
| 1 100 100 % | | |
| 2 80 80 % | | |
| 3 60 60 % | | |
| 4 40 40 % | | |
| 5 20 20 % | | |
| 6 100 100 % | | |
- Turn the dial clockwise or anticlockwise until the required cooking time is shown in the display.
- Press the Instant/Start button to begin cooking. The display will show the remaining time.
If you press the Micro Power/Grill/ Combi button during cooking, the selected microwave power level will be displayed.
Automatic defrosting
The appliance can be used to defrost meat, poultry and fish/seafood. The defrosting time and power is set automatically once you have entered the weight of the food.
EXAMPLE: You want to defrost 600 g prawns.
- Place the prawns to be defrosted in the appliance.
- Press the Preset/Clock/Defrost button (10) three times, until "d3" is shown in the display.
K
- Turn the dial until "0.6" is shown in the display.
- Press the Instant/Start button to begin defrosting.
During cooking, the appliance will beep to remind you that the food needs turning.
| Defrosting programme | Food item Interval | |
| d1 Meat 0.1-2.0 kg | | |
| d2 Poultry 0.2-3.0 kg | | |
| d3 Seafood 0.1-0.9 kg | | |
The appliance has 12 auto-menu programs used for different food types and functions (see auto-menu list in the table below).
- Turn the dial one setting anticlockwise. Then turn the dial clockwise or anticlockwise until the number for the required auto menu programme is shown in the display. Press the dial once to select the auto menu program displayed.
- Turn the dial clockwise or anticlockwise until the required weight/number of items is shown in the display. The setting options vary according to the auto menu program selected. The appliance itself calculates the cooking time and power on the basis of the weight or the number you specified.
- Press the Instant/Start button to begin cooking.
| Auto menu program | Food item Settings |
| A1 Popcorn 3.0 | - 3.5 ounces (approx. 85 - 100 grams) |
| A2 Potatoes 0.45 | - 0.65 kg | |
| A3 Vegetables | 0.1 - 0.2 - 0.3 | - 0.4 - 0.5 kg |
| A4 Meat* | 0.2 - 0.3 - 0.4 | - 0.5 - 0.6 - 0.7 kg |
| A5 Fish* | 0.2 - 0.3 - 0.4 | - 0.5 - 0.6 - 0.7 kg |
| A6 Poultry* | 0.2 - 0.3 - 0.4 | - 0.5 - 0.6 - 0.7 kg |
| A7 Reheating | 0.2 - 0.4 - 0.6 | - 0.8 - 1.0 kg |
| A8 Drinks | 250 - 500 m | |
| A9 Rice | 0.1 - 0.2 - 0.3 | - 0.4 - 0.5 kg |
| A10 | Spaghetti** | 0.1 - 0.2 - 0.3 - 0.4 - 0.5 kg |
| A11 Bread 0.1 | - 0.2 - 0.3 - 0.4 - 0.5 kg |
| A12 | Pizza | 1-2 items |
** = Add boiling water before cooking.
Cooking using the timer
You can set the microwave oven to start cooking at a given time. Check that the clock is set correctly.
- Place the food in the oven.
- Press the Micro Power button to set microwave power.
- Set the cooking time.
-
Hold the Preset/Clock/Defrost button pressed for 3 seconds.
-
Set the number of hours for the cooking start time and press the Preset/Clock/Defrost button.
- Set the number of minutes for the cooking start time and press the Preset/Clock/Defrost button.
- A beep will sound. The clock symbol flashes in the display. Microwave power is also shown.
- Cooking starts once the set time is reached.
UK
Once you have set the timer, you can check when cooking will commence by pressing the Preset/Clock/Defrost button at any time.
The start time for cooking will be shown in the display for 1 second and the display will then return to the clock function.
Express and auto menu programs can not be programmed with the timer.
You can cancel timer settings by pressing the Pause/Cancel button.
Cooking in several stages
You can program the appliance to cook at different power levels and different intervals.
- Place the food in the oven.
- Press the Micro Power button to set microwave power.
- Set the cooking time.
- Repeat point 2 and 3. Up to 4 stages can be programmed.
- Press the Instant/Start button to begin cooking.
When a combination of microwave power and cooking time (one stage) ends, the next stage will be executed
CHILD SAFETY LOCK
The child safety lock prevents young children from using the appliance. The appliance cannot be operated as long as the child safety lock is active. The child safety lock is activated by holding the Pause/Cancel button pressed for 3 seconds. A beep will be heard, and the display shows "OFF" and a lock symbol. To deactivate the child safety lock again, press and hold the Pause/ Cancel button for 3 seconds. The symbol will then disappear from the display.
TIPS FOR FOOD PREPARATION
When preparing food in the appliance, the following basic rules apply:
Cooking time
- Smaller quantities of food cook more rapidly than large quantities. If the amount of food is doubled, the preparation time must be more than doubled correspondingly.
- Small pieces of meat, small fish and chopped vegetables cook more quickly than large pieces. For the same reason, it is recommended, if, for example, you wish to make goulash, stews or similar, that the meat be cut into pieces no bigger than 2 x 2 cm.
- The compactness of the food is also very important for the cooking time. The more compact the food is, the longer it takes to cook.
• Whole joints require a longer cooking time than stewed dishes.
- A joint requires a longer time than a dish using minced meat.
- The colder the food, the longer the cooking time needs to be. Food at room temperature will therefore cook faster than food from a fridge or freezer.
- When cooking vegetables, the cooking time depends on the freshness of the vegetables. Therefore, check the condition of the vegetables and add or deduct a little time accordingly.
- The short cooking time when using an appliance means that the food does not overcook. If required, a little water can be added.
- When cooking fish and vegetables, you only need to use the minimum of water.
Microwave power
The choice of power setting depends on the condition of the food to be cooked. In most cases, the food is cooked on full power.
• Full power is used, among other things, for reheating food quickly, boiling water or similar.
- Low power is principally used to defrost food and prepare dishes containing cheese, milk or egg. (Whole eggs in their shell cannot be cooked in the appliance, as there is a risk of the eggs exploding.) In addition, lower power settings are also used to finish off and to retain the excellent aroma of a dish.
- If the whole meal is to be prepared in the appliance, it is recommended that you start with the most compact foods, such as potatoes. Once these are ready, cover them while the rest of the food is prepared.
- Most food should be covered. A close-fitting cover retains the steam and moisture, which shortens the cooking time in the appliance. This is particularly the case when cooking vegetables, fish dishes and casseroles.
• Covering food also distributes the heat better, thus ensuring rapid and excellent results.
- In order to achieve the best possible results, it is important to position the food correctly, as the microwave rays are most powerful in the centre of the appliance. If, for example, you are baking potatoes, you should position them along the edge of the glass turntable so that they cook evenly.
- In order to cook compact dishes such as meat and poultry evenly, it is important to turn the meat a few times.
- You can use the appliance for baking, although not recipes that include yeast.
- When preparing food with a thick skin, e.g. potatoes, apples, whole squash or chestnuts, you should prick holes in the skin to prevent the food from bursting during cooking.
- When preparing food in a "traditional" oven, you normally avoid opening the oven door as much as possible. This is not the case with this appliance: no energy or significant heat is lost. In other words, you can open the oven door and look at the food as often as you want.
USING UTENSILS WHEN PREPARING FOOD
- Before starting to prepare food in containers, you should check that the containers you wish to use are made of a suitable material, as some types of plastic may become limp and deform, while some types of ceramics may crack (particularly when heating small quantities of food).
- In order to test if a container is suitable for use in a microwave oven:
- Place the container in the appliance.
- At the same time, place a half-full glass of water in the container.
- Start the appliance. Allow it to run for 15-30 seconds on maximum power.
- If the container becomes very hot to the touch, avoid using it.
UK
Suitable utensils and materials
When you prepare food in the appliance, you should preferably use the following utensils and materials: Glass and glass bowls
Stoneware (glazed and unglazed).
The food stays hot longer in glazed stoneware than in other dishes.
Plastic containers. Can be used for many heating purposes. Caution! Plastic containers made from melamine, polyethylene and phenol must NOT be used.
Porcelain. All porcelain can be used in microwave ovens, although ovenproof porcelain is preferable.
Fireproof covered dishes. Glass dishes with lids that fit so closely that steam cannot escape are ideal for vegetables and fruit to which no liquid is added (however, the cooking time must not exceed 5 minutes).
Browning dishes. You must be very careful when using this type of dish. Never heat the browning dish for more than 5 minutes on the turntable. Suitable insulation, such as a heat-tested plate, should be placed between the browning dish and the turntable to prevent the turntable from overheating.
Microwave roasting film. Used particularly for soups, sauces, stewed dishes or when defrosting food. Can also be used as a loose covering to prevent fat, etc. from spraying out into the oven compartment.
Kitchen roll. Kitchen roll is ideal, as it absorbs moisture and fat. For example, bacon can be placed in layers, with kitchen roll between each layer. The bacon will then be completely crispy, as it does not sit in its own fat. Home- baked bread can be taken directly from the freezer, packed in kitchen roll and heated in the appliance.
Wet kitchen roll. Can be used for fish or vegetables. Covering the food prevents it from drying out.
Greaseproof paper. Fish, large vegetables such as cauliflower, corn on the cob and similar can be wrapped in wet greaseproof paper.
Roasting bags. Roasting bags are ideal for meat, fish and vegetables. However, they must never be closed using metal clips. Cotton thread should be used instead. Prick the bag with small holes, and place it in the appliance on a plate or glass dish.
Unsuitable utensils and materials
When you prepare food in the appliance, you should not use the following utensils and materials:
Sealed glass jars/bottles with small openings, as they may explode.
General-purpose thermometers
Silver foil/foil trays, as the microwave rays cannot penetrate the material and the food will not cook.
Recycled paper, as it may contain small metal splinters that could cause sparks and/or fire.
Closed tins/containers with tightly sealed lids, as excess pressure may cause the tin/container to explode.
Metal clips and other lids/foils, containing metal wires.
These can form sparks in the appliance and must therefore be removed.
Metal bowls/containers and packaging, unless they are designed specifically for use in microwave ovens. The microwaves are reflected and cannot penetrate the food through the metal.
Plates, dishes and bowls/containers with metal, gold and silver decorations.
They may break and/or cause sparks to form in the oven compartment.
CLEANING
When cleaning the appliance, you should pay attention to the following:
- Turn off the appliance and remove the plug from the wall socket before cleaning.
- Never use scouring powder, steel scourers or other strong cleaning agents to clean the interior or exterior surfaces of the appliance, as they may scratch the surfaces.
• Instead use a cloth dampened with hot water, and add washing-up liquid if the appliance is very soiled.
• Make sure that no water gets into the vent holes.
- The spindle and the floor of the appliance must be cleaned regularly so that the glass turntable rotates freely.
- The glass turntable and spindle can be cleaned in a dishwasher.
- Do not remove the mica plate (5) from the inside of the oven!
Tip: When the oven has been in use for some time, the oven compartment can begin to smell.
If the smell is not dispersed by ordinary cleaning, place a few lemon slices in a cup and cook them in the appliance at full power for 2-3 minutes. This will effectively disperse the smell.
BEFORE GOING TO A REPAIR CENTRE
If the appliance will not start:
Check that the plug is correctly in place in the wall socket. If that is not the case, remove the plug, wait 10 seconds and then plug it in again. Check whether a fuse has blown or whether the fuse relay has been switched off. If it is not that, you can check that the socket itself is working by plugging in another device.
Check that the oven door is closed properly. If this is not the case, the automatic safety system via the lock dowels (4) ensures that the appliance cannot be started.
Check whether the child safety lock is activated (lock symbol appears on display).
The child safety lock can be deactivated by holding the "Pause/Cancel" button pressed down for 3 seconds.
If the appliance still does not work, contact a repair technician.
FOR UNITED KINGDOM ONLY
Plug wiring:
This product is fitted with a BS 1363 13-amp plug. If you have to replace the fuse, only those that are ASTA or BSI approved to BS1362 and with a rated current of 13 amps should be used. If there is a fuse cover fitted, this cover must be refitted after changing the fuse.
If the fuse cover is lost or damaged, the plug must not be used. You must also check if the socket outlets in your home fit with the plug of the appliance. If the socket outlet in your home does not fit with the plug, the plug must be removed and disposed of safely as insertion of the plug into the socket is likely to cause electric hazard. A replacement plug should be wired according to following description.
Important
This appliance must be earthed. The wires in the cord set are coloured, thus:
BLUE- Neutral, Brown-Live, Green& Yellow-earth (For detachable plug only)
As the colours of the wires in the mains lead of this appliance may not correspond with the coloured markings identifying the terminals in your plug, proceed as follows:
The wire that is coloured Green&
Yellow must be connected to the terminal in the plug that is marked with the letter E or by the earth symbol, or coloured green & yellow.
The wire that is coloured blue must be connected to the terminal that is marked with the letter N or coloured black.
The wire that is couloured brown must be connected to the terminal that is marked with the letter L or coloured red.
Please note that this product is marked with this symbol:

This means that this product must not be disposed of along with ordinary household waste, as electrical and electronic waste must be disposed of separately.
In accordance with the WEEE directive, every member state must ensure correct collection, recovery, handling and recycling of electrical and electronic waste. Private households in the EU can take used equipment to special recycling stations free of charge.
In some member states you can in certain cases return used equipment to the retailer from whom you purchased it, if you are purchasing new equipment. Contact your retailer, distributor or the municipal authorities for further information on what to do with electrical and electronic waste.
UK
WARRANTY TERMS
The warranty does not apply:
- if the above instructions have not been followed
- if the appliance has been interfered with
- if the appliance has been mishandled, subjected to rough treatment, or has suffered any other form of damage
- if the appliance is faulty due to faults in the electricity supply.
Due to the constant development of our products in terms of function and design, we reserve the right to make changes to the product without prior warning.
FREQUENTLY ASKED QUESTIONS
If you have any questions regarding the use of the appliance and cannot find the answer in this user guide, please try our website at www.commaxx.nl.
You can also see contact details on our website if you need to contact us for technical questions, repairs, accessories or spare parts.
MANUFACTURED IN CHINA FOR
Commaxx B.V.
Wiebachstraat 37,
NL-6466 NG Kerkrade
Netherlands
www.commaxx.nl
We cannot be held responsible for any printing errors.
EINLEITUNG
HAUPTKOMPONENTEN
HOOFDCOMPONENTEN
PRINCIPAUX COMPOSANTS
CONDITIONS DE LA GARANTIE
COMPONENTES PRINCIPALES
GŁÓWNE CZĘŚCI
WYPRODUKOWANO W CHINACH DLA
Commaxx B.V.
Wiebachstraat 37,
NL-6466 NG Kerkrade
Netherlands
www.commaxx.nl
COMPONENTI PRINCIPALI