
16640144 - Hair dryer Melissa - Free user manual and instructions
Find the device manual for free 16640144 Melissa in PDF.

| Product type | Rechargeable hair dryer |
| Brand | Melissa |
| Model | 16640144 |
| Power supply | Rechargeable battery, mains charger 230 V ~ 50 Hz |
| Charging time | 8 hours |
| Battery life | Approx. 45 minutes |
| Indicator light | Yes (indicates charging) |
| Functions | On/Off |
| Included accessories | Comb |
| Care | Clean with a damp cloth; do not immerse |
| Safety | Use by children aged 8 years and above with supervision; do not use if damaged |
| Dimensions (approx.) | Approx. 20 x 8 x 8 cm |
| Weight (approx.) | Approx. 500 g |
| Warranty | According to provided terms; void if instructions are not followed |
| Importer | Adexi A/S, Grenåvej 635A, DK-8541 Skødstrup, Denmark |
Frequently Asked Questions - 16640144 Melissa
User questions about 16640144 Melissa
0 question about this device. Answer the ones you know or ask your own.
Ask a new question about this device
Download the instructions for your Hair dryer in PDF format for free! Find your manual 16640144 - Melissa and take your electronic device back in hand. On this page are published all the documents necessary for the use of your device. 16640144 by Melissa.
USER MANUAL 16640144 Melissa
UK Rechargeable trimmer 18
FR Tondeuse rechargeable 26

DK
BRUG
natural_image
Two diagrams showing a hand pressing on a surface with a magnifying glass and a cross symbol (no text or labels)DK
OPLYSNINGER OM BORT- SKAFFELSE OG GENBRUG AF DETTE PRODUKT
NO
BRUK
natural_image
Two diagrams showing a hand pressing on a surface with a magnified circle and an X symbol, no text or labels present.NO
INFORMASJON OM KASSERING OG RESIRKULERING AV DETTE PRODUKTET

SE
ANVÄNDNING
natural_image
Two diagrams showing a hand pressing on a surface with a magnified circular symbol and a cross symbol (no text or labels)SE
INFORMATION OM KASSERING OCH ÅTERVINNING AV DENNA PRODUKT

FI
KÄYTTÖ
natural_image
Two diagrams showing a hand pressing on a surface with a magnifying glass and a cross symbol (no text or labels)FI
TIETOJA TUOTTEEN HÄVITTÄMIS- ESTÄ JA KIERRÄTTÄMISESTÄ
To get the best out of your new rechargeable trimmer, please read through these instructions carefully before using it for the first time. Take particular note of the safety precautions. We also recommend that you keep the instructions for future reference.
GENERAL SAFETY INSTRUCTIONS
- This appliance may only be used by children aged from 8 years and above and persons with reduced physical, sensory or mental capabilities or lack of experience and knowledge if they are supervised or have been given instructions concerning use of the appliance in a safe way and understand the hazards involved.
- Children must not play with the appliance. Cleaning and user maintenance must not be performed by children without supervision.
- Keep the appliance under constant supervision while in use. Keep an eye on any children in the vicinity of the appliance when it is in use. The appliance is not a toy.
- Incorrect use of this appliance may cause personal injury or damage the appliance.
- Use for its intended purpose only. The manufacturer is not responsible for any injury or damage resulting from incorrect use or handling (see also Warranty Terms).
- For domestic use only. Not for outdoor or commercial use.
- Remove all packaging and transport materials from the inside and outside of the appliance.
- Check that the appliance has no visible damage and that no parts are missing.
-
Do not use with any cords other than that supplied.
-
Check that it is not possible to pull or trip over the cord or any extension cord.
- Turn off the appliance and remove the plug from the socket before cleaning, or when the appliance is not in use.
- Avoid pulling the cord when removing the plug from the socket. Instead, hold the plug.
- Keep the cord and appliance away from heat sources, hot objects and naked flames.
- Ensure that the cord is fully extended.
- The cord must not be twisted or wound around the appliance.
- Check regularly that neither the cord nor charger is damaged and do not use the appliance if there is any damage, or if it has been dropped on the floor, dropped in water or damaged in any other way.
- If the appliance, cord or charger has been damaged, have the appliance inspected and if necessary repaired by an authorised repairer.
- The charger may only be connected to 230 V, 50 Hz. The warranty is not valid if the appliance is connected to incorrect voltage.
- The charger must not be used together with a timer switch or a separate remote control system.
- Never try to repair the appliance yourself. Please contact the store where you bought the appliance for repairs under warranty.
- Unauthorised repairs or modifications will invalidate the warranty.
UK
SPECIAL SAFETY INSTRUCTIONS
- Handle the blade with care when cleaning it, as the parts are sharp and very fragile.
- Do not use if the blade is damaged, as it may cut the skin.
- The appliance and blade must not be exposed to water.
MAIN COMPONENTS
- On/Off button
- Indicator light
- Blade
- Guide comb 9/12 mm
- Guide comb 3/6 mm
- Scissors
- Cleaning brush
- Oil
- Comb
- Charger (not shown)
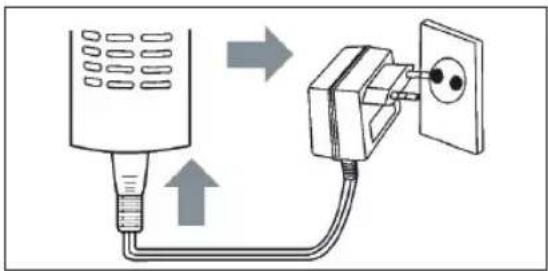
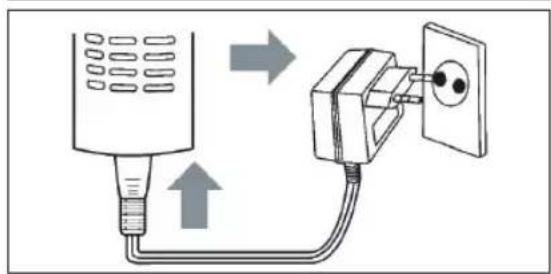
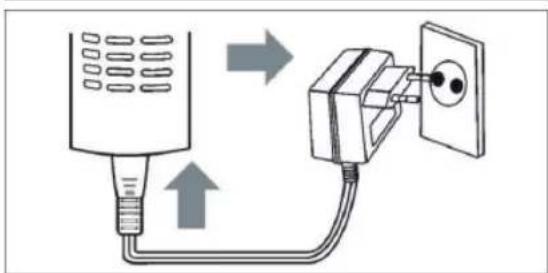
CHARGING
- The appliance must be charged for 8 hours prior to first use.
- Check that the appliance is switched off.
- Plug the charger (10) into a wall socket and plug the charger into the charging jack on the appliance. The charging indicator comes on.
- Charge the appliance. Once the charge indicator goes out, the appliance is fully charged and should be disconnected from the charger.
- A full charge provides around 45 minutes of running time.


UK
USE
- Brush the hair or beard with the comb (9).
- Place the required guide comb (4, 5) on the appliance so that it clicks securely over the blade (3). Make sure to turn the guide comb correctly so that you cut the hair at the required length.
- Switch on the appliance using the on/off button (1).
- Cut the hair or trim the beard. Make sure that the guide comb is flat against the base of the head or the cheek.

natural_image
Two diagrams showing a hand pressing on a surface with a magnifying glass and a cross symbol (no text or labels)-
Regularly shake hair or beard cuttings out of the appliance to prevent the blade from becoming blocked.
-
Always switch the appliance off using the on/off button when you have finished using it.
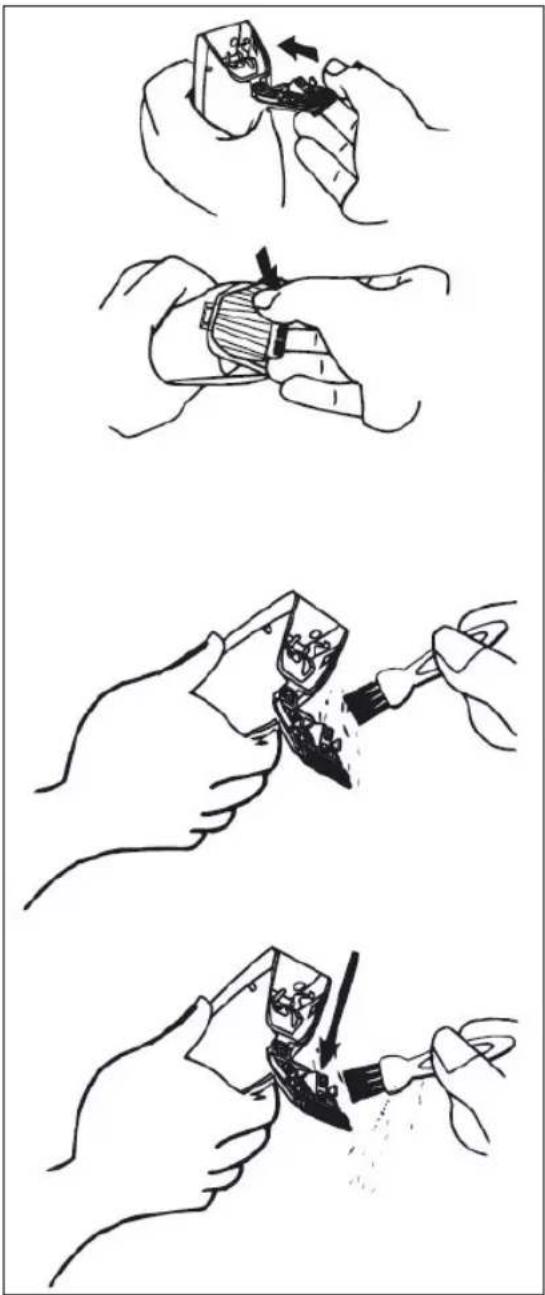
CLEANING
When cleaning the appliance, you should pay attention to the following:
- Turn off the appliance and unplug it before cleaning.
- Tilt the blade out of the appliance.
- Brush the blade using the cleaning brush (7) supplied to remove hairs.
- Lubricate the blade with a few drops of oil (8).
- Tilt the blade back again and click it securely onto the appliance. Switch the appliance on and let it run a few seconds to distribute the oil into the blade.
- Do not submerge the appliance in water, and do not let water enter the appliance.
- Clean the appliance by wiping it with a damp cloth. Do not use detergents of any kind.
UK
INFORMATION ON DISPOSAL AND RECYCLING OF THIS PRODUCT
Please note that this Adexi product is marked with this symbol:

This means that this product must not be disposed of along with ordinary household waste, as electrical and electronic waste must be disposed of separately.
In accordance with the WEEE directive, every member state must ensure correct collection, recovery, handling and recycling of electrical and electronic waste. Private households in the EU can take used equipment to special recycling stations free of charge.
In some member states you can in certain cases return used equipment to the retailer from whom you purchased it, if you are purchasing new equipment. Contact your retailer, distributor or the municipal authorities for further information on what to do with electrical and electronic waste.
WARRANTY TERMS
The warranty does not apply:
- if the above instructions have not been followed
- if the appliance has been interfered with
- if the appliance has been mishandled, subjected to rough treatment, or has suffered any other form of damage
- if the appliance is faulty due to faults in the electricity supply.
Due to the constant development of our products in terms of function and design, we reserve the right to make changes to the product without prior warning.
FREQUENTLY ASKED QUESTIONS
If you have any questions regarding the use of the appliance and cannot find the answer in this user guide, please try our website at www.adexi.eu.
You can also see contact details on our website if you need to contact us for technical questions, repairs, accessories or spare parts.
IMPORTER
Adexi A/S
Grenåvej 635A
DK-8541 Skødstrup
Denmark
www.adexi.eu
We cannot be held responsible for any printing errors.
DE
EINLEITUNG
DE
VERWENDUNG
natural_image
Two diagrams showing hand positioning on a surface, one with a magnifying glass and the other with a cross (no text or symbols)natural_image
Four-step line drawing showing hand tool application: adding a small object, holding a device, cutting a tool into a plastic container, and finally using a tool to clean or disassemble (no text or symbols)
FR
UTILISATION
natural_image
Illustration showing two hand positions: one with a circle on the ground and another with an 'X' symbol, both on a textured surface (no text or symbols present)natural_image
Four-step line drawing showing a hand holding a small object, with each step indicating a procedure to remove or remove material (no text or symbols present)FR
INFORMATIONS SUR LA MISE AU REBUT ET LE RECYCLAGE DE CE PRODUIT
CONDITIONS DE LA GARANTIE
PL
SPOSÓB UŻYCIA
natural_image
Two diagrams showing a circular object on a surface and a cross symbol, both without any text or labels.PL
INFORMACJE O UTYLIZACJI I RECYKLING TEGO PRODUKTU


- DK
- BRUG
- OPLYSNINGER OM BORT- SKAFFELSE OG GENBRUG AF DETTE PRODUKT
- NO
- BRUK
- INFORMASJON OM KASSERING OG RESIRKULERING AV DETTE PRODUKTET
- SE
- ANVÄNDNING
- INFORMATION OM KASSERING OCH ÅTERVINNING AV DENNA PRODUKT
- FI
- KÄYTTÖ
- TIETOJA TUOTTEEN HÄVITTÄMIS- ESTÄ JA KIERRÄTTÄMISESTÄ
- GENERAL SAFETY INSTRUCTIONS
- UK
- SPECIAL SAFETY INSTRUCTIONS
- MAIN COMPONENTS
- CHARGING
- USE
- CLEANING
- INFORMATION ON DISPOSAL AND RECYCLING OF THIS PRODUCT
- WARRANTY TERMS
- FREQUENTLY ASKED QUESTIONS
- IMPORTER
- DE
- EINLEITUNG
- VERWENDUNG
- FR
- UTILISATION
- INFORMATIONS SUR LA MISE AU REBUT ET LE RECYCLAGE DE CE PRODUIT
- CONDITIONS DE LA GARANTIE
- PL
- SPOSÓB UŻYCIA
- INFORMACJE O UTYLIZACJI I RECYKLING TEGO PRODUKTU
Brand : Melissa
Model : 16640144
Category : Hair dryer