
CCHAQM15W110BK - Battery charger NEDIS - Free user manual and instructions
Find the device manual for free CCHAQM15W110BK NEDIS in PDF.
| Product Type | Phone holder with built-in wireless charger |
| Brand | Nedis |
| Model | CCHAQM15W110BK |
| Wireless charging power | 15 W |
| Compatibility | iPhone 12/13/14, cases with magnetic insert, devices compatible with wireless charging |
| Attachment methods | Suction cup (windshield) and vent clip (air vent) |
| Power supply | USB-C port (cable included) |
| LED display | Yes, indicates charging status and compatibility |
| Main material | ABS plastic |
| Intended use | Vehicle interior only |
| Safety instructions | Do not open, do not expose to water, use only the provided cable |
| Care and cleaning | Unplug before cleaning, use a soft dry cloth, no chemicals |
| Package contents | Charging holder, USB-C cable, suction cup, vent clip |
| Warranty | 2 years |
| Standards | CE, RoHS |
Frequently Asked Questions - CCHAQM15W110BK NEDIS
User questions about CCHAQM15W110BK NEDIS
0 question about this device. Answer the ones you know or ask your own.
Ask a new question about this device
Download the instructions for your Battery charger in PDF format for free! Find your manual CCHAQM15W110BK - NEDIS and take your electronic device back in hand. On this page are published all the documents necessary for the use of your device. CCHAQM15W110BK by NEDIS.
USER MANUAL CCHAQM15W110BK NEDIS
Automatic Wireless Car
Charger
Including dual mount
CCHAQM15W110BK | CCHAQ15W110BK

natural_image
Line drawings of four different electronic devices or accessories, including a cylindrical case, a battery pack, a mechanical clamp, and a handheld device (no text or symbols present)

ned.is/cchaqm15w110bk


ned.is/cchaq15w110bk


Quick start guide 5

Kurzanleitung 8

natural_image
Four-panel diagram showing a device with a circular component, each divided into four views (no text or symbols)Automatic Wireless Car Charger
CCHAQM15W110BK
CCHAQ15W110BK

For more information see the extended manual online:
ned.is/cchaqm15w110bk | ned.is/cchaq15w110bk
Intended use
This product is a phone holder with integrated wireless charger.
This product is intended to be used with an iPhone 12/13/14 or a phone case with a magnetic insert.
This product is intended for devices that support wireless charging.
The product is intended for indoor use only.
Any modification of the product may have consequences for safety, warranty and proper functioning.
The product is not intended for professional use.
This product can be used by children aged from 8 years and above and persons with reduced physical, sensory or mental capabilities or lack of experience and knowledge if they have been given supervision or instruction concerning use of the product in a safe way and understand the hazards involved. Children shall not play with the product. Cleaning and user maintenance shall not be done by children without supervision.
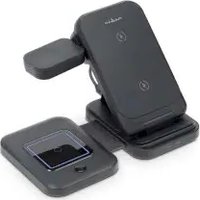
Main parts (image A)
1 CCHAQ15W110BK charging plate
2 Clamp
3 Adjustment ring
4 Clamp release button and LED indicator
5 USB-C charging port
6 Ball head
7 Clip adjustment ring
8 Air vent clip
9 Support anchor
10 CCHAQM15W110BK magnetic charging plate
11 LED indicator
12 Suction mount
13 Locking tab
14 Suction cup
15 USB-C – USB-A cable
Safety instructions
WARNING
- Ensure you have fully read and understood the instructions in this document before you install or use the product. Keep the packaging and this document for future reference.
- Only use the product as described in this document.
- Do not open the product, there are no user serviceable parts inside.
- Do not use the product if a part is damaged or defective. Replace a damaged or defective product immediately.
- Do not drop the product and avoid bumping.
- Do not expose the product to water or moisture.
- Only power the product with the voltage corresponding to the markings on the product.
- Only use the provided USB-C charging cable.
- Disconnect the product before cleaning.
- Do not use aggressive chemical cleaning agents such as ammonia, acid or acetone when cleaning the product.
Mounting the product (image B, C & D)
- Turn the adjustment ring A 3 counterclockwise.
- Click the ball head A 6 into the opening of the adjustment ring A 3.
- Turn the adjustment ring A ③ clockwise to fasten the ball head A ⑥.
Air vent clip (image C):
- Open the support anchor A 9.
- Open the clip adjustment ring A 7 by turning it counterclockwise. The air vent clip A 8 opens.
- Place the air vent clip A 8 on the desired air vent.
- Close the clip adjustment ring A ⑦ by turning it clockwise.
Suction mount (image D):
- Pull up the locking tab A 13.
- Slightly moisten the suction cup A 14.
- Place the suction mount A 12 on a desired place on the windshield.
- Push the locking tab A 13 to secure it to the windshield.
Connecting the product to a power source
-
Plug the USB-C connector of the USB-C cable A 15 into the USB-C charging port A 5 of the product.
-
Plug the other end of the USB-C cable A 15 into a USB charging port of your car.
The LED indicator A11 lights up.
Adjusting the product
- Turn the adjustment ring A 3 counterclockwise to loosen the charging plate A 1 10.
- Adjust the charging plate A 1 10 to your desired position.
- Turn the adjustment ring A ③ clockwise to fasten the charging plate A ① ⑩ in position.
Charging your device
The product can only be used with devices that support wireless charging. Only use the product with an iPhone 12/13/14 or a phone case with a magnetic insert.
For product CCHAQM15W110BK:
- Place your device on the magnetic charging plate A 10. The product automatically starts charging your device.
The LED indicator A11 starts pulsing.
- Remove your device when fully charged.
The LED indicator A11 lights up.
For product CCHAQ15W110BK
- Press the clamp release button A 4.
- Place your device on the charging plate A 1.
- Press the clamp release button A 4 when your device is fully charged.
- Remove your device.
LED indicator status\*
*Only applicable to CCHAQ15W110BK.
| LED indicator Description | |
| Solid green Indicates the product is ready for use. | |
| Solid blue Indicates the placed device is charging. | |
| Blinking green and blue Indicates the placed device is not compatible with the product. |
Disposal

The product is designated for separate collection at an appropriate collection point. Do not dispose of the product with household waste.
For more information, contact the retailer or the local authority responsible for the waste management.

Kurzanleitung
Lüftungsclip (Abbildung C):
9 Ancrage de support
De Tweeling 28, 5215 MC 's-Hertogenbosch – The Netherlands
- Automatic Wireless Car
- Charger
- Including dual mount
- CCHAQM15W110BK | CCHAQ15W110BK
- Automatic Wireless Car Charger
- Intended use
- Main parts (image A)
- Safety instructions
- WARNING
- Mounting the product (image B, C & D)
- Air vent clip (image C):
- Suction mount (image D):
- Connecting the product to a power source
- Adjusting the product
- Charging your device
- LED indicator status\*
- Disposal
- Kurzanleitung
- Lüftungsclip (Abbildung C):
Brand : NEDIS
Model : CCHAQM15W110BK
Category : Battery charger