
IVW6025A - Dishwasher INVENTUM - Free user manual and instructions
Find the device manual for free IVW6025A INVENTUM in PDF.
| Product type | Fully integrated built-in dishwasher |
| Brand | Inventum |
| Model | IVW6025A |
| Dimensions (W x D x H) | 598 x 550 x 815 mm |
| Built-in height | 815 - 865 mm |
| Net weight | 51 kg |
| Power supply | 220-240 V ~ 50 Hz, 10 A |
| Total power consumption | 1760 - 2100 W |
| Heating power | 1800 W |
| Capacity | 14 place settings |
| Number of programs | 8 (Auto, Intensive, Universal, ECO, Glass, 90 min, Quick, Silent) |
| Number of spray arms | 3 (upper, lower, cutlery tray) |
| Drying system | Turbo |
| Special functions | Half load, Extra dry, 24h timer, Auto door, Aquastop |
| Control panel | Black LED with white display |
| Water supply pressure | 0.04 - 1 MPa (0.4 - 10 bars) |
| Power cord length | 1.50 m |
| Water inlet hose length | 1.50 m |
| Drain hose length | 1.40 m |
| Noise level (Silent program) | Silent operation suitable for night use |
| Maintenance | Regular cleaning of filters and spray arms |
| Safety | Aquastop, child lock not mentioned, earthing required |
| Warranty | 5 years (specific conditions Netherlands) |
| Repairability | Spare parts available via Inventum after-sales service |
Frequently Asked Questions - IVW6025A INVENTUM
User questions about IVW6025A INVENTUM
0 question about this device. Answer the ones you know or ask your own.
Ask a new question about this device
Download the instructions for your Dishwasher in PDF format for free! Find your manual IVW6025A - INVENTUM and take your electronic device back in hand. On this page are published all the documents necessary for the use of your device. IVW6025A by INVENTUM.
USER MANUAL IVW6025A INVENTUM
natural_image
Line drawing of a simple rectangular box with a handle and lid (no text or symbols)2
natural_image
Mechanical component diagram showing a gear-like component with a red rotation arrow and labeled point A (no text or symbols beyond label)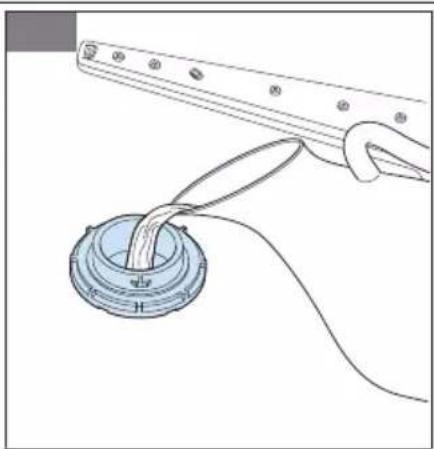
natural_image
Diagram of a mechanical assembly with a central component and connecting wires (no text or symbols)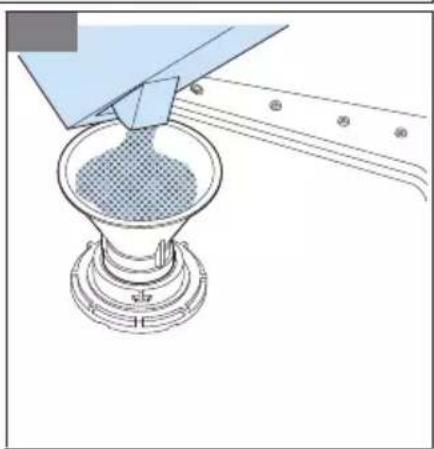
natural_image
Diagram of a funnel pouring liquid into a conical flask (no text or symbols)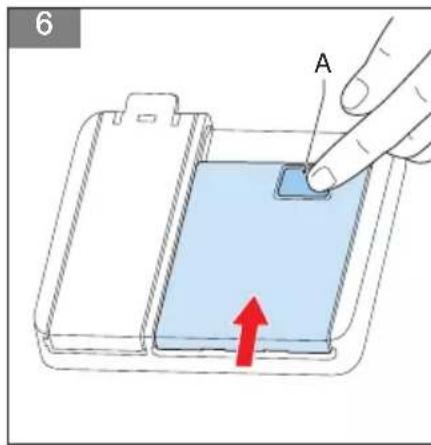
natural_image
Three technical line drawings of a multi-compartment storage tray with grid patterns, no text or symbols present.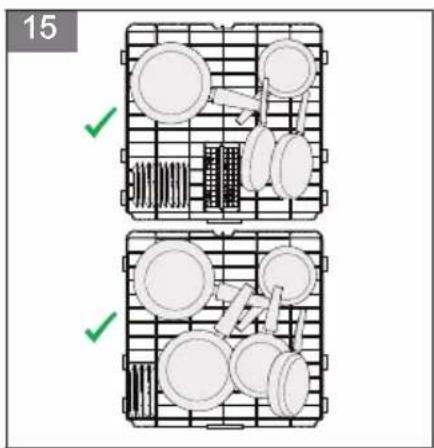
natural_image
Technical diagram of a mechanical or electrical component with internal spring-like structures and grid lines (no text or symbols)

natural_image
Isometric view of a wire cage with metal frames and a red curved arrow indicating motion (no text or symbols)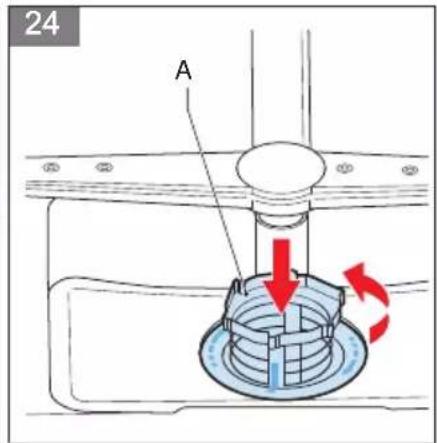

Inhoudsopgave
HET APPARAAT PLAATSEN
HET APPARAAT STOPPEN

Opmerking:
1 Introduction....28
2 Safety....28
3 Specifications....35
4 Description....36
5 Operation....38
6 Cleaning and maintenance....43
7 Extra information....44
8 Troubleshooting....44
9 General terms and conditions of service and warranty....47
1 Introduction
HOW TO USE THIS DOCUMENT
- Read this document completely. Make sure that you know and understand all the instructions.
- Obey the safety instructions to prevent injury and/or damage to the appliance and its surroundings.
- Do the procedures completely and in the given sequence.
- Keep this document in a safe area for future use. This document is a part of the appliance.
SYMBOLS USED IN THIS DOCUMENT
| Safety symbol Function Description | ||
 | Warning | "Warning" means that injury or death is possible if you do not obey the instructions. |
 | Caution | "Caution" means that damage to the appliance is possible if you do not obey the instructions. |
 | Note | "Note" is used to give additional information. |
2 Safety
GENERAL SAFETY INSTRUCTIONS
- Fully read the instruction manual prior to using the appliance.
- Carefully store the instruction manual for future reference.
-
Only use this appliance for the purposes described in the instruction manual. If the appliance is used for other purposes the full responsibility of any consequences lies with the user. Any damages to the appliance or other products are not covered by the warranty.
-
If the safety instructions and warnings are not observed, the manufacturer cannot be held liable for any resulting damage.
- Make sure that the appliance is placed out of reach of children. Children are not always able to understand potential risks. Teach children how to handle electrical appliances in a responsible way.
- This appliance cannot be used by children from 0 to 8 years. This appliance can be used by children aged from 8 years and above and persons with reduced physical sensory or mental capabilities or lack of experience and knowledge if they have been given supervision or instruction concerning use of appliance in a safe way and understand the hazards involved.
- Keep the appliance and the mains cable out of reach of children younger than 8 years.
- Children are not allowed to perform cleaning and maintenance.
- Do not let children play with the appliance.
DELIVERY
- Do a check for damage to the packaging or the appliance that resulted during transportation.
- Do not use a damaged appliance. Contact your supplier.
- Dispose of the packaging materials according to local regulations.
- Keep the packaging material out of reach from children. Danger of suffocation.
INSTALLATION
- This appliance should be installed and repaired by an authorized service only.
- Place and connect the appliance according to the installation regulations.
-
Make sure that the appliance is not plugged in during placement.
-
Check whether the indoor electrical fuse system is connected according to the regulations.
- All electrical connections must match the values of the rating plate.
- If the mains cable is damaged, it can only be replaced by the service organizations of the manufacturer or equivalent qualified persons.
- Make sure that the appliance is not placed on the mains cable.
- Do not use an extension cable or a multiple socket for the connection. The mains plug must be easily accessible after installing the appliance.
- Do not excessively bend the water inlet and drain hoses or the mains cable during installation. Make sure that the water inlet and drain hoses or the mains cable do not become stuck.
• After installing the appliance, make sure that you run the appliance without dishes for the first time.
POSITIONING THE APPLIANCE
- When determining the place of the appliance, make sure that you choose a place where you can easily load and unload it.
- Do not place the appliance in a location where the room temperature can be below 0°C.
- Place the appliance close to a water tap or drain and mains socket. Keep in mind that the connections will not be changed when they are made.
- Do not hold the appliance at the door or control panel to move it.
- Make sure that the water inlet and outlet hoses do not get stuck while placing the appliance.
- Place the appliance in a safe and level location.
- Make sure that the appliance is level and balanced by adjusting the feet. When the appliance is placed correctly the door opens and closes easily.
WATER CONNECTION
- Make sure that the indoor plumbing is suitable for installing the appliance.
• Install a filter at the water supply to avoid damage to the appliance due to contamination from the water (sand, clay, rust, etc.). - Use the new water inlet hose supplied with the appliance. Before making the connection, run water through the hose.
- Make sure that you connect the water inlet hose directly to the water tap. The pressure of the water tap must be a minimum of 0,03 MPa and a maximum of 1 MPa. Install a pressure relief valve if the pressure is more than 1 MPa.
• After connecting the appliance, open the water tap completely and do a check for leaks. - The appliance is supplied with a double-walled aquastop. The system automatically cuts off the water supply if the water inlet hose is leaking and the space between the walls is filled with water. Do not cut into the aquastop and make sure that the aquastop does not get twisted or stuck.
- Do not use a drain hose that is longer than 4 meter. As a result, dishes can remain dirty. The manufacturer will not accept responsibility.
- The water drain hose can be connected either directly to a drain pipe with a minimum diameter of 4 cm, or let the hose run into the sink, making sure to avoid bending or crimping it. The free end of the hose must be at a height between 40 and 100 cm and must not be immersed in water.
- The appliance must be connected to the water mains using the newly supplied hose sets. Do not reuse old hose sets.
ELECTRICAL CONNECTION
- Make sure that the mains plug of the appliance is connected to a grounded mains socket. The manufacturer is not responsible for
damage resulting from using the appliance with a mains socket that is not grounded.
- Make sure that the voltage and the frequency values for the current correspond to the values of the rating plate.
- The electrical system in your home must be supplied with a 16 Amp fuse. The appliance is designed for connecting to 220-240 V \~50Hz.
- Do not connect the appliance during placement.
- Use the provided mains plug.
- The mains cable of the appliance must only be replaced by an authorized service or an authorized electrician. Failure to do so can lead to accidents.
- For safety reasons, make sure that you disconnect the mains plug when a program has finished. Do not disconnect the mains plug when your hands are wet. This can result in electric shock.
- Always pull the mains plug when you disconnect the appliance. Do not pull the mains cable.
SAFETY INSTRUCTIONS FOR OPERATION
- This appliance is intended to use in household and similar applications, such as shops, offices and other working environments, farm houses, customers of motels, hotels and other residential environments and bed and breakfasts.
- For safety reasons, only use accessories and spare parts from the manufacturer that are suitable for your appliance.
- This appliance must be grounded, this prevents the risk of electric shock in the event of an error or fault. The appliance has a grounded mains cable and mains plug. Only connect the mains plug to a grounded mains socket that is installed according to local electrical regulations.
- Incorrectly connecting the mains cable can result in a life threatening situation. In case of doubt, contact a qualified electrician or service technician.
- Do not make changes to the mains plug. If the mains plug does not fit into the mains socket, contact a qualified electrician.
- Do not place heavy objects on the opened door of the appliance.
- Do not stand on the opened door of the appliance. The appliance can fall over which can result into damage to the appliance.
- Do not put any chemical dissolving agents such as solvents in the appliance. There is a risk of explosion.
- Do not clean unsuitable plastic dishes in the appliance. Only dishes with a mark, indicating that they are dishwasher-safe can be cleaned in the appliance. Follow the instructions of the manufacturer when dishes do not have a mark.
- Only use detergent, rinse aid and salt that is intended for dishwashers. The manufacturer will not be responsible for any damage resulting from using unsuitable products.
- Keep detergent and rinse aid out of reach of children.
- Keep children away from the appliance when the door is open. There can be cleaning agent present in the appliance. When cleaning agent is swallowed, immediately consult a doctor and take the packaging.
- Some dishwasher detergents are strongly alkaline and can be extremely dangerous if swallowed. Avoid contact with the skin and eyes. Keep children and pets away from the appliance when the door is open. Check that the detergent reservoir is empty after completion of the wash cycle.
- Keep the door closed. You can fall.
- Avoid contact between the cleaning agent and your skin and eyes.
- Make sure that all loose components in the appliance are fitted correctly.
-
Do not open the door of the appliance during operation. Hot water can come out.
-
Do not use the appliance for any other purpose than washing dishes.
- Only use the appliance in a frost free room.
- Remove the door or deactivate the lock when disposing of the appliance. Make sure that children cannot lock themselves in an old appliance.
- Make sure that the detergent reservoir is empty at the end of a wash cycle.
- Make sure that you fill the salt and rinse aid reservoir before first use and when the indicators are on.
- Make sure that you set the salt consumption before use.
- Make sure that you disconnect the appliance before cleaning or performing repairs. Remove the mains plug from the mains socket or turn off the switch in the fuse box.
- Make sure that long and/or sharp items of cutlery are placed facing down in the cutlery basket or are placed horizontally in the upper basket or the cutlery drawer.
- Do not put any items in the appliance that are not suitable for dishwashing.
- Do not fill a basket above the capacity. The manufacturer will not be responsible for damage to the appliance caused by movement of a basket.
- Do not drink the water from the appliance. The water is not suitable for consumption.
- Malfunctions of the appliance must be repaired by a qualified service technician. Repairs that are performed by other persons are not covered by the warranty.
ENVIRONMENTALLY-FRIENDLY DISPOSAL

Note:
- Recycling - WEEE
- Dispose of packaging in an environmentally-friendly manner.
- This appliance is labelled in accordance with European Directive 2012/19/EU concerning used electrical and electronic appliances (waste electrical and electronic equipment - WEEE). The guideline determines the framework for the return and recycling of used appliances as applicable throughout the EU.
3 Specifications
GENERAL SPECIFICATIONS
| Item Specification | |
| Fully integrated Yes | |
| Color of control panel Black with white LED | |
| Number of spray arms 3 | |
| Upper basket height adjustable Yes | |
| Maximum amount of place settings 14 | |
| Half-load option Yes | |
| Extra-dry option Yes | |
| Timer [hours] 24 | |
| Aquastop Yes | |
| Type of drying system Turbo |
DIMENSIONS AND WEIGHT
| Item Specification | |
| Dimensions (W x D x H) [mm] 598 x 550 x 815 | |
| Built-in height [mm] 815-865 | |
| Built-in width [mm] 600 | |
| Built-in depth [mm] 580 | |
| Height of appliance door (min. & max.) [mm] | 682-720 |
| Net weight [kg] | 51 |
| Gross weight [kg] | 57 |
| Weight of appliance door (min. & max.) [kg] | 5-10 |
TECHNICAL SPECIFICATIONS
| Item Specification | |
| Total power consumption [W] | 1760 - 2100 |
| Heating power [W] | 1800 |
| Rated voltage [V] / frequency [Hz] | 220-240 / 50 |
| Water supply pressure [MPa] | 0.04 (0.4 bar) - 1 (10 bar) |
| Current [A] | 10 |
| Length of mains cable [m] | 1.50 |
| Type of mains plug | EU/TR |
| Type of supply hose connection | 3/4 inch, inner thread |
| Position of supply hose | Left rear |
| Length of supply hose [m] | 1.50 |
| Position of outlet hose Left rear | |
| Length of outlet hose [m] 1.40 |
4 Description
INTENDED USE
The appliance is intended to wash dishes.
Do not use the appliance for any other purpose than described in this document.
BUILT-IN DISHWASHER
(Figure 1)
| A Nozzle of the cutlery drawer | G Detergent and rinse aid reservoir |
| B Cutlery drawer | H Cutlery basket |
| C Upper basket | I Salt reservoir |
| D Lower basket | J Filters |
| E Rating plate | K Lower spray arm |
| F Control panel | L Upper spray arm |
| Item Function | |
| Nozzle of the cutlery drawer To clean the dishes in the cutlery drawer. | |
| Cutlery drawer Refer to section | Loading the appliance. |
| Upper basket Refer to section | Loading the appliance. |
| Lower basket Refer to section | Loading the appliance. |
| Rating plate To show the specifications of the appliance. | |
| Control panel Refer to section | Control panel. |
| Detergent and rinse aid reservoir To hold the detergent and rinse aid. | |
| Cutlery basket | Refer to section Loading the appliance. |
| Salt reservoir | To hold the salt. |
| Filters | To keep the appliance free from contamination. |
| Lower spray arm | To clean the dishes in the lower basket. |
| Upper spray arm | To clean the dishes in the upper basket. |
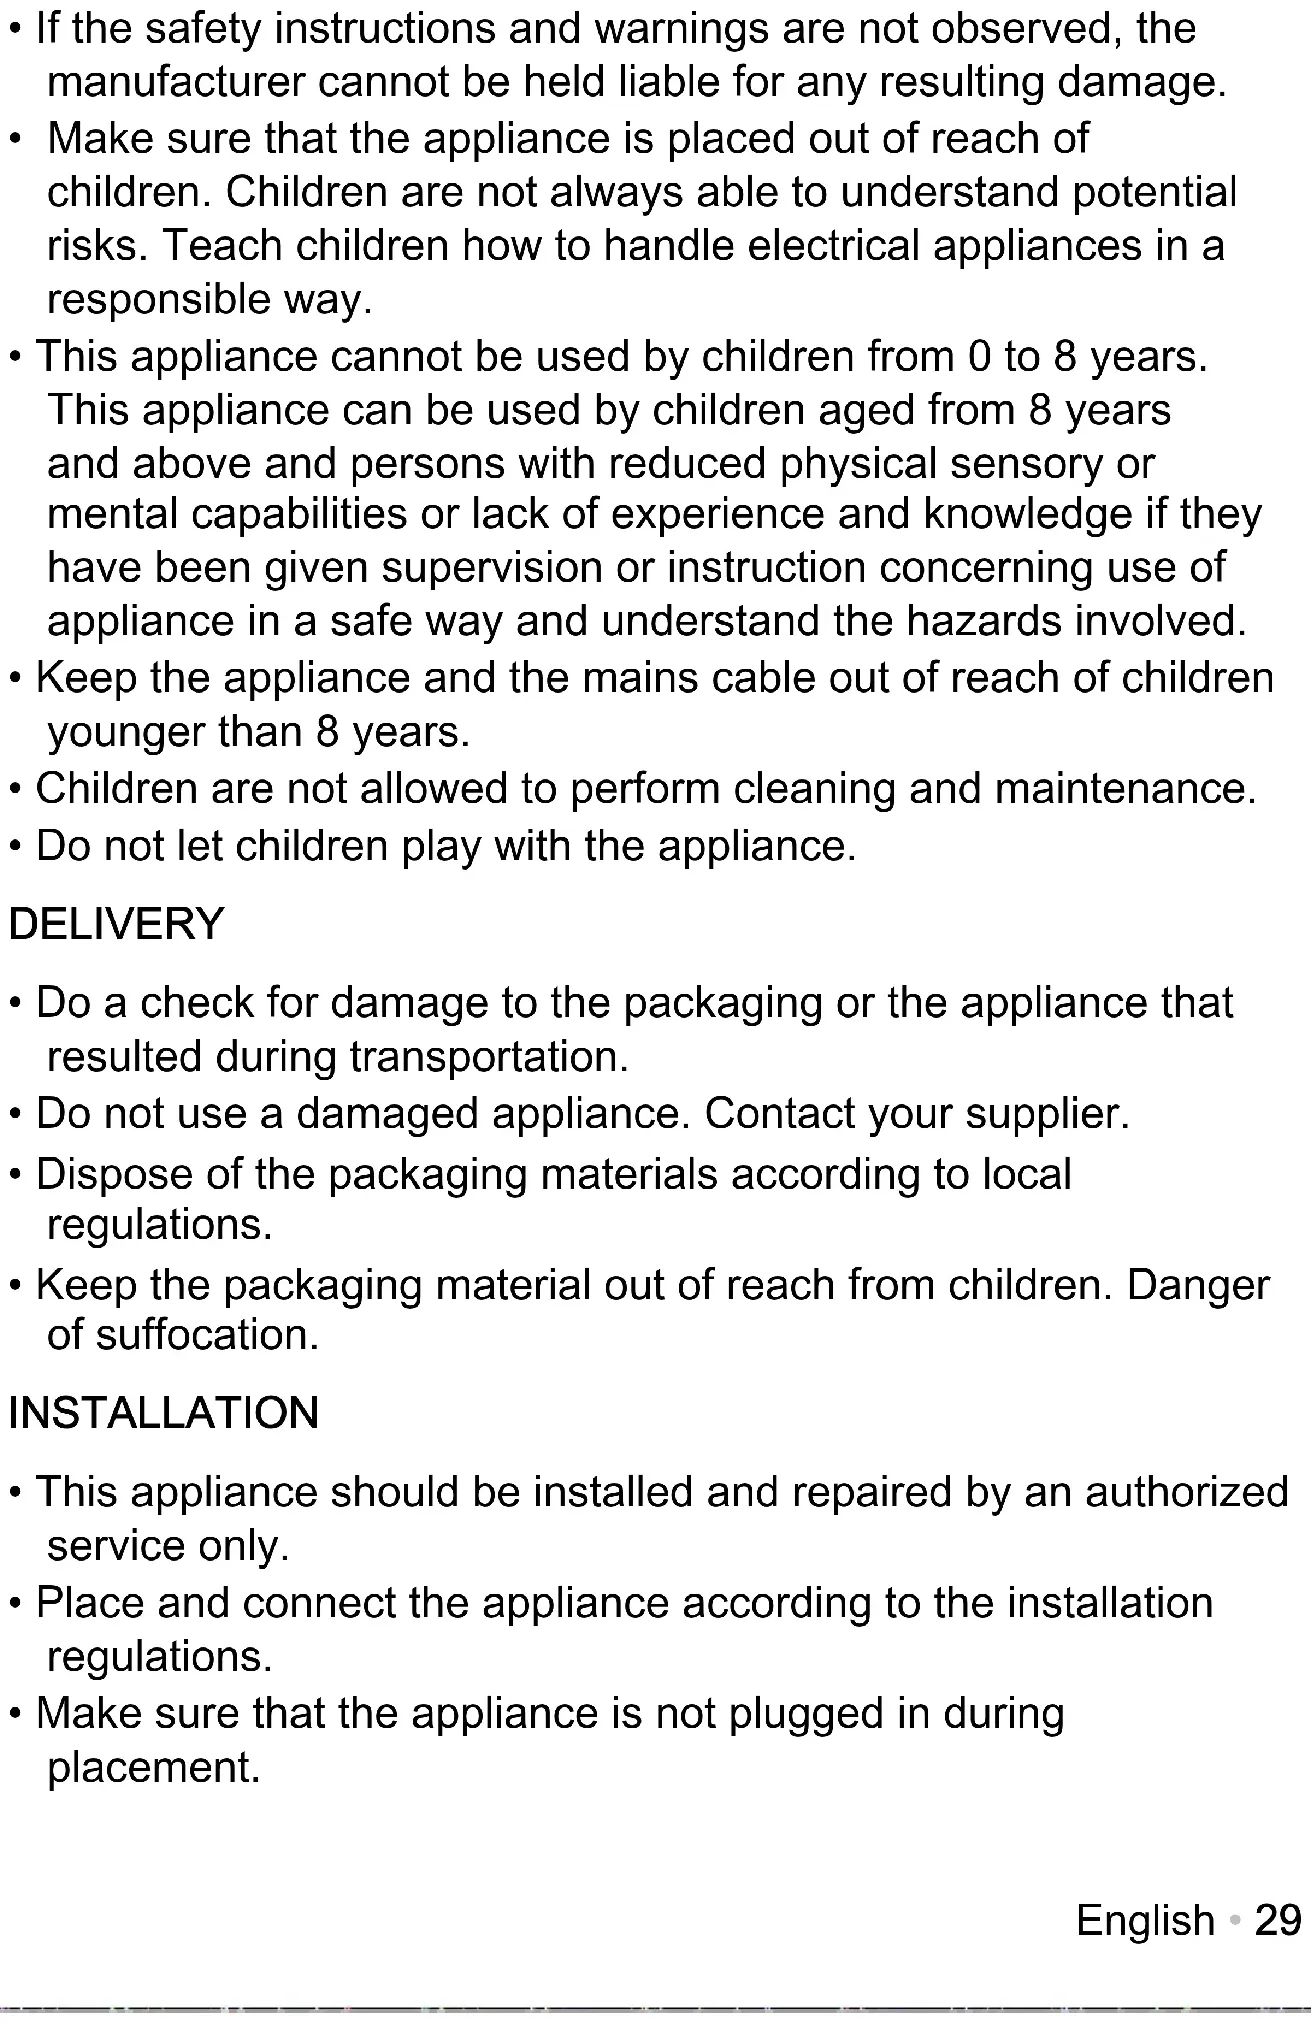
CONTROL PANEL
(Figure 2)
| A Timer indicator | F Half-load |
| B Warning indicator | G Delay |
| C Program indicator | H Program |
| D Function indicator | I Power |
| E Extra drying | J Auto door |
| Item Function | |
| Timer indicator | To show the remaining time, delay time, error code etc. |
| Warning indicator | The dishwasher is low on dishwasher rinse aid or dishwasher salt and requires a refill. |
| Program indicator | To show the selected program. Refer to section Programs. |
| Function indicator The dishes in the indicated rack will be washed. | |
| Extra drying For better drying result. | |
| Half-load | Press the button to select whether the upper spray arm or the lower spray arm will work. |
| Delay | Press this button to set the delayed hours for washing. You can delay the start of washing up to 24 hours. One press on this button delays the start of washing by one hour. |
| Program | Press this button to select the appropriate washing program. The program indicator comes on. |
| Power To start or stop the appliance. | |
| Auto door | After the program has ended, the door will open automatically to achieve better drying results. The auto door option can be turned off by pressing the button for 3 seconds. The auto door indicator will fade out in the display. This setting will be saved for future use, unless the auto door function is turned on again. The auto door option can be turned on again by pressing the button for 3 seconds. The indicator comes on in the display. |
PROGRAMS
| Icon Name Description | Time [min.] | ||
 | Automatic Auto sensing | wash, lightly, normally or heavily soiled crockery, with or without dried-on food. | 85-150 |
 | Intensive For heaviest | soiled crockery, and normally soiled pots, pans, dishes etc. With dried-on food. | 205 |
 | Universal For normally | soiled loads, such as pots, plates, glasses and lightly soiled pans. | 175 |
| ECO | ECO Daily program for | normally soiled dishes. The program takes longer, but uses less water and slowly heats for lower energy consumption. | 220 |
 | Glass For lightly soiled | crockery and glass. | 120 |
 | 90 minutes For normally soiled loads that need quick wash. 90 | ||
 | Rapid A shorter wash for lightly soiled loads that do not need drying. | 30 | |
 | Silence This program is suitable for glasses and crockery with normal soil. It operates more quietly and can be used in the evening or at night. | 270 |

Note:
The eco program is suitable to clean normally soiled dishes. It is the most efficient program because of the combined energy and water consumption and it complies with the EU ecodesign legislation.
5 Operation
PREPARING FOR OPERATION
- Do a check if the electricity and the water supply connections of the appliance match the values indicated in the installation instructions.
- Remove all packaging material inside the appliance.
- Fill the salt reservoir. Refer to section Filling the salt reservoir.
- Fill the rinse aid reservoir. Refer to section Filling the rinse aid reservoir.
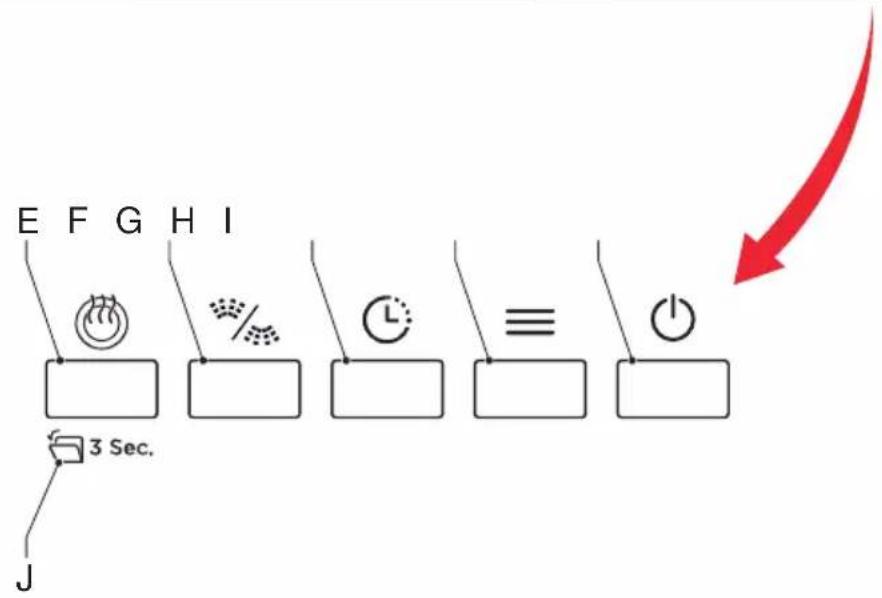
FILLING THE SALT RESERVOIR
For a good result the appliance needs soft (less calcareous) water. Salt is used to soften the water and it prevents white lime residues on your dishes and the interior of the appliance.

Caution:
Only use salt that is suitable for a dishwasher. Do not use table salt.

Note:
Fill the salt reservoir when the salt indicator on the control panel is on.
- Remove the lower basket.
- Turn the cap (A) of the salt reservoir counter-clockwise to remove it.
- Fill the salt reservoir with water.
(Figure 3)
(Figure 4)

Note:
You only have to fill the salt reservoir with water before first use of the appliance.
-
Put a funnel in the opening of the salt reservoir.
-
Fill the reservoir with salt until the overflow level.
- Install the cap of the salt reservoir.
(Figure 5)

Caution:
Remove any spilled salt immediately and run a full program to prevent corrosion of the appliance.
SETTING THE LEVEL OF SALT CONSUMPTION
The salt consumption of the appliance depends on the level of water hardness.
Set the level of salt consumption according to the information in section Troubleshooting table.

Note:
Contact your local water company to verify the level of water hardness in your area.

Note:
As a default, the level of water hardness of the appliance is set to level H3.
- Push the on/off button to start the appliance.
- Push and hold, for 5 seconds or longer, the program selector button within 1 minute after the appliance starts.
- Push the program selector button again to change the level of water hardness.
- Push the on/off button to confirm the setting.
FILLING THE DETERGENT RESERVOIR

Warning:
Store detergent out of reach of children in a cool and dry place.

Caution:
Only use detergent that is suitable for dishwashers.

Caution:
Do not put a detergent tablet in the cutlery basket, only use the detergent reservoir.

Note:
Detergent is available in powder, gel and tablets and is also available as a combined product (with salt and/or rinse aid). Combined products only produce sufficient results under certain conditions. Observe the instructions of the packaging.
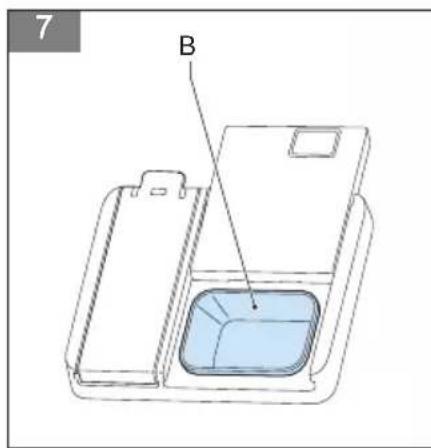
- Make sure that you fill the detergent reservoir before you start the appliance.
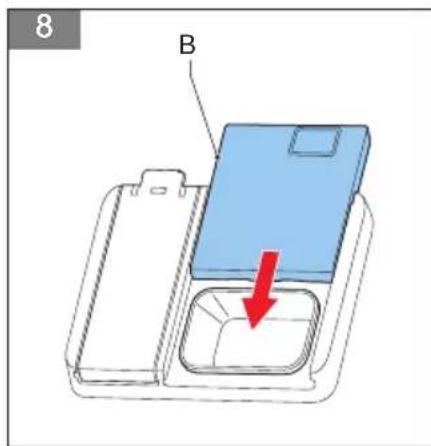
- Push the latch (A) to open the detergent reservoir.
- Fill reservoir (B) with detergent.
(Figure 6)
(Figure 7)

Caution:
The detergent reservoir has a capacity of 40 grams. Do not overfill the detergent reservoir. This can result in poorly dissolving detergent and damage to your glassware.
- Close the detergent reservoir.
- Select a program.
- Close the door.
(Figure 8)
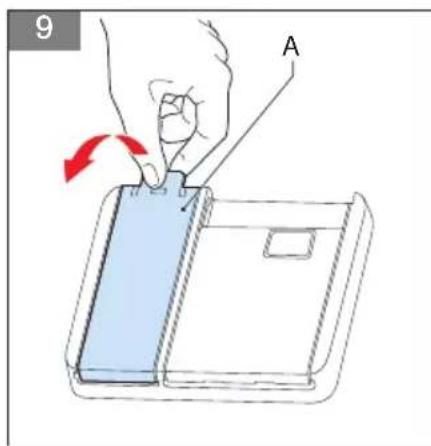
FILLING THE RINSE AID RESERVOIR
Rinse aid is used to prevent traces of water droplets on clean dishes and increases drying performance.

Caution:
Only use rinse aid that is suitable for dishwashers.

Note:
Fill the rinse aid reservoir when the rinse aid indicator on the control panel is on.
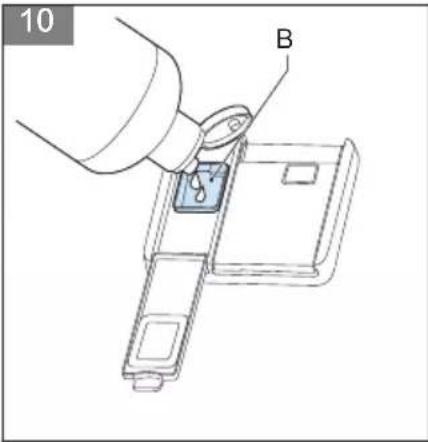
- Remove the rinse reservoir cap (A) by lifting up the handle.
(Figure 9)
- Pour the rinse aid into the dispenser (B), being careful not to overfill.
(Figure 10)

Caution:
Remove any spilled rinse aid immediately. Spilled rinse aid can form extreme foam which can cause leaks.
- Close the cap.
SETTING THE LEVEL OF RINSE AID CONSUMPTION
When water stains form on your dishes after a wash cycle, you have to increase the level of rinse aid consumption. When blue stains form on your dishes after a wash cycle, you have to decrease the level of rinse aid consumption.
-
Open the door and switch on the appliance.
-
Within 60 seconds after the appliance was switched on, press the program button for 5 seconds. Press the Delay button to enter the set model. The rinse aid indicator blinks at 1Hz frequency.
-
Press the Program button again to select the proper set according to your using habits. The setting will change in the following sequence: D1->D2->D3->D4->D5->D1. The higher the number, the more rinse aid the dishwasher uses.
-
Wait for 5 seconds or press the Power button to complete the setup and exit the setting mode.
When set to a low number, the appliance uses less rinse aid. When set to a high number, the appliance uses more rinse aid.
- Close the cap.
LOADING THE APPLIANCE
Correctly placing dishes into the appliance has a positive effect on the energy consumption and the washing and drying performance of your appliance.
You can place dishes in the cutlery drawer or the cutlery basket, the upper basket and the lower basket.

Caution:
Make sure that you load the appliance in such a way that the dishes do not block the upper and lower spray arm. If the spray arms are blocked they cannot spin during washing.
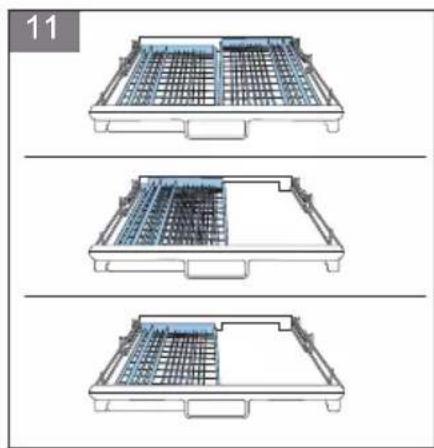
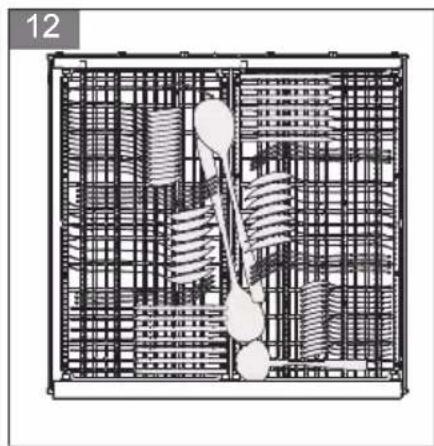
Loading the cutlery drawer
The cutlery drawer is designed for loading cutlery. You can remove the cutlery drawer partly to create more space in the upper basket or you can remove it completely for easy loading.
- If necessary, remove the cutlery drawer partly from the appliance.
(Figure 11)
-
If necessary, remove the cutlery drawer from the appliance.
-
Place the cutlery items in the drawer.
(Figure 12)
Loading the cutlery basket
The cutlery basket is designed for loading cutlery.

Warning:
Place sharp items of cutlery, such as knives and forks, face down in the cutlery basket to prevent injury.

Caution:
Make sure that there are no items of cutlery sticking out of the bottom of the basket.
- Place the cutlery piece by piece in a compartment of the cutlery basket to make sure that the spray arms can reach all items.
(Figure 13)
Loading the upper basket
The upper basket is designed for loading cups and saucers, small bowls and glasses. You can both adjust the height of the upper basket and the height of the racks of the upper basket to create more space.
-
If necessary, adjust the height of the racks of the upper basket. Refer to section Adjusting the height of the upper basket.
-
If necessary, adjust the height of the upper basket. Refer to section Adjusting the height of the upper basket.
-
Place the dishes in the upper basket.
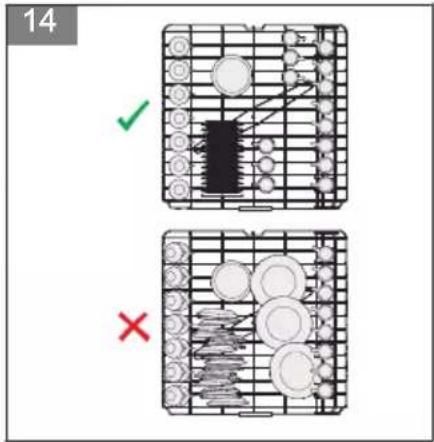
(Figure 14)
- Make sure that you place wine glasses and long-stem glasses against the edge of the basket, rack or glass supporter wire.

Caution:
Do not place wine glasses and long-stem glasses against other items to prevent damage to the glasses.
- Place long, small cooking utensils, such as wooden spoons, in the middle of the upper basket.
Loading the lower basket
The lower basket is designed for loading pots with long handles, pans, lids, plates and salad bowls. The lower basket also has space for the cutlery basket. You can fold the racks of the lower basket to create more space for larger items.
-
If necessary, fold the racks of the lower basket. Refer to section Folding the racks of the lower basket. (Figure 15)
-
Place the dishes in the lower basket. (Figure 16)
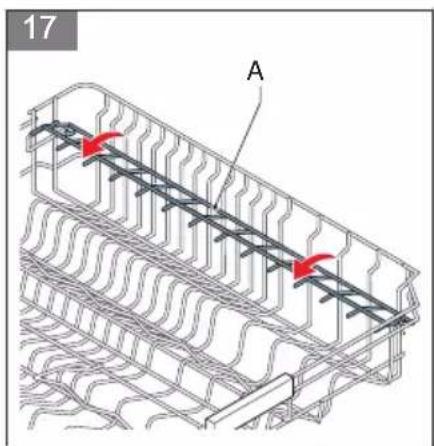
ADJUSTING THE HEIGHT OF THE RACKS OF THE UPPER BASKET
The racks can be moved up to create more space in the upper basket, for example to place different-sized glasses under the racks or to place cutlery items on the racks.
- Move the racks (A) up or down. (Figure 17)
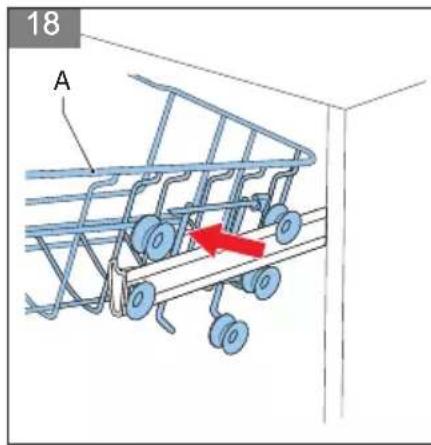
ADJUSTING THE HEIGHT OF THE UPPER BASKET
The complete upper basket can be moved to create more space in the upper basket or in the lower basket. When the upper basket is in the upper position, you can place large items, such as pots and large plates, in the lower basket. When the upper basket is in the lower position, you can place large plates in the upper basket.
-
Pull out the upper basket.
-
Remove the upper basket (A). (Figure 18)
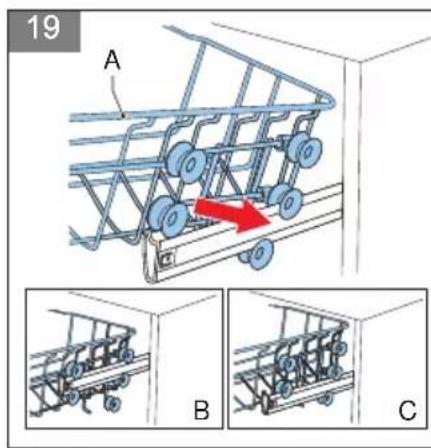
-
Install the upper basket (A):
(Figure 19)
a. Install the basket in the upper runners to put the basket in the lower position (B).
b. Install the basket in the lower runners to put the basket in the upper position (C).
- Push in the upper basket.
FOLDING THE RACKS OF THE LOWER BASKET
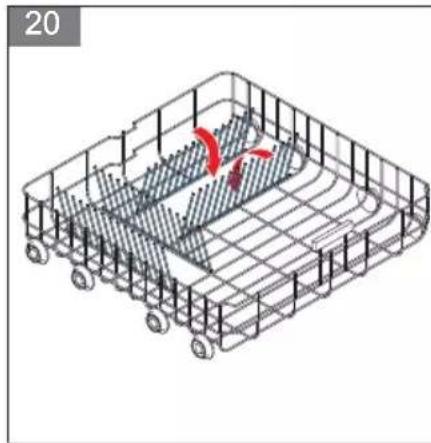
The racks can be folded down to create more space in the lower basket, for example to place large items (pots, pans, etc.) in the basket. The racks can be folded separately or together.
(Figure 20)
- Push the racks to fold them down.
- Pull the racks upwards to put them in the up position.
STARTING THE APPLIANCE
- Push the on/off button to start the appliance. The program indicator on the display goes on.
CHOOSING A PROGRAM

Note:
For an overview of the programs, refer to section Programs.
- Use the program selector button to choose a program.
- Use the timer button to delay the start time of the program. Refer to section Delaying the program
- Close the door to start the program.
CHANGING THE PROGRAM

Note:
You can only change the program shortly after the appliance has started.
- Carefully open the door to avoid water spillage.
- Push and hold one of the program selector buttons for 3 seconds.
- Push the program selector button to choose the program.
- Close the door.
The newly selected program will resume the course of the previously selected program.
DELAYING THE PROGRAM

Note:
The start time of a program can be delayed up to 24 hours.
- Push the timer button to delay the start time of a program. Every time you push the button the start time will be delayed with 1 hour.
- Push the timer button again to increase the delay of the start time or to cancel the timer.
- Close the door to activate the timer.
The program will start when the timer has finished.
STOPPING THE APPLIANCE

Note:
The appliance is silent for 40 to 45 minutes during the drying process.

Note:
A buzzer sounds five times when the program is finished.

Note:
The diswasher door must not be blocked when set to open automatically. This can disrupt door lock functionality.

Note:
The floor lamp blinks for 5 minutes to indicate the program is finished.
- Open the door if the automatic door function is disabled.
- Wait a few minutes before you unload the appliance. The dishes are very hot and can break.
- Push the on/off button to switch off the appliance.
6 Cleaning and maintenance
CLEANING THE APPLIANCE

Caution:
Make sure that the appliance is off.

Note:
If you clean the appliance regularly, it will improve the service life.
- Clean the outside of the appliance. Use a damp cloth.
- Clean the seals of the door. Use a soft cloth.
- Clean the inside of the appliance in case of high contamination:
a. Fill the detergent reservoir with a special cleaning agent for dishwashers.
b. Select a program with a high temperature.
c. Start the program.
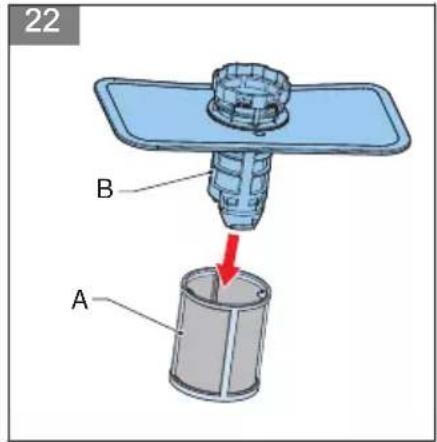
CLEANING THE FILTERS
The filter system of the appliance consists of three components: the main filter, the micro filter and the sieve. Clean the filters weekly.

Warning:
Do not use the appliance without the filter system.

Note:
Clean filters make sure that your appliance functions correctly.
- Remove the lower basket.
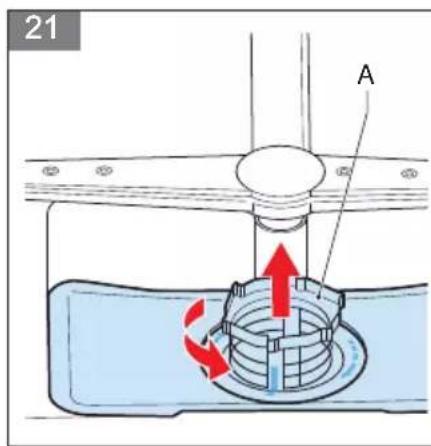
- Turn the main filter (A) counter-clockwise to remove it.
(Figure 21)

Note:
The micro filter and the sieve are attached to the main filter.
- Remove the micro filter (A) from the filter assembly (B).
(Figure 22)
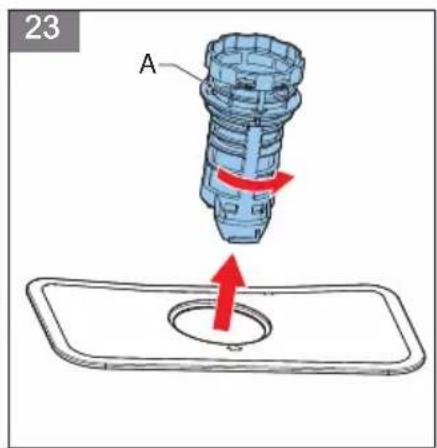
- Turn the main filter (A) counter-clockwise to remove it.
(Figure 23)
- Clean the main filter, the micro filter and the sieve. Use warm water and a dishwasing brush.
- Install the sieve.
- Install the main filter into the micro filter. Make sure that the markers are aligned.
- Install the main filter into the sieve.
- Turn the main filter (A) clockwise to fasten it.
(Figure 24)

Caution:
Make sure that the filters are placed correctly. Incorrect placement of the filters affects the maximum performance of the appliance.
CLEANING THE SPRAY ARMS
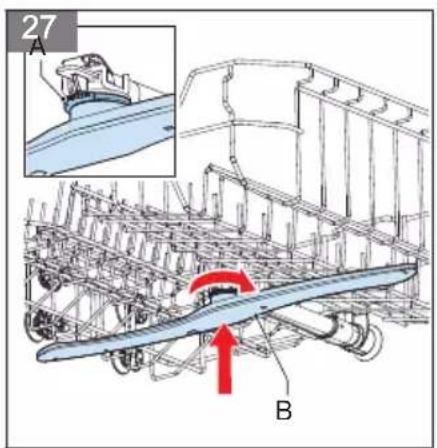
- Hold the nut (A) in the center still and rotate the upper spray arm (B) counter clockwise. (Figure 25)
- Pull the lower spray arm (A) upwards to remove it. (Figure 26)
- Clean the spray arms. Use soapy and warm water and use a soft brush to clean the jets.
- Hold the nut (A) in the center still and rotate the upper spray arm (B) clockwise. (Figure 27)
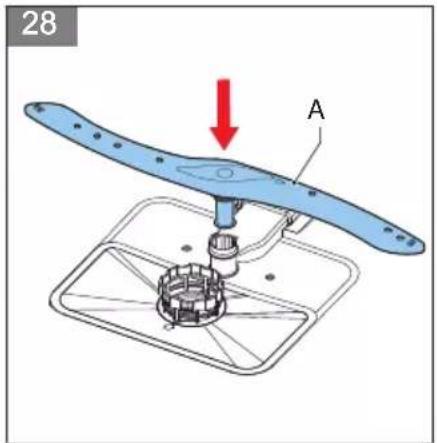
- Push the lower spray arm (A) down to put it back. (Figure 28)
7 Extra information
WATER HARDNESS LEVEL SETTINGS (SALT CONSUMPTION)
| Level | German hardness [dH] | French hardness [dF] British hardness [dE] Program selector button on | ||
| H1 0-5 0-9 | 0-6 Quick '30, on | |||
| H2 6-11 10 | 20 7-14 Quick '90, on | |||
| H3 12-17 2 | 1-30 15-21 Quick '90 and Quick '30, on | |||
| H4 18-22 3 | 1-40 22-28 Eco, on | |||
| H5 23-34 4 | 1-60 29-42 Eco and Quick '30, on | |||
| H6 35-50 6 | 1-90 43-63 Eco and Quick '90, on | |||
8 Troubleshooting
GENERAL TROUBLESHOOTING PROCEDURE
- Try to find a solution for the problem with the help of the troubleshooting table and the fault codes.
- If the fault code keeps re-occurring, contact the Inventum-servicedienst.
TROUBLESHOOTING TABLE
| Problem Possible cause Possible solution | ||
| The program does not start. | The mains plug is not connected. Connect the mains plug. | |
| There is a problem with the fuse. | Do a check on the fuse box. | |
| There is no water supply. | Open the water tap. | |
| The door of the appliance is open. Close the door. | ||
| The appliance is switched off. | Start the appliance. Refer to section Starting the appliance. | |
| The water inlet hose and filters are clogged. | Make sure that the water inlet hose and the filters are not clogged. | |
| The detergent reservoir contains detergent residues. | The detergent reservoir is filled while the reservoir was still damp. | Make sure that you fill the detergent reservoir when it is dry. |
| The appliance contains water when the program is finished. | The drain hose is clogged or twisted. | Make sure that the drain hose is not clogged.Make sure that the drain hose is not twisted. |
| The filters are clogged. | Clean the filters. Refer to section Cleaning the filters. | |
| The program has not finished. | Wait until the program is finished.A buzzer sounds five times when the program is finished. | |
| The appliance stops during a program. | There is a power failure. Make sure that there is power. | |
| There is a water inlet failure. | Make sure that there is water inlet supply. | |
| The program is paused. Start the program. | ||
| The appliance makes unusual sounds during a program. | The appliance is not loaded correctly. | Make sure that you load the appliance correctly. Refer to section Loading the appliance. |
| One of the spray arms hits the dishes. | Make sure that you load the appliance correctly. Refer to section Loading the appliance. | |
| There is food waste left on the dishes. | The appliance is not loaded correctly and the spray arms cannot reach all the dishes. | Make sure that you load the appliance correctly. Refer to section Loading the appliance. |
| The cutlery basket is too full. | Make sure that you load the appliance correctly. Refer to section Loading the appliance. | |
| The dishes are placed too close together. | Make sure that you load the appliance correctly. Refer to section Loading the appliance. | |
| The amount of detergent is insufficient. | Make sure that you fill the detergent reservoir with a sufficient amount of detergent. Refer to section Filling the detergent reservoir. | |
| The selected program is not suitable for the loaded dishes. | Choose a suitable program. Refer to section Programs. | |
| One of the spray arms is clogged. | Clean the spray arms. Refer to section Cleaning the spray arms. | |
| The filters are clogged. | Clean the filters. Refer to section Cleaning the filters. | |
| The filters are not placed correctly. | Make sure that you correctly place the filters. | |
| The water drain pump is clogged. | Make sure that the water drain pump is not clogged. | |
| There are white stains on the dishes. | The amount of detergent is insufficient. | Make sure that you fill the detergent reservoir with a sufficient amount of detergent. Refer to sectionCleaning the filters. |
| The level of rinse aid consumption is set too low. | Adjust the level of rinse aid consumption. Refer to sectionSetting the level of rinse aid consumption. | |
| There is a high level of water hardness and no salt is used. | Fill the salt reservoir. Refer to sectionFilling the salt reservoir. | |
| The level of water hardness is set too low, which affects the salt consumption. | Adjust the level of salt consumption. Refer to sectionSetting the level of salt consumption. | |
| The cap of the salt reservoir is not closed correctly. | Make sure that the cap of the salt reservoir is closed firmly. | |
| The dishes are not dry. | The selected program does not include drying. | Choose a program that includes drying. Refer to sectionPrograms. |
| The level of rinse aid consumption is set too low. | Adjust the level of rinse aid consumption. Refer to sectionSetting the level of rinse aid consumption. | |
| The appliance is unloaded too quickly after the program is finished. | Wait a few minutes after the program is finished before you unload the appliance. | |
| There are rust stains on the dishes. | The stainless steel quality of the dishes is insufficient. | Make sure that you only clean dishwasher-safe dishes in the appliance. |
| The level of salt consumption is set too high. | Adjust the level of salt consumption. Refer to sectionSetting the level of salt consumption. | |
| The cap of the salt reservoir is not closed correctly. | Make sure that the cap of the salt reservoir is closed firmly. | |
| Any spilled salt during filling of the salt reservoir was not cleaned immediately. | Make sure that you clean any spilled salt immediately and run a full program to prevent corrosion. | |
| The water supply is polluted. Do a check on the water supply. | ||
FAULT CODES
The fault codes are shown on the display of the control panel.
| Fault code Possible cause Possible solution | ||
| E1 | There is insufficient water supply. | Make sure that the water tap is fully open and that the water supply is not blocked.Close the water tap, remove the water inlet hose and do a check if the hose is clogged.Start the appliance again.Contact the Inventum-servicedienst if the fault code keeps re-occurring. |
| E3 The heater has an error. Contact the Inventum-servicedienst. | ||
| E4 | The safety for water overflow is activated. | Contact the Inventum-servicedienst. |
| Ed Error in the electronics. Contact the Inventum-servicedienst. | ||
9 General terms and conditions of service and warranty
5-year Inventum warranty!
- Customers enjoy a 5-year full manufacturer's warranty on all Inventum products.
- Within this period, a defective product or part, which makes normal functioning of the product or part impossible, will always be repaired free of charge or, if repair is not possible and/or does not provide a solution, replaced (by the same or equivalent products). The assessment of this lies with Inventum.
- In order to make a claim under the 5-year Inventum warranty, you must, within two months after discovering the fault or defect, either return the product to the shop where you bought it, or contact the Inventum customer service department by using the form at 'https://www.inventum.eu/service'.
- The warranty period starts from the date stated on the product's original sales receipt.
- To invoke the warranty, you must always send a copy of the original proof of purchase with the service request and present the original proof of purchase to the service technician.
- The 5-year warranty applies only to normal domestic use of Inventum products within the Netherlands.
Warranty exclusions
- The 5-year Inventum guarantee does not apply in case of: normal wear and tear, consumables, improper use, insufficient or incorrect maintenance, incorrect and/or inexpert assembly and installation of the appliance, repairs by unauthorized third parties, business or commercial use, missing serial number, damage caused by an external cause. This enumeration is not exhaustive.
- B-choice products and products that have been built-in in a showroom are not covered by the 5-year Inventum warranty. All optical damage such as dents, scratches and slight traces of use are excluded from any warranty.
Reporting malfunctions on Inventum products
- Faults or defects on Inventum products can be reported by using the service request form on the website 'https://www.inventum.eu/service' or through the seller of the product.
- A copy of the original proof of purchase must be included with the request.
- Inventum's service department determines whether the product will be repaired or replaced, based on the request and the sales receipt.
Important to know
- Products sent without prior notification will not be accepted. Further to the notification, you will be informed by Inventum whether a warranty applies and whether you must return the product.
- The replacement or repair of a defective product, or a part thereof, does not lead to an extension of the original warranty period.
- Products eligible for replacement or repair must be emptied and clean.
For a detailed explanation of the warranty conditions and items excluded from them, please visit Inventum's website 'https://www.inventum.eu/algemene-voorwaarden'
These general warranty and service conditions apply to Inventum brand products purchased after 27th of April 2022 and intended for use within the Netherlands.
For Inventum products used outside the Netherlands, but within a EU Member State, the warranty rules of that country apply. Inventum provides warranty and service by a white goods technician only in the Netherlands.
As a consumer, you are entitled by law to a properly working product. Does the product break down sooner than you might expect? This means that the product is not in conformity. In that case, the law offers you, the buyer, with a number of legal remedies for your protection. This legal protection is not affected by the above commercial warranty given by Inventum on Inventum products used within the Netherlands.
Modifications and errors reserved
INVENTUM
facebook.com/inventum1908
pinterest.com/inventum1908
youtube.com/inventum1908
instagram.com/inventum1908


