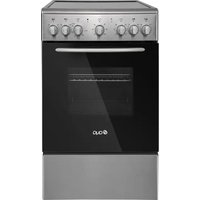
ACV5063IX - Other kitchen appliances AYA - Free user manual and instructions
Find the device manual for free ACV5063IX AYA in PDF.


| Product type | Freestanding electric cooker |
| Brand | AYA |
| Model | ACV5063IX |
| Dimensions (W x D x H) | 50 x 65 x 85 cm |
| Oven capacity | 53 L |
| Hob type | Ceramic glass |
| Number of zones | 4 (2 of Ø165 mm, 2 of Ø200 mm) |
| Total zone power | 6000 W |
| Oven power (top + bottom) | 950 W (top) + 1100 W (bottom) |
| Energy class | A |
| Conventional energy consumption | 0.64 kWh/cycle |
| Supply voltage | 220-240 V ~ / 380-415 V 3N ~, 50-60 Hz |
| Mechanical timer | 120 minutes |
| Cooking functions | Conventional, lower heat, upper heat, dual grill, rotisserie, ECO mode |
| Interior light | Yes, 25 W |
| Residual heat indicator | Yes, on the zones |
| Removable door | Yes, for easy cleaning |
| Adjustable feet | Yes, for levelling |
| Anti-tilt device | Hook provided |
Frequently Asked Questions - ACV5063IX AYA
User questions about ACV5063IX AYA
0 question about this device. Answer the ones you know or ask your own.
Ask a new question about this device
Download the instructions for your Other kitchen appliances in PDF format for free! Find your manual ACV5063IX - AYA and take your electronic device back in hand. On this page are published all the documents necessary for the use of your device. ACV5063IX by AYA.
USER MANUAL ACV5063IX AYA
Figure 1
Contraintes anti-basculement

ELECTRIC COOKER
CONTENT
IMPORTANT SAFTY WARNING -2-
INSTALLATION -10-
SAFTY INFORMATION -17-
PRODUCT DESCRIPTION -19-
OPERATION INSTRUCTIONS -20-
CLEAN AND MAINTENANCE -24-
TROUBLE SHOOTING -27-
TECHNICAL CHARACTERISTICS -28-

THIS PRODUCT IS FOR HOUSEHOLD USE ONLY! PLEASE READ CAREFULLY THIS MANUEL BEFORE YOUR FIRST USE AND SAVE IT FOR FUTURE REFERENCE.
Important Safety Warning
THESE WARNINGS ARE PROVIDED IN THE INTEREST OF SAFETY. PLEASE READ THEM CAREFULLY BEFORE INSTALLING OR USING THE APPLIANCE.To maintain the
● To maintain the EFFICIENCY and SAFETY of this appliance, we recommend:
- Call only the Service Centers authorized by store where you buy the cooker
● Always use original Spare Parts
- This appliance is intended for non-professional use within the home.
- Before using the appliance, read the instructions in this owner's manual carefully since you should find all the instruction you require to ensure safe installation, use and maintenance. Always keep this owner's manual close to hand since you may need to refer to it in the future.
- After remove the packing, check that the appliance is not damaged. If you have any doubts, do not use the appliance, contact your nearest Service Centre of the store where you buy the
appliance. Never leave the packing components (within the reach of children since they are a source of potential danger.
-
The appliance must be installed only by a qualified person in compliance with the instructions provided. The manufacturer declines all responsibility for improper installation which may harm persons and animals and damage property.
-
This appliance can be used by children aged from 8 years and above and persons with reduced physical, sensory or mental capabilities or lack of experience and knowledge if they have been given supervision or instruction concerning use of the appliance in a safe way and understand the hazards involved. Children shall not play with the appliance. Cleaning and user maintenance shall not be made by children without supervision.
-
The electrical safety of this appliance can only be guaranteed if the cooker is correctly and efficiently earthed, in compliance with current regulations on electrical safety. Always ensure that the earthing is efficient; if you have any doubts call in a qualified electrician to check the system. The manufacturer declines all responsibility for damage resulting from a system which has not been earthed.
-
Check that the electrical capacity of the system and sockets will support the maximum power of the
hob, as indicated on the rating label. If you have any doubts, call in a qualified technician.
-
When the cooker is first used an odour may be emitted, this will cease after a period of use. When first using the cooker, ensures that the room is well ventilated (e.g. open a window or use an extractor fan) and that persons who may be sensitive to the odour avoid any fumes. It is suggested that any pets be removed from the room until the smell has ceased. This odour is due to temporary finish on oven liners and elements and also any moisture absorbed by the insulation.
-
Ensure that the appliance is switched off before maintenance, by switching off the main switches and turning all knobs to “OFF” position.
-
The openings and slots used for ventilation and dispersion of heat on the rear and below the control panel must never be covered.
-
This appliance must be used for the purpose for which it was expressly designed. Any other use is considered to be improper and consequently dangerous. The manufacturer declines all responsibility for damage resulting from improper and irresponsible use.
12.A number of fundamental rules must be followed when using electrical appliances.
The followings are of particular importance:
- Do not touch the appliance when your hands or feet are wet.
- Do not use the appliance barefooted.
- Never allow the Mains Cable to be stretched, pulled or damaged if the cooker is moved for cleaning etc.
- Do not use the cooker if the Mains Cable is damaged, consults a qualified electrician.
- Do not allow the cooker to be used unsupervised by children or persons unfamiliar with it.
-
Do not grill to open the door.
-
Always switch off the electrical supply to the cooker and allow it to cool down before carrying out any cleaning operations etc.
- Danger of fire: do not store items on the cooker surfaces.
- To avoid accidental spillage do not use cookware with uneven or deformed bottoms on the burners or on the electrical plates.
-
Special care should be taken when using chip pans etc. in order to avoid splashing or spillage of hot oil. They should not be used unattended since overheated oil may boil over and could also ignite.
-
Parts of this appliance, cooking surfaces, retain heat for considerable periods after switching off. Care should, therefore, be taken when touching these areas before they have completely cooled down.
-
Never use flammable liquids such as alcohol or gasoline, etc. near the appliance when it is in use.
- When using small electric appliances near the hob, keep the supply cord away from the hot parts.
-
Make sure the knobs are in its “OFF” position when the appliance is not in use. Also make all potentially dangerous parts of the appliance, safe, above all for children who could play with the appliance.
-
When the appliance is in use, the heating elements and some parts of the oven door become extremely hot. Make sure you don't touch them and keep children well away.
-
If you use the power code for single phase, the minimum cross-sectional area is 4mm2 (3G 4.0mm2 ). For three phases, the cross-sectional area is 2.5 mm2 (5G 2.5mm2 ) or 4mm2 (4G 4.0mm2 ). The power code type should be H05RR-F, H05RN-F, H07RN-F.
-
Do not use harsh abrasive cleaner or sharp metal scrapers to clean the oven door glass since they can scratch the surface, which may result in shattering of the glass.
-
Any spillage should be removed from the lid before opening and the hob surface should be allowed to cool before closing the lid.
-
If the surface is cracked, switch off the appliance to avoid the possibility of electric shock. (If the hob surface is of glass-ceramic or similar material and protects live parts.)
26.A steam cleaner is not to be used.
-
The appliance is not intended to be operated by means of an external timer or separate remote-control system.
-
WARNING: Unattended cooking on a hob with fat or oil can be dangerous and may result in fire. NEVER try to extinguish a fire with water, switch off the appliance and then cover flame e.g. with a lid or a fire blanket.
29.WARNING: Use only hob guards designed by the manufacturer of the cooking appliance or indicated by the manufacturer of the appliance in the instructions for use as suitable or hob guards incorporated in the appliance. The use of inappropriate guards can cause accidents.
30.WARNING: The appliance and its accessible parts become hot during use.
31. Care should be taken to avoid touching heating elements.
32. Children less than 8 years of age shall be kept away unless continuously supervised.
33. During use the appliance becomes hot. Care should be taken to avoid touching heating elements inside the oven.
34. Place the tray and grill at the same level on both sides, make sure they are in a horizontal and stable position.
35. The means for disconnection must be incorporated in the fixed wiring in accordance with the wiring rules.
36. Regarding the instructions for the all necessary spaces with dimensions, the method of fixing and how the appliance is to be fixed to its support, thanks to refer to the section “INSTALLATION”.
37. Regarding the method of the cables' connection, thanks to refer to the section "ELECTRICAL CONNECTION".
38. Regarding the instructions for the blub replacement and the type reference of the luminaire, thanks to refer to the section “Blub Replacement”.
-
Any spillage should be removed from the lid before opening. The hob surface should be allowed to cool before closing the lid.
-
WARNING: Ensure that the appliance is switched off before replacing the lamp to avoid the possibility of electric shock.
-
Do not use harsh abrasive cleaners or sharp metal scrapers to clean the oven door glass since they can scratch the surface, which may result in shattering of the glass.
-
These surfaces can get hot.
-
Young children should be kept away.
-
You must grill with closed door.
-
ATTENTION! HOT SURFACE. The accessible surfaces may be hot during use.
46.CAUTION: The cooking process has to be supervised. A short term cooking process has to be supervised continuously.
- The appliance must not be installed behind a decorative door in order to avoid overheating.
Installation
The following instructions should be read by a qualified technician to ensure that the appliance is installed, regulated and technically serviced correctly in compliance with current regulations.
Important: remember to disconnect the appliance from electricity by turn off the mains before regulating the appliance or carrying out any maintenance work.
Positioning
Important: The hob should never be installed in proximity of a door access. People opening and closing the door could come into contact with pots or pans cooking on the hob.
This unit may be installed and used only in permanently ventilated rooms:
Unpacking
a) Be careful when unpacking and installing the appliance. Sharp edges might cause accidents.
b) The oven is heavy and care must be taken when moving it. Ensure that all packing, both inside and outside the cooker, has been removed before the oven is used.
c) Unpack the oven from the carton, check and make sure it has not been damaged in any way. If you have any doubts, do not use it, contact the service center or where you buy the oven.
Installation
The cooker is designed to fit between kitchen cabinets. The space either side need only be sufficient to allow withdrawal of the cooker for servicing. It can be used with cabinet one side or both as well as in a corner setting. It can also be used free-standing.
The appliances can be installed next to furniture units which are no taller than the top of the cooker hobs. If the cooker is placed touching walls or sides of neighboring cabinets, these must be of withstanding a temperature rise of 50°C above capable room temperature. For a correct installation of the cooker the following precautions must be followed:
a) The cooker may be located in a kitchen, but not in a bathroom or shower room.
b) Kitchen cabinets installed next to the cooker that are taller than the top of the cooker hobs must be situated at least 20cm from the edge of the hobs.
c) Hoods must be installed according to the requirements in the installation manual for the hoods themselves and in any case at a minimum distance of 65cm.
d) Place the wall cabinets adjacent to the hood at a minimum height of 42cm from the hobs as indicated in figure 1.
e) The hoods must be installed according to the requirements in the hood handbook.
f) Should the cooker be installed beneath a wall cabinet, the latter should be situated at least 70cm away from the hobs as indicated in figure 1.
g) The cut-out for the cooker cabinet should have the dimensions indicated in the figure 1.
h) The wall in cocontact with the back of the cooker must be of flameproof material.

Figure 1
Leveling Your Appliance
Take out of the 4 cooker feet from oven cavity, which be packed together with backing rack, and then screw them into the 4 plinth in lower part of cooker. These feet level off the oven when necessary. The height of the cooker can be adjusted by means of adjustable feet in the plinth. Adjust the feet by tilting the cooker from the side. Then install the product into position. It is essential that the cooker be standing level before installation.
Safety reminding
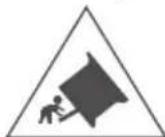
Caution,possibility of tilting

Anti-tip restraints WARNING: In order to prevent tipping of the appliance, this stabilising means must be installed. Refer to instructions for installation.
Install Anti-tilt Bracket
Warning: In order to prevent tipping of the cooker, the anti-tilt bracket must be installed with cooker. To install Anti-tilt bracket, use screwdriver to mount the anti-tilt bracket (1) with screws (2) to the ground, as shows in Figure 3.
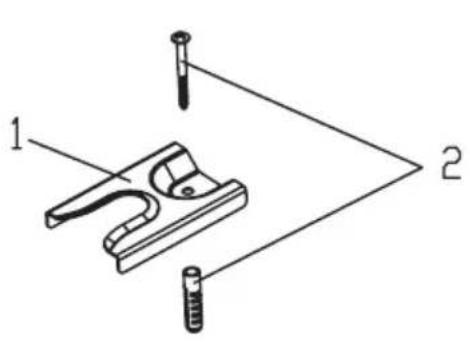
Figure 2 Figure 3
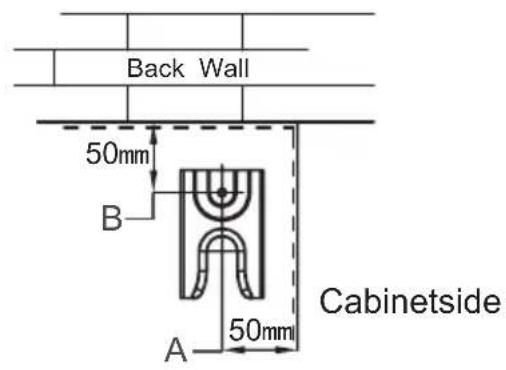
After fix anti-tilt bracket, push the electric cooker inside cabinet as show in Figure 4. For correct installation, the rear and right foot of cooker would be clipped by the anti-tilt bracket.

Figure 4
Electrical connection
WARNING – THIS APPLIANCE MUST BE EARTHED.
Power supply voltage and frequency: 220-240V\~/380-415V 3N\~,50Hz-60Hz
The electric cooker without a power supply cable. The cooker is designed to operate on an electricity supply which conforms to the electrical data shown on the Rating label. The cooker can be connected to the mains only after removing the back panel of the cooker itself with a screwdriver.
Note: the following installation procedure must be carried out by a qualified electrician. For the installation of the feeding cable carry out the following operations:
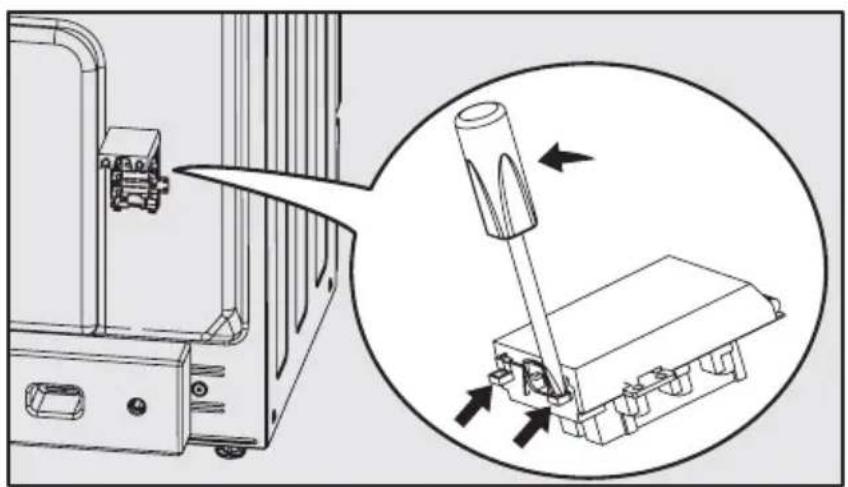
- Open the terminal board by inserting a screwdriver into the side tabs of the power code cover. Use the screwdriver as a lever by pushing it down to open the cover as below:
-
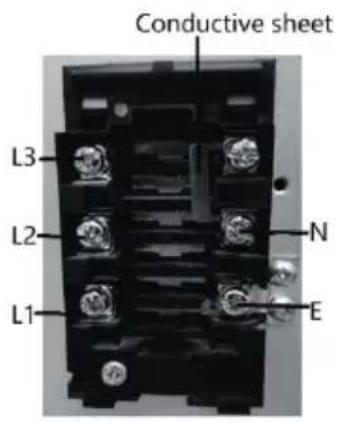
Connect the electricity follows the diagram as printed in the surface of power code cover.
-
Fasten the supply cable in place with the clamp and close the cover of the terminal board.
Note: The red electricity indicator on conntrol panel will illuminate once connect to electricity.
Remark:
The appliance is supplied by a set of terminals for permanently fixed wiring or fitted with supply cord. The 3 alternative connection ways as below:
1, 220-240V\~: power cord requirements: wire diameter 3G 4.0mm² at least; cord type:
H05RR-F, H05RN-F, H07RN-F. The conductive sheet connection method as below:
2, 380V-415V 2N\~: power cord requirements: wire diameter 4G 4.0mm² at least; cord type: H05RR-F, H05RN-F, H07RN-F. The conductive sheet connection method as below:
3, 380-415V 3N\~: power cord requirements: wire diameter 5G 2.5mm² at least; cord type: H05RR-F, H05RN-F, H07RN-F. The conductive sheet connection method as below:
| voltage | wiring | cable type | |
| 220-240V~ | 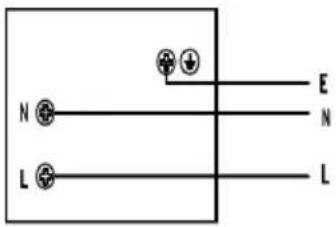 | 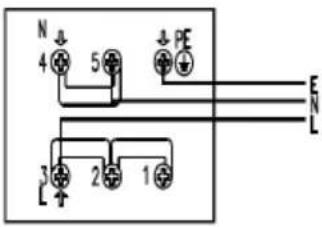 | 3G4.0mm 2 H05RR-FH05RN-FH07RN-F |
| 380-415V 2N~ |  | 4G4.0mm 2 H05RR-FH05RN-FH07RN-F | |
| 380-415V 3N~ |  | 5G2.5mm 2 H05RR-FH05RN-FH07RN-F | |
| L,L1,L2,L3 = Phase , N = Neutral, PE,E =Earth | |||
Important: The power cable must be positioned so that no point reaches a temperature above 50° C.
Saafety Information
When use proppercly your appliance is completely safe but as with any electrical product there are certain precautions that must be observed.
PLEASE READ THE PRECAUTIONS BELOW BEFORE USING YOUR APPLIANCE.
Always
_ Turn controls OFF when you have finished cooking and when not in use.
_ Stand back when opening an oven door to allow any build up of steam or heat to disperse.
_ Use dry good quality oven gloves when removing items from the oven/grill.
_ Place pans centrally over the hotplate making sure handles are kept away from the edge of the hob and cannot become heated by other hot plate/pans.
_ Take care to avoid heat/steam burns when operating the controls.
_ Turn off the electricity supply before cleaning and allow the appliance to cool.
_ Make sure the shelves are in the correct position before switching on the oven.
_ Take care when removing items from the grill when the lower oven is on as the contents will be hot.
_ Keep the appliance clean, as a build up of grease or fat from cooking can cause a fire.
_ Follow the basic principles of food handling and hygiene to prevent the possibility of bacterial growth.
_ Keep ventilation slots clear of obstructions.
_ Refer servicing to a qualified appliance service engineer.
Take care to avoid touching heating elements inside the oven, as during use the oven becomes hot.
Never
_ Never line the interior of the oven with foil as this may cause the appliance to overheat.
_ Never leave children unsupervised where a cooking appliance is installed as all surfaces will be hot during and after its use.
_ Do not allow children or persons who are not familiar with the appliance to use it, without supervision.
_ Never allow anyone to sit or stand on any part of the appliance.
_ Never store items above the appliance that children may attempt to reach.
_ Never leave anything on the hob surface when unattended and not in use.
_ Never remove the oven shelves whilst the oven is hot.
_ Never heat up unopened food containers as pressure can build up causing the container to burst.
_ Never store chemicals/food stuffs, pressurized container in or on the appliance, or in cabinets immediately above or next to the appliance.
_ Never place flammable or plastic items on or near the hob.
_ Never fill a deep fat frying pan more than 1/3 full of oil, or use a lid.
DO NOT LEAVE UNATTENDED WHILE COOKING.
_ Never use the appliance as a room heater.
_ Never use the grill to warm plates.
_ Never dry any items on either the hob or oven doors.
_ Never install the appliance next to curtains or other soft furnishings.
_ Never use steam cleaners.
SAFETY ADVICE IN CASE OF A CHIP-PAN FIRE
In the event of a chip pan fire or any other pan fire.
- TURN OFF THE COOKER APPLIANCE AT THE WALL SWITCH.
- COVER THE PAN WITH A FIRE BLANKET OR DAMP CLOTH, this will smother the flames and extinguish the fire.
- LEAVE THE PAN TO COOL FOR AT LEAST 60 MINUTES BEFORE MOVING IT. Injuries are often caused by picking up a hot pan and rushing outside with it.
NEVER USE A FIRE EXTINGUISHER TO PUT OUT A PAN FIRE as the force of the
extinguisher is likely to tip the pan over! Never use water to extinguish oil or fat fires!
Product Description

A. Cooktop
B. Vitro Ceram
C. Control Panel
D. Baking Pan
E.B akingRack
F. AdjustableF eet
Operation Instructions


The cooker could be with different functions as below, please refer to the functions for the cookeryoubuy.
| Symbol | Function description |
 | Oven Lamp: Enables the user to observe the progress of cooking without opening the door. Oven la mp will light ing for all cooking functions, for the cooker with t his optionalfunction . except ECO function |
 | Conventional cooking: The top and bottom work together to provide conventional cooking. |
 | Bottom heat: A concealed element in the bottom of the oven provides a more concentrative heat to the base of food without blowing |
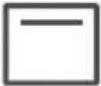 | Top heat: The top element of cooker works provides gentle heat. |
 | Double grilling: The inside radiant element and top element are working. |
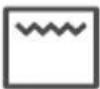 | Radiant grilling: The inner grill element switches on and off to maintain temperature. |
 | For energy-saved cooking. Cooking the selected ingredients in a gentle manner, and the heat comes from the top and the bottom. |
The temperature is set individually for each cooking zone, using the respective temperature controls. The controls can be turned clockwise and back again. The desired temperature can be adjusted continuously.
The power control lamp indicates that it goes out when all Multi-stage cooking zones controls are off.

Control settings
□□ = Location of the cooking zone
=Off
LO = lowest setting (Keep food warm)
MED = Middle setting of the central zone independently(cooking, roasting)
HI = Highest setting of the central zone independently(cooking, roasting)
When finished cooking, turn the control back to the Off position ●.
Recipes for ECO mode
| Recipes Temperature ( ) Level Time (min) | Pre-heat | |||
| Potato Cheese Gratin | 180 1 90-100 No | |||
| Cheese Cake | 160 1 100-150 No | |||
| Meatloaf 190 | 1 110-130 No | |||
Residual heat indicator
After switching off the cooking zone, the residual heat indicator lights up.
The lit residual heat indicator warns the user not to touch the hot cooking surface.
WARNING: Risk of burning!
Do not touch the cooking zones as long as the residual heat indicator is on.
i NOTe:
After having switched off the heating power, you may use the residual heat for different purposes, such as heating up or keeping food warm without having to switch on the heating power.
Safety requirements for deep fat frying
- Use a deep pan, large enough to completely cover the appropriate heating area.
- Never fill the pan more than one-third full of oil.
- Never leave oil or fat unattended during the heating or cooking period.
- Never try to fry too much food at a time, especially frozen food. This only lowers the temperature of the oil or fat too much, resulting in greasy food.
- Always dry food thoroughly before frying, and lower it slowly into the hot oil or fat. Frozen foods, in particular, will cause frothing and spitting, if added to quickly.
- Never heat fat, or fry, with a lid on the pan.
- Keep the outside of the pan clean and free from streaks of oil or fat.
Hotplates General Information Notes
| Always Never | |
| Use good quality flat-based cookware on all electric heat sources. | Use gauze, metal pan diffusers, asbestos mats and stands e.g. Wok stands - they can use overheating. |
| Always ensure pans have clean, dry bases before use. | Use utensils with skirts or rims e.g. buckets and some kettles. |
| Ensure pans match size of heating area. Use badly dented or distorted pans. | |
| Remember good quality pans retain heat well, so generally only a low or medium heat is necessary. | Leave an element switched on when not cooking. |
| Ensure pan handles are positioned safely and away from heat sources. | Cook food directly on the ceramic glass. |
| Always lift pans, do not drag. | Drag or slide utensils, along the hob surface. |
| Always use pan lids except when frying. | |
| Deal with spillages immediately but with care. | |
Do Not
Do not cook directly on the hob surface without a cooking utensil, as this will result in damage to the surface of the hob.
Do not use the hob as a worktop surface as damage may occur to the smooth surface of the hob.
Do not drag or slide utensils on the hob surface, as this will cause scratches in the surface of the hob.
Do not allow a cooking utensil to come into contact with the hob surround.
Do not leave any utensils, food or combustible items on the hob when it is not in use.
Do not place aluminum or plastic foil, or plastic containers on the hob.
Do not leave the hotplates or cooking areas switched ON unless they are being used. We recommend not to place large preserving pans or fish kettles across two heating areas.
Do not leave utensils partly covering the heated areas. Always ensure that they are placed centrally over the heated areas and have the same diameter as the heating area used.
We recommend not to use a utensil with a base diameter greater than 25cm.
Pressure cookers or other large pans should be used on the front cooking areas.
Always ensure that saucepan handles are positioned safely.
Choosing Your Utensils
Do not use utensils with rough bases.
Do not use lightweight utensils with thin, distorted or uneven bases.
Do not use lightweight enameled steel utensils.
Do not use cast iron utensils.
Do not use utensils with recessed, scrolled or ridged bases.
Do not use a utensil which h as a base concavity greater than 1mm as this will reduce the performance of the hob.
Do not use a utensil with a convex base.
Do not use glass ceramic utensils.
Oven Control
The oven temperature setting knob can only be rotated clockwise from the OFF position. Turn oven function control knob to select the cooking function, meanwhile turn the timer (for the model with timer) to set the cooking time you want. Then turn oven temperature control clockwise to therequired oven temperature. The red oven temperature pilot light will immediately illuminate and will automatically go off when oven temperature reaches the temperature setting.
Timer (only available on certain models)
For the cooker with 2 hour mechanical timer, you can use it to set cooking time from 1-120 minutes. To use the timer, the buzzer must be wound up by turning the knob one full turn clockwise; then turn it back to the desired time so that the number of minutes on the knob matches the reference mark on the panel. After set cooking time finish, timer buzzer would sounds.
Turn the time control knobs to position, the timer will keep always on.
Clean and Maintenance
Before each operation, disconnect the cooker from the electricity. To assure the long life of the cooker, it shall be thoroughly cleaned frequently, keeping in mind that:
- Wait until the oven has cooled before removing the wire shelves, wash them separately in warm soapy water and dry thoroughly.
- Wash the interior of the oven with hot soapy water and wipe down with a damp cloth.
- Leave the door open until the interior has dried, before replacing the wire shelves.
- Clean the oven after eachuse, especially after roasting or grilling, this will prevent spilt or splattered food debris burning and becoming difficult to remove.
- Do not use abrasive pads to clean the interior of the oven as this may re move the enamel, which will affect the efficiency of your oven.
- Do Not use harsh, abrasive cleaners or sharp metal scrapers to clean the oven door glass since they can scratch the surface, which may result shattering of the glass.
Cleaning the outside of the oven
- You should regularly wipe over the control pan el, oven door and oven sides using a soft cloth and mild liquid detergent as spilt liquids may damage the enamel.
- Wash enameled or chrome plated parts of the oven with warm soapy water or with non-abrasive detergents.
- Never use abrasive pads to clean enameled, chromed or stainless steel surfaces.
- When using commercially available stainless steel cleaning products, a void clea ning any lettering or symbols, as they can become damaged.
Removing the door for easier cleaning
We recommend you have someone to assist you during removal of the door.
- Open the door completely.
- The door hinge has a small latch. Lift the latch on both hinges.
- Lift the door slightly as if closing, and then with both hands supporting the door, pull it away from the oven.
- To replace the door, hold the door in an open position and insert the latches on both hinges back into place.
Open and close the door to make sure that it has been fitted correctly.


Oven Lamp Replacement
- Switch off and disconnect the power from the oven. Ensure that the internal parts are cool before touching internal parts.
- Remove the lamp cover by turning it counterclockwise (note, it may be stiff), remove the bulb by turning it counter-clockwise.
- Insert the new bulb, which should be resistant to 300° C. For replacement bulbs contact your local service centre.
- Re-fit the cover.
- If in any doubt, consult a qualified electrician for help.


WARNING: To avoid electric shocks - please ensure that the electricity supply to the appliance is switched off and the appliance is fully cold, before removing the lamp lens.
Trouble shooting
Customer service
Before contacting the authorized service center in case of problem while using your cooker, check the problem guide below; there may be nothing wrong with your cooker.
| Problem | |
| Slight odour or small amount of smoke when using the cooker for the first time. | This is normal and should cease after a short period. |
| Nothing Works | Is the main cooker wall switch turned on? There may be no electricity supply. |
| Oven does not cook evenly. | Check that the containers being used in the oven allow sufficient air flow around them. Check that the cooker is level. |
| Hotplates are slow to boil or will not simmer | Check that your pans conform to the recommendations in these instructions. |
| Marks appearing on hotplates. Can not clean hob / hotplates. | The hob surround can be cleaned with warm soapy water and a cream cleaner, such as Cif. The sealed hotplates should be cleaned regularly |
| Grill keeps turning on and off. | When the grill control is operated at a setting less than maximum, this is normal regulator operation, not a fault. |
| Condensation on the wall at the rear of the cooker. | Steam and/or condensation may appear from the vent at the rear of the appliance when using an oven particularly for foods with a high water content e.g. frozen chips, roast chicken etc. This is normal and any excess should be wiped off. |
| Steam / Condensation in the oven after use. | Steam is a by-product of cooking any food with high water content. This is normal and could be clean when regular cleaning of cooker. |
Teechmal Characteristics
| Supplier's name | BUT |
| Supplier's model identifier | ACV5063IX |
| Energy efficiency index(EEI cavity) per cavity | 82.6 |
| Energy class | A |
| Energy consumption per cycle in forced air mode | / |
| Energy consumption per cycle in conventional mode | 0.64 |
| Number of cavity | 1 |
| The heat source per cavity | Electricity |
| Volume of each cavity | 53L |
| Product dimensions | 50*65*85 cm Cooker |
| Top element | 950W |
| Bottom element | 1100W |
| Lamp* | 25W |
| Hilight 165mm (RF,LR) | 1200W*2 |
| Hilight 200mm (RR,LF) | 1800W*2 |
| Hilight 270-165mm | / |
| Hilight 230mm (LF) | / |
| Timer* | 120 minutes mechanical timer |
| Rated voltage: | 220-240V~/380-415V 3N~, 50Hz-60Hz |
We decline liability for any damage or accident derived from any use of this product which is not in conformity with the instructions contained in this booklet.
REMOVAL OF HOUSEHOLD APPLIANCES
This symbol on the product or in the instructions means that your electrical and electronic equipment should be disposed at the end of its life separately from your household waste. There are separate collection systems for recycling in the EU. For more information, please contact the local authority or your retailer where you purchased the product.

CE
When you have unpacked the oven, make sure that it has not been damaged in any way. If you have any doubts at all, do not use it: contact a professionally qualified person. Keep packing materials such as plastic bags, polys tyrene, or nails out of the reach of children because these are dangerous to children.

LE TRI
FACILE

- CONTENT
- IMPORTANT SAFETY WARNING
- INSTALLATION
- POSITIONING
- UNPACKING
- LEVELING YOUR APPLIANCE
- SAFETY REMINDING
- INSTALL ANTI-TILT BRACKET
- ELECTRICAL CONNECTION
- WARNING – THIS APPLIANCE MUST BE EARTHED
- REMARK
- SAAFETY INFORMATION
- ALWAYS
- NEVER
- DO NOT LEAVE UNATTENDED WHILE COOKING
- SAFETY ADVICE IN CASE OF A CHIP-PAN FIRE
- NEVER USE A FIRE EXTINGUISHER TO PUT OUT A PAN FIRE AS THE FORCE OF THE
- PRODUCT DESCRIPTION
- OPERATION INSTRUCTIONS
- CONTROL SETTINGS
- RESIDUAL HEAT INDICATOR
- WARNING: RISK OF BURNING
- I NOTE
- SAFETY REQUIREMENTS FOR DEEP FAT FRYING
- DO NOT
- CHOOSING YOUR UTENSILS
- OVEN CONTROL
- TIMER (ONLY AVAILABLE ON CERTAIN MODELS)
- CLEAN AND MAINTENANCE
- CLEANING THE OUTSIDE OF THE OVEN
- REMOVING THE DOOR FOR EASIER CLEANING
- OVEN LAMP REPLACEMENT
- TROUBLE SHOOTING
- CUSTOMER SERVICE
- TEECHMAL CHARACTERISTICS
- REMOVAL OF HOUSEHOLD APPLIANCES
- CE
Brand : AYA
Model : ACV5063IX
Category : Other kitchen appliances